E-Swin E-O75 User manual

User Manual

TABLE OF CONTENTS
Dear client,
You have just purchased an and I thank you for
your trust.
Habits change and is an example of this. Now,
you can safely have access to a hair removal technology
that uses the latest generation of pulsed light in com-
pact size.
I have personally ensured that utmost attention be paid
to the implementation of each ; and you will see,
is an exceptional product.
I hope that you will be completely satised with your
device and that you will share your experience on our
company’s ocial website prostore.esw-beauty.com.
Yours Sincerely,
Yves Vincent Brottier
Creator of .
PROHIBITED HANDLING
USING THE ACCESSORIES
MAINTENANCE
SUPPORT
TECHNICAL CHARACTERISTICS
STANDARDS
WARRANTY CONDITIONS
PACKAGE CONTENTS
PRECAUTIONS FOR USE
GLOSSARY
INFORMATION PROVIDED BY 'S TOUCH SCREEN
REMOVING HAIR WITH
CHANGING THE OPTIC CARTRIDGE
SOFTWARE OPTIONS
18
32
40
42
44
46
48
4
6
12
14
50
55
56

5
1 optic
consumable cartridge
(included in applicator of your ).
2 pen – pencil of work and
sharpener. 1 gel - ashing intended gel
(1000ml). 2 mask – safety glasses.
1 stop - guide plate. 1 clean - optical spray. 2 patches - self-adhesive patches
(220 self-adhesive patches on each
plate).
1 user manual. 1 extractor
tool to remove the head. 1 special filter - lter for highly
pigmented skin only (Fitzpatrick Skin
Type V) delivered in its own plastic case.
REMINDER: Only E-Swin is entitled to market and its accessories:
optic
,
stop
,
clean
,
patches
,
pen
,
gel
,
mask
,fun, etc. on the shop prostore.esw-beauty.com.
PACKAGE CONTENTS
WARNING: YOU MUST KEEP ALL THE ELEMENTS OF THE ORIGINAL PACKAGING (BOXES, PADDING ETC…). The manu-
facturer’s warranty will cover parts and labour only if the device is returned with all its elements in its original packa-
ging. You must therefore safely keep the whole original packaging in which your was delivered to you.
1 base and its applicator
consumable cartridge. 1 activation card .
1 power cord.
4

7
USAGE PRECAUTIONS
y SCOPE OF APPLICATION OF
, designed and manufactured by E-Swin is a device of health regulated of class IIa, with CE marking delivered by TÜV
Rheinland (CE 0197).
may be used for the following applications:
- Treatment of excessive hair associated with hormonal or idiopathic hirsuitism.
- Depilatory treatment for purely cosmetic purposes, on all parts of the body outside the peri-ocular region.
y FOR YOUR SECURITY
BEFORE USING , PLEASE READ THE FOLLOWING INFORMATION CAREFULLY:
• Voltage: 100 -240 V.
• Nominal frequency: 50-60 Hz.
• Maximum power consumption:540 VA.
• Make sure that the voltage corresponds to that of your installation. Improper connection may cause permanent damage which
is not covered by warranty.
• Make sure that the power outlet to which you are connecting your is undamaged, in perfect working condition and that
it does not interfere with the proper use of your (the power outlet must be easily accessible).
• This device is intended for professional use only.
• Do not unplug by pulling the cable of .
• Do not use any extension cord with .
• Never use with wet hands.
• must never be used in the shower, bath or in any place where water can splash the device (applicator or base).
• Never immerse the base of , its applicator or the optic cartridge in water.
• Never use if damaged, never use in case of a functional anomaly appearing on the touch screen, or following a fall
(non-visible damage can be detrimental to your safety and that of your patient).
• This device can be repaired only with special tools. For any problem after delivery, please contact us on our website prostore.
esw-beauty.com through your client account.
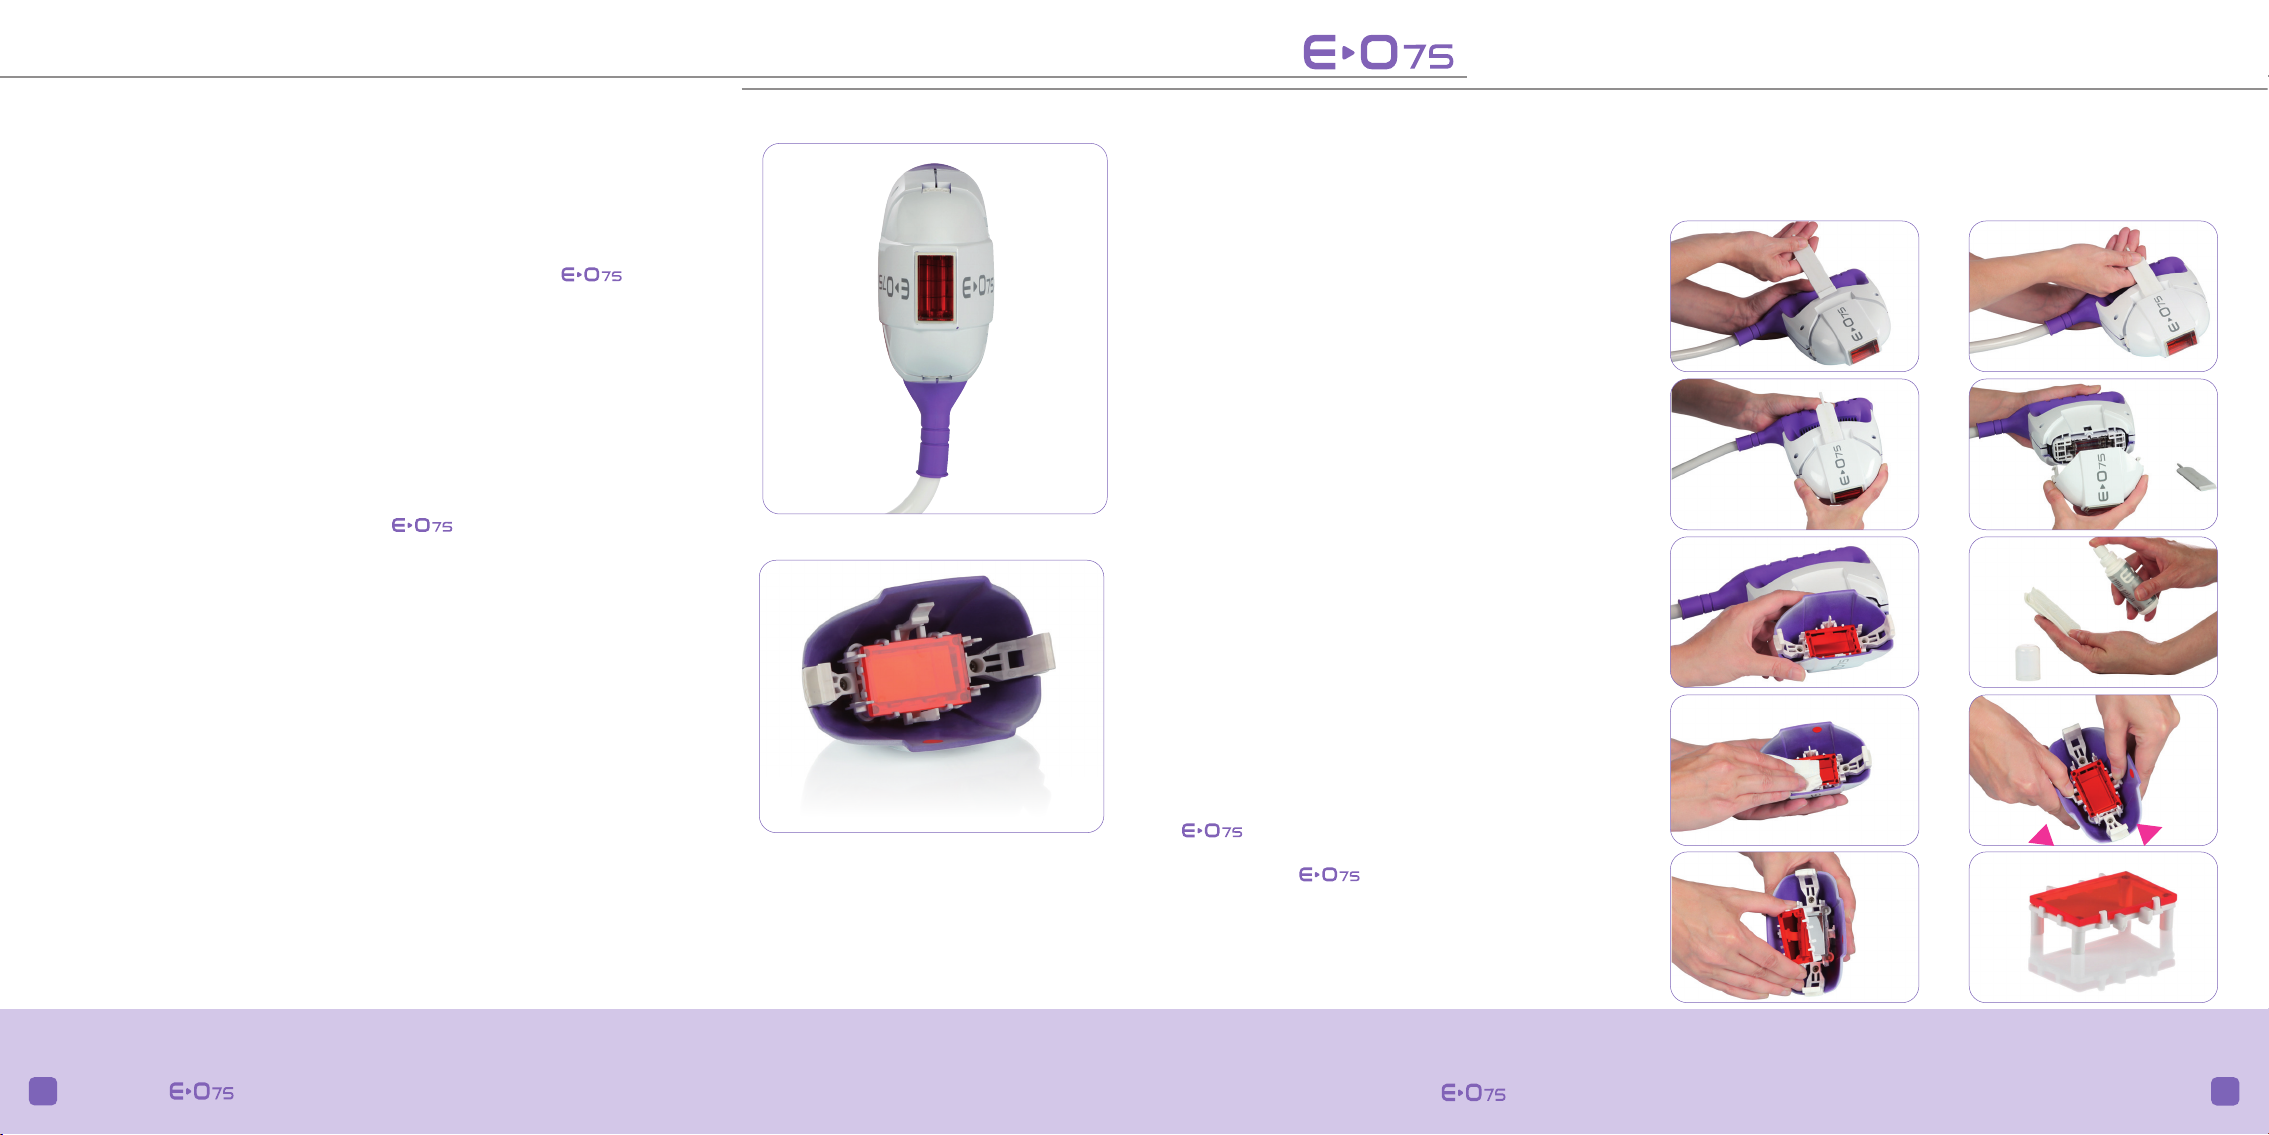
• The optic cartridges and, more generally all accessories, must be ordered only via our onlineshop prostore.esw-beauty.com,
inthe “Accessories and cartridges” section. Wedisclaim any responsibility for the use of consumable cartridges and accessories
from another manufacturer.
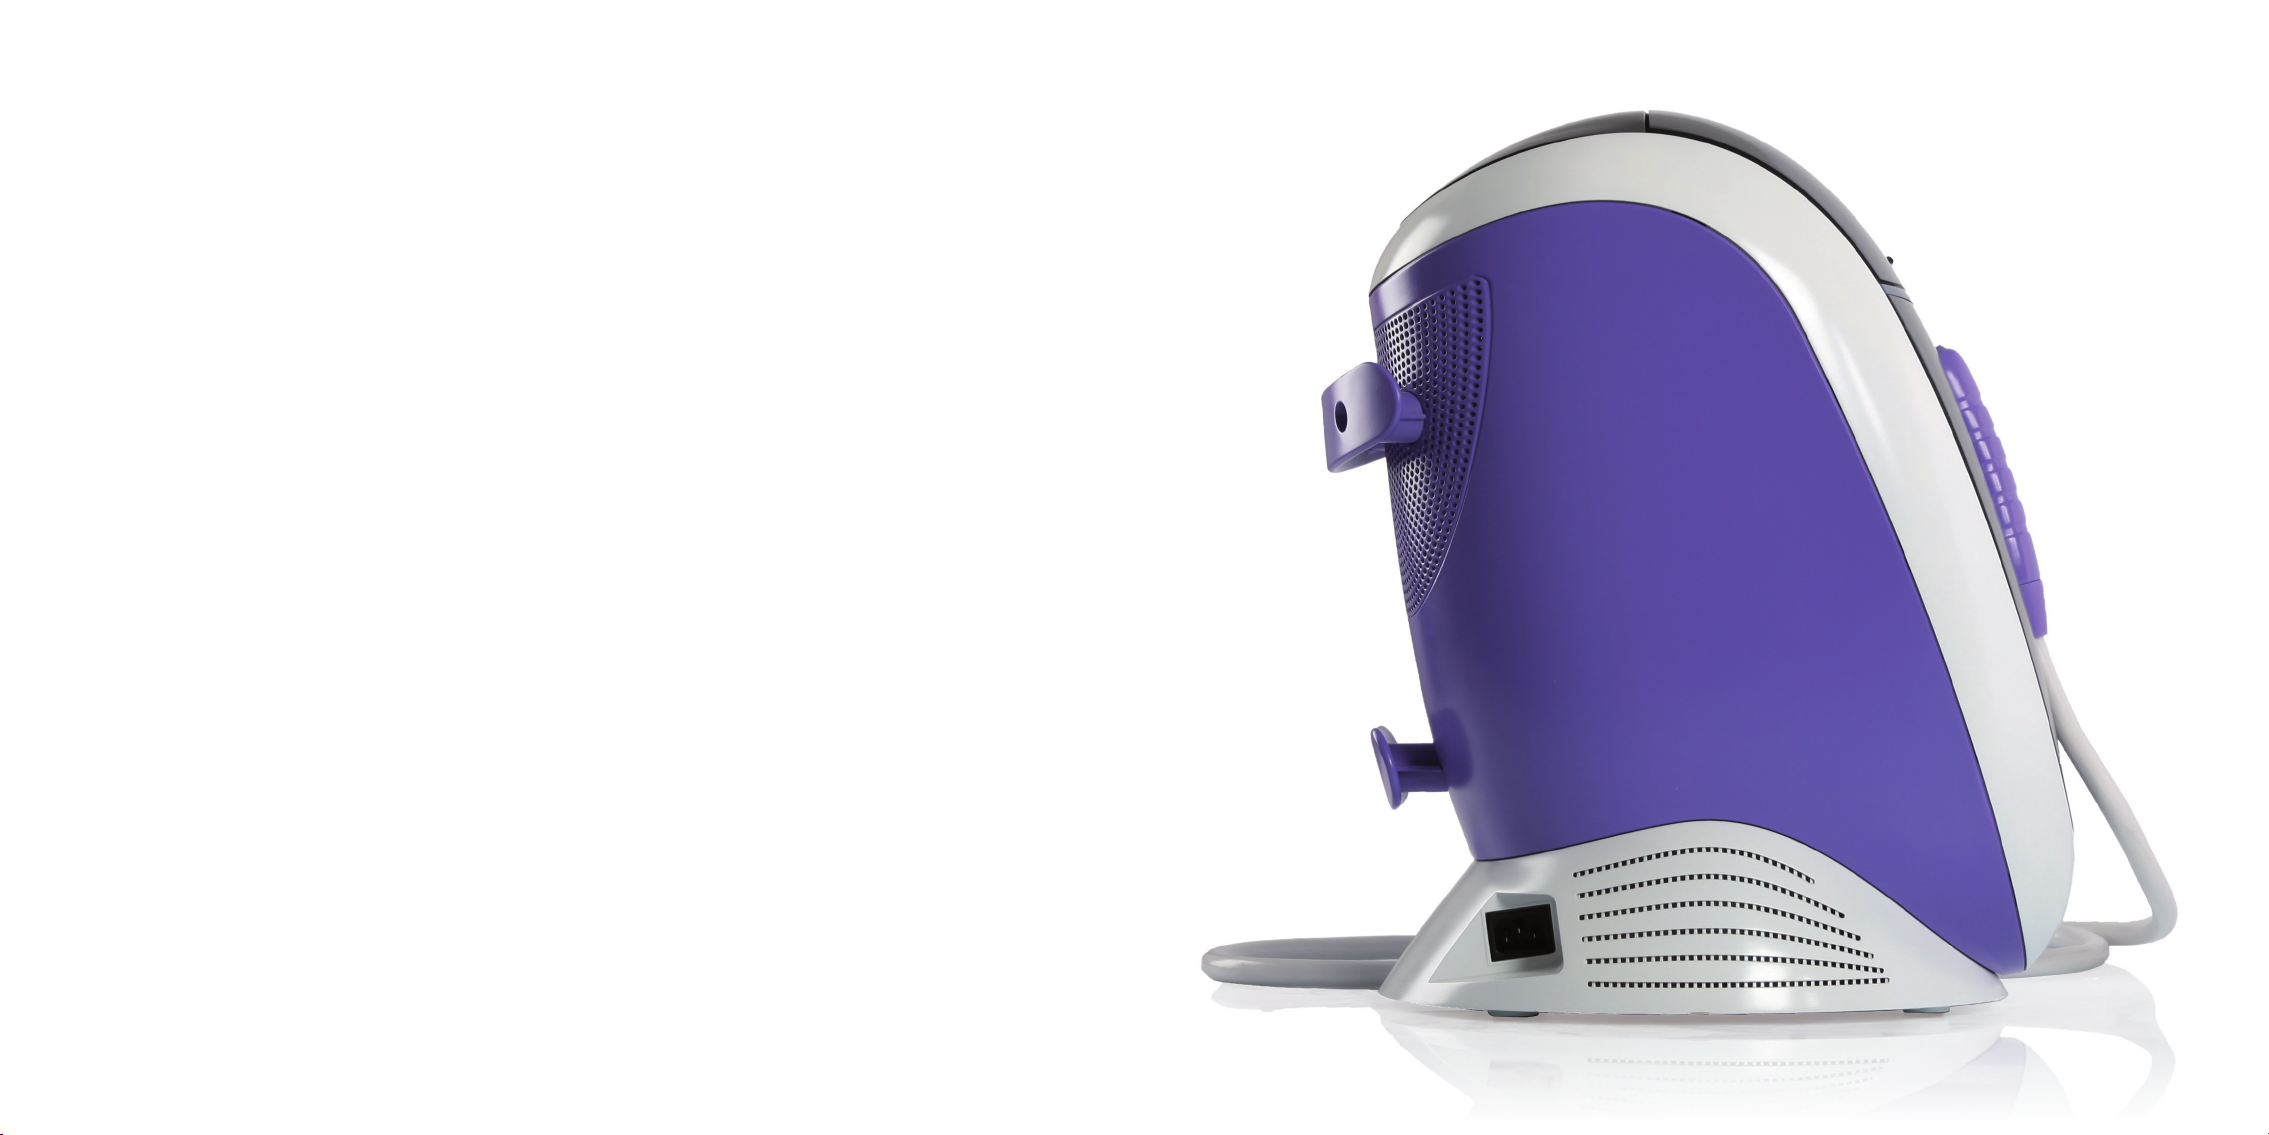
• When using the device, make sure to place it on a at surface, in a place where all risk of falls will be avoided.
• E-Swin SAS disclaims any responsibility for any damage resulting from improper use of the device or use other than descri-
bed in this manual.
• Attention - Using controls or setting or performance of procedures others than those specied in this user manual may result
in exposure to dangerous optical radiation.
• Two pairs of safety glasses mask are included with the device. The professional and the patient shall wear these glasses
mask when using the device for better visual comfort. Any other person around you when using shall also wear these
glasses mask.
• When is being used, it must not come into contact with any of the items listed below, in order to prevent any risk of
injury, obstruction or deterioration:
- Clothes or any other object.
- Hair.
- The periocular region delimited by the safety glasses mask (for example: eyebrows and eyelashes must not be ashed
with ).
• The applicator tip must not touch the mask at the time of the ash.
• Never use near an aerosol, a heat source, or electronic devices.
•Do not stock on top of other devices
• Your is provided with a power cord (2 meters long) and an applicator cable (2 meters long). Do not use any extension
cables or any cable other than those provided by E-Swin SAS, as this could render the equipment non-compliant from an elec-
tromagnetic point of view.
• The wireless communication equipment must be kept away (about 3 meters) because they may interfere with the proper
functioning of the device.
• The device must be installed in an environment unpolluted by electromagnetic disturbance (computer, electrical appliances...).
• Earth conductor is only used as functional earth.
NEED HELP?
To contact our sales department or technical support, please visit your client account on prostore.esw-beauty.com
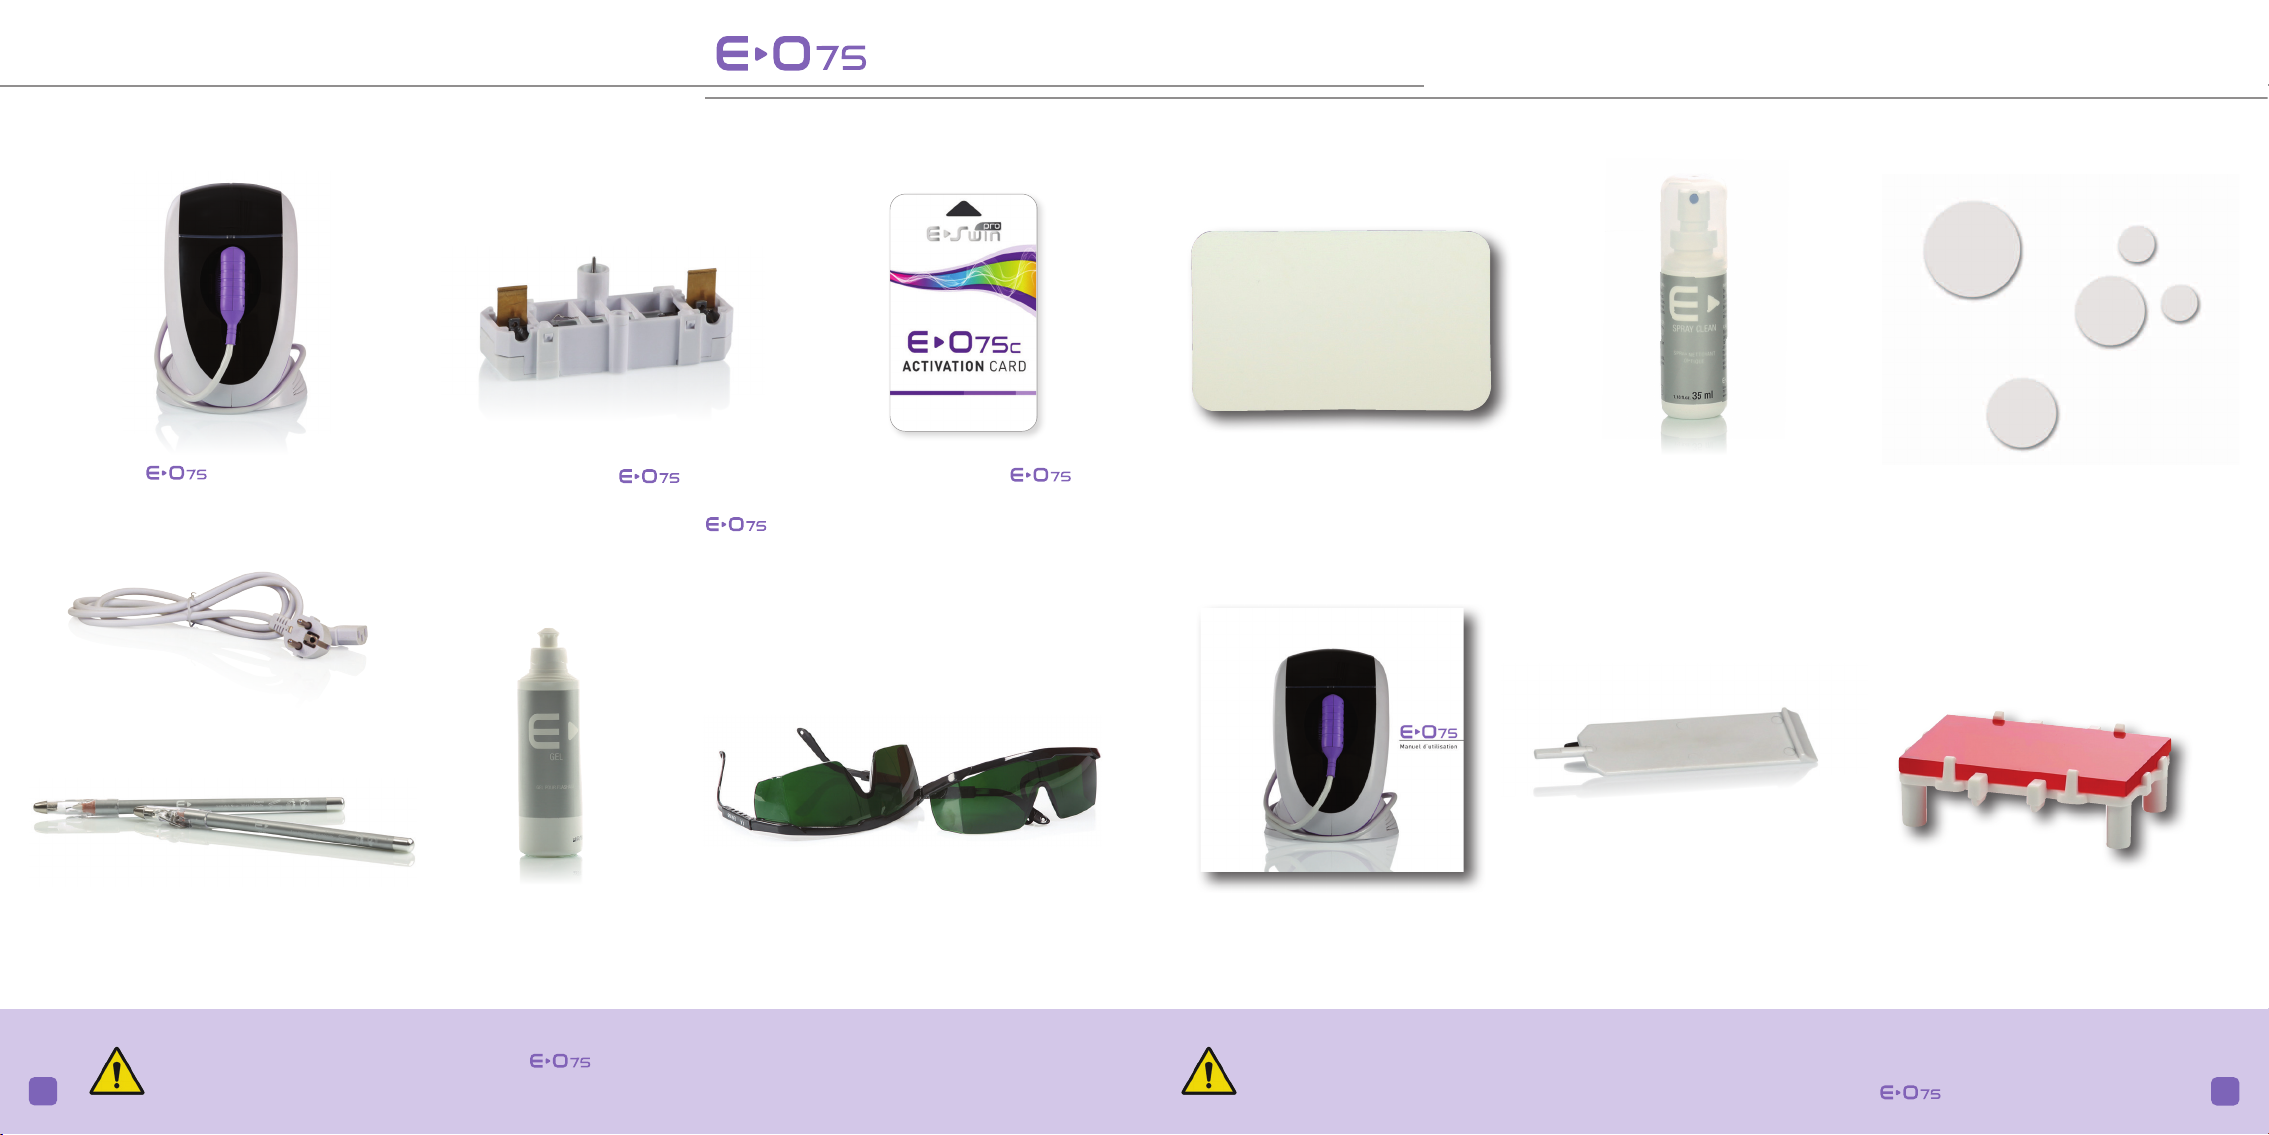
You must only use the pencil of work pen, the gel gel, the self-adhesive patches patches, the guide plate stop
and the safety glasses mask provided with your . The use of any other products may cause skin burns.
6

9
USAGE PRECAUTIONS
y COMPATIBILITY CRITERIA
Do not use on people who are incompatible with depilation by pulsed light, including those who meet one of the following
criteria:
• On pregnant women.
• On very dark skin or black skin.
• On injured, burned, or infected skin.
• On skin that has been sunburnt and when recovery time is less than one month.
• In case of a previous history of allergic reaction to sunlight.
• On skin that has been exposed to high pressure UV for less than ten days.
• To persons who have applied a self-tanning product (cream, dietary supplement) for less than 2 months.
• On skin lesions of unusual aspect, you must rst have a medical consultation with your doctor.
• On high-risk areas (blemishes, birthmarks, warts, unhealed wounds...).
• On moles: if they are located on the zone to be treated, they must first be protected, for example by covering them with the
self-adhesive patches provided with your .
• On tattooed areas: permanent makeup (e.g. lip tattoos) or cosmetic tattoos, whatever their colour. If this is the case, use the
delimitation plate stop that came with your .
• On persons suering from a skin condition (eczema, inammation, acne...).
• On persons taking a photosensibilising treatment (medical advice must be sought).
• If there is a previous history of skin disease.
• On diabetics, hemophiliac, epileptics, persons suering of tardive cutaneous porphyria.
• On persons wearing a pacemaker or cardiac debrillator.
• On animals.
• For the treatment of white, grey or red hair. More precisely, certain people are born as red phototype I (red hair type). As adults
these people may experience a reduction of this essentially orange colour. Nevertheless, the melanin structure of this hair retains
characteristics that render light technologies ineective for hair removal.
y COMPATIBILITY WITH OTHER TREATMENTS
• Before starting a session, the patient must not apply any cosmetic treatments which are aggressive to the skin. In the case of
non-aggressive cosmetic treatments, however, a time interval of 24 hours should be allowed between these treatments and the
treatment session using .
• In case of other treatments, including hyaluronic acid and/or botox injections, treatment by pulsed light, laser or radio-frequency
treatment, etc., the patient must consult the professional who has administered the treatment concerned, in order to establish
the time interval to be allowed before starting treatment with .
• On the day of the session itself, no cosmetic treatment should be applied beforehand. You are responsible for checking the
cleanliness of the skin.
• Fragrance-free micellar water will be used for the removal of any cosmetic residues from the skin.
• After ash treatment, the application of cosmetic products is possible.
y CAUTIONS REGARDING UV
SUNBEDS OR ARTIFICIAL UV IN A BEAUTY PARLOUR
Care must be taken with regard to the inordinate use of articial UV radiation.
More specically in the case of high-pressure UV administered by high-powered machines, it is recommended that an interval of
several days should be allowed before or after any such session, before starting treatment with .
NATURAL UV
In case of exposure to sunlight after a ash treatment session with , it is imperative to recommend the application of a
very high protection factor sunscreen on the zones which have received ash treatment throughout the duration of the treatment
programme, and for a period of 3 weeks following the end of the treatment programme.
y SELF-TANNING PRODUCTS
Do not use on people who have applied a self-tanning product on the area to be treated. Wait until the eects of the self-
tanning product have disappeared completely before using .
IMPORTANT: The professional must make sure that only those who meet the criteria for use as described in this manual
can benet from a hair removal session with .
8

11
USAGE PRECAUTIONS
• Protect any zones which are not to receive ash treatment (e.g.: tattoos) using the stop barrier plate.
• Increase the power level as required, depending upon the sensation reported by the patient and subject to the
absence of any skin reaction.
• Turn off the machine at the end of the session (wait 10 minutes before unplugging the machine, in order to
allow it time to cool).
• Remove the gel and rinse the skin (you may apply a moisturising cream if you wish).
• Clean the optical head using a soft cloth dampened with fresh water, and disinfect.
• Clean the internal and external optical components after each session using the Clean spray supplied (once
the fans in the applicator have shut down).
AFTER THE SESSION
• Alert the patient to the possible occurrence of skin redness.
• Schedule the next session with your patient.
• Recommend the application of sunscreen to zones which have received ash treatment, in case of exposure to UV.
y POSSIBLE SIDE EFFECTS WITH THE
When used properly, the risk of adverse eects, such as skin rashes or burns, is extremely reduced but still exist.
If these eects occur, you must stop using the device immediately.
A simple solution is to test the device on a small area of the skin. The absence of skin reaction will enable a perfectly safe use of the
device.
When your hair removal device is used as directed, side eects and complications are rare. However, all cosmetic treatments,
even those designed for home use, involve certain risks. This is why it is important that your client understands and accepts these risks
and possible complications when pulsed light hair removal system is used.
y METHODE OF TREATMENT
BEFORE THE SESSION
• Explain the technology and the principle of depilation to the patient.
• Identify any contra-indication for the use of pulsed light.
• Specify the cost of the tarifs for each session and other charges.
• Get the patient to sign the informed consent document.
• Ask the patient to attend the session with no cosmetic products on the skin to be depilated (insofar as possible).
DURING THE SESSION
• Conrm the continuing absence of any contra-indication (specically the absence of any new treatment).
• Confirm the absence of any cosmetic products on the skin which may need to be removed, where applicable,
using an unscented micellar water cleanser.
• Moisturise, then shave the skin to be depilated using a mechanical razor.
• Mark out the zone which is to receive ash treatment, using the Pen.
• Mask any moles and other brown pigmentation marks using the patches.
• Check that the lter applied is appropriate to the skin colour concerned.
• Apply the gel in a thick layer, one small zone at a time (particularly on the legs).
• Fit the mask to your patient (protective glasses).
• Set parameters on : gender, zone, skin colour, hair thickness, power level. (always start on power level 1, wich may be
increased progressively, depending upon skin tolerance).
• Check that all safety functions are correctly applied, and release these functions.
• Fit your own protective glasses mask.
NOTE: Optimum results are achieved, on average, by the completion of 8 sessions at 2-month intervals. If, for personal rea-
sons, certain patient wish the time between sessions to be reduced, you may accept this, provided that a minimum interval of 4
weeks is observed, whilst explaining to the patient that this will not enhance the eectiveness of treatment. The total number
of sessions required will be increased accordingly.
10

13
GLOS SARY
y THE BASE y THE APPLICATOR
Power cord connection
Activation card slot
(only for
devices)
Applicator holding area
Vizor to protect touchscreen
Mobile head Release clips (for
the mobile head) Mobile headApplicator zone
Applicator zoneAir vents Trigger button Flash- ready indicator
Applicator cord support
Ventilation grid Fixed side casing
Power cord connection
12

15
14
A
The Home menu of (screen A) enables you to access the
following 3 menus:
1HAIR REMOVAL MENU
This menu enables you to selectthe settings for the hair removal
treatment and to launch the ashing session.
2CONSUMABLES MEMU
This menu displays the number of ashes left.
3CONFIGURATION MENU
This menu enables you to adjust the various settings of the
device. Other information are displayed automatically and
continuously:
4Temperature of the system (applicator).
5Number of remaining rent days. Only displayed on
devices in rent mode.
6Number of ash credits remaining .
7Date and time.
8Go back to the previous menu. This icon enables you to modify
any selection made before.
9User support icon. It enables you to access the instructions.
10 Start / Stop icon.
HAIR REMOVAL MENU (screen
B)
sums up the selected settings
of the successive screens
11 Gender.
12 Main area to be treated.
13 Specic zone from the main area to be treated.
14 Skin colour.
15 Thickness of hair.
16 Power level gauge: level of light energy desired.
17 Set of all precautions to observe imperatively before each use.
18 Pause icon to pause the ashing session. Pressing this icon puts
in pause mode. This mode prohibits the applicator of
issuing any ashes. To exit the pause mode, simply press this
icon again.
y HOME MENU
y HAIR REMOVAL MENU
y CONSUMABLES
MENU
NOTE: During loading time, the signal remains red.
CONSUMABLES MENU (screen
C
) displays the number of ashes
still available on the optic cartridge (and its activation card).
The device works either with activation codes or with an activation
card, which is specic to each optic cartridge. If your device works
with activation card, each new optic cartridge is supplied with its
unique activation card.
20 Number of remaining rent days.
Only displayed on devices in rent mode.
21 Number of remaining ashes.
INFORMATION PROVIDED BY TOUCH SCREEN
45
1
23
7
9
6
810
11
12
13
14 15
16
2895
2895
2895
2895
y CONFIGURATION MENU
CONFIGURATION MENU (screen D) enables you to proceed to the
various settings on the sub-menus shown here, this corresponds to
the following software options:
21 Pin code.
22 Languages.
23 Maintenance.
24 Sound and brightness.
21
23 24
22
2895
B
C
D
2120
17 18


19
REMOVING HAIR WITH
y REMOVING THE MOBILE HEAD
TO CLEAN THE INTERNAL AND EXTERNAL OPTICAL COMPONENTS
•Hold the applicator so that the air vents are facing you.
Insert the extractor between the mobile and the
xed lateral casing of the applicator (image C).
•Push the extractor all the way into the mobile head
(image C).
• Press simultaneously on the 2 locking tabs that hold the
mobile head, and remove the mobile head (image E).
• Remove the extractor and delicately place the
applicator on a at surface (image F).
• Grab the mobile head; the lter is now in front of you
(imageG). Spray clean on a lint-free cloth beforehand
(imageH) and clean the filter with the cloth (image I).
• Grab the mobile head, slowly part the partitions outward
(image J), delicately remove the filter (image K) and
place it on a at surface (image L).
• Repeat the same cleaning operation on the internal
optical glass.
The filter (the at red piece made of glass) must be
intact, not cracked and the surface must be at and regular.
It must be clean and dust-free. For better eciency of
, it is recommended to clean the filter before
every use with the spray clean that is provided when
you purchase . Any damaged filter following
inadequate maintenance will not be covered by the
warranty (see the terms of use of the spray above).
y BEFORE EACH USE
•
Check the power cord (must not be pinched or crushed, wire must not be bare).
•
Check the cable connecting the base to the applicator (no visible impairment).
•
Check the external (image A) and internal ( image B) optical parts of .
CHECK THE EXTERNAL OPTICAL PARTS
Make sure that the glass tip of the applicator (optical guide), does not have any surface
defect, and if it does, it is essential to change the mobile head. You can order this part at
prostore.esw-beauty.com.
CHECK THE INTERNAL OPTICAL PARTS
Before each use and before plugging in your , you must check the integrity of
the internal optical parts: tube, filter (image B) (at red piece made of glass), optical
guide.
WARNING:You must not use your if the external and/or internal optical part have been damaged.
WARNING:is restricted to professional use only.
18
A
B
C
E
F
I
K
D
F
H
J
L

IMPORTANT:
Do not damage, bend, or cut the activation card of
the
optic
cartridge. Damaged cards are not covered the E-SWIN
warranty. Therefore it will not be replaced and its
optic
cartridge
will be unusable. You will need to buy a new
optic
cartridge and
its activation card. Do not keep the activation card near a heat or
electromagnetic source.
21
y USE OF THE ACTIVATION CARD FOR
• Take the activation card of your optic cartridge.
• Insert the card into the slot provided for this purpose, located on the
side of , in the base. The location of this slot is easily identiable
thanks to the sticker, which delineates it.
• Leave the card like that throughout the entire session.
• At the end of the session, remove the activation card while making sure
not to damage it and store it in its case.
• Follow the procedure for turning o the device.
RFID V1.00
E-O75c V1.00
M1
y STARTING FOR THE FIRST TIME
There are both “activation codes” and “cartridge codes”.
1) ACTIVATION CODES
You own a or a :
Activation codes (5 characters, followed by another set of 5 characters) must be
entered when you start the device for the rst time. Once entered, these codes
will no longer be requested.
2) CARTRIDGE CODES
You own a :
Cartridge codes (5 characters, followed by another set of 5 characters) must
be entered each time you renew the optic cartridge. These codes are available
on your personal customer client space and enable you to activate the new
cartridge.
You own a :
There are no cartridge codes to enter when you renew the optic cartridge.
3) CONNECT TO ITS POWER CORD:
The procedure for internal testing of is triggeredandlasts afewseconds.
At the end of it, the following screen automatically appears (screen
M1
/
M2)
.
20
IMPORTANT:
* : Works with activation codes for the optic cartridge. This
means that each time you change the optic cartridge, you must
enter specic codes for the new optic cartridge.
* : Works with activation card. This means that each time
the optic cartridge (and its activation card) is changed, there are
no codes to enter. Once the new optic cartridge is in place, simply
insert the new activation card in the base of the device.
E-O75
V1.00
M2
REMOVING HAIR WITH
screen
At the bottom left of the screen, you will see the
module version of the software of the device and
underneath, you will see the name of the device as
well as the software version number.
screen
At the bottom left of the screen, you will see the
name of the device as well as its software version
number.

23
y STEP 3
SETTING UP THE HAIR REMOVAL TREATMENT
IMPORTANT: You can only access the “Hair removal” menu if your ash credit account
is not zero.
• Select the “Hair removal” menu (screen N).
Select the “Hair removal” menu from the home page.
• Identify the gender of the patient (screen O).
These icons enable you to choose between “woman” or “man” by clicking on them. The
selected silhouette corresponds to your patient and remains on the screen: the other
silhouette disappears.
• Identify the main area to be treated (screen P).
Once the silhouette has been selected, the names of the 3 main areas of the body are
shown. Press the main area that corresponds to that of the patient.
Female: face, torso or legs.
Male: face, torso or legs.
N
O
P
REMOVING HAIR WITH
2895
2895
2895
y STEP 1
CHOOSING THE BEST TIME TO HAVE A TREATMENT WITH
If the previous hair removal method of your patient was:
• Razor:
You can treat your patient with .
•Depilatory cream:
You can only treat your patient with 1 week after their last depilatory cream treatment.
•Waxing, electric epilator, tweezers:
You can only treat your patient with 3 weeks after their last depilation treatment.
•Laser technology, ash lamp or other method:
You can only treat your patient with after hair re-growth has started.
y STEP 2
PREPARING THE PATIENT
• Patient has to be settled in an examination and treatment chair lying or sitting.
•Skin must be clean, dry and free of any cosmetic product: make sure that no cream, moisturizer, oil or any other substance has been
applied to the skin.
•Shave the area to be ashed.
It is imperative for the areas of the skin to be ashed to be completely free of all hair by shaving (and especially not by waxing, depilation
cream, electric epilator or by any other hair removal procedure). Shaving must be done preferably on wet skin in order to reduce the
aggressive eect of the razor.
•Rinse the skin with cleansing water. After shaving, the skin must be thoroughly rinsed to remove cutted hair.
22

25
•
Adjust the request power level (screen T).
After selecting the previous settings, the power level gauge for the flash appears.
The arrows enable you to increase or to decrease the strength of the flash to be
emitted. Once the power level is determined, press on the validation icon on the right.
The choice of energy level should be carried out according to the client's feelings, and must
be in accordance with the principles set forth below.
•
Unlock the safety catches (screen U).
This procedure enables to conrm the following points:
-
You and your patient are wearing the safety glasses mask, throughout the entire session.
-
You are using the gel on the entire area to be treated.
-
You are not using in some physiological or medical contexts (pregnant women, photosen-
sitivity medications...).
-
You are not using before the end of the necessary waiting period on skins that have been
sunburnt recently.
-
You have to read the user manual before proceeding to the session (including warnings and
precautions for use).
-
Verify the absence of projection of water on .
-
Once all precautions are validated, press on the validation icon to the right.
REMINDER: will not issue any ash as long as you have not unlocked all the
safety catches by pressing on each security icons.
•
Validating the selected settings (screen V).
This screen sums up the choices made by the user and the
validation is done by clicking the icon represented by a check sign.
At any time, it is possible to modify a setting by clicking on it, or to go back to the previous
menu, with the help of the arrow situated at the bottom left.
NOTE:
By default, the power level proposed is adjusted according to its basic value. This
value enables most users to obtain good quality results, with optimum safety in 100% of
cases. Increasing the power level of will have the following consequences:
-
An increase in the results obtained.
-
Increased feeling on the skin when the ash is delivered.
-
Increased potential rashes, or burns on highly pigmented skins (olive) after a session.
IMPORTANT:
The darker the skin is whether by nature or after a tan, the more you have to be careful
about increasing the default power level.
T
U
V
INPRACTICE:Always startwith atest usingthe basicsetting (thedefault adjustmentproposed by )thengradually movethe intensityup 1
notch until you reach the desired intensity. Issue a ash, then wait 5 minutes after this ash is emitted to appreciate the skin reaction. In the absence
of skin reaction, you can ash the entire desired area or move the intensity up 1 notch again and observe the reaction once again (and so on).
Female
Face
Cheeks
2895
2895
2895
• Identify the specic zone to be treated (screen Q).
Once the main area has been selected, the names of each specic zone are shown.
Press on the specic zone which corresponds to the patient.
Female:
Face: Upper lip, chin, nape of the neck, neck, forehead, eyebrows, cheeks
Torso: Arms, armpits, hands, ngers, breasts, stomach, waistline, back
Legs: Thighs, lower legs, feet, toes.
Male:
Face: Beard, nape of the neck, neck, forehead, eyebrows, cheekbones.
Torso: Arms, armpits, hands, ngers, torso, stomach, waistline, back.
Legs: Thighs, lower legs, feet, toes.
• Identify the skin colour of the patient (screen R).
These six icons represent six types of skin colour, from the lightest skin (left) to the
darkest skin (right).
Press on the colour which corresponds to the patient skin colour.
Thelasticon(no.6)correspondstoblackskin;youarenotauthorisedtoselectthiscolour
(this skin colour is not compatible with ). If this colour is selected, a warning
message will appear to remind you this skin colour cannot be treated with this device.
For skin colour no. 5, please use the specific filter.
• Identify the thickness of the hair to be removed (screen S).
These 5 icons represent the hair type, from the thinnest (left) to the thickest (right).
Press on the thickness which corresponds to your patient’s hair type.
Q
R
S
2895
2895
2895
Choice of energy level
Validaon of warnings
Hair removal
24
REMOVING HAIR WITH

NOTE: With each ash, the zone treated corresponds to the area covered by the end of the optical guide, or 3.75 x 2 = 7.50 cm2.
NOTE:
• Ensure that the Gel is applied in a generous layer.
• Gel must never overow into the interior of the mobile head of the
device.
• Gel must never be applied below the stop plate.
NOTE: If you are planning to ash a large area, do not apply the gel over the entire area at the beginning. It will eventually dry out
and lose its eectiveness in terms of optical transmission. Therefore apply the gel
as you progress onto the area concerned. Once
the gel has been used on the skin and has been ashed, it should under no circumstance, be collected and reused on another area:
ashing the gel is likely to cause a change in its optical characteristics.
27
y STEP 4
DELIMIT THE AREA TO BE FLASHED
To ensure an optimum hair removal session, pen are provided. Thanks
to these accessories, it is possible to mark out the areas that need to be
ashed directly onto the skin.
•Delimit the area to be ashed with the help of the pen, by tracing
parallel lines on the large areas.
•If necessary, use the guide plate stop to cover a rather large area that
should not be ashed (tattoos...).
•Cover potential moles with the patches.
•After applying a thick layer of gel over the entire area to be ashed,
move the applicator along the delimited area (refer to the next page to
know how to issue a ash).
•The applicator’s positioning leaves a print on the skin, which enables
you to see the area that has already been treated. Thus, from one ash
to another, it is very easy to distinguish between an area that has already
been and another area that has not yet been. An overlap of about 1 mm
is possible.
• If necessary, use stop to cover a rather large area that must be ashed
(tattoos…).
REMINDER:
Make sure that you are applying a thick layer of gel. The gel must never
overow inside the mobile head of the device.
When selecting the settings for flashing, it is imperative to respect the
instructions of the user manual provided with the device.
Ifin doubtaboutthe selectionof thesetting, pleasecontact oursales department
either by telephone or via your client account on
prostore.esw-beauty.com
.
• Specic treatment programme for highly pigmented skins.
All treatments carried out on highly pigmented skin requires the exclusive use of the “special highly pigmented skin”.
To easily dierentiate the basic lter from the
“
special highly pigmented skin
”
lter, place them side-by-side on a white
material (paper for example). The darker lter is the one dedicated to highly pigmented skins, which corresponds to the
selection of skin type 5 on the touchscreen of the .
2895
After the ashing session and once the device has stopped running and has been unplugged (see instruction on turning o the device, as dened at
the end of the chapter entitled: “Removing hair with your device”, step “End of the session” of the user manual), it is possible to remove the “special
highly pigmented skin” lter and to place the original mobile head back.
Highly pigmented skins are represented by the icon no.5 when you “select the type of
skin” on the touch screen of your device.
The “special highly pigmented skin” special filter must imperatively be put in place
before connecting the device.
Once the new lter has been installed, the device can be started.
When skin type no.5is selected,the followingwarning message appears onthe screen;
you need to validate it by pressing on OK.
The ashing session can begin once all the settings have been validated.
REMINDER:Youmustonlyusethepencilofworkpen,thegel,theself-adhesivepatches,the guideplate stop andthe safetyglasses
mask provided with your . The use of any other products may cause skin burns and will void the warranty of your device.
Careful
26
REMOVING HAIR WITH

29
y STEP 6
ENDING THE SESSION
• Press the stop / start button 10 .
• The fans will continue to operate for around 10 minutes.
• Do not disconnect the power cord while they are still running. This enables, among other
things, the optical parts to properly cool down.
• Unlike the fans located in the applicator, which stop running after a certain period
of time, the fans located in the base will continue, for their part, to work until the nal
disconnection of the power cord of the device.
•
Clean
the glass tip of the applicator (optical guide) with the spray clean (image
W
).
To do this, spray
on a lint-free cloth beforehand (image
X
) and
clean
the optical guide
(image
Y
).
• After the hair removal session, small red spots may appear: this is a normal reaction and
will disappear quickly.
• It is also possible to clean the base in which the applicator ts (by rinsing it in water and
by making sure it is dry by the time you t it again). To do this, you must unhook the black
smoked base, by grasping both of its wings (images
Z1
&
Z2
).
y STEP 5
ISSUING A FLASH
IMPORTANT: Do not ash the periocular area (located under the safety
glasses mask protecting your patient's eyes, eyebrows, eyelashes…).
•You and your patient must wear your safety glasses mask. If other people
are around you while you are using , they must also wear the
safety glasses mask.
•To be able to ash, the glass tip of the applicator (optical guide) must be
applied on the skin. Then, press in order to “clip” the head of the applicator.
•Take care of stretching the skin where it is the thinnest, so that the glass
tip (optical guide) of the applicator is well in contact with the skin.
•Then the ash can be triggered by pressing the button located at the front
of the applicator.
•The pressure must be released and the applicator will be separated from
the skin.
•The applicator is moved to the area next to it.
•Make sure to stretch the skin where it is the thinnest, so the glass part
(optical guide) of the tip of the applicator is in contact with the skin.
•To ensure the eciency of the session, it is imperative to keep pressing the
button, and to exert pressure on the mobile head throughout the entire
duration of the ash.
is in charging mode between 2 ashes. This charging
phase is indicated by a red light on the top of the applicator and
a red light on either side of the screen. The applicator must not
be used again until the green indicator light is illuminated. If
the applicator is pressed against the skin too early (before the
green indicator light is illuminated), it will not be possible to
trigger a ash.
NOTE:
• After 7 seconds of inactivity, screen will switch over to standby mode. Flashing is still possible. Touch the screen to reactivate.
•After 15 minutes of idleness, , will automatically be set on pause mode. Press the "play" icon to activate it again.
NOTE: After session, small red spots may appear. This is a normal reaction, and spots will clear rapidly.
28
REMOVING HAIR WITH
W
X
Y
Z2Z1


33
CHANGING optic CARTRIDGE
y STEP 2
COOLING OF OPTICAL PARTS
During the procedure for changing the optic cartridge, before turning o and unplugging your device, you must wait until the
fans located inside the applicator have stopped working (this may take several minutes). This procedure cools down the internal optical
parts of the applicator.
y STEP 3
TURNING OFF THE DEVICE
•Turn o the device.
•Unplug the power cord from the device.
y STEP 4
SEPARATING THE MOBILE HEAD OF THE
APPLICATOR USING THE EXTRACTOR AND
EXTRACTING THE OPTIC CARTRIDGE IN PLACE.
•Hold the applicator so as to facing the logo and
the cord, which connects the applicator to the
base is on your left. Insert the extractor
between the mobile head and the xed lateral
casing of the applicator (image B).
•Push the extractor all the way inside the
mobile head (image C).
•Press simultaneously on the 2 locking tabs of the
mobileheadand removethemobilehead(imageD).
•Remove the extractor and place the mobile
head delicately on a flat surface (image E).
•Identify the pre-emption notches of the optic
cartridge (image F).
•Pull out the cartridge delicately and remove it
completely (image G).
A
0
6
Consumables Conguration
NOTE: Unlike the fans located inside the applicator that stop running after a certain period, fans located inside the base will
continue, for their part, to work until the nal disconnection of the power cord of the device.
Home
y CHANGING THE OPTIC CARTRIDGE
• For the very rst use, is already equipped with an Optic cartridge.
• Replacement of the Optic cassette must be undertaken with the utmost care. Improper handling may result in permanent damage to
the applicator, and to in general. The guarantee does not cover improper handling. We therefore recommend that you pay very
careful attention to the procedure to be observed.
y STEP 1
CHECKING THE NUMBER OF FLASHES AVAILABLE
You can monitor your ash usage in real time (see the icon indicating the number of re-
maining ashes 6.
When the ash credit reaches zero, the main menu “Hair removal” instantly becomes inac-
tive and appears in grey colour (screen
A
).
32
The optic cartridge needs to be changed only when the number of
ashes reaches zero. Users of an device (with activation codes) must
never change the optic-cartridge before, otherwise the ashes remaining on
the old catridge will no longer be available.
B C
D E
F G

35
CHANGING optic CARTRIDGE
y STEP 5
INSERTING A NEW OPTIC CARTRIDGE
•Check the direction for inserting this new cartridge:
To help you, a red dot indicates one side of the optic cartridge. This side must be oriented
to match the side of the applicator which has the same red dot.
To sum up, you need to match the 2 red dots (image H).
NOTE: The optic cartridges are not symmetrical, so they must be inserted in a specic
way, and absolutely not in any other way.
•After engaging the cartridge, you must check its correct position: it must be aligned
with the edge of the xed part of the applicator (image I).
If this is not the case (i.e., it exceeds by more than 2 mm), it means that the cartridge has
not been correctly inserted.
You must take it out and check:
- The match of the red dots (image H).
- That you have not twisted the electrodes (image J). If you have twisted the electrodes,
do not insert your cartridge into the applicator as it may create serious damage to your
device. You must return the damaged cartridge to us and order another one.
• Check the cartridge has been well engaged.
y STEP 6
CLEANING EXTERNAL AND INTERNAL OPTICAL PARTS
• Using the Clean spray (photo M), clean the glass end of the applicator (optical guide).
To do this, apply the Clean spray beforehand to a lint-free cloth, and clean the optical
guide.
• Before repositioning the mobile part of the applicator, systematically clean the filter
(in the head of the applicator) on both sides using the Clean spray. (photos N). The
filter is the at element of red-coloured glass (see steps for the removal of internal
optical parts).
NOTE: We recommend to you change the lter each time you insert a new cartridge.
34
H
I
J
K
L
M
N
PRECAUTIONS:
During theentireprocedureforchanging thecartridge,youmustinany circumstances
touch:
- The tube or its reector (image K).
- The electrodes of the tube (image L).
If accidentally you touch the tube or the reector, we strongly recommend to return
back your optic cartridge so it can be exchanged (the returning cost and new
shipment is not covered by E-Swin SAS).

37
CHANGING optic CARTRIDGE
y STEP 7
CLOSING THE APPLICATOR
• Bring the mobile part of the applicator closer to its xed part.
• Reposition the mobile head so as to match the red dot of the xed part with the
internal red dot of the mobile head (image O, turquoise arrows).
• Set o the mobile part again by delicately pressing on the locking tabs to hold the
mobile head (image O, pink arrows).
y STEP 8 (ONLY FOR )
INSERTING A NEW ACTIVATION CARD
• There is no need to enter any code.
• Remove the old activation card and insert the new card that has been delivered with
its optic cartridge, in the slot provided for this purpose (image P).
• Each activation card bears the same serial number as the optic cartridge has been
provided. Each activation therefore only works with only a single optic cartridge
and must not be used with another cartridge.
• If you run out of ash credits while using the device, the warning screen (screen Q)
will appear.
• If there is no activation card or if the activation card is damaged, the warning screen
(screen R) will appear.
T
You might have to change the cartridge before the expiration of the number of ashes initially planned, when, for example, a
tube has been broken, or is not working anymore. For any change of optic cartridge outside the normal procedure, please
refer strictly to the instructions given by our technical department.
y STEP 9 (ONLY FOR )
IN THIS CASE, IT IS COMPULSORY TO ENTER ACTIVATION CODES FOR
THE OPTIC CARTRIDGE.
• Plug in and turn on your device 10 .
• Once the home screen is displayed, go to the “Consumables” menu.
• Select icon 21 , which corresponds to the addition of ashes.
• With the help of the digital keyboard:
- Enter the rst cartridge code, and validate with the “V” button.
- Enter the second cartridge code, and validate with the “V” button.
• The “C” button enables you to correct the digits in each box.
• If the cartridge code is correct, the message "Valid Code" will be displayed on the
screen. You must then click OK. The "Consumables" menu appears (screen T); the
modication of the ashes credit meter means that the new ashes have been
well credited (icon 21 ).
• If you have entered a wrong code, after validation, an error message will be
displayed (screen U): the "Consumables" menu appears again.
• Using the go back icon 8(screen S), it is possible to go back to the home screen.
• The cartridge codes are unique, they take into account the serial number of your
machine and will not work on another , or on any other device made
available by E-Swin SAS.
Icon 5(screen S) followed by its number of days is displayed only in rental mode.
In sale mode, no icon is displayed at this location.
S
36
U
885
1000
1000
Consumables
885
Careful
Numeric keypad
Code refused
10
21
8
5
Flash credit expired
Insert card
R
Q
P
O

39
38 39
CHANGING optic CARTRIDGE
38
CHANGING THE OPTIC CARTRIDGE OUTSIDE NORMAL PROCEDURE
You may need to have to change the cartridge before the expiration of the number of
ashes initially planned, when, for example, a tube has been broken, or is not working
anymore. For any change of optical cartridge outside the normal procedure, please
strictly refer to the instructions given by our technical department.
RENTAL MODE
• Plug in and turn on your device 10
• Once the home screen is displayed, go to the “Consumables” menu.
• Select icon 17 , which corresponds to the addition of ashes (screen W).
• With the help of the digital keyboard (screen X):
- Enter the rst cartridge code, and validate with the “V” button.
- Enter the second cartridge code, and validate with the “V” button.
• A message specifying that the codes are valid will then be displayed. You must click OK.
• The "Consumables" menu appears (screen W); the modication of the days’ credit
meter means that they have been increased accordingly.
• Using the go back icon 8 , it is possible to go back to the home screen.
The “C” button enables you to correct the digits in each box.
If you have entered a wrong code, after validation, an error message will be displayed:
the “Consumables” menu appears again (screen W).
If the days’ code entered is correct, the message "Valid codes" will be displayed on the
screen. Adding days’ credit only concerns the in rental mode. This section does
not concern the sale mode.
If you have a which requires an activation code for your cartridge, then you can access this from your personal client space.
Please go to https://prostore.esw-beauty.com and enter your email address and password. You can then access your personal
space, by clicking on your name onthe top right of the page and clicking on ‘Your account’. Click on Training questions and Activation
codes. You will then see your E-Swin products. Click on the blue box – Activation codes. Under the tab ‘Available optical cartridges’
you will be able to see your cartridges and activate using the corresponding serial number which is written on your cartridge. You
will receive two 5-digit codes to enter into your . You can also refer to this page to see all historical information referring
to activation codes.
IMPORTANT: Only our technical department is authorised to ask you to
change the optic cartridge outside the normal procedure. Any change of
optic cartridge and/or inserting new cartridge codes without being
instructed by our technical team, will result in the irreversible loss of the
remaining number of ashes on your optic cartridge; you will then
need to buy a new optic cartridge.
X
885
Numeric keypad
V
885
885
Consumables
W
885
885
Consumables
IMPORTANT: Unlike cartridge change, you're not required to wait until the
days’ credits have run out to add more days. The additional days will be
added to the residual number of days.
Please go to https://prostore.esw-beauty.com and enter your email address and
password. From there, click on the products tab and then Monthly Rental which
is situated underneath.
You can then purchase your rental days. To activate these rental days, you must
access your personal space by clicking on your name on the top right of the page
and clicking on ‘Your account’. Click on Training questions and Activation codes.
You will then see your E-Swin products. Click on the blue box – Activation codes.
Under the tab ‘Your rental credit’ you can activate your day codes. These will be
two 5-digit codes. You can also refer to this page to see all historical information
referring to activation codes.
17
810
4
Table of contents
Other E-Swin Hair Removal System manuals