Eagle Eye Pro Timing User manual

IN THE BAG
EQUIPMENT LIST 3
LICENSING & USB KEY 3
I. TRACK & FIELD
A. SYSTEM OVERVIEW
1. General Overview & Suggestions 4-5
2 Operational Overview 6
3. Hardware Overview 6
4. Software Overview 7
B. OPERATION INSTRUCTIONS
1. Import Athletes 8
2. Time a Race 8
3. Read a Race 8
4. Assign Times 9
5. Save Results File 9
6. Wireless Trigger Unit 10
C. FILE SHARING
1. Using the USB Switch 11
D. CREATING FILES
1. Creating lynx.evt File (option 1) 12
2. Using Excel .xls File (option 2) 13
E. HARDWARE SET UP
1. Camera 14
2. Wireless Receiver & Transceiver 14
F. PRE-MEET SET UP
1. Recommended Order of Set Up 15
2. Camera Placement 15
3. Camera Alignment 16
4. Camera Adjustments 17
G. SET UP OPTIONS
1. Standard 18
2. Extended Distance 18
3. Multiple Camera 18
4. Gigibit PoE Ethernet Switch 18
H. PRE MEET PRECAUTIONS
1. Check Hard Drive Space 19
2. Turn Off Firewall 19
I. MISC. FEATURES
1. Change Race Clock Display 20
2. Print Proof of Performance/ Images) 20
3. Save or Export Video 20
4. Record & Review Simultaneously 21
5. Practice Mode –Virtual Grabber 21
II. CROSS COUNTRY
A. SYSTEM OVERVIEW
1. Camera Options 22
2 Manual vs. Automatic Start 22
3. Entering Bib Numbers 22
4. Camera Alignment 22
B. OPERATION INSTRUCTIONS
1. Time a Race 23
2. Camera Alignment 24
3. Choose a Camera 25
C. RESULTS & FILES
1. Using an Excel .xls template 26
2. Suggested Hy-Tek Process 26
III. VIDEO ANALYSIS
1. Camera Option 27
2. On-Screen Overlay 27
3. Output to .avi 27
4. Export .seq to .avi 28
5. Play .avi File 28
6. Motion Analysis Software 28
IV. SUPPORT
A. TROUBLESHOOTING
1. Software Issues / Restore Settings 29
2. No Start Detection 29
3. No Camera Detection or Reduced Frame Rate 29
4. Poor Image Quality 29
5. Trouble Reading Hip Numbers 29
B. UPDATES
1. Software Updates 29
2. Manual Updates 29
3. Video Tutorials 29
4. Software installation on a Second Computer 29
V. SUPPLEMENTS
A. ADDITIONAL FILE SHARING OPTIONS
1. Sharing Results File via Internet Dropbox 30
2. Windows Ad Hoc Wireless Network 31
B. OPTIONAL DISPLAY
1. Set Up and Operation 32
2. Optional Extended Range Set-Up 33
C. DISCONTINUED PRODUCTS
1. GoSuite! File Sharing 34
2. Express Card 34
3. Sennheiser Trigger 34
4. Wireless Start System (blue trigger) 35
2

EQUIPMENT LIST
The standard Eagle Eye Pro 100 Timing system includes the following items shipped in an
easy to carry backpack. Please take inventory of the contents of your backpack to be sure all
items are included.
1. Computer
Includes: Lenovo Thinkpad notebook computer with power source. [Operating System: Windows 7. Software: Eagle Eye Pro
Timing Software, Pylon camera Driver, Sentinel USB Key Driver]
2. Video Camera with Lens
Included power source and protective pelican camera case.
3. USB Software Key
Stored in the protective pelican camera case.
4. Wireless Trigger System
Includes: 1 x Receiver unit with power source and 2 x 15 inch attachable
antennas (one used for back-up). 1 x transmitter unit with 9-volt battery
installed, 1 x 4 inch attachable antenna and 2 x USB audio adaptor
(one use for back-up) and audio cable.
5. Data Cables
Includes: 1 x 300 foot cable & 1 x6 foot practice data cable.
6. Camera Mounting Kit (some 2014 packages).
Includes: Clamp, extension arm & geared tripod head.
7. Backpack Carrying
Includes: All listed equipment above.
LICENSING
Your Eagle Eye Pro software is licensed and controlled by
a USB key. The USB key must remain plugged into a USB port while Eagle Eye Pro is running.
If the USB Key is not in use, Eagle Eye Pro software will operate as a READ ONLY version.
Damaged keys:
A damaged USB key can be replaced at a cost of $75.00 plus shipping. The damaged key
must be returned to Eagle Eye before a replacement key can be shipped.
Lost or stolen keys:
The USB protection key acts as the actual license for the software and therefore a lost or
stolen key cannot be replaced without a fee. A replacement key is the same as providing
another copy of the software.
Lost or stolen USB keys/licenses can typically be claimed on the owner’s insurance.
3

I. TRACK & FIELD
A. SYSTEM OVERVIEW
1. General Introduction & Suggestions
Your Eagle Eye Pro timing system is an easy to use combination of software and hardware. As with all
electronic equipment and computer software, it is important that you understand its many features. The
information below will help lay the foundation to begin learning your system and working with this
manual.
Training a Timing Operator
Operating your Eagle Eye Pro timing system does not require a computer expert. However, an operator’s
experience and ability depends on your expectations and the importance of the competition being timed.
It is possible to train a student in as little as fifteen minutes (10 minutes of instruction and 5 minutes on
their own) to operate the software for small time trial event, however more training is required for a
large invitational that integrates results with meet management software.
Practicing
Eagle Eye Pro software is equipped with a video simulator called a Virtual Grabber. Using the virtual
grabber allows you to practice without the need to connect the camera. Although you will not see a live
image, the Virtual Grabber allows you to trigger the race clock, record, playback, bookmark athletes,
determine results, etc. You will need to insert the USB Key before using the Virtual Grabber. Note:
Grabber is another word for camera.
Developing a Meet Schedule
We recommend using a rolling schedule for your first event, or building a time schedule with adequate
time between events so that the novice operator will not be stressed during competition. Adequate
practice and familiarity with the system will help assure a quality first meet experience for everyone. The
goal of a capable operator should be to allow the Starter to move the meet along as efficiently as
possible.
Meet Management Operator
Track and field competitions that integrate timing (Eagle Eye) with meet management software (Hy-Tek,
Race Tab, RaceberryJAM, etc.) require the use of two computers to operate efficiently; one computer
dedicated to timing and another dedicated to meet management. These two computers are typically
networked via the included USB switch. Above all, it is important not to underestimate the need for a
knowledgeable operator of your meet management software. This person dictates the flow of results
and must keep pace with the running events and enter field events in a timely manner.
Hip Numbers & Finish-Line Management
The use of hip numbers to identify athletes is common for all electronic timing systems. The ability to
successfully read hip numbers on the recorded video is a result of camera placement (distance of camera
to athlete(s)), the lens focus and aperture and the appropriate (exposure) setting for current lighting
conditions. Special attention to the above will assure that hip numbers can be identified on the recorded
race video.
4

The full frame video of Eagle Eye Pro offers a significant advantage. If a hip number of a finishing
athlete is obscured at the finish line, the video can easily advance forward or backward to reveal the
number. However, as is common with all competitions, hip numbers often fall off during a race. For
this reason it’s important to have a plan for the retrieval of hip numbers (athlete identity) immediately
upon the completion of a distance race. All timing system operators must have an accurate order of
finish to refer to while assigning times. With the camera mounted on the infield, we recommend
placing two hip numbers on each athlete, one on the left hip and a second number on the upper left
chest (often viewable on the recorded video). Secondly, we recommend that a finish line observer
physically write down a rank order of finishing athletes (hip numbers) as they cross the finish line.
Having a hip number retrieval process will save valuable time for the timing operator and assure your
event operates with the highest level of efficiency and accuracy.
Camera Alignment
Be sure to allow adequate time prior to an event to set up and align your camera to the finish line.
Create a plan in advance and practice mounting your camera off the ground (ladder, tall tripod, old
pole vault standard, volleyball pole, etc.). Our preference is multi-adjustable a frame aluminum ladder.
If possible, try and mount your camera on the inside of the track so that the camera is as close to the
finishing athletes (when not in lanes) as possible. This makes reading hip number considerably easier
and more reliable. Additionally, pay special attention to calibrating the finish line within the software
per the steps outlined in this manual.
System Set-Up
It’s recommend that you allow at least one hour for system set up. Although set up can take less time,
one hour allows for troubleshooting unforeseen issues. Above all, establishing a live-image (between
the camera and computer) should be your first priority. This assures the system is working properly.
1. Position camera on the finish-line.
2. Layout the 300 foot length of data cable from the camera to the timing computer.
3. Establish a live video image within Eagle Eye Pro software.
4. Move the timing computer to the finish line and re-establish a live-image on the computer, using
the six foot practice cable.
5. Within the Finish Line tab, select the Calibration tool while viewing the computer screen, adjust
the camera/clamp so that the calibration line is on the leading edge of the finish line.
6. Reconnect the timing computer to the main data cable.
7. Connect the wireless trigger and re-establish a live image. Be sure to verify detection within the
Trigger tab (be sure to properly connect the USB audio plug before opening the Pro software to
assure it detection).
8. Test the wireless system with the Starter while standing at the location furthest from receiver/
computer. It’s recommended to test from all start locations.
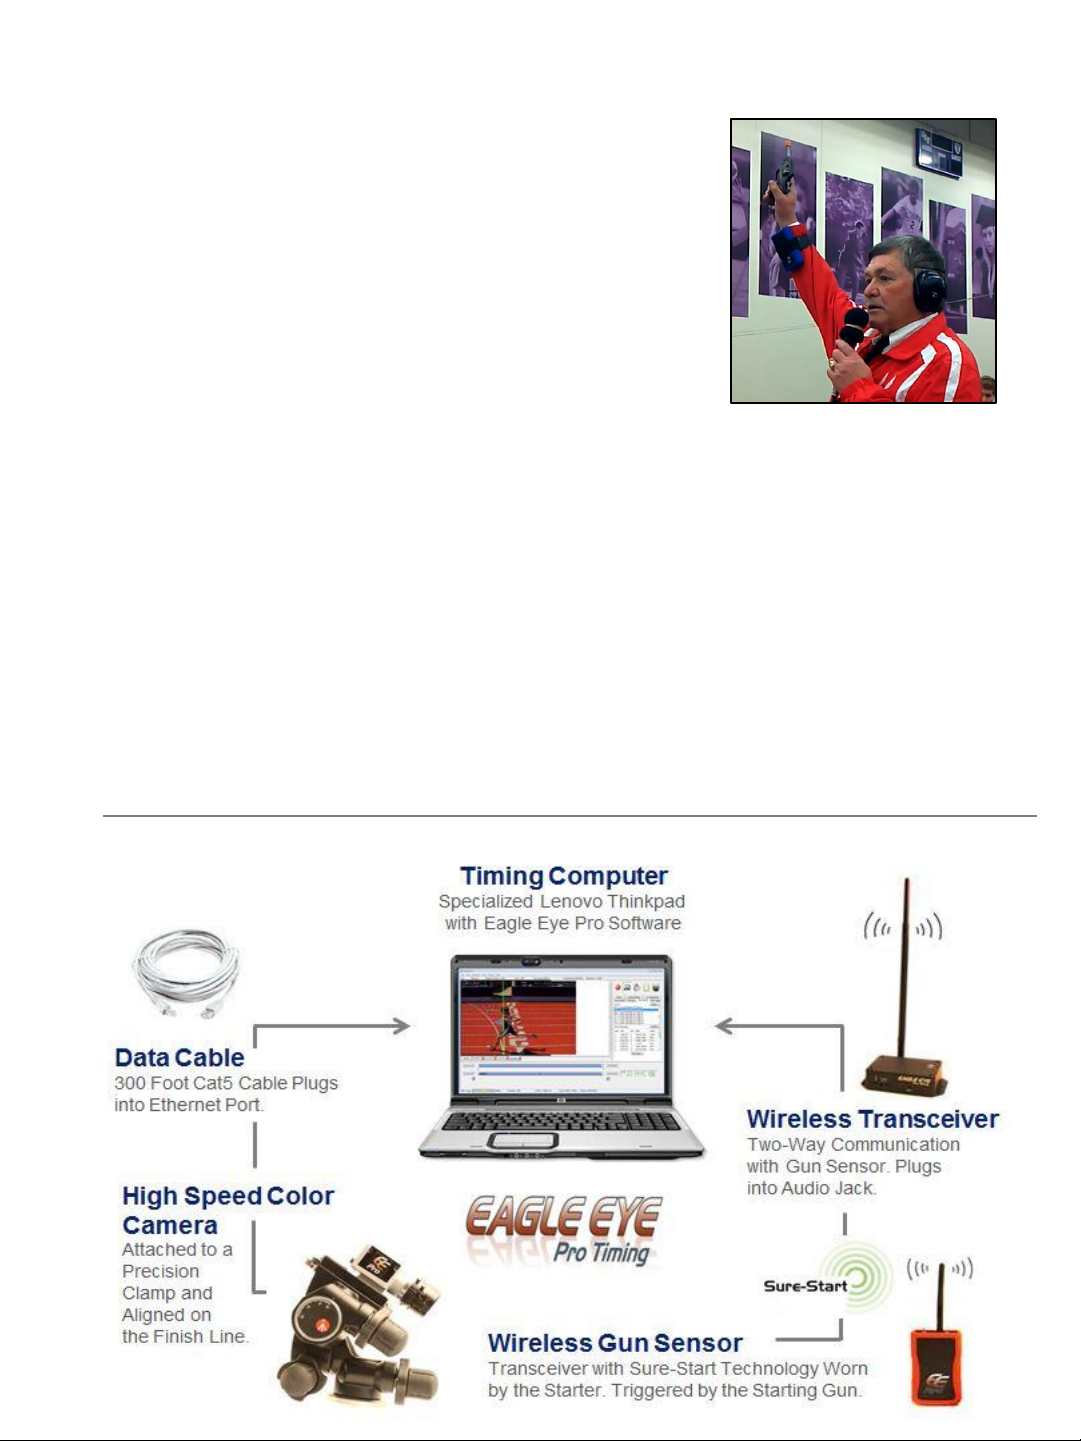
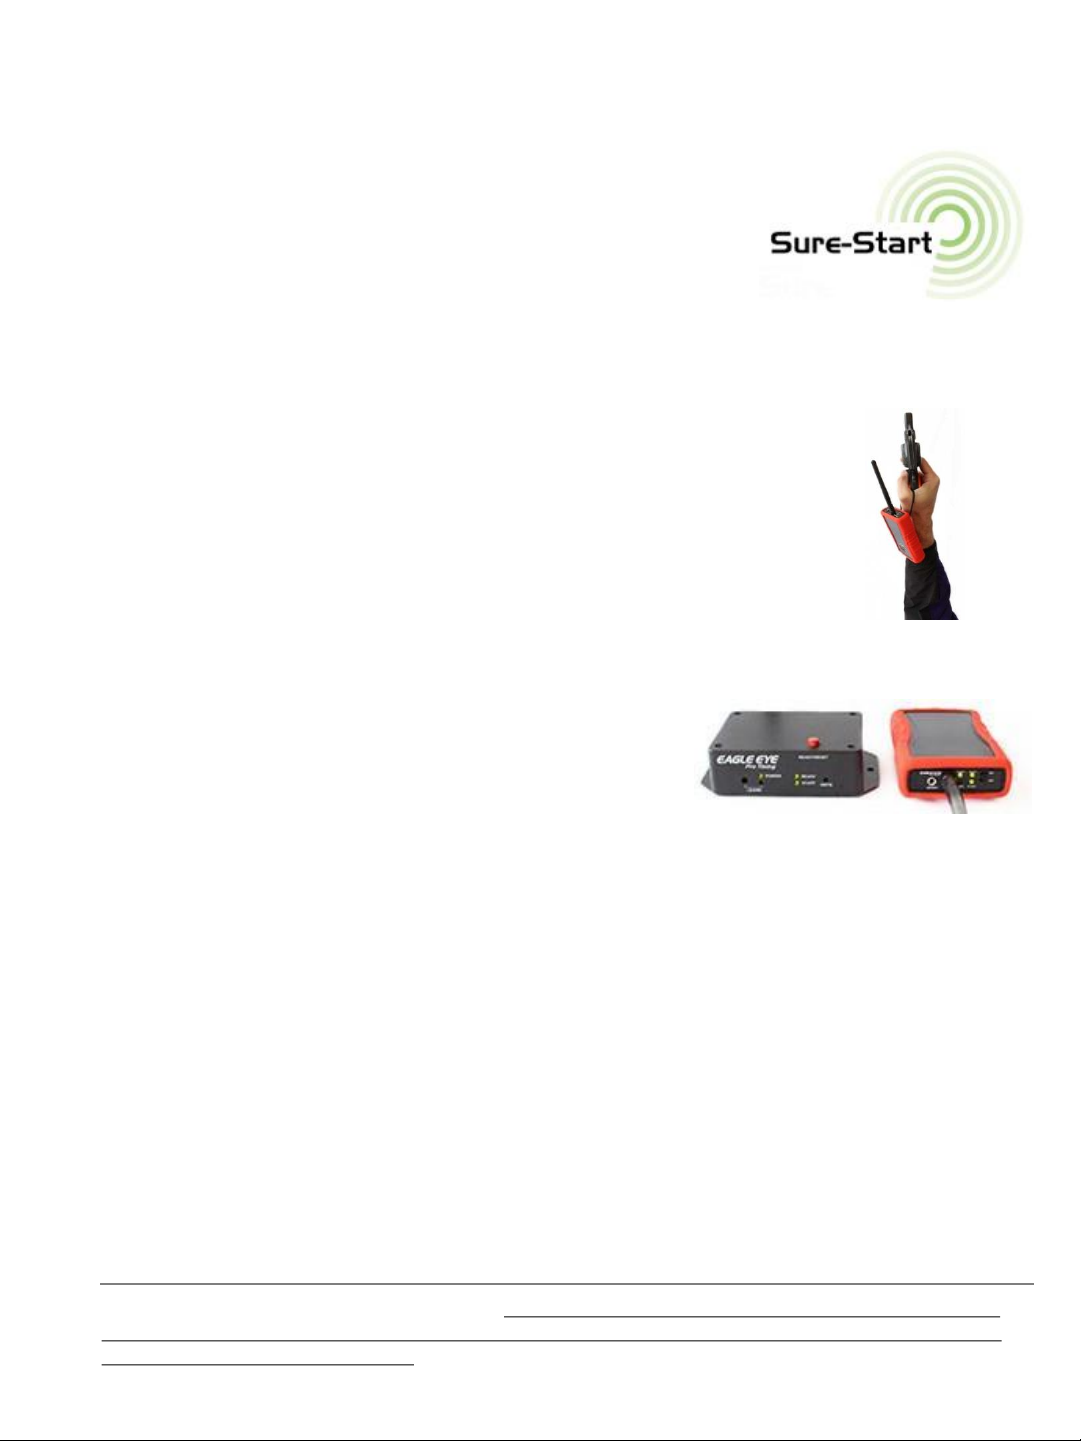
Communicate with Starter
It is important to explain to the Starter how to use the wireless transceiver. Let the Starter know how
to read the red and green lights and how the timer intends to communicate via the data lights; also if
you expect the Starter to immediately monitor for a successful start and recall the race if necessary. Be
sure to have an extra high quality 9-volt battery on hand for the wireless transceiver.
Troubleshooting
Your software settings are hard-coded and optimized for your timing application. To restore the default
settings, simply exit and reopen the software program. 5

2. Operational Overview
1. ➔Start - Upon the firing of the starting pistol, the transmitter
worn by the Starter, sends a wireless signal to its receiver
(connected to the timing computer) to begin the race clock
within the Eagle Eye Pro software.
2. ➔Capture - As the runners approach the finish line, the
Operator 'clicks' the record button to capture video directly
to the computer's hard drive. [Each frame is time-stamped to
1/1000th of a second, producing increments in excess of 100fps].
3. ➔Bookmark - A simple press of the space-bar during the record process allows the Operator
to "mark" the video as athletes cross the finish line, making the review process extremely fast
and efficient (recommended for events 400m and longer).
4. ➔Review –After the last runner crosses the finish line, the stop button is clicked and the
recorded race video is immediately available for review. The operator easily moves the video
(via the scrollbar, arrow keys or roller mouse) to bring the torso of each athlete to the finish line
and determine their finishing time.
5. ➔Results –Results can either be recorded manually or integrated with meet management
software (such as Hy-Tek Meet Manager, RaceberryJAM, Race Tab, etc.) A press of the keyboard
automatically assigns the finishing time to the appropriate athlete within Eagle Eye Pro. This file
is accepted into the management software for seamless integration.
3. Hardware Overview
6

4. Software Overview
Eagle Eye Pro timing software is sophisticated yet easy to use. Its graphical interface is designed
to make operation both intuitive and efficient.
Eagle Eye Pro uses a convenient tab
structure (located on the right side of
the screen) that contains all the
necessary features for easy access.
Activating the Camera Icon reveals
seven tabs, each with a specific
function. Shown below are the Finish
Line and the Race Tab (most
commonly used.)
The Reel icon reveals a
directory of recorded events.
The Results and Finish Line tabs are shown below.
Tab structure shown below. The Race Results tab is
used for each event.
7

B. OPERATION INSTRUCTIONS
1. Import Athletes
1. ➔Create an Event File (.evt) or Excel (.xls) template
Described on pages 11 and 12.
2. ➔Import & Pre-Name the Race Video
SELECT the Results tab and CLICK Import and navigate to the
created .evt or .xls file. Once loaded within the Race Tab, SELECT
(highlight) the race from the list that is about to be run. This
will automatically name the video sequence (.seq file) by
the event name upon recording.
2. Time a Race
1. ➔Arm the Wireless Trigger
PRESS the red button on top of the receiver to active the green ready light.
2. ➔Arm the Software
PRESS Ctrl-F12 to ARM the system or the Arm button within the Race Trigger tab. The
word ARMED will appear when system is ready –and immediately change to TRIGGERED
upon the detection of the gun.
3. ➔Record the Race
CLICK the red REC button to start recording prior to the athletes crossing the finish line.
Continue recording until ALL athletes have finished the race.
4. ➔Create Event Markers “Bookmarks” (optional: Recommended for all distance events)
PRESS the SPACE BAR to mark finishing athletes just prior to crossing the finish-line. This
will create “Event Markers” on the recorded video time-line of each finishing athlete,
making it fast and easy to read distance events.
5. ➔Stop the Race
CLICK the STOP button after the last athlete has crossed the finish line.
6. ➔Signal the Start
PRESS the RED button (on top of the receiver) to active the ready light on the Starter’s
transceiver. This step is optional, however it serves as Red Flag to hold the Starter from
firing the gun before the timing operator is ready for the next event to begin. More info on
page 10 and 14.
8
Important: If at anytime the time-code is triggered prematurely by the Starter (from bumping
the transceiver, etc.) –simply RE-ARM the software with Ctrl-F12. The time-code will keep
running however upon TRIGGERING the time code will start over at zero.
Press RED button once to turn the Ready light RED. Press again to
turn ready light GREEN.

TIP: An athlete has crossed the finish line when the leading edge of their torso has met or exceeded
the finish line (the torso is considered the region between the neck and waist).
4. Assign Times
1. ➔Be sure to first activate the time line region by clicking anywhere on the timeline bar.
2. ➔TYPE the number key that corresponds to the finishing athlete’s HIP number or LANE
number. The time will automatically populate into the appropriate cell next to their
name. (as viewable in the results tab).
TIP: TIME REQUIREMENT: For double digit entries, press both numbers on the key pad within one second.
Example: For hip number 12, press the 1 and 2 keys consecutively. TIP: CORRECTING MISTAKEN ENTRY: Retype the
correct HIP or LANE number. TIP: DELETING ENTRY: Perform a RIGHT-CLICK on the cell you wish to delete the entry from.
5. Save Results File
After all times have been determined for each runner, EagleEye Pro
software generates (with the steps below) a results file that contains
the necessary information to integrate with Meet Management
software such as Hy-Tek, RaceberryJAM, Race Tab, etc.
1. ➔CLICK the Save Times button.
2. ➔CHOOSE the appropriate folder and SELECT Save
TIP: The folder you select to save the race file to will become the default folder for each
race to follow. Example: :C tfmeets folder is the default Hy-Tek folder.
TIP: The file name is defaulted and does not need to be manually typed.
Saved Video
Recorded sequences (race videos) do not need to be saved after each race. Each recording is
saved directly to the hard drive and labeled by event name. ACCESS recorded video with the
HISTORY REEL icon. 9
3. Read a Race
After stopping the record process, the captured video is immediately available for
review.
When NOT using Event Markers “bookmarks”
LEFT-CLICK and HOLD the timeline button with your mouse and proceed to drag the
video time-line left to right. Use arrow keys or mouse roller
wheel to make frame by frame adjustments as needed.
PAUSE to read the video as each athlete’s torso meets the
finish-line.
When using Event Markers “bookmarks”
ACTIVATE the video by CLICKING the
video scroll bar (any location on the
scroll bar). PRESS Ctrl + Arrow Key (left or right arrow key) to jump to each event
marker “bookmark”. Use arrow keys or mouse to make frame by frame adjustments
as needed. PAUSE to read the video as each athlete’s torso meets the finish-line
overlay.
GREEN Event Marker Represent finishing athletes

Transmitter
6. Wireless Trigger Units
The benefits of Sure-Start Technology begin as soon as both units are powered
on. Within moments, flashing lights turn solid red as the transceiver
and receiver synchronize with one another. Both units are
technically transceivers that make possible two-way communication
via a series of green and red lights that communicate the systems readiness,
effectively replacing the need for a ‘ready flag’ in the press box.
Although the LEARN pairing button is still present, it is no longer necessary to use as a pairing process (as it was
with the older blue generation 1 unit) since the wireless trigger and receiver auto-pair with one another.
Prior to each race the Starter should either:
1) HANG the transceiver from the gun hand (as shown) OR
2) HOLD the transceiver in the non-gun hand when both arms are held
outstretch and above the head (prior to and during the firing of the gun).
This option is often used when the Starter is monitoring and confirming a successful
start immediately after the gun is fired (option A below). When held in the non-gun hand,
it’s easier to tip the unit downward after firing the gun to visually confirm a green light (successful
trigger). A red light indicates a non-successful trigger and the race should immediately be recalled.
A. READY Mode Option
The READY mode allows the timing operator and Starter
to use the trigger units to communicate the same way a
flag is often used in the press box. A white flag in the press
box tells the Starter to begin the next race, while a red flag indicates the timing operator is not
ready or that a recall (upon the gun start) is needed.
Timing Operator: Presses the Ready/Reset button (on the top of the receiver) after each race to
turn the Ready light Red. The button is pressed again to turn the Ready light green once the
system is armed and ready for the next race .
Starter: The Starter monitors the transceiver and does not begin each race until the Ready light
turns green. The Starter may also choose to monitor the unit (immediately upon firing the gun) to
confirm the timing system was triggered. A red light on the unit would require an immediate recall
of the race.
B. GREEN Mode Option
The GREEN mode (or open mode) uses the Ready/Reset button ONLY when the timing
operator needs more time before the start of the next race. The timing operator DOES NOT
press the Ready/Reset button after each race but rather only when needed.
TROUBLESHOOTING: Unresponsive Date Lights: PRESS and HOLD the Ready/Reset button for three seconds if
at any time the data lights are unresponsive. This will reset the lights. You may need to turn the transceiver off
and back on to assist the reset process. A Low Battery in the transceiver may cause unresponsive data lights.
Always have a fresh high quality 9-volt battery on hand. TIP: Because of its external omni-directional antenna,
the black face of the transceiver does not need to be pointed in the direction of its receiver). 10

C. FILE SHARING
When integrating Eagle Eye Pro with meet management software (Hy-Tek, Race Tab,
RaceberryJAM, etc.) it is necessary to share the lynx.evt event file (created by the meet
management software) and the .lif results files (created by Eagle Eye Pro software).
1. Sharing Results File via USB Switch
The included USB Switch allows each computer to access the same external
drive. The shared files remain on this drive while allowing each computer
access via the following process.
1. ➔PLUG a USB storage device (such as a thumb drive) into the back of the USB Switch.
2. ➔CONNECT the USB cables from the USB Switch to available USB ports on each
computer.
3. ➔ACCEPT the USB storage device on computer one once it
is detected.
4. ➔PRESS the RESET button on the USB Switch to connect
to computer two.
5. ➔ACCEPT the USB storage device on computer two once it is
detected. You need only accept the thumb drive once on each
computer during initial set up.
6. ➔Within the Eagle Eye Results Tab, SAVE a results file to the USB thumb drive
connected to the USB Switch. You need only map this drive once during set up.
7. ➔Within the Meet Management software, CHOOSE to direct the .EVT file to the USB
storage device connected to the USB Switch. This should also be the location the meet
management software will receive the .lif results file generated by Eagle Eye. You need
only map to this drive once during set up.
Tip: It is recommended that the operator of the meet management software (results computer) operate
the USB Switch. This allows the timing operator to focus entirely on reading each race and preparing to
time the next event.
Eagle Eye Computer
Timing Hy-Tek, etc. Computer
Results
USB Switch
USB Cable USB Cable
Additional Wireless File Sharing Options
See pages 30-31 for additional file sharing options: 1) Free Dropbox internet file sharing
process used when wifi is available and 2) a Windows Ad Hoc computer to computer
wireless network which does not require an internet connection or wifi.
11
* Instructions for the discontinued USB file transfer cable can be found on page 34.

D. CREATING FILES
1. Creating an .EVT File for Import (Option 1)
Used when using Meet Management Software
A lynx.evt file is an industry standard event file created by common meet management
software. This file contains information (heat, name, school and lane/position) for each seeded
event. In order to integrate with Eagle Eye Pro, this file must first be created by your meet
management software (Hy-Tek, Race Tab, RaceberryJaM, etc.) and imported into Eagle Eye Pro
via the Race Results tab. Follow the instructions below depending on the software you use.
Hy-Tek Meet Manager (version 4.0)
1. From the top menu go to Set-up > Photo Finish Interface > Eagle Pro Timing.*
2. Within the Run mode go to Interfaces > Photo Finish -Eagle Eye Pro > Update Start Lists.
-----------
If updating for the first time and or changing the file location.
3. SELECT the Activate update of start list checkbox (middle of screen) if updating for the first time.
4. SELECT the Change Data Location button and navigate to the destination folder you intend to share
between Hy-Tek and Eagle Eye.
5. CLICK the OK button. Hy-Tek will save the lynx.evt in the location chosen in step 4 .
6. Within Eagle Eye Pro >Results Tab > Choose the import button and navigate to the Lynx.evt file.
*If Eagle Eye is not an option in an earlier version, choose FinishLynx File Sharing. ** Hy-Tek requires their Photo Finish
Interface license for this feature to activate the Get Times button within the Run mode.
Race Tab (version 3.64)
1. Within the desired seeded meet, CHOOSE RaceTab from the upper left.
2. CHOOSE FAT Interfaces and BROWSE to a destination folder where the lynx.evt will save to.
3. CHOOSE Eagle Eye as the brand of FAT and CLICK Save and Done (lower right).
4. CHOOSE RaceTab (upper left) > Export > Lynx. (Note - no confirmation is indicated)
5. Within Eagle Eye Pro > Results Tab > CHOOSE import and navigate to the saved lynx.evt file.
Race Tab can be downloaded for FREE at http://racetab.milesplit.com/page/download
RaceberryJaM
1. PULL ScoreMeetLynx file down to Create Lynx/ Flash Timing file (if Eagle Eye is not listed).
2. CHOOSE the destination folder (meet directory).
3. CHOOSE an offset to the IDs to distinguish men's and women's events.
("0" for one division, "100" for the next, etc. are good options)
4. ACCEPT the defaults for the schedule file. Say "No: to finalize schedule.
5. SWITCH to next division (Ctrl-G). Repeat for all divisions and choose to finalize the schedule.
Importing the lynx.evt file into Eagle Eye Pro Software
1. SELECT the RESULTS TAB. 2. NAVIGATE to the location of the lynx.evt file
and CHOOSE Import. SELECT OPEN. 3. EVENTS and ATHLETES will appear in
the Race Results Tab. 12

2. Integrating with an Excel .xls File (Option 2)
Used when not using Meet Management Software
Your Eagle Eye Pro system has the ability to integrate with an .xls file. This file
can be imported into Eagle Eye Pro as a blank template (without names, schools, etc.) in order
to print results or as a customized template containing athlete names, teams, heats, lanes, etc.
that you have added manually.
To use the Excel feature you must use the provided .xls template or create an .xls file with the
correct format (Row 1/ Columns A-H) as shown in the image below.
1. ➔DOWNLOAD the Meet-Template.xls file via the address below and SAVE to the location of
your choice. It’s recommended to copy and paste the address into your web browser.
http://www.eagleeyedv.com/Meet_Template_s/704.htm
2. ➔Within Eagle Eye Pro Software, SELECT the Results tab and CLICK Import and navigate
to the location of the file.
3. ➔CHANGE the Worksheet File to .xls (lower right corner)
and SELECT the Meet-Template.xls file.
4. ➔RECORD a race and ASSIGN times as usual.
5. ➔CLICK the Save Times button to save times to the Meet-Template.xls document.
6. ➔PRINT results by opening the .xls file at its source and choosing to print entire document
or individual sheet (event).
Customizing template
Enter names, teams, ID/Bib # and TFRRS numbers for each participant if you choose.
These cells can be left blank, however DO DOT delete unused columns. The labeled
columns are necessary for the proper file structure. If you wish to delete columns, do so
only after you are done using the .xls file within Eagle Eye Pro software. Additionally you
can delete and add heats, lanes and events to fit your needs. Please use caution not to
change the fundamental format of the file. Always keep a copy of the original .xls file
on hand. 13

TIPS
Practice Triggering: A finger tap to the outside of the transceiver will trigger the system. A data light on both the
transceiver and receiver confirm a successful transmission. Position: Do not position the transceiver on the hip of
the Starter or wear in a pocket. The body may attenuate (reduce) the signal. Elevate: Do not try to send a signal
through a crowd of people on the infield, etc. Elevate the receiver or transceiver if necessary. A longer audio cable
may be required (purchase from Eagle Eye or retailer such as Radio Shack, etc.). This would require operating in
Green mode only (see page 10). Sensitivity: The transmitter is set at 50% gain before shipment. If you believe an
increase in sensitivity is necessary for your facility, please contact Eagle Eye for details. Test: Be sure to test your
wireless start system for successful transmissions prior to each track meet. Pay special attention to the start
locations farthest from the receiver. Be sure to maintain a clear line of sight.
E. HARDWARE SET UP
1. Camera
1. ➔TURN ON the computer.
2. ➔INSERT the USB Key into a USB Port (of your choice) on the computer.
3. ➔TURN ON the camera by plugging in its power supply.
4. ➔INSERT the data cable into both the back of the camera and the computer’s Ethernet
port. (wait 1-2 minutes for camera to connect)
5. ➔OPEN software and a live image should appear.
Tip: If live image does not load, go to top toolbar and SELECT > Hardware > Load Grabber and choose
your listed camera (Basler Pylon Gigi Camera).
2. Wireless Trigger System/ Gun Sensor (Generation 2)
Instructions below refer to the Generation 2 trigger system (red cover). Instructions for the
Generation 1 (blue cover) can be found on page 35.
1. ➔ATTACH an antenna to both units.
2. ➔PLUG IN the large end of the audio cable to the back of the receiver.
3. ➔PLUG IN the receiver’s power supply.
4. ➔PLUG IN the other end of the audio cable into the microphone
input on the USB audio card . *Lenovo computers only. See info below for non Lenovo computers.
5. ➔PLUG IN the USB adaptor to an available USB port on the computer.
6. ➔SWITCH on the transceiver. At this point both units will automatically pair with one
another (the manual ‘Learn’ process is no longer necessary ). Once paired the flashing red
lights will remain solid red. Pressing the Ready/Reset button on the receiver will turn the
Ready lights green.
*Some non Lenovo computers do not need the USB audio card since they are equipped with
a microphone and head phone jack separate from one another. Your non-Lenovo computer
may allow for the audio cable to be plugged directly into the audio jack without the use of the
USB audio adaptor card.
14
USB adaptor
USB Port Audio Cable
Antennas
Plug into microphone input

F. PRE-MEET SET
1. Recommended Order of Set Up
It is recommend that you allow at least one hour for system set-up. Although set up can take
less time, one hour or more allows for troubleshooting unforeseen issues.
Establishing a live-image (between the camera and computer) should be your first priority.
This assures the system is working properly.
1. ➔POSITION camera on the finish line.
2. ➔LAYOUT the long (300 foot) data cable from the camera to the timing computer.
3. ➔ESTABLISH a live video image within Eagle Eye Pro software.
4. ➔MOVE the timing computer to the finish line and re-establish a live-image on the
computer, using the smaller length practice cable.
5. ➔OPEN the Finish Line tab and select the calibration tool. While viewing the computer
screen, adjust the camera/clamp so that the calibration line is on the leading edge of the
finish line.
6. ➔RECONNECT the timing computer to the main (300‘) data cable.
7. ➔CONNECT the wireless trigger and re-establish a live image. Be sure to verify detection
within the Trigger tab. Be sure to properly connect the USB audio plug before opening the
Pro software.
8. ➔TEST the wireless trigger system (while standing at the location furthest from receiver/
computer) via one of the following methods: 1) firing the Starter’s pistol, 2) a strong finger
tap to the front face of the receiver unit while holding the unit above your head. A sharp
blow directly into the transmitter’s sensor port may be used, however be sure your hand or
body does not block the receiver’s line of sight.
2. Camera Placement
Position the camera so that athletes in lane one (closest to camera) are visible from the knees
up. This will allow identification of hip numbers in lane one while keeping athletes in the
outside lanes as close to the camera as possible. It’s best to have a live image on the computer
and have a helper stand in lanes 1 and 8 (during the set up process) with the camera set and
angled accordingly.
1. ➔MOUNT the camera 7-10 feet in the air via a tripod, pole, standard, etc.
2. ➔POSITION the camera 8-15 feet back from the finish-line.
3. ➔PLUG the camera into the computer and position so that you can move the
camera/stand while viewing the live finish-line image.
4. ➔MOVE the camera
stand as needed so
that the finish line on
the track is centered
within the image on
the computer with the
calibration tool.
15

3. Camera Alignment
Proper camera alignment assures finish line accuracy. The goal is to square the camera both
horizontally and vertically. This is accomplished with the help of the calibration tool within the
Finish Line tab.
1. ➔PLACE the timing computer in a stable location near the camera aligned on the finish-line
2. ➔CONNECT the camera to the computer and obtain a live image within the software.
3. ➔CHOOSE the Finish Line tab and check the Calibrate box and Both from the Mode drop
down list.
4. ➔While standing on a ladder or reaching to
adjust the camera, align the camera so
that the vertical line is on the leading edge
of the finish line and the horizontal line is
perpendicular to a lane line
5. ➔SELECT the ADD LINE button and draw a
vertical line directly on top of the
calibrated center line (positioned over the
finish line). Adjust the line width and color as
preferred and SELECT the Lock Overlay check
box and Uncheck the Calibration box
Calibration
Lines appear
both
horizontally
and vertically
TIP: To delete the finish line: Click on the finish line and RIGHT-CLICK on the line
and select delete.
TIP: To Straighten line: With the curser on the bottom of the line, CLICK and
HOLD and move in the direction the line needs to straighten.
16

4. Camera Adjustment
The procedures on this page will help maximize your camera image quality while adapting easily
to changing lighting conditions.
With the camera aligned on the finish line, powered on and a picture on your computer screen:
A. At the Camera
1. ➔TURN the focus dial (outside ring) slowly until you obtain
the best clarity.
2. ➔TURN the aperture dial (inside ring) fully open (counter
clockwise when standing behind camera). The image
should appear washed out.
B . At the Computer (within the software)
3. ➔SELECT the Live Adjustments tab and SELECT Exposure
from the features list.
4. ➔SET the initial Exposure setting as low as possible.
Example: start at 50
5. ➔RAISE the Exposure setting (if necessary) until the image is
optimized. Attempt to use the lowest exposure the lighting
conditions will allow.
C. Adjusting to Changing Lighting Conditions
➔Increase the Exposure settings as lighting decreases.
TIP: The graph on the left represents the relationship
between light and motion. The brighter the day and
the faster the race, the lower the Exposure setting. In
low light conditions, you may need to increase the
Exposure settings to maintain image clarity. Do not
exceed an exposure of 8000; doing so may impact
frame rate.
TIP: Think of the Exposure setting as ‘ Shutter Speed’
–however, instead of a high shutter speed number
you find on still cameras, your timing camera uses a
low exposure to achieve similar results. The lower the
Exposure setting the less motion blur.
17

1. Standard
The camera is positioned up to 300 feet away with the included Ethernet data cable.
2. Extended Distance
The use of an optional PoE Gigibit Ethernet switch (must support 9k jumbo frames) can double
the distance from your camera to your timing computer. * Also used when no power source is
available for the camera.
3. Multiple Camera
Connect two or more cameras to the Ethernet Switch and easily switch from either camera
within the Pro software. Ideal for running dash events with the wind.
G. SET UP OPTIONS
Below are hardware set up options for you to consider based on your facility and objectives. All options
show the Eagle Eye Pro timing computer networked to share files with the meet management computer
(via your choice of included USB switch or wireless options such as Dropbox).
Gigibit Enabled PoE Ethernet Switch
The use of a Switch can significantly increase the distance from the timing
computer to the camera. Multiple cameras can be connected to the same
switch and viewable within Eagle Eye Pro software.
* No Camera Power Needed
Your Eagle Eye Pro timing camera is PoE enabled, allowing it to draw power from a powered PoE Ethernet
switch without the need for its own power source. The examples above using a PoE Ethernet Switch does not
require the camera to have its own power source.
300 foot data cable
Up to 300
foot data cable
Up to 600 feet total distance with one switch, 1200 feet with two switches, etc.
Up to 300
foot data cable
Up to 300 foot data cable
18
The Ethernet Switch to be located
in press box or on the infield. If on the infield, a third 300 foot cable would be required from the Switch to the timing computer
Eagle Eye Timing Computer
Meet Management Computer
Meet Management Computer Eagle Eye Timing Computer
Eagle Eye Timing Computer
Meet Management Computer

H. PRE-MEET PRE-CAUTIONS
1. Check Available Record Time (hard drive)
Check to be sure you have adequate space on your hard drive.
The example at right shows 3:56.10 minutes of available
recording time.
To Check Record Time
➔SELECT the Record Tab and Calculate size in Time.
To Increase Record Time
To increase recording time you may need to create space on
your hard drive by deleting or moving existing video
(sequences) files.
1. ➔To delete Individual videos SELECT the HISTORY via the Reel icon.
2. ➔RIGHT-CLICK on the file and choose delete file to delete videos (sequences) in bulk,
DELETE directly from the destination folder
located at:
C: My Documents > Sequence (folder)
To Change Storage Location (optional)
1. ➔SELECT TOOLS and Eagle Eye Pro Settings from
the top toolbar.
2. ➔SELECT the RECORDING Tab and
3. ➔BROWSE to a folder of your choice.
*If recording to an external drive, must be a 7200 rpm USB 3 hard drive.
2. Turn Off Anti Virus & Fire Wall Applications
IMPORTANT!
Programs running in the background while operating Eagle Eye Pro run the risk of creating an
interruption during a recorded race. It’s very important NOT to run a fire wall or anti virus
(Norton, McAfee, etc.) software program during a track meet. Because your computer is off-
line there is no risk of a virus.
Your Eagle Eye computer was shipped to you with the fire wall turned off for this reason.
19

I. MISC. FEATURES
1. Change Race Clock Display
2. Print Proof of Performance / Images
Eagle Eye Pro supports printing images in several ways via the File menu.
For Proof of Performance images we recommend performing a PRINT SCREEN function
using the built in Windows print screen feature.
1. ➔PRESS the PrntScr button located on the top row of
your keypad.
2. ➔CHOOSE to Print or copy into a document of your
choice.
3. Save or Exporting Video
Occasionally you may want to save a small section of a race video. That section, called a
snippet can be saved while the remainder is discarded. Discarding the unnecessary portion
of video assures the resulting file is as small as possible.
If you have been recording a sequence and wish to save a snippet, click the Save button.
Remember that the whole sequence must be selected in order to save the entire sequence.
Saving can only be performed in Review or Playback mode, when the upper status bar
displays the range of frames in the current Selection. There are three ways to save a
snippet:
1. ➔CLICK the Save button
2. ➔SELECT File | Save As... from the main menu
3. ➔RIGHT-CLICK on the Coarse Slider and select Save Selection As... OR Choose to
export to .avi
1. ➔From the top toolbar,SELECT Tools > Eagle
Eye Pro Settings and CLICK the Timestamp Tab.
2. ➔SELECT the font, size, color, & position as desired.
20
Table of contents