Eagle EG6088K User manual

OperationManualforShuttlePersonnel Carrier

Thanks forbuyourproduct. Foryourbetteruse,pleaseread throughthismanualbeforeoperatethisvehicleto
avoidanypossibledamagedue toimproperoperation;andkeepitinaproperwayafterreadingforfuture
reference.
ImportantInformation:
Particularlyimportant information isdistinguished bythe followingnotations:
W
W
Wa
a
ar
r
rn
n
ni
iin
n
ng
g
g:
:
:
Fail tofollowWarninginstructionscouldresult insevereinjuryordeathtothevehicleoccupants, bystandersor
personsinspectingorrepairingthe vehicle.
C
C
Ca
a
au
u
ut
t
ti
iio
o
on
n
n!
!
!
Fail tofollowCaution instructionscouldcausedamagetothe vehicle.
Special Notice:
Because theseat&backrestwrappingfilmmaystick totheseatvinylandcause seat
vinylfadingorstained,please removetheseat&backrestwrappingfilmwhenyoustartto
use thevehicle!
Ifyouhavetostockthevehicleforlongtime,please alsoremovetheseat&backrest
wrappingfilm.

Index
1. BriefIntroduction..............................................................................................................................................1
2. TechnicalDescription........................................................................................................................................1
3. Important Labels...............................................................................................................................................1
4. Operation System.............................................................................................................................................3
5. OperationalProcess.........................................................................................................................................5
5.1Start thevehicle.......................................................................................................................................5
5.2Stopthe Vehicle......................................................................................................................................5
5.3Chargethebatteries................................................................................................................................5
6. RulesforSafeOperation..................................................................................................................................6
7.Maintenance..................................................................................................................................................7
7.1MaintenanceofBattery:..........................................................................................................................7
7.2Maintenanceofthe GearBox:..............................................................................................................11
7.3Maintenanceofthe TractionMotor.......................................................................................................11
7.4Maintenanceofthe SpeedController...................................................................................................12
7.5MaintenanceofBrakeSystem..............................................................................................................13
7.6Lubrication ofthe WholeVehicle...........................................................................................................13
7.7Running-inofNewVehicle:...................................................................................................................14
8. Storage...........................................................................................................................................................16
9. TroubleShooting............................................................................................................................................16
10.WiringDiagram.............................................................................................................................................19

-1
1. BriefIntroduction
Ourelectricshuttlepersonnelcarrierisakind ofenvironment-friendlypassengervehicle.It can beused in
vacationland, villaareas, garden-stylehotels, touristscenicspots, etc.. Ourelectricshuttlepersonnelcarrieris
an idealoff-road electricvehiclewithexcellentperformance,fashionabledesign,luxuriousand delicateinternal
decoration aswell ascomfortableand saferide.
2. Technical Description
PersonnelCarrier
Description
VehicleType EG6088K EG6118KA EG6118KB EG6158K
Dimensions(mm)(LxWxH) 4270X1490X2050
4270X1490X2050 5020X1490X2100
5020X1490X2100
8x6V 70 60 / /
12x6V / / 80 75
Range km/h)
(smoothandstraight
road, 20km/h,fullload)
16x6V / / 100 90
48V/3KW
35 / / /
48V/5KW
40 40 40 40
MaximumSpeed(km/h)
72V/5KW
/ / 45 45
MinimumTurningRadius(m)4.5 4.5 6 6
MaximumGradeability 20% 20% 20% 20%
Noise(Db)60 60 60 60
Front1210 1210 1210 1210
Tread(mm)
Rear1200 1200 1200 1200
BrakeDistance(V=20Km/h)4 4 4 4
Min.groundclearance(mm) 140 140 135 135
Parking Ability 20% 20% 20% 20%
3. ImportantLabels
Safetyand Instruction Labels
W
W
Wa
a
ar
r
rn
n
ni
iin
n
ng
g
g:
:
:
Pleasereadthefollowinglabelscarefullybeforeoperatingthe vehicle,andpromptlyreplaceanylabelswhich
becomeunreadableorremoved.
Label Position

-2
Label Content

-3
4. Operation System
1)SchematicFigureofOperation System
2)FunctionsofOperating System
PowerKey Controlthe powersupplyofthe wholevehicle.When the keybeinginserted intoit and turned
clockwise,it will switchon lights,hornand the controlsystem; when the keybeingturned back,the powerwill
beswitched off.
Acceleration Pedal Controlthespeed.Itshouldbestepped downslowly.The vehiclespeedsupwiththe
gradualstepping-down,and reachesthefull speed when thepedalisstepped tothebottom.Thevehicleslows
downwhen the pedalbeingreleased gradually. Whenthe pedalisfullyreleased,electricbrakeworks.
Service Brakepedal Deceleratethe vehicle.
ClutchPedal Controltheclutch.When driving,do notridetheclutch,otherwise,itwilldamagethe clutch.
Handbrake Lever Parkand brakethevehicle.
Steering wheel Controlthe drivingdirection
Amperemeter Indicatethecurrentoftheworkingvehicle.And on the Britishone,thereisalsoahour
meteron the bottom.

-4
Voltameter Indicatethevoltageof battery. OnMetricStandardMeter,it rangesfrom20Vto60V(for48V
system)and 30Vto96V(for72Vsystem)fromleft toright, including3sectionshighlighted byRed, Yellowand
Green.Greensectionrepresentsthe batteryisfull incapacity.Withthe consumption ofthe power,the indicator
will fall fromthe righttotheleft gradually.When theindicatorcomestotheintersectionpointoftheyellow
section and the redsection,itrepresentsthatthe batterywill cometothe end incapacity,nowthe battery
shouldbere-charged.When the indicatorcomestothe redsection,thevehicleisprohibited touse,thebattery
shouldberecharged immediately.OnBritishStandardMeter,excepttouseVoltage tojudgeifthe batteryneed
tobecharged, the batterypowermeteron thebottomisalsobeused asbatterypowerindicator. Thereare10
divisionsinthismeter(from1to10).Thismeterwill descendfromhigherdivision tolowonesasthe battery
discharges.When the batteryistoolow, the red indicatorlightwillflash, remindingyou torechargethe battery.
Speedometer&Odometer Indicatethe speed ofthe vehicleisrunningand the accumulated distance
the vehiclehasrun.BothMetricand Britishonesareavailable.
LightSwitch -Controllightsystem,includingturningsignal,headlight(includeshighbeamand lower
beam).
Wiper&HornSwitch Controlthe wiperand horn.
Emergency LightSwitch Controlthe emergencylight.
Fog lightSwitch Controlthe foglight.

-5
Gearshift Thereistotally5positions.Forwardshift includes1,2,3and4.
Reverseshift isR.It isrecommended touse1forclimbing,use2,3and 4for
flat road.
5. Operational Process
5.1Startthevehicle
1)Switchon thepowerkey;
2)Stepthe clutchpedaltothebottom,select1st position ifgoforwardand Rposition ifgobackward.Ifgo
forward,afterstartthe vehicle,changetorightshift and makesuretouserightspeed when driving.
Selection standardistomakesurethat theworkingcurrent ofmotorstaysassmall aspossibleaslongas
thiscurrent isenoughfordriving.
3)Releasetheparkinghandbrakelever.
4)Releasetheclutchpedalslowly.
5)Stepdownthe accelerationpedalsmoothly; inthiscase, thevehiclestartsrunning.
W
W
Wa
a
ar
r
rn
n
ni
iin
n
ng
g
g:
:
:
If you steptheacceleration pedalbeforeswitchingonthe powerkey,the vehiclewillnotrun.Inthiscase,you
shouldreleasetheaccelerationpedalfirst, and stepit again, thusthe vehiclewill start running.
5.2StoptheVehicle
1)Stepthe servicebrakepedaltodeceleratethevehicleuntil itstopscompletelyand shift the geartoNull
position;
2)Engagethe handbrakelevertoparkthe vehicle;
3)Releasetheservicebrake;
4)Switchoffall lights;
5)Switchoffthe powerkeyandtakeout thekey.
5.3Chargethebatteries
C
C
Ca
a
au
u
ut
t
ti
iio
o
on
n
n!
!
!
1)Wehavetwodifferentkindsofchargerforyou tochoose,one isexteriorchargerand the otherisbuild-in
(on-body)charger. Beforeyouusethe charger, pleaseread the chargeroperation manualwhichattachedwith
the charger.
2)Explosivehydrogen gasisproduced whilebatteryischarged.Onlychargethe batteryinwell-ventilated
areas.
3)Beforeusingthecharger, pleasecheck ifthebatterychargeryouaregettingtouseiscorrectlyratedasper
yourlocalACelectricitynetwork.
5)Donot disconnect the DC output cordfromthe batteryreceptaclewhen thechargerisON, otherwisean arc
couldoccurwhichmaycausean explosion.
7)It isprohibited toopen thehousingofthe charger.
8)Onlyqualified electrician isallowed toopen thehousingofthe charger.
9)Thechargershouldbestoredinsafeand dryroomwithgood ventilation.

-6
10)The chargershouldbepacked properlyifnot used forlongtime.
Belowisthecharging procedure:
·TurnOffThePowerOfTheWholeVehicle
1)When it’snon-onboardcharger, one setofbatteries, the process isasfollows:
a)Connect chargertoDC receptacleon the vehicle;
b)Connect thechargertoACpower;
c)Turnonthecharger
d)Turnoffthe chargerwhen thebatteriesarefullycharged,disconnectthechargerfromACpowerfirst, then
disconnect the chargerwithACreceptacle;
2)When it’snon-onboardcharger, twosetsofbatteries, the process isasfollows:
a)Disconnect the twoDC receptaclesunderthe driver’sseat, refertoleft picture;
b)Connect thechargerstotheDC receptacles, onechargertoonereceptacles;
c)Connect the chargerstoACpower;
d)Turnon the chargers;
e)Turnoffthe chargerswhen the batteriesarefullycharged,disconnectthechargerswithACpowerfirst,
then disconnectthechargerswithDC receptacles;
f)Connect thetwoDC receptaclesunderthe driver’sseat.
3)When it’sonboard(build-in)charger(s), no matterthereisone set ortwosetsofbatteries, theprocess isas
follows:
a)Connect thecharger(s)withACpower;
b)Turnon the charger(s);
c)Turnoffthe charger(s)when the batteriesarefullycharged, disconnect the charger(s)withACpower;
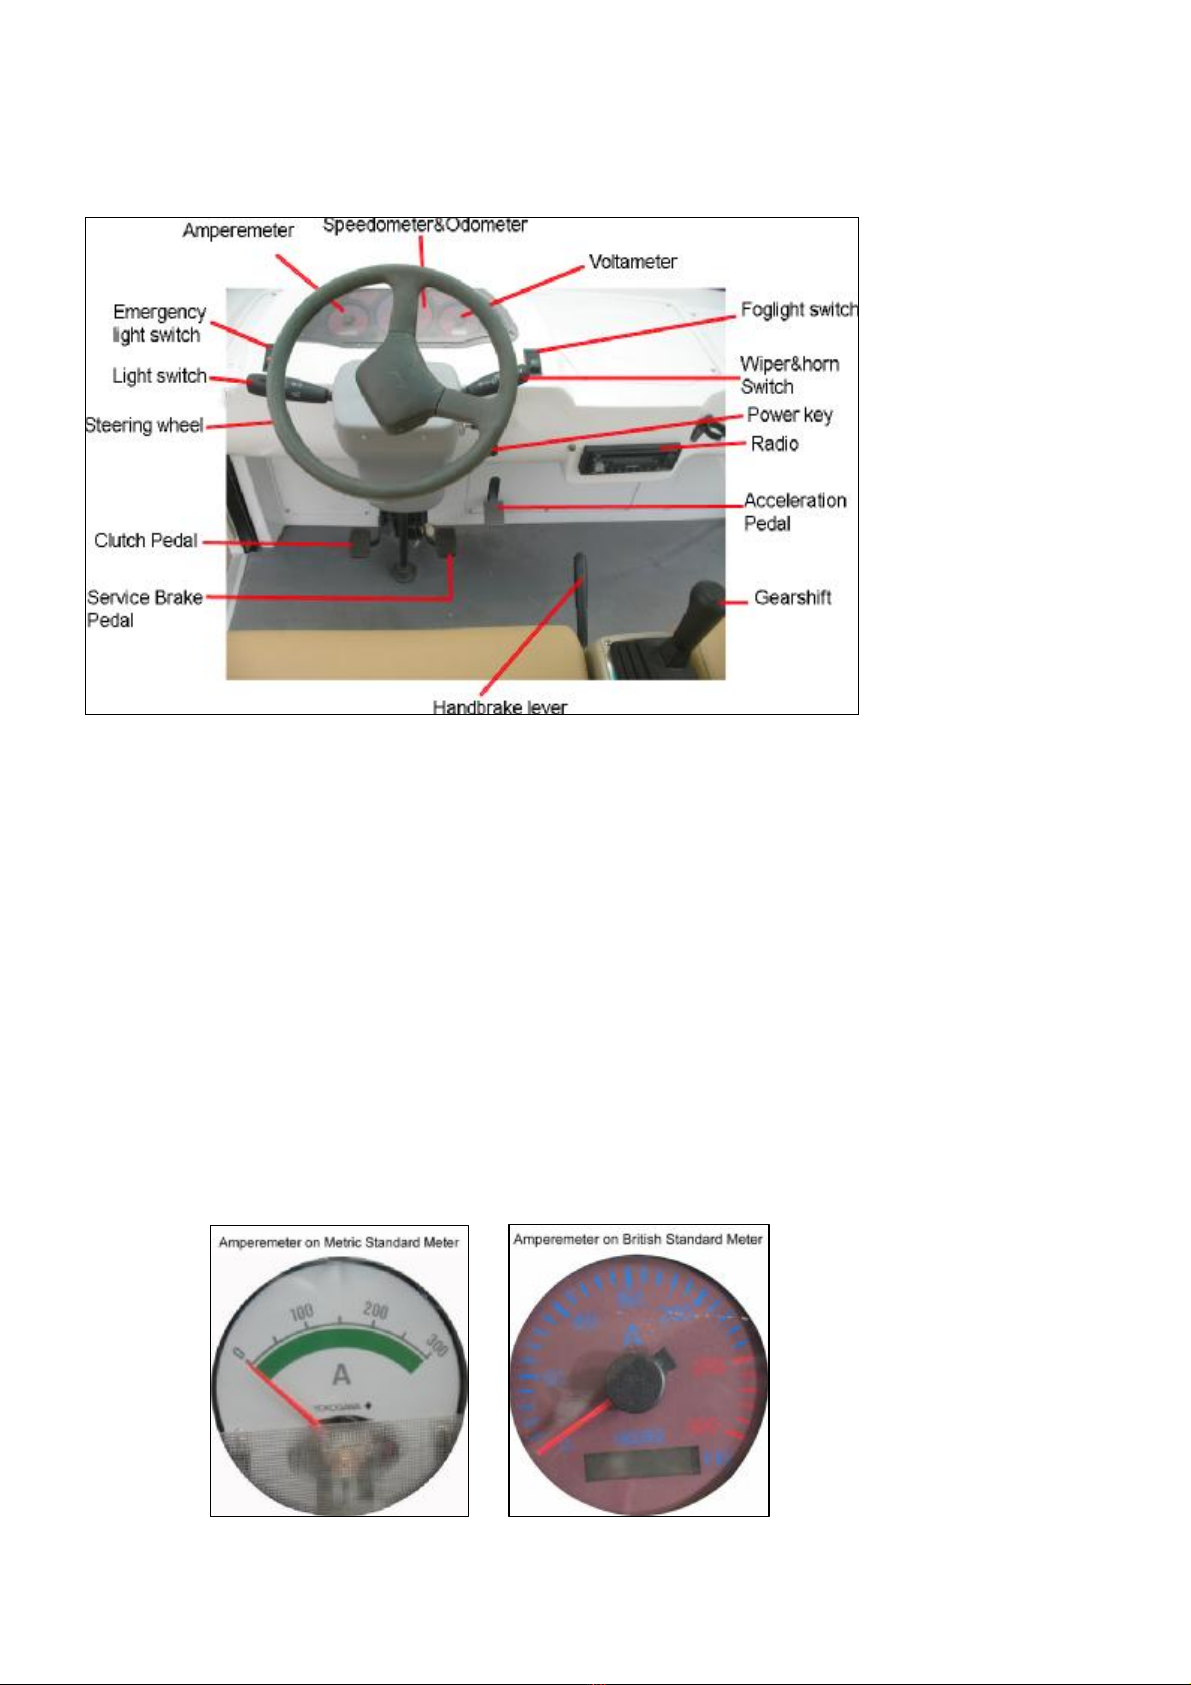
6. RulesforSafe Operation
The drivershouldhaveagood knowledgeofthe operation systemofthe vehicleand itsfeatures;meanwhile
followthe rulesforsafeoperation.
W
W
Wa
a
ar
r
rn
n
ni
iin
n
ng
g
g:
:
:
lDrivethe vehicleoffroad unless it isallowed.
lThevehiclecannotbeover-loaded,otherwisethe motorwill bedamaged,the vehiclewill losecontrol
and itslifewillbeshortened.
lUnqualified personsareprohibited todrivethe vehicle.
lMakesurethisvehiclerunsinitsrated climbingability.
lDon’t overtakeothervehiclesat crossroad, inblind area orinotherdangerouszone.
WHILEOPERATING THEVEHICLE
lKeepyourentirebodyinsidethevehicle, keepseatedandholdingonwhilethe vehicleismoving.
lDonot start thevehicleuntil all occupantsaresecurelyseated.

-7
lKeepyourhandsonthesteeringwheeland youreyeson the pathyou aregoing.
lAlwaysback the vehicleslowlyand watchthe back carefully.
lAvoidstartingand stoppingsuddenly.
lAvoidturningthe vehicletoo sharplyat highspeed.
lAlwaysdriveslowlyupand downon the slope.
lDonot makeanymodification oradditionwhichmayaffect the capacityorsafety.
lChildren arenotallowed toplayinthe vehicle.Children shouldbeseated between adultsand protected
whilethe vehicleismoving.
7.Maintenance
Usersshoulddo maintenanceasfollows,whichwill decide the performanceofthe vehicleand life:
7.1Maintenance ofBattery:
W
W
Wa
a
ar
r
rn
n
ni
iin
n
ng
g
g:
:
:
Batteryelectrolyteispoisonousand dangerous,may cause severeburns,injury,etc.. Always wear
protectiveclothing,gloves,and goggles whenhandling batteries,electrolyte,and charging your
battery.
KEEPITOUTOFREACH OFCHILDREN.
1)Cleaning
a.Theexteriorofthe battery, the connectionwiresand boltsshouldalwaysbekept clean anddry. When
cleaning,pleasemakesureall ventcapsaretightlyinplace.Clean the batterytopwithaclothorbrush
and solutionofbakingsoda and water.When cleaning,do notallowanycleaningsolution,orother
foreignmattertoget inside the battery. Thisshouldbedoneeveryweek.
b.Clean batteryterminalsand the inside ofcableclampsusingapostand clampcleaner.Clean
terminalswillhaveabrightmetallicshine.Thisshouldbedonewhen it isnecessary.
c.Reconnect theclampstothe terminalsand thinlycoatthemwithpetroleumjelly(Vaseline)toprevent
corrosion.
W
W
Wa
a
ar
r
rn
n
ni
iin
n
ng
g
g:
:
:
Beforeyoudisconnectanybatterycablefromanyterminalon the battery, pleasealwaysremovethe powerby
disconnectingthemainbatterycablefromthe controller.
2)Checking theterminalsand nuts
The connectionofthe batteryshouldalwaysbekeptingood condition.Pleasecheck everyweek on whether
anybatterycableterminalornuthasbecomelooseinordertopreventanysparkleordamagetoterminals.
Pleasecheck everyweek on whetheranybatterycableisdamaged ornot, the damaged batterycableshould
bereplaced immediately.
3)Noforeign matter
Donotplaceanyobjectson the batteryand donotconnectthe positivepoletothe negativepole.Thismay

-8
causeashort circuit, dangeroussparkormaycausedamagetothe batteryorinjurytoyourbody.
4)Recharging
a.Aslongasyou usethe vehicle,regardless of howlongyouhaveused it, thebatteryshall berecharged
fullyon thesameday.Anydelayon the re-chargingwill causenegativeeffect on the battery.
Notes:the lead-acidbatterydoesnotdevelopamemory,soneed notbefullydischarged before
recharging.
b.If the vehicleisgoingtobekeptunused foracertainlongtime,the batteryshall befullyrecharged first.
Afterthat, the batteryshall befullyrecharged every2weeks.
c.When driving,the drivershall bealwaysawareofthe droplevelofthe batterypowerfromthe battery
powermeter,anydropmeansthe batterypowerisdiminishing.Besides,the drivershall estimatethe
distanceneeded tobetaken,and rechargethe batteryatapropertimeincasethatthe vehiclecannot
get back tothe rechargingstation intimeforrecharging.
W
W
Wa
a
ar
r
rn
n
ni
i
in
n
ng
g
g:
:
:
Pleasemakesurethebatteryisrecharged beforethe batterypowermetershows20%powerisleft
inside the battery.Over-discharged batterywillhaveaveryshortservicelifeand willmakethe recharging
verydifficult.
W
W
Wa
a
ar
r
rn
n
ni
iin
n
ng
g
g:
:
:
Duringrecharging,the vehicleshall beparked inawell-ventilated area withthe fillcapstightlysecured.
Keepfarawayfromanyflameand sparks toavoidanyexplosion orfirethat couldcausephysicalinjury
ordamagetothe property.
5)WATERING
Flooded batteriesneedwater. Moreimportantly, wateringmust bedone at the right timeand intheright
amount orelsethe battery'sperformanceand longevitysuffers.
Watershouldalwaysbeadded afterfullychargingthebattery.Priortocharging, thereshouldbeenough
watertocoverthe plates. Ifthe batteryhasbeen discharged partiallyorfully, the waterlevelshouldalsobe
abovethe plates. Keepingthe waterat thecorrect levelafterafull chargewill prevent havingtoworryabout
the waterlevelat adifferent stateofcharge.
Dependingon thelocalclimate, chargingmethods, application, etc.. It’srecommended that batteriesbe
checked onceamonthuntil you getafeelforhowthirstyyourbatteriesare.
Importantthingstoremember:
1. Donot lettheplatesget exposed toair. Thiswill damage(corrode)the plates.
2. Donot fill the waterlevelinthe fillingwelltothecap. Thismost likelywill causethe batterytooverflow
acid, consequentlylosingcapacityandcausingacorrosivemess.
3. Donotusewaterwithahighmineralcontent. Usedistilled ordeionized wateronly.
W
W
Wa
a
ar
r
rn
n
ni
iin
n
ng
g
g:
:
:
Theelectrolyteisasolution ofacidand watersoskincontactshouldbeavoided.

-9
Stepbystepwatering procedure:
1. Open thevent capsand lookinside the fill wells.
2. Check electrolytelevel; theminimumlevelisat the topofthe plates.
3. Ifnecessaryaddjust enoughwatertocoverthe platesatthistime.
4. Put batterieson acompletechargebeforeaddinganyadditionalwater(refertothe Chargingsection).
5. Oncechargingiscompleted, open thevent capsand lookinsidethefill wells.
6. Addwateruntil the electrolytelevelis1/8"belowthe bottomofthe fill well.
7. Apieceofrubbercan beused safelyasadipstick tohelpdetermine thislevel.
8. Clean, replace, and tightenall vent caps.
C
C
Ca
a
au
u
ut
t
ti
iio
o
on
n
n!
!
!
Neveradd acidtoabattery.
6)TESTING
Visualinspection aloneisnot sufficient todetermine the overall healthofthe battery. Bothopen-circuit
voltageand specificgravityreadingscan giveagood indication ofthe battery'schargelevel,age,and health.
Routine voltageand gravitychecks will notonlyshowthe stateofchargebutalsohelpspotsignsofimproper
vehicle, suchasunderchargingand over-watering, and possiblyeven locateabadorweakbattery.The
followingstepsoutline howtoproperlyperformroutine voltageand specificgravitytestingon batteries.
I. SpecificGravityTest (Flooded batteriesonly)
1. Donot addwaterat thistime.
2. Fill and drainthe hydrometer2to4timesbeforepullingout asample.
3. Thereshouldbeenoughsampleelectrolyteinthehydrometertocompletelysupport the float.
4. Takeareading, recordit, and returntheelectrolyteback tothecell.
5. Tocheck anothercell, repeat the3stepsabove.
6. Check all cellsinthebattery.
7. Replacethe vent capsandwipeoff anyelectrolytethatmight havebeen spilled.
8. Correct the readingsto80oF:
Add .004 toreadingsforevery10o above80oF
Subtract .004 forevery10obelow80oF.
9. Comparethe readings.
10. Check the stateofchargeusingTable1.
Thereadingsshouldbeatorabovethefactoryspecification of1.277+/-.007.Ifanyspecificgravityreadings
registerlow, then followthe stepsbelow.
1. Check andrecordvoltagelevel(s).
2. Put battery(s)on acompletecharge.
3. Takespecificgravityreadingsagain.

-10
Ifanyspecificgravityreadingsstill registerlowthen followthe stepsbelow.
1. Check voltagelevel(s).
2. Performequalization charge. Refertothe Equalizingsection forthe properprocedure.
3. Takespecificgravityreadingsagain.
Ifanyspecificgravityreadingstill registerslowerthan the factoryspecification of1.277+/-.007thenoneor
moreofthe followingconditionsmayexist:
1. The batteryisoldand approachingthe end ofitslife.
2. The batterywasleft inastateofdischargetoolong.
3. Electrolytewaslost due tospillageoroverflow.
4. Aweakorbad cell isdeveloping.
5. Batterywaswatered excessivelyprevioustotesting.
Batteriesinconditions1-4shouldbetakentoaspecialist forfurtherevaluation orretired fromservice.
II. Open-CircuitVoltageTest
Foraccuratevoltagereadings,batteriesmustremainidle(no charging,no discharging)foratleast6hrs,
preferably24 hrs.
1. Disconnectall loadsfromthe batteries.
2. MeasurethevoltageusingaDC voltmeter.
3. Check thestateofchargewithTable1.
4. Chargethe batteryifit registers0%to70%charged.
Ifbatteryregistersbelowthe Table1values, the followingconditionsmayexist:
1. The batterywasleft inastateofdischargetoolong.
2. The batteryhasabad cell.
Batteriesintheseconditionsshouldbetaken toaspecialist forfurtherevaluation orretired fromservice.
TABLE1. Stateofchargeasrelatedtospecificgravityand
opencircuitvoltage
Open-Circuit Voltage
Percentageof
Charge
Specific
Gravity
Corrected to
80o F6V 8V 12V 24V 36V 48V
100 1.277 6.37 8.49 12.73
25.46
38.20 50.93
90 1.258 6.31 8.41 12.62
25.24
37.85 50.47
80 1.238 6.25 8.33 12.50
25.00
37.49 49.99
70 1.217 6.19 8.25 12.37
24.74
37.12 49.49

-11
60 1.195 6.12 8.16 12.24
24.48
36.72 48.96
50 1.172 6.05 8.07 12.10
24.20
36.31 48.41
40 1.148 5.98 7.97 11.96
23.92
35.87 47.83
30 1.124 5.91 7.88 11.81
23.63
35.44 47.26
20 1.098 5.83 7.77 11.66
23.32
34.97 46.63
10 1.073 5.75 7.67 11.51
23.02
34.52 46.03
7)Batteryinstallation
Tightenthebatterycablestobatteryterminalswithtorque of95-105lbs.inchor10.7-11.9N.M.Makesurethere
isnothingelsebetween the batterycablelugandbatteryterminalpost.
W
W
Wa
a
ar
r
rn
n
ni
iin
n
ng
g
g:
:
:
Whenworking withthebattery,DONOTputwrenches oranyothermetalobjectsacross thebattery
terminals, otherwise, anarccanoccur, and itmay causeexplosion ofthebatteryand physical injury.
Batteryisinstalledorreplacedonlybythequalifiedelectrician.
7.2Maintenance oftheGearBox:
①Theclearancefortheclutchshouldbekept between 2-3mm.
②Thefriction plateshouldbechanged periodically;thefriction value on oneside shouldnotexceed 2mm.
③Adjusttheflatness oftheplatenspringplate(feelingmanually):firsttighten thescrewsdiagonally,useyour
hand tocheck the flatness ofthe springplate. Ifnot flat, tighten thescrewsforthe non-flat part.
④Changethe gearoil inside the gearboxperiodically(fornewvehicle,changethe oil afterone monthor
accumulated runningdistanceexceed 1200kms;changethe oil againtwomonthslater,then changetheoil
everyhalfayear) Theoil typeis85W/90GL.
⑤Clean the gearboxbeforechangingthe oil.
C
C
Ca
a
au
u
ut
t
ti
iio
o
on
n
n!
!
!
Nevermixdifferent oils.
7.3Maintenance oftheTractionMotor
①Thistraction motorisdesigned touseatthesea levelnotbeyond1200 metersand inatemperature
between -25℃and40℃.
②Thismotorcan workproperlywithavoltageproduced bybatteryinseries.
③Neverkeepthe motorrunningidly.
④Noexplosivegasshall exist inthe air.
⑤Anymud,sand andotherclingingobjectsshall often becleanedawaysoastoprovide good heat-radiation.
⑥Check the carbon brusheverythree months,changetheworncarbon brushandweaken carbon brush

-12
press spring.
Trouble-ShootingforMotor:
W
W
Wa
a
ar
r
rn
n
ni
iin
n
ng
g
g:
:
:
OnlyQualified Electrician Can Changeand Adjust The carbon Brushand Commutator.
Item SymptomsPossibleCauses
1 All copperplatesturnblack. Thepressureofbrushisincorrect.
2 Thecommutatorturnsblack
inacertainorderandin
groups.
Shortcircuitinthe commutatororarmaturecoil;poor
weldingordisconnection between the commutators
and the armaturecoil.
3 Thecommutatorturnsblack
indisorder.
Thecentrallineofthecommutatordeviatesorits
surfaceisnot round and not smooth.
4 The brushwearsout, turns
colorsand becomebroken.
The motorvibrates;the clearancebetween the brush
and itsholderistoobig;the clearancebetween the
brushand commutatorsistoo big;the micabetween
differentcommutatorsextrudes;thebrushismade by
wrongmaterials; the brushiswrongintype.
5 Bigsparkles Themotorisover-loaded;thecommutatorsarenot
clean,notroundornotsmooth;micaorsome
commutatorsextrude;thebrushisnotground
properly;thebrushisbiginpressure;thebrushis
wrongintype;the brushisjammed inthe brush
holder;thebrushholderbecomelooseorvibrating;
the polarityand sequenceofmagneticpolesbecome
wrong.
6 Thebrushand itswiresget
hot.
Bigsparklesofthe brush; poorcontact between brush
and soft wires; small section area ofsoft wires.
7 Thebrushisnoisy Thesurfaceofthe commutatorsisnot smooth.
7.4Maintenance oftheSpeedController
The speed controllerofthe vehicleiswhollyimported, whichadoptshighfrequencyMOStechnologytorealize
the controlofspeed, torque andbrakewithsmoothness, silence, highefficiencyandenergy-save.
·Preventthe vehiclerunswaywhen starts. When the vehiclestarts,the controllerwill inspectsignalfromthe
accelerator,ifsignalexceeds20%,theHPD(protection unitinthecontroller) willprohibitthe outputof
controller.

-13
·When the vehiclestarts,the SRO (protection unit inthe controller) will effect.
Thecontrollerwill self-check when thevehicleisrunning.Ifanydefectinspected,thecontrollerwillstopthe
vehicletoprotect the operatorand thevehicle.
①PeriodicalMaintenance:
a.Check ifthe contactbetween contactingpointsofthe contactorisingood condition,check ifanycontact
sticks orisjammed mechanically.
b.Check ifthe microswitchinthe acceleratorcan beswitched on and offproperly.
c.Check ifthe switchforturnsignalcan beswitched on and offproperly.
c.Check ifall the connectionsbetween the motor, the battery, andthecontrollerareingood condition.
Pleaseusethefollowingcleaningprocedureforroutine maintenance:
1)Turnthe powerkeytoOFF position.
2)Removepowerbydisconnectingthe battery.
3)Dischargethe capacitorsinthe controllerbyconnectingaload (suchasacontactorcoil orahorn)across
the controller’sB+and B-terminals.
4)Removeanydirtorcorrosion fromthe connectorareas.The controllershouldbewiped clean withmoist
rag.Dryitbeforereconnectingthebattery.Thecontrollershouldnotbesubjected topressured waterflow
fromeitherastandardhoseorapowerwasher.
5)Makesurethe connectionsaretight, butdo not over-tighten them.
NOTES: All abovechecks shall beperformed underpoweroff.Abovechecks shall becarried out onceevery3
months; afterthe powerkeyturnsoff, the wave-filtercapacitorinthe controllerunit shall keepdischarging fora
fewminutesmore;don’twashtheelectricalpartswithwater.It isallowed toremovedustwithabrushor
high–pressureair.
7.5Maintenance ofBrake System
①Stepthebrakepedalwithaforceof30kgorso, the pedaltravelshouldn’t exceed2/3ofthefull free pedal
travel.
②Theclearanceforthebrakeplateisself-adjusted.Underaforceofaround20kgs,the parking brakehandle
shouldbe fixed inonegearfrom5to10ratchet.When the brakehandleisreleasedcompletely,thebrake
function will stop.
③Inspect and changebrakeshoe,addlubrication intothebrakebearingperiodically.
7.6LubricationoftheWholeVehicle
①Use901 vehiclebrakeoil DOT3asbrakeoil;
②Use1Lof85W/90GLlubrication oil forgearbox;
③Use1Lof90GLhypoidgearoil forthe rearaxle;
④Lubrication points: a. steeringgears; b. horizontalbars; c. steeringball joints; d. bearings;

-14
7.7Running-inofNew Vehicle:
Inordertoguarantee the performanceofthe vehicleand enhanceitsreliabilityand workinglift, all partsin
motorshouldexperienceacertainperiod ofrunning-inbeforethe motorworks withitsmaximumcapacity,thus,
eachnewvehicleisrequired togiveone monthofrunning-intime, detail procedureasperthefollowing:
①Check thelevelsofoil,waterand liquidscarefullybeforerunning-inandfill themasrequested ifinsufficient.
Thetireshouldmeet 145R12 withthe airpressureof 3.5kgf/cm2.
②Duringrunning-intime, the speed shouldbelimited asfollows:
CurrentShift
Model 1 2 3 4
EG6088 100A 50A 50A 55A
EG6118KA, EG6118KB 110A 55A 50A 65A
EG6158K 110A 60A 55A 70A
③Ifpossible, tryyourbest toavoiddrivingon poorconditionsroads.
④Check and tightenregularlythefixingpartsofeachconnectingpoints.
Notes:
1)Toavoidanydamageon thebrakeshoe,handbrakeshouldbe releasedtoitsbottombeforestaringthe
vehicle.
2)Thelubricant forrearpowerassemblymust beapplied andchanged asperuser’smanual.
3)Thebrakesystemmust beadjusted onceevery3months.
4)Theelectricitysystemmustbechecked onceevery3months(especiallymaincircuit)foritsfasteningparts
and wiringconnections.Meanwhilethe contactorshouldbechecked,anydefectivepartsshouldbe
replaced immediately. Itsdust shouldbecleaned bylowpressureair.
5)The electriccontactorseasilybecomehotiftheirmutualcontactisnotingood condition,sospecial
attentionshouldbepaidregularlytotheelectriccontactors.
6)When changingthe fuse, makesurethat thenewfuseisright inrated current.
7)Forthe sakeofsafety, disconnect thepositivepolefromthe batterywhen maintenanceisdone.
8)Neverstepthe acceleratorhardand frequently, whichmayshorten the lifeofthe controller.
9)It isprohibited tofillanyotherliquids(suchasbatteryaddictives,mineralwaterand tapwater)intothe
battery, ONLYthe distilled waterisallowed tofillinthe battery.
10)Donotdriveathighspeed when goingdownhill;slowdownthe vehiclewhen turning;andremind the
passengerstoholdonwhen turningandgoingdownhill.
11)Children arenotallowed toplayinthevehicle;Children shouldbeseatedbetween adultsandvehicleed by
adultswhen thevehicleisrunning.
12)PeriodicMaintenanceCharts
Regularmaintenanceisrequired forthe best performanceand safeoperation ofthevehicle.

-15
W
W
Wa
a
ar
r
rn
n
ni
iin
n
ng
g
g:
:
:
Makesuretoturnoffthe powerkeyand applytheparkbrakewhen youdothemaintenanceunless specified.If
the ownerisnot familiarwiththe maintenanceofthisvehicle, the dealershoulddo the work.
1D –perday1W –perweek1M –permonth1Q –perquarter1Y –peryear
item Descriptions 1D 1W 1M 1Q 1Y
1.Check the liquidlevel.Pleaseadd the distilledwaterif
necessary. Y
2. Chargethe battery Y
3. Tighten the nuton thebatterycable Y
4.Check ifthe batteryisover-discharged (the batterypower
meterflashing) Y
5.Check the liquiddensityofthe battery,standarddensity
shouldbe1.275±0.005(25 ). Y
6.Check ifthe batteryischarged fullyby3ways:a)usingthe
hydrometer; b)checkingthe batterypowermeter;Y
Battery
7. Clean the surfaceofbattery Y
8.Observethe chargingstatus,check ifthe chargerplug
becomeshot. Y
Charger
9.Clean thesurfaceofthe charger.Donotgetanywater
inside the charger. Y
10.Check ifall terminalsaretightened properly.Pleasedo
thisafterthe powerisoff. Y
11. Clean the surfaceofthe controller. Y
Controller
12.Check ifthesolenoidisinorder,checkingitstouching
point. Y
13. Check ifanywatergetsin. Check ifit becomestoo hot. Y
14. Check ifthe carbon brushshouldbereplaced. Y
Motor
15.Check if the acceleratorpedalworks well and if itcan be
released freelyand automatically. Y
16.Check ifthebrakedrumandthebrakeshoeshouldbe
replaced ornot. Y
17. Check ifthe handbrakefunctions.Y
18. Check ifthe hoseand tubeforthe brakeliquidleaking.Y
19.Check ifthe brakeliquidinside the brakeliquidtankis
enough. Y
20.Check theairpressureinside thetire,check ifthetire
surfaceisworn, check ifthe nutsaretightenedproperly. Y
21.Check ifthe shock absorberhasanyoil leaking,flator
abnormalnoise.Y
22.Check if thereisoil leakingonthegearboxandthe rear
end. Y
Chassis
and body
23.Addthe lubricant inside the wheelhub, steeringsystem. Y

-16
24.Adjust the toe-inofthe front end Y
25. Clean the bodyandseat Y
Afterabovemaintenance, drivethe vehicletocheck ifthe vehicleworks properly.
8. Storage
Pleasefollowthe stepsasbelowwhen the vehicleisstored.
1. Check theliquidlevelinside the battery;rechargeit fullybeforestoringthe vehicle.
W
W
Wa
a
ar
r
rn
n
ni
i
in
n
ng
g
g:
:
:
Pleasechargethebatteryonce amonthifyourvehiclewill bestoredmorethanonemonth.
2. Turnthe powerkeytoOFF position, removethe key,and storethekeyinasafeposition.
3. EngagetheHandbrake.
4. Check thetirepressuretomakesureitspressureisset torecommended pressure.
5. Clean the exteriorofthe vehicleand applytherust inhibitor.
6. Coverthe vehiclewithabreathablecoverand storeit inadry, safeand well-ventilated place.
7.Ifthe vehicleisplanned tostoreforalongertime,then pleasecheck theliquidlevelinside the batteryoncea
month, rechargethe battery
9. TroubleShooting
Thereisno settled mode todiagnoseand eliminatethe malfunction ofelectricvehicles.During maintaining
and checking,wesuggestyou firstlisten,thenlookand feel.Belowisthe diagnosesandmaintenanceofsome
common malfunctions.
1)Thevehicledoesn tmove. Turnonpowerkey,stepon the acceleratorpedal,the vehicledoesn’t
move.
Malfunction Possiblereason Troubleshooting
1.Connector(s)inCircuit islooseoropen Tighten orconnect
2.Fuseofcontrollerormaincircuit isopen Changefuse
3.Batterycable(s)islooseordisconnected Tighten orchange
4.Powerkeyisbroken Change
5.Volatmeterisbroken Change
Turnon powerkey,
Voltameterhasno signal
6.Batteryterminalsconnect improperly Adjust
1.Improperoperatingprocedure Operateproperly
2.ControllerFailure Check orChange
3.SolenoidFailure Check, repair, change
4.AcceleratorFailure RepairorChange
5.MotorFailure Repairorchange
6.Parkingbrakedoesn’t loosen Loosenparkingbrake
Turnon powerkey,
Voltameterhassignal.
7.Over-heat protection Check, eliminate

-17
2)Lose control whenvehiclestartsrunning:speedcannotbeadjusted
Malfunction Possiblereason Troubleshooting
1.TerminalsofSolenoidstick together Check, repair
2.Controllerfailure Change
Vehiclerunsatfull speedwhen it
just starts 3.Potentiometerfailure Repair, change
1. Internalshort ofMotor Repair, change
2.Motorisassembled too tight orblocked Repair, change
3.Controllerfailure Repair, change
Vehiclestopsimmediatelyafterit
starts
4.AcceleratorFailure Repair, change
1. ControllerFailure Check, change
2. MotorFailure Check, change
Normalat lowspeed
Weakpowerat highspeed 3.AcceleratorFailure Check, change
3)Vehiclecannotchangedirection:vehiclecanonlyrun intheonedirection
Malfunction Possiblereason Troubleshooting
1. Gearboxfailure Change
Vehiclecan onlyrun in
one direction 2. ControllerFailure Change
4)Possiblereason and troubleshooting ofthemalfunction ofelectricvehiclemechanicsystem
System Malfunction Possiblereason Troubleshooting
1.Clearanceofrearaxledecelerating
gearistoo big, orthe decelerating
gearisbroken Adjust, change
2.Transmission cross shaftwearout Change
3.Gearoftransmission wearout or
damage Change
4. Flangebearingdamage Change
5. Motorbearingdamage Change
Abnormalsound
when running
6.Gearliquidisdeficient orempty Add Gearliquid
1.Clutchcannot separatesmoothly Adjust
2.Gearshift tightwiredamage Change
3.Gearinside transmission case
wearout Change
Transmission
System
Hardtoshift gear,
and/orgearshift
jumpsindifferent
positions 4.Orientationpinloosen Change
1. Pressureoffront tireisdeficient. Check the pressure
and Inflate
2. ScrewplugofRedirectoristoo
tight Adjust
3.Lack oflubeinredirector Maintain add lube
SteeringSystem Steeringheavy
4. Toe-inabnormal Adjust
This manual suits for next models
3
Table of contents
Other Eagle Utility Vehicle manuals
Popular Utility Vehicle manuals by other brands

Midland
Midland SIDE DUMP GRAVEL TRAILER Operator's manual

Cushman
Cushman Front Line 898810 Operator's manual

Curtis
Curtis KUBOTA B2650 Installation & owner's manual

Atlanta
Atlanta 701D Technical manual

Bomag
Bomag BMP 8500 Operating and maintenance instructions

Taylor-Dunn
Taylor-Dunn B0-210-36 Service and Replacement Parts Manual