eaReckon EARebound User manual

User manual 1
–––
USER MANUAL
(Revision EN-1.0.0)

2eaReckon EARebound

User manual 3
EARebound
USER MANUAL

4eaReckon EARebound
Table of contents
ABOUT THIS MANUAL ........................................................................................................................................... 5
Credits ..................................................................................................................................................................... 6
Introduction.............................................................................................................................................................. 7
System requirements............................................................................................................................................... 8
Installation ............................................................................................................................................................... 8
Demo version...................................................................................................................................................... 8
Full version.......................................................................................................................................................... 9
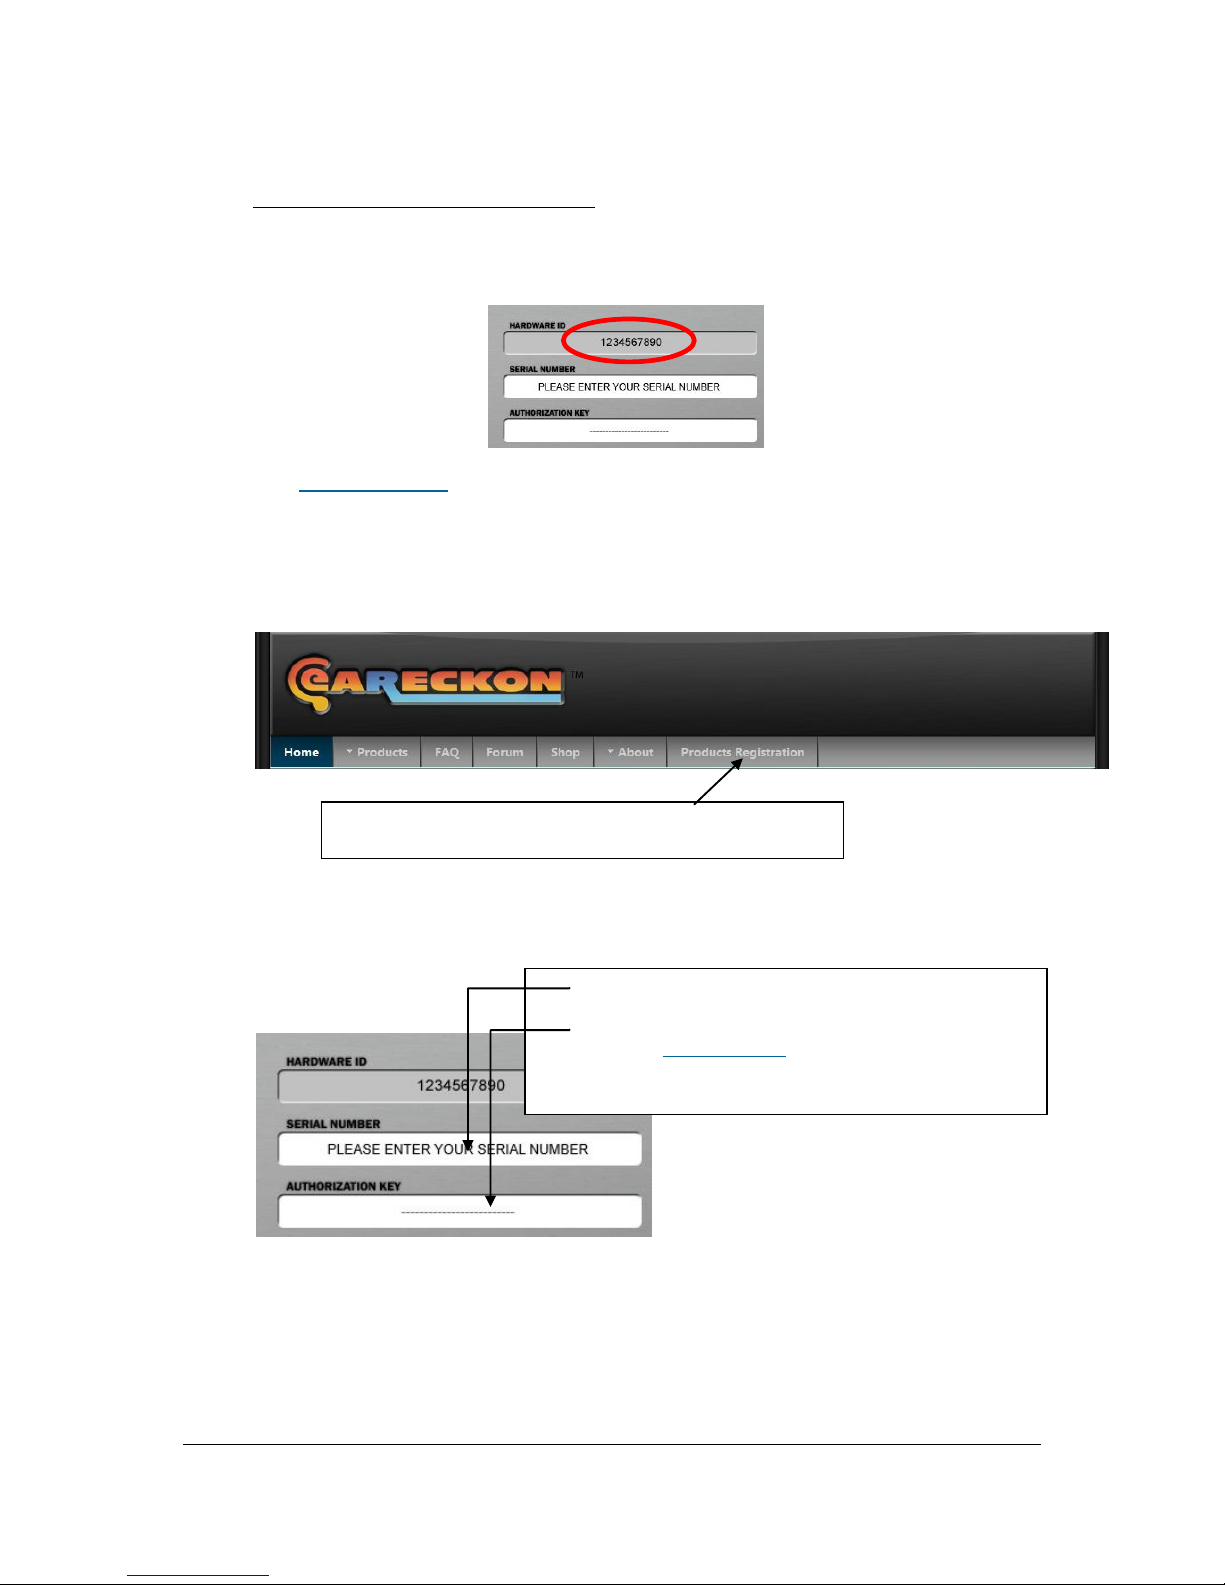
How to authorize the software by using codes ............................................................................................... 9
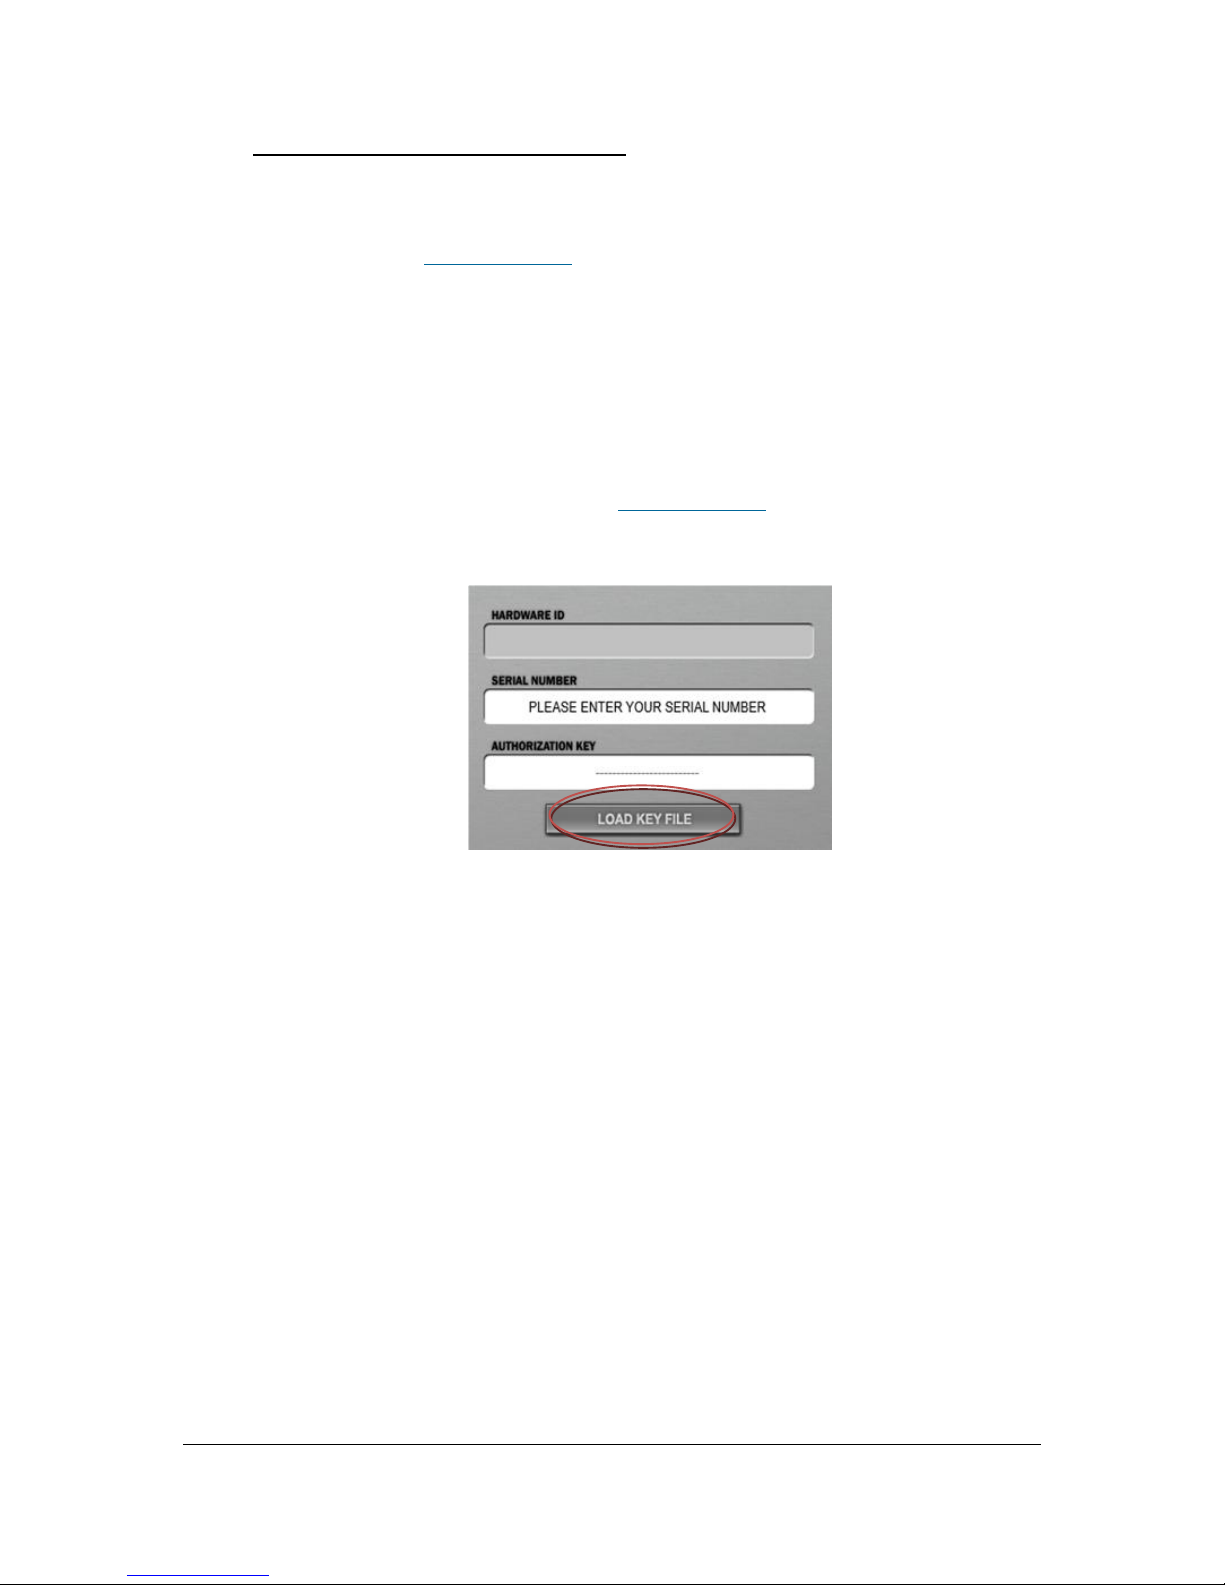
How to authorize the software by using a Key File ....................................................................................... 10
Quick Overview ..................................................................................................................................................... 11
Top Panel .............................................................................................................................................................. 13
Bottom Panel......................................................................................................................................................... 14
Main View.............................................................................................................................................................. 15
A. Global Settings......................................................................................................................................... 15
B. Individual Settings .................................................................................................................................... 18
1. Saturation............................................................................................................................................. 19
2. Filters ................................................................................................................................................... 19
3. Modulation ........................................................................................................................................... 20
4. Level .................................................................................................................................................... 21
5. Position ................................................................................................................................................ 21
6. Delay Time........................................................................................................................................... 22
Alternative views.................................................................................................................................................... 23
A. Time Line.................................................................................................................................................. 23
B. Mix View................................................................................................................................................... 24
MIDI Control .......................................................................................................................................................... 25
MIDI Learn ........................................................................................................................................................ 25
MIDI Note / CC.................................................................................................................................................. 26
Saving MIDI settings ......................................................................................................................................... 26
Appendix: End User License Agreement (EULA).................................................................................................. 27

User manual 5
ABOUT THIS MANUAL
The information in this document is subject to change without notice and does not represent a
commitment on the part of Philippe DECUYPER (eaReckon).
Some screenshots in this manual may show the interface of 3rd party products that are not
delivered with this eaReckon product.
In addition, screenshots included in this manual may differ from the actual product.
THE SOFTWARE DESCRIBED IN THIS DOCUMENT IS FURNISHED UNDER A LICENSE
AGREEMENT OR NONDISCLOSURE AGREEMENT. THE SOFTWARE MAY BE USED OR COPIED
ONLY IN ACCORDANCE OF THE TERMS OF THE AGREEMENT.
PHILIPPE DECUYPER (EARECKON) MAKES NO WARRANTY OF ANY KIND WITH REGARDS TO
THIS MATERIAL, INCLUDING, BUT NOT LIMITED TO, THE IMPLIED WARRANTIES OF
MERCHANTABILITY, NON-INFRINGEMENT AND FITNESS FOR A PARTICULAR PURPOSE.
PHILIPPE DECUYPER WILL NOT BE LIABLE FOR ERRORS CONTAINED HEREIN OR FOR
INCIDENTAL OR CONSEQUENTIAL DAMAGES IN CONNECTION WITH THE FURNISHING,
PERFORMANCE OR USE OF THIS MATERIAL.
eaReckon and the eaReckon logo are trademarks of Philippe DECUYPER.
VST is a trademark of Steinberg Media Technologies GmbH.
Microsoft and Windows are either registered trademarks or trademarks of Microsoft Corporation in
the United States and/or other countries.
Apple, Mac, Mac OS and Audio Unit are trademarks of Apple Computer, Inc., registered in the U.S.
and other countries.
Intel is a trademark of Intel Corporation in the U.S. and/or other countries.
Other company and product names are trademarks or registered trademarks of their respective
owners.
This manual is copyrighted © 2013 Philippe DECUYPER (eaReckon).
No part of this document may be transmitted in any form or by any means, electronic or mechanical,
including photocopying and recording, for any purpose without the express written permission of
Philippe DECUYPER.

6eaReckon EARebound
Credits
Conception, Development & Artwork Philippe DECUYPER
English manual correction and proofreading John Braner [http://www.soundclick.com/johnbraner]
BETATESTERS
Far more than just a dream team of bug hunters... THANK YOU SO MUCH !
Kevin AFFLACK, John BRANER, Jörg HARKENER, Brad HOLLAND, Joris HOLTACKERS,
Dax LINIERE, Theodore MANDYLAS, Jerry MATEO, Dave MODISETTE, Dieter POLLATSCHEK,
Marco SPIES.
ADDITIONAL THANKS
Marie MASSON and Lucas DECUYPER for their support and patience.
The TOONTRACK team
Special thanks to Mattias EKLUND, Rogue MARECHAL,Erik PHERSSON and Andreas SUNDGREN.
Dax Liniere (Puzzle Factory) for his suggestions and expertise on some critical parts of this product.
THIRD PARTY TECHNOLOGY
-VST Plug-In Technology by Steinberg Media Technologies GmbH.
-Audio Unit version implemented using Symbiosis version 1.2
Copyright (c) 2010 - NuEdge Development / Magnus Lidström. All rights reserved.
Symbiosis is released under the "New Simplified BSD License".
-XML processing implemented using the pugixml library (http://pugixml.org).
Copyright (c) 2006-2012 - Arseny Kapoulkine.
pugixml is distributed under the MIT license.

User manual 7
Introduction
First of all, thank you for your interest in EARebound!
This plug-in has been originally thought to meet a specific need: quickly create rhythm lines from percussive
sounds recorded in various environments (natural, urban, industrial...).
Recording these sounds, processing them through (carefully selected) effects in order to obtain multiple versions
of them, loading and mapping them in a sampler, placing them in space, … takes a considerable amount of time
and can be an obstacle to spontaneous creativity. In addition, even if we are satisfied with the results after hours
of hard work, this rhythmic grail cannot be easily modified as we would like during live situations.
The idea behind EARebound was to create an effect featuring 15 delay lines and a workflow similar to the one
provided by a good old drum machine. This tool had to offer 16 commutable and synchronized “steps”, with each
of them being independently shaped and placed in space by a series of dedicated effects. A confidential
prototype was then born in 2011, offering 15 delay lines, a saturation module, two filters, a chorus and a
positioning tool. This prototype was enough to create rhythm lines from any kind of recorded sounds within a
couple of minutes. It was already lots of fun and saved time!
Later, this pre-version was subject to some enhancements in order to get something presentable enough to be
sent to the test team...
... and it turned out that not everyone shared my obsession for environmental percussive sounds (which some
would consider as pathological)!
Soon, it became obvious that EARebound had the potential to evolve into a much more universal product. This
evolution took about one year of additional development and test cycles.
Now, EARebound can be used as a 'simple' multi-effects unit, a multi-tap delay, a positioning tool in the context of
surround or stereo mixes and, of course, as a combination of these.
EARebound provides a pretty intuitive way to create rhythm lines from almost any sound material, but it can also
be used to improve or add some complexity to existing loops, sublimate guitar or synth parts and finally, subtly fill
the space with small sonic elements that will enhance your tunes as rare spices on the best dishes.
Whatever your musical preferences, I hope that we will share this same pleasure and inspiration provided by
EARebound.
Philippe DECUYPER

8eaReckon EARebound
System requirements
PC:
Operating system : Windows XP, Windows Vista or Windows 7, Windows 8 (32 or 64 bits)
Processor : Intel Core2Duo (minimum)
RAM : 1 Gb (minimum)
Mac:
Operating system : Mac OS X (10.5, 10.6, 10.7 or 10.8)
Processor : Intel Core 2 Duo (minimum)
RAM : 1 Gb (minimum)
EARebound is a 32/64bit VST plug-in for Windows and a 32/64bit VST/Audio Unit plug-in for Mac.
A compatible host is required to load them.
Access to the Internet is required to authorize the software (if EARebound is installed on a computer that does
not provide an access to internet, you can use another computer to get authorization codes).
Installation
EARebound is delivered as multiple setup applications.
Please double-click on the setup file that matches your system. Then you will be guided through the installation
process.
The installation of a plug-in implies the acceptation of the End User License Agreement (EULA).
Demo version
Once installed, demo versions are ready to be used. This manual is related to the full version and some features
described here are not available in the demo version.
Demo and Full version are different binary files. It’s not possible to “transform” the Demo version to the Full
version.
If you want to purchase the full version of EARebound, please go to www.eareckon.com. A link to the full version
setup application will be made available after your purchase is validated.

User manual 9
Full version
How to authorize the software by using codes
1. Before using an eaReckon plug-in, you need to register and authorize it. To do so please load the plug-
in in your favorite host. The plug-in will display your Hardware ID.
2. Go to www.eareckon.com.
Create and/or log into your user account to register your product and get your Authorization Code
(your Hardware ID is required).
Your customer account (used to purchase products from the online shop) and your user account
(used to register and authorize your products) are different things.
3. Enter your serial number and authorization code in the plug-in.
Use this button to register your product and get your authorization codes.
This button may not be visible if you are not logged into your user account.
1. Enter your serial number (or paste it from the clipboard using the
paste button)
2. Enter or paste the authorization code
(given at www.eareckon.com)

10 eaReckon EARebound
How to authorize the software by using a Key File
Once your serial number registered in your eaReckon user account and as soon as your personal
information has been (manually) checked by eaReckon, a Key File will be available in your « Products
Registration » page at www.eareckon.com).
This file is an easy way to authorize the software on several computers without having to request a new
authorization code. Validity of this key file is not time limited.
This file does not contain explicit personal data. However, eaReckon will have the possibility to identify
the user who downloaded this “watermarked” file.
You are responsible for making sure this file does not get into illegal circulation.
To authorize the software by using a Key File, please press the « Load Key File » button and select your
Key File (downloaded from your user account at www.eareckon.com).
Thank you for taking the time to install and authorize your product!

User manual 11
Quick Overview
EARebound offers different tools to sculpt an audio signal and/or place it in space.
Let’s forget about the 16 delay lines for a while (even though these represent a major part of the plugin!), in order
to focus on the following effects:
Effects Set
1. Saturation
Different types of saturations and distortions are accessible from the interface, from the lightest to the
most devastating ones.
This effect will shape the original signal by generating additional harmonics and applying some filters.
2. High-pass (low cut) and low-pass (high cut) filters
These filters attenuate the presence of low or high frequencies. The combination of both can be used as
a customizable “band pass” filter.
Tip:
The combination of saturation and filter modules will help you to sculpt the incoming signal in order to
obtain a distinct version of the original.
For example, it is possible to get a high pitched sound from a rich enough kick drum which can then be
used as a "shaker" in the context of a percussive line.
3. Modulation
The modulation module’s purpose is mainly to place the sound in space.
Two types of modulation are available:
- (Quad) Chorus: acts on pitch and can be used to make the signal “thicker” and/or distribute it in the
stereo field.
- (Quad) Tremolo: acts on volume and can be used to make the sound travel through the stereo field.
More detailed information are available in this manual.
1
2
3
4

12 eaReckon EARebound
4. Position
EARebound features 6 audio outputs (3 stereo pairs) : “Main”, “Aux”, “LFE”.
In "Multi Chn" mode, the positioning pad can be used to adjust the amount of signal sent to both “Main”
and “Aux” outputs (vertical axis) and the stereo panning applied to both these outputs (horizontal axis).
This control can be useful in the context of a "surround" mix but doesn’t have to be. Indeed, we may just
want to apply a third-party effect (a reverb or a 3D positioning tool, for example) to the “Aux” output in
order to get some more custom results.
This brief description of EARebound’s featured effects highlights a deliberate choice to offer two categories of
tools: shaping and placement tools.
These effects allow you to create distinct versions of the original sound. Each of them can then be used to
create rhythmic lines thanks to the...
Fifteen Delay Lines + an extra Global Delay option
With EARebound synchronized to the host tempo, you won't have to worry about the time placement of the
generated elements.
Each pad on the bottom panel corresponds to a delay line (except the first one which is dedicated to the
“source”). By default, delay times are set so we get all 16th-notes (1/16) of a 4/4 bar. If you’ve already used a
vintage rhythm box or a "step sequencer", these rectangular pads should look familiar to you.
It is also possible to apply a totally different delay time to each delay line (this will be described later in this
manual).
The first fifteen delay lines (including their dedicated set of effects) are independent of each other and it is then
possible to apply different effects/settings to each of them.
Finally, the global delay line can be used to create loops or very special effects from patterns built with the first
fifteen delay lines.

User manual 13
Top Panel
Enable this switch to synchronize
EARebound to the host tempo.
Manual adjustment of the
tempo.
Presets Manager
Right-click on the white screen to access the presets menu.
Use the buttons to browse through the presets.
User Presets
-Save current configuration as a preset which will appear in the “USER PRESETS”
category of the menu.
-Delete preset (only available when a user preset is selected).
-Rename preset (only available when a user preset is selected).
-Move the selected preset up in the list (user presets only).
-Move the selected preset down in the list (user presets only).
Tip: In live situations, it is quite practical to have user presets related to a song correctly ordered so
we can use the buttons to switch from one to the other.
Only one instance of EARebound (the “Master instance”) is allowed to
modify presets in order to avoid corrupting presets. By closing the interface of the “Master
Instance”, you will allow another instance of EARebound to modify presets.
Regularly click this button
to set the tempo.
Random
Should you need some instant inspiration, use the Random button to randomly configure the plug-in.
Please note that global settings (input level, send level, send FX mix, dry/wet mix, etc.) are not affected by this function.
Generating random settings without any control could create some weird effects. Hopefully, you can modify the behavior of the
Random function by pressing the “random settings” button: .
By default, the randomizer will generate a 16th sequence of filtered and centered taps featuring some light saturation and a
progressive stereo spread effect. These settings should work on most projects.
That said, some settings will probably work better on some specific sources. For example, the “8thD/8th” options of the “Delay
Time” sub-menu may seriously give some bite to a straight 175 BPM DnB drums loop!
« View » selector.
Panic Button
Should you experience
uncontrollable audio
mayhem, just press
the Panic button to
instantly and smoothly
clean all delay lines.
Please note that once
cleaned, delay lines
will not be deactivated
(in other words, the
panic button will not
change current
settings.)
It is also advised to
stop sending audio to
EARebound before
pressing the Panic
button!

14 eaReckon EARebound
Bottom Panel
Press the "EDIT" button to view and
adjust effects applied to the source
(first button) or to a delay line.
Activate or deactivate delay
lines with these rectangular
buttons.
Enable or disable effects
applied to the source.
Mute or un-mute direct input signal.
Note: the input signal ("source") will always be sent to delay lines whatever the
state of this switch.
To prevent it being sent to delay lines, please use the "Send Level" fader.
Activity indicators
These tiny LEDs indicate whether or not a signal is coming out of a specific delay line.
Please note that the two indicators dedicated to the source (“IN”) are related to the processed input
signal (once it has passed though saturation, filters and other FX modules) and not to the raw signal
received by the plug-in.
Gray: Level < -50dB
Green: -50dB < Level < -3dB
Yellow: Level > -3dB
Global Delay Line
This delay line processes the combination of signals coming out of the fifteen other delay lines and the
(processed) source signal. You can choose to include ( ) or exclude ( ) the (processed) source signal
from this global delay line.
Once a pattern is created with delay lines 2 to 16, this global delay can be used to make it loop. It can also be
temporarily activated, to create very special effects.
As other delay lines, the global delay line can be processed by its own set of effects.
Please note that this special line will receive a stereo version of other delay lines (+ source). The Main/Aux
“position” of these will be ignored by the global delay line.

User manual 15
Main View
A. Global Settings
Global settings are only accessible from the 'Classic View'. They have an overall impact on the plug-in (and not
only on the source or a delay line in particular).
These parameters are mostly related to inputs and outputs of EARebound.
(1) Output mode
EARebound has 3 pairs of outputs and features
two output modes.
Stereo : in this mode, the “Aux” (and “LFE”) outputs are unused and the vertical
position of the ‘position’control is ignored.
Multi Channel : in this mode, the vertical position of the ‘position’
control can be used to adjust the level of the selected delay line
(or source) sent to “Main” and “Aux” outputs.
More information about output modes is available on the next page.
(2) Low frequency settings
If "Split LF" is enabled, low frequencies (as defined by the "XOVER" parameter) are processed
differently.
You can “monoize” LF by activating the switch.
Finally, you can adjust the level of low frequencies by using the "LF GAIN" potentiometer.
Should you want to keep your LF settings untouched when browsing presets, please activate the
switch.
The “Pre/Post” option is described on the next page.
Input level.
Amount of input signal sent
to delay lines.
This fader can be used to define the proportion of
processed/unprocessed input signal to be sent to delay
lines.
Output mode (1).
Dry (unprocessed) / Wet (processed) mix.
Overall output
level.
Low frequency settings (2).

16 eaReckon EARebound
INPUT MAIN OUTPUT
INPUT MAIN OUTPUT
INPUT MAIN OUTPUT
INPUT
MAIN OUTPUT
AUX OUTPUT
LFE OUTPUT
AUX OUTPUT
LFE OUTPUT
AUX OUTPUT
LFE OUTPUT
AUX OUTPUT
LFE OUTPUT
Depending on the state of “MultiCh/Stereo”, “SplitLF” and LF “Pre/Post” options, the routing of low frequencies
can be very different and suit many situations.
Basic stereo routing:
Basic multi-channel routing:
Stereo routing with adjustable LF –LF are processed by the source effects and delay lines:
Stereo routing with adjustable LF - LF do not reach the source effects and delay lines:
TO MAIN
TO AUX
Tip: This configuration avoids effecting the low frequencies, which can often result in muddy mixes.

User manual 17
INPUT
MAIN OUTPUT
INPUT
MAIN OUTPUT
LFE OUTPUT
AUX OUTPUT
AUX OUTPUT
LFE OUTPUT
Multi-channel routing with adjustable LF –LF are processed by the source effects and delay lines:
Multi-channel routing with adjustable LF –LF do not reach the source effects and delay lines:
TO MAIN
TO AUX
TO MAIN
TO AUX
Tip: This configuration avoids effecting the low frequencies, which can often result in muddy mixes.

18 eaReckon EARebound
B. Individual Settings
These settings allow you to adjust the effects applied to each delay line or the source itself.
For example, adjusting the amount of saturation applied to the first delay line will not affect the saturation applied
to the other ones.
To select the element to which changes will be applied, please click on the corresponding “EDIT”button (bottom
panel).

User manual 19
1. Saturation
You can choose from 7 types of saturation / distortion.
2. Filters
These two filters provide a way to pass frequencies within a range defined by a low and a high cutoff
frequency (they will attenuate frequencies outside this range).
ERD-1 adds presence to the signal while giving it a vintage character. It has an
obvious impact on mid frequencies while lowering the presence of high
frequencies. ERD - 1 is particularly suitable for the creation of distinct
elements in the context of a rhythm line.
These modules could probably be compared to overdrive/distortion like those
we find on a guitar pedal. DIS-1 provides an overdrive-like saturation while
DIS-2 has been designed to be very destructive.
'VBs' are emulations of tube saturations. They will add some warmness to the
signal as an old guitar preamp would do. VB - 2 is a more aggressive version of
the VB-1 module.
‘VAs’, as ‘VBs’, are emulations of tube saturations.
However, VAs affect low and high frequencies more than VBs do (VBs have a
more important impact on med frequencies).
Low-pass filter –Cutoff frequency.
High-pass filter –Cutoff frequency.

20 eaReckon EARebound
3. Modulation
This module can be used to get a “thickened” sound, to spread it in the stereo field, or make it “move”
around in space.
The modulation module consists of four chorus (or tremolo) lines. Two of them are applied to the right
channel and the other two to the left channel of the incoming signal.
About the UNSYNC and OFFSET parameters...
These parameters are powerful, but they are not very easy to understand at first.
It probably would have been easier to just implement a menu providing a few meaningful presets but we wanted to offer
more flexibility at the cost of some added complexity in order to satisfy the sound designer in you.
You will find some modulation presets in the Quick Modulation Settings menu that should demonstrate the possibilities
offered by these two uncommon parameters.
Offset
This setting can be used to “shift” the modulation
curve applied to each mod line.
Depth (amplitude).
Unsync
Use this setting to make modulation lines slightly
out-of-sync.
By setting it to 0%, the four mod lines will have the
exact same frequency (= RATE).
Increase the value of Unsync to apply a more and
more different rate to each mod line.
Rate - Frequency (speed) of the
modulation.
Note: This setting is not available
when the modulation is
synchronized to tempo.
Width
This knob can be used to spread the
sound in the stereo field.
It also affects the complexity of results.
When Width is set to 0%, only two mod
lines (instead of four) are active.
Note: This setting has an effect even if
LFOs are not active (DEPTH = 0%)
Use this menu to synchronize the 'RATE'
parameter to the current tempo.
Set it to ‘KNOB’ if you want to freely set
rate by using the ‘Rate’ knob.
Use this switch to select the modulation type.
CHORUS : Quad Chorus (pitch modulation).
TREMOLO : Quad Tremolo (level modulation).
Use this to control the mix of processed and
unprocessed signals.
Quick Settings menu
This menu contains some comprehensive
modulation presets. These will probably help you
to understand what is under the hood of the
UNSYNC and OFFSET knobs…
Table of contents
Popular Recording Equipment manuals by other brands

GSS
GSS STS 1916 IPSR CT CI Assembly instruction

Mitsubishi Electric
Mitsubishi Electric DX-TL4516U series user guide

Tascam
Tascam US-322 quick start guide

PIONEER DJ
PIONEER DJ Toraiz Squid operating instructions

Wheatstone Corporation
Wheatstone Corporation EMX user manual

Roland
Roland Edirol R-44 owner's manual