EAS Electric EMTD7EC User manual

www.easelectric.com
Secadora
Tumble Dryer
MANUAL
EMTD7EC
Before using your tumble dryer, please read
this manual carefully and keep it for future
reference.
Lea este manual de Instrucciones antes de
usar el aparato. Y consérvelo para futuras
consultas.
V.1

1.
2.
Este producto pertenece a la categoría de aparatos eléctricos, y es sólo para
el secado de textiles, los cuales han sido lavados con agua en el hogar. Por
favor preste atención a las notas de seguridad.
La toma de corriente donde conecte esta secadora debe estar conectada a la
conexión a tierra de la instalación eléctrica de la vivienda
3. El cable de alimentación de la secadora debe ser capaz de soportar una carga
de16A. Si no fuera así adapte la toma de corriente para cubrir las necesidades
de alimentación eléctrica del aparato.
4. La capacidad máxima de carga de la secadora es 8kg de material textil seco.
5. No seque productos que hayan sido limpiados con productos químicos industriales.
6. Productos que hayan sido ensuciados de aceite, acetona, alcohol, disolventes,
gasolina, queroseno, cera y eliminadores de ceras, deben ser lavados en agua
caliente con una cantidad extra de detergente antes de su secado en secadora.
7. Los artículos hechos de espuma de latex, espuma de goma y materiales
impermeables no deben secarse en la secadora.
8. La última parte de cada programa de secado consiste en un ciclo de enfriamiento
(sin aplicación de calor) para evitar el deterioro de las prendas por un cambio
brusco de temperara.
9. El filtro de las pelusas debe ser vaciado con frecuencia
10. No permita que se acumule suciedad o pelusas sobre la secadora y su entorno.
11. Asegúrese de que haya una buena ventilación en el lugar donde ubicará la
secadora, para evitar la acumulación del calor y/o los gases.
12. PRECAUCIÓN: No detenga la secadora antes de finalizado el ciclo completo de
secado, a menos que las prendas sean rapidamente extraidas y extendidas para
que disipen el calor.
13. El electrodoméstico no debe ser instalado tras una puerta con cierre o corredera,
ni tras una puerta con las bisagras en el lado opuesto a las de la puerta de la
secadora, para que sea posible abrir completamente la puerta del aparato.
14. Mantenga las mascotas alejadas de la secadora.
Información de seguridad
Información de seguridad..........................................................................................1
Visión general de la secadora...................................................................................3
Precauciones.............................................................................................................4
Instalación..................................................................................................................6
Cuadro de mandos....................................................................................................7
Tabla de programación.............................................................................................8
Condiciones de garantía comercial...........................................................................9
Advertencias y consejo............................................................................................10
Limpieza y mantenimiento.......................................................................................11
Reinicio seguridad...................................................................................................12
Resolución de problemas........................................................................................13
Descripción de otras funciones y especificaciones técnicas...................................14
Ficha técnica del producto.......................................................................................15
V.1
V.1

Información de Seguridad
2
Visión general de la secadora
3
15. Los artículos que contengan restos de combustible, se pueden inflamar al estar en
contacto con focos de calor como la secadora, asegúrese de haber eliminado cualquier
residuo de material inflamable antes de introducir el artículo en la secadora para evitar
el cualquier riesgo de incendio.
16. La máquina no debe ser volcada durante su uso o mantenimiento.
17. Antes de introducir cualquier prenda asegúrese de que no haya ningún objeto en
los bolsillos.
18. Este electrodoméstico puede ser utilizado por niños mayores de 8 años y personas
con capacidades físicas o mentales reducidas, falta de experiencia y conocimiento, si
han tenido instrucciones relativas al uso del aparato de forma segura y entienden los
riesgos que conlleva, o bien bajo supervisión. Los niños no deben jugar con la
secadora. La limpieza y mantenimento de la misma no puede ser realizada por niños
sin la supervisión de un adulto.
19. Si el cable de alimentación esta dañado, debe ser reemplazado por el fabricante,
el servicio técnico o personal cualificado.
20. Este electrodoméstico es solo para su uso en interiores.
21. La apertura de la puerta no debe obstaculizarse.
22. Los niños menores de 3 años deben de mantenerse alejados de la secadora o
bajo continua supervisión.
23. Si el aparato se calentara más de lo normal por favor desconecte el enchufe.
24. El cable de alimentación debe cumplir con la normativa y ser capaz de soportar los
valores eléctricos que aparece en la tabla más abajo.
Descripción del producto
1. Tablero superior 6. Filtro de pelusas
2. Panel de control 7. Tubo flexible
3. Puerta 8. Enchufe de alimentación
4. Panel frontal 9. Interruptor
5. Panel lateral 10. Tambor
Advertencias antes de uso
La secadora utiliza una corriente alterna con una tensión nominal y frecuencia específica. El
voltaje fluctúa aproximadamente al 6% de tensión nominal para que la secadora trabaje.
La toma de corriente y el cable de conexión a tierra deben ser instalados por un electricista
para asegurarse una correcta instalación . En el caso de que el cable de alimentación se dañe,
este debe ser reemplazado por personas cualificadas.
V.1
V.1

45
Precauciones Precauciones
Instale o guarde el aparato en el lugar donde no esté
expuesto a las condiciones variables del clima, ya
que podría causar daños permanentes e invalidar la
garantía.
Mantenga la salida de aire y las áreas que rodeen a la
secadora limpies de pelusas, polvo y suciedad. Una toma
obstruida, puede reducir el flujo del aire.
Centrifugue las prendas antes del proceso de secado,
esto disminuye el tiempo de secado y ahorra energía.
Asegurese de que ningún combustible en
aerosol esté cerca de la secadora cuando esté
en funcionamiento.
Evite lavar prendas de ropa que hayan sido
manchados con substancias combustibles o
explosivas, tales como ( cera, aceite, pintura...)
No intente enchufar el aparato si está dañado,
está parcialmente desarmado, o si le falta alguna
pieza.
No permita que los niños se suban al aparato o se
metan dentro de él.
Evite utilizar el aparato con manos o
pies mojados.
No coloque en la parte superior de la secadora materiales
plásticos, papel o ropa, ya que podrían quemarse durante
su funcionamiento.
El aire de desecho no debe ser descargado en
una tubería que sea utilizada para desechar
humos de aparatos que queman gas u otros
combustibles
Evite secar artículos que contengan caucho, plástico o
materiales similares tales como sujetadores de relleno,
deportivos, botas de agua, baberos, impermeables.
Algunos materiales de plástico al ser calentados, pueden
bajo ciertas circunstancias producir fuego por combustión
espontánea.
La puerta de la secadora solamente se puede abrir
cuando la secadora esté parada. Evite abrir la
puerta antes de que el programa haya finalizado
para evitar quemaduras en la piel por el vapor.
Simbolos informativos sobre el secado
V.1
V.1

67
6 7
67
Instalación
Transporte
Debe transportarse con cautela. No sujete las piezas más destacadas de la máquina. Al levantarla
no la debe agarrar de la puerta. Si la secadora no se puede transportar recta, puede girarla hasta
un ángulo de 30º.
Posición de instalación
1. Es recomendable que, por su conveniencia, la máquina se coloque cerca de la lavadora.
2. La secadora debe ser instalada en un lugar limpio, donde la suciedad no se acumule.
No obstruya ni la entrada ni la salida de aire en la parte trasera de la secadora.
3. Para disminuir las vibraciones y el ruido cuando la secadora esté en uso, debería ser
colocada en una superficie llana.
Nivel de ajuste
Una vez esté en la posición definitiva, compruebe
que la secadora está absolutamente nivelada. Si no
lo está, ajuste las patas con una herramienta.
Conexión de la fuente de alimentación
1.Asegúrese que la tensión de la fuente de alimentación es la misma que la que figura
en las especificaciones de la secadora.
2. No conecte la placa de conexión de alimentación al enchufe universal o zócalo.
Cuadro de mandos
Siga las instrucciones para iniciar y utilizar su nueva secadora. Lea las secciones específicas de este
manual para obetener una información más detallada. Advertencia importante: para reducir el riesgo de
incendios, choques eléctricos o lesiones a personas. Lea este manual correctamente antes de hacer
funcionar la secadora.
1. Pulse la tecla TIMBRE para seleccionar las funciones de señal de encendido o apagado.
La alarma se iniciará al finalizar el ciclo. Pulse la tecla (ENCENDER/APAGAR) y
desenchufe el cable de alimentación.
2.
3.
4.
Pulse la tecla INTENSIDAD, para seleccionar el ajuste de nivel en el proceso de secado.
La selección tiene tres niveles. El tiempo de secado aumenta 3 minutos en cada nivel.
Pulse la tecla INICIO DIFERIDO para seleccionar la demora que tendrá las prendas para
secarse en 24 horas. Se puede seleccionar entre 1 y 24 horas.
Pulse la tecla ANTI-ARRUGAS para seleccionar la función, una vez finalice el ciclo de
secado la función anti arrugas es de 30 minutos ( pre-determinada) y 120 minutos
seleccionada). La luzzdel ANTI-ARRUGAS se enciende cuando la función se activa. Esta
función evita que la carga tenga arrugas.
5. Si los usuarios necesitan una función de bloqueo para niños, ésta se activará pulsando la
tecla ANTI ARRUGAS y INICIO DIFERIDO simultáneamente por más de 3 segundos.
6. Limpie el filtro, el gabinete y el tubo interno.
7. Este símbolo significa que el programa de eficiencia de energía en el "programa estándar
de algodón" está en funcionamiento, el cual es más adecuado para secar una carga normal
de algodón con la capacidad de carga asignada.
8. Cuando hhaya finalizado el programa de secado, limpie el filtro cuando si la luz parpadea.
V.1
V.1

Tabla de Programación
.
Y
diferido
1. Los programas de algodón extra están solamente recomendados para utilizar de acuerdo a
los hábitos personales. La ropa gruesa y de muchas capas, por ejemplo ropa de cama,
pantalones vaqueros, chaquetas, etc.. no son fáciles de secar. Es más recomendable elegir el
programa de Mix Extra y la intensidad máxima de secado.
2. La función secado en frío significa que el aire frío circula antes de acabar durante 3 minutos.
3. Si se ha seleccionada la función Anti Arrugas, el proceso de anti arrugas puede retardarse
hasta dos horas, de lo contrario sin esta opción, el tiempo de secado sería de 30 minutos.
4. La temperatura ambiente y la humedad afectarán al tiempo de secado.
5. Revise la etiqueta adherida a la ropa y elija la temperatura y el tiempo de acuerdo a la
explicación.
CONDICIONES DE LA GARANTIA COMERCIAL
Esta lavadora tiene una garantía de reparación de dos años, a partir de la fecha de venta,
contra todo defecto de funcionamiento proveniente de la fabricación, incluyendo mano de
obra y piezas de recambio. Para justificar la fecha de compra será obligatorio presentar la factura
o ticket de compra. La presente garantía solo será efectiva en España.
EXCLUSIONES DE LA GARANTÍA
•Los aparatos utilizados para uso profesional o no exclusivamente doméstico, en
establecimientos industriales o comerciales.
•Los aparatos utilizados indebidamente, de manera no conforme a las instrucciones de uso.
•Los aparatos desmontados o manipulados por personas ajenas a los Servicios Técnicos
autorizados.
•Las operaciones periódicas de mantenimiento del producto.
•Las averías producidas por causas fortuitas, siniestros de fuerza mayor
o derivados de una instalación incorrecta.
•Los materiales rotos o deteriorados por desgaste o uso normal del aparato: juntas,
plásticos, cristales, escobillas, etc.
www.easelectric.es
V.1
V.1

Advertencias y consejos
1.
Antes del proceso de secado, centrifuge la ropa minuciosamente en la lavadora. Cuando se centrifuga la ropa a alta
velocidad, se puede reducir el tiempo de secado y ahorrar el consumo de energía.
2.
Para el secado de uniformes, separar la ropa de acuerdo al tipo de tela y al programa del secado.
3.
Antes de secar, cierre los cierres, ganchos y ojales, abotonar la ropa, atar los cinturones de tela, etc.
4.
No seque la ropa más de lo debido, ya que al hacerlo, la ropa fácilmente puede tener arrugas.
5.
No seque los artículos que contengan goma o materiales elásticos similares.
6.
La puerta puede ser abierta solamente cuando el programa de secado haya finalizado para prevenir quemaduras y
lesiones en la piel causadas por el humo caliente o la máquina sobrecalentada.
7.
Limpie el filtro de pelusa y vacíe el recipiente luego de cada uso para evitar la extensión del tiempo del lavado y ahorrar
energía.
8.
No seque prendas después de un proceso del lavado en seco.
Siga las siguientes referencias de peso:
1 Q
@
¿
10
Limpieza y mantenimiento
Limpieza del filtro
1)
Limpie el filtro de pelusas antes de cada uso. Retirarlo
estirando directamente para arriba.
2)
Limpieza del filtro. Utilice un paño o
saque la pelusa con la mano.
3)
Instalación del filtro. Si el filtro se limpia con un paño
húmedo o en el agua, insértelo cuando esté completamente
seco.
Limpieza del aparato y del tubo interno
Utilice un paño suave y húmedo para limpiar la secadora y el tubo interno.
1.
No lave con agua directamente.
2.
No utilice esponjas para fregar.
3.
No utilice gasolina o alcohol para limpiar. Asegúrese de abrir
la puerta frontal para ventilar el aprato después de limpiar el tubo
interno.
V.1
V.1

Reinicio de Seguridad
1.
Estas secadoras cuentan con un interruptor de apagado que se activa con la temperatura.
2.
La tecla de reinicio de seguridad se encuentra en el tablero trasero. Si la secadora se ha recalentado, se
debe reiniciar con esta tecla antes de que la secadora se ponga en funcionamiento nuevamente. Es
necesario esperar 10 minutos para que se enfríe.
3.
La razón más común para que la secadora se sobrecaliente es un filtro bloqueado. Limpie el filtro de
pelusas después de cada carga para prevenir el sobrecalentamiento de la secadora.
La única razón para pulsar la tecla de seguridad de reinicio es si la secadora se está sobrecalentando. Deje
que la secadora repose al menos por 10 minutos antes de pulsar esta tecla. Pulse la tecla blanca hasta
que se escuche un click del reinicio. El hecho de limpiar el filtro después de cada carga evitará el
procedimiento repetitivo de pulsar la tecla de reinicio.
La tecla de reinicio podría emplearse en las siguientes situaciones:
1.
El filtro de pelusas está obstruido.
2.
Los tubos de escape están bloqueados en la parte trasera de la secadora.
3.
Una ventilación pobre en la habitación de lavado o la abertura de una puerta o ventana.
4.
Piezas de carga ligera ej.: pañuelos, han sido succionadas por el filtro.
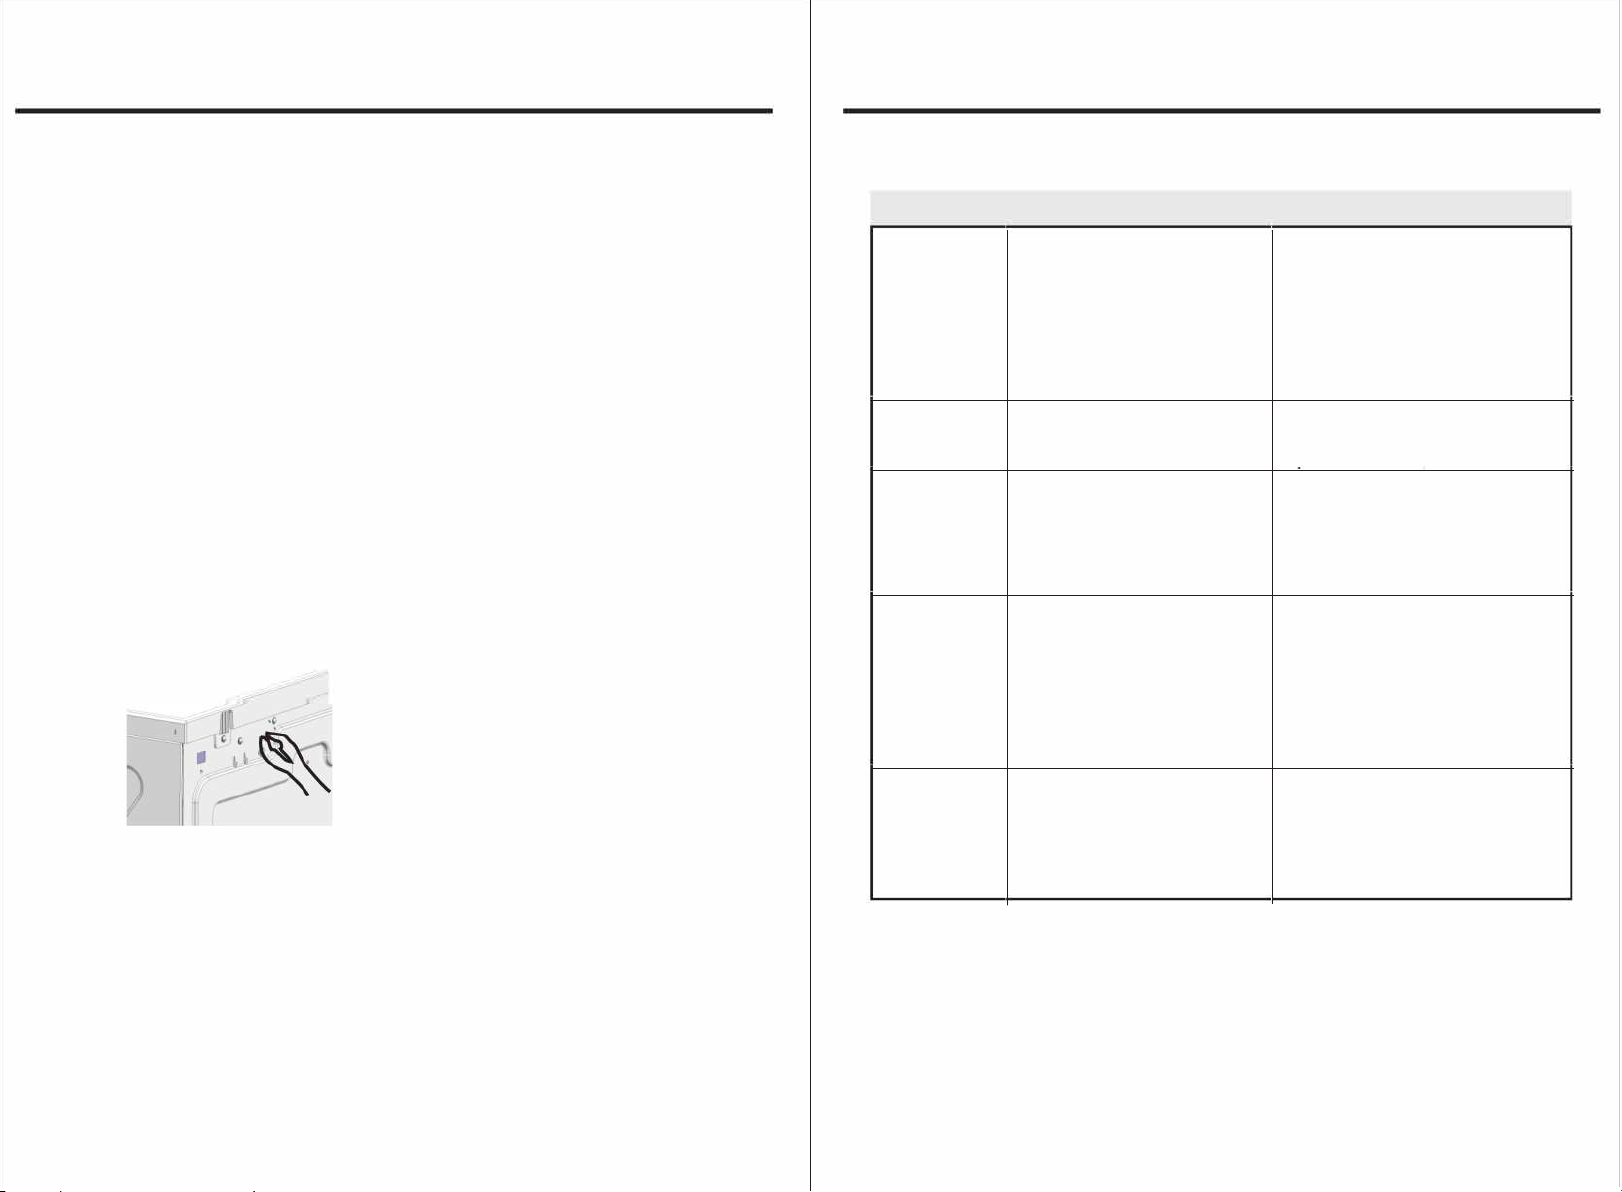
Tecla de reinicio de seguridad
Utilizar el dedo o un lápiz para pulsar la tecla hasta que se escuche un click.
12
Resolución de problemas
Problema Causa Solución
No se inicia
•
Interrupción de la energía.
•
El enchufe de alimentación no está
bien enchufado.
•
Exceso de ropas para secar.
•
El fusible de temperatura está
quemado.
•
Espere para activar la electricidad.
•
Verifique el enchufe, y asegurarse de
que el mismo se encuentra bien enchufado.
•
Las prendas a ser secadas no pueden
exceder los 7 kg.
•
Sírvase cambiar el fusible de
temperatura por parte de un técnico
electricista.
Calor externo
•
El filtro de pelusas está sucio.
•
El tubo de absorción o de
ventilación está sucio.
•
Asegúrese de limpiar el filtro de
pelusas a su debido tiempo.
•
Limpie el tubo
Las prendas
están demasiado
secas
Calor externo se percibe
un olor a calor
•
Asegúrese que no haya un exceso de
prendas.
•
Extraiga las prendas inmediatamente
cuando se acabe el ciclo.
•
Observe la página 7.
•
Observe la etiqueta de mantenimiento en
las prendas.
•
Observe la etiqueta de mantenimiento en las
prendas
q
ue sea fácil que se encojan, debe
revisar las prendas cuando estén secas. Extraiga
las prendas cuando estén ligeramente húmedas y
no extremadamente secas. Luego colgar las
prendas hasta que se sequen completamente.
Las prendas se
encogen
•
Están demasiado secas
Se observan
pelotitas en
las prendas
•
Con frecuencia las telas de fibra sintética
tienden a generar pelotitas. Esto sucede
además cuando el ciclo de secado es
continuo.
•
Utilice suavizante de telas para lubricar
la tela de fibra sintética. Rocíe en los puños
y el cuello al momento de planchar las
prendas. Extraer las prendas
correspondientes para no excederse en el
ciclo de secado
El sonido de la secadora cuando está en funcionamiento puede causar
:
•
Alarma de vibración: se produce debido a giros y sacudidas de la de la ropa húmeda. Esto
generará por tanto ruidos.
•
Golpes de aire: Cuando ocurre el proceso del secado, la máquina generará vapor que saldrá
fuera del tubo y esto generará golpes en el fondo del tubo interno.
13
V.1
V.1

+
EAS ELECTRIC
EMTD7EC
Detenga el programa y vea el
motivo del error.
Acción cuando se produce un error
Automático o no-automática: Automática
V.1
V.1

Safety information.......................................................................1
Installation before use.................................................................3
Part name...................................................................................3
Notice before use..........................................................................3
Precautions.................................................................................4
Simple installation.......................................................................6
Control panel...............................................................................7
Programme table.......................................................................8
Conditions of commercial warranty.............................................9
Operation explanation................................................................10
Drying clothes instruction................................................................10
Cleaning and routine maintenance...........................................11
Safety reset...............................................................................12
Precautions...............................................................................13
Safety information
1
Catalogue
1.This product belongs to CategoryⅠelectrical appliances, and
only for drying textiles which have been washed with water in
the household. Please pay attention to the safety of power
use during the operation!
2.The power source with reliable earthing must be used. Its
earth wire must be buried under the ground and shall not be
connected with the public utilities such as city water pipe or
gas pipe etc. The earth wire and null wire shall be
distinguished and shall not be connected together.
3..The maximum mass of dry textile material is 8 kilograms to
be used in the appliance.
4.That the tumble dryer is not to be used if industrial chemicals have
been used for cleaning.
5.Do not dry unwashed items in the tumble dryer.
6.Items that have been soiled with substances such as cooking oil,
acetone, alcohol, petrol, kerosene, spot removers, turpentine,
waxes and wax removers should be washed in hot water with an
extra amount of detergent before being dried in the tumble dryer.
7.Items such as foam rubber (latex foam), shower caps, waterproof
textiles, rubber backed articles and clothes or pillows fitted with
foam rubber pads should not be dried in the tumble dryer.
8.Fabric softeners, or similar products, should be used as specified
by the fabric softener instructions.
9.The final part of a tumble dryer cycle occurs without heat
(cool down cycle) to ensure that the items are left at a
temperature that ensures that the items
will not be damaged.
V.1
V.1

Safety information
23
Installation before use
10. The lint trap has to be cleaned frequently.
11. The lint must not to be allowed to accumulate around the tumble dryer.
12. Adequate ventilation has to be provided to avoid the back flow of
gases into the room from appliance burning other fuels, including open
fires.
13. WARNING: never stop a tumble dryer before the end of the drying
cycle unless all items are quickly removed and spread out so that the heat
is dissipated.
14. The exhaust air must not be discharged into a flue which is used for
exhausting fumes from appliance burning gas or other fuels.
15. The appliance must not be install behind a lockable door, a sliding
door or a door with a hinge on the opposite side to that of the tumble
dryer. In such a way that a full opening of the tumble dryer door is
restricted.
16. Keep pets away from this appliance.
17. Oil-affected items can ignite spontaneously, especially when exposed
to heat sources such as in a tumble dryer. The items become warm,
causing an oxidation reaction in the oil. Oxidation creates heat. If the heat
cannot escape, the items can become hot enough to catch fire. Piling,
stacking or storing oil-affected items can prevent heat from escaping and
so create a fire hazard.
18. If it is unavoidable that fabrics that contain vegetable or cooking oil or
have been contaminated by hair care products be placed in a tumble dryer
they should first be washed in hot water with extra detergent-this will
reduce, but not eliminate, the hazard.
19. The appliance should not be overturned during normal use or
maintenance.
20. Remove all objects from pockets such as lighters and matches.
21. This appliance is for indoor use only.
Part name
1.Top board 2.Control panel 3.Door 4.Front panel 5.Side panel 6.Filter 7.Flex tube 8.Power plug
9.Switch 10.Tumbling box
Notice before use
The first step: Power source and grounding.
The dryer employs alternative current with the rated voltage and frequency. When the voltage
fluctuates between 6% of rated voltage, the dryer can work normally. A special power socket for
the dryer had better be set beside the dryer for convenience and safety. The method of
connection of the socket is as the figure below.
To be safe, please make improvements as soon as possible
according to the rules and suggestions mentioned above.
Notices:
The socket and the grounding wire must be installed by an electrician to prevent incorrect
installation or use of the socket and to guarantee the safety of use of electricity. The power wire
of the dryer employs Y connection, if the supply cord is damaged, it must be replaced by the
manufacturer, its service agent or similarly qualified persons in order to avoid a hazard. No
connection of the grounding wire the neutral wire, otherwise the cabinet will be charged, which
is likely to cause the danger of electric shock.
V.1
V.1

45
Installation before use Installation before use
Step 2: Precautions
Install or store where it will not be exposed to
temperatures below freezing or exposed to
water or weather, which could cause permanent
damage and invalidate the warranty.
Keep area around the exhaust opening and
adjacent surrounding areas free from the
accumulation of lint, dust and dirt. An obstructed
port might reduce the airflow.
Thoroughly spin the laundry in washing machine.
High spin speed can reduce the drying time and
save energy consumption.
Make sure combustible sprayer will not be
close to dryer when it is working, and once
the gas leaks, do not touch plug or start/pause
on it.
Do not wash or dry articles that have been
cleaned in, washed in, soaked in or spotted with
combustible or explosive substances ( such as
wax, oil, paint, gasoline, degreasers, dry-cleaning
solvents, kerosene, etc.).
Never attempt to operate this appliance if it is
damaged, malfunctioning, partially disassembled,
or has missing or broken parts, including
a damaged cord or plug.
Do not allow children on or in the appliance. Close
supervision of children is necessary when the
appliance is used near children.
Please do not use the machine when your foot
or hand with water.
Do not store plastic, paper or clothing that may
burn or melt on top of the dryer during operation.
The exhaust air must not be discharged into
a flue which is used for exhausting fumes
from appliance burning gas or other fuels.
Do not dry articles containing rubber, plastic or similar
materials such as padded bras, tennis shoes,
galoshes, bath mats, rugs, bibs, baby pants, raincoat
plastic bags or pillows that may melt or burn. Some
rubber materials, when heated, can under certain
circumstances produce fire by spontaneous
combustion.
The door can be opened only after the
programme of the drying machine is completed.
Do not open the door before the programme
finished to avoid the human skin from being
scalded by hot steam or over heated drying
machine.
This product belongs to type I electronic products and please take note of safety problem accordingly:
1.It is rule to use power which is buried in the earth and will not touch any socialequipments such as
gas pipe or water pipe etc. Make sure the difference of different lines and they are not connected.
2.Please use special socket which is according to National Standard and will endure 10A current.
To be safe, please make improvements as soon as possible according to the rules and suggestions
mentioned above.
Please pay attention to use the drying machine if the materials of your clothes can not be dried by it or
contain the symbols as follows:
Dry
Dry clean
Line dry / hang to dry Drip dry
Do not dry clean
Normal Do not dry
In the shade
Dry flat
Not tumble dry normal
Dry clean normal cycle
with any solvent
Dry clean normal cycle
petroleum solvent only
V.1
V.1

67
Simple installation
Control panel
1)
2) Press the 【 】button to
3
Press the 【Signal】button to select the on or off signal function. The buzzer will prompt from the
dryer when finishing the cycle. Press the【On/Off】 button and pull out the power cable.
Intensity select adjust the dryness level of the laundry. The level has three
grades . The drying time increases 3 minutes in every grade.
(1).The intensity function can be activated only before the programme start.
(2).Press the 【Intensity】 button repeatedly to select the drying time.
) Press the【Delay】 button to select delay clothes drying within 24 hours. You can press this key
continuously; it can be selected within 1-24 hours .
4) Press the 【Anti-Crease】button to select the fuction, at the end of the drying cycle, the anti-crease
operation time is 30 minutes (default ) or 120 minutes (selected).The 【Anti-Crease】 light shall
illuminate when the anti-crease function is selected. This function prevents the laundry from creases.
5) If users need child lock function, pressing the 【Anti-Crease】 and 【Delay】buttons simultaneously
for over 3 seconds to start child lock function.
6) Clean the filter, cabinet and inner tube.
7) This symbol means the energy efficiency test programme “standard cotton programme”,
which is most suitable to dry normal cotton load at rated load capacity.
8) Please clean the filter when the“Filter” light is flashing, after the dryer stop.
On/Off Start/Pause
Intensity Delay Anti-Crease
6
Control panel
Following are instructions for starting and using your new dryer. Please refer to specific sections
of this manual for more detailed information.
Important Warning: To reduce the risk of fire, electric shock, or injury to person, read this entire
manual, including the Important Safety Instructions, before operating this dryer.
67
Signal
Program Knob
7
Transport
Move cautiously. Do not grasp any salient parts of machine. The machine door can not be
used as the handle for delivery. If the dryer can’t be transported erect, the dryer could be slant
to right less than 30° .
Installation Position
Level Adjusting
Once in its permanent operating position,
check that the dryer is absolutely level with the aid
of a spirit level. If it is not, adjust the feet with a tool.
Power Supply Connection
1.Make sure that the voltage of the power supply is the same as the electric specification of the dryer.
2.
2.Do not connect the dryer with the power connection board, the universal plug or socke
1.It is recommended that, for your convenience, the machine is positioned close to your washing
machine.
2.
3.
The tumble dryer must be installed in a clean place, where dirt does not build up. Air must be able
to circulate freely all round the appliance. Do not obstruct the front air inlet or the air intake grilles
at the back of the machine.
To keep vibration and noise to a minimum when the dryer is in use, it should be placed on a firm
and level surface.
4.The feet must never be removed. Do not restrict the floor clearance through deep pile carpets,
strips of wood or similar. This might cause heat built-up which would interfere with the operation
of the appliance.
V.1
V.1

8 9
Note: The programmes above are only recommended for using, users can choose the appropriate programme according to the personal habits. Thick and multi-layered
fabrics,e.g. bedlinen, jeans, jackets etc, are not easy to dry, you'd better choose Jeans programme and maximum drying intensity level..
Programme table
Y N
YN
YN
Y N
Y
Y Y
Less
If you can not determine what the clothing's material is, please choose Mix.
For cottons and coloureds made of cotton or linen.
Standard
Standard
Mix
30 min
Extra 7.0kg
7.0kg
Cotton
Extra
(max)
Weight
Special
Programme
Delicate To dry delicate laundry that is suitable for drying or laundry which is advised to be hand-washed
at a lower temperature.
To dry cotton pieces of clothing. Drying level: less dry.
To dry cotton pieces of clothing. Drying level: standard dry.
To dry cotton pieces of clothing. Drying level: extra dry.
Application/Properties Delay Time
Synthetics
Standard
Extra
For non-iron washing made of synthetic and blended fabrics,cotton.
3.0kg
Time
40 min
50 min
60 min
Refresh
Quick
Airing
Wool
Airing
Wool For a fluffy and fresh wool clothing(Can not be used for drying wool clothing), When the cycle is done,
take out the clothes at once, let them dry in the air.
Remove the smell for the long-laid clothes.
To air clothes without blowing hot air .
To dry mix pieces of clothing. Drying level: standard dry.
To dry mix pieces of clothing. Drying level: extra dry.
To dry pieces of clothing. Drying level: standard dry.synthetics
To dry synthetics pieces of clothing. Drying level: extra dry.
Time 30 min.
Time 40 min.
Time 50 min.
Time 60 min.
Rapid warm for the long-laid clothes.
Y
Y Y
Y Y
Note:
1.The Cotton Extra programmes above are only recommended for using, users can choose
the appropriate programme according to the personal habits. Thick and
fabrics,e.g. bedlinen, jeans, jackets etc, are not easy to dry, you'd better
programme and maximum drying intensity level.
2.Cold wind function means there is only cold wind for circulating before finishing heating
minutes.
3.If Anti-Crease option is selected, the anti-crease process will enlarge to 2 hour, otherwise
it keeps 30min without this option.
4.The inside temperature and humidity will affect drying time.
5.Check the label attached on clothes and choose the right temperature and time
to the explanation.
Cotton Extra
multi-layered
choose Mix Extra
3
according
Programme table
Suggestion: When clothes is less than 1kg, please select 60 min program.
www.easelectric.es
CONDITIONS OF COMMERCIAL WARRANTY
This appliance has a repair warranty of two years from the date of sale, against
any malfunction from the manufacture, including labor and spare parts. To
justify the purchase date will be required to submit the invoice or receipt. This
warranty is only effective in Spain.
WARRANTY EXCLUSIONS
· The appliances for professional use in industrial or commercial
establishments.
· The devices improperly used so not in accordance with instructions.
· The devices dismantled or manipulated by people outside Technical Services
authorized.
· Periodic maintenance of the product.
· Malfunctions caused by acts of God, force majeure or accidents resulting from
improper installation.
· Broken or damaged materials for wear or normal use, joints, plastic, glass,
brushes, etc.
V.1
V.1

Filter clean
10 11
Filter clean
Cleaning cabinet and inner tube
1) Clean the lint filter before each use.
Remove by pulling straight up.
2) Cleaning filter
Use wiping cloth wipe with your hand.
3) Install filter
If the filter is cleaned by damp cloth or
in the water, please install after the sun
dry.
Cleaning cabinet and inner tube
Use soft damp cloth wipe when cleaning cabinet and inner tube.
1.Not to rinse by water direct.
2.Not to use neutral scour wipe.
3.Not to use gasolene and alcohol wipe.
Make sure open the front door for aeration after
cleaning the inner tube.
Cleaning and routine maintenance
Operation explanation
1.Before drying, thoroughly spin the laundry in washing machine. High spin speed can
the drying time and save energy consumption.
2.For uniform drying result, sort the laundry according to fabric type and drying programme.
3.Before drying, please close zips, hooks and eyelets, button up, tie fabric belts, etc.
4.Do not over dry the clothes, because over dried clothes can easily get creases.
5.Do not dry the articles containing rubber or similar elastic materials.
6.The door can be opened only after the programme of the drying machine is human skin from
being scalded by hot steam or over heated drying machine.
7.Clean the lint filter and empty container after each use to avoid extension of drying time and
energy use.
8.Do not dry these clothes after dry-clean process.
reduce
The reference weight of dry clothes
Mixed-fabric clothes
(about 800g)
Jacket
(about 800g cotton)
Jeans
(about 800g)
Towel quilt
(about 900g cotton)
Single bedsheet
(about 600g cotton)
Short sleeve shirt
(about 180g cotton)
Work clothes
(about 1120g)
Short pants
(about 70g cotton)
Sleepwear
(about 200g)
Socks
(about 50g
mixed-weave)
Long sleeve shirt
(about 300g cotton)
V.1
V.1

12 13
Precautions
Trouble Cause Solution
Will not start
External hot or
can smell hot
Clothes too dry
Clothes shrink
Hairball on clothes
•Power cut.
• The power plug is not plugged tight.
•Dry clothes exceed.
• The temperature fuse is cut.
•The lint filter is dirty.
• The uptake or exhaust duct is dirty.
•Too dry
•The clothes in machine are too full.
•Not to take out the clothes in time
when finish.
• The clothes don’t assort properly.
•The temperature is enacted too high.
•It is right for synthetic fibre and
permanent press fibre causing
hairballs. This is because the right
rub causing.
The sound of dryer when runs can cause
•Buzzer of vibration: Due to heavy wet clothes’ turning and bumping, and this will cause
accordingly.
•Air bumping: When drying, machine will generate steam which will come out from pipe
this will cost bumping with the bottom of inner tub.
noise
and
•Wait for switching on electricity.
•Check the power socket, make sure plug
tight.
•The clothes in drier must be after spining,
drying clothes can not exceed 6kg.
•Please career man restore the temperature
fuse.
and
•Make sure clean the lint filter in time.
•Clean out the stem.
•Make sure the clothes are not too full.
• Take out the clothes immediately when
finish.
•See page 7.
•Observe the maintenance label on clothes.
•Observe the maintenance label on clothes,
if easy to shrink, should examine the
when dry. Take out the clothes
damp for too dry. Then hang the
until full dry.
clothes
when tiny
clothes
•Use fabric softener lubricate fibre,
spray settled gule on cuff and
iron clothes. Turn the
for reducing rub.
please
neckline
when sarcenet out
Precautions
Safety reset
Safety reset
1. These dryers have a safety cut out switch which is activated by temperature.
2. The safety reset button is on the backboard. If your dryer not heating this button must
be reset before the dryer will operate again. You may need to wait 10 minutes for
cooling to occur.
3. The most common reason for the dryer to overheat is a blocked filter. Clean the line
filter after each load to prevent overheating of the dryer.
It will only be necessary to press the safety reset button if the dryer not heating. Allow
the dryer at least 10 minutes to cool down before pressing the button .Press the white
button in until you feel the reset click. Cleaning the filter after each load will avoid
repetitive operation of the safety cut out switch.
The cut out switch may operate for the following reason:
1. Lint filter is blocked.
2. Exhaust outlets blocked at the back of the dryer.
3. Poor ventilation in the laundry or room-open a window or door
4. Lightweight garment eg. handkerchief, sucked over the filter.
Safety Reset Button
Use your finger or a pencil to press the button in until you feel it click.
This marking indicates that this product should not be disposed with other
household wastes throughout the EU. To prevent possible harm to the
environment or human health from uncontrolled waste disposal, recycle it
responsibly to promote the sustainable reuse of material resources. To return
your used device, please use the return and collection systems or contact the
retailer where the product was purchased. They can take this product for
environmental safe recycling.
V.1
V.1
Table of contents
Languages:
Other EAS Electric Dryer manuals
Popular Dryer manuals by other brands

Siemens
Siemens WT45W569DN Installation and operating instructions

Fisher & Paykel
Fisher & Paykel DG7027G1 installation instructions

Bosch
Bosch WTR85T00TH Installation and operating instructions

Beko
Beko EDF95243CSH2A user manual

LG
LG DLG3171 series owner's manual

Miele
Miele TWB 140 WP operating instructions