EAZbike STM-F07 User manual

E-bike operation instructionE-bike operation instruction
This is a precision instruction ,please make sure you read this carefully before you try your first ride.
If you doubt about any information inside this insturction,please contact us or your local distributer .
science and technology change the way of travel
STM-F07
Imported by:
Importpris.no AS
Tomteveien 53
1618 Fredrikstad
Norway

1.Warning!1.Warning!
Please, pay attention to the following safety advices, in order to enjoy a
safe driving experience:
- First of all. you need to charge your batteries fully before using it.
- Read carefully this User Manual, and before riding.
- It is forbidden to touch the electric conlacls in the battery box.
- Please do not disassemble or repair without technical assistance from
an Authorized Dealer.
- When in use, regular checks on brakes. tyres, steering, rims and
caution concerning possible.increased braking distances in wet weather.
2.Parts description2.Parts description
Saddle
Battery Front fork
Motor
Pedal
Display Brakes
Derailleur
01

To ensure your safety, make the following functional checks
before driving:
1 - Nomial operation of the light, brake and power cut systems.
2 - Tire pressure (low pressure, will influence both autonomy and
speed).
3 - Wheel axle tightening.
4 - Battery charge level.
5 - Braking system adjustment and free operation.
1. Carefully take out the electric bike from its carton;
2. Please tighten the handlebar-stem with the following instruction:
Step1, Step2, Step3
02
Gear shift
Display
Rear brake lever
Throttle
Front brake lever
3.Assembling instructions3.Assembling instructions
Step1

03
4.Battery charging4.Battery charging
Step2
Step3
Charging methods
The vehicle battery must be recharged when finished using or when
running low. You can charge the battery, eitherassembled or removed
from the vehicle. Please take proper attention to the following charging
methods:
1. remove the battery case.
2. with the key, unlock the battery case at its base.

04
5.About charging5.About charging
When the battery is charging on the bike
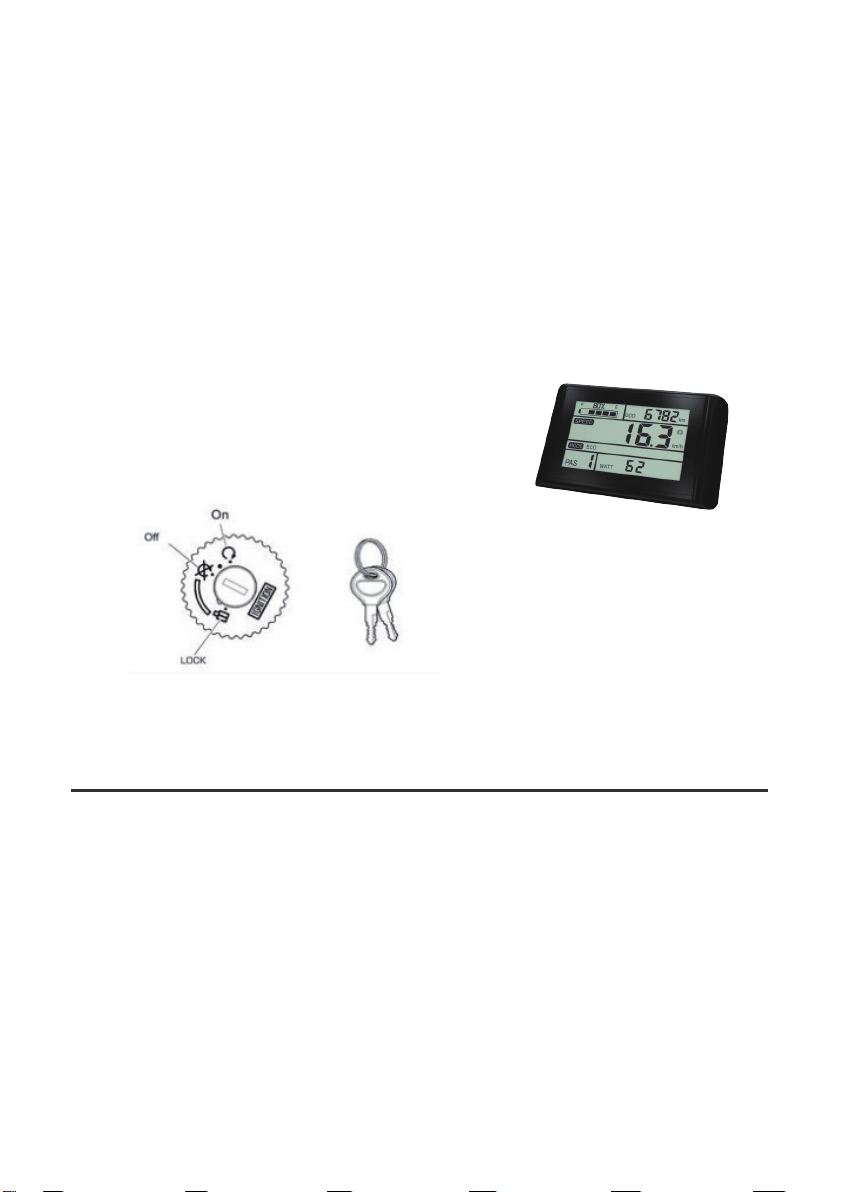
1. Please switch off the power and remove the key.
2. Remove (rotate to open) rubber stopper in the charging hole, and the
stopper should be kept well. Then. first plug in output plug(48V terminal)
of charger to the socket of battery box, after that, plug in power input
plug(110/220V terminal) to household power socket to start charging.
3. After charging is finished, first pull out the power input plug(110/220V
terminal) and then pull out the output plug.
Duration if charging
1. When the input and output terminal are connected, the red indication
light of the charger will be turned on, showing that the power is being
connected.
2. When the battery is charged for the first time, 8-10 hours should be
spent for charging.
3. This charger has the protection device for over-charging. Long time
charging should not be more than 24 hours without affecting the life time
of the battery.
With the battery removed
1. When the battery is removed, do not touch the"+"and "- contacts,
especially with wet hands or metalic objects.
2. Do not recharge the battery in the inverted position.
3. Place the charger in a flat, secure place, and connect the output plug
(48V terminal) to the socket in the battery box.
4. Then, connect the input plug (110v/220V terminal) to the power outlet
, and the charging will start.
5. After the charging has finished, first, unplug the input plug (terminal
110V/220V), and then the output plug.

05
6.Driving6.Driving
Important tips while driving
1 - Do not push the throttle too fast. The vehicle should accelerated
slowly, reducing consumption and risk of damage to the electrical
system.
2 - To increase security and reduce power consumption, is advised to
avoid sudden stops and startups.
3 - The vehicle controller has a charge overload protection. If on
overload, energy will be cut automatically and restored when it returns to
normal.
4 - The maximum load is 90kg. Avoid driving with superior weights. Do
not drive too fast.
If charging with the battery removed
1 - The charger does not need to be connected to be grounded.
2 - Keep the charger in a safe place away from children.
3 - Do not use the battery when not fully charged.That will decrease its
lifespan.
4 - Do not charge the battery with other chargers than the original.
5 - The charger works with 110/220V. Please do not open it without
permission.
6 - Avoid charger contact with liquids and/or metal objects. Always be
sure it is safely stored/placed so that it can not suffer damage from a
fall/impact.
7 - When in use, the charger should not be covered, to prevent
overheating, damage, or fire.
8 - The charger is only for indoor use. Please keep it in dry and
ventilated place.
9 - If you notice a strange smell coming from the charger, or it is too hot,
please stop charging, and contact an Authorized Center.

06
7.Basic maintenance7.Basic maintenance
How to start up the vehicle
Important tips when parking
1 - When pushing the vehicle manually turn off the power, to avoid
accidental acceleration and accidents.
2 - It is recommended to park indoors. Do not forget to switch off the
power and remove the key.
3 - In a public place, the vehicle must be parked in accordance with local
traffic rules Do not forget to switch off the power and remove the key.
For a safe driving experience, please keep your vehicle in perfect
condition, making maintenance and washing regularly.
Regular self-checks
1. Tightening and correct operation of both wheels, frame and front fork.
2. Gearshift correct operation.
3. Braking system correct operation.
4. If you do not use the vehicle for long periods of time, charge the
battery at least once a month. to avoid reducing its lifespan.
A. Insert key and turn it to the ON
position.
At this point, the charge indicator light
will turn on, indicating that the vehicle
is powered on.
B. Option: Please
check the LCD
display for details.

07
8.Paremeter8.Paremeter
Maintenance and cleaning tips
1. Do not wash withhigh pressurejets to prevent water infiltration into the
electrical system.
2. Dirt on painted surfaces should be removed with a neutral product.
Then, wipe with a dry cloth.
3. Do not apply lubricant on the brakes, brake levers, rims, tires, battery
and controller.
92cm
61cm
110-120cm
176cm
120cm
Battery 48V 10.4Ah lithium battery
Front fork Aluminum alloy suspension
Brake F/R disc-brake
Rear derailleur Outer 7 speed SHIMANO
Chain Wheel Steel 44T*170mm, Prowheel
PAS Pedal Assisted System
Saddle JUSTEK
Display LCD display
Controller Low noise & durable 100~240V, 50-60Hz
Speed 25-45 km/h
Tyre size 20* 4.0 CST/ KENDA
Chain Rust resistant chain, KMC

08
10.Useful tips10.Useful tips
1 - This User Manual's only to explain the vehicle's use and
functions. and should not be used as reference for it's inspection.
2 - The images shown may differ from the actual model presented in the
shops.
3 - We reserve the right to change the model without prior notice due to
technical improvements.
4 - This vehicle has a top speed limiter. For security reasons, its
removal is strictly prohibited.
9.Battery maintenance and saving tips9.Battery maintenance and saving tips
Frequent braking and starting, ridinguphill traveling against a strong
wind, starting from a standstill and riding on rough or muddy roads, and
carrying more than one person, or heavy loads will consume extra
battery power and shorten the range.
A few tips to prolong the battery life during these conditionsis as follows:
1. Frequent Braking-try to look ahead and coast rather thanstop and go
frequently.
2. Riding uphill or against a stiff wind-pedal to supliment the battery
power.
3. When starting from a standstill-use the pedals to help bring you up to
speed
4. When the battery meter indicates the voltage is low, switch to manual
power and avoid using the battery so you don't shorten the battery life.
5. If the battery is being stored, remove the battery from the bicycle and
recharge it every month.

Thank you again for choosing our electric bicycles!
Our company will be committed to create a better experience for you!
Table of contents
Other EAZbike Bicycle manuals