Newgen 345-E User manual

ASSEMBLY &
MAINTENANCE
OWNER’S MANUAL
newgenbikes.com
345-E

INDEX
INDEX
-
---------------------------------------------------------------------------------------------------------------------------------------
IMPORTANT SYMBOLS
-
-------------------------------------------------------------------------------------------------
INTRODUCTION
-
---------------------------------------------------------------------------------------------------------------
INTENDED USE
-
------------------------------------------------------------------------------------------------------------------
REGISTER YOUR 345 ------------------------------------------------------------------------------------------------------
LOCAL REGULATIONS ----------------------------------------------------------------------------------------------------
ABOUT YOUR BIKE
-
----------------------------------------------------------------------------------------------------------
UNBOXING & ASSEMBLY
-
-------------------------------------------------------------------------------------------
PREPARATION FOR RIDING -----------------------------------------------------------------------------------------
OPERATING YOUR 345-E
-
--------------------------------------------------------------------------------------------
BATTERY -----------------------------------------------------------------------------------------------------------------------------------
DISPLAY
-
------------------------------------------------------------------------------------------------------------------------------------
GENERAL SAFETY --------------------------------------------------------------------------------------------------------------
PRE-RIDE SAFETY CHECKLIST
-
--------------------------------------------------------------------------------------
MAINTENANCE
-
----------------------------------------------------------------------------------------------------------------
REPAIRS & MAINTENANCE SCHEDULE
-
--------------------------------------------------------------
02
345
2
3
4
5
6
6
7
7
11
12
13
16
17
19
20
22

Please be aware of the following symbols used throughout the manual.
TOOLS REQUIRED
IMPORTANT INFORMATION
WARNING
NEWGEN TEAM TIP
IMPORTANT SYMBOLS
03
345

INTRODUCTION
Thank you for purchasing your 345-E from NewGen Bikes.
This manual contains information, warnings and cautions concerning the safe operation
of your bike. All information in this manual should be carefully reviewed. If you have any
questions, please contact NewGen Bikes immediately.
Keep this manual with your bike for future reference. Please note, the content of this
manual is subject to change or withdrawal without notice, for the most up-to-date version
please visit our website (newgenbikes.com). While this manual is intended as a guide,
it is not a comprehensive guide to cycling or bicycle maintenance.
Before setting out on your rst ride, please make sure you have carefully read and
understood your owner’s manual, and that you are familiar with the 345-E’s components
and operation. We recommend that you familiarise yourself with your new bike in a safe
environment before riding your bike on public roads or cycle paths.
There are risks associated with the use of any bike that cannot be predicted or avoided
and which are the sole responsibility of the rider.
Note: The 345-E (electric bicycle) is referred to in this manual as a bike, bicycle,
NewGen Bike, and 345, unless otherwise noted.
04
345

Knowledge Centre
Contact Us
The 345 is designed for use on roads and well-made paths, carrying a
maximum load of 120kgs (rider plus any luggage). The 345 is not intended for
stunts, off-road trails, racing or extreme sports. Your 345 should be used for its
intended purpose only. No liability or warranty shall be accepted if the use of
the 345 deviates from the intended use.
The manufacturer is not liable for any direct or consequential damages. Misuse
may lead to failure of some components, void your warranty, and/or risk injury
or death to the rider.
For the most up-to-date information about your 345-E,
please visit our website: newgenbikes.com
+44 (0) 20 7729 2704
newgenbikes.com
instagram.com/newgen_bikes
INTENDED USE
05
345

LOCAL REGULATIONS
It is important to register your bike with NewGen. When doing so, you will be asked to
enter your serial number, which is stamped on the top of the bike’s bottom bracket (the
cylindrical part of the frame between the pedals - see diagram on p.7). Scan the QR code
below to register your 345-E with our online form to validate your warranty.
The UK and EU recognise your 345-E as an ‘electrically assisted pedal cycle’ (EAPC). In
the UK and EU, you do not need a driver’s licence to operate an electric bike, nor do you
need to have it registered, taxed or insured, but you must be over the age of 14 to use
one.
Electric bike laws and regulations vary from country to country so please make sure you
check your local regulations. In most countries, you can ride an electric bike in bike lanes
and on bike paths as you would a regular non-assisted bicycle.
In many countries, including the UK, it is illegal to cycle on a public road after dark
without lights (front and rear) and reectors. Before riding at night be sure to check the
battery to ensure there is sufcient charge to power any lights for the duration of your ride.
It is also sensible to wear bright reective clothing. If you are using lights purchased from
Alternatively, please visit our website newgenbikes.com/345-registration.
Registration will allow us to inform you about product updates and promotions.
REGISTER YOUR 345
06
345
UNBOXING & ASSEMBLY
You should be condent that you have the skills required to safely prepare your bike
before use. If you have concerns about assembling the bike safely, please consider
taking it to a bike shop where a professional can assemble it for you.
We recommend asking a friend to help unpack and assemble your bike.
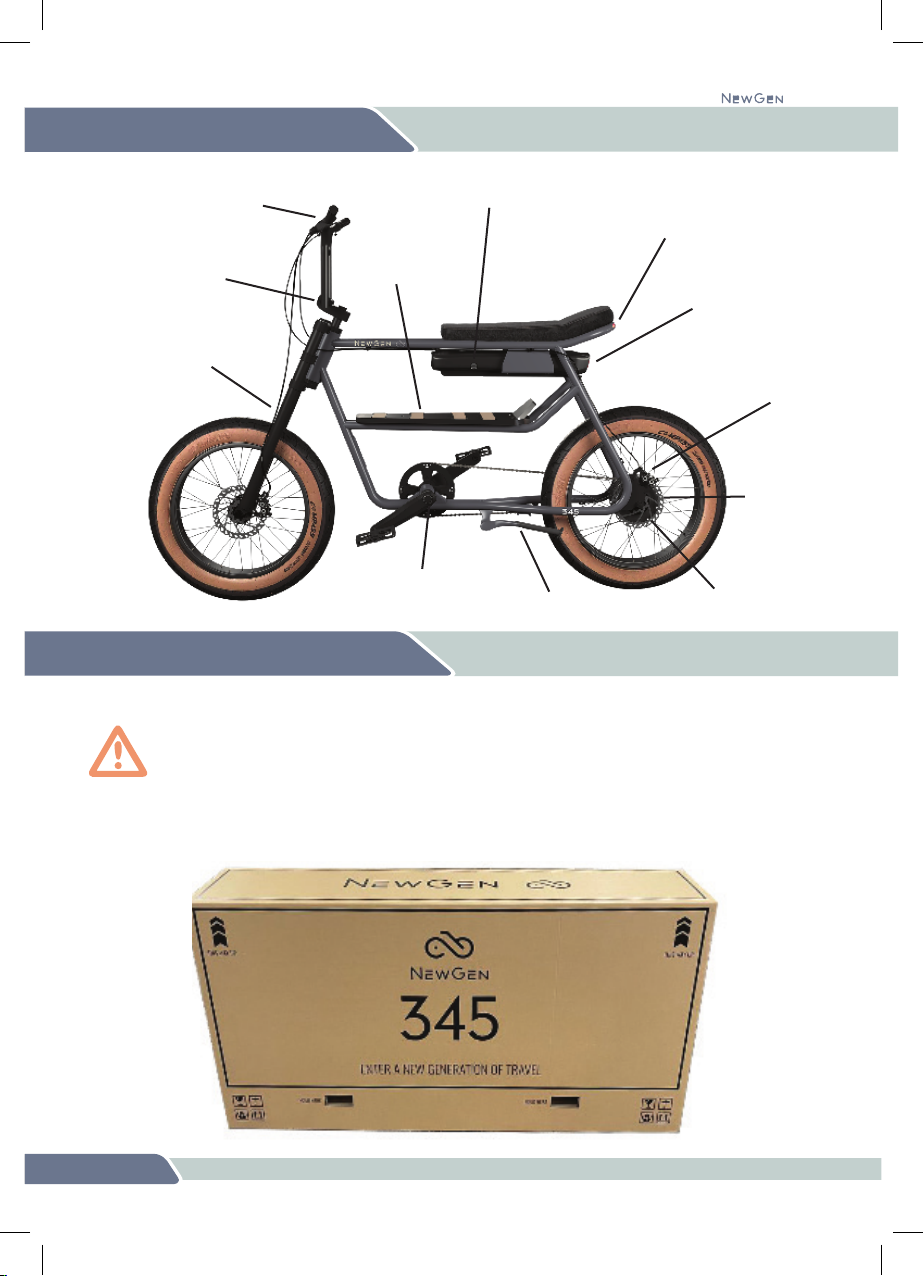
ABOUT YOUR BIKE
07
345
LED rear light
Rigid front fork
Bottom bracket
and cadence sensor
Cargo deck
250w hub
motor
Removable
battery with light
and reector
Brake levers and
display
Brake rotor
Brake caliper
Headset and
handlebar stem
Battery lock
Kickstand

1. Remove the four plastic inserts located around the bottom of the box.
Then, with two people, lift the top box off and set it down next to the bike.
If your bike has a front light, do not use it to lift the bike. It is not designed to hold the
weight of the bike.
2. Remove the accessories box from the tower. In this box you will nd:
3. Slide out the tower, so you can carefully roll your 345-E out from the box. Use the
bike’s kickstand to lean the bike on while you complete the rest of the assembly.
1 x 6mm Allen key 2 x pedals
1 x 15mm pedal spanner 1 x battery charger
1 x user manual 1 x bell
2 x battery keys
08
345

3. Now release the handlebars from the protective packaging and place them on the
stem. Loosely screw the bolts and plate back onto the stem making them nger-tight.
4. Working in a diagonal sequence, tighten each bolt by a half turn before moving
onto the next, allowing each bolt to be tightened evenly until all are tight and the
handlebar will not rotate in the stem. Ensure the handlebars are angled
perpendicular to the ground, as shown in the diagram on p.7.
5. To avoid damage during shipping the pedals are not pre-installed onto the
crank arms. Grab the pedals and the 15mm spanner from the box.
HANDLEBAR AND PEDAL ASSEMBLY
1. First take out the 6mm Allen key (an L-shaped metal tool). You will need this
to install the handlebars onto the handlebar stem.
2. Using the 6mm Allen key, remove all four bolts and plate from the stem.
09
345
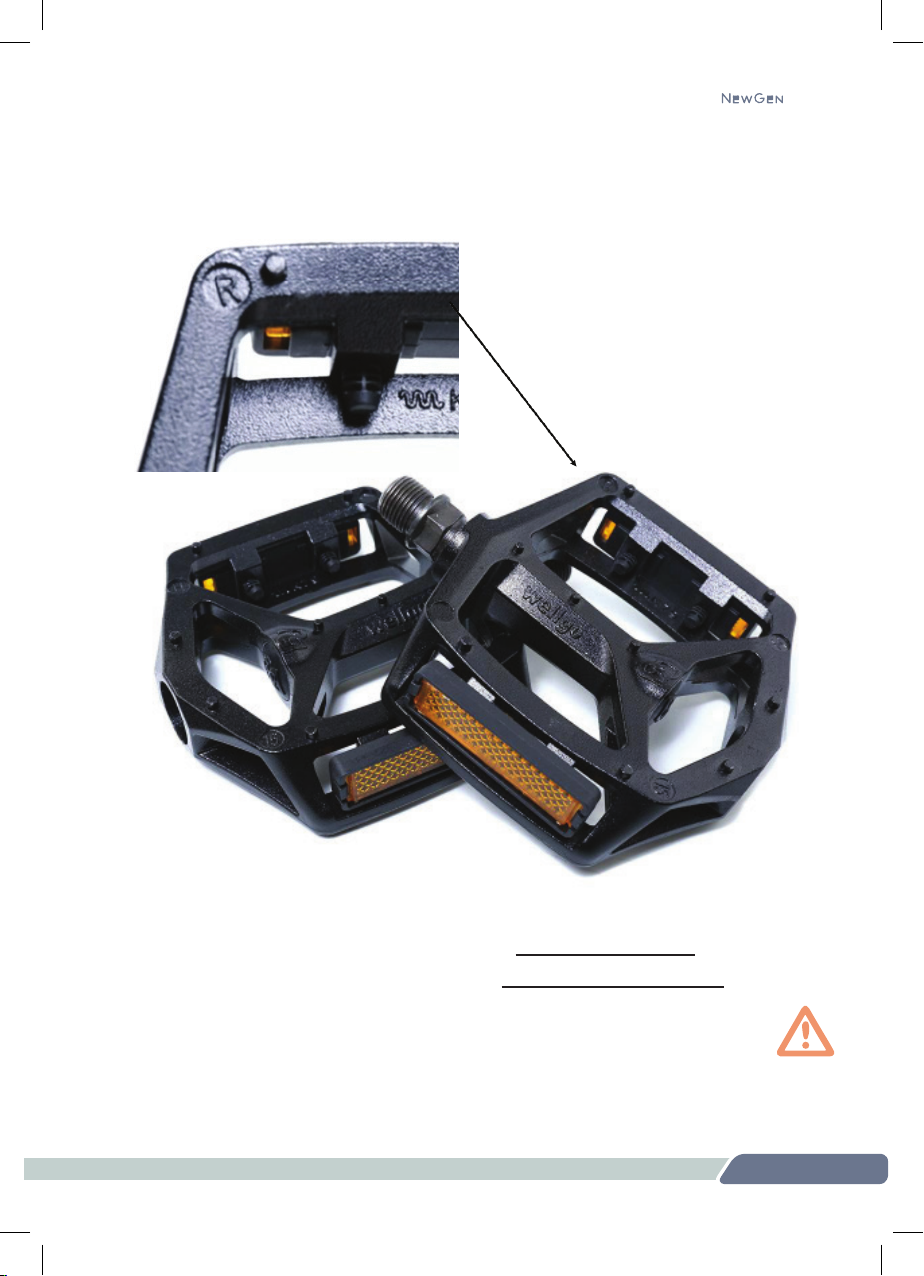
7. Carefully attach the pedals to the crank arms and start tightening them by hand:
• The Right pedal should be tightened in a clockwise direction.
• The Left pedal should be tightened in an anticlockwise direction.
8. The thread on the pedals should be found easily. If not, check you have the
correct pedal for that side of the bike, remove and realign it, then try again.
Once the pedal is partly screwed into the crank, use the 15mm spanner to
tighten it fully. Excessive force may damage the pedal and/or crank arm.
6. The pedals look similar but one is intended for the right crank and one for the
left crank. Each pedal is marked with either an R for right and L for left. The right
and left side of the bike are as seen from the perspective of a seated rider.
10
345

We recommend having your 345-E checked by a reputable bike shop before
taking it out for its rst ride.
Extreme care should be taken when using the pedal assistance, which is activated by the
cadence sensor in the bottom bracket (or by an optional thumb throttle). Make sure you
understand and are prepared for the assistance to engage as you start pedalling.
Users must understand the operation of the pedal assistance before using the bike and
take ample care when riding it, particularly in respect to travelling at speeds appropriate
to the location, surface, riding conditions, and user experience level. Always use the
lowest assist level until you are comfortable with the bike and feel condent controlling it.
Check the following before riding:
ELECTRICAL SYSTEM
Make sure you are familiar with the information on your bike’s display and understand the
function of the buttons before operating the bike. Please consult the Operating Your 345
section overleaf and read the Display section of this manual (p.17) for more details.
WHEELS & TYRES
Check each tyre is the correct pressure of 20psi (1.4 Bar). Lift each wheel off the ground
and make sure it spins smoothly without any lateral movement. The brake rotors should
not rub signicantly against the brake pads. If a wheel seems to be loose, wobbles or a
brake rubs heavily, please contact us or take the bike to a bike shop to be checked.
HEADSET & HANDLEBARS
To check the headset is fully secure, stand in front of your bike with the front wheel
rmly between your legs. Turn the handlebars from side-to-side to check they can’t move
independently of the front fork. Secondly, apply the front brake and rock the bike forwards
and backwards. If anything appears loose, tighten the headset and stem bolts.
BRAKES
Check the brakes by pulling both brake levers. You should feel an obvious pressure point.
Standing next to the bike, rock it back and forth making sure the brakes stay locked and
the bike does not roll forward or back. The brake levers should not touch the handlebar.
PREPARATION FOR RIDING
345

1. Check your battery is fully charged before going for a ride!
2. Insert the battery into the rear of the bike. To learn how to insert and remove the
battery please refer to the Battery information on the next page of this manual.
3. Make sure the battery is rmly locked in place!
4. To switch the bike on, hold down the power button on the top left-hand side of the
display for three seconds. For detailed information about how to operate the display,
please see the dedicated Display section on p.17
5. Select the pedal assist level by using the front of the display as rocker switch:
press the upper part of the display to increase assist and the lower part to reduce it.
Always set the assist level to the lowest level (level 1) when you set off to make sure you
have full control of the bike. Then when you feel comfortable, increase the assist level.
Squeze the brake levers as you mount the bike to avoid any unintentional movement.
6. To switch your light(s) on, simply press the top of the display rocker switch for three
seconds. A headlight icon will appear on the display indicating the light is on. Switch
the light(s) off in the same way, pressing the top of the display for three seconds.
7. After your ride, always make sure you turn the bike off by pressing the power button
on the top left-hand side of the display for three seconds.
OPERATING YOUR 345
12
345
Power button
Menu button
Pedal assist level
Speedometer
Battery charge level
Light(s) on/off
Error indication

BATTERY
The 345-E is equipped with a high-capacity lithium-ion rechargeable battery. Charge
the battery fully before your rst use. It will take around ve hours to charge fully. The
charger that comes with your e-bike recognises the battery pack’s initial charge and will
automatically cease charging when the battery is fully charged. Follow the instructions
shown on the label on the battery charger. The charger’s LED light will change from red to
green when the battery is charged. Make sure the rubber cover to the battery’s charging
port is in place before riding to prevent moisture and dirt collecting in the socket. Always
keep the battery and charger out of direct sunlight and away from re. The battery comes
tted with a rear light as well as USB port for charging other devices
345
13
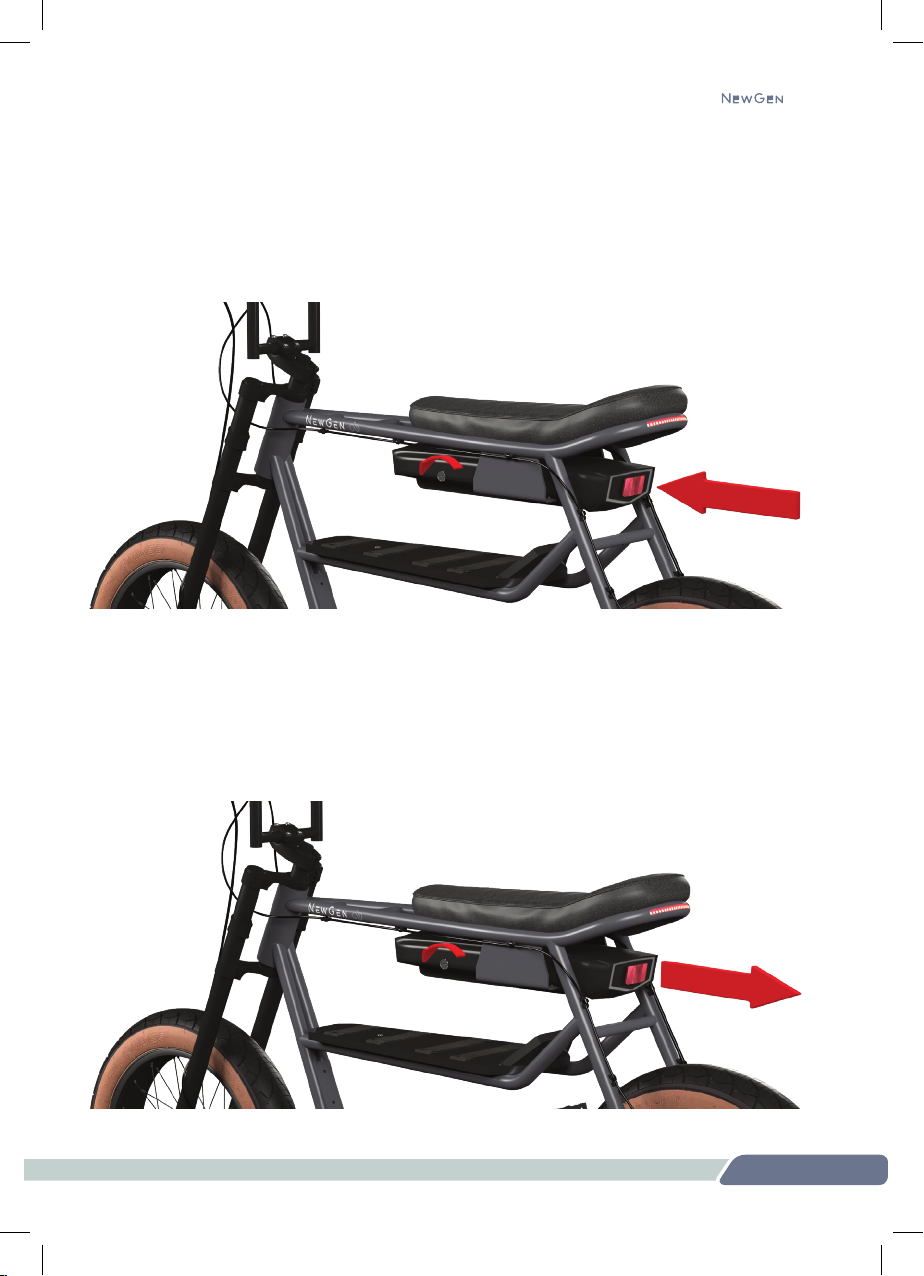
TO INSTALL THE BATTERY, slide it into the rack under the seat with both hands. The lock
will prevent it going all the way in, so push the key into the lock and turn it anticlockwise.
This will open the lock, allowing you to slide the battery fully into place. With the battery
installed, turn the key clockwise, then remove it and keep it safe. Check the battery is
correctly locked in place by trying to pull it out from the rear of the bike.
TO REMOVE THE BATTERY, push the key into the lock and turn it anticlockwise to unlock
the battery, then pull it backwards from the rear of the bike using your other hand. The
battery pack can be charged when installed in the bike or when it is removed. Removing
the battery reduces the total weight of the bike and may make it easier to lift it up stairs.
14
345

Important safety information about your battery and charger
In order to maximise the life from your battery you should take care to use, store and
recharge it correctly. Over time, the capacity of the battery will reduce and eventually the
battery may need replacing. The service life of the battery will vary according with usage.
The old battery should be disposed of responsibly, in accordance with local regulations.
• The battery should be charged indoors in dry conditions and at room temperature
• Never use a battery that shows any signs of damage, leaks, dents in the housing or
that has been dropped
• Only use the battery for your e-bike and do not attempt to use it for other purposes
• Do not leave your battery plugged into the charger unattended
• Charge your battery on a re-resistant surface and/or in a safe place
• Only use the battery supplied with your 345-E, or a replacement from NewGen Bikes
• Keep the battery away from heat sources and re
• Do not expose your battery to liquids or water
• Do not store your battery at very low temperatures (below ve degrees Celsius)
• Remove the battery before transporting your bike
• Keep the battery out of reach of children and animals
• Never tamper with the battery. Do not open the case or try to repair the battery.
Do not attempt to modify the battery connector in any way
• DO NOT TOUCH a damaged or defective battery casing or the cells
contained within it because this may lead to acid injuries and/or electric shocks
• Remove the charger from the battery after charging
• Unplug your charger when not used
• Protect your battery against falls and do not subject it to impacts or shocks.
• Do not leave your bike parked for long periods with a battery installed
• If the charger or charging cable is damaged, do not risk using them
345
15

GENERAL SAFETY
Riders should pay special attention to all general safety points below before
operating their 345. Neglecting these precautions may affect your warranty
and personal safety!
Road safety:
• When riding obey all laws applicable in your local area
• Ride predictably and smoothly with the ow of trafc. Never ride against the trafc
• Use hand signals to indicate turning and stopping
• Maintain a comfortable stopping distance from all other objects, riders, and vehicles.
Safe braking distances can change depending on the road surface, available light,
weather conditions and braking performance, among many other variables
• It is not recommended to ride in wet weather. Your 345 is not is not intended for use in
heavy rain, puddles, streams or rivers
• If riding in wet conditions, take extra care including reducing your speed and leaving
more space to slow down. Feet, hands and tyres can slip in wet conditions and lead
to serious injury and/or death
• Try to avoid potholes, gravel, wet or oily roads, wet leaves, kerbs, tram tracks, speed
bumps, drain grates, thorns, glass and other obstacles, hazards and puncture risks
• Avoid hard bumps, impacts and shocks because these may damage the electronics,
frame, wheels, tyres, battery, connectors or other components
• When riding on public roads at night, it is a legal requirement in the UK and many
other countries to have working front and rear lights and reectors
• If you note strange sounds or vibrations, please get your bike checked by a bike shop
• Maintain a comfortable stopping distance from all other objects
• Secure any loose clothing while riding to prevent it getting caught in any moving parts
• Do not carry passengers or cargo that will interfere with your ability to control the bike
• Squeezing a brake lever too hard or too fast can lead to unintended sudden stopping
and/or a tyre losing traction, increasing the chances of a crash or collision
• Make sure to test the braking power before heading into trafc. The 345’s disc brakes
may be much more powerful than the brakes you’ve used on other bikes
16
345

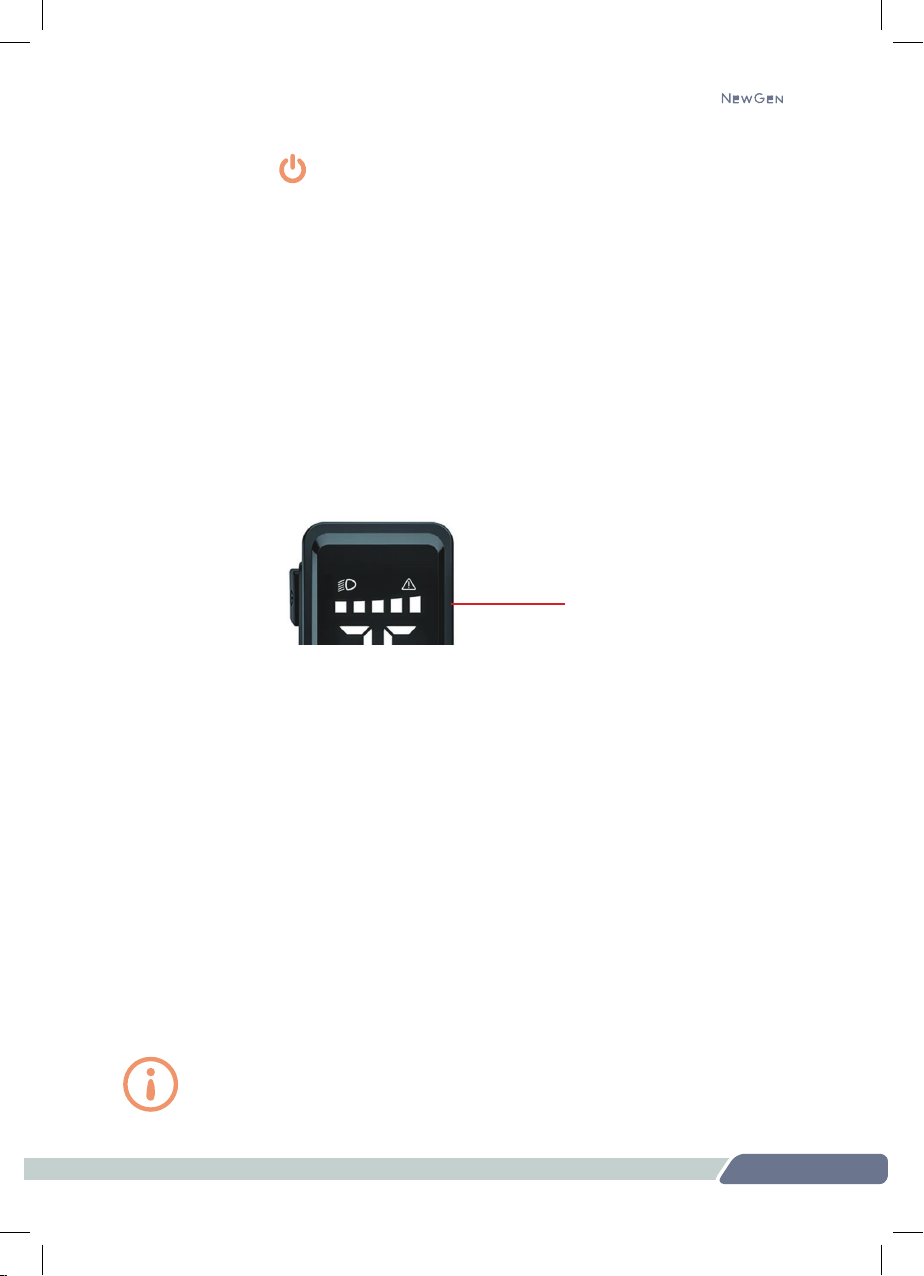
The 345-E comes tted with the DZ40 waterproof LED display. Do no attempt to operate
the display while riding.
DISPLAY
345
17
The pedal assist level is selected by using the curved display of the 345-E as a rocker
button. Pushing the top part of the display will increase the level of pedal assist, while
pushing the bottom part will reduce it.
Press to increase
the pedal assist level
Press to decrease
the pedal assist level
Power button
Menu button
Pedal assist level
Speedometer
Battery charge level
Light(s) on/off
Error indication
Operation
1. Turning On/Off
• Press the power button on the top right-hand side of the display for three seconds.
The screen will light up as the display boots up and bike switches on.
• To switch off, press the power button for three seconds.
2. Power Assist levels
• There are ve levels of pedal assist: 1 is the lowest and 5 is the highest.
• The assist level is displayed along the top of the screen. Each square represents
a level of assist, 1- 5 across the screen.
• Press the top or bottom of the display to select the level of assist required. The
assist level will always default to level 1 when the bike is switched on.
3. Walk Assist Mode
• With the bike switched on, press the bottom of the display for two seconds to put
the bike into walk assist mode. This will gently engage the motor and accelerate
the bike to a walking pace (4 mph). Keep pressing the lower part of the display
to maintain walking mode.
• To exit walking mode and turn off the assist, stop pressing the display.
4. Headlight on/off
• With the bike switched on, press the top of the display for two seconds to turn
the light(s) on. The headlight icon will be displayed on the screen.
• To switch the light(s) off, press the top of the display for another two seconds.
18
345
Pedal assist level
Remember to use both the front and rear lights when riding at night
or in low-light conditions. If your 345-E doesn’t have a front light,
we strongly suggest you purchase one before riding at night.

Before riding your 345-E for the rst time, and periodically thereafter, please pay
close attention to the following:
• We strongly recommend the use of an approved cycling helmet, even if their use is
not mandatory in your country. Bike helmets save thousands of lives every year.
• Before riding, please take the time to familiarise yourself with the operation of the
bike and pedal assist system in a safe environment away from hazards.
• Ensure your battery is locked securely in place, do so by pushing the battery into the
holder until it clicks into place. Remove the key from the lock and pull the battery to
check it’s locked in place.
• Check the brakes by pulling both brake levers. You should feel an obvious pressure
point. The break levers should not touch the handlebar.
• Check brakes and tyres regularly (including their pressure) .
• Check that all wheel nuts and brake bolts are properly tightened.
Take extra care while riding in wet conditions including decreasing speed and
increasing braking distances. Feet or hands can slip in wet conditions and
lead to serious injury and/or death
PRE-RIDE SAFETY CHECKLIST
345
19

Follow these basic guidelines and see a certied, reputable bike mechanic at regular
intervals to ensure your bike is safe for use. Performing regular maintenance on your
NewGen 345-E can improve the bike’s riding efciency and extend the components’
lifespan. When carrying out any maintenance on your 345-E make sure the bike is turned
off, is securely positioned and the battery is removed. This will reduce the potential for
damaging the bike or injuring yourself.
BRAKES
GEARS
Brakes are one of the most important parts of your bike and require regular attention. Your
345-E is tted with mechanical disc brakes.
Mechanical brakes do not require specialist equipment to carry out adjustments or
maintenance, however if you are not comfortable carring out the maintenance yourself
we recommend it is carried out by a professional. Most local bike shops will be able to
perform this service for you. After a while (depending on use) the pads in the calipers will
become worn down and should be replaced. Replacements can be found at most local
bike shops.
Disc brakes generally take a little time to settle in and it’s possible they may squeak a little
on your rst few rides. This is normal and not a cause for concern, but if it persists please
contact us or speak to a bike mechanic.
Your 345-E has a single-speed transmission and therefore should not need any adjustment.
However over time the chain, chainring and rear sprocket will wear and may need
replacing - ask your mechanic to check their condition when you have the bike serviced.
To prolong the life of the chain, chainring and rear sprocket, add a small amount of
specialist lubricant or light oil to the chain. Please note that adding too much, too often
will only collect dirt, accelerate wear and increase the chance of dirtying your clothes.
MAINTENANCE
20
345
This manual suits for next models
1
Table of contents
Other Newgen Bicycle manuals


