Echotouch 160 Quick start guide
1
THIS IS A TEMPORARY COVER
THE FINAL COVER IS IN A SEPARATE FILE
OWNER’S & INSTALLATION GUIDE
TOUCH SCREEN
COLOR 2-WAY
UPGRADE KIT

2
Table Of Contents
Installing & Programming The ECHO System....................................................... 3
Overview Of The Controller................................................................................... 4
The ECHO-TOUCH Status Screen ....................................................................... 5
Using The ECHO-TOUCH Controller .................................................................... 6
First time use & controller setup........................................................................ 6
Language selection ........................................................................................... 6
Controlling your system..................................................................................... 7
Mutli-Car Operation & Vehicle Proles ................................................................ 12
Multi-car operation........................................................................................... 12
Programming the vehicle name....................................................................... 12
Selecting car1 or car2 ..................................................................................... 13
Selecting the vehicle image............................................................................. 13
Programming The Controller Options.................................................................. 14
Selecting button beep, melody, & vibrate modes ............................................ 14
Clock & time options overview ........................................................................ 15
Setting the time & date .................................................................................... 15
Setting the time format (12 or 24 Hour)........................................................... 16
Setting the alarm clock .................................................................................... 16
Demo mode..................................................................................................... 17
LCD screen display options overview ............................................................. 17
Setting the screen on time............................................................................... 18
Setting the screen brightness.......................................................................... 18
Other Controller Functions .................................................................................. 18
Viewing the alarm trigger history ..................................................................... 18
Power off mode ............................................................................................... 19
Parking timer & remote start timer................................................................... 19

3
The ECHO-TOUCH communicates with a window-mounted base unit which
is plugged directly into the host security system module. The window-mount
antenna should be mounted directly to the interior glass by utilizing the attached
adhesive pad (clean the glass before adhering) for the best performance. The
receiver/transmitter also contains alternative Status Lights and a Valet Switch.
these may be used, or the original items may be retained.
NOTE: It is recommended to fully charge the controller before use.
Step 1
Locate &
Remove the
security system’s
Echo port jumper
connector (it has a
Red wire loop).
Step 3 Program the Echo controller and the
original 1-way transmitters into the security system
(see the system’s guide for instructions).
Echo Base
Transmitter/
Receiver Unit
Step 2 Plug in and route the Echo
transmitter/receiver unit wiring harness.
Using the adhesive tape, mount the Echo
transmitter/receiver onto an interior glass
(carefully clean the surface).
Host Omega Security
System Control
Module
( ( (ECHO
LED and
Valet Switch
plugs.
V
(congurations vary)
Installing & Programming The ECHO System

4
Overview Of The Controller
1
3
5
4
2
1) Antenna: Sends commands to the
system and receives conrmations for
2-way functions.
2) Touch Screen LCD: Displays all
controller function buttons as well as the
status of your system.
3) Home Button: This wakes up the
controller when the screen is off and
returns you back to the status screen.
4) Charger Port: This is where you plug
in the charger to recharge the control-
ler’s battery.
5) Keychain Loop: Use this loop to
attach the controller to your keychain.
5
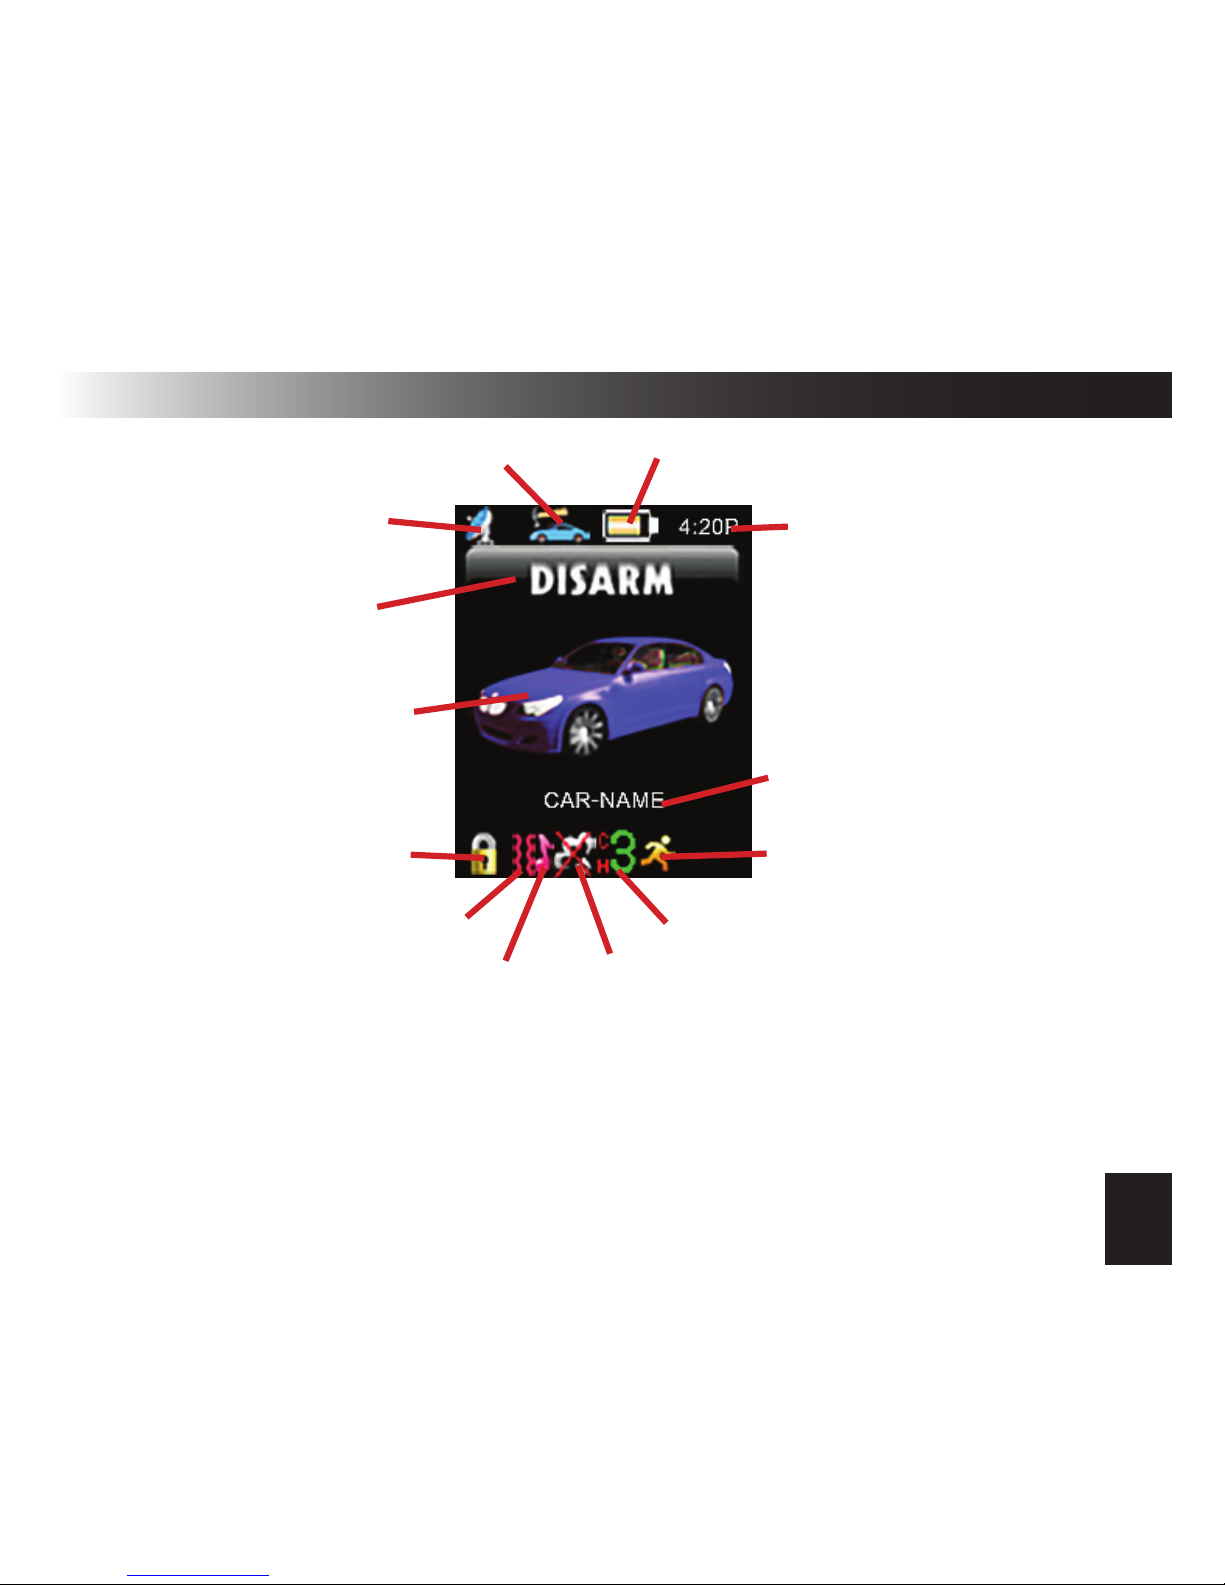
The ECHO-TOUCH Status Screen
Battery Level Indicator*
Clock/Timer
Current System State
Vehicle Image
(Selectable)
Alarm Clock ON icon
Vehicle Name
(Programmable)
CH2/CH3 Indicator
Remote Start ON/OFF Indicator
Melody/Voice Indicator
Vibration Mode Indicator
Lock/Unlock Indicator
Alarm Trigger Indicator
In Range Indicator
*The controller is powered by a built-in rechargeable battery. When the battery
level indicator shows a low battery, plug the supplied USB cable into the control-
ler, then connect the othe end to the supplied AC adapter or your computer’s USB
port. While charging, the indicator will increment from empty to full. When full, the
indicator will show a plug icon.
6
Using The ECHO-TOUCH Controller
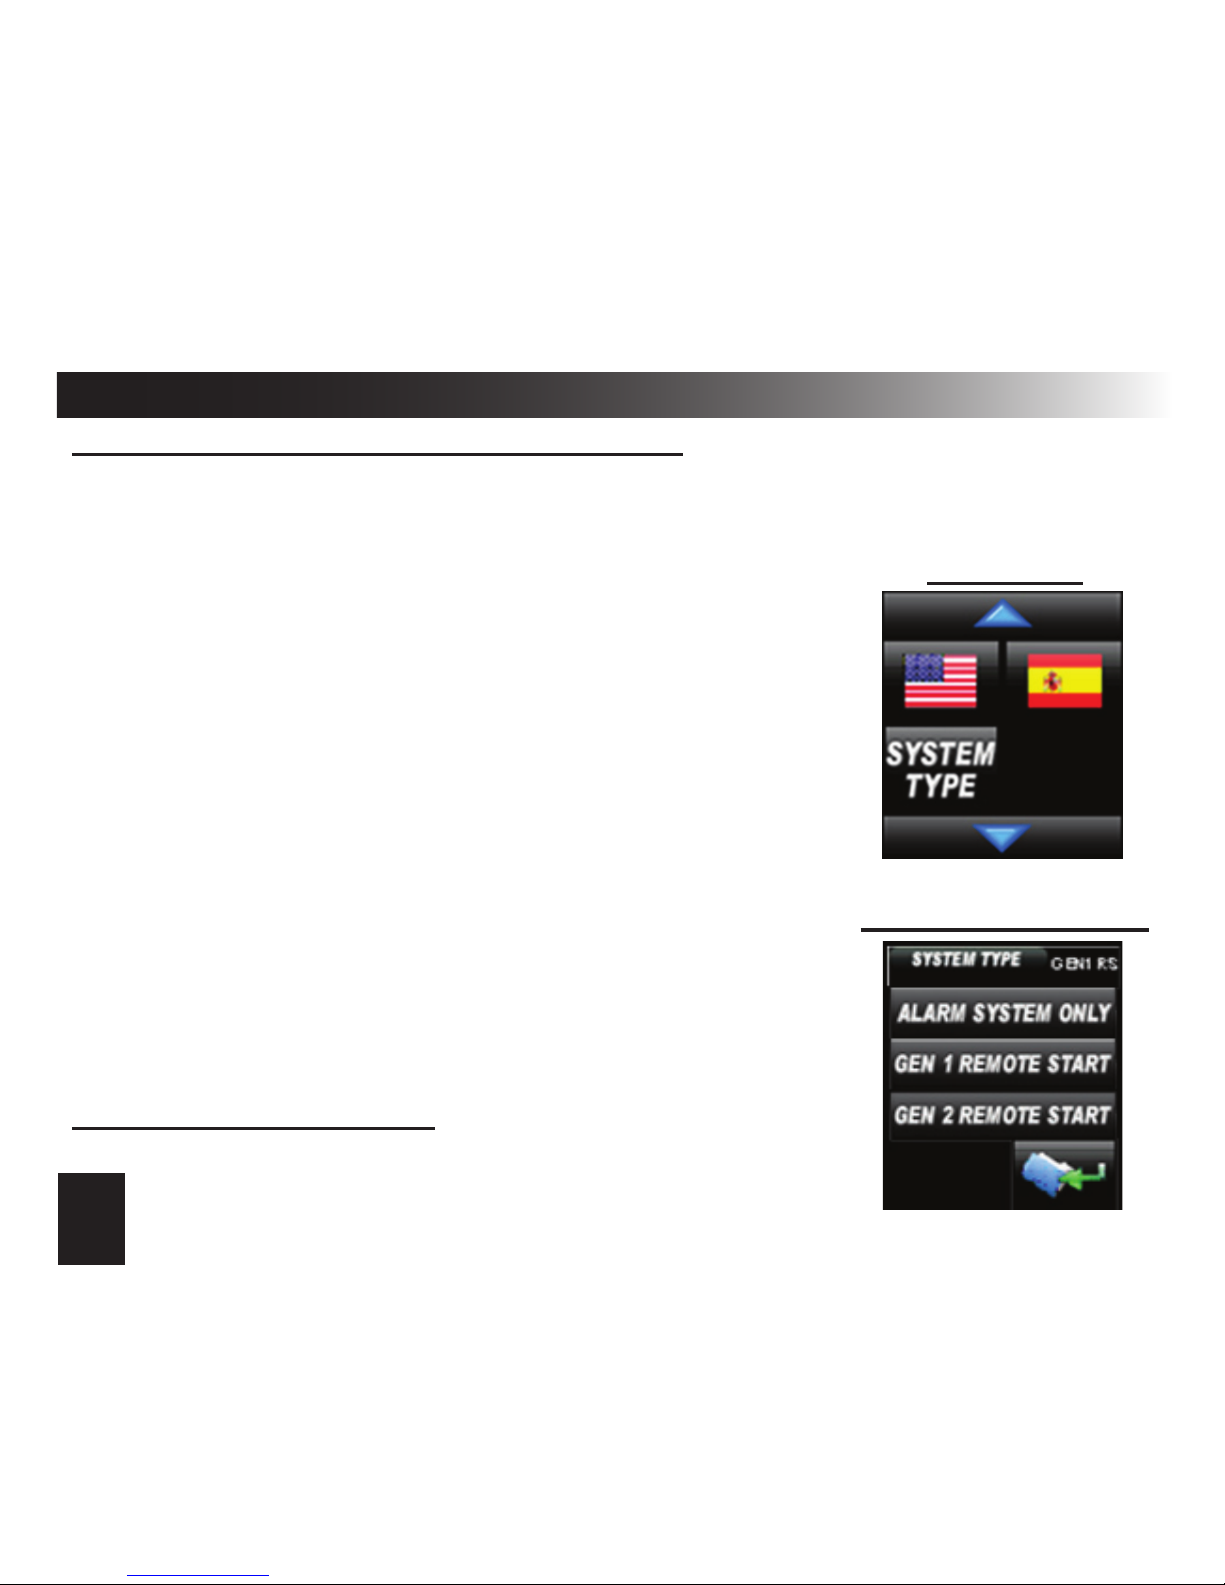
FIRST TIME USE & CONTROLLER SETUP
Before the controller will function properly, it must be matched to the type of
system you have. The ECHO-TOUCH is compatible with many different sys-
tems so please follow these steps to congure it for yours:
1) Press the HOME button to turn on the controller.
2) Tap the screen to see the control icons
3) Press the UP ARROW once until you see SCREEN
6 (pictured to the right).
4) Press the SYSTEM TYPE button
5) Select one of the following options:
Alarm System Only: Use this setting for systems with-
out a built-in remote start option.
GEN 1 Remote Start: Use this setting if you press
LOCK+UNLOCK to activate your remote starter.
GEN 2 Remote Start: Use this setting if you press the
“|||” button or a single dedicated “START” button to
activate your remote starter.
6) Press the “FOLDER” button to save the setting.
SCREEN 6
System Type Select
LANGUAGE SELECTION
Go to SCREEN 6 and choose: American ag = ENGLISH
Spanish ag = SPANISH
7
Using The ECHO-TOUCH Controller (cont’d)
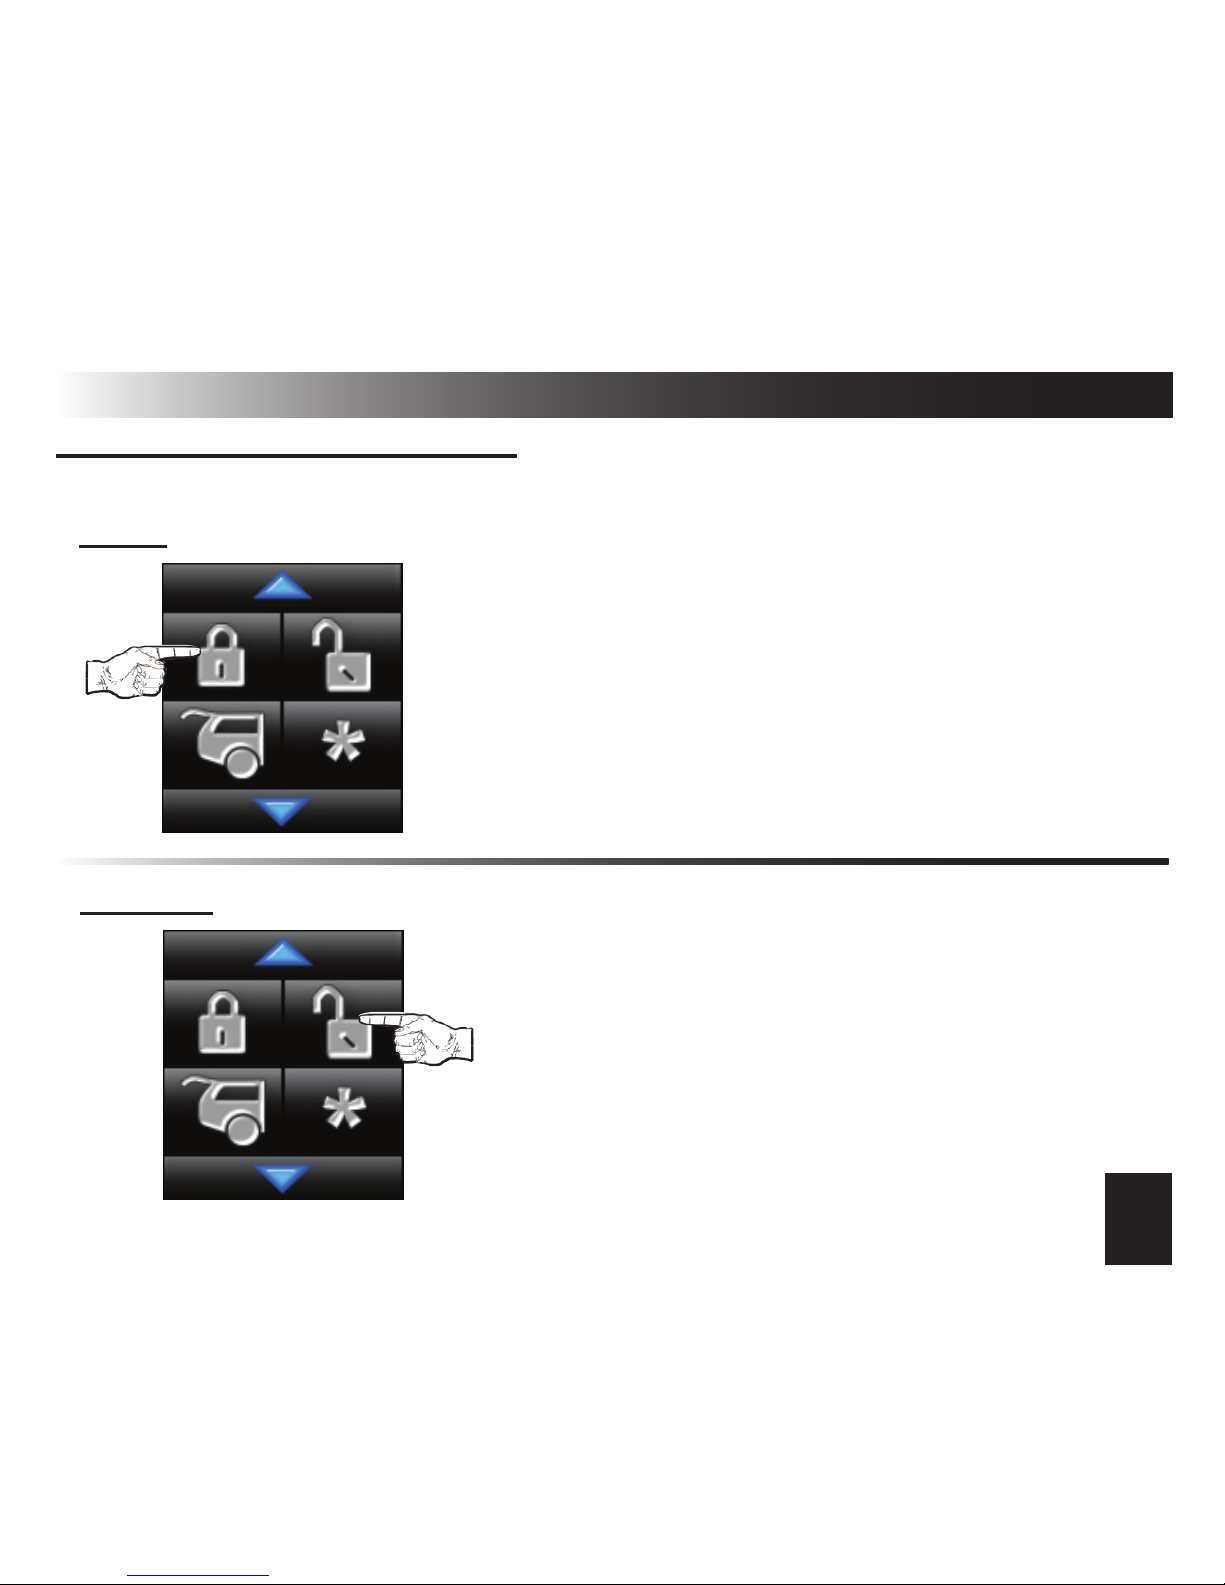
CONTROLLING YOUR SYSTEM
SCREEN 1: To access, press the HOME button and tap the screen.
LOCK: Press and release the “LOCK” icon.
YOUR SYSTEM SHOULD REACT THE SAME AS•
WITH YOUR ORIGINAL CONTROLLER.
UPON RECEIVING CONFIRMATION FROM YOUR•
SYSTEM, IT WILL PLAY THE LOCK/ARM ANIMATION
AND VOICE ALERT.
NOTE: PRESSING LOCK TWICE IN 5 SECONDS
STARTS THE PARKING TIMER. THE CLOCK WILL
CHANGE TO 0:00 AND START COUNTING IN MIN-
UTES & HOURS.
UNLOCK: Press and release the “UNLOCK” icon.
YOUR SYSTEM SHOULD REACT THE SAME AS•
WITH YOUR ORIGINAL CONTROLLER.
UPON RECEIVING CONFIRMATION FROM YOUR•
SYSTEM, IT WILL PLAY THE UNLOCK/DISARM ANIMA-
TION AND VOICE ALERT.

8
TRUNK RELEASE / CHANNEL 2: Press the and hold the “TRUNK” icon for 3
seconds.
YOUR SYSTEM SHOULD REACT THE SAME AS•
WITH YOUR ORIGINAL CONTROLLER.
UPON RECEIVING CONFIRMATION FROM YOUR•
SYSTEM, IT WILL PLAY THE TRUNK RELEASE ANIMA-
TION AND VOICE ALERT
START (GEN 1/GEN 2 REMOTE START): Press and release the “ ” icon us-
ing the same method as with the original controller (i.e., 1 or 2 presses, etc).
YOUR SYSTEM SHOULD REACT THE SAME AS•
WITH YOUR ORIGINAL CONTROLLER.
UPON RECEIVING CONFIRMATION FROM YOUR•
SYSTEM, IT WILL PLAY THE REMOTE START ANIMA-
TION, AND PLAY THE REMOTE START ON/OFF VOICE
ALERT.
THE CLOCK WILL CHANGE TO 0:00 TO START THE•
REMOTE START TIMER. IT WILL TIME HOW LONG
THE ENGINE RUNS IN MINUTES & HOURS.
*
Using The ECHO-TOUCH Controller (cont’d)
9
Using The ECHO-TOUCH Controller (cont’d)
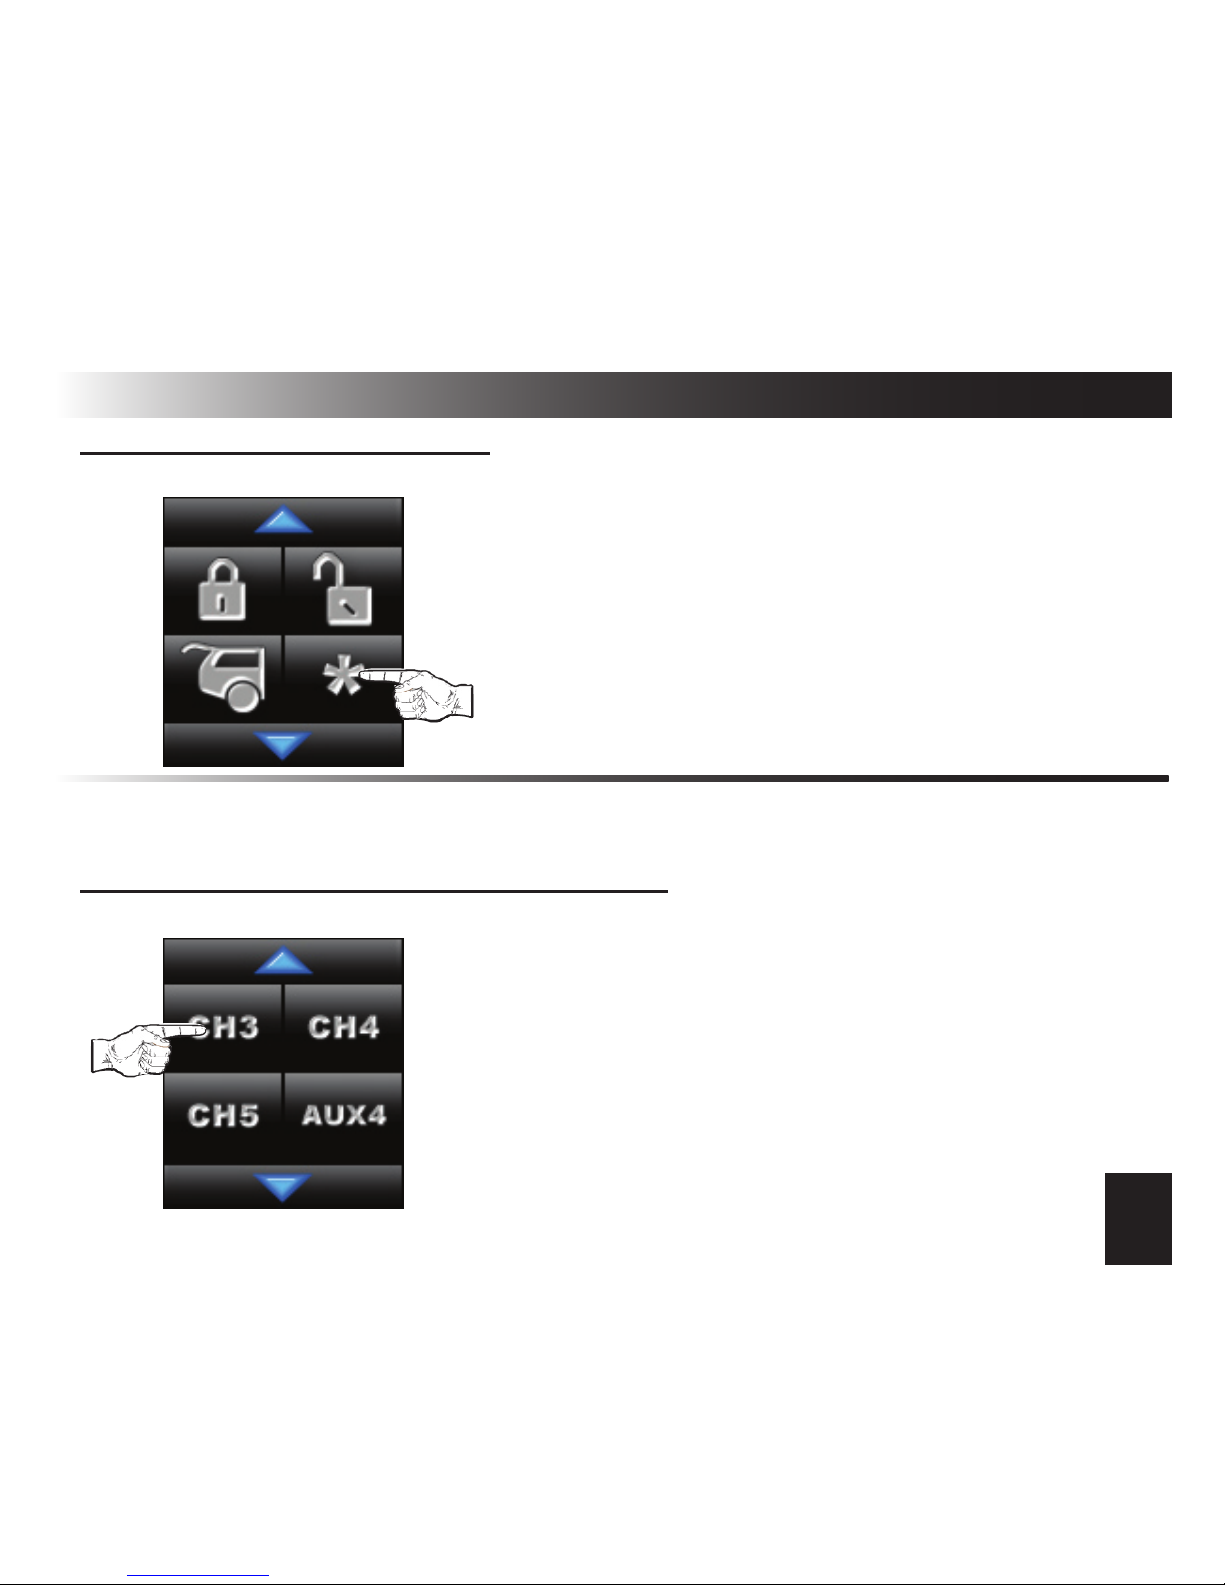
CHANNEL 3 (ALARM ONLY): Press and release the “ ” icon using the same
method as with the original controller (i.e., 1 or 2 presses, etc).
YOUR SYSTEM SHOULD REACT THE SAME AS•
WITH YOUR ORIGINAL CONTROLLER.
UPON RECEIVING CONFIRMATION FROM YOUR•
SYSTEM, IT WILL PLAY THE CHANNEL 3 ANIMATION
AND VOICE ALERT.
*
CHANNEL 3 (GEN 1/GEN 2 REM START): Press and release the “CH3” icon
using the same method as with the original controller (i.e., 1 or 2 presses, etc).
YOUR SYSTEM SHOULD REACT THE SAME AS•
WITH YOUR ORIGINAL CONTROLLER.
UPON RECEIVING CONFIRMATION FROM YOUR•
SYSTEM, IT WILL PLAY THE CHANNEL 3 ANIMATION
AND VOICE ALERT.
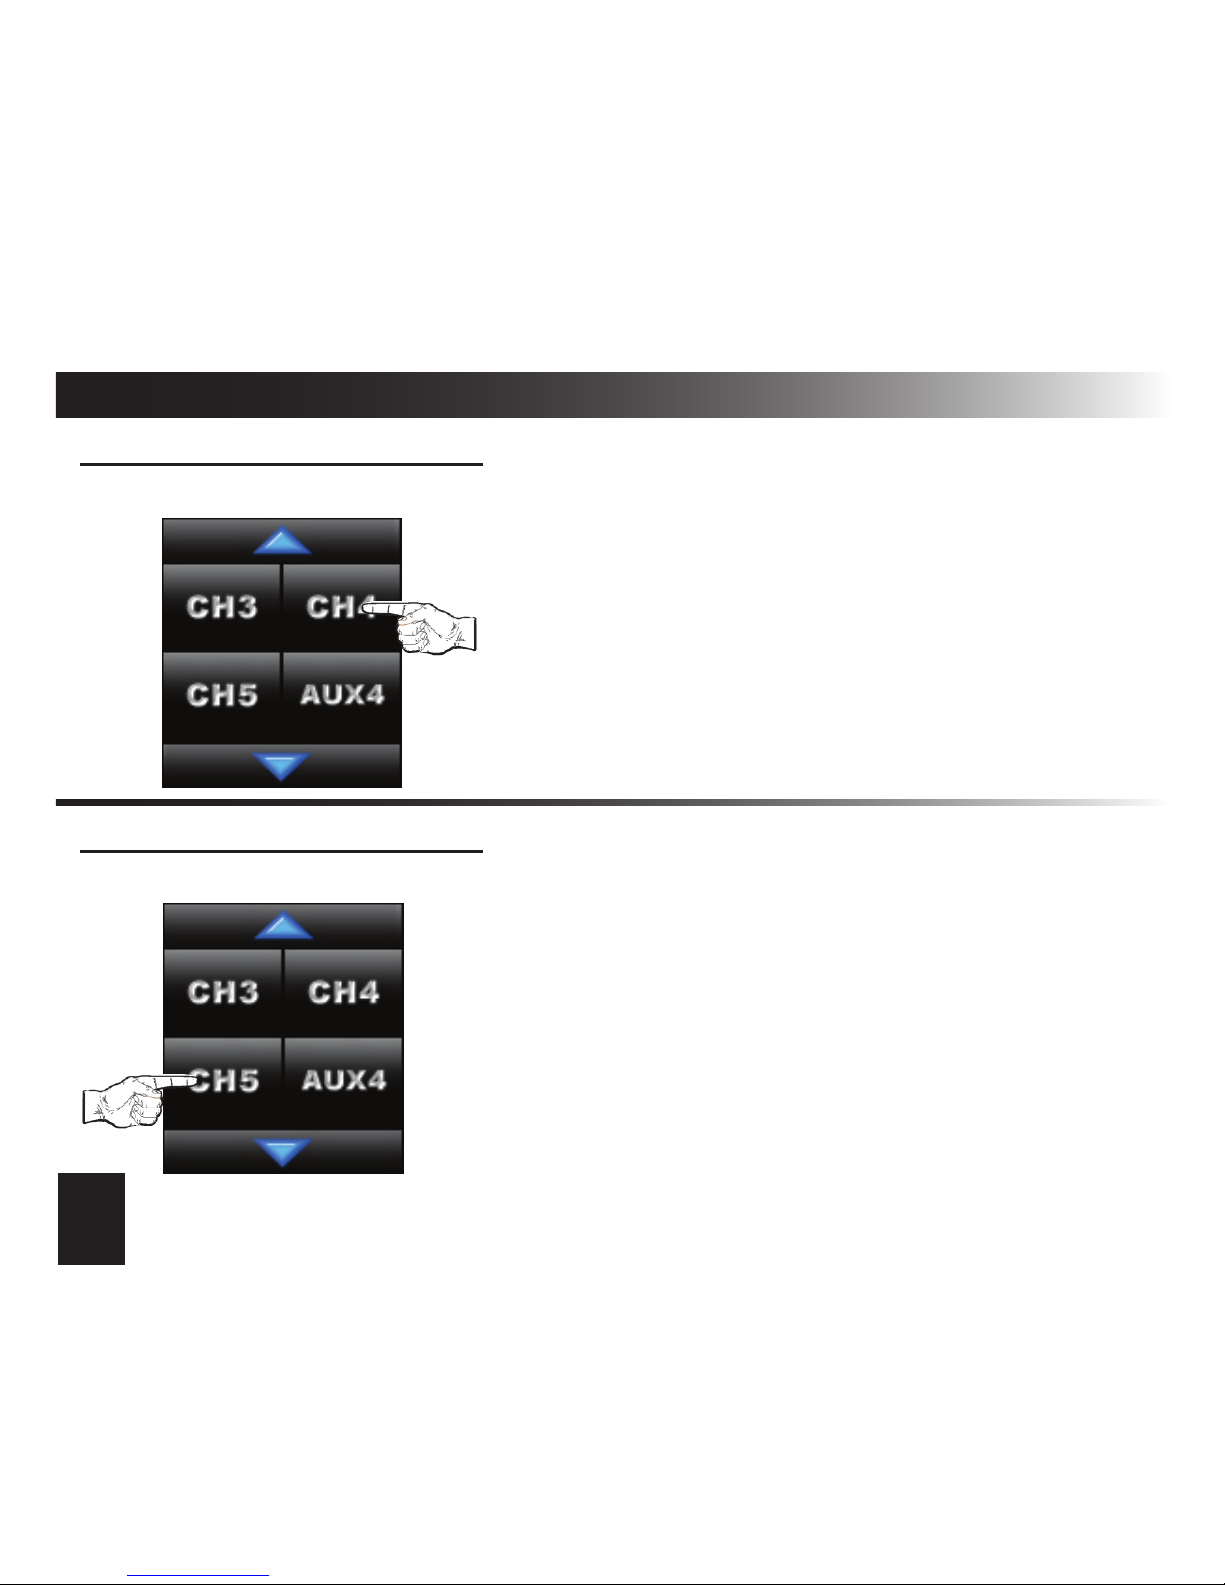
SCREEN 2: To access, press the HOME button, tap the screen, press the down
arrow once.
10
Using The ECHO-TOUCH Controller (cont’d)
CHANNEL 4 (IF EQUIPPED): Press and release the “CH4” icon using the
same method as with your original controller (i.e., 1 or 2 presses, etc).
YOUR SYSTEM SHOULD REACT THE SAME AS•
WITH YOUR ORIGINAL CONTROLLER.
NOTE: THE “CH3” ICON WILL NOT BE VISIBLE
WHEN THE CONTROLLER IS SET FOR “ALARM
ONLY” UNDER THE “SYSTEM TYPE” SETTING.
YOUR SYSTEM SHOULD REACT THE SAME AS•
WITH YOUR ORIGINAL CONTROLLER.
NOTE: THE “CH3” ICON WILL NOT BE VISIBLE
WHEN THE CONTROLLER IS SET FOR “ALARM
ONLY” UNDER THE “SYSTEM TYPE” SETTING.
CHANNEL 5 (IF EQUIPPED): Press and release the “CH5” icon using the
same method as with your original controller (i.e., 1 or 2 presses, etc).
11
Using The ECHO-TOUCH Controller (cont’d)
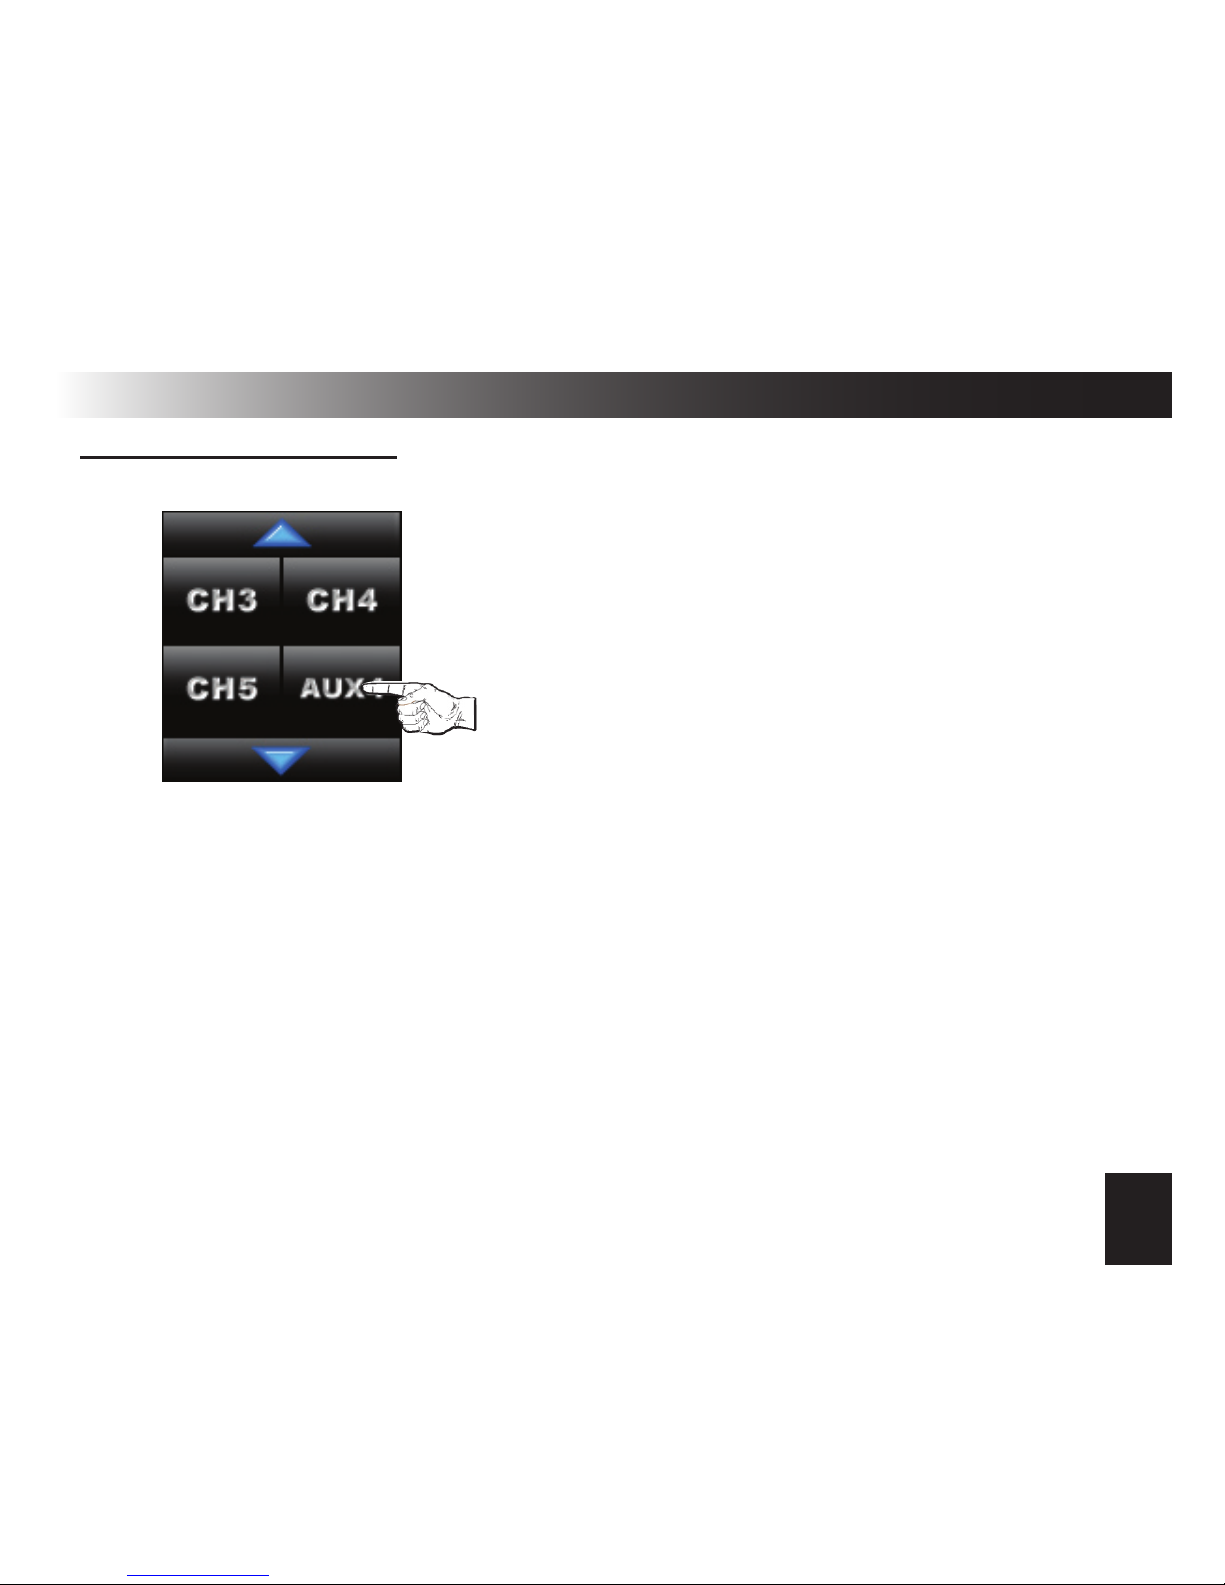
AUX 4 (IF EQUIPPED): Press and release the “AUX4” icon using the same
method as with your original controller (i.e., 1 or 2 presses, etc).
AUX4 IS A VIRTUAL CHANNEL OUTPUT ON THE•
SYSTEM’S DATA PORT. IF USED, IT WAS CONFIG-
URED BY YOUR INSTALLER.
YOUR SYSTEM SHOULD REACT THE SAME AS•
WITH YOUR ORIGINAL CONTROLLER.
NOTE: THE “CH3” ICON WILL NOT BE VISIBLE
WHEN THE CONTROLLER IS SET FOR “ALARM
ONLY” UNDER THE “SYSTEM TYPE” SETTING.
12
Mutli-Car Operation & Vehicle Proles
MULTI-CAR OPERATION
The TOUCH controller can operate up to 2 different systems. When control-
ling 2 systems, the controller will receive all status updates on the currently
selected vehicle prole and will receive only trigger alerts for the 2nd vehicle.
You can switch from one car to the other at anytime as well as choose a unique
image and name for each vehicle. Use the following steps to change vehicle
proles as well as select the vehicle image and name.
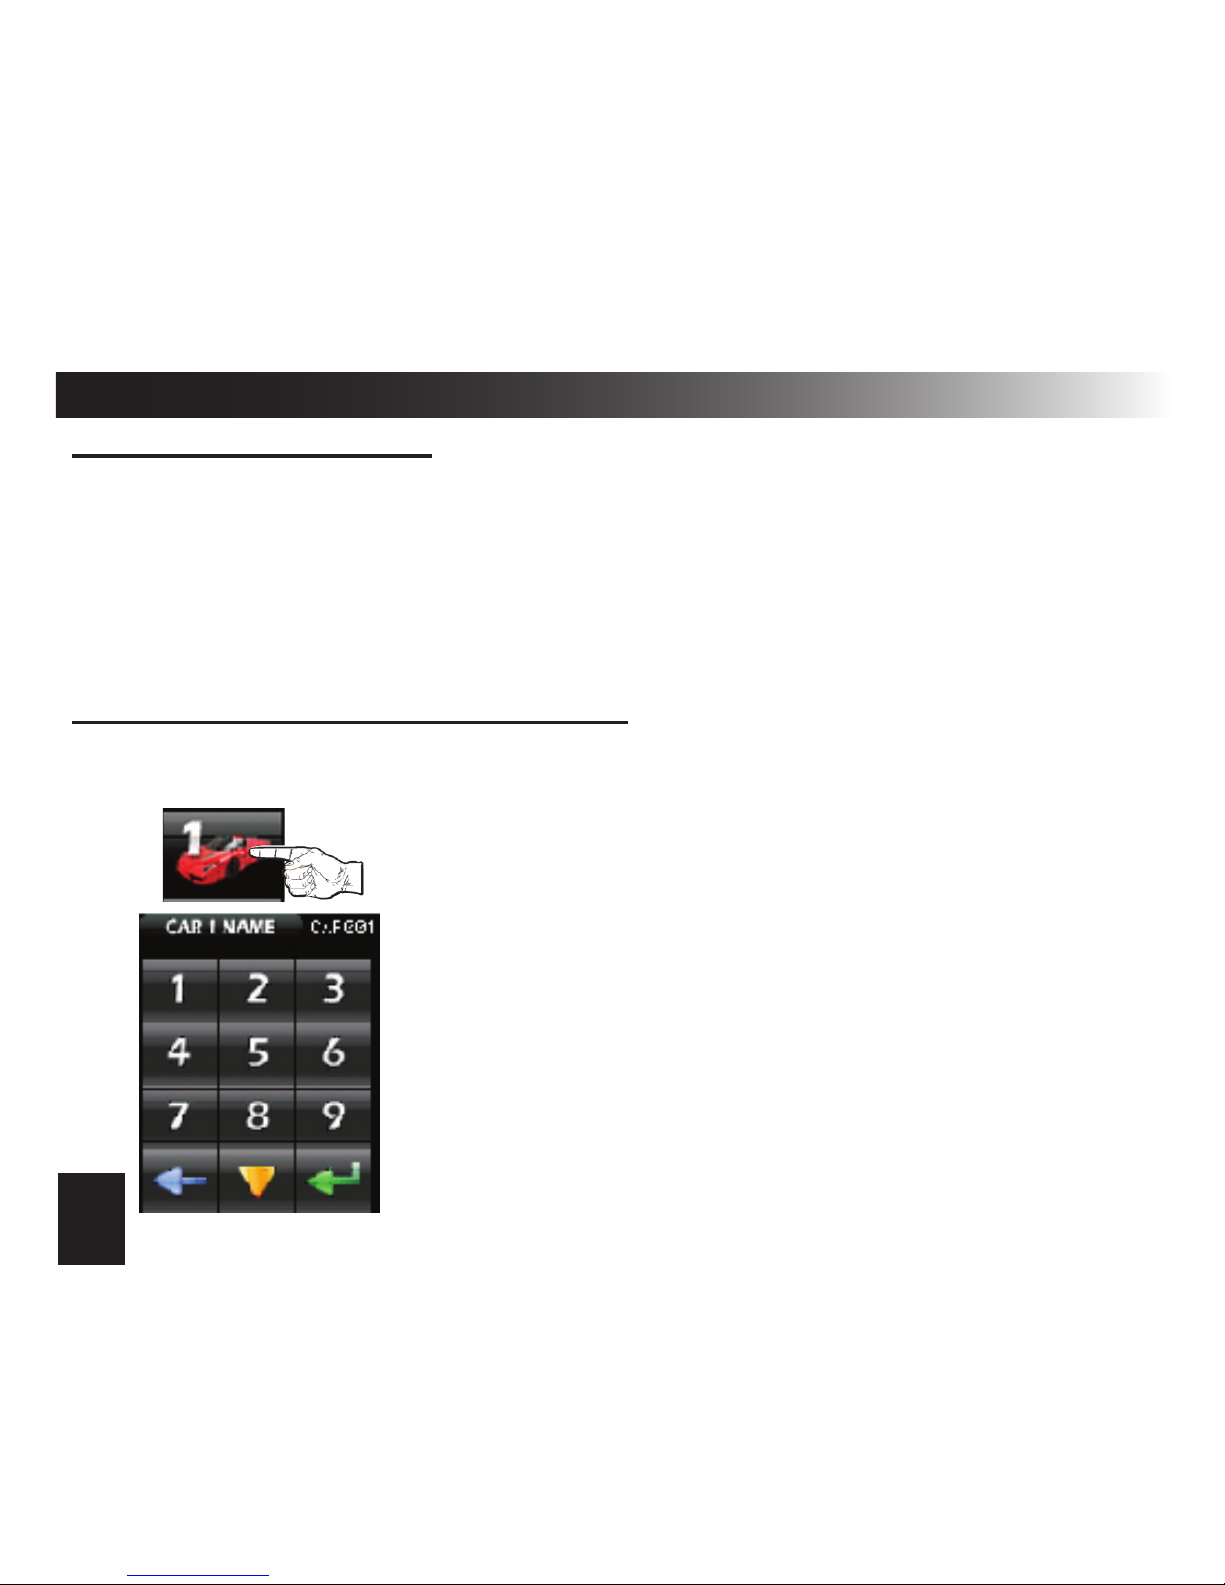
1) Access SCREEN 3: press the HOME button, tap the screen, press the down
arrow twice. 2) Press the “CAR1” icon (pictured to the left). You will
then see the “CAR 1 NAME” screen.
3) Program the name you desire (up to 16 characters)
BLUE arrow: Backspace
YELLOW arrow: Scrolls through numbers,
letters, and symbol screens
4) Press the GREEN arrow to save the name.
NOTE: Programming the name for CAR2 is the same
procedure, except you will need to press the CAR2
icon in step 2.
PROGRAMMING THE VEHICLE NAME
13
Mutli-Car Operation & Vehicle Proles (cont’d)
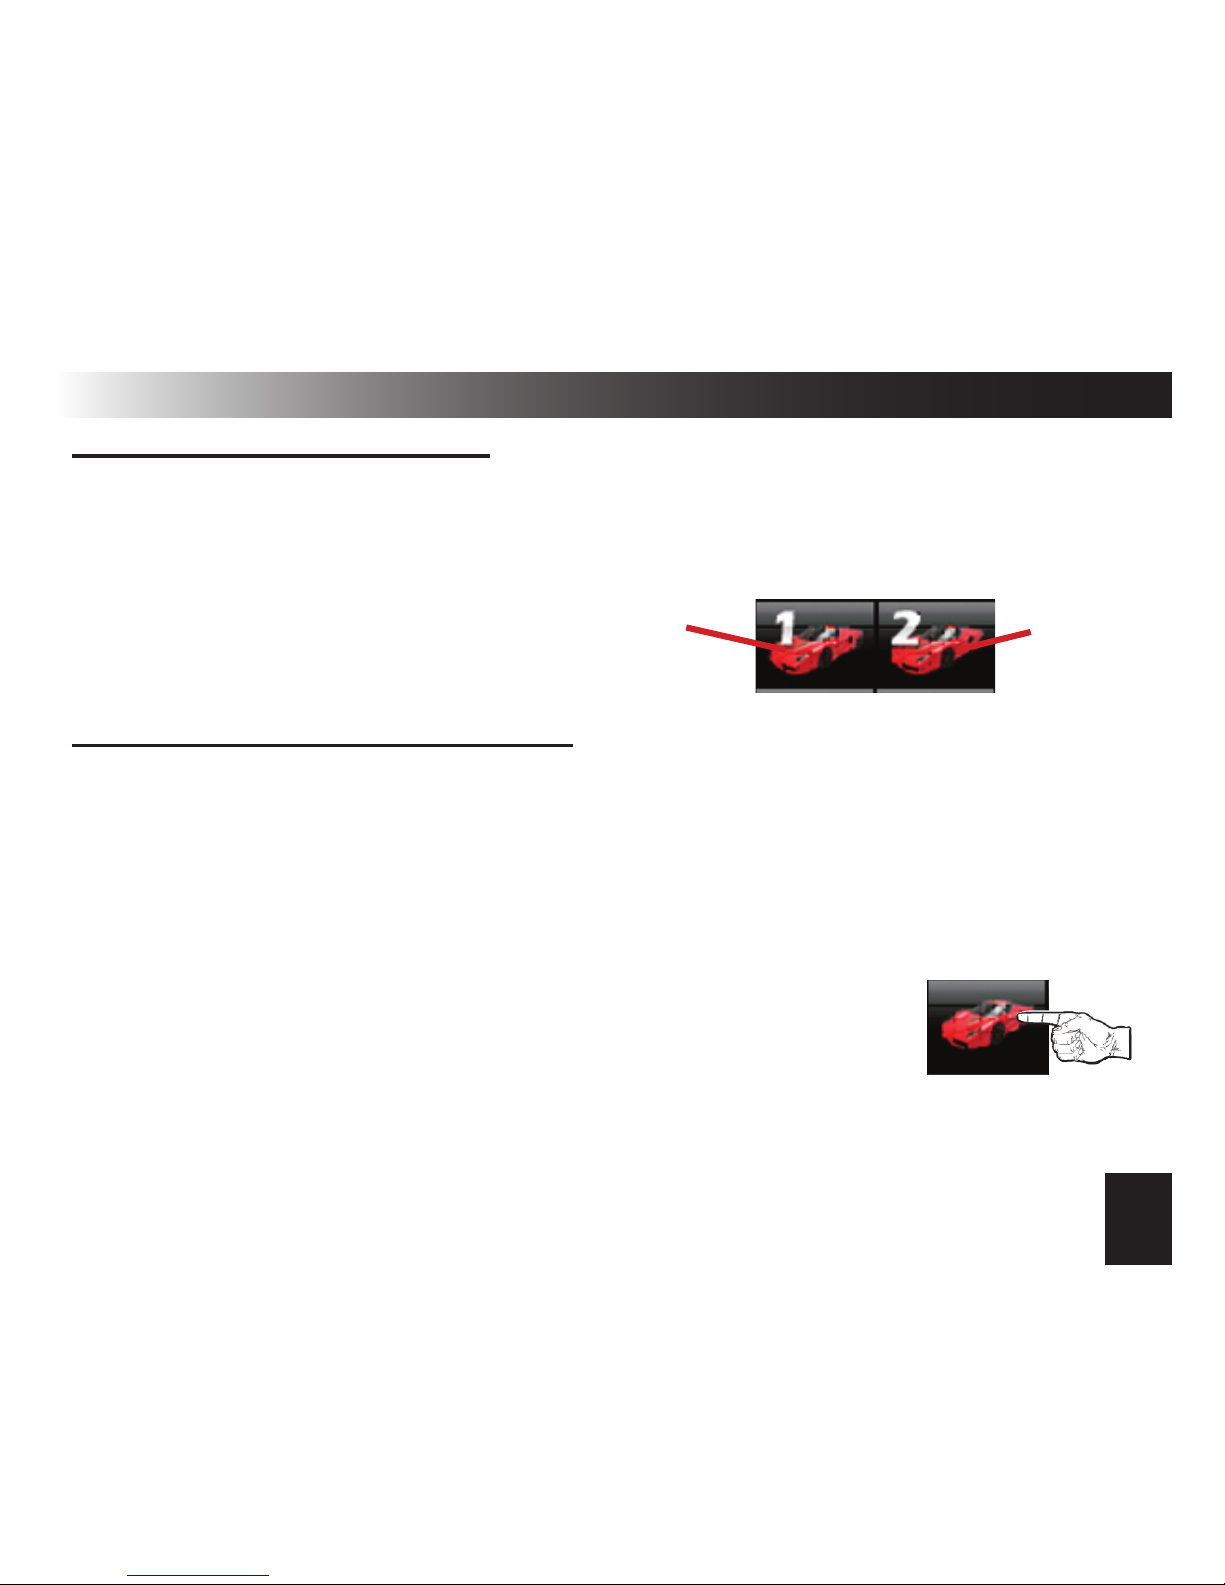
SELECTING CAR1 OR CAR2
Once the vehicle names have been programmed for both vehicle proles, you
can simply switch between the two as needed. To do so:
1) Tap the desired vehicle’s icon (CAR1 or CAR2) on SCREEN 3 as if you are
going to change the name.
2) Then, press the GREEN arrow
icon to select that prole.
CAR 1 CAR 2
SELECTING THE VEHICLE IMAGE
You can select a different vehicle image for each vehicle prole if desired.
The controller is preloaded with 3 different vehicle images, a CAR, TRUCK, and
SUV. To change the image, follow these steps:
1) Make sure you are already in the desired vehicle prole
(CAR1 or CAR2).
2) Access SCREEN 3
3) Press the VEHICLE IMAGE icon (pictured to the right) to
view the image select screen.
4) Press the GREEN UP ARROW to change the image.
5) Press the FOLDER icon to save your selection.

14
Programming The Controller Options
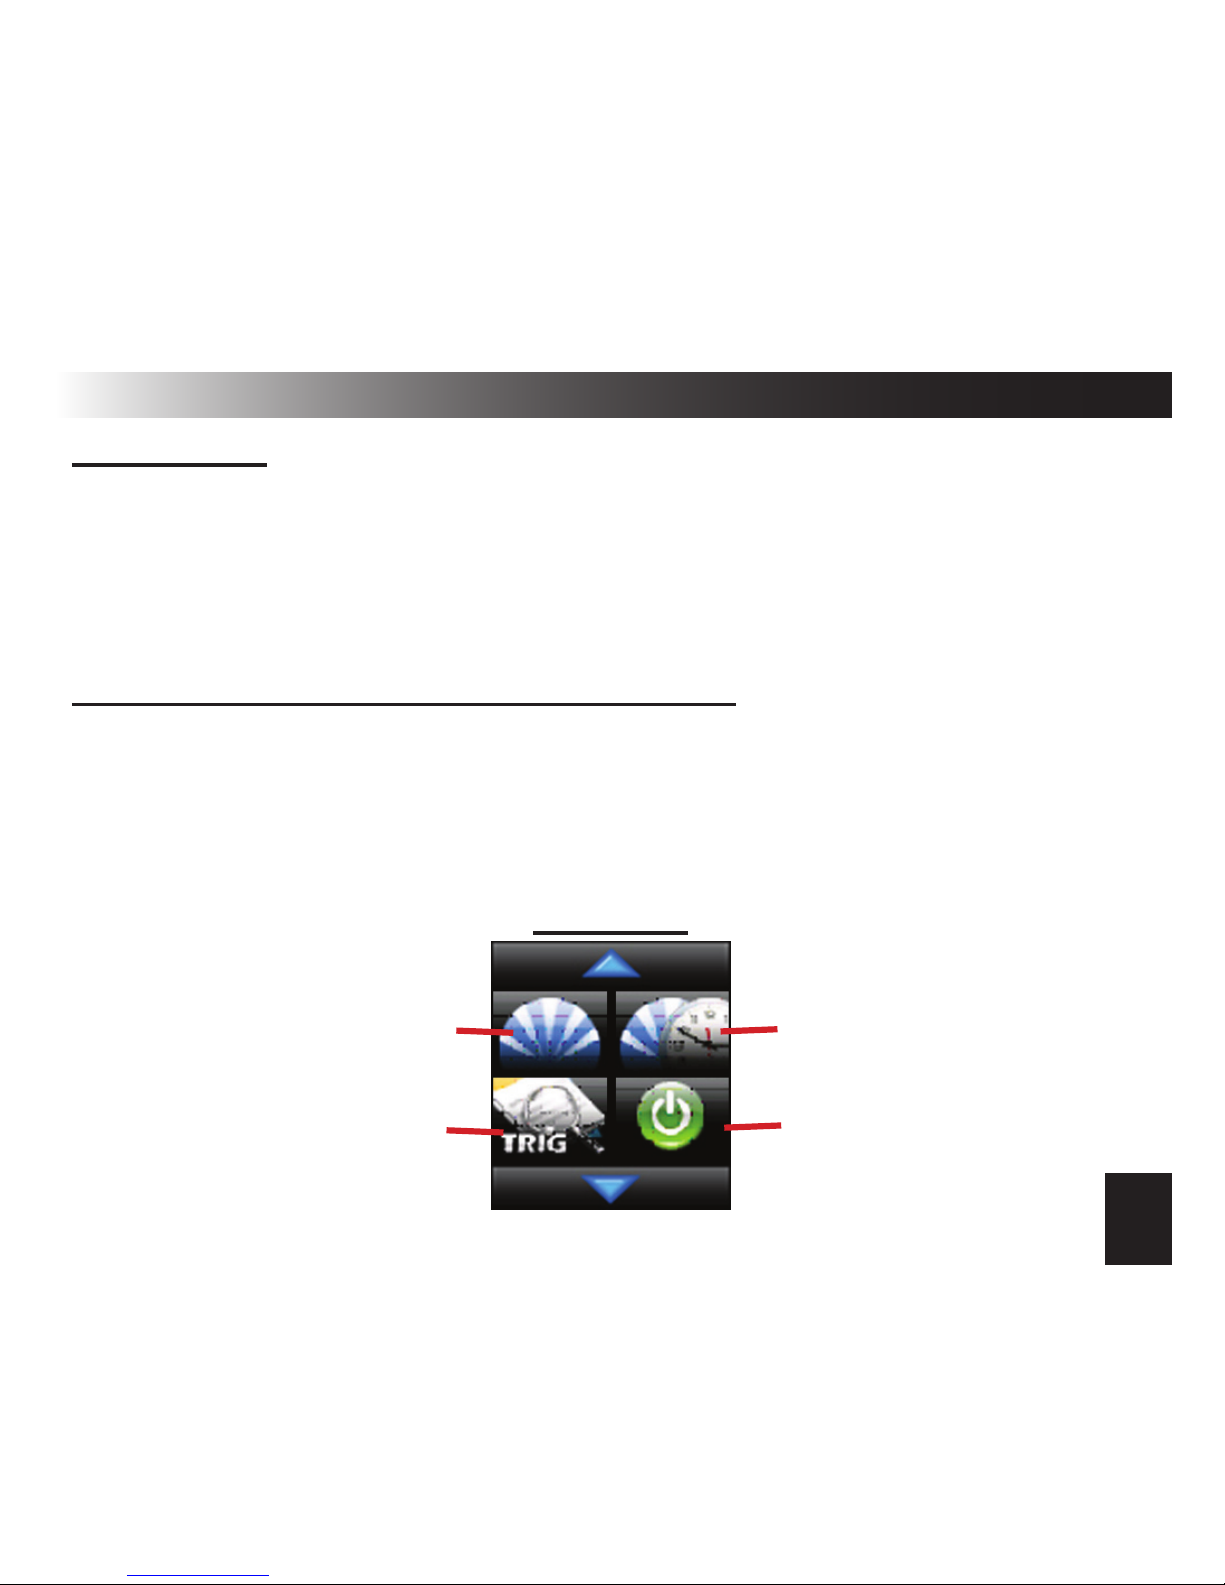
SELECTING BUTTON BEEP, MELODY, & VIBRATE MODES
The controller has 3 different type of alert modes. BUTTON BEEP congures
the controller to beep as a conrmation when you press any icon on the screen.
The MELODY and VIBRATE settings congure how you are alerted any time
the controller receives a conrmation or alert from the vehicle’s system. MELO-
DY turns on/off all audible alerts including voice alerts. VIBRATE mode turns on/
off vibration alert. To change these options:
1) Access SCREEN 3 (see page 12) and press the alert icon (pictured below).
2) Change the alert settings as desired according to the diagram below.
3) Press the folder icon to save the setting
Button Beep ON
Button Beep OFF
Vibrate ON/OFF Melody ON/OFF
Save Settings
Vibrate ON Indicator
Melody ON Indicator
Alert Icon Alert Settings
1 2

15
Programming The Controller Options (cont’d)
CLOCK & TIME OPTIONS OVERVIEW
The controller’s clock has 3 programmable options. You can set the time
& date, select 12 or 24 hour format, and program the built-in alarm clock. To
program these options, you must rst access SCREEN 4 by pressing the home
button, tapping the screen, and pressing the DOWN ARROW 3 times.
SCREEN 4
Clock Format
12/24 Hour
Demo Mode
See pg. 17
Set Time/Date
Set Alarm Clock
1) Access SCREEN 4 and press the “SET TIME/DATE” icon.
2) Use the number pad screen to set the date. Format: MMDDYY
~ BLUE arrow = Backspace
3) Once the date is correct, press the GREEN arrow to save.
SETTING THE TIME & DATE

16
Programming The Controller Options (cont’d)
SETTING THE TIME & DATE (cont’d)
4) Now, set the time using the +/- increment icons. You can increase or
decrease the minute or hour by increments of 5 or 1.
~Use the GREEN UP ARROW to change from hours to minutes.
5) Press the FOLDER icon to save the date & time.
SETTING THE TIME FORMAT (12 OR 24 HOUR)
1) Access SCREEN 4 (see page 15)
2) Press the TIME FORMAT icon (pictured on page 15) to toggle between 12 &
24 hour formats.
SETTING THE ALARM CLOCK
1) Access SCREEN 4 (see page 15)
2) Press the ALARM CLOCK icon (pictured on page 15) to access the alarm
clock screen.
3) Use the number pad screen to set the desired alarm time exactly in the same
method used to set the clock time.
4) Press the FOLDER icon to save the alarm clock setting.
Note: To turn the alarm clock off, set the alarm time to midnight
(12:00AM-12HR or 0:00-24HR)
17
Programming The Controller Options (cont’d)
DEMO MODE
Demo mode will show you a demonstration movie of all the controller’s avail-
able functions along with conrmation animations and voice alerts. To view
demo mode, use the following steps.
1) Access SCREEN 4 (see page 15).
2) Press the DEMO icon (pictured on page 15).
LCD SCREEN DISPLAY OPTIONS OVERVIEW
The LCD screen has two adjustable parameters, SCREEN ON TIME and
SCREEN BRIGHTNESS. Both settings have an effect on battery life. So, it is
recommended to use the lowest settings your are comfortable with. These set-
tings are accessed from SCREEN 5. To access SCREEN 5, press the home
button, tap the screen, and press the DOWN ARROW 4 times.
SCREEN 5
Screen ON Time
Power Off
See pg. 19
Screen Brightness
Trigger History
See pg. 18

18
Programming The Controller Options (cont’d)
1) Access SCREEN 5 (see page 17)
2) Press the SCREEN ON TIME icon (see page 17)
3) Choose the 5, 10, or 15 second preset and, if desired, adjust with the +/- 1
second increment icons.
4) Press the FOLDER icon to save the setting
SETTING THE SCREEN ON TIME
1) Access SCREEN 5 (see page 17)
2) Press the SCREEN BRIGHTNESS icon (see page 17)
3) Choose any of the 1-5 brightness settings to your liking.
4) Press the FOLDER icon to save the setting
SETTING THE SCREEN BRIGHTNESS
The controller will store recent alarm trigger events in a log that displays the
date & time of the trigger as well as which zone was triggered. The history is
cleared when you turn on the vehicle’s ignition. To view the trigger history:
1) Access SCREEN 5 (see page 17)
2) Press the TRIGGER HISTORY icon (see page 17)
3) Press the HOME button to exit.
VIEWING THE ALARM TRIGGER HISTORY
Other Controller Functions

19
Other Controller Functions (cont’d)
The controller can be turned off completely to save battery life while traveling
or out of range of the vehicle. To turn the controller off:
1) Access SCREEN 5 (see page 17)
2) Press the POWER OFF icon (see page 17)
3) You will see a warning screen asking you to conrm.
4) Press the FOLDER icon to conrm.
To turn the controller back on, press the HOME button.
POWER OFF MODE
The controller has 2 convenient timer functions. The PARKING TIMER tells
you how long you’ve been parked in case you are at a parking meter or other
parking areas with time restrictions. The REMOTE START TIMER tells you how
long your engine has been running in remote start mode. This is a good indica-
tor to judge how long you have left in the remote start run cycle.
PARKING TIMER: Press LOCK twice within 5 seconds. When the controller
receives both LOCK conrmations, it will start the timer.
REMOTE START TIMER: This turns on every time you remote start.
Note: Pressing the home screen during either timer mode will show the
time clock for 2 seconds before returning to the timer.
PARKING TIMER & REMOTE START TIMER

20
THIS IS A TEMPORARY COVER
THE FINAL COVER IS IN A SEPARATE FILE
Table of contents
Popular Car Alarm manuals by other brands

Auto Page
Auto Page Professional Vehicle Security System RF-315 Operation manual

Auto Mate
Auto Mate 3303A owner's guide

Auto Page
Auto Page C3-RS-727A LCD Operation manual

Autostart
Autostart AS-6450VTW-FM Wiring schematic

Autostart
Autostart AS-6660i TW-FM Wiring schematic

Hyundai
Hyundai D-300A operating manual


