Eckman EKBP1 User manual

7.2V CORDLESS GARDEN PRUNER
MODEL EKBP1
INSTRUCTION MANUAL
IMPORTANT:Read and understand this manual before assembling or operating this
appliance. Improper use of this appliance can cause severe injury or death. Keep this manual
in a safe place for future reference.
Any questions please call the Eckman helpline on:0844 441 3011 or go to www.eckman.co.uk

1
CONTENTS
Explanation of Safety Symbols......................................................... 2
Safety Instructions...................................................................... 2-5
Functional Description............................................................... 5
Technical Data............................................................................ 5
Product Identification................................................................ 5-6
Charging the Battery........................................................................ 6
Operation........................................................................................... 6-7
Maintenance and Service................................................................. 7-8
Guarantee......................................................................................... 8
EC Declaration Of Conformity...................................................... 9
Exploded View......................................................................................... 10
Part List................................................................................................... 11

2
Explanation of Safety Symbols
- Warning!
- Do not use in rain or wet
conditions.
- Read the instruction manual
before use
-Always wear eye protection,
muffler and helmet.
Safety Instructions
Know your machinel
·Warning! Carefully observe the instructions in this manual to reduce the risk of personal injury or material damage.
·Read all of this manual carefully before operating the machine.
·Before operating the machine , make sure that you know how to switch the tool off in an emergency .
·Retain this manual for future reference .
General Safety Rules
WARNING! Read all instructions, failure to follow all instructions listed below may result in electric shock, fire and/or
serious injury. The term “power tool” in all of the warnings listed below refers to your battery operated (cordless) power
tool.
SAVE THE INSTRUCTIONS
1) Work area
a) Keep work area clean and well lit. Cluttered and dark areas invite injuries.
b) Do not operate power tools in explosive atmospheres, such as in the presence of flammable liquids, gases
or dust. Power tools create sparks which may ignite the dust or fumes.
c) Keep children and bystanders away while operating a power tool. Distractions can cause you to lose control.
2) Electrical safety
a) Avoid body contact with earthed or grounded surfaces such as pipes, radiators, ranges and refrigerators.
There is an increased risk of electric shock if your body is earthed or grounded.
b) Do not expose power tools to rain or wet conditions. Water entering a power tool will increase the risk of electric
shock.
3) Personal safety
a) Stay alert, watch what you are doing and use common sense when operating a power tool. Do not use a
power tool while your tired or under the influence of drugs, alcohol or medication. A moment of inattention while
operating power tools may result in serious personal injury.
b) Use safety equipment. Always wear eye protection. Safety equipment such as dust mask, non-skid safety shoes,
hard hat, or hearing protection used for appropriate conditions will reduce personal injuries.
c) Avoid accidental starting. Ensure the switch is in the off position before plugging in. carrying power tools with
your finger on the switch or plugging in power tools that have the switch on invites accidents.
d) Remove any adjusting key or wrench before turning the power tool on. A wrench or a key left attached to a
rotating part of the power tool may result in personal injury.
e) Do not overreach. Keep proper footing and balance at all times. This enables better control of the power tool in
unexpected situations.
f) Dress properly. Do not wear loose clothing or jewellery. Keep your hair, clothing and gloves away from
moving parts. Loose clothes, jewellery or long hair can be caught in moving parts.

3
g) If devices are provided for the connection of dust extraction and collection facilities, ensure these are
connected and properly used. Use of these devices can reduce dust related hazards.
4) Power tools use and care
a) Do not force the power tool. Use the correct power tool for your application. The correct power tool will do the
job better and safer at the rate for which it was designed.
b) Do not use the power tool if the switch does not turn it on and off. Any power tool that cannot be controlled with
the switch is dangerous and must be repaired.
c) Disconnect the plug from the power source before making any adjustments, changing accessories, or
storing power tools. Such preventive safety measures reduce the risk of starting the power tool accidentally.
d) Store idle power tools out of the reach of children and do not allow persons unfamiliar with the power tool or
these instructions to operate the power tool. Power tools are dangerous in the hands of untrained users.
e) Maintain power tools. Check for misalignment or binding of moving parts, breakage of parts and any other
condition that may affect the power tools operation. If damaged, have the power tool repaired before use. Many
accidents are caused by poorly maintained power tools.
f) Keep cutting tools sharp and clean. Properly maintained cutting tools with sharp cutting edges are less likely to
bind and are easier to control.
g) Use the power tool, accessories and tool bits etc., in accordance with these instructions and in the manner
intended for the particular type of power tool, taking into account the working conditions and the work to be
performed. Use of the power tool for operations different form intended could result in a hazardous situation.
5) Battery tool use and care
a) Ensure the switch is in the off position before inserting battery pack. Inserting the battery pack into power tools
that have the switch on invites accidents.
b) Recharge only with the charger specified by the manufacturer. A charger that is suitable for one type of battery
pack may create a risk of fire when used with another battery pack.
c) Use power tools only with specifically designated battery packs. Use of any other battery packs may create a
risk of injury and fire.
d) When battery pack is not in use, keep it away from other metal objects like paper clips, coins, keys, nails,
screws, or other small metal objects that can make a connection from one terminal to another. Shorting the
battery terminals together may cause burns or a fire.
e) Under abusive conditions, liquid may be ejected from the battery; avoid contact.
If contact accidentally occurs, flush with water. If liquid contacts eyes, additionally seek medical help. Liquid
ejected from the battery may cause irritation or burns.
6) Service
a) Have your power tool serviced by a qualified repair person using only identical replacement parts. This will
ensure that the safety of the power tool is maintained.
Additional safety instructions for battery and charger Battery
READALL INSTRUCTIONS CAREFULLYAND KEEP IN A SAFE PLACE FOR FUTURE REFERENCE.
1. Do not incinerate the battery even if it is severely damaged or is completely worn out. The battery can explode in a fire.
2. A small leakage of liquid from the battery cells may occur under extreme usage or temperature conditions. This does
not indicate a failure. However, if the outer seal is broken and this leakage gets on your skin:
a. Wash quickly with soap and water.
b. Neutralize with a mild acid such as lemon juice or vinegar.
c. If battery liquid gets in your eyes, flush them with clean water for a minimum of minutes and seek immediate medical
attention. (Medical notes: the liquid is 25-35% solution of potassium hydroxide.)
3. Do not connect the positive pole and the negative pole of the battery with any metal objects. Battery could be short
circuited causing damage to the battery and possibly causing severe burns or fire.
4. Charge the battery only in the chargers supplied with the product.
5. NOTE: The battery in your tool is the Lithium-ion type, with no self-discharge or memory effect.

4
Charger
·Charger’s plug must match the outlet. Never modify the plug in any way. Unmodified plugs and matching outlets will
reduce risk of electric shock.
·Use your charger only to charge batteries of the type supplied with your tool. Other batteries could burst, causing
personal injury and damage.
·Only 2 battery packs are allowed to be charged continuously in order to prevent overheating of charger, necessary rest
time is required to let the charger cool down before further charging.
·When charging is finished, unplug the charger from mains socket outlet and take away the battery pack from the charger,
do not leave the battery pack in the charger.
·Never carry the charger by its cord or pull it to disconnect from the socket. Keep the cord away from heat, oil and sharp
edges.
·Never attempt to charge non-rechargeable batteries.
·The cord of charger is not changeable, do not continue to use if the cord is damaged.
·Do not expose to water or rain, do not use in wet condition.
·Do not open the charger.
·Do not probe the charger.
·Intended for indoor use only
Additional safety instructions for garden pruner
Wear safety goggles when operating this tool.
Wear gloves when operating this tool.
Do not expose the tool to rain or high humidity.
·THIS TOOL CAN CAUSE SERIOUS INJURIES. Read instructions carefully for the correct handling, preparation,
maintenance, starting and stopping of the tool. Be familiar with all controls and proper use of the tool;
·Only use the tool in daylight or good artificial light.
·Never allow children to use the tool;
·Beware of overhead power lines;
·Avoid operating while people, especially children are nearby;
·Dress properly! Do not wear loose clothing or jewellery which can be caught in moving parts. Use of sturdy gloves,
non-skid footwear, and safety glasses is recommended;
·If the tool stalls, immediately switch it off. Remove the battery before attempting to remove any obstructions;
·Remove the battery before checking, maintenance or working on the tool;
·While operating the tool be always sure of a safe and secure operating position especially when using steps or a ladder;
·Do not attempt to repair the tool;
·Do not operate the tool with a damaged or excessively worn cutting device;
·Always wear ear protection, goggle and helmet during operating;
·Always ensure that all guards are fitted when using the tool. Never attempt to use an incomplete tool or a tool with
unauthorized modifications;
·Always use two hands to operate the tool;
·When transporting or storing the tool always fit the blade sheath.
·Always be aware of your surroundings and stay alert for possible hazards that you may not hear due to the noise of the
tool;
·Do not carry the tool with your hands on the switch unless the battery has been removed .
·If you have not used a hedge trimmer before, preferably seek practical instruction by an experienced user in addition to
studying this manual.
·Never touch the blades while the tool is running .
·Never attempt to force the blades to come to a standstill.
·Do not put the tool down until the blade have come to a complete standstill .
·Regularly check the blades for damage and wear . Do not use the machine when the blades are damaged.
·Take care to avoid hard objects (e.g. metal wire, railings)when trimming. Should you accidentally hit any such object
immediately switch the tool off and check for any damage.
·Should the tool start to vibrate abnormally, immediately switch it off and check for any damage.
5
·Always be aware of falling debris when cutting the higher sides of a hedge.
·Be aware of the cutting blade, always wear gloves to protect your hands from cut.
Functional Description
Intended Use
The cordless garden pruner can be used for the following applications only:
Limbing and pruning branches from trees. (Max. diameter 16 mm)
NOTICE: DO NOT CUT OTHER MATERIALSUCH AS WIRE, STEEL WIRE, STONE, PLASTIC, AND SO ON.
Technical Data
Voltage:
DC7.2V
Length Of Machine
27.5cm
Net Weight(without battery
charger)
0.64kg
Battery Type
Lithium-ion
Charging Time
5 hours
Max.Cutting Diameter
16mm
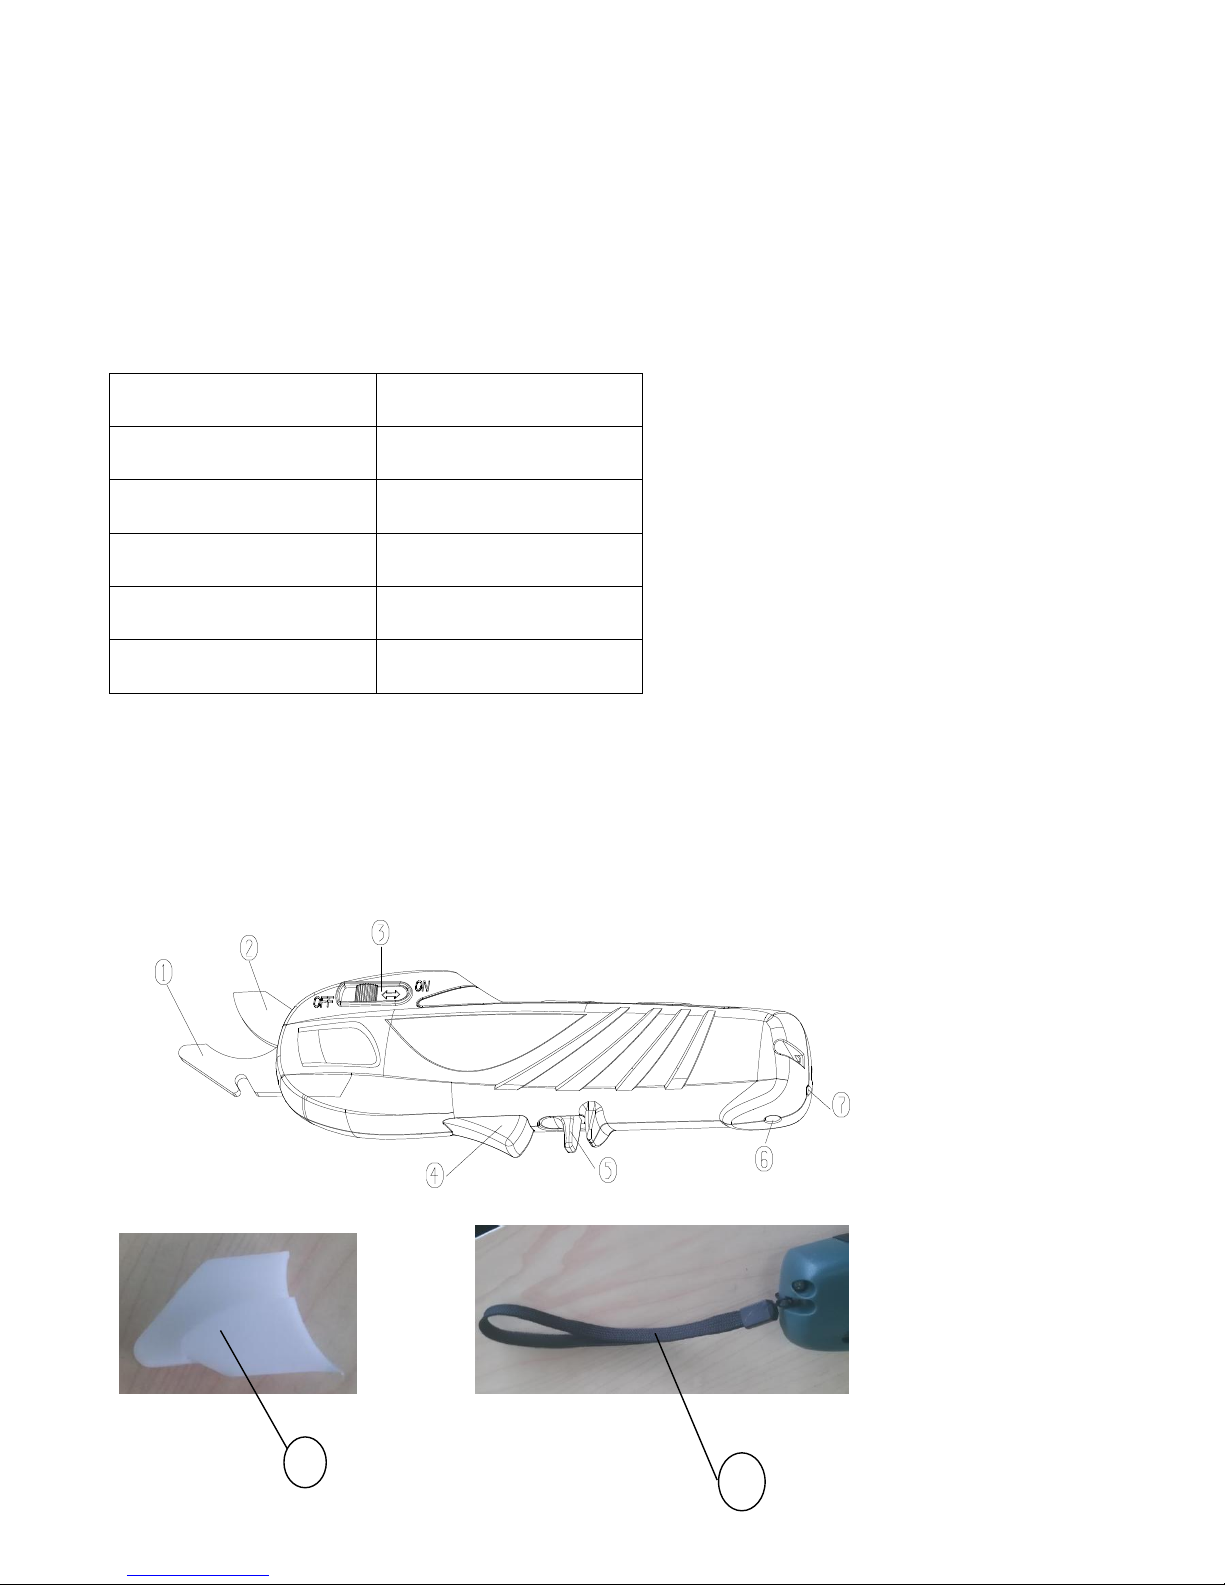
Product Identification
9
8

6
1. Blade-Fixed 2. Blade-Moving 3. The lock-off button 4. On/Off switch
5. The locking retractors 6. Charging socket 7. Charging light 8. Blade sheath
9. Strap 10. Battery Charger 11. Charger plug
Charging the Battery
Warning! Always push the lock-off button 3 to “OFF” position.
Do not use other battery chargers. The supplied battery charger is designed for Lithium-ion battery in
your machine.
Observe correct mains voltage: The voltage of the power source must agree with the voltage specified on the nameplate
of the unit. Equipment marked with 230 V can also be connected to 220 V or 240 V. The Li-ion battery is protected
against deep discharging by the “Electronic Cell Protection”. When the battery is empty, the machine is
switched off by means of a protective circuit: The inserted tool no longer rotates.
WARNING: Do not continue to press the On/Off switch after the machine has been automatically
switched off. The battery can be damage.
The battery is supplied partially charged. To ensure full capacity of the battery, completely charge the
battery in the battery charger before using your power tool for the first time.
A battery that is new or has not been used for a longer period does not develop its full capacity until after
approx. 5 charging/discharging cycles.
When the machine cannot rotate while the On/Off switch is pressed, then the battery has insufficient
capacity and should be charged.
Plug the mains plug of the battery charger 10 into a socket outlet and the charger plug 11 into the socket 6.
At this time, the battery charge-control indicator 7 lights up red. The battery charge-control indicator
indicates the charging progress. The indicator lights up red during the charge procedure. The battery is
completely charged when the indicator lights up green.
Disconnect the battery charger from the mains supply when not using it for longer periods.
Protect the battery charger against moisture!
Operation
NOTE: Remove the blade guard first before operating the machine.
Switching On and Off
To start the machine, remove the blade guard first and then push the lock-off button 3 to “ON”position, pull the locking
retractors 5 backward, then the moving blade 2 will move back until to the fully open position while pressing the On/Off
switch 4 at the same time. When the machine is running, maintain the On/Off switch state. The moving blade will go
forward until to the fully close position, and then stop.
To switch off the machine, release the On/Off switch 4 simultaneously. Do not release the locking retractors 5. The
moving blade will move back until to the fully open position, and then stop.
10
11

7
Maintenance and Service
1,Maintenance and Cleaning
Warning! Always push the lock-off button 3 to “OFF” position.
For safe and proper working, always keep the machine clean.
Always wear protective gloves when using, adjusting or cleaning the machine.
Regularly check for obvious defects such as loose fixings, and worn or damaged components.
2,Changing the Moving Blade
Warning! Always push the lock-off button 3 to “OFF” position.
Always wear protective gloves when using, adjusting or cleaning the machine.
Never attempt to operate the machine without the blade, spacer or screw correctly secured to prevent
damage to the machine.
STEP1
STEP2
STEP 1: Use a 5 mm hex wrench 10 (provided) to loosen the blade screw 11 which secures the blades. Remove the bush
12. Remove the moving blade 2 as shown.
Be careful not to allow any foreign matter to become attached to the blade gear and do not damage it. Please ensure
the moving blade is in the open position if you intend to change it.
STEP2: Insert the moving blade 2 to fit the screw hole as shown.
Refit the bush 12. Ensure the bush 12 is located through fixed blade and moving blade.
Refit the blade screw 11 and tighten it by using a 5 mm hex wrench 10 (provided). Do not overtighten.
3,After Pruning/Storage
Warning! Always push the lock-off button 3 to “OFF” position.

8
Always wear protective gloves when using, adjusting or cleaning the machine.
Clean the exterior of the machine thoroughly using a soft brush and cloth. Do not use water, solvents or polishes. Remove
all debris.
Always lubricate the cutting blade with protective spray before storage.
Operate the machine and make the moving blade to fully close position. Fit the blade guard.
Store the machine in a secure, dry place out of the reach of children. Do not place other objects on top of the machine.
Guarantee
This product is guaranteed against faulty workmanship for a period of 12 months from date of purchase.
Your guarantee will be invalidated if the machine is modified in any way, used for purposes outside the
parameters of this instruction manual or willfully damaged or abused. Your statutory rights remain
unaffected.
EC DECLARATION OF CONFORMITY

9
The undersigned, as authorised by:Ningbo East Tools Co.,Ltd.
Declares that the following equipment manufactured by Ningbo East Tools Co.,Ltd.
has been tested and conforms to the Directive: -
EN 55014-1:2006
EN 55014-2:1997+A1+A2
of the European Parliament and of the council on the approximation of the laws of the Member States relating to the
noise emission in the environment by equipment for use outdoors.
Equipment Category - (As defined in the Directive)
Product Name: Pruning shears (Cordless Garden Pruner)
Model: M06-6ET-7.2(ECKMAN MODEL NO.: EKBP1)
Description: 7.2V
The technical documentation is kept by:Ningbo East Tools Co.,Ltd.
Add: No.307,East Buzheng Rd,Wangchun Industrial Zone,Yinzhou section, Ningbo, China
The conformity assessment procedure followed was in according with annex 2006/42/EC of the Directive.
A copy of this certificate has been submitted to the European Commission and to EU Member State: the United
Kingdom
Place of Declaration: NINGBO, 315000, P.R. China
Date: May, 2016
Signed by:
Position in Company: GENERAL MANAGER
Name and address of manufacturer or Authorised representative: Ningbo East Tools Co.,Ltd.
Add: No.307,East Buzheng Rd,Wangchun Industrial Zone,Yinzhou section, Ningbo, China
IMPORTED BY ECKMAN CO.,LTD
ADD: 29 WELBECK STREET,LONDON W1G 8DA, ENGLAND
EXPLODED VIEW

10

11
Parts list
NO.
DESCRIPTION
QTY
NO.
DESCRIPTION
QTY
1
Left chassis
1
35
Sleeve
1
2
PCB
1
36
Center base of the stand
1
3
spring
1
37
Bearing
1
4
Self-locking retractors
1
38
Bevel Gear 2
1
5
Rocker Switches
1
39
Shaft ring
1
6
spring
1
40
nut
1
7
Switch plugboard
1
41
Sleeve
1
8
spring
1
42
Screw
2
9
Screw
1
43
Elastic washer
2
10
washer
1
44
Centre support
1
11
button
1
45
washer
1
12
Positioning plate
1
46
Fixed blade
1
13
Switch
1
47
Activities blade
1
14
Switch
2
48
Bush
1
15
Motor
1
49
Screw
1
16
Welding pieces
3
50
Spindle
1
17
Welding pieces
1
51
Screw
3
18
Motor Gear
1
52
right chassis
1
19
Lithium Battery
2
53
Screw
1
20
Gearbox
1
21
Screw
4
22
Elastic washer
2
23
washer
1
24
Gear Ring
1
25
Planet Carrier 1
1
26
Planetary Gear
6
27
Planet Carrier 2
1
28
Ring opening
1
29
washer
1
30
Gearbox
1
31
Bearing
1
32
Spindle
1
33
Bevel Gear 1
1
34
Screw
6
Table of contents
Other Eckman Lawn And Garden Equipment manuals

Popular Lawn And Garden Equipment manuals by other brands


Scheppach
Scheppach Riwall PRO RPMT330 instruction manual

Nakayama
Nakayama PRO NS5210 manual

Backyard
Backyard SNOWSTORM Little Cloud instruction manual

Miracle-Gro
Miracle-Gro AeroGarden Harvest Quick setup guide

Toro
Toro 200 Z Master Series Operator's manual

OWIM
OWIM florabest FHV 32 B2 Operation and safety notes