Ecler EVO5 User manual

QUICK GUIDE
GUÍA RÁPIDA
GUIDE DE PRISE EN MAIN
KURZANLEITUNG

2

3
LIST OF CONTENTS
1.IMPORTANTREMARK 04
Notice
License
Safety Instructions
Warranty Descriptions
2.INSTALLATION 05
3. FURTHER CONSIDERATIONS 05
Ground loops
Audio connections
Cleaning
4.QUICKSTART 06
5. SCREEN DESCRIPTIONS 12
6.BLOCDIAGRAM 47
All numbers subject to variation due to production tolerances. ECLER S.A. reserves the right to make changes or improvements in
manufacturing or design which may affect specifications.

4
1. IMPORTANT REMARK
License
This product contains software elements, subject to public software licenses as for example GPL and LPGL. For
further details you may visit http://www.ecler.es/gnu/evo5.
Safety Instructions
In order to get the optimum operation and efficiency from your mixing unit, it is VERY IMPORTANT - before you
plug anything - to read this manual very carefully and take seriously into account all considerations specified within
it. We strongly recommend that its maintenance be carried out by our Authorised Technical Services.
This apparatus must be earthed through its mains cable.
Do not expose the unit to rain or water splashes, and do not place liquid containers or incandescent
objects like candles on top of the unit. Do not obstruct the ventilation shafts with any kind of material.
Any change in the configuration of the unit must be carried out by a qualified technician. Should any
connection / disconnection task be done, always disconnect the unit from the mains supply.
Warranty Descriptions
Your ECLER equipment has undergone exhaustive laboratory and quality control tests before leaving the factory.
Nevertheless, your may be in need of our Technical Service during the period covered by the Guarantee or
afterwards. In that case, carefully protect your equipment in its original packet and send it to our Technical Service
with the transport and insurance paid. Attach a photocopy of your Guarantee Certificate and a detailed description
of the defect you have observed.
ECLER S.A. guarantees the EVO5 mixer against material defects and manufacturing faults for the period of one
year, starting from the original purchase date.
ECLER, S.A., will repair the defective equipment within the aforementioned period, with no charge for parts and
labour.
To ensure the validity of the Guarantee, it is essential that the attached Guarantee, Registration Card is filled out
correctly and remitted to your ECLER distributor, within 10 DAYS after date of purchase.
The Guarantee is non-transferrable and protects the original buyer only.
The Guarantee does not cover:
Damages caused by mistreatment or negligent handling, lack of elementary precautions, disregard to the
instructions in the manual, faulty connection or accidents.
ECLER, S.A., will not be held responsible for any direct or indirect damage, loss or other damage originated by or
relating to the set.
* sets that have been manipulated, altered or repaired other than at the authorized Technical Service centers.
* the exterior fittings and electro-mechanical parts, nor their wear due to use.
* shipping and insurance expenses, nor for damages the set may incur during its transport.
This Guaranteed is valid only for repairs or services carried out at an authorized Technical Service Center.
The liquid crystal display is manufactured with high-precision technology. However, some units may have pixels (up
to 4) that are continuously glowing or turned off. This is not a malfunction.

5
2. INSTALLATION
The EVO5 operates now with a new universal input power supply “Switching Power Supply” and can perfectly
works without any internal modification from 90V to 264V – 47 to 63Hz. Make sure that the mains-wire is far away
from the signal-cables in order to avoid any possible audio hum.
Because of the high gain of the PHONO and MICROPHONE inputs, always try to place the mixer as far away as
possible from noise sources (dimmers, engines, etc.) and mains wires. For the very same reason, and under any
circumstance, you should never remove the unit's metallic cover.
The power consumption of the EVO5 is very low, so they do not need any cooling, but you should avoid extreme
temperatures and the atmosphere should be as dry and dust free as possible.
In order to protect the unit from an eventual electrical overload it carries a T 1A fuse. Should it ever blow up, unplug
the unit from mains and replace it with an identical one. If the new fuse blows again contact immediately with our
authorized technical service.
ATTENTION: NEVER SHORT-CIRCUIT THE SECURITY PATH NOR USE A HIGHER VALUE FUSE.
CAUTION: Fuse substitutions have to be performed by a qualified technician.
3. FURTHER CONSIDERATIONS
Ground loops
Ensure at all times that no signal sources reaching the mixing desk and no devices connected to its output have
their earths interconnected; that is, earth should never reach them via two or more different paths, as this could
lead to humming which could even interfere with sound reproduction quality. In order to avoid earth loops, ensure
that the shielding of cables, if connected to the chassis, are never connected with each other.
Audio connections
As a general rule of thumb, make the signal connections as short as possible and use the best connectors and
cable available. Cables and connectors are frequently held cheap, forgetting that a bad connection can result in a
poor sound quality.
Cleaning
The front panel should not be cleaned with dissolvent or abrasive substances because silk-printing could be
damaged. To clean it, use a soft cloth slightly wet with water and neutral liquid soap; dry it with a clean cloth. Be
careful that water never gets into the unit through the holes of the front panel.

6
4. QUICK START
Congratulations, you have bought an original ECLER professional DJ mixer!
The EVO5 is an unique digital mixer with A/D and D/A converters at 24 bit/96KHz, internal
Firewire soundcard with 12 input channels and 12 output channels, a powerful,
completely programmable effects module, MIDI control with 69 controllers, 64 individual
parameter patterns and a full colour monitor from which you will be able to edit all of the
mixer's controls.
We suggest you to read the user manual before starting to use your EVO5. You will find
the guide on the included CD-ROM. If you prefer to read the manual later, you will find the
necessary information to easily set up and experiment with your EVO5 in this quick guide.
You can also visit our web site "http://www.eclerdjdivision.com", where you will find
additional information.
For the following procedure you will need a CD player and headphones. If you also wish
to experiment with the MIDI controller and the internal soundcard you will also need a
computer with firewire connection.
1. Set the controllers to their initial position.
Set the rotary controllers GAIN, HI, MID and LOW from channel 1 (5, 6, 7, 9) to the
central snap-in position. Put the channel fader (15) down and move the A/OFF/B switch
(14) to position A (this channel is now assigned to the crossfaders' A side).
2. Connect the headphones.
Connect your headphones to one of the outputs on the mixer's front panel (23). Set the
MONITOR LEVEL (22) to minimum and move the MONITOR SELECT control (21) to the
PFL position.
3. Connect a CD player.
Connect a CD player to LINE input on channel 1 (43), insert a CD and play the CD.
4. Connect the mixer's power cable.
Connect the power cable to power source input (55) on the mixer's back side and turn the
mixer on by pressing the MAINS INPUT switch (53).

7
5. Select the input source.
Make sure that the input source selector on channel 1 (3) is in LINE position and that the channel's VU-meter (8)
lightens up. If this does not happen make sure that CD player is correctly connected and that there is an audio
track being played back. You should also make sure that the tone and gain controls are in central position.
6. Adjust the input level.
Move the GAIN control until the VU-meter shows 0dB. Each channel's red overload LED OVL (2), lightens up if the
input level for this channel is to high and has to be diminished with the channel's GAIN controller.
7. Send the signal to the main output.
Set the fader on channel 1 (15) to maximum and place the crossfader (16) on side A.
8. Listen to the signal with your headphones.
Press the PFL button (10) on channel 1. Adjust the MONITOR LEVEL controller (22) to obtain a comfortable
monitoring volume. Now you should hear music with your headphones. Turn the MONITOR SELECT controller (21)
to the right to crossfade the PFL signal and the MIX signal. When this controller is completely turned to the right,
only the MIX signal will be monitored.
9. Try the operation of the tone controllers.
Experiment with this powerful 3-way stereo equaliser (6, 7, 9). This tone control has been designed for a creative
sound edition: each way can be individually isolated using the big and ergonomic rotary controllers.
10. Check the adjustment of the crossfader.
The channels 1 to 4 can be assigned to the crossfader (16) using the A/OFF/B selector. The crossfader allows you
to melt the signals that are assigned to both of its sides. With this selector in position A or B, you assign the
channel to one of both sides of the crossfader. The OFF position disables the crossfader's function on this channel.
11. Adjust the crossfader curve.
The XFADER SHAPE controller (19) allows a fine adjustment of the crossfader curve's slope. Setting this controller
all left, the signal is diminished when the crossfader reaches the central position, which allows mixing two songs
with a soft melting. The crossfader curve's slope increases if the controller is turned to the right. When is gets
completely turned to the right, the signal enters very fast with hardly a movement of the crossfader. This is very
useful for scratching.

8
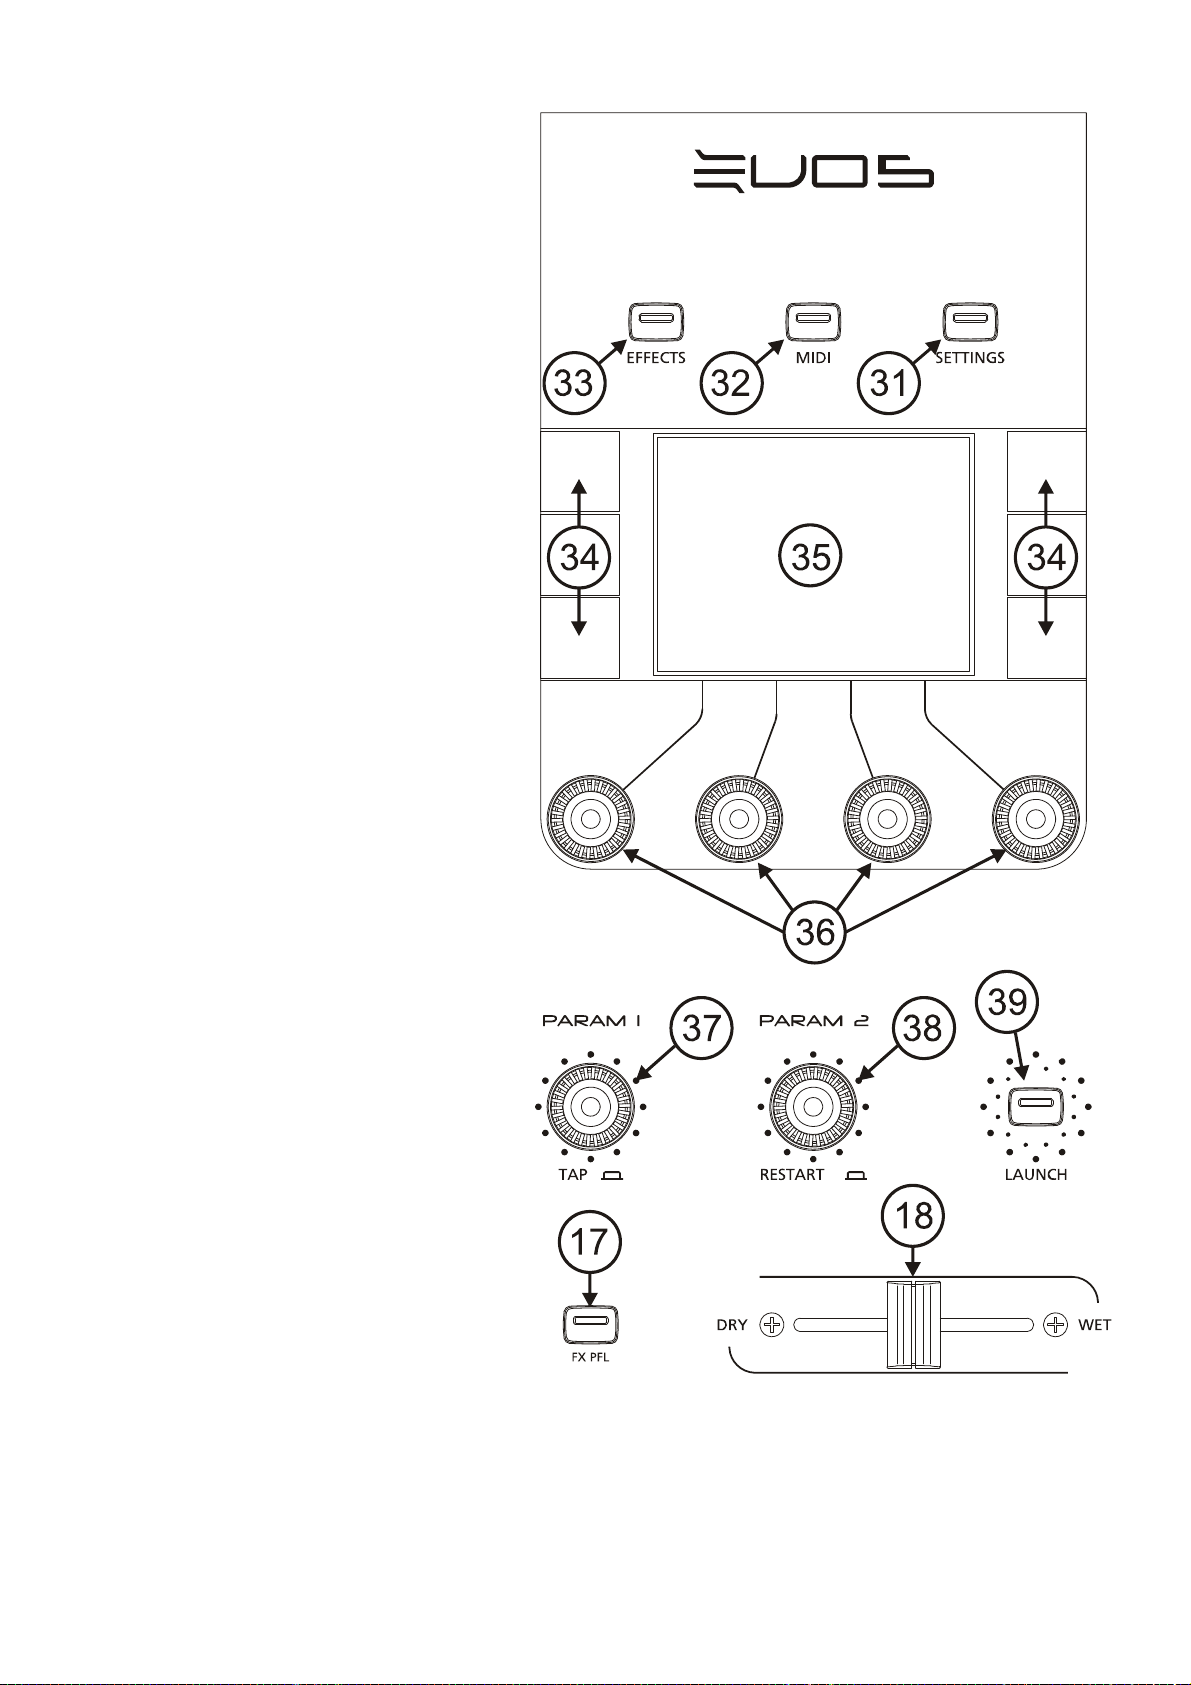
12. Select an effect.
Hold the EFFECTS controller (33) pressed while
you press at the same time one of the six
shortcut controllers (34) located at both sides of
the display. The selected effect appears on
screen. If you wish to select more effects, hold
down the EFFECTS button and press the
encoder identified on screen as LOAD. A list
with up to 64 effects or personal combinations
appears. Select the one you want.
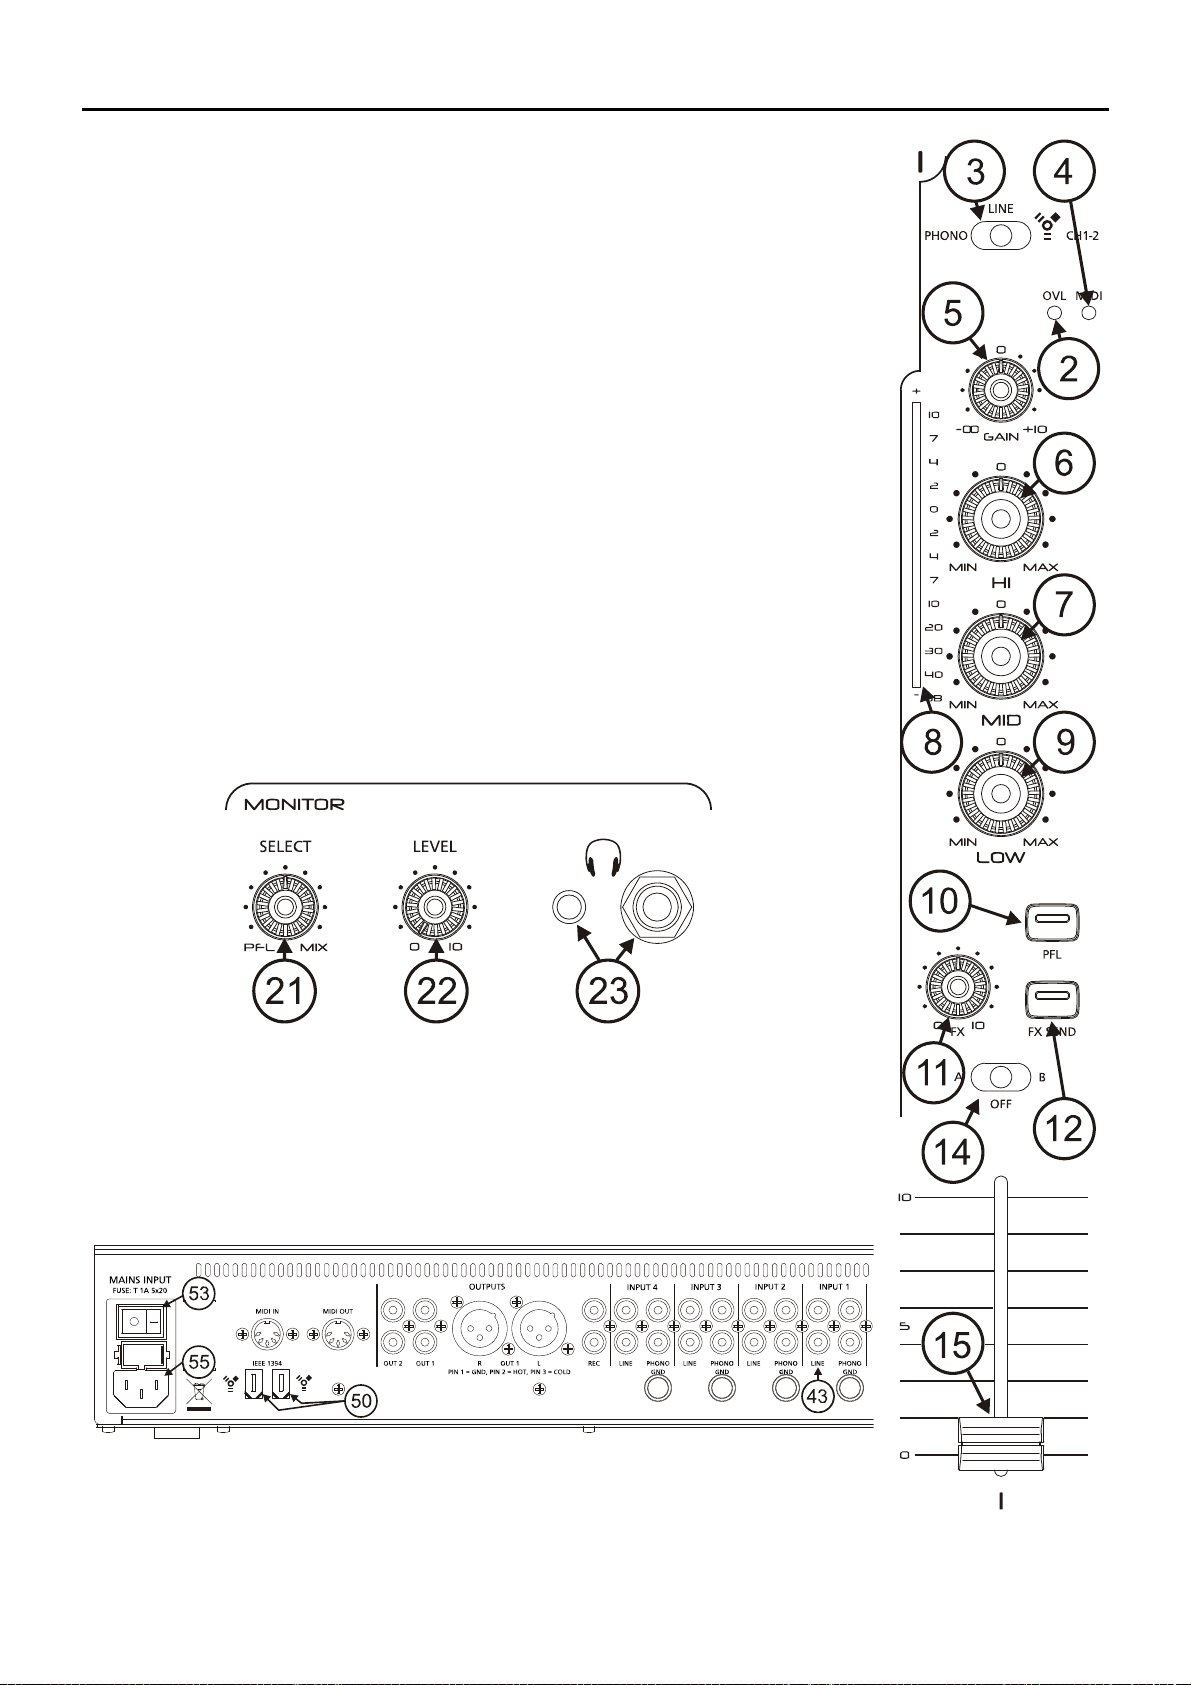
13. Enable an effect.
Turn the effects send potentiometer (11)
completely to the right. With this controller you
can set the amount of signal level you want to
send to the effects processor. Press the FX
SEND button on channel 1 (12) to enable the
signal send to the effects processor. Sending
can be activated independently for each channel
which makes sound edition more flexible. Now
press the LAUNCH button (39) and move the
DRY/WET (18) crossfader, which melts the
original signal (DRY) with the processed signal
(WET). If you want to monitor the effects signal,
press FX PFL (17) (even if you have not pressed
LAUNCH).
14. Adjust an effect.
Move the PARAM1 and PARAM2 controllers
(37, 38) to adjust the effects sound. The
parameters you are adjusting appear on screen.
If you wish to adjust any other parameter, press
the controller identified on screen as FX1/2 and
all parameters that can be adjusted in real-time
appear on screen. Adjust the effect using the
four encoders located below the display (36).
If you wish to get started using the MIDI control
and the internal soundcard, you will need a
computer with firewire connection and a DJ
software with MIDI capabilities. The EVO5
includes configuration presets to control
applications as Ableton's LIVE 6 and Native
Instruments' TRAKTOR 3. We suggest you to
download the demo versions of these
applications from the owner's website, if you do
not have any of this software.
15. Connect the mixer to the computer.
Together with the mixer, you will receive a
firewire cable (IEEE1394). Connect this cable to
the firewire port on your computer and to one of
the two firewire ports on the mixer (50). Through
this firewire cable, all audio and MIDI data is
sent between mixer and computer. It is not
necessary to use the MIDI OUT output.

9
16. Run the installation programme
The mixer is supplied with an installation CD-ROM and a FireWire cable. Before connecting the mixer to the
computer, run the "setup_evo5" file, which you will find on the CD-ROM. This will automatically install the mixer
drivers and the "EVO5 Firmware Upgrade" and "EVO5 Librarian" applications. Once the installation is completed,
connect the mixer to the computer in accordance with the following instructions. The EVO5 is compatible with
Windows® XP SP2, Vista and Macintosh® OSX v 10.X. operating systems.
Windows XP SP2
Once you connected the mixer to the computer, the message "New hardware found. Ecler EVO5" will pop up.
The new hardware found wizard will open. Select the option "No, not this time" and press "Next".
Select the "Install software automatically" option (recommended).

10
When the warning appears, press "Continue Anyway". Finish the installation.
A new pop-up informs you that the installation has been successfully completed.
If you want to make sure that the drivers are correctly installed, open the "Device Manager", where the mixer will
appear as "Ecler EVO5" in the chapter "Sound, video and game controllers".

11
MAC OSX v 10.X
The software will automatically detect and install the necessary drivers. The mixer will appear as input/output
device in the "System settings" in the chapter "sound".
If you wish to use the mixer as default soundcard on your computer, open the "Audio and MIDI settings" and set the
necessary parameters.
17. Configure the soundcard for your DJ software.
Each DJ application has a different method to configure the soundcard. Open your software and enter the audio
device management section. Your software will recognize the mixer's soundcard as "Ecler EVO ASIO Driver".
Assign the soundcard's 12 input and 12 output channels to the software channels you wish.
18. Play back a digital sound file.
Once your soundcard is correctly configured, play back a digital music file with your DJ software. Set the input
selector (3) on channel 1 to FireWire CH1-2 position. The channel's VU-meter will lighten up and you can adjust the
input signal with the GAIN and tone controllers as you did before with the analogue signal.
19. Select a MIDI control pattern.
The EVO5 offers 64 different MIDI control patterns and configurations for applications as LIVE 6 and TRAKTOR 3.
Press EFFECTS (33) and the encoder identified on screen as LOAD. A list with 64 available patterns will appear.
Select an "EMPTY" pattern and try using it.
20. Assign a command to a MIDI controller.
Each DJ application uses a different MIDI configuration procedure. Take your time to get through all the MIDI
control possibilities offered by your software and to find out how to programme them. Now select the function you
want to control and move the mixer’s controller you want to execute this function when the MIDI device asks you to
do so. The device will identify the MIDI note sent by the mixer. From now on you will be able to remote control this
function. The controllers located around the display send MIDI data if this mode has been activated using the MIDI
button (32). The channel and output controllers instead, have to be configured to send MIDI data (a blue LED
indicates that the input channels are working in MIDI mode). Please consult the user manual if you wish to
configure the MIDI control, to program notes for each controller, to create labels or to save your presets.

12
5. SCREEN DESCRIPTIONS
FX 1 BEAT SYNC
FX 2 BEAT SYNC
SHORTCUT NUMBER
EFFECT 1 TYPE
EFFECT 2 TYPE
EFFECT MODIFIED BY USER
EFFECT'S NAME
BPM INDICATOR
BPM CONFIDENCE
LEVEL
BPM SOURCE:
MIX/FX/MIDI
CLOCK/TAP
MIDI COMMAND ASSIGNMENTS
TAP FUNCTION
TURNING FUNCTION

13
MIDI CLOCK MIDI TRANSMISSION
LAYOUT NUMBER
LAYOUT NAME
USER ACTIVE PROFILE
MENU TREE

14
ÍNDICE
1.NOTAIMPORTANTE 15
Nota
Licencia
Instrucciones de seguridad
Descripción de la garantía
2.INSTALACIÓN 16
3. OTRAS CONSIDERACIONES 16
Bucles de masa
Conexiones de audio
Limpieza
4. INICIO RÁPIDO 17
5. DESCRIPCIÓN DE LAS PANTALLAS 23
6. DIAGRAMA DE BLOQUES 47
Todos los datos están sujetos a variación debida a tolerancias de producción. ECLER S.A. se reserva el derecho de realizar
cambios o mejoras en la fabricación o diseño que pudieran afectar las especificaciones.

15
1. NOTA IMPORTANTE
Licencia
Este producto contiene elementos de software sujetos a licencias de software público tales como GPL y LGPL.
Para más detalles, visite "http://www.ecler.es/gnu/evo5".
Instrucciones de seguridad
Para conseguir la máxima funcionalidad del aparato y su máximo rendimiento, es muy importante antes de su
conexión, leer detenidamente y tener muy presentes las consideraciones que en esta guía rápida se especifican.
Para garantizar el óptimo funcionamiento de este aparato, recomendamos que su mantenimiento y eventuales
reparaciones sean llevadas a cabo por nuestros Servicios Técnicos autorizados.
Este aparato debe conectarse a tierra a través de su cable de red.
No exponer la unidad a la lluvia o a salpicaduras de agua, no colocar recipientes que contengan líquidos
u objetos incandescentes tales como velas sobre el aparato. No obstruya las rejillas de ventilación.
Cualquier cambio en la configuración de la unidad debe ser llevado a cabo por técnicos cualificados. Cualquier
conexión o desconexión de la unidad debe ser realizada, siempre, con la unidad desconectada de la red.
Descripción de la garantía
Su equipo ECLER ha superado ensayos de laboratorio y exhaustivos controles de calidad antes de abandonar la
fábrica. No obstante podría darse el caso que necesite nuestro Servicio Técnico durante el periodo que cubre la
garantía o posteriormente. En tal caso, proteja cuidadosamente la unidad en su caja original y envíelo a nuestro
Servicio Técnico con los gastos y el seguro pagados. Adjunte una fotocopia del certificado de garantía y una
descripción detallada del defecto observado.
ECLER S.A. garantiza el mezclador EVO5 ante defectos de materiales o fabricación durante el periodo de un año
transcurrido tras la fecha de compra original.
ECLER, S.A. reparará el equipo defectuoso dentro del periodo especificado, sin cargo alguno para piezas y mano
de obra.
Para asegurar la validez de la garantía es preciso que la Garantía y la Tarjeta de Registro se rellenen
correctamente y se remitan a su distribuidor ECLER, en el plazo de 10 días después de la fecha de compra.
La garantía no es transferible y solamente protege al comprador original.
La garantía no cubre:
Daños ocasionados por malos tratos o manejo negligente, falta de cuidados elementales, desatención de las
instrucciones del manual, conexión equivocada o accidentes.
ECLER, S.A., no será responsable por ningún daño directo o indirecto, pérdida o perjuicio originado por o en
relación con el equipo.
* aparatos que hayan sido manipulados, alterados o reparados fuera del Servicio Técnico autorizado.
* el mueble exterior, los componentes electromecánicos ni su desgaste por uso.
* los gastos de envío y seguros, ni los daños que el aparato pueda sufrir durante el transporte.
Esta garantía es válida sólo si las reparaciones o servicios se realizan en un Servicio Técnico autorizado.
Pantalla LCD. La pantalla de cristal líquido está fabricada con tecnología de alta precisión. Sin embargo, pueden
aparecer en algunas unidades algunos píxeles (hasta 4) que permanezcan constantemente iluminados o
apagados. Esto no constituye una anomalía.

16
2. INSTALACIÓN
El EVO5 funciona con alimentación conmutada de tipo universal permitiendo trabajar sin ningún tipo de ajuste
desde 90V a 264V / 47-63Hz. Asegúrese de que el cable de red se encuentre lejos de los cables de señal para
evitar zumbidos.
Dada la elevada ganancia de las entradas de PHONO y de MICRÓFONO debe procurarse situar el mezclador lo
más alejado posible de fuentes de ruido (variadores de tensión, motores, etc.) así como de cualquier cable de red.
Por esta misma razón y bajo ninguna circunstancia debe quitarse la tapa metálica del aparato.
Ya que el consumo del EVO5 es muy bajo, éste no precisa ventilación, sin embargo debe evitarse que esté
expuesto a una temperatura extrema y que la atmósfera del local en que esté emplazado sea lo más seca y limpia
de polvo posible.
Para proteger al mezclador de eventuales sobrecargas en la línea de red existe un fusible de red de tipo T 1A. En
caso de que éste se fundiera se desconectaría el aparato y se sustituiría por otro de idénticas características. Si
éste último se volviera a fundir, consulte con nuestro Servicio Técnico.
ATENCIÓN: EN NINGÚN CASO DEBE CORTOCIRCUITAR EL CIRCUITO DE PROTECCIÓN O
PONER UN FUSIBLE DE VALOR MÁS ELEVADO.
ADVERTENCIA: La sustitución del fusible debe ser realizada por un técnico cualificado.
3. OTRAS CONSIDERACIONES
Bucles de masa
Procuraremos en todo momento que todas las fuentes de señal que lleguen a la mesa de mezclas, así como todos
los aparatos que estén conectados a su salida, no tengan las masas interconectadas, es decir, que nunca les
llegue masa por dos o más caminos distintos, ya que de esta manera se podrían producir zumbidos que llegarían
incluso a interferir la calidad de la reproducción sonora. Los blindajes de los cables, de estar conectados a chasis,
en ningún momento deben estar unidos entre sí, de esta forma evitaremos la formación de bucles de masa.
Conexiones de audio
Como norma general deberemos procurar que las conexiones de señal sean lo más cortas posible, asimismo
emplearemos conectores y cables de la mejor calidad. Normalmente a los cables y conectores no se les presta el
interés merecido. En muchas ocasiones y debido a una mala conexión o por el uso de cables de baja calidad,
pueden aparecer importantes problemas en la reproducción sonora.
Limpieza
La carátula no deberá limpiarse con sustancias disolventes o abrasivas puesto que se corre el riesgo de deteriorar
la serigrafía. Para su limpieza se utilizará un trapo humedecido con agua y un detergente líquido neutro, secándola
a continuación con un paño limpio. En ningún caso se debe permitir la entrada de agua por cualquiera de los
orificios del aparato.

17
4. INICIO RÁPIDO
¡Felicidades por adquirir un auténtico mezclador DJ profesional de ECLER!
El EVO5 es un mezclador digital único con conversión A/D y D/A a 24bit/96kHz, tarjeta
de sonido FireWire interna con 12 canales de entrada y 12 canales de salida, un potente
módulo de efectos totalmente programable, control MIDI con 69 controles, 64 plantillas
personalizables y una pantalla a todo color desde la cual podrá editar todos los controles
del mezclador.
Le recomendamos que lea el manual de usuario del producto que encontrará en el
CD-ROM antes de empezar. Sin embargo, le facilitamos esta guía rápida para que pueda
conectar y experimentar con su EVO5 de manera inmediata si prefiere leer el manual de
usuario más tarde. También puede consultar la web "http://www.eclerdjdivision.com"
donde encontrará más información.
Necesitará un reproductor de CD y unos auriculares para llevar a cabo este
procedimiento. Si desea experimentar además con el control MIDI y el funcionamiento de
la tarjeta de sonido interna, necesitará de un ordenador con conexión FireWire.
1. Ponga los controles en posición de inicio.
Ajuste los controles rotativos GAIN, HI, MID y LOW del canal 1 (5, 6, 7, 9) en posición
central enclavada. Sitúe el fader (15) del canal 1 abajo y asigne el selector A/OFF/B (14)
en posición A (el canal está asignado ahora al lado A del crossfader).
2. Conecte unos auriculares.
Conéctelos en cualquiera de las salidas del panel frontal del mezclador (23). Ajuste el
MONITOR LEVEL (22) al mínimo y lleve el control MONITOR SELECT (21) a su posición
PFL.
3. Conecte un reproductor de CD.
Conecte un reproductor de CD a la entrada LINE del canal 1 (43), inserte un CD y
póngalo en marcha.
4. Conecte el mezclador a la red eléctrica.
Conecte el cable de red en la entrada de alimentación (55) de la parte trasera del
mezclador y póngalo en marcha pulsando el interruptor MAINS INPUT (53) situado
también en el posterior.

18
5. Seleccione la fuente de entrada.
Compruebe que el selector de entrada de la vía 1 (3) está en posición LINE y que se ilumina el Vu-metro (8) de
ese canal. Si no se ilumina, asegúrese de que el reproductor de CD está bien conectado y de que se está
reproduciendo una pista de audio. Asegúrese también de que los controles de tono y ganancia estén en posición
central.
6. Ajuste el nivel de entrada.
Mueva el control GAIN hasta que el Vu-metro indique 0dB. El LED rojo OVL (2) "Overload" de cada canal nos
avisa que el nivel de entrada es demasiado elevado y debe atenuarse con el control GAIN del canal.
7. Envíe la señal a la salida principal.
Coloque el fader de la vía 1 (15) arriba y sitúe el crossfader (16) en el lado A.
8. Escuche la señal en sus auriculares.
Presione el botón PFL (10) de la vía 1. Ajuste el control MONITOR LEVEL (22) para obtener un nivel de escucha
confortable. Ahora debería escuchar la música en sus auriculares. Mueva el control MONITOR SELECT (21) hacia
la derecha para fundir la señal PFL con la de MIX. Con este control totalmente a la derecha, tan solo escuchamos
la señal MIX.
9. Compruebe el efecto del control de tonos.
Experimente con el potente ecualizador estéreo de 3 bandas (6, 7, 9). Este control de tonos está diseñado para la
modificación creativa del sonido: cada banda puede aislarse independientemente mediante los grandes controles
rotativos ergonómicos.
10. Compruebe el ajuste del crossfader.
Los canales 1 al 4 pueden asignarse al crossfader (16) usando el selector A/OFF/B. El crossfader permite realizar
un fundido entre las señales asignadas a ambos lados del mismo. Con el selector en posición A o B asignamos la
vía a uno u otro lado del crossfader. La posición OFF anula la función crossfader para este canal.
11. Ajuste la curva del crossfader.
El control XFADER SHAPE (19) nos permite ajustar la pendiente de la curva del crossfader de manera precisa.
Situando el control totalmente a la izquierda, la señal se atenúa en la posición central del crossfader y podemos
mezclar dos canciones fundiéndolas suavemente. La curva del crossfader se vuelve más afilada si movemos el
control hacia la derecha. Situando el control totalmente a la derecha, la señal entra de golpe con un leve
movimiento del crossfader, algo muy indicado para la técnica scratch.

19
12. Seleccione un efecto.
Mantenga pulsado el control EFFECTS (33) y
pulse a su vez alguno de los seis controles de
selección rápida de efectos (34) que hay
alrededor de la pantalla. En la pantalla
aparecerá el efecto seleccionado. Si desea
seleccionar algún otro efecto, mantenga pulsado
EFFECTS y pulse el encoder que indica LOAD
en pantalla. Le aparecerá una lista de hasta 64
efectos o combinaciones personalizables.
Seleccione el que desee.
13. Active un efecto.
Mueva el potenciómetro de envío a efectos (11)
totalmente a la derecha. Con este control
ajustamos el nivel de la señal que deseamos
procesar con un efecto. Active el pulsador FX
SEND de la vía 1 (12) para activar el envío de
la señal a efectos. El envío se activa de manera
independiente en cada vía, lo cual nos confiere
una gran flexibilidad. A continuación active el
pulsador LAUNCH (39) y mueva el crossfader
DRY/WET (18), que nos permite fundir la señal
original (DRY) con la señal procesada (WET). Si
desea monitorizar la señal de efectos, pulse
FX PFL (17) (incluso sin haber pulsado
LAUNCH).
14. Ajuste un efecto.
Mueva los controles PARAM1 y PARAM2 (37,
38) para ajustar el sonido del efecto. En la
pantalla le aparecerán los parámetros que está
ajustando. Si desea ajustar algún otro
parámetro, pulse el control indicado en pantalla
como FX1/2 y podrá visualizar todos los
parámetros ajustables en tiempo real. Ajuste el
efecto experimentando con los cuatro encoders
bajo la pantalla (36).
A continuación, si desea iniciarse en el uso del
control MIDI y de la tarjeta de sonido interna,
necesitará un ordenador con conexión FireWire
y un software DJ con funcionalidad MIDI. El
EVO5 incluye configuraciones de control para
software como LIVE 6 de Ableton y TRAKTOR 3
de Native Instruments. Le recomendamos que,
si no dispone de estas aplicaciones, descargue
versiones de demostración gratuitas desde las
páginas web respectivas.
15. Conecte el mezclador a su ordenador.
Con el mezclador recibirá un cable FireWire
(IEEE1394). Conéctelo desde el puerto FireWire
de su ordenador a cualquiera de los dos puertos
FireWire del mezclador (50). A través del cable
FireWire se envía toda la señal de audio y la
información MIDI. No es necesario utilizar la
salida MIDI OUT.

20
16. Ejecute el programa instalador.
El mezclador se suministra con un CD-ROM de instalación y un cable FIREWIRE. Antes de conectar el mezclador
al ordenador, proceda a la ejecución del archivo "setup_evo5" que encontrará en el CD-ROM y que instalará
automáticamente los drivers del mezclador y las aplicaciones "EVO5 Firmware Upgrade" y "EVO5 Librarian". Una
vez finalizada la instalación conecte el mezclador al ordenador siguiendo las instrucciones que le detallamos a
continuación. El EVO5 es compatible con los sistemas operativos Windows® XP SP2, Vista y Macintosh® OSX v
10.X.
Windows® XP SP2
Una vez conectado el mezclador al ordenador, aparecerá en su ordenador un "pop up" que diga "Nuevo hardware
encontrado. Ecler EVO5".
Cuando se inicie el asistente para hardware nuevo encontrado, escoja la opción "No por el momento" y apriete
"Siguiente”.
Escoja la opción "Instalar software automáticamente (recomendado)
Other manuals for EVO5
1
Table of contents
Languages:
Other Ecler Dj Equipment manuals