Ecodri Uni-blade User manual

INTELLIGENT FACILITY SOLUTIONS
Electric Works, 3 Concourse Way, Sheffield, S1 2BJ
United Kingdom: +44 (0) 114 354 0047
Eire: +353 190 36387
sales@ihdryers.co.uk
www.intelligenthanddryers.com

Ecodri Uni-blade Hand Dryer
HDUK-3009
User Manual
Technical Parameters...............7
Troubleshooting........................7
Warni
ng.....................................1
Characteristics..........................2
Parts...........................................2
I nstallation Methods..............3-4
How to Use................................5
Maintenance..............................6
• Thank you for purchasing our automatic high-speed hand dryer
• Please read this manual carefully before installation and use
• Please keep this manual safe for future reference

Warning
Please read the following warning notice before installation to ensure correct use
For safety reasons please use this product correctly to avoid physical injury or loss.
Ignoring th ese warning notes may lead to faulty installation and increase risk of physical
injury , loss or failure of the hand dryer.
Please refer to the following:
No Disassemble
Forbidden Must Perform
Do not use your hands, other materials or objects to block up the air
outlet. This may cause electric shock or failure of the hand dryer
Do not splash water into the machine whilst servicing or during
maintenance. This may cause electric shock or failure of the hand
dryer.
Do not disassemble, repair or modify this hand dryer without qualified
supervision to avoid electric shock, fire etc.
Do not put ignited articles such as cigarettes onto the hand dryer to
avoid burning the cover or risk of fire
Please do not swing on the hand dryer once it is installed. This may
lead to physical injury or damage to the hand dryer
Whilst servicing or maintenance, make sure the power is turned OFF

Characteristics
Parts
Included
Mounting plate Fixing screws Install instructions How to use
Automatically turns on when hands are placed in the sensor area. No touch
operation is both convenient and hygienic.
After 60 seconds of continuous activation the hand dryer will automatically shut off to
prevent misuse
The heater can be turned off to maximise energy efficiency
Bladed air outlet rapidly scrapes moisture off the hands leaving them fully dry in
seconds
Installation Methods
Notice before installation
All electrical matters should be performed by a professional electrician or
electrically competent person according to local regulations.
Please install a leakage circuit breaker to protect against electric shock.
Please use a leakage circuit breaker whose rated power is 10A,AC230V
Guide for installing dryer hand the
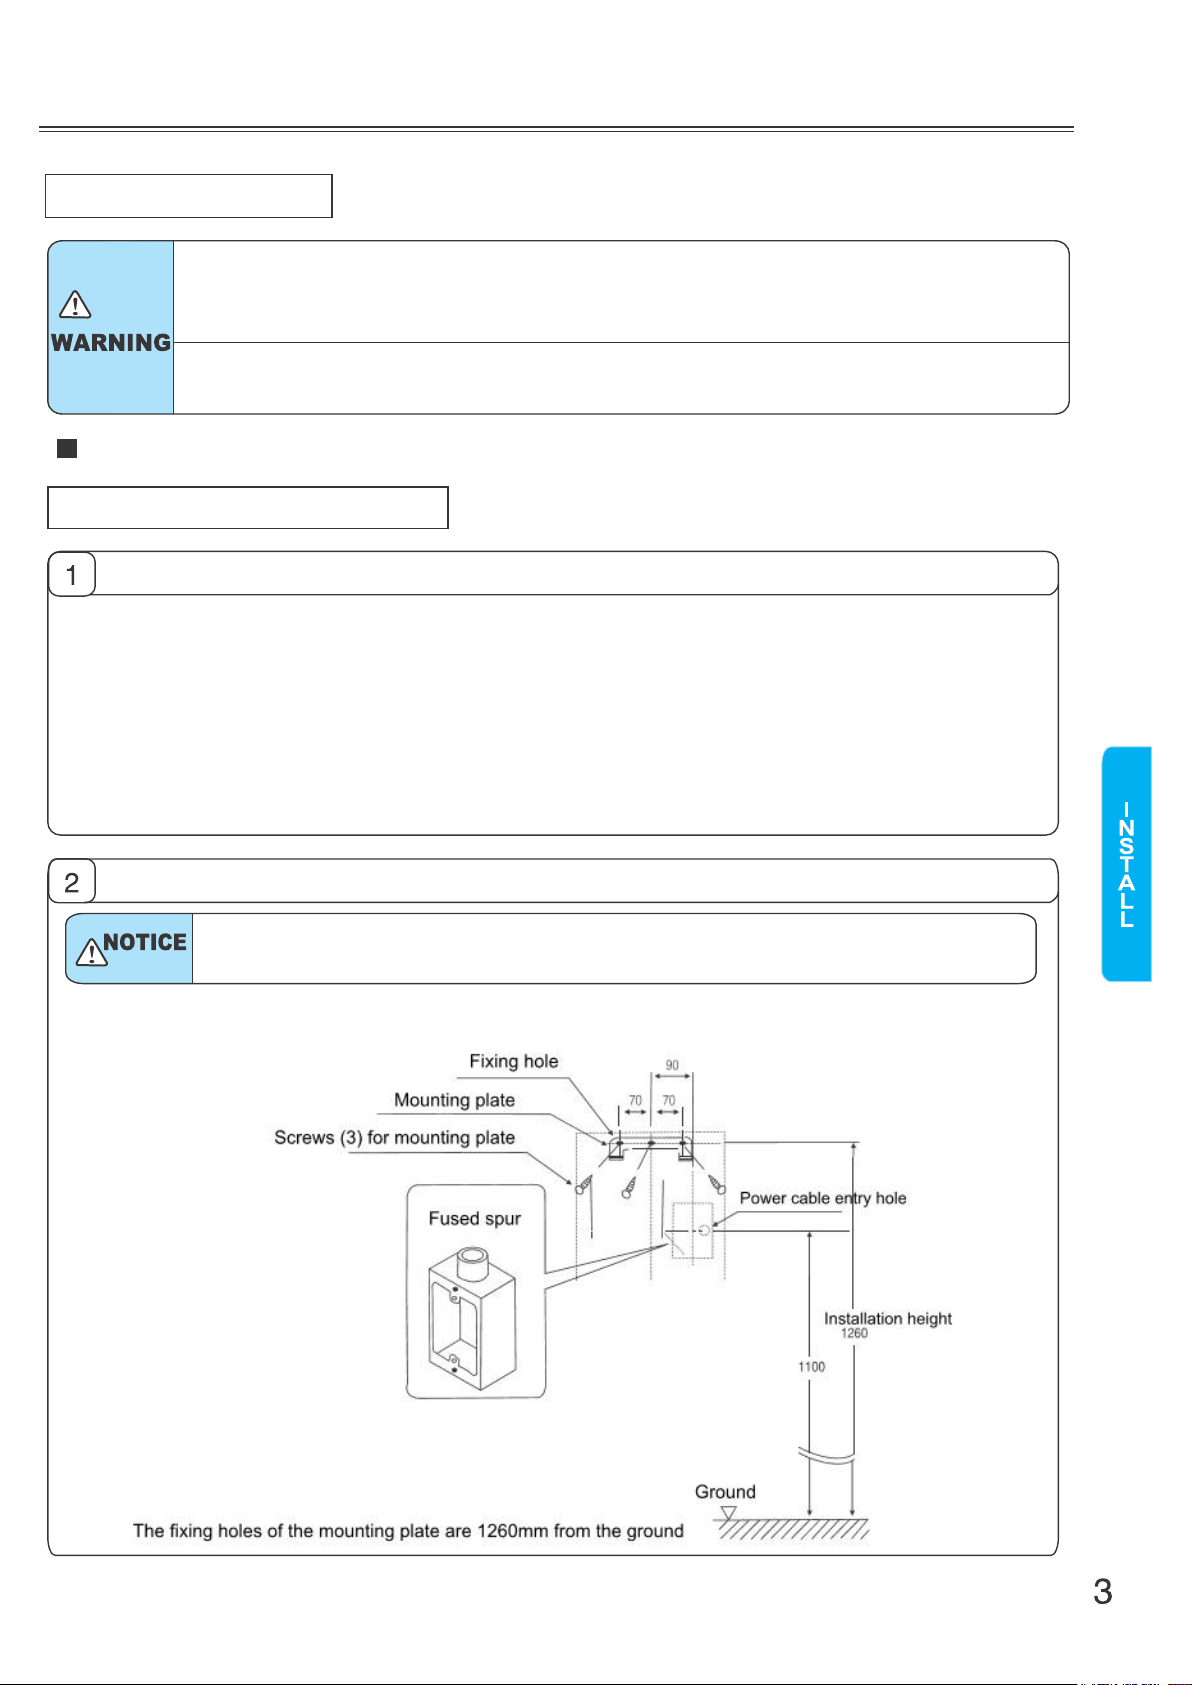
Connecting to the fused spur
• A fused spur will need to be situated in the location if one is not already present to
connect the power cable.
• Ideally the fused spur should be situated to allow for the power cable to enter the hand
dryer 1100mm from the ground and approx. 90mm to the right from the central fixing
hole of the mounting plate. (See diagram in stage 2 - Installation of mounting plate)
• The minimal length of power cable entering the hand dryer, through the power cable
entry hole, should be 300mm
Installation of mounting plate
Please fix the hand dryer firmly to the wall to avoid damage
• Install on a flat, solid wall using the dimensions (mm) on the below diagram as a guide

Installation of the main body
• Remove the 2 screws from the cover, then detach the cover from the main body
• Pass the power cable through the power cable entry hole of the main body, then hang
the main body of the hand dryer on the mounting plate
Cover
• Replace the cover onto the main body of the hand dryer and secure using the 2 cover
screws
o Note: first insert the cover clasps into the opening holes of the main body, then press the rest of the cover to the
main body
Post installation tests:
1. Power source - make sure the leakage
circuit breaker is ON
2. Power source - make sure the power
switch is ON
3. Confirmation of operation - put your hands in the sensor window area below the air
outlet and make sure the air blows
After testing:
Please retain these instructions for future reference
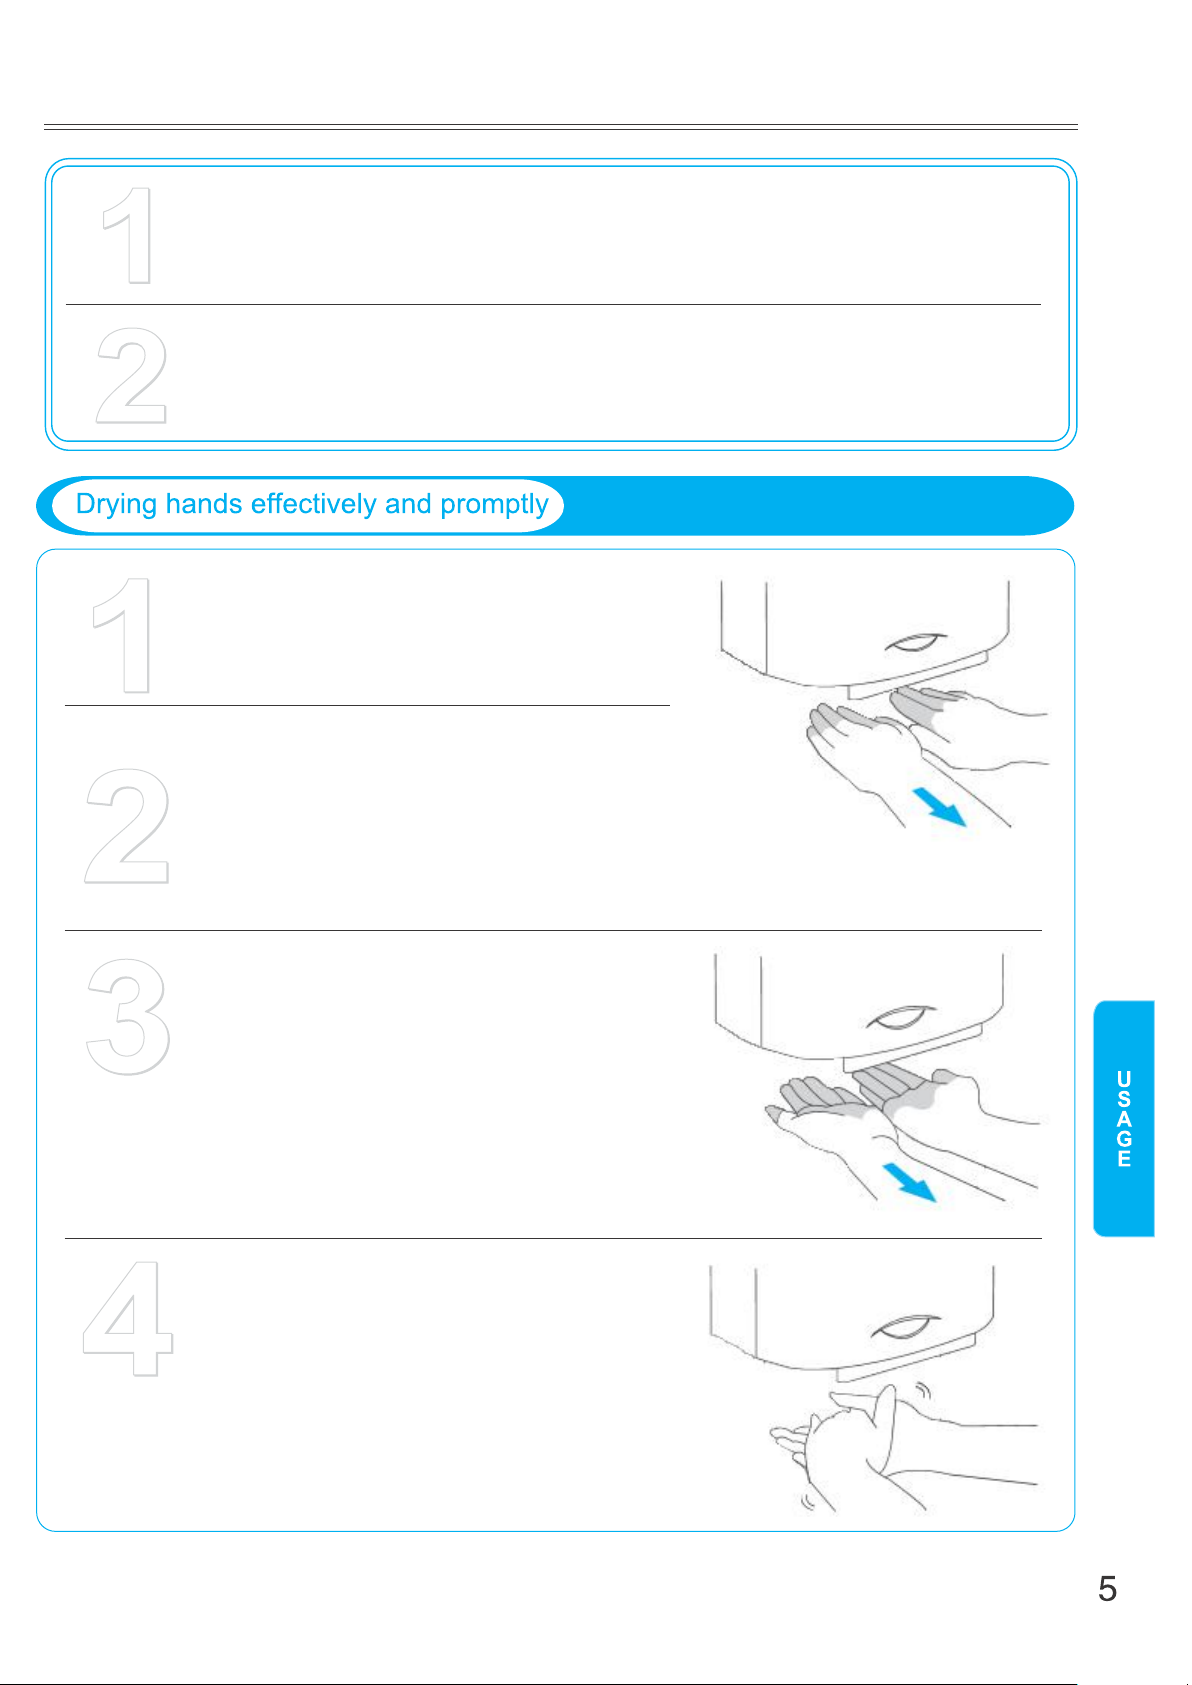
How to Use
Press the power switch to "ON"
Place the hands under the body of the hand d ryer in the area of the sensor
window to activate the air from t he air outlet. Once the hands are dry, remove
the hands from the sensor window area to stop the unit from blowing air.
Without touching any part of the hand dryer,
including the air outlet, place you stretched out
hand with unbent fingers in the sensor window
area
When the hand dryer starts, slowly move your
hands forwards and backwards through the
airflow, allowing air to get between the fingers
Note: the closer your hands are to the air outlet the
quicker the dry time. (Please be aware that this may
cause the water to splash)
Once this side of the hands are dry, turn the
hands so that the palms are facing up and
repeat the slow movement of your hands
forwards and backwards through the airflow.
Again allowing air to get between the
fingers.
Finally rub your hands together under the
airflow to finish
The hand dryer will automatically shut off the airflow after 60s continuous use. Please follow
stages 1-4 above to restart the hand dryer
Maintenance
Do not splash water inside the hand dryer during servicing and
maintenance as this may cause electric shock and/or faults
Please turn off the power source to the hand dryer before
performing any servicing or maintenance
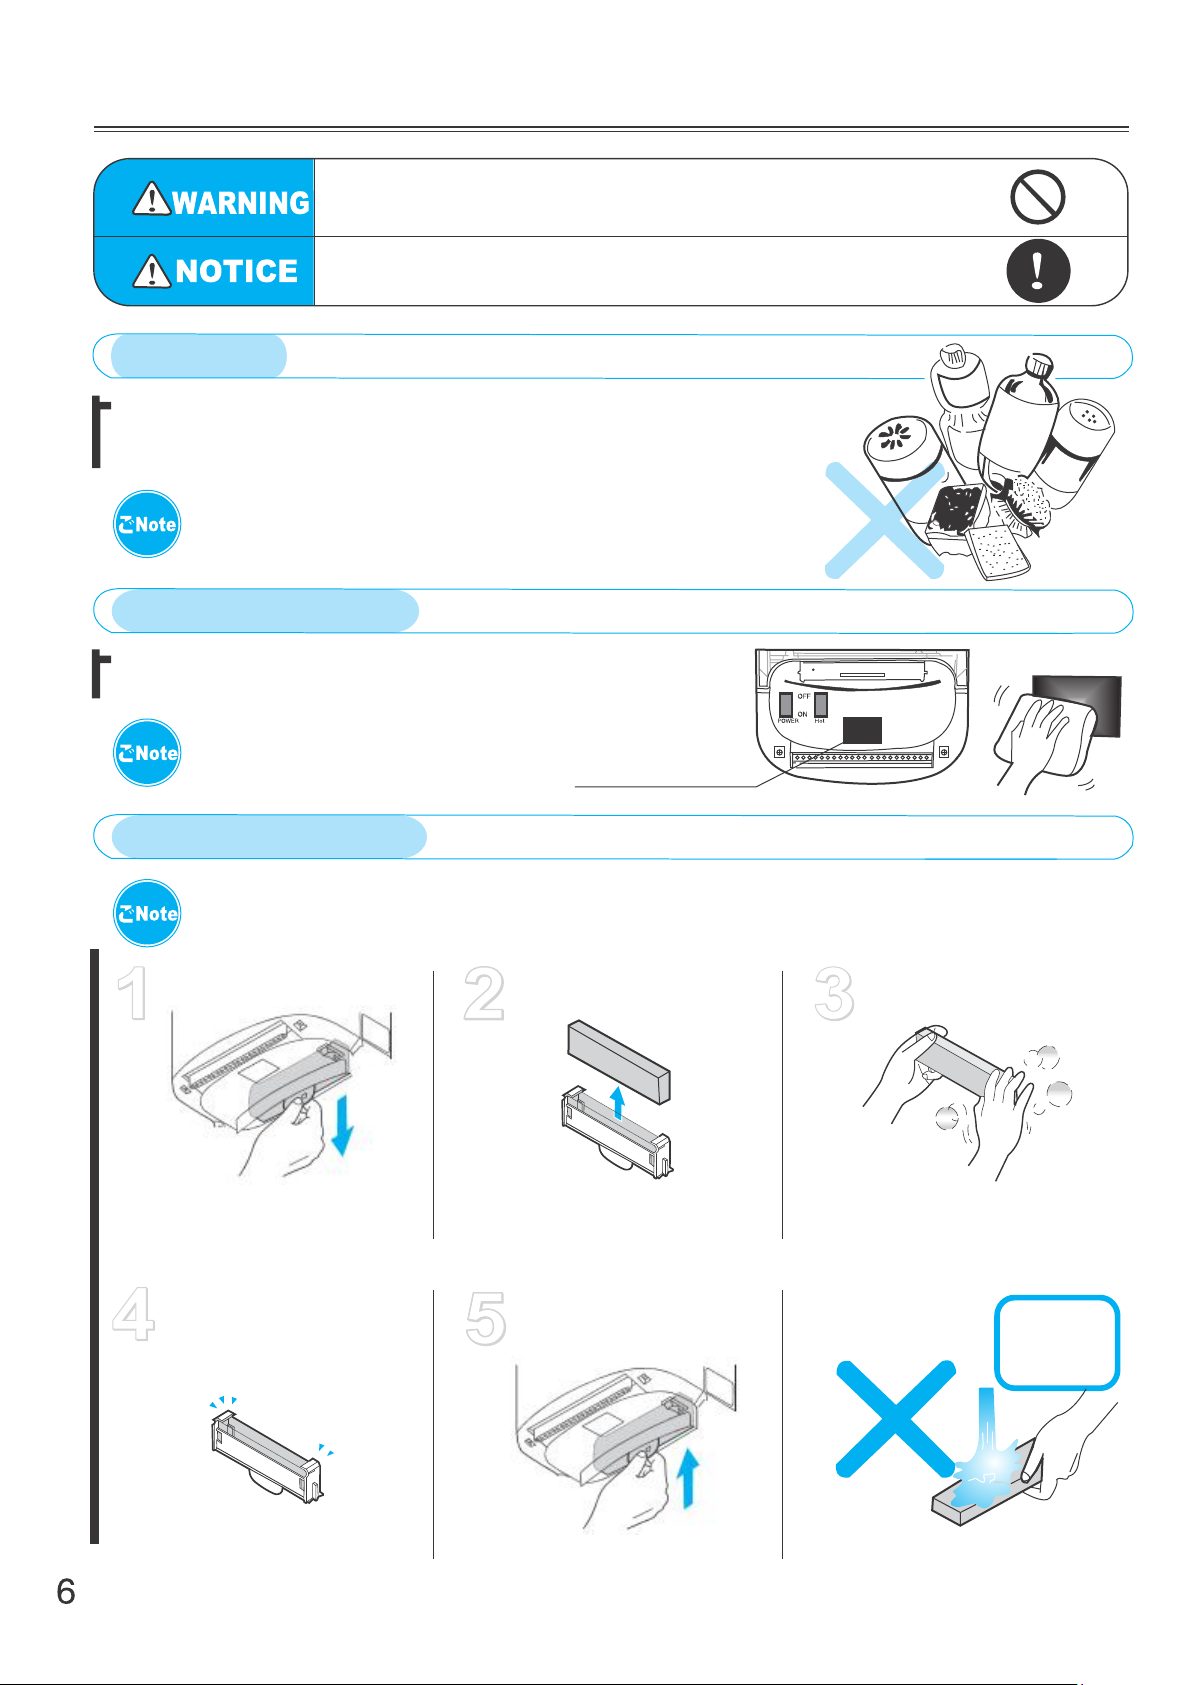
Cover cleaning
For cleaning the cover of dirt and marks, turn off the power source, then use a
soft cloth to wipe the cover clean. For more persistent stains use a damp soft
cloth and neutral detergent, making sure not to excessively wet the hand
dryer. Remove any detergent using a damp soft cloth and dry thoroughly.
You should not use acid or alkaline detergents like benzene, lacquer
thinner or other abrasives. Moreover you must not use nylon brushes or
similar in order to avoid damage to the cover
SENSOR WINDOW
To ensure the senso r works perfectly, turn off the power source, then
use a damp soft cloth to wipe the sensor window clean.
Cleaning the sensor window Perform once or twice per month
Do not use detergent on the sensor window
as it may lead to damage and/or sensor
abnormalities.
Filter pack maintenance (Prevent reduction in air quality a nd volume)
The filter may become clogged up over time and reduce the air quality and volume. Please clean or replace the
filter periodically
Take out the filter box Take out the filter Clean the filter
Return the filter to
the filter box
Return the filter box
to the hand dryer
Take hold of the jut at the
centre of the filter box and pull
downwards
Take out the filter from the filter
box
Shake the filter over a bin to remove dust
and dirt from it. If this does not remove it
sufficiently, please replace the filter.
DON'T
WASH
Put the filter back in the filter
box Return the filter box to its
original place

HDUK-3009
Technical Parameters
Item Specification
Model
Voltage
Rated Power
Heater Power
Motor
Fan
Protective Device
Working Temp.
Size (mm)
Weight (kg)
AC220V, 50/60Hz
1200W
Resistance wire heating (650W)
AC Brush Motor
Turbo fan
Temperature fuse, thermostat, over current fuse
0-40C
250mm x 235mm x 165mm
4.5kg
roubleshootingT
Don't disassemble, repair or modify without qualified
supervision or there is danger of electric shock, fire etc.
Issue Check and Fix
No air coming from
the unit
• Is the power ON?
o If OFF please turn the power ON
• Is the AC power circuit break ON?
o If it's OFF please turn ON
• Is the sensor dirty?
o Use a damp soft cloth to remove any dirt
Air continuously
running when hands
are removed
• Is the sensor dirty?
o Use a damp soft cloth to remove any dirt
Low air volume
• Is the filter dirty?
o Please clean or replace the filter - see page 6
- see page 6
- see page 6
This manual suits for next models
1
Table of contents


