EcoEthic MullToa 65 User manual

Installation Guide
MullToa 65 / MullToa 55
MullToa 25 / MullToa 10
MullToa Composting Toilet is a biological composting toilet that uses the processes of evaporation and aerobic
decomposition to transform human fecal waste, urine, and toilet paper to a hygienically safe product (humus) that may be
safely utilized. Proper installation and maintenance is important. Please read instructions completely and give us a call
if you have any questions. Always check with your local health authorities and building inspectors for local
regulations governing composting toilets prior to the installation of your MullToa.
What Comes in the Box
1 – Composting Toilet
1 – MullToa Mulch (30L Bag)
1 – Winterizing Plug
1 – Manual Mixing Rake
5 – 56 cm (22 in.) sections 54mm white vent pipe, belled 1 end
1 – 56 cm (22 in.) white vent pipe, no bell (Reducing Coupling
attached)
1 – 56 cm (22 in.) section 108mm black vent pipe, belled 1 end
1 – 56 cm (22 in.) section 108mm black vent pipe, no bell
2 – 56 cm (22 in.) Styrofoam insulation
1 – Roof flashing
1 – Insect Netting
Accessories (available separately)
• 45º Vent Pipe Elbows • Insulation • Interior/Attic/Exterior Pipe • MullToa Mulch
INSTALLATION
Tools You Will Need
•Standard & Phillips screwdrivers
•Drill
•2 1/4” Hole Saw, Jig Saw or Keyhole Saw
•Hammer
•Roofing nails
•Level
•100% adhesive silicon caulking (do not use latex silicon)
•Plumb bob or weighted string
•Pencil
Before You Begin
✔Make sure there is adequate airflow into the bathroom. This should preferably be from the living area. A 1”
gap under the bathroom door or a vent in the bottom of the door or wall will ensure sufficient airflow to the
toilet. Overhead vent fans and open windows should be used with caution as they may cause negative air
pressure and promote a back draft through the toilet causing the presence of unpleasant odours. You are
installing a chimney.
✔In some cases it may be necessary to install a 3” fresh air intake wall vent in the bathroom in order to ensure
enough airflow to the toilet (see diagram below).
✔Ensure there is adequate floor space in front of toilet to accommodate removal of the tray.
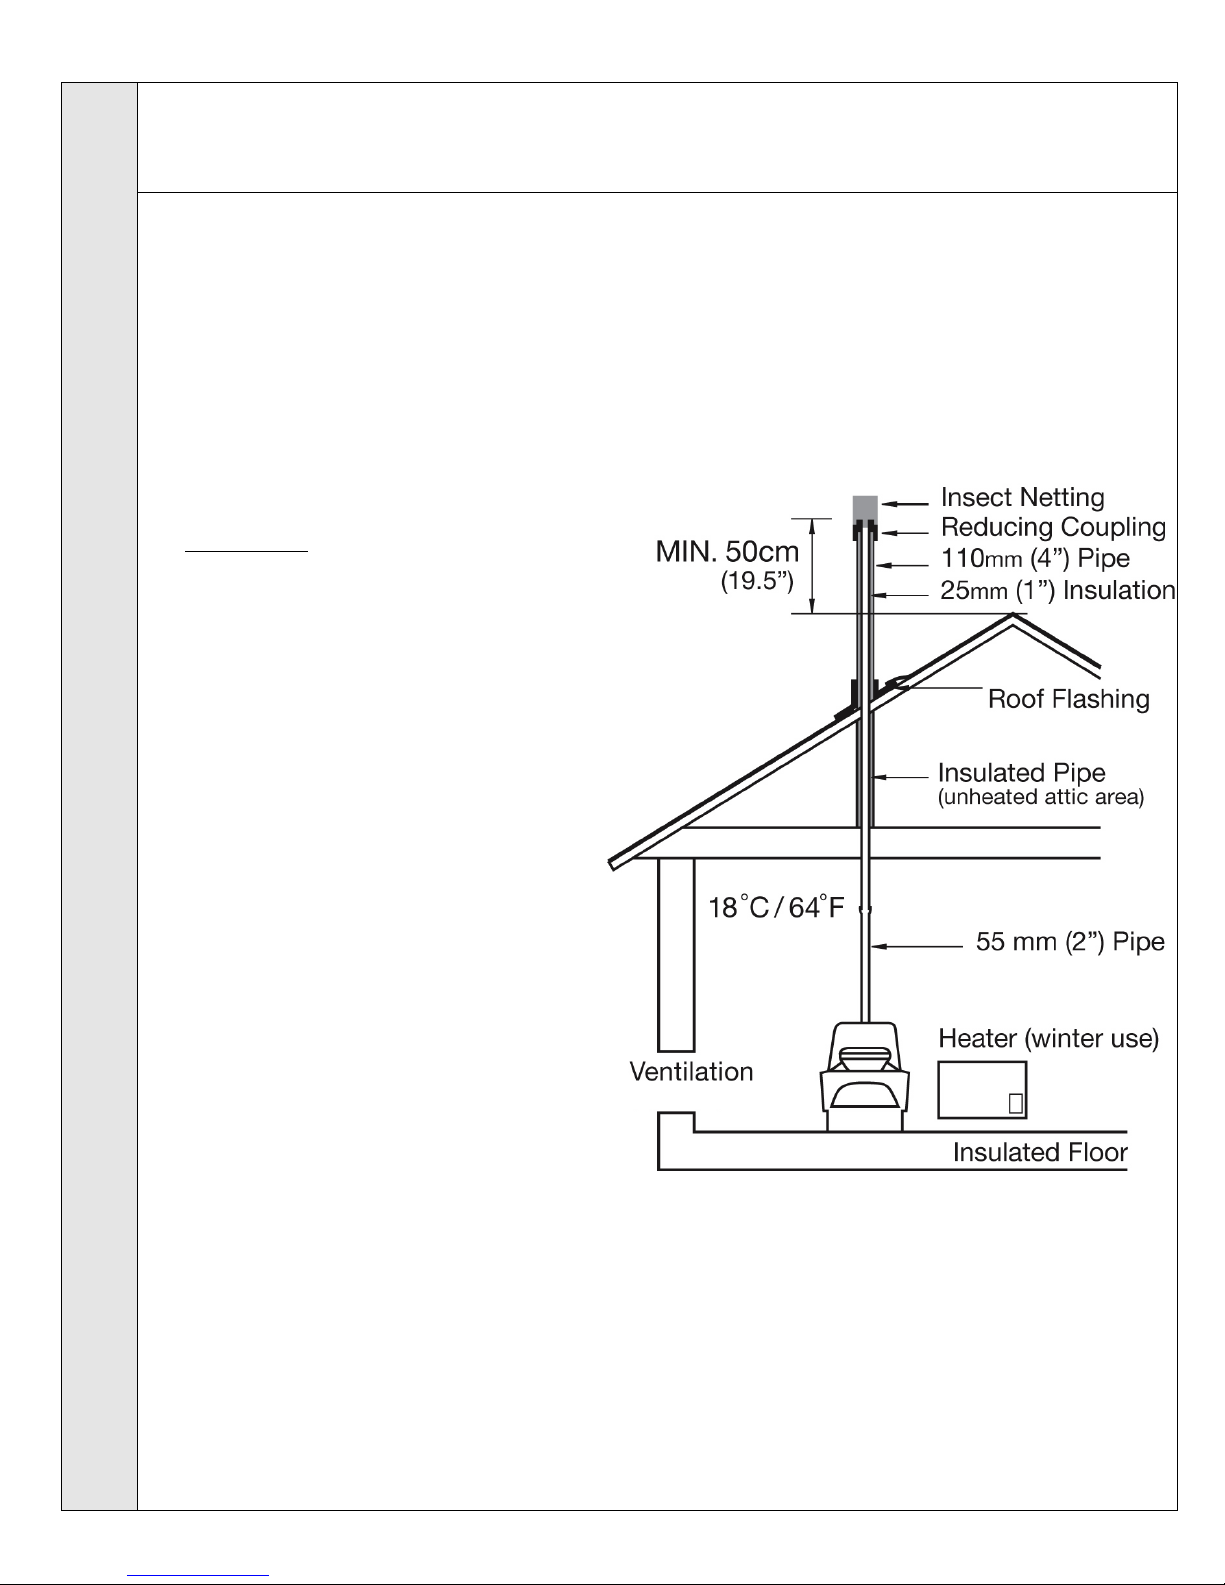
✔The temperature in the room where the toilet is to be installed must be maintained above 18°C (64°F) during
periods while the toilet is being used.
✔Make sure the floor under the toilet is level and insulated (not dirt or poured concrete slab).
✔The vent pipe must extend at a minimum of 50cm (19.5”) above your roof peak. Or anything within 10’
(additional vent pipe may be ordered separately).
✔If you cannot install the vent pipe straight up from your toilet, Make sure your installation can be achieved with
the installation of no more than 2 x 45° angles (available separately).
✔Make sure the vent pipe is less than 30’ in a straight up installation or 27’ if 2 x 45° angles are required.
Questions?
Call our Customer Assistance Centre:
1-888-436-3996
TM
INSTALLATION
Straight Vent Pipe (through ceiling and roof)
*Use only MullToa Vent Pipe. Installing other vent pipe can cause venting problems and odours.*
1. Position the toilet against the wall.
2. Drill a 2 1/4” (55mm) hole in the ceiling above the vent connection in the toilet (use Plumb Bob to align vent
pipe with toilet).
3. Drill a 2 1/4” (55mm) hole in the roof above the hole in the ceiling.
4. Insert 1 length of white pipe (belled end up) into the rubber vent opening on the back of the toilet.
5. Continue adding white ventilation pipe, belled end up, through the holes and seal with silicone around the
hole and roof to avoid any leakage.
6. The white pipe must extend through the
roof, by approximately 2”.
IMPORTANT: All pipe from ceiling through
any unheated area (i.e. attic space) it must be
insulated. Ensure there are no gaps in
insulation. Use Only MullToa Attic Pipe &
Insulation (additional pieces sold separately).
7. Insulate the pipe in the area between the
ceiling and the roof. Insulate the pipe
above the roof.
8. Cut the non-belled black pipe and
insulation to match the angle of the roof.
9. Slide roof flashing over non-belled black
pipe.
10. Outline the Flashing on the roof. Raise
Flashing and apply silicone inside the
outline of the flashing.
11. Slide the Flashing back down, sliding the
flange under the shingles along the top
edge and press it firmly into the silicone.
When flashing is properly placed, the top
part of the flashing should be under the
shingles and the lower portion should be
on top so water sheds easily.
12. Secure the top of the flashing with corrosion resistant nails or staples at each corner and along the sides at
4” – 6” intervals. Exposed nails or staples should be sealed with silicone.
13. Attach additional pieces of black pipe, insulation and white pipe.
14. The end of the last pipe must extend a minimum of 50cm (19.5”) above the peak of the roof or anything
within 10 feet.
15. Fit the Reducing Coupling down onto the last black pipe.
16. Attach Insect Netting (optional). In winter (extremely cold areas) icing up can occur and removal of netting
may be necessary.

ALTERNATIVE INSTAION
Alternative Installation (using 2 x 45° Vent Pipe Elbows)
Questions? Please call 1-888-436-3996 for technical help.
Additional Interior Vent Pipe, Exterior Vent Pipe Sets and
45° Vent Pipe Elbows may be ordered from EcoEthic Inc.
or your authorized MullToa dealer.
A maximum of 2 Elbows may be used in any
installation.
The maximum total length of vent pipe must be less than
30’ in a straight up installation or 27’ if 2 x 45° angles are
used.
1. Position the toilet against the wall.
2. Mark place on wall directly above the vent opening
on the toilet where you want the pipe to pass through
the wall.
3. Drill a 2 1/4” hole at a 45° angle through the wall
where marked in the previous step.
4. Pass the belled end of the 45° elbow through the
hole in the wall.
5. Measure the distance from the top of the vent pipe
opening on the toilet to the end of the 45° elbow and
add 2”.
6. Cut the non-belled end of the straight white pipe to achieve the length found in 5.
7. Insert 1 length of white, belled pipe into the vent opening on the back of the toilet with the belled end up.
8. Insert the next white, belled pipe into the pipe installed in the back of the toilet. Repeat until the end of the
white pipe reaches the 45° elbow.
9. Insert the non-belled end of the 45° elbow into the belled end of the pipe extending from the toilet.
10. Insert the non-belled end of the 2nd 45° elbow into the belled end of the 1st 45° elbow.
11. Continue the pipe upward as in the “Straight run through ceiling and roof” procedures above.
12. Ensure the pipe is insulated with at least a R11 insulating value wherever it is outside a heated area.
13. Please proceed with “Getting Your MullToa Ready To Use” .
Should you have any questions about installing your MullToa or operating your MullToa
please give us a call at: 1-888-436-3996
Thank you.
This manual suits for next models
3
Table of contents
Popular Other manuals by other brands

LAMBORGHINI
LAMBORGHINI VELA 20 BS - SCHEMA manual

FANOX
FANOX SIA-B user manual

Bosch
Bosch Eyes instruction manual

Painless Performance Products
Painless Performance Products 90542 installation instructions

Zonar
Zonar ZPass Installation guidelines

COXREELS
COXREELS SLP series Installation and maintenance manual


