Inscape Data AirEther BR108 User manual

AirEther™BR108 5GHz Wireless Bridge
1
AirEther™BR108
5.3 / 5.8 GHz OFDM
Point to Multipoint
WIRELSS BRIDGE
User Manual
Version 3.2b

AirEther™BR108 5GHz Wireless Bridge
2
PREVIOUS HISTORY
Revision Date of Issue Scope
0.0 March 31, 2004 Initial
1.0 April 2, 2004 First draft
2.0 April 2,2004 Correct errors and the paragraph
orders
2.5 May 25, 2004 Second draft
3.0 June 15, 2004 Edit the third part and correct
errors
3.1a Dec. 30, 2004 Add the third part and correct
errors
3.2a April. 10,2005 Correct errors and add feature
3.2b July 14, 2006 Wording Update
FCC Notice:
This equipment has been tested and found to comply with the limits for a Class B digital device,
pursuant to Part 15 of the FCC Rules. These limits are designed to provide reasonable
protection against harmful interference in a residential installation. This equipment generates
uses and can radiate radio frequency energy and, if not installed and used in accordance with
the instructions, may cause harmful interference to radio communications. However, there is no
guarantee that interference will not occur in a particular installation. If this equipment does
cause harmful interference to radio or television reception, which can be determined by turning
the equipment off and on, the user is encouraged to try to correct the interference by one or
more of the following measures:
Reorient or relocate the receiving antenna.
Increase the separation between the equipment and receiver.
Connect the equipment into an outlet on a circuit different from that to which the receiver is
connected.
Consult the dealer or an experienced radio/TV technician for help.
Changes or modifications not expressly approved by the party responsible for compliance could
void the user‘s authority to operate the equipment.
This device and its antenna(s) must not be co-located or operating in conjunction with any other
antenna or transmitter

AirEther™BR108 5GHz Wireless Bridge
3
PREFACE
We are so honored to offer you this product – “AirEther BR108 Wireless Outdoor Bridge”.
The AirEther BR108 Wireless Outdoor Bridge is cost-effective to expand or relocate your local
wired networks (LANs). This advanced design suits the goal to create an unwired working
environment.
The AirEther BR108 with IEEE 802.11a feature is the wireless solution for
building-to-building. The AirEther BR108 provides the data rate up to 108 Mbps and is suited
for enterprises, campus or off-site locations that require LAN or Internet access without the
availability of wired networks to extend network coverage.
The AirEther BR108 provides point-to-point and point-to-multi-point connection capabilities.
The wireless building-to-building bridging solution contains a state-of-the-art wireless Bridge,
high gain performance antenna and power-over-Ethernet technology. For further protection,
the bridge and power-over-Ethernet adapter have built in lightning protector.
The AirEther BR108 provides the alternative solution for last-mile connection. By
leveraging the IEEE 802.11’s volume power and low cost, AirEther BR108 Link provides very
cost effective solution to carriers. With the cost effective wireless last mile solution, service
provider can have fast deployment (time-to-market) and successful business models.
The document is for your information to know more detail about AirEther BR108 Weather
proof Wireless Outdoor Bridge. We will introduce the hardware part, the software
configuration, and the field installation in the following chapters. This manual is intended for
those people who will install and operate the AirEther BR108.

AirEther™BR108 5GHz Wireless Bridge
4
Table of contents
PREVIOUS HISTORY.................................................................................................................................................2
PREFACE................................................................................................................................................................3
TABLE OF CONTENTS.............................................................................................................................................4
TABLE OF CONTENTS.............................................................................................................................................6
MANUAL CONVENTIONS...........................................................................................................................................7
DISCLAIMER............................................................................................................................................................8
1. INTRODUCTION ....................................................................................................................................................9
2. AIRETHER BR108 HARDWARE FEATURE ......................................................................................................10
2.1 HARDWARE ARCHITECTURE............................................................................ERROR! BOOKMARK NOT DEFINED.
2.2 PRODUCT FEATURE.........................................................................................................................................10
2.3 PRODUCT AND ACCESSORIES ..........................................................................................................................10
2.4 PRODUCT CONNECTION FEATURE....................................................................................................................11
2.4.1 External Antenna & Power over Ethernet (PoE) Cable Connector......................................................11
2.4.2 Grounding Screw .................................................................................................................................11
2.4.3 Caution over Cable Connection...........................................................................................................11
2.5 PRODUCT WARRANTY .....................................................................................................................................12
2.6WARRANTY LIMITATION....................................................................................................................................12
2.7 REQUIREMENT ................................................................................................................................................12
2.8 FEATURE SUMMARY ........................................................................................................................................13
3. IP DISCOVER UTILITY........................................................................................................................................14
4. BRIDGE (AIRETHER BR108) CONFIGURATION..............................................................................................16
4.1 THE MASTER/SLAVE SIDE PC NETWORK CONFIGURATION ................................................................................16
4.1.1 How To Start Network Configuration on your PC................................................................................16
4.1.2 Master Bridge side PC TCP/ IP Setup.................................................................................................17
4.1.2.1 Master side PC TCP/IP Setup.....................................................................................................................17
4.1.2.2 Master Bridge Side PC IP/ MAC Address Set up........................................................................................17
4.1.2.3 Slave Side PC Configuration and TCP/IP set up.........................................................................................18
4.1.3 MASTER/SLAVE BRIDGE CONFIGURATION......................................................................................................19
4.1.3.1 How To Start.....................................................................................................................................19
4.1.3.2 Master/Slave Bridge Configuration...................................................................................................20
4.1.3.2.1 After Login................................................................................................................................................20
4.1.3.2.2 Region/Country Set up.............................................................................................................................20
4.1.3.2.3 Master/ Slave side IP/ MAC Address first time Set up..............................................................................22
4.1.3.2.3 Configure 5GHz Bridge Setting................................................................................................................23
Radio Setting...................................................................................................................................................23
Security Setting – Master / Slave side Share/Unique Key...........................................................................26
Master Side......................................................................................................................................................27
Slave Side........................................................................................................................................................28
4.1.4.2 Master & Slave Bridge joining condition......................................................................................................29
4.1.4.3 Statistics......................................................................................................................................................29
4.2 FIRMWARE AND LICENSE UPGRADE..................................................................................................................32
4.3 REBOOTING ....................................................................................................................................................33
5. SNMP....................................................................................................................................................................34
6. PLANNING LINKAGE..........................................................................................................................................38
6.1 SITE SURVEY..................................................................................................................................................38
6.2 DATA RATE.....................................................................................................................................................39
6.3 PLANNING RADIO PATH ...................................................................................................................................39
6.3.1 Antenna Height ....................................................................................................................................41
6.3.2 Antenna Types.....................................................................................................................................42
6.3.3 Antenna Cable .....................................................................................................................................42
6.3.4 Weather Affection.................................................................................................................................43
7 FIELD INSTALLATION.........................................................................................................................................44

AirEther™BR108 5GHz Wireless Bridge
5
7.1 UNPACK THE SHIPMENT...................................................................................................................................44
7.1.1 Required Tools:....................................................................................................................................44
7.1.2 Product.................................................................................................................................................44
7.1.3 Accessories..........................................................................................................................................44
7.2 INSTALLING THE ODU......................................................................................................................................45
7.2.1 Required Tools:....................................................................................................................................45
7.2.2 Installed Accessories: ..........................................................................................................................45
7.2.3 How to Mount the Bridge: ....................................................................................................................45
7.2.4 Connecting the cable ...........................................................................................................................46
7.2.5 General Antenna and Safety Tips........................................................................................................46
7.2.6 Basic Antenna Alignment.....................................................................................................................47
7.2.7 ESD Protection.....................................................................................................................................47
7.2.8 Review the Installation.........................................................................................................................47
APPENDIX A............................................................................................................................................................48
GLOSSARY............................................................................................................................................................48
APPENDIX B............................................................................................................................................................50
TROUBLESHOOTING...............................................................................................................................................50

AirEther™BR108 5GHz Wireless Bridge
6
Table of contents
Picture1 Bridge Architecture Error! Bookmark not defined.
Picture 2 Bridge 11
Picture 3 Connection1 11
Picture 4 IP Discover Tool 14
Picture 5 Find out the IP and MAC address 15
Picture 6 Start Menu 16
Picture 7 Network Connection 16
Picture 8 Local Area Connection Properties 17
Picture 9 Internet Protocol Properties 18
Picture 10 Enter Username and Password 19
Picture 11 Statistic Page 20
Picture 12 Region/Country Setup 21
Picture 13 Manually setup IP address 22
Picture 14 Auto Get IP 23
Picture 15 5GHz Bridge (Master) 26
Picture 16 5GHz Bridge (Slave) 26
Picture 17 Master Bridge Security Setup 27
Picture 18 Slave Bridge Security 28
Picture 19 Master/Slave Bridges Connections 29
Picture 20 Statistics 30
Picture 21 Firmware Upload Web Page 32
Picture 22 Rebooting Window 33
Table 1 Evaluated Maximum Distance 39
Picture 23 Line-of-Sight (LOS) 40
Table 2 Estimated LOS Clearance 41
Picture 24 Antenna Height 41
Picture 25 The Bridge with the omnidirectional antenna 42
Picture 26 Mount the ODU on the Mask or the Pole 45

AirEther™BR108 5GHz Wireless Bridge
7
MANUAL CONVENTIONS
Bold
Bold type within paragraph text indicates commands, file names,
directory names, paths, output, or returned values.
Italic Within commands, italics indicate a variable that the user must
specify.
Titles of manuals or other published documents are also set in
italics.
Courier The courier font indicates output or display.
[] Within commands, items enclosed in square brackets are
optional parameters or values that the user can choose to specify
or omit.
{} Within commands, item enclosed in braces are options from
which the user must choose.
| Within commands, the vertical bar separates options.
… An ellipsis indicates a repetition of preceding parameter.
> The right angle bracket separates successive menu selection.
NOTE: This message denotes neutral or positive information that calls out important points
to the text. A note provides information that applies only in special cases.
Caution: Cautions call special attention to hazards that can cause system damage
or data corruption, to a lesser degree than warnings.
Warnings: Warnings call special attention to hazards that can cause system
damage, data corruption, personal injury, or death.

AirEther™BR108 5GHz Wireless Bridge
8
DISCLAIMER
AirEther BR108 Wireless Outdoor Bridge User Manual
Document No.: 50-5000(REV: 3.24), July. 14, 2006.
Any part of this publication could not be copied, stored in a retrieval system, or translated into
any language or computer language in any form or any means, electronic, magnetic, chemical,
manual or otherwise, without the prior written permission of our company.
The instructions in this manual have been carefully checked for accuracy and are presumed to
be reliable. The accuracy and adequacy of this document are the responsibilities of our
company. Please email any comments or corrections to our review team at
review@inscapedata.com.

AirEther™BR108 5GHz Wireless Bridge
9
1. Introduction
The AirEther BR108 is designed for the outdoor environment. It will function under the strict
weather as the following passages you see. About the further protection, the bridge and
Power over Ethernet adapter are built with the lightning protector. This advanced innovation is
to help you to increase from the productivity, cost-effective, mobile Internet access, to other
sections.
The AirEther BR108 is a wireless building-to-building bridge solution. The AirEther
BR108 provides the data rate up to 108 Mbps that is best suited for enterprises, campus or
off-site locations that require LAN or Internet access without the availability of wired networks to
extend the network coverage. The AirEther BR108 provides the point to point and point to
multi-point connection.
One of the AirEther BR108 advanced feature is over the data rate section. The bridge
has two data rate modes, one is the IEEE 802.11a, and another is the IEEE802.11a turbo.
About the bridge under the IEEE 802.11a mode, it supports the data rate from 6 Mbps to 54
Mbps. Under the IEEE802.11a turbo mode, it supports the data rate from 12 Mbps to 108
Mbps in turbo mode. The supported frequency channel for the IEEE802.11a or the
IEEE802.11a turbo are across from 5.15 to 5.85 GHz.
Another advanced design is the security setting. We all know the security is the major issue
over the wireless communication. We offer the two modes on the security setting, one is
“Shared Key”, and the other is “Unique Key”. It is really easy for you to secure your
communication through this thoughtful feature.
About the field installation, it is easy for you to install the device outside field. The
following paragraphs remind you what you need to notice during the installation form the site
survey, antenna installation, to the ODU installation. We also offer you the evaluated max
distance as your reference under the IEEE802.11a and the Antenna gain is either 17 dBi or 23
dBi.
During the appendix section, we offer you some terminologies explanation and how to do
the simple troubleshooting when you encounter the difficult over the wireless connection.

AirEther™BR108 5GHz Wireless Bridge
10
2. AirEther BR108 Hardware FEATURE
2.1 Product Feature
Temperature — The wireless bridge is tested for normal operation in temperatures
from -30°C to 70°C.
Wind Velocity — The wireless bridge can operate in winds up to 90 MPH and survive
higher wind speeds up to 125 MPH. You must consider the known maximum wind
velocity and direction at the site and be sure that any supporting structure, such as a
pole, mast, or tower, is built to withstand this force.
Lightning — The wireless bridge includes its own built-in lightning protection.
However, you should make sure that the unit, any supporting structure, and cables are
all properly grounded. Additional protection using lightning rods, lightning arrestors,
or surge suppressors may also be employed.
Range —The wireless bridge has been refined and optimized for long range
application, up to 28Km under the Basic data mode, and 14Km at the Turbo mode.
Rain — The wireless bridge is weatherproofed against rain and prolonged heavy rain
has no significant effect on the radio signal. It is highly recommended to use sealing
tape around the RF connector for prolonged operation. If moisture enters the
connector, it may cause degradation in performance or even a complete failure of the
link.
2.2 Product and Accessories
A. AirEther BR108 high capacity outdoor bridge unit
B. Ethernet Inline Power Injector (PoE), 48V, 1Amp,with Power Cord
C. Weatherproof connector kit
D. Installation CD with Locator Utility & User Manual CD
E. Mast Mount U Bolt
F. Warranty Information Sheet
G. Quick Installation Guide

AirEther™BR108 5GHz Wireless Bridge
11
2.4 Product Connection Feature
2.4.1 External Antenna & Power over Ethernet (PoE) Cable Connector
Picture 2 Bridge
2.4.2 Grounding Screw
1) Be grounding strip connection.
2) Proper grounding is always for the safety consideration.
2.4.3 CAUTION OVER CABLE CONNECTION
Picture 3 Connection1
External Antenna
Connector
PoE Cable
Connector

AirEther™BR108 5GHz Wireless Bridge
12
2.5 Product Warranty
Our product is warranted against defects in materials and workmanship for a period of one
year from date of shipment. During the warranty period time, we will either repair or replace
products which to be defective.
For warranty service or repair, this product must be returned to a service facility designated
by us. Buyer shall prepay shipping charges to us and we shall pay shipping charges to return
the product to Buyer. However, buyers shall pay all shipping charges, duties, and taxes for
products returned to us from another country.
Our warranty is for its software and we designed firmware when you properly installed on
this product. We do not warrant that the operation of the product, or software, or firmware will
be uninterrupted or error free.
2.6 Warranty Limitation
The foregoing warranty shall not apply to defects resulting from improper or inadequate
maintenance by buyers, buyer-supplied software, interfacing, unauthorized modification,
inappropriately use, operation out of the product environment specifications, or improper site
preparation and maintenance.
No any other warranty is expressed or implied. We specifically disclaim the implied
warranties of merchantability and fitness for a particular purpose.
2.7 Requirement
An FTP server is required for update bridge firmware.
The Ethernet connection is required for the initial Bridge configuration.

AirEther™BR108 5GHz Wireless Bridge
13
2.8 Feature Summary
Provide the Ethernet to Wireless LAN Bridge fully compatible on IEEE 802.3 Ethernet
side and fully interoperable with IEEE 802.11a compliant equipments.
The Ethernet interface with 10 /100Base-T.
The operating mode is for IEEE 802.11a infrastructure.
The dynamic data rate switching with 6, 9, 12, 18, 24, 36, 48, 54 and turbo mode allows
auto fallback data rate for optimized reliability, throughput and transmission range.
Using the FTP to upgrade the Firmware.
The 17dBi directional flat panel antenna offers up to 20 km transmission range with the
6MHz data rate.
The lightning protector.
Outdoor environment.
AirEther™BR108 5GHz Wireless Bridge
14
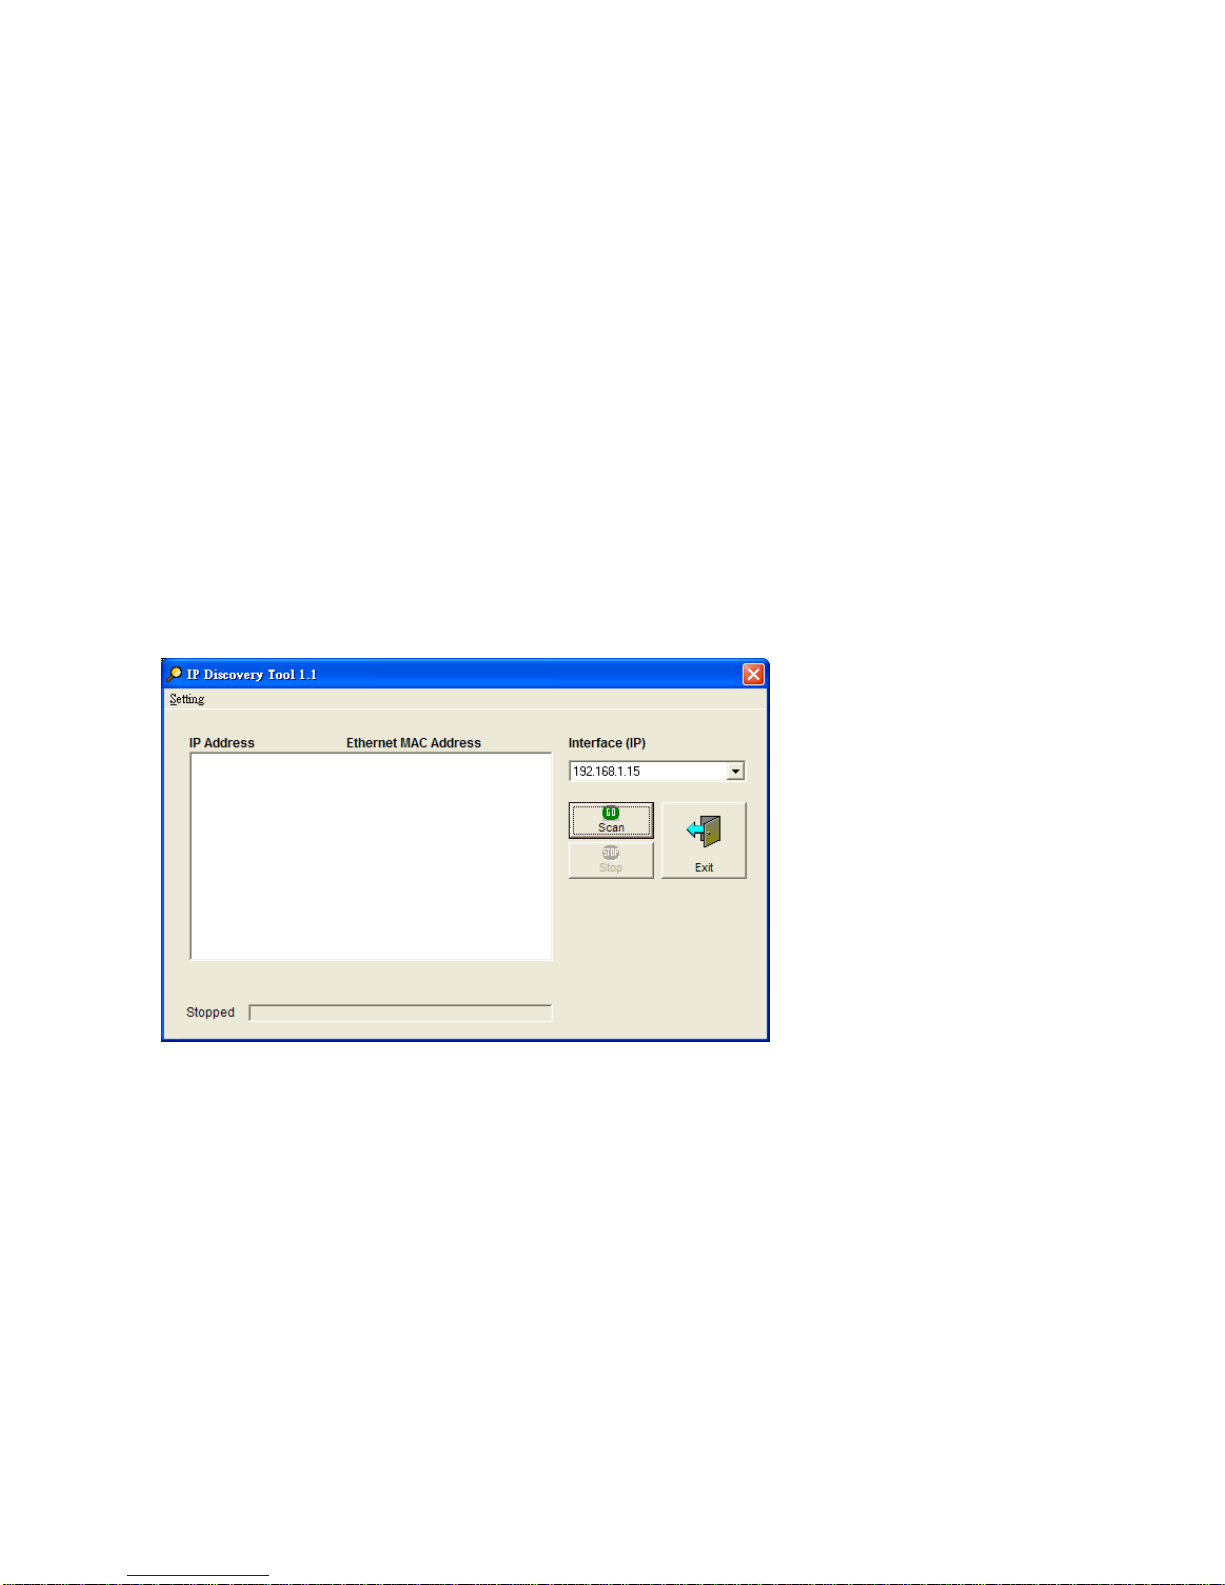
3. IP Discover Utility
A simple Windows Utility is supplied on the CD. This utility can be used to locate the IP address
of the AirEther BR108 Outdoor Bridge on the same sub-network segment. Although the
AirEther BR108 Outdoor Bridge has a default IP address, this utility useful when the network
administrator forgets the modified IP address. Before using this utility, please make sure the
system firewall installed in your PC is “Disable”.
Below the installation and usage procedure:
1. Insert the Utility and User’s Manual CD into the CD-ROM drive.
2. Once the menu screen appears, click on the “IP Discover Tool” for installation. If the menu
screen dose not appears, enter E:\Utility\setup.exe (Assume “E” is your CD-ROM drive).
Flow the prompts to complete the installation.
3. After the installation completes, you can start this utility from “Start”>”Program
Files”>”IpDiscover1.1”>”IpDiscover1.1”.
4. Once the utility is executed, the below screen will pop up. The “Interface(IP)” shows the
current IP address of your computer.
Picture 4 IP Discover Tool

AirEther™BR108 5GHz Wireless Bridge
15
5. Click on the “Scan” button for the utility to start searching. And the utility will display the IP
address and MAC address of the available AirEther BR108 Outdoor Bridge. Now you can
using a web browser to access the management interface with the IP address.
Picture 5 Find out the IP and MAC address

AirEther™BR108 5GHz Wireless Bridge
16
4. Bridge (AirEther BR108) Configuration
4.1 The Master/Slave side PC Network Configuration
4.1.1 How To Start Network Configuration on your PC
1) Click the “Start Menu” and choose “Setting”.
2) Click “Network and Dial-up Connection”.
3) Right-click on the “Local Area Connection” and select “properties”.
Picture 6 Start Menu
Picture 7 Network Connection

AirEther™BR108 5GHz Wireless Bridge
17
4.1.2 Master Bridge side PC TCP/ IP Setup
4.1.2.1 Master side PC TCP/IP Setup
1) After clicking on “Property”, you will see the diagram as below.
2) Marking the “Internet Protocol (TCP/IP)” and click the “Properties”
Picture 8 Local Area Connection Properties
4.1.2.2 Master Bridge Side PC IP/ MAC Address Set up
1) Use “IP address (ex. 192.168.1.2)” under the same Bridge subnet and
Bridge Default IP Address( 192.168.1.20 ).
2) Using the default Subnet Mask Setting During the first time.
(Default value: 255.255.255.0)
3) Keep the “Default Gateway” as “Blank”.
4) Keep the “DNS Server Address” as “Blank” also.
5) Click ”OK” when you finish setting and Close the Window.

AirEther™BR108 5GHz Wireless Bridge
18
Picture 9 Internet Protocol Properties
4.1.2.3 Slave Side PC Configuration and TCP/IP set up
1) About “ the Slave side PC Configuration “, you just follow “the same
Set up method” as how you set the Master side.
2) As TCP/IP, you also follow “the exact same procedure” as you set
up the Master side PC.

AirEther™BR108 5GHz Wireless Bridge
19
4.1.3 Master/Slave Bridge Configuration
4.1.3.1 How To Start
1) Launch a Web Browser.
2) Key in the default IP Address as URL (Default IPAddress is http:// 192.168.1.20).
3) “Enter Network Password” Diagram will appear.
4) Enter “Username: Admin”(Case Sensitive).
5) Enter ”Password: 5up” (Case Sensitive).
6) Click ” OK ” when you finish.
Picture 10 Enter Username and Password

AirEther™BR108 5GHz Wireless Bridge
20
4.1.3.2 Master/Slave Bridge Configuration
4.1.3.2.1 After Login
You will access by clicking the “Management” from left side menu.
Picture 11 Statistic Page
4.1.3.2.2 Region/Country Set up
1) Click the “Management” on the left side of the Web page.
2) Select the “ Country ” you want from the list. Why you need to select the
“Country or Region” is because “different countries have its own RF
regulation”.
3) You need to use “the default Username and Password” when you sign in for
the first time.
4) SSH Server SSH is a secured telnet-like mechanism to invoke the command
line interface. All the commands and response will be encrypted. SSH
function can co-exist with Telnet function. The SSH port is 22. You need to
have an SSH client (e.g. OpenSSL) to access SSH.
Note: The web browser needs to equip 128-bit Cipher Strength to
process HTTPS SSL encryption. So, it is strongly
recommended you use the web browser whose version newer
than or equal to IE (Internet Explorer) 6 SP1 or Netscape 7.
Otherwise, you might experience the response of "The Page
Cannot Be Displayed".
5) SNMP Community Community name is a string for administrator to read the
SNMP MIB from external SNMP manager. The default SNMP community
Table of contents


