EcoNet UETST700SYS User manual

EcoNet®Smart Thermostat User Guide 2
User Guide Table of Contents
Overview................................................................................................................................................... 3
Items Included in the Box.............................................................................................................................. 3
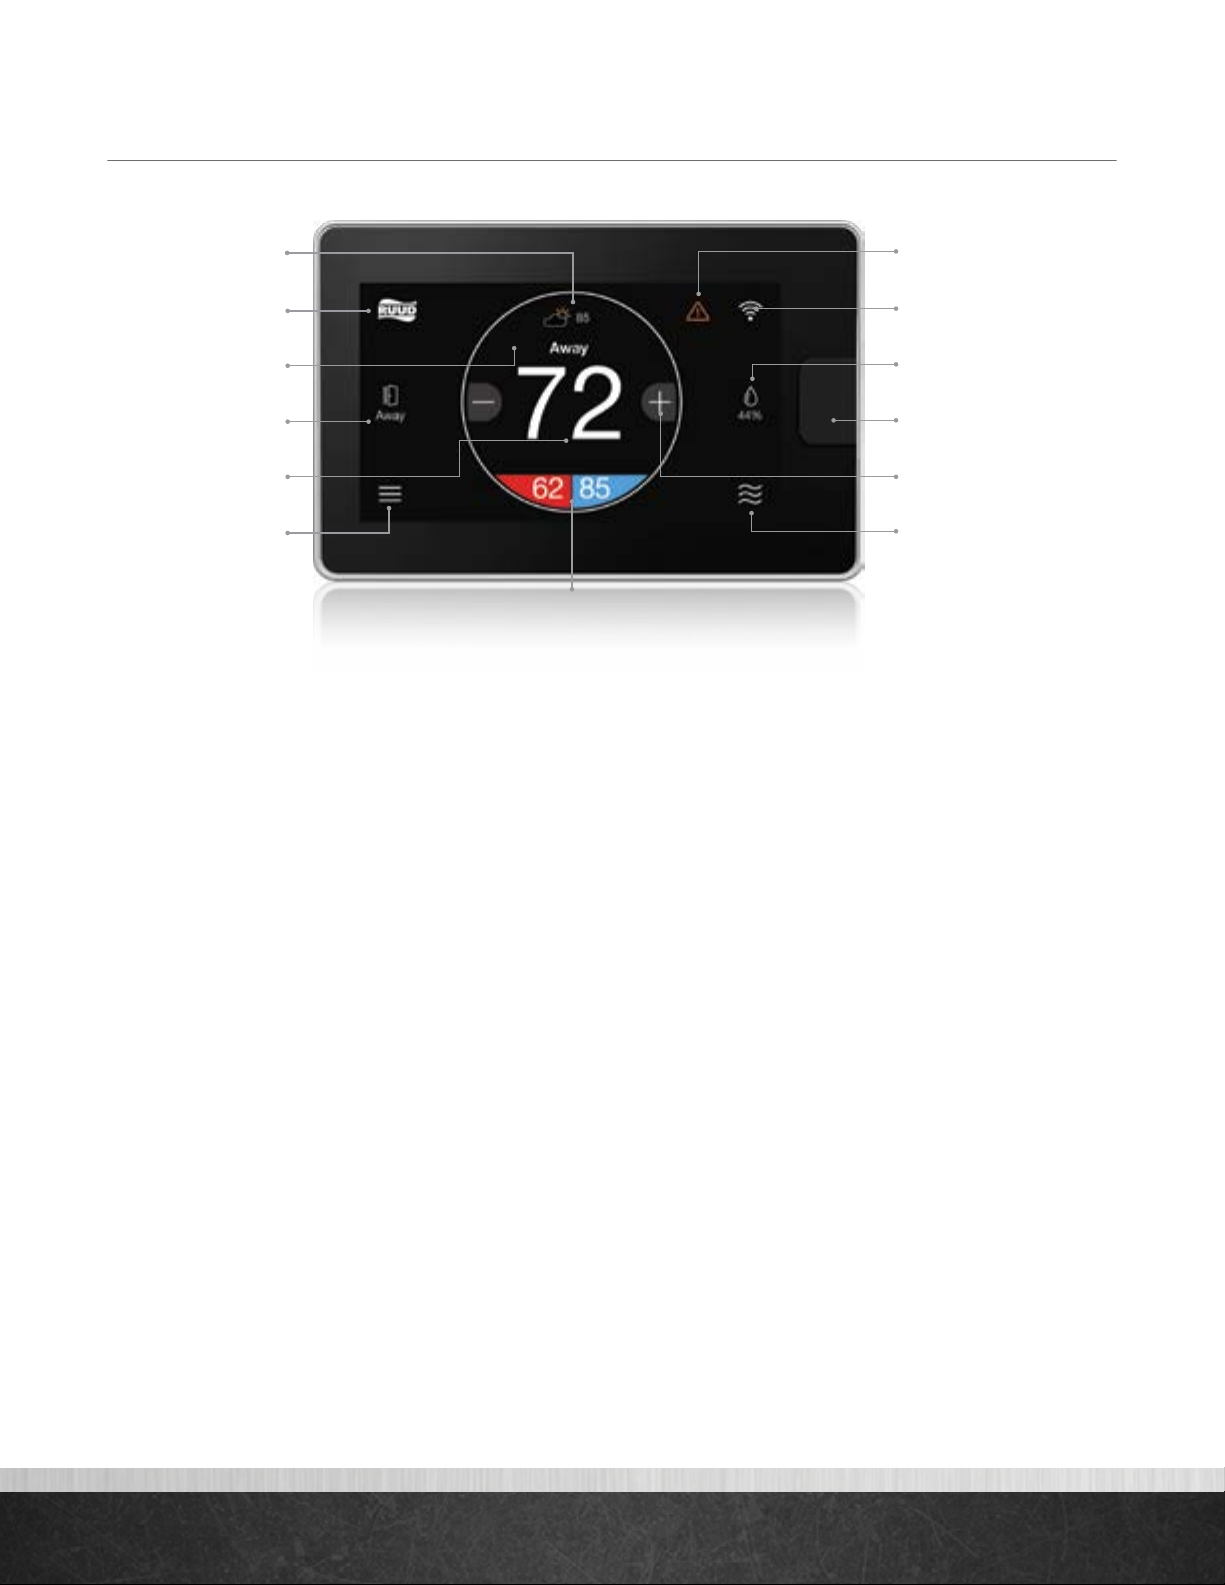
Homescreen Overview ................................................................................................................................ 4
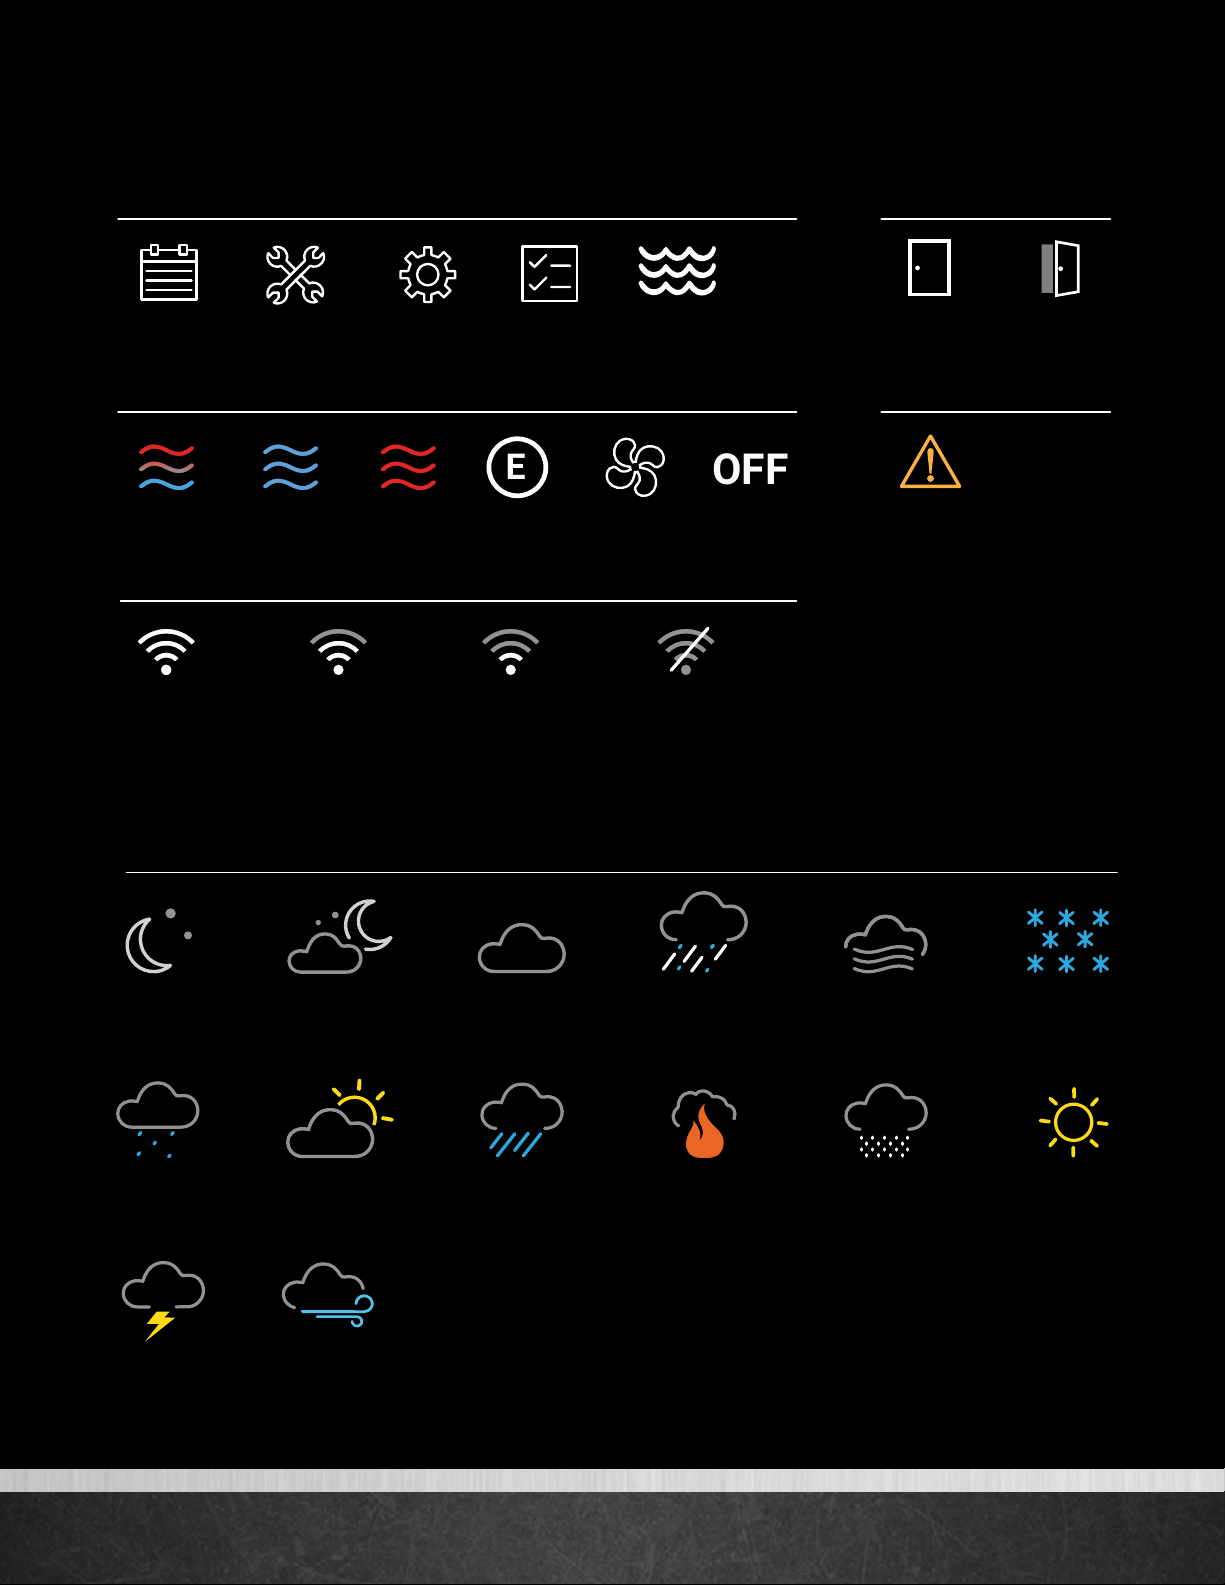
Icons to Become Familiar With...................................................................................................................... 5
Standby Screen .......................................................................................................................................... 6
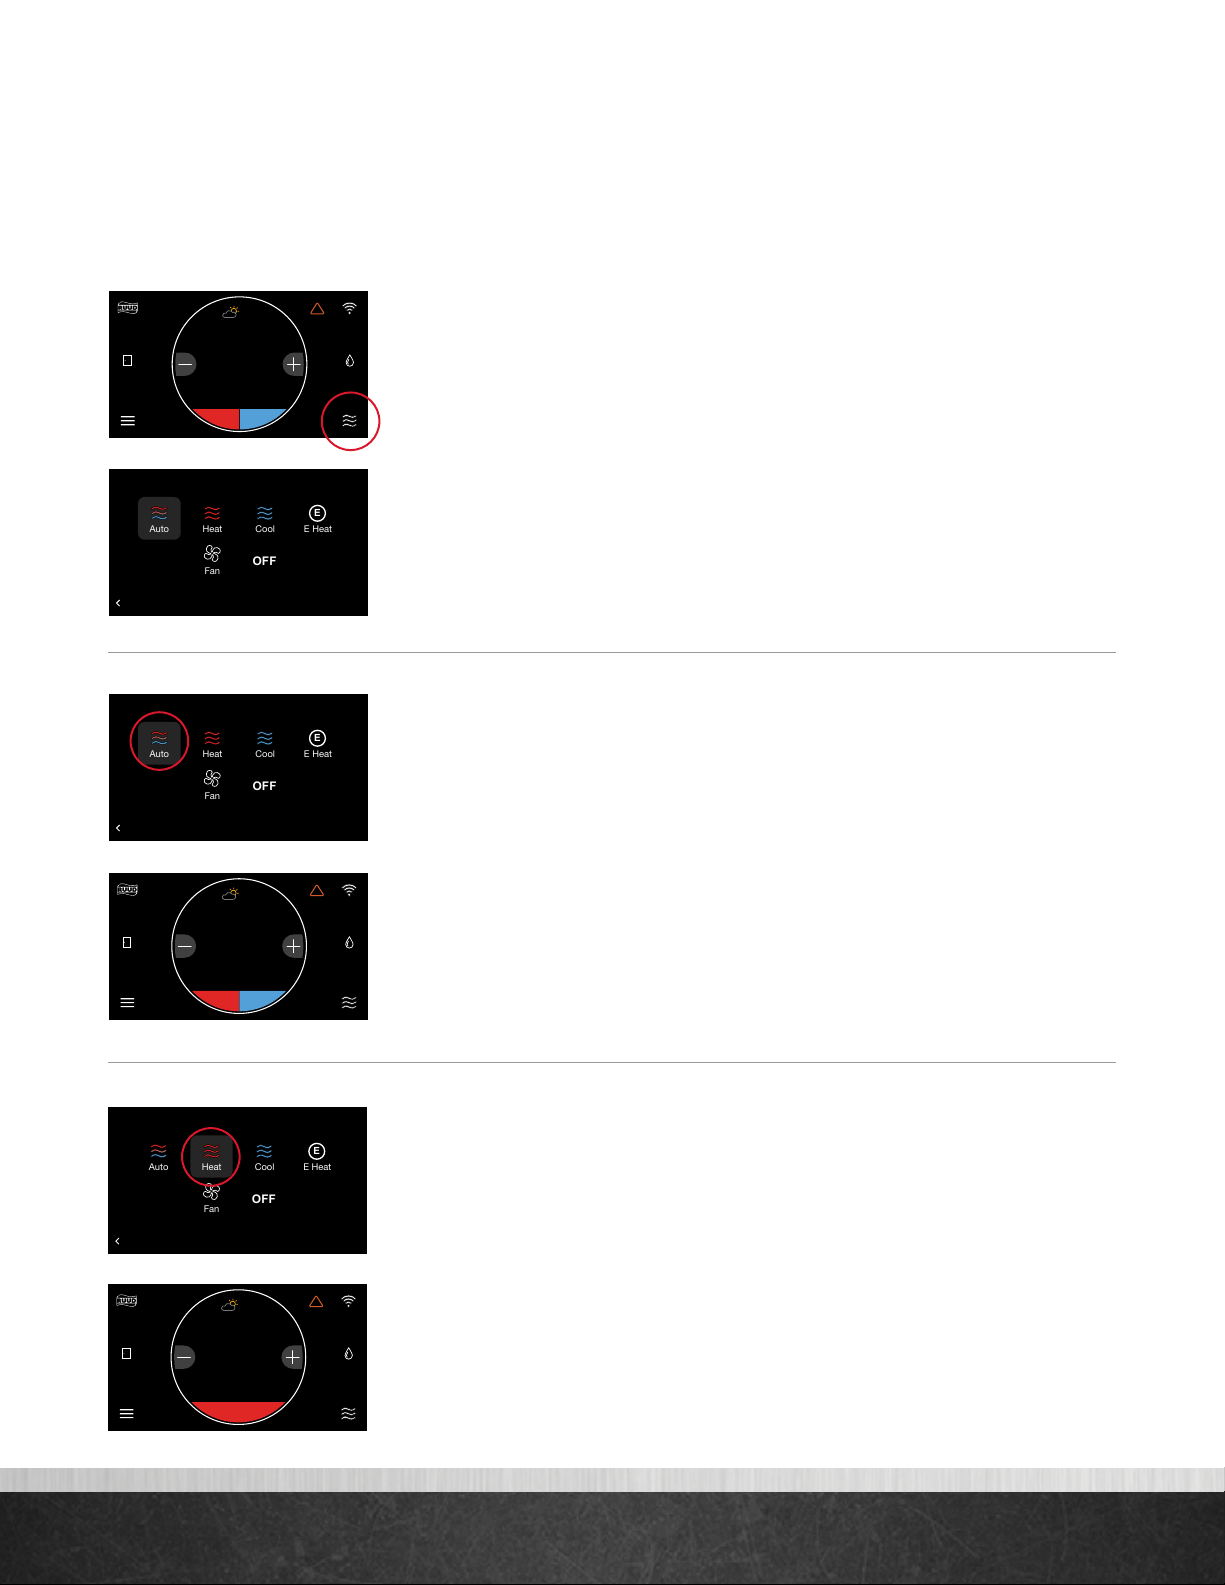
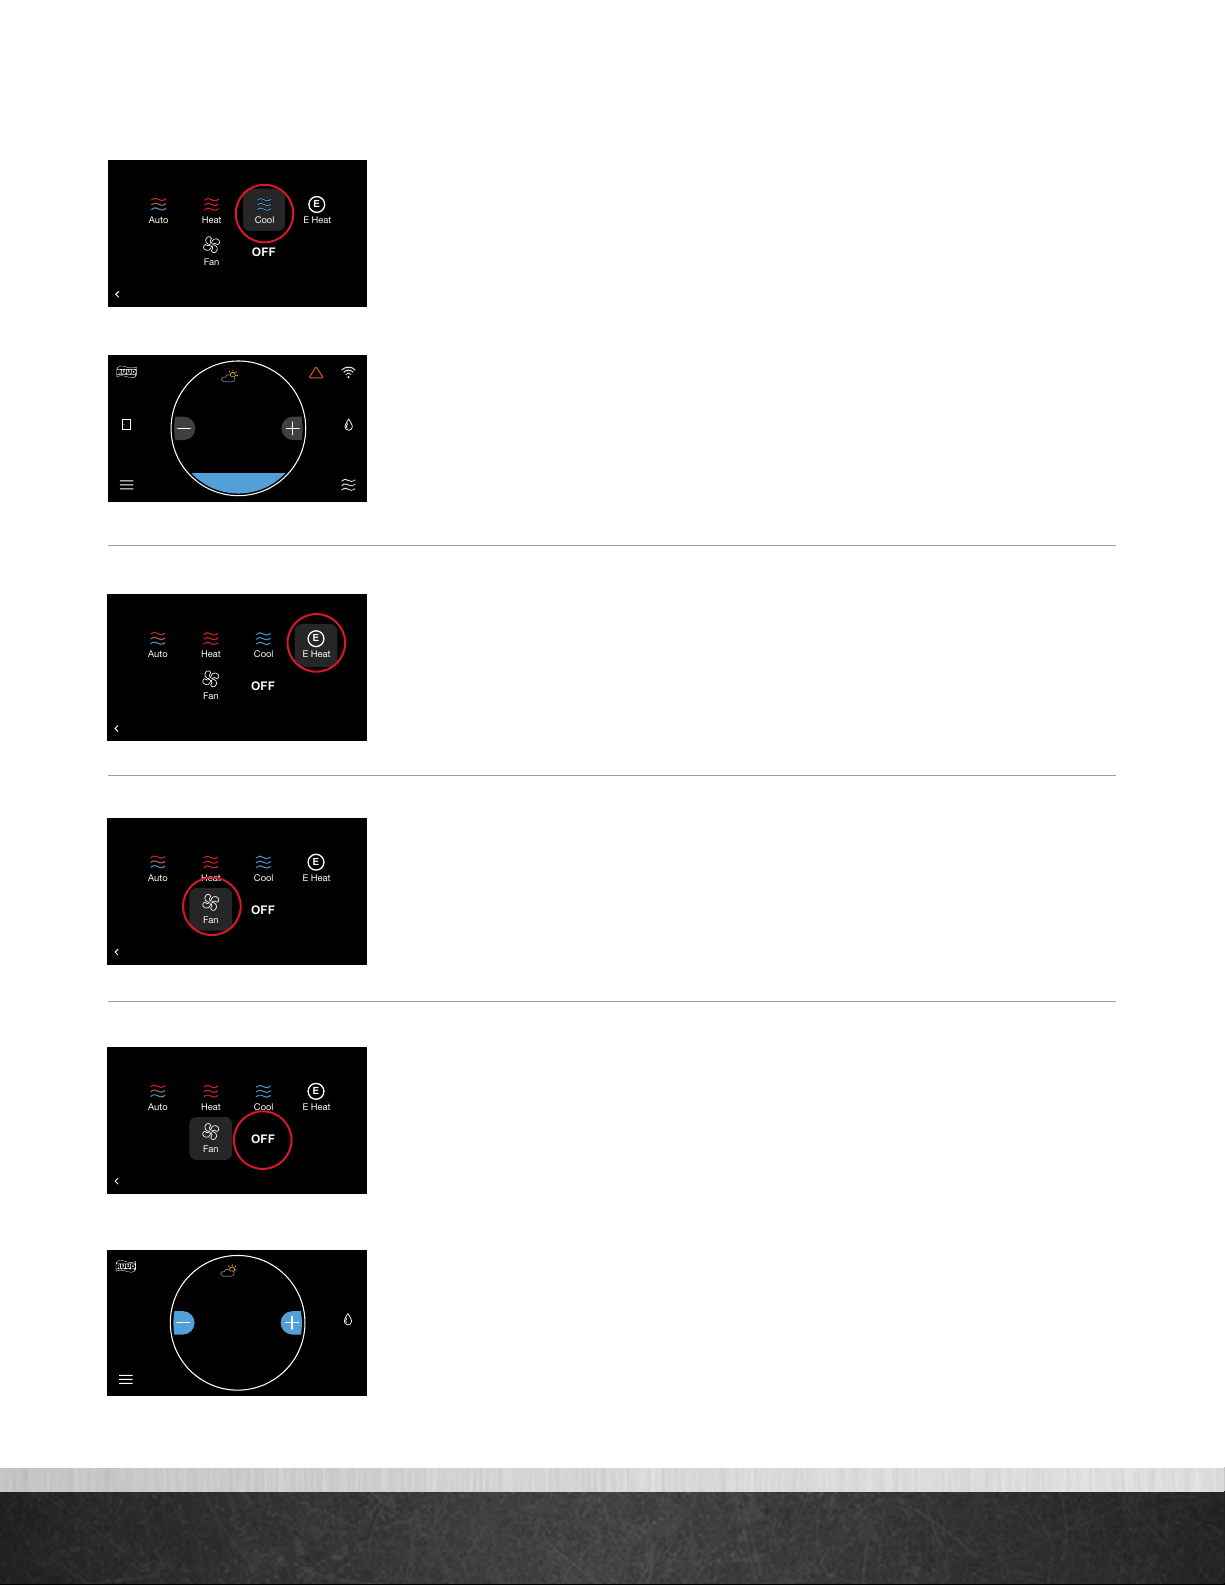
System Modes .........................................................................................................................................7–9
Connecting to WiFi ................................................................................................................................... 10
Weather .................................................................................................................................................. 11
Menu Options .......................................................................................................................................... 12
Settings...............................................................................................................................................12–17
Settings > Basic .............................................................................................................................12–13
Settings > Time ................................................................................................................................... 14
Settings > Humidity ........................................................................................................................14–15
How to Test a Humidifier ...................................................................................................................... 15
Settings > Away Settings...................................................................................................................... 15
Settings > Vacation.............................................................................................................................. 16
Settings > Fan................................................................................................................................16–17
Settings > Zoning Settings.......................................................................................................................... 17
Schedules................................................................................................................................................. 18
Status ...................................................................................................................................................... 19
Furnace Status .................................................................................................................................... 19
AC/HP Status ..................................................................................................................................... 19
Air Handler Status............................................................................................................................... 19
Zoning Status...................................................................................................................................... 20
Service ...............................................................................................................................................21–22
Service > Current ................................................................................................................................ 21
Service > History ................................................................................................................................ 21
Service > Alerts .................................................................................................................................. 21
Service > Support ............................................................................................................................... 22
Service > Equipment............................................................................................................................ 22
Water Heating.......................................................................................................................................... 23
Zoning..................................................................................................................................................... 23
EcoNet Smart Thermostat Installation Instructions........................................................................................... 24
Safety Considerations.......................................................................................................................... 24
Thermostat Location............................................................................................................................. 24
Wiring Considerations......................................................................................................................... 25
Mounting EcoNet Smart Thermostat....................................................................................................... 26
Wiring Remote Temperature Sensor ....................................................................................................... 27
Installer Settings...................................................................................................................................28–31
Furnace Settings.............................................................................................................................28–29
How to Connect a Ventilator to an EcoNet HVAC System ......................................................................... 30
AC/HP Settings .................................................................................................................................. 30
Thermostat Settings.............................................................................................................................. 31
Air Handler Settings ............................................................................................................................ 32
Caring for your Thermostat......................................................................................................................... 32
Amazon Alexa Enabled Devices ................................................................................................................. 33
Regulatory and Warranty Information.......................................................................................................... 34

EcoNet®Smart Thermostat User Guide 3
> Return to Table of Contents
EcoNet Smart Thermostat User Guide
The EcoNet®Smart Thermostat is an easy-to-use programmable thermostat that provides complete control over
your home’s smart air and water comfort systems. It’s smart enough to alert you when an issue is detected, yet it’s
designed to be simple to operate with an intuitive touchscreen interface. And it has built-in WiFi so you can monitor
your system and adjust temperatures and schedules while on-the-go.
More than a thermostat, it’s part of an intuitive system that maximizes comfort and efficiency while offering complete
peace of mind—so you can stay focused on what matters most.
Items Included in the Box
EcoNet Smart Thermostat
Wall Mounting Plate
Ferrite Toroid
Mounting Screws and Drywall Anchors
Lens Cloth
Quick Start Guide
QUICK START
GUIDE
E1
E2
C
RR
E1
E2
S1
S2
C
R
E1
E2
C
OUTDOOR UNIT INDOOR UNIT OPTIONAL REMOTE
TEMPERATURE SENSOR
ECONET
SMART THERMOSTAT
R C S1 S2 E1 E2
QUICK START
GUIDE
E1
E2
C
RR
E1
E2
S1
S2
C
R
E1
E2
C
OUTDOOR UNIT INDOOR UNIT OPTIONAL REMOTE
TEMPERATURE SENSOR
ECONET
SMART THERMOSTAT
R C S1 S2 E1 E2
EcoNet Smart Thermostat
QUICK START
GUIDE
E1
E2
C
RR
E1
E2
S1
S2
C
R
E1
E2
C
OUTDOOR UNIT INDOOR UNIT OPTIONAL REMOTE
TEMPERATURE SENSOR
ECONET
SMART THERMOSTAT
R C S1 S2 E1 E2
Wall Mounting Plate
QUICK START
GUIDE
E1
E2
C
RR
E1
E2
S1
S2
C
R
E1
E2
C
OUTDOOR UNIT INDOOR UNIT OPTIONAL REMOTE
TEMPERATURE SENSOR
ECONET
SMART THERMOSTAT
R C S1 S2 E1 E2
Ferrite Toroid
x 2
x 2
Mounting Screws
and Drywall Anchors
QUICK START
GUIDE
E1
E2
C
RR
E1
E2
S1
S2
C
R
E1
E2
C
OUTDOOR UNIT INDOOR UNIT OPTIONAL REMOTE
TEMPERATURE SENSOR
ECONET
SMART THERMOSTAT
R C S1 S2 E1 E2
Lens Cloth

EcoNet®Smart Thermostat User Guide 4
> Return to Table of Contents
Homescreen Overview
What This Means to Me, the Homeowner:
Weather
Current weather condition and outside
temperature; tap to see forecast
Brand Logo
Tap to access contractor information and
support help
One-Touch Away
Tap once to enter preset Away settings; tap again
to return to previous settings or
resume schedule
Indoor Temperature
Shows the current temperature
inside your home
Menu
Tap to navigate to the full Menu where you can
change basic settings, customize your
schedule and more
Alert
Indicates an important reminder, minor alert, or
critical alarm; tap for additional details
WiFi
Current WiFi signal strength; tap to start the
setup process
Humidity
Current relative humidity in your home; tap to
configure to your preference
System Mode
Tap to navigate to Mode selection screen
(auto/heat/cool/e-heat/fan/off)
System Set Point
System Mode
Temperature Adjustment
Motion Sensor
WiFi
Alert
Humidity
One-Touch Away
Indoor Temperature
Brand Logo
Weather
Messaging Bar
Menu

EcoNet®Smart Thermostat User Guide 5
> Return to Table of Contents
Icons to Become Familiar With
Weather
Windy
Weather Icons 1-10-2018
Sunny Partly Cloudy/
Partly Sunny Cloudy Windy
Light Rain Fog Smoke Frost
Raining Thunderstorm Snowing Freezing Rain
Additional
Clear
Night
Weather Icons 1-10-2018
Sunny Partly Cloudy/
Partly Sunny Cloudy Windy
Light Rain Fog Smoke Frost
Raining Thunderstorm Snowing Freezing Rain
Additional
Cloudy
Night
Weather Icons 1-10-2018
Sunny Partly Cloudy/
Partly Sunny Cloudy Windy
Light Rain Fog Smoke Frost
Raining Thunderstorm Snowing Freezing Rain
Additional
Cloudy
Weather Icons 1-10-2018
Sunny Partly Cloudy/
Partly Sunny Cloudy Windy
Light Rain Fog Smoke Frost
Raining Thunderstorm Snowing Freezing Rain
Additional
Freezing
Rain
Weather Icons 1-10-2018
Sunny Partly Cloudy/
Partly Sunny Cloudy Windy
Light Rain Fog Smoke Frost
Raining Thunderstorm Snowing Freezing Rain
Additional
Frost
Weather Icons 1-10-2018
Sunny Partly Cloudy/
Partly Sunny Cloudy Windy
Light Rain Fog Smoke Frost
Raining Thunderstorm Snowing Freezing Rain
Additional
Fog
Weather Icons 1-10-2018
Sunny Partly Cloudy/
Partly Sunny Cloudy Windy
Light Rain Fog Smoke Frost
Raining Thunderstorm Snowing Freezing Rain
Additional
Weather Icons 1-10-2018
Sunny Partly Cloudy/
Partly Sunny Cloudy Windy
Light Rain Fog Smoke Frost
Raining Thunderstorm Snowing Freezing Rain
Additional
Partly
Sunny
Weather Icons 1-10-2018
Sunny Partly Cloudy/
Partly Sunny Cloudy Windy
Light Rain Fog Smoke Frost
Raining Thunderstorm Snowing Freezing Rain
Additional
Weather Icons 1-10-2018 REV. 1
# 1 Sunny# 0 Partly Sunny # 2 Cloudy # 7 Windy
# 10 Light Rain # 11 Fog # 12 Smoke # 13 Frost
# 4 Raining # 6 Thunderstorm
# 5 Snowing
# 3 Freezing Rain
# 8 Clear Night # 9 Cloudy Night
Snowing
Weather Icons 1-10-2018
Sunny Partly Cloudy/
Partly Sunny Cloudy Windy
Light Rain Fog Smoke Frost
Raining Thunderstorm Snowing Freezing Rain
Additional
Storms
Weather Icons 1-10-2018
Sunny Partly Cloudy/
Partly Sunny Cloudy Windy
Light Rain Fog Smoke Frost
Raining Thunderstorm Snowing Freezing Rain
Additional
Rainy
Weather Icons 1-10-2018
Sunny Partly Cloudy/
Partly Sunny Cloudy Windy
Light Rain Fog Smoke Frost
Raining Thunderstorm Snowing Freezing Rain
Additional
Mist Smoke
Weather Icons 1-10-2018
Sunny Partly Cloudy/
Partly Sunny Cloudy Windy
Light Rain Fog Smoke Frost
Raining Thunderstorm Snowing Freezing Rain
Additional
Sunny
System Operation
Auto Cooling Heating Fan OnlyEmergency
Heat Power Off
Auto
Cool
Heat
E Heat
E
Fan
OFF
Menu
Settings
Settings
Service
Service
Home
Away
Status
Status
Schedule
Schedule
Water
Heater
WiFi Signal
Connected
Strong Signal Connected
Medium Signal Connected
Low Signal Not
Connected
Home & Away
Home Away
Alerts
Alert

EcoNet®Smart Thermostat User Guide 6
> Return to Table of Contents
Standby Screen
If the thermostat has not been touched for 30 seconds, the screen dims and the standby screen activates displaying
indoor temperature and outdoor weather conditions. If an alert or alarm is present, the alert / alarm icon will be
displayed as well.
The motion sensor will automatically wake the thermostat and activate the home screen as you approach.
The standby screen can be turned off by disabling the back-light under basic
settings (Menu > Settings > Basic)

EcoNet®Smart Thermostat User Guide 7
> Return to Table of Contents
System Modes
The EcoNet Smart Thermostat will call for heat or cool based on the current settings and temperature. Cooling
and heating equipment may have a delay period before operation is enabled. The delay can be up to 5 minutes
(if the mode was changed right after equipment turns off). Status screen will show a “Hold-Off Timer” for
Equipment State.
Select the mode icon in the bottom right corner of the home screen to quickly
change the operating mode.
Select from Auto, Heat, Cool, E-Heat, Fan and Off
Auto – Activates the heating or cooling system as required to keep your home
within the configured range of set point temperatures. Select the desired set
point, and then use the large adjustment buttons to set the desired temperature.
To adjust your cooling set point, tap the set point on the right - it will turn blue,
then adjust using the plus and minus buttons. The current temperature in the
center of the screen will temporarily be replaced by the set point in large font
during temperature adjustments.
Note: The default deadband or separation between the heating and cooling set points is 2 degrees.
Heat – Turns on heating when the current temperature drops below your set
point temperature. When there is an active call for heating, the words ‘Heating
To’ will appear above the heating set point.
(Heating set point screen)
71 47%
68
OFF Dining Room
Zone 3
Away
Backlight Enabled?
Outside Temp Selection?
BACK
Basic Settings
Internet
Yes
36
UNITS
34
Group 1
Refrigeration
!
61%
72
Basement
Zone 4
85
80
Zoning System Test
T957_O Low Refrigerant Pressure
BACK
Installer Checkout
Linearize Dampers
21
status: Setting airflow
CFM: 840
54
75 44%
80
65
Away
Resume Schedule
71
Home 44%
70
80
Cooling to
BACK
Select a Mode
E Heat
E
Fan
OFF
Cool
Heat
Auto
71 47%
68
OFF Dining Room
Zone 3
Away
Backlight Enabled?
Outside Temp Selection?
BACK
Basic Settings
Internet
Yes
36
UNITS
34
Group 1
Refrigeration
!
61%
72
Basement
Zone 4
85
80
Zoning System Test
T957_O Low Refrigerant Pressure
BACK
Installer Checkout
Linearize Dampers
21
status: Setting airflow
CFM: 840
54
75 44%
80
65
Away
Resume Schedule
71
Home 44%
70
80
Cooling to
BACK
Select a Mode
E Heat
E
Cool
Auto
Heat
Fan
OFF
71 47%
68
OFF Dining Room
Zone 3
Away
Backlight Enabled?
Outside Temp Selection?
BACK
Basic Settings
Internet
Yes
36
UNITS
34
Group 1
Refrigeration
!
61%
72
Basement
Zone 4
85
80
Zoning System Test
T957_O Low Refrigerant Pressure
BACK
Installer Checkout
Linearize Dampers
21
status: Setting airflow
CFM: 840
54
75 44%
80
65
Away
Resume Schedule
71
Home 44%
70
80
Cooling to
BACK
Select a Mode
E Heat
E
Fan
OFF
Cool
Heat
Auto
71 47%
68
OFF Dining Room
Zone 3
Away
Backlight Enabled?
Outside Temp Selection?
BACK
Basic Settings
Internet
Yes
75
Home
62 85
!
44%
80
71 47%
68
OFF Dining Room
Zone 3
Away
Backlight Enabled?
Outside Temp Selection?
BACK
Basic Settings
Internet
Yes
75
Home
62 85
!
44%
80
71 47%
68
OFF Dining Room
Zone 3
Away
Backlight Enabled?
Outside Temp Selection?
BACK
Basic Settings
Internet
Yes
36
UNITS
34
Group 1
Refrigeration
!
61%
72
Basement
Zone 4
85
80
Zoning System Test
T957_O Low Refrigerant Pressure
BACK
Installer Checkout
Linearize Dampers
21
status: Setting airflow
CFM: 840
54
75 44%
80
65
Away
Resume Schedule
71
Home 44%
70
80
Cooling to
75
Home
!
44%
62
80

EcoNet®Smart Thermostat User Guide 8
> Return to Table of Contents
System Modes (con’t)
Cool – Turns on cooling when the current temperature rises above your set point
temperature. When there is an active call for cooling, the words ‘Cooling To’ will
appear above the cooling set point.
(Cooling set point screen)
E-Heat (Heat Pump Systems Only) – The emergency heat option is a
manual setting, not an automatic function initiated by the heat pump thermostat.
The purpose of the emergency heat setting is to bring the backup heat source
online immediately to deliver 100% of the home’s heating demand while
simultaneously locking out the heat pump.
Fan Only – While in Fan Only mode, the heating/cooling equipment is turned
off. Use the plus or minus adjustment buttons to navigate between fan speeds
from Low to High. Press Mode again to reactivate a heating or cooling mode.
Fan only is a manual override of a set schedule. If a schedule is being followed,
the fan speed will return to the scheduled fan speed when you reactivate the
heating/cooling equipment. You can set continuous fan when in Heating,
Cooling or Auto mode from the Settings screen.
O – The system will not actively heat or cool your home.
If you have an EcoNet Zoning System and the EcoNet Zone Control heat
set point is set to 50°F (10°C) or the cool set point is set to 92°F (33°C), the
Zone Control will default to Off.
71 47%
68
OFF Dining Room
Zone 3
Away
Backlight Enabled?
Outside Temp Selection?
BACK
Basic Settings
Internet
Yes
36
UNITS
34
Group 1
Refrigeration
!
61%
72
Basement
Zone 4
85
80
Zoning System Test
T957_O Low Refrigerant Pressure
BACK
Installer Checkout
Linearize Dampers
21
status: Setting airflow
CFM: 840
54
75 44%
80
65
Away
Resume Schedule
71
Home 44%
70
80
Cooling to
BACK
Select a Mode
E Heat
E
Heat
Auto
Cool
Fan
OFF
71 47%
68
OFF Dining Room
Zone 3
Away
Backlight Enabled?
Outside Temp Selection?
BACK
Basic Settings
Internet
Yes
36
UNITS
34
Group 1
Refrigeration
!
61%
72
Basement
Zone 4
85
80
Zoning System Test
T957_O Low Refrigerant Pressure
BACK
Installer Checkout
Linearize Dampers
21
status: Setting airflow
CFM: 840
54
75 44%
80
65
Away
Resume Schedule
71
Home 44%
70
80
Cooling to
BACK
Select a Mode
E Heat
E
Fan
OFF
Cool
Heat
Auto
71 47%
68
OFF Dining Room
Zone 3
Away
Backlight Enabled?
Outside Temp Selection?
BACK
Basic Settings
Internet
Yes
36
UNITS
34
Group 1
Refrigeration
!
61%
72
Basement
Zone 4
85
80
Zoning System Test
T957_O Low Refrigerant Pressure
BACK
Installer Checkout
Linearize Dampers
21
status: Setting airflow
CFM: 840
54
75 44%
80
65
Away
Resume Schedule
71
Home 44%
70
80
Cooling to
75
Home
!
44%
85
80
71 47%
68
OFF Dining Room
Zone 3

EcoNet®Smart Thermostat User Guide 9
> Return to Table of Contents
System Modes (con’t)
You can manually adjust the temperature from the Home Screen by touching the
plus and minus buttons. When the set point is being changed, the ring
will either turn blue or red—depending on the mode of operation—and the new
set point is displayed in the center of the screen. If Auto mode is selected, press
the lower left set point (red) for heat or lower right set point (blue) for cool.
(Cooling set point adjustment)
(Heating set point adjustment)
71 47%
68
OFF Dining Room
Zone 3
Away
Backlight Enabled?
Outside Temp Selection?
BACK
Basic Settings
Internet
Yes
36
UNITS
34
Group 1
Refrigeration
!
61%
72
Basement
Zone 4
85
80
Zoning System Test
T957_O Low Refrigerant Pressure
BACK
Installer Checkout
Linearize Dampers
21
status: Setting airflow
CFM: 840
54
75 44%
80
65
Away
Resume Schedule
71
Home 44%
70
80
Cooling to
75
Home
62 85
!
44%
80
71 47%
68
OFF Dining Room
Zone 3
Away
Backlight Enabled?
Outside Temp Selection?
BACK
Basic Settings
Internet
Yes
36
UNITS
34
Group 1
Refrigeration
!
61%
72
Basement
Zone 4
85
80
Zoning System Test
T957_O Low Refrigerant Pressure
BACK
Installer Checkout
Linearize Dampers
21
status: Setting airflow
CFM: 840
54
75 44%
80
65
Away
Resume Schedule
71
Home 44%
70
80
Cooling to
80 42%Home
71 47%
68
OFF Dining Room
Zone 3
Away
Backlight Enabled?
Outside Temp Selection?
BACK
Basic Settings
Internet
Yes
36
UNITS
34
Group 1
Refrigeration
!
61%
72
Basement
Zone 4
85
80
Zoning System Test
T957_O Low Refrigerant Pressure
BACK
Installer Checkout
Linearize Dampers
21
status: Setting airflow
CFM: 840
54
75 44%
80
65
Away
Resume Schedule
71
Home 44%
70
80
Cooling to
63 42%Home

EcoNet®Smart Thermostat User Guide 10
> Return to Table of Contents
Connecting to WiFi
Your EcoNet Smart Thermostat supports WiFi 802.11 b/g/n. WiFi is normally configured during initial setup. You
may, however, be required to reconfigure the settings if your WiFi network settings change.
Connecting to WiFi will enable voice control through Amazon Alexa1devices, send local weather and allow you
to remotely manage your comfort and receive critical alarms should something ever go wrong. To save time, we
recommend having your home WiFi network password and your Internet-connected smartphone or tablet close to
the thermostat before you begin.
1. Download the EcoNet App2and ensure your smartphone or tablet is already connected to your home
WiFi network.
2. Select ‘Create Account’ and follow the instructions.
3. On the EcoNet Smart Thermostat, tap the WiFi icon in the top right corner of the home screen (See Fig. 1).
4. Select ‘Get Started’ (See Fig. 2).
5. When ‘Ready to Connect’ appears, use the EcoNet App to complete the setup process (See Fig. 3).
6. Follow the in-app instructions to complete your connection.
7. You may be required to enter your network password.
8. Tap ‘Done’ to complete setup (See Fig. 4).
71 47%
68
OFF Dining Room
Zone 3
Away
Backlight Enabled?
Outside Temp Selection?
BACK
Basic Settings
Internet
Yes
36
UNITS
34
Group 1
Refrigeration
!
61%
72
Basement
Zone 4
85
80
Zoning System Test
T957_O Low Refrigerant Pressure
BACK
Installer Checkout
Linearize Dampers
21
status: Setting airflow
CFM: 840
54
75 44%
80
65
Away
Resume Schedule
71
Home 44%
70
80
Cooling to
When "Ready to Connect"appears below use the
EcoNet app to complete the setup process.
Ready to Connect
WiFi Status
Almost There!
71 47%
68
OFF Dining Room
Zone 3
Away
Backlight Enabled?
Outside Temp Selection?
BACK
Basic Settings
Internet
Yes
36
UNITS
34
Group 1
Refrigeration
!
61%
72
Basement
Zone 4
85
80
Zoning System Test
T957_O Low Refrigerant Pressure
BACK
Installer Checkout
Linearize Dampers
21
status: Setting airflow
CFM: 840
54
75 44%
80
65
Away
Resume Schedule
71
Home 44%
70
80
Cooling to
Congratulations! Your thermostat has successfully been
connected to Wi-Fi.
Done
Setup Complete!
71 47%
68
OFF Dining Room
Zone 3
Away
Backlight Enabled?
Outside Temp Selection?
BACK
Basic Settings
Internet
Yes
36
UNITS
34
Group 1
Refrigeration
!
61%
72
Basement
Zone 4
85
80
Zoning System Test
T957_O Low Refrigerant Pressure
BACK
Installer Checkout
Linearize Dampers
21
status: Setting airflow
CFM: 840
54
75 44%
80
65
Away
Resume Schedule
71
Home 44%
70
80
Cooling to
Connect to Wi-Fi to receive local weather
and remotely manage your system with the
EcoNet mobile app.
Setup
Later
Get
Started
Wi-Fi Setup
71 47%
68
OFF Dining Room
Zone 3
Away
Backlight Enabled?
Outside Temp Selection?
BACK
Basic Settings
Internet
Yes
36
UNITS
34
Group 1
Refrigeration
!
61%
72
Basement
Zone 4
85
80
Zoning System Test
T957_O Low Refrigerant Pressure
BACK
Installer Checkout
Linearize Dampers
21
status: Setting airflow
CFM: 840
54
75 44%
80
65
Away
Resume Schedule
71
Home 44%
70
80
Cooling to
75
Home
62 85
!
44%
80
(Fig. 1)
(Fig. 2)
(Fig. 3)
(Fig. 4)

EcoNet®Smart Thermostat User Guide 11
> Return to Table of Contents
Weather
Tap the weather icon on the home screen to display local weather conditions and view the hourly and
daily forecasts. The weather will be based on the current location or ZIP code used when creating your
EcoNet account.
Current Weather Conditions
24-Hour Forecast
6-Day Forecast
71 47%
68
OFF Dining Room
Zone 3
Away
Backlight Enabled?
Outside Temp Selection?
BACK
Basic Settings
Internet
Yes
36
UNITS
34
Group 1
Refrigeration
!
61%
72
Basement
Zone 4
85
80
Zoning System Test
T957_O Low Refrigerant Pressure
BACK
Installer Checkout
Linearize Dampers
21
status: Setting airflow
CFM: 840
54
75 44%
80
65
Away
Resume Schedule
71
Home 44%
70
80
Cooling to
TUE WED THU FRI S AT SUN
BACK
Forecast
75 80 75 70 7070HI
LO 55 60 55 50 5050
0% 0% 80% 0% 0%0%
71 47%
68
OFF Dining Room
Zone 3
Away
Backlight Enabled?
Outside Temp Selection?
BACK
Basic Settings
Internet
Yes
36
UNITS
34
Group 1
Refrigeration
!
61%
72
Basement
Zone 4
85
80
Zoning System Test
T957_O Low Refrigerant Pressure
BACK
Installer Checkout
Linearize Dampers
21
status: Setting airflow
CFM: 840
54
75 44%
80
65
Away
Resume Schedule
71
Home 44%
70
80
Cooling to
75
Home
62 85
!
44%
80
71 47%
68
OFF Dining Room
Zone 3
Away
Backlight Enabled?
Outside Temp Selection?
BACK
Basic Settings
Internet
Yes
Currently: HI: 92 LO: 77
5
50 %Rh
80 ºF
BACK
Today’s Weather
MPH, N
FORECAST
12 pm 6 pm 12 am6 am
75 80 5065
5 , N 0 , N 10 , N5 , N
80% 0% 0%0%

EcoNet®Smart Thermostat User Guide 12
> Return to Table of Contents
Menu Options
Tap the Menu icon in the bottom left corner of the home screen to easily
view and configure your personal and system settings.
Settings
Settings (Menu > Settings)
Adjust system-level settings and preferences, from customizing your away
temperatures to scheduling a vacation. Tap the Menu icon from the home screen
and then tap Settings.
Basic (Menu > Settings > Basic)
Adjust thermostat or basic equipment settings and preferences.
Follow Schedule – If a programmed schedule is desired, set to “Yes.”
Alarm Beep Enable – Sounds an audible alarm tone shall a critical alarm
condition occur.
Screen Lock – To lock the main screen from any changes, enable the lock. To
unlock, enter the Basic settings menu again and set Screen Lock to “No.” This
locking function prevents any changes except changes made from within the
Basic Settings.
Temperature Display – Change your indoor temperature and set points
between Fahrenheit and Celsius.
Schedule Override Time – While a schedule is running, if a set temperature
change occurs on the main screen, the change will be in effect for this amount of
time. The default is 2 hours. You can customize between a minimum override of
1 hour and a maximum of 8 hours. You can also choose to have the override in
effect until canceled, or until the next scheduled day part.
Auto Changeover Time – When the system is in Auto mode, this is the
amount of time demand must exist in the opposite mode (cooling or heating) in
order for the system to switch to that mode. The default is 5 minutes. The setting is
configurable between 5 and 60 minutes.
71 47%
68
OFF Dining Room
Zone 3
Away
Backlight Enabled?
Outside Temp Selection?
BACK
Basic Settings
Internet
Yes
36
UNITS
34
Group 1
Refrigeration
!
61%
72
Basement
Zone 4
85
80
Zoning System Test
T957_O Low Refrigerant Pressure
BACK
Installer Checkout
Linearize Dampers
21
status: Setting airflow
CFM: 840
54
75 44%
80
65
Away
Resume Schedule
71
Home 44%
70
80
Cooling to
BACK
Settings
Installer
Away
Humidity
Time
Basic
Vacation
Fan
71 47%
68
OFF Dining Room
Zone 3
Away
Backlight Enabled?
Outside Temp Selection?
BACK
Basic Settings
Internet
Yes
36
UNITS
34
Group 1
Refrigeration
!
61%
72
Basement
Zone 4
85
80
Zoning System Test
T957_O Low Refrigerant Pressure
BACK
Installer Checkout
Linearize Dampers
21
status: Setting airflow
CFM: 840
54
75 44%
80
65
Away
Resume Schedule
71
Home 44%
70
80
Cooling to
BACK
Menu
Settings Schedule Status
Water Heating
Service
71 47%
68
OFF Dining Room
Zone 3
Away
Backlight Enabled?
Outside Temp Selection?
BACK
Basic Settings
Internet
Yes
36
UNITS
34
Group 1
Refrigeration
!
61%
72
Basement
Zone 4
85
80
Zoning System Test
T957_O Low Refrigerant Pressure
BACK
Installer Checkout
Linearize Dampers
21
status: Setting airflow
CFM: 840
54
75 44%
80
65
Away
Resume Schedule
71
Home 44%
70
80
Cooling to
Follow Schedule?
Alarm Beep Enable?
Screen Lock?
Temperature Display
Schedule Override Time
Auto-Changeover Time
BACK
Basic Settings
Yes
Fahrenheit
2 hours
5 min.
MORE
No
No
71 47%
68
OFF Dining Room
Zone 3
Away
Backlight Enabled?
Outside Temp Selection?
BACK
Basic Settings
Internet
Yes
36
UNITS
34
Group 1
Refrigeration
!
61%
72
Basement
Zone 4
85
80
Zoning System Test
T957_O Low Refrigerant Pressure
BACK
Installer Checkout
Linearize Dampers
21
status: Setting airflow
CFM: 840
54
75 44%
80
65
Away
Resume Schedule
71
Home 44%
70
80
Cooling to
75
Home
62 85
!
44%
80

EcoNet®Smart Thermostat User Guide 13
> Return to Table of Contents
Settings (con’t)
More >
Set Point Deadband – This is the minimum difference between heating and
cooling set points in Auto mode. The default is 2 degrees. This setting is
configurable between 0 and 6 degrees. A 0 degree deadband means your
system will switch between heating and cooling to maintain the specified set
point. The smaller the deadband setting the more frequently your system will
switch between heating and cooling.
Temperature Oset – This is an offset applied to the displayed room
temperature. A negative offset will cause the displayed indoor temperature to
be less than the sensed temperature. A positive offset will cause the displayed
temperature to be higher than sensed temperature.
Relative Humidity Oset – This is an offset applied to the indoor relative
humidity. A negative offset will cause the displayed relative humidity to be less
than the sensed relative humidity. A positive offset will cause the displayed
relative humidity to be higher than sensed relative humidity.
Note: You should allow the thermostat to calibrate in the conditioned space for 30 minutes before
adjusting offsets.
Room Sensor Selection – You can wire a remote 10K temperature sensor*
to the EcoNet Smart Thermostat. If a remote temperature sensor is connected,
you can choose to use the remote sensor, internal sensor on the Smart Thermostat
or an average between the two for current indoor temperature.
*Optimized for use with an Aprilaire 8051 indoor temperature sensor.
Proximity Sensing – Selecting ‘No’ will disable the motion sensor. To
activate the thermostat, you will need to tap the screen.
Smooth Arrival – The thermostat will start recovery at the optimum time
to ensure the set point is reached at the scheduled time. If a setback in
temperature is scheduled, for either cooling or heating, the set temperature is
ramped to the next scheduled set temperature 60 minutes before the next time
period.
Backlight Enabled – When the thermostat is not being used it will enter
standby mode. The default screen brightness in standby is 1%. You can turn off
the Backlight when in standby by selecting “No.”
Outside Temp Selection – The selection determines where the outside
temperature that is displayed on the home screen is pulled from. Choose
between Internet and Equipment.
• Internet – Pulls temperature based on your zip code.
• Equipment – Uses the temperature sensor installed on your
outdoor condenser.
Backlight Enabled?
Outside Temp Selection?
BACK
Basic Settings
Internet
Yes
Backlight Enabled?
Outside Temp Selection?
BACK
Basic Settings
Equipment
Yes
71 47%
68
OFF Dining Room
Zone 3
Away
Backlight Enabled?
Outside Temp Selection?
BACK
Basic Settings
Internet
Yes
36
UNITS
34
Group 1
Refrigeration
!
61%
72
Basement
Zone 4
85
80
Zoning System Test
T957_O Low Refrigerant Pressure
BACK
Installer Checkout
Linearize Dampers
21
status: Setting airflow
CFM: 840
54
75 44%
80
65
Away
Resume Schedule
71
Home 44%
70
80
Cooling to
Set Point Deadband
Temperature Offset
Relative Humidity Offset
Room Sensor Selection
Proximity Sensing?
Smooth Arrival Enabled?
BACK
Basic Settings
Yes
Yes
2º F
0.0º F
0.0 %
Internal
MORE

EcoNet®Smart Thermostat User Guide 14
> Return to Table of Contents
Settings (con’t)
Time & Date (Menu > Settings > Time)
Set the current time and date. Your schedule times, vacation events and weather
forecast will be based off the time entered on this screen. It is important to ensure
the correct date and time are programmed before setting your schedule.
DST – At the bottom of this screen you can elect to enable or disable
daylight savings time.
Humidity Settings (Menu > Settings > Humidity)
Control your home’s humidity settings for more ideal comfort.
Dehumidification (Menu > Settings > Humidity)
Enable Dehumidication – The system will attempt to reduce humidity in
cooling mode by reducing fan speed and over-cooling the space (when allowed
by the Over-Cooling setting). The system will only reduce airflow if the room
temperature is within one degree of set point, otherwise, full cooling airflow will
be performed.
Dehumidify Set Point – The indoor relative humidity to be controlled to
while in cooling mode.
Over-Cooling Amount – The system will activate cooling, and possibly over-
cool the space by the desired number of degrees to improve dehumidification
performance in an effort to reach the dehumidify set point. The factory setting for
over-cooling is zero (no over-cooling) and can be adjusted up to 5 degrees of
over-cooling.
Dehumidify Drain Timer – At the end of a cooling cycle, if set, the
continuous fan setting will be turned off for the selected amount of time in
order to drain water from the indoor coil.
71 47%
68
OFF Dining Room
Zone 3
Away
Backlight Enabled?
Outside Temp Selection?
BACK
Basic Settings
Internet
Yes
36
UNITS
34
Group 1
Refrigeration
!
61%
72
Basement
Zone 4
85
80
Zoning System Test
T957_O Low Refrigerant Pressure
BACK
Installer Checkout
Linearize Dampers
21
status: Setting airflow
CFM: 840
54
75 44%
80
65
Away
Resume Schedule
71
Home 44%
70
80
Cooling to
BACK
Settings
Installer
Away
Humidity
Time
Basic
Vacation
Fan
71 47%
68
OFF Dining Room
Zone 3
Away
Backlight Enabled?
Outside Temp Selection?
BACK
Basic Settings
Internet
Yes
36
UNITS
34
Group 1
Refrigeration
!
61%
72
Basement
Zone 4
85
80
Zoning System Test
T957_O Low Refrigerant Pressure
BACK
Installer Checkout
Linearize Dampers
21
status: Setting airflow
CFM: 840
54
75 44%
80
65
Away
Resume Schedule
71
Home 44%
70
80
Cooling to
Enable Dehumidification?
Dehumidify Set Point
Over-Cooling Amount
Dehumidify Drain Timer
BACK HUMIDIFICATION
Dehumidification
52 %
0 ºF
5 min.
Yes
71 47%
68
OFF Dining Room
Zone 3
Away
Backlight Enabled?
Outside Temp Selection?
BACK
Basic Settings
Internet
Yes
36
UNITS
34
Group 1
Refrigeration
!
61%
72
Basement
Zone 4
85
80
Zoning System Test
T957_O Low Refrigerant Pressure
BACK
Installer Checkout
Linearize Dampers
21
status: Setting airflow
CFM: 840
54
75 44%
80
65
Away
Resume Schedule
71
Home 44%
70
80
Cooling to
BACK
Time and Date
2 : 38 pm
Jan 29 2018
D.S.T.
Accept Yes
71 47%
68
OFF Dining Room
Zone 3
Away
Backlight Enabled?
Outside Temp Selection?
BACK
Basic Settings
Internet
Yes
36
UNITS
34
Group 1
Refrigeration
!
61%
72
Basement
Zone 4
85
80
Zoning System Test
T957_O Low Refrigerant Pressure
BACK
Installer Checkout
Linearize Dampers
21
status: Setting airflow
CFM: 840
54
75 44%
80
65
Away
Resume Schedule
71
Home 44%
70
80
Cooling to
BACK
Settings
Installer
Away
Humidity
Time
Basic
Vacation
Fan

EcoNet®Smart Thermostat User Guide 15
> Return to Table of Contents
Settings (con’t)
Humidification (Menu > Settings > Humidity > Humidification)
Enable Humidication – The system can control a humidifier attached to the
furnace or air handler to increase humidity in the space. It is important to note
you cannot humidify above the dehumidification set point.
Humidication Set Point – This setting allows you to choose the indoor
relative humidity desired, under which humidification will activate. The default is
humidification set point is 30% and is configurable between 15 and 45%.
Humidify During – Select the modes in which humidification will be
performed. Humidification can occur during heating, continuous fan and/or
cooling mode.
• Heat – Humidifier will operate with equipment during Heat if a
humidification demand is present.
• Heat/Fan – Humidifier will operate with equipment during these modes if a
humidification demand is present.
• Heat/Fan/Cool – Humidifier will operate with equipment during these
modes if a humidification demand is present.
Smart Control – Smart Control is used to reduce or prevent water
condensation on the inside of windows while humidifying in the winter season.
The control monitors indoor and outdoor temperatures and reduces the
humidification percentage according to the Smart Control level chosen by the
user. Start out with the Low setting. If objectionable condensation occurs on
windows, choose the Medium or High setting.
Humidify With Fan – If there is a call to humidify and the fan and heating/
cooling are off, the fan will be forced on to humidify. Select the desired fan
speed from Low to High.
Note: Humidification is only available if a humidifier is installed.
How to Test a Humidier
Adjust the humidify set point up to ‘TEST’, select Humidify during “Heat/Fan”, then turn on a continuous fan speed
on the Fan screen under Settings. This should force the humidifier to run. This setting will last for 30 minutes, where
the maximum setting will return to 4% below the dehumidification set point.
Away Settings (Menu > Settings > Away)
Your system will follow the customized heating, cooling and fan settings when
you place your system into ‘Away’ mode. The system can be placed into Away
by selecting the Home icon (closed door) on the home screen. Once the system is
placed into Away mode it will remain until canceled. Simply tap the Away icon
(open door) to exit Away mode. The system will resume the schedule or return to
the previous settings if a schedule is not being followed. You can also exit Away
by increasing or decreasing the temperature.
Note: If your system is in Cool or Heat when placed into Away mode your system will only manage
to the respective Away set point.
71 47%
68
OFF Dining Room
Zone 3
Away
Backlight Enabled?
Outside Temp Selection?
BACK
Basic Settings
Internet
Yes
36
UNITS
34
Group 1
Refrigeration
!
61%
72
Basement
Zone 4
85
80
Zoning System Test
T957_O Low Refrigerant Pressure
BACK
Installer Checkout
Linearize Dampers
21
status: Setting airflow
CFM: 840
54
75 44%
80
65
Away
Resume Schedule
71
Home 44%
70
80
Cooling to
Enable Humidification?
Humidify Set Point
Humidify During...
Smart Control
Humidity With Fan
BACK
Humidification
30 %
Heat
Off
Off
No
71 47%
68
OFF Dining Room
Zone 3
Away
Backlight Enabled?
Outside Temp Selection?
BACK
Basic Settings
Internet
Yes
36
UNITS
34
Group 1
Refrigeration
!
61%
72
Basement
Zone 4
85
80
Zoning System Test
T957_O Low Refrigerant Pressure
BACK
Installer Checkout
Linearize Dampers
21
status: Setting airflow
CFM: 840
54
75 44%
80
65
Away
Resume Schedule
71
Home 44%
70
80
Cooling to
BACK
Settings
Installer
Away
Humidity
Time
Basic
Vacation
Fan

EcoNet®Smart Thermostat User Guide 16
> Return to Table of Contents
Settings (con’t)
If you have an EcoNet Zoning System and the EcoNet Zone Control ‘Away’
heat set point is set to 50°F (10°C) or the cool set point is set to 92°F (33°C),
the Zone Control will default to Off. Adjusting the ‘Away’ heat set point as low as
51°F (11°C) and the cool set point up to 91° (32°C) will allow the zone to be
conditioned when required.
Configure individual ‘Away’ settings for each zone from the EcoNet Zone Control or
through the EcoNet App. From the respective Zone Control unit, tap Menu > Away
to configure the unique ‘Away’ set point for a particular zone.
Refer to pg.17 to enable your Zoning System.
Vacation (Menu > Settings > Vacation)
The Vacation screen allows you to preschedule desired heating, cooling and fan
settings when you are going to be away for an extended time.
To schedule your vacation, select the time, month, day and year and then use the
up and down arrows to set desired start and end dates.
Note: You will need to set the vacation end time and date before you can set its start.
If you have an EcoNet Zoning System each zone will follow the configured
‘Away’ settings during ‘Vacation’ events. To customize the Away / Vacation
settings from the Zone Control unit, tap Menu > Away. This will allow you to set
unique ‘Vacation’ setting for a particular zone. Refer to pg.17 to enable your
Zoning System.
Select each set point and fan speed and then use the up down arrows to set
to your desired vacation conditions. We recommend setting the fan speed
to Auto.
Vacation Activated – A Vacation will be indicated by the word ‘Vacation’
above the current temperature on the home screen and an active Away button.
Tap Vacation on the home screen to cancel and resume schedule or return to
previous settings.
Your HVAC equipment will automatically follow a vacation event. If you have a
connected water heater, you have the option to have your water heater follow
the vacation event; simply toggle the button to Yes.
Fan (Menu > Settings > Fan)
Fan Speed – Chose from one of 5 speeds to run continuous fan. This
setting allows the fan to continue circulating air in between calls for heating
or cooling. If the system is following a schedule the fan speed presented
will match the speed set in your schedule. You can temporarily override the
scheduled fan speed here. You will notice the copy on screen changes to ‘Fan
Speed Override’. The override will follow the ‘Schedule Override Time’ set in
Basic Settings.
71 47%
68
OFF Dining Room
Zone 3
Away
Backlight Enabled?
Outside Temp Selection?
BACK
Basic Settings
Internet
Yes
36
UNITS
34
Group 1
Refrigeration
!
61%
72
Basement
Zone 4
85
80
Zoning System Test
T957_O Low Refrigerant Pressure
BACK
Installer Checkout
Linearize Dampers
21
status: Setting airflow
CFM: 840
54
75 44%
80
65
Away
Resume Schedule
71
Home 44%
70
80
Cooling to
BACK
Settings
Installer
Away
Humidity
Time
Basic
Vacation
Fan
71 47%
68
OFF Dining Room
Zone 3
Away
Backlight Enabled?
Outside Temp Selection?
BACK
Basic Settings
Internet
Yes
36
UNITS
34
Group 1
Refrigeration
!
61%
72
Basement
Zone 4
85
80
Zoning System Test
T957_O Low Refrigerant Pressure
BACK
Installer Checkout
Linearize Dampers
21
status: Setting airflow
CFM: 840
54
75 44%
80
65
Away
Resume Schedule
71
Home 44%
70
80
Cooling to
BACK
Vacation Settings
85º Auto65º
Start:
End:
Vacation
02:00 pm Jan. 29 2018
02:30 pm Feb. 10 2018
Yes Water
Heater Yes
71 47%
68
OFF Dining Room
Zone 3
Away
Backlight Enabled?
Outside Temp Selection?
BACK
Basic Settings
Internet
Yes
36
UNITS
34
Group 1
Refrigeration
!
61%
72
Basement
Zone 4
85
80
Zoning System Test
T957_O Low Refrigerant Pressure
BACK
Installer Checkout
Linearize Dampers
21
status: Setting airflow
CFM: 840
54
75 44%
80
65
Away
Resume Schedule
71
Home 44%
70
80
Cooling to
77
Vacation
36%Away
64
!
80
71 47%
68
OFF Dining Room
Zone 3
Away
71 47%
68
OFF Dining Room
Zone 3
Away
Backlight Enabled?
Outside Temp Selection?
BACK
Basic Settings
Internet
Yes
36
UNITS
34
Group 1
Refrigeration
!
61%
72
Basement
Zone 4
85
80
Zoning System Test
T957_O Low Refrigerant Pressure
BACK
Installer Checkout
Linearize Dampers
21
status: Setting airflow
CFM: 840
54
75 44%
80
65
Away
Resume Schedule
71
Home 44%
70
80
Cooling to
BACK
Settings
Installer
Away
Humidity
Time
Basic
Vacation
Fan

EcoNet®Smart Thermostat User Guide 17
> Return to Table of Contents
Settings (con’t)
Fan Mode – This feature allows you to define the minimum amount of time
each hour that the system fan will run. The default is continuous and the fan will
run in between heating and cooling calls constantly. You can adjust the minimum
fan runtime between 10 and 40 minutes per hour. The fan runtime applies during
any mode selected except when the system is turned off.
Note: When fan speed is set to Auto the Fan Mode setting is not applicable.
If you have an EcoNet Zoning System, see below:
Please refer to the EcoNet Zoning I/O manual for proper installation instructions.
Zoning (Menu > Settings > Zoning)
If a zoning application is installed tap Menu > Settings. Tap the Zoning icon
to view Zoning Settings.
Note: System level Zone Settings are only accessible through the EcoNet Smart Thermostat
and not through the EcoNet Zone Controls. Temperature changes to individual zones can be made
from the Smart Thermostat under Menu > Zoning, via the individual zone controls or through the
EcoNet App2.
On the Zoning Settings menu, set Zoning Enabled to ‘Yes’ to display applicable
zone settings. From this screen you can select which zone you want to use to
track relative humidity, customize airflow noise limits and name zones.
All Zones Follow Zone 1 – Default is set to ‘No’. Selecting ‘Yes’ will ensure
all additional zones will follow the mode, set points and fan speed you have
selected for Zone 1.
Humidity Sensor to Use – Default is Zone 1. However, you can select to
follow the humidity reading from any individual zone or chose to follow the
average humidity reading from all zones.
Over Conditioning – This is a setting that can allow Zone 1 to be
conditioned below the set point in order to allow the system to continue to
condition a calling zone that is not large enough to run the equipment by itself.
The default is set to Auto. Auto will allow the system to over-condition Zone 1
up to the most conditioned zone set point. You can also choose to restrict Over-
Conditioning in Zone 1 by setting to ‘None’ or setting to a specific degree
between 1-10°F.
The individual zone Over-Conditioning settings may be adjusted directly from the
respective zone control.
Zone Airow Setting – Adjust airflow noise level limits for each zone.
The system will automatically set the airflow limit for each zone to one level
above the minimum airflow required to run the system.
We recommended leaving the airflow setting at the level and CFM assigned by
the system. If the airflow in a given zone is too loud, return to this screen and set
a lower limit.
Note: It is important to keep in mind that if only one zone calls, its maximum airflow setting must be
greater than the minimum airflow required by the system or the equipment will not operate. For the
system to operate in this scenario, at least one zone must be set to over-condition. This condition will
be represented by an asterisk next to the airflow limit.
Zone Name – Customize the name for each zone using the on-screen keyboard.
71 47%
68
OFF Dining Room
Zone 3
Away
Backlight Enabled?
Outside Temp Selection?
BACK
Basic Settings
Internet
Yes
36
UNITS
34
Group 1
Refrigeration
!
61%
72
Basement
Zone 4
85
80
BACK
Zone 4 Airflow Setting
Unlimited
Zone 1 Name Text
Zone 1
Zone 2 Name Text
Zone 2
Zone 3 Name Text
Zone 3
Zone 4 Name Text
Zone 4
Zoning Settings
71 47%
68
OFF Dining Room
Zone 3
Away
Backlight Enabled?
Outside Temp Selection?
BACK
Basic Settings
Internet
Yes
36
UNITS
34
Group 1
Refrigeration
!
61%
72
Basement
Zone 4
85
80
Zoning Enabled?
All Zones Follow Zone 1?
Humidity Sensor to Use
Average All Zones
Zone 1 Airflow Setting
Zone 2 Airflow Setting
Zone 3 Airflow Setting
Over-Conditioning
BACK
Zoning Settings
Yes
0 F
• High
• High
• High
472 CFM
472 CFM
472 CFM
MORE
No
71 47%
68
OFF Dining Room
Zone 3
Away
Backlight Enabled?
Outside Temp Selection?
BACK
Basic Settings
Internet
Yes
36
UNITS
34
Group 1
Refrigeration
!
61%
72
Basement
Zone 4
85
80
BACK
Settings
Installer
Away
Humidity
Time
Basic
Vacation
Zoning
Fan
BACK
Fan Setting
Fan Speed: Auto
Fan Mode: Timed, 20 min.

EcoNet®Smart Thermostat User Guide 18
> Return to Table of Contents
Schedules
Tapping Menu > Schedule will present your current schedule. First, please
ensure the correct date and time settings have been entered under Settings. To
edit the schedule for a day, tap the day of the week you want to edit. Tap the
day part (morning, day, evening or night) time and use the up and down arrows
to set the desired start time. Next tap the heat set point, cool set point and/
or fan speed for each day part and use the up and down arrows to change to
your desired settings. Your system will follow your preferred settings until the
next day part start time is reached. If Smooth Arrival is enabled under Basic
Settings, your system will start recovery up to 60 minutes early to ensure the set
points for the next scheduled day part are reached at the scheduled time.
To copy a day’s schedule to another day, tap “Copy Day”, then select the day(s)
you wish to copy to, then tap “Paste Day.” You can select “Cancel” to cancel the
paste day operation.
When a schedule is being followed and a manual adjustment is made overriding
the schedule, a Resume Schedule option will be displayed above the current
temperature on the home screen. The schedule will be temporarily overridden
according to the schedule override time under Basic Settings. The default
schedule override time is two hours. Your schedule will automatically resume
once the override expires. You can also resume the schedule by tapping ‘Resume
Schedule’ on the home screen.
If you have an EcoNet Zoning System you can set a unique schedule for each
Zone by tapping Menu > Schedule from each respective Zone Control unit.
71 47%
68
OFF Dining Room
Zone 3
Away
Backlight Enabled?
Outside Temp Selection?
BACK
Basic Settings
Internet
Yes
36
UNITS
34
Group 1
Refrigeration
!
61%
72
Basement
Zone 4
85
80
Zoning System Test
T957_O Low Refrigerant Pressure
BACK
Installer Checkout
Linearize Dampers
21
status: Setting airflow
CFM: 840
54
75 44%
80
65
Away
Resume Schedule
BACK
Schedule
Morning
Copy Day Cancel
05:30 am Auto
Day 07:00 am Auto
Evening 07:30 pm Auto
Night 10:30 pm Auto
70º
62º
70º
62º
78º
MTWTFSS
85º
78º
78º
71 47%
68
OFF Dining Room
Zone 3
Away
Backlight Enabled?
Outside Temp Selection?
BACK
Basic Settings
Internet
Yes
36
UNITS
34
Group 1
Refrigeration
!
61%
72
Basement
Zone 4
85
80
Zoning System Test
T957_O Low Refrigerant Pressure
BACK
Installer Checkout
Linearize Dampers
21
status: Setting airflow
CFM: 840
54
75 44%
80
65
Away
Resume Schedule
BACK
Schedule
Morning
Copy Day Cancel Paste Day
05:30 am Auto
Day 07:00 am Auto
Evening 07:30 pm Auto
Night 10:30 pm Auto
70º
62º
70º
62º
78º
MTWTFSS
85º
78º
78º
71 47%
68
OFF Dining Room
Zone 3
Away
Backlight Enabled?
Outside Temp Selection?
BACK
Basic Settings
Internet
Yes
36
UNITS
34
Group 1
Refrigeration
!
61%
72
Basement
Zone 4
85
80
Zoning System Test
T957_O Low Refrigerant Pressure
BACK
Installer Checkout
Linearize Dampers
21
status: Setting airflow
CFM: 840
54
75 44%
80
65
Away
Resume Schedule
71
Home 44%
70
80
Cooling to
BACK
Menu
Settings Schedule Status
Water Heating
Service

EcoNet®Smart Thermostat User Guide 19
> Return to Table of Contents
Status
Tapping Menu > Status will display the connected communicating
equipment, thermostat mode and the equipment operating status.
Selecting Furnace, Air Handler or AC/HP on the Status screen will display each
piece of equipment’s current operating status and historical cycles and run times.
Furnace Status (Menu > Status > Furnace)
Furnace Status – Displays detailed furnace operation information including
two week and lifetime cycles, as well as run time hours.
AC/HP Status (Menu > Status > AC/HP)
AC/HP Status – Displays detailed AC/HP operation information including
two week and lifetime cycles, as well as run time hours.
Air Handler Status (Menu > Status > Air Handler)
Air Handler Status – Displays detailed air handler operation information
including two week and lifetime cycles, as well as run time hours.
BACK
Status
Inside Temp : 77º Outside Temp : 80º
Inside Rel. Humidity : 39%
Thermostat Mode : Off
Equipment Operating Status : Off
Furnace AC/HP Air Handler
ENERGY
71 47%
68
OFF Dining Room
Zone 3
Away
Backlight Enabled?
Outside Temp Selection?
BACK
Basic Settings
Internet
Yes
36
UNITS
34
Group 1
Refrigeration
!
61%
72
Basement
Zone 4
85
80
Zoning System Test
T957_O Low Refrigerant Pressure
BACK
Installer Checkout
Linearize Dampers
21
status: Setting airflow
CFM: 840
54
75 44%
80
65
Away
Resume Schedule
71
Home 44%
70
80
Cooling to
BACK
Furnace Status
Current -> Capacity : CFM :0% 0
0
0
0
0
0
0
0
0
0
0
0
0
0
n/a
0
0 days
0
0 º
offoff
0 º80º
off
RPM :
G : Aux 1 : Aux 2 :
Outside :
Lo Heat Hi Heat Blower Powered
0.00 in.
Supply : Return :
Temperatures ->
Discrete Inputs ->
Static Presure :
Two Week Cycles :
Two Week Hours :
Lifetime Cycles :
Lifetime Hours :
71 47%
68
OFF Dining Room
Zone 3
Away
Backlight Enabled?
Outside Temp Selection?
BACK
Basic Settings
Internet
Yes
36
UNITS
34
Group 1
Refrigeration
!
61%
72
Basement
Zone 4
85
80
Zoning System Test
T957_O Low Refrigerant Pressure
BACK
Installer Checkout
Linearize Dampers
21
status: Setting airflow
CFM: 840
54
75 44%
80
65
Away
Resume Schedule
71
Home 44%
70
80
Cooling to
BACK
AC/HP Status
Unit Type : var-speed 2 tons
1
0
2
0
1
0
6
2
0Utility Input : Disabled
Lo cool Hi cool
AC
68°
Outside Temp:
Hold-off Timer:
Two Week Cycles :
Two Week Hours :
Lifetime Cycles :
Lifetime Hours :
MORE
Inverter Current Speed:
EXV Current Position:
Superheat:
BACK
AC/HP Status
0 RPM (0%)
96.0%
---
Coil Temp:
Suction Line Temp:
Liquid Line Temp:
71.6 º
71.4 º
Suction Pressure: 203.6 PSIG
-40.0º
Liquid Pressure:
Subcooling:
0.0 PSIG
0.0 º
71 47%
68
OFF Dining Room
Zone 3
Away
Backlight Enabled?
Outside Temp Selection?
BACK
Basic Settings
Internet
Yes
36
UNITS
34
Group 1
Refrigeration
!
61%
72
Basement
Zone 4
85
80
Zoning System Test
T957_O Low Refrigerant Pressure
BACK
Installer Checkout
Linearize Dampers
21
status: Setting airflow
CFM: 840
54
75 44%
80
65
Away
Resume Schedule
71
Home 44%
70
80
Cooling to
BACK
Air Handler Status
Current -> Elec. Heat : CFM :off 0
0
0
3
0
0
0
3
6
20
0
112
115
4
n/a
20
85 days
0
--
offoff
--
off
RPM :
G : Aux 1 : Aux 2 :
Lo Heat Hi Heat Blower Powered
0.00 in.
Supply : Return :
Temperatures ->
Discrete Inputs ->
Static Presure :
Two Week Cycles :
Two Week Hours :
Lifetime Cycles :
Lifetime Hours :
MORE
71 47%
68
OFF Dining Room
Zone 3
Away
Backlight Enabled?
Outside Temp Selection?
BACK
Basic Settings
Internet
Yes
36
UNITS
34
Group 1
Refrigeration
!
61%
72
Basement
Zone 4
85
80
Zoning System Test
T957_O Low Refrigerant Pressure
BACK
Installer Checkout
Linearize Dampers
21
status: Setting airflow
CFM: 840
54
75 44%
80
65
Away
Resume Schedule
71
Home 44%
70
80
Cooling to
BACK
Air Handler Status
EXV Current Position ………… 58.2%
EXV Current Superheat ……… 10.1°
Suction Line Temp …………… 61.1°
Saturated Suction Temp ……… 51°
Suction Pressure ……………… 145 PSIG
71 47%
68
OFF Dining Room
Zone 3
Away
Backlight Enabled?
Outside Temp Selection?
BACK
Basic Settings
Internet
Yes
36
UNITS
34
Group 1
Refrigeration
!
61%
72
Basement
Zone 4
85
80
Zoning System Test
T957_O Low Refrigerant Pressure
BACK
Installer Checkout
Linearize Dampers
21
status: Setting airflow
CFM: 840
54
75 44%
80
65
Away
Resume Schedule
71
Home 44%
70
80
Cooling to
BACK
Menu
Settings Schedule Status
Water Heating
Service

EcoNet®Smart Thermostat User Guide 20
> Return to Table of Contents
Status (con’t)
If you have an EcoNet Zoning System, see below:
Zoning Status (Menu > Status > Zoning)
The Zoning Status displays the current state of every zone showing set point,
current temperature, relative humidity, damper position and airflow CFM.
Note: Set point and fan speed adjustments must be made at the respective Zone Control or through
the EcoNet App2.
71 47%
68
OFF Dining Room
Zone 3
Away
Backlight Enabled?
Outside Temp Selection?
BACK
Basic Settings
Internet
Yes
BACK
Zoning Status
Zone Ht Cl Act %RH %Open CFM
65
60
60
63
69
85
85
70
72
75
77
72
49
52
54
50
100
0
0
100
250
0
0
225
Zone 1
Zone 2
Zone 3
Zone 4
BACK
71 47%
68
OFF Dining Room
Zone 3
Away
Backlight Enabled?
Outside Temp Selection?
BACK
Basic Settings
Internet
Yes
36
UNITS
34
Group 1
Refrigeration
!
61%
72
Basement
Zone 4
85
80
BACK
Status
Inside Temp : 69º Outside Temp : 71º
Inside Rel. Humidity : 56%
Thermostat Mode : Filter Check
Equipment Operating Status : Filter Check
Air
Handler AC/HP Zoning
Table of contents
Languages:
Other EcoNet Thermostat manuals
Popular Thermostat manuals by other brands

Bryant
Bryant TSTATBBP250-01 User's information manual

Salus
Salus RT 10 Installation and operating instructions

Lafayette
Lafayette TM-1 user manual

Telkonet
Telkonet ecosmart EcoTouch+ Installation, operation, maintenance guide

Pentair
Pentair RAYCHEM AMC-1A installation instructions

Indeeco
Indeeco OTL221 installation instructions