Ecoological GapShield User manual

Installation Manual
Dear valued customer,
Thank you for choosing the GapShield as a valued accessory for your truck that will save you significant time and
hassle from cleaning out that obnoxious debris that falls in the tailgate gap. The following page includes
installation instructions so that your GapShield will properly perform as specified after the installation.
INSTALLATION TIME
Approximate installation time: 5-10 minutes
TOOLS REQUIRED
PARTS INCLUDED
Clean Cloth
Rubbing alcohol, surface cleaner, soap/water
Scissors or other cutting utensil
(1) GapShield w/installed tape
(1) Adhesion promoter
-ATTENTION-
Read and understand all instructions before installing or using this product. The GapShield will fit trucks with plastic liners, spray liners
and no liners. However, the attachment may be more difficult if a plastic or spray liner is installed in the truck. Any modification or
unintended use of this product shall immediately void all manufacturer warranties. The manufacturer disclaims all liability for injuries
to persons and property resulting from modifications to, or unintended use of this product.
WARNING - Car washes may cause tape to lose its adhesion, especially to spray liners. If using a power washer, do not spray directly
on the GapShield as it could detach it from its location.
INSTALLATION
Open the tailgate and clear any debris from the gap and bed surface. Before removing red backing
from tape, put the GapShield in place and determine its fitting. If it needs to be cut to size, use scissors
or other cutting utensil to create the right size for your specific truck.
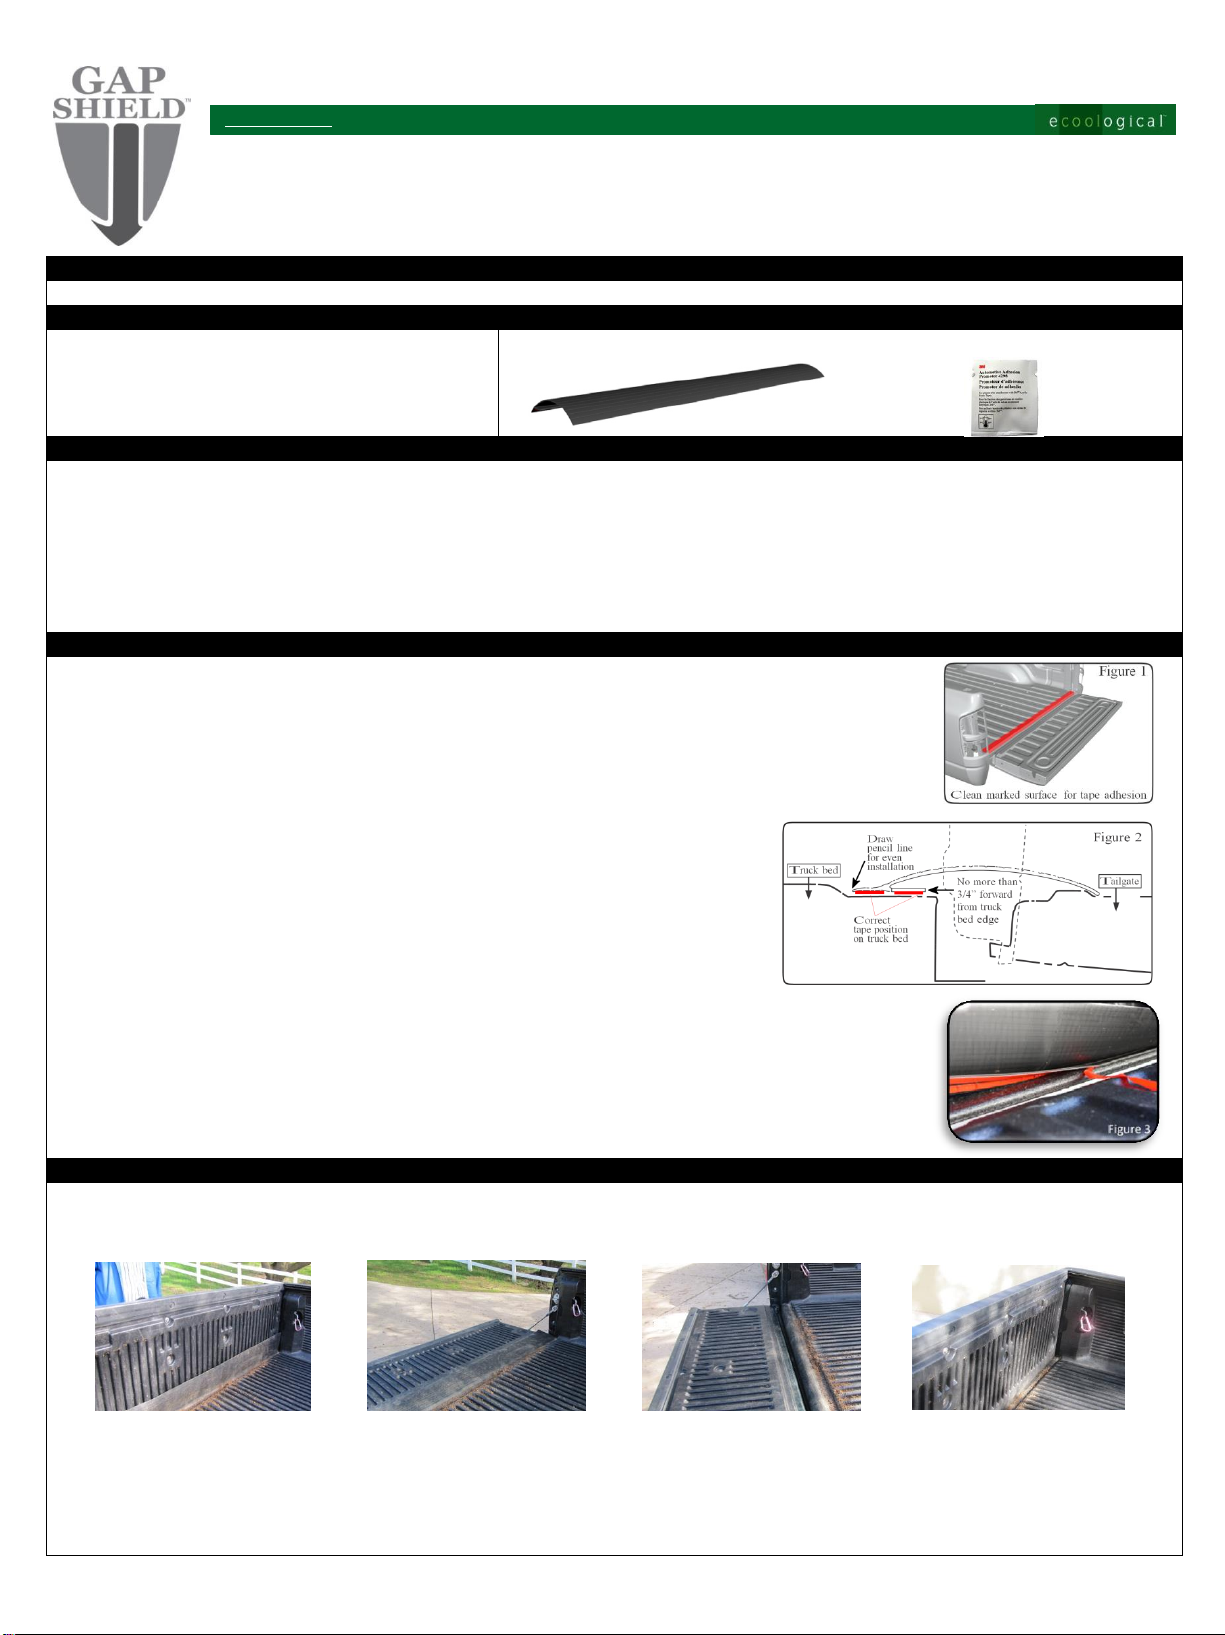
Use clean cloth with rubbing alcohol, surface cleaner, or soap and water to wipe clean the bedside
surface highlighted to the right in Figure 1. Let dry thoroughly. (NOTE: For best tape adhesion results,
use a cleaner that will remove oil and grease when cleaning the surface).
Open your adhesion promoter wipe and apply to cleaned truck surface where tape
will be applied (see highlighted area in Figure 1).
Position the GapShield such that the tape portion is near the rearward edge of the
truck bed as shown in Figure 2. Draw a straight pencil line on the truck bed along
the forward edge of the GapShield for reference.
Peel red backing from adhesive strip progressively as you carefully position the
GapShield into place per your drawn line. Continue until the tape is evenly applied to the truck bed
surface (refer to Figures 2 and 3). Apply firm pressure along the taped area to assure adhesion.
If the corrugated surfaces extend to the very end of the truck bed, the soft material of the
GapShield will form around those raised areas. However, make sure to apply enough pressure to
these areas for good tape adhesion. In some cases, such as where the corrugated surface of a
plastic liner does not provide sufficient surface area for adhesion. The GapShield can be installed
with the taped portion between the liner and the truck bed.
DIRECTIONS FOR USE
The GapShield is designed to flex when the tailgate is in the closed position (A) and to lay relatively flat and bridge the gap between
the truck bed and tailgate when the tailgate is lowered (B), keeping loose materials/debris from falling through the gap.
(A) (B) (C) (D)
The free end of the GapShield may also be tucked in the tailgate gap without interfering with the closure of the tailgate (C). In this
position, the GapShield is out of the way of any other uses of your truck bed when the tailgate is lowered. In addition, in this
position, the GapShield acts as a nice tailgate seal when the tailgate is closed (D), inhibiting intrusion of dust, moisture, etc. in to the
truck bed while the truck is in motion. However, before hauling loose material, the free end must be pulled back out of the gap to
be in the correct position when hauling loose materials.
www.ecoological.com ©2013 Ecoological 03/2013
Manual de instalación
Estimado cliente,
Gracias por elegir el GapShield como un valioso accesorio para su carro le ahorrará mucho tiempo y molestia de la
limpieza de ese odioso desechos que cae en el hueco de la puerta trasera. La siguiente página incluye instrucciones
de instalación para que su GapShield interpretará correctamente especificado después de la instalación.
TIEMPO DE INSTALACIÓN
Tiempo de instalación aproximado: 5-10 minutos
HERRAMIENTAS NECESARIAS
PIEZAS INCLUIDAS
Paño limpio
Frotando alcohol, limpiador, jabón/agua
Tijeras u otro utensilio de corte
GapShield con cinta de instalado
(1) Promotor de adherencia
-ATENCIÓN-
Lea y comprenda todas las instrucciones antes de instalar o usar este producto. El GapShield caben camiones con revestimientos de
plásticos, Revestimientos de aerosol y no los trazadores de líneas. Sin embargo, el accesorio puede ser más difícil si un revestimiento
plástico o aerosol está instalado en el camión. Cualquier modificación o uso no intencional de este producto anulará inmediatamente
todas las garantías del fabricante. El fabricante declina toda responsabilidad por lesiones a las personas y bienes causados por
modificaciones o debido al uso de este producto.
ADVERTENCIA - Lavaderos puede causar cinta perder su adhesión, especialmente para los trazadores de líneas del aerosol. Si utiliza una
lavadora, no rocíe directamente en la GapShield como podía desconectarlo de su ubicación.
INSTALACIÓN
Abrir la puerta trasera y eliminar cualquier residuo de la superficie de gap y cama. Antes de retirar el
forro rojo de cinta, colocar la GapShield y determinar la instalación del mismo. Si tiene que ser cortado a
la medida, utilizar tijeras u otro utensilio de corte para crear el tamaño correcto para su carro específico.
Utilice un paño limpio con alcohol, limpiador, o jabón y agua para limpiar la superficie cabecera
destacada a la derecha en la figura 1. Dejar secar completamente. (Nota: para mejores resultados de
adhesión de cinta, use un limpiador que elimina grasa y el aceite al limpiar la superficie).
Abra su trapo de promotor de adherencia y aplíquelo en la superficie del carro
limpio donde cinta será aplicado (véase área resaltada en la figura 1).
Coloque el GapShield tal que la porción de la cinta es cerca del borde posterior de la
camioneta como se muestra en la figura 2. Dibujar una línea recta en la cama del
camión en el borde delantero de la GapShield para referencia.
Pelar el forro rojo de la cinta adhesiva progresivamente como usted coloque con
cuidado el GapShield en el lugar por su línea dibujada. Continúe hasta que la cinta se
aplica uniformemente a la superficie de la cama de carro (vea las figuras 2 y 3). Aplique una presión
firme a lo largo de la zona con cinta para asegurar adherencia.
Si las superficies corrugadas se extienden hasta el final de la cama del camión, el material blando de la
GapShield formará alrededor de las zonas elevadas. Sin embargo, no se olvide de aplicar suficiente
presión a estas áreas para la adherencia de la cinta buena. En algunos casos, como donde la superficie
acanalada de un forro de plástico no proporciona suficiente superficie para la adherencia. El
GapShield puede instalarse con la parte grabada entre el forro y la cama del camión.
INSTRUCCIONES DE USO
El GapShield está diseñado para doblar cuando el portón trasero está en la posición cerrada (A) y para poner relativamente plana y
puente de la brecha entre la camioneta y el portón trasero cuando la puerta trasera es baja (B), manteniendo materiales/detritos caiga
a través del espacio.
(B) (B) (C) (D)
El extremo libre del GapShield también puede estar metido en el hueco de la puerta trasera sin interferir con el cierre de la puerta
trasera (C). En esta posición, el GapShield es alejados de cualquier otro uso de su camioneta cuando se baja la puerta trasera. Además,
en esta posición, el GapShield actúa como un sello de puerta trasera agradable cuando se cierra la puerta trasera (D), inhibiendo la
intrusión de polvo, humedad, etc. a la camioneta mientras el carro está en movimiento. Sin embargo, antes de transportar el material
suelto, el extremo libre debe ser retirado de la brecha a estar en la posición correcta al acarreo de materiales sueltos.
www.ecoological.com ©2013 Ecoological 03/2013
Table of contents
Languages:
Other Ecoological Automobile Accessories manuals

Popular Automobile Accessories manuals by other brands

Tractive Technology
Tractive Technology AUTO-BLiP user manual

LAS
LAS 11010 operating instructions

Hauler Racks
Hauler Racks HKAS4-1 installation instructions

Metra Electronics
Metra Electronics 99-6503 installation instructions

Simple
Simple TranzitBLU HF Installation & operation manual

Mercedes-Benz
Mercedes-Benz XS25000 operating instructions


