EcoPower DIYSolar OFF-GRID User manual
DIY
REV-1107.19-144000
AG

TABLE OF CONTENTS
Warning and Disclaimer................................................................................ 1
Kit Contents ........................................................................................................... 2
Pre-Installation .................................................................................................... 3
Installation
Pole Assembly..................................................................................................4
Battery Box Assembly ............................................................................... 5
Wiring .................................................................................................................... 6
Finalization......................................................................................................... 7
Warranty Information.....................................................................................8

1
WARNING
DISCLAIMER
ELECTRICAL HAZARD
Only trained personnel are authorized to make alterations to any
components in this kit. Prior to assembly, EcoSOLAR highly recommends
you read all these installation instructions, and watch our EcoSOLAR DIY
Installation video at ecopowerinc.com/diy-installation before installing
the kit. For any questions related to installation, call us at 1-800-564-8086
for assistance.
If this kit is installed in any other manner than is shown herein, the
manufacturer’s warranty is void. Failure to adhere to these instructions
involves the risk of property damage, fall, or death. Due to the weight of
some components, EcoPOWER recommends a minimum of two people
for installation.
Always call before you dig. Have locates done to ensure there are no
underground services where this kit is being installed.
If the location of the DIYSolar Off-Grid DIY/Contractor Kit being installed
experiences temperatures below 0 degrees Celsius (32 Fahrenheit) it
must use either an VRLA AGM battery (Valve Regulated Lead Acid meant
for solar, 12vDC or 24vDC) or our EcoLiFe NORTH or POLAR products. For
more information visit our website at https://ecosolar.ecopowerinc.com.
DO NOT RETURN THIS KIT TO POINT OF PURCHASE.
You will need the bar code number on your DIYSolar Off-Grid DIY/
Contractor Kit, date and place of purchase, along with your receipt when
calling sales and/or technical support. A space is provided on the back
cover of these instructions to write your bar code number for easy future
reference.
EcoPOWER Inc, it’s afliates, employees, consignees, and related
parties shall not be held liable in any way for the transportation, use,
or performance of this product. The utmost of caution must be taken
when installing this kit to ensure safety and preservation of life and
property.
2
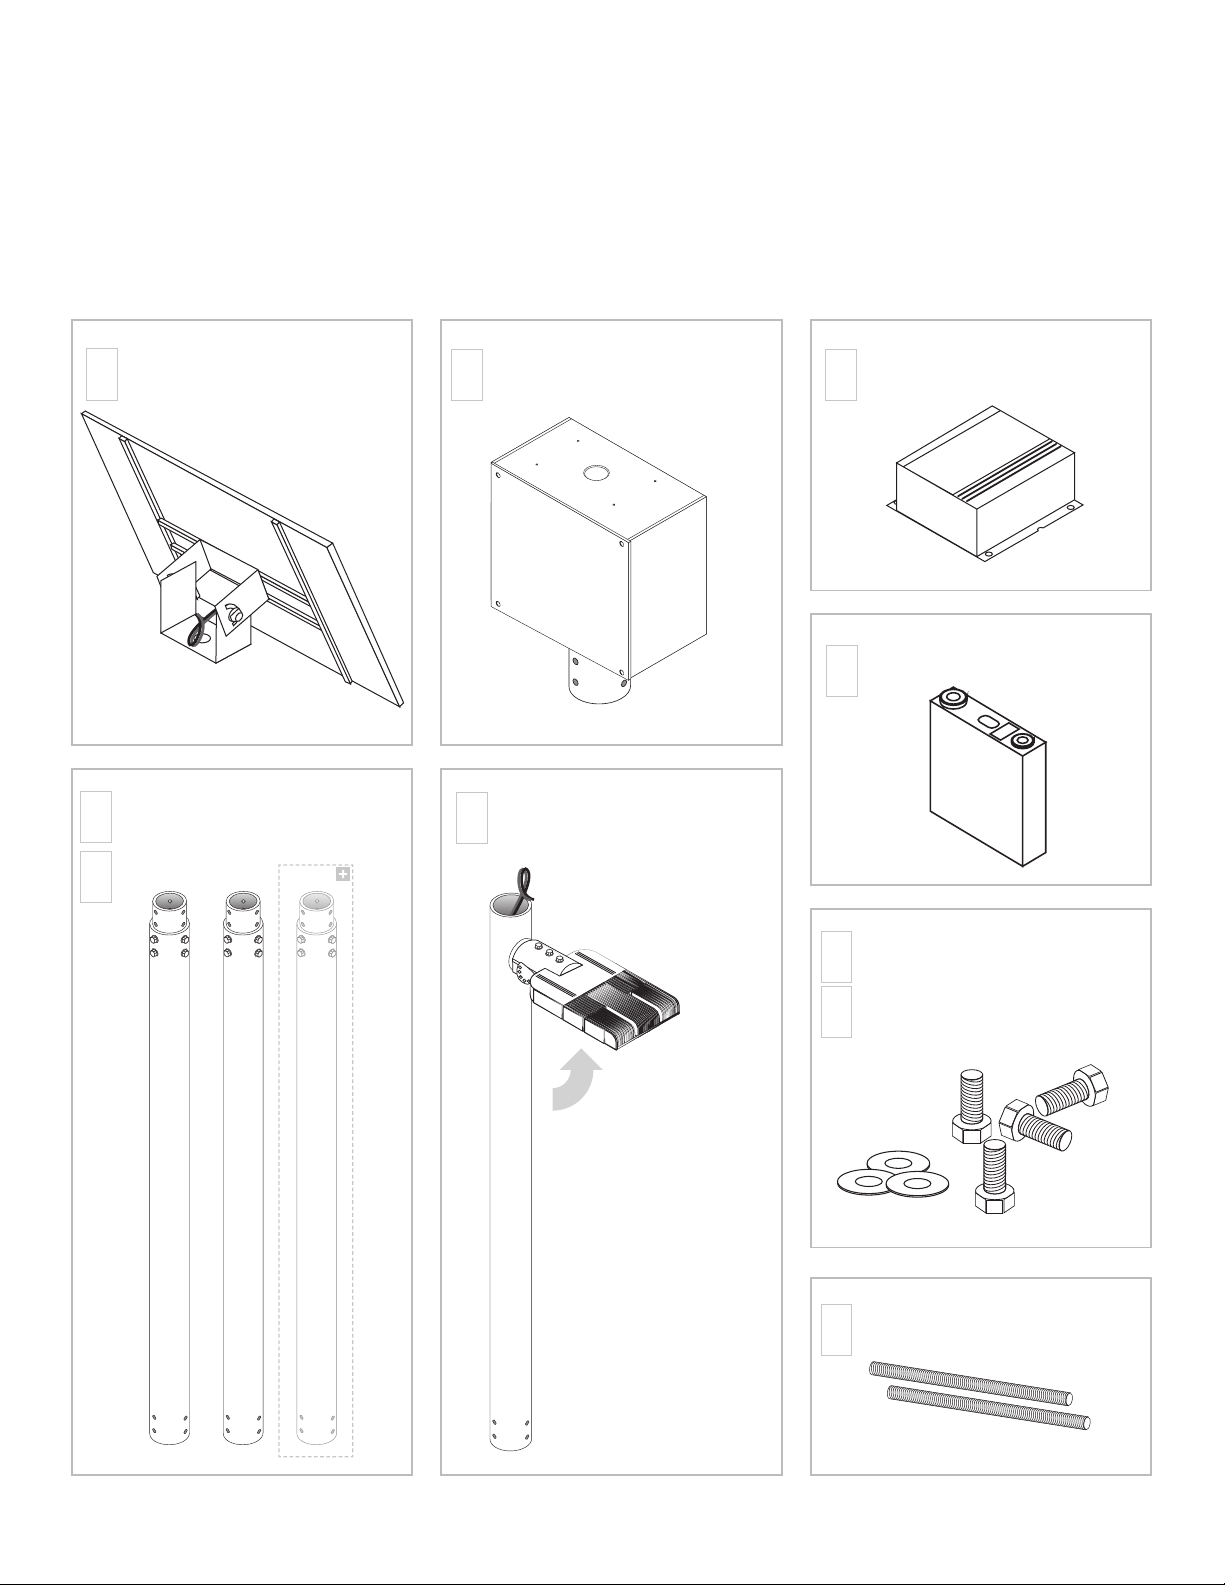
KIT CONTENTS
The contents of your DIYSolar Off-Grid DIY/Contractor Kit are marked
with removable UPC code product stickers. Where possible the sticker
is kept out of sight when installed and can be left on or removed as
desired.
Battery Box
With attached tenon sleeve
VRLA 125AH Battery; or
EcoLIFE LiON Battery Pack
8" x 1/4" Threaded Rod
6' Section of Schedule 40 Pipe
With 6 holes drilled at both ends
and pre-installed couplers
20'
Model
Only
Pole Hardware
3/8-16 UNC-2B x 3/4" SS Bolts
and Rubber Washers
12/18 Preinstalled or
tamper proof fasteners
and screwdriver
14'
14'
20'
QTY QTY
QTY
QTY
QTY
20'
Rack Assembly
With 85W or 120W PV panel and
attached rack.
6’ Section of Schedule 40 Pipe
With 3 holes drilled at the bottom
and fixture mounted at the top
NOTE
Fixture will arrive with head
adusted down for shipping
purposes.
Adjust fixture to desired angle
and tighten accordingly.
1
1
2
2
24
36
3
1
1
S1 S2
T1
P2
P3
P3a
P1
B1
S3
QTY
QTY
Charge controller,
including cables
1
C1
QTY
P3b

3
MATERIALS
REQUIRED
XX" Wrench or
Socket set
Pliers
Shovel
C Clamps
Ladder
SONO Tube
(not provided)
PRE-INSTALLATION
LOCATION AND BASE SUGGESTIONS
Below grade engineering is the responsibility of the purchaser.
Choose a location that has clear unobstructed views to the south (in the
northern hemisphere), in order to maximize the amount of irradiance
(energy) the PV panel will absorb. To determine the best angle of
incidence for the PV panel, use the solar angle calculator availabe at
www.solarelectricityhandbook.com/solar-angle-calculator.html
Prepare pole S1 by inserting threaded rods through pre-drilled hole at
bottom of pole. These rods will provide extra stability and retention within
the cement poured in the next step. Do not remove top wrapping (S1)
until pole is set in concrete for 24 hours.
Ensure all service locates have been completed including, but not limited
to, gas, water, telecommunications, and power. The base pole must be set
in 3200 PSI cement in a minimum 12" round (for 14' model) or 18" (for 20'
model) SONO tube or equivalent that is 4' below grade level. The easiest
method to hold the pole in place (brace) is to purchase (2) 8' - 2" x ½" pine
boards, place one board on the ground, place the S1 pole section on the
board at 90 degrees to the board 12" from the bottom edge of the board
to the top of the pole S1 (not to the top of the collar, to the top of the
pole), place the second board on top of the pole and aligned with the rst
board underneath. Clamp both ends with C clamps.
12"
CLAMP
CLAMP
Ensure soil is undisturbed 12" below grade. Dig hole accordingly, set
SONO tube, ensure the SONO tube is backlled and compacted, pour
cement 2" below grade, place pole section 1 (S1) in the centre of the
SONO tube with 12” of the pole above grade. Ensure the pole section is
at 180 degrees to horizontal.
4
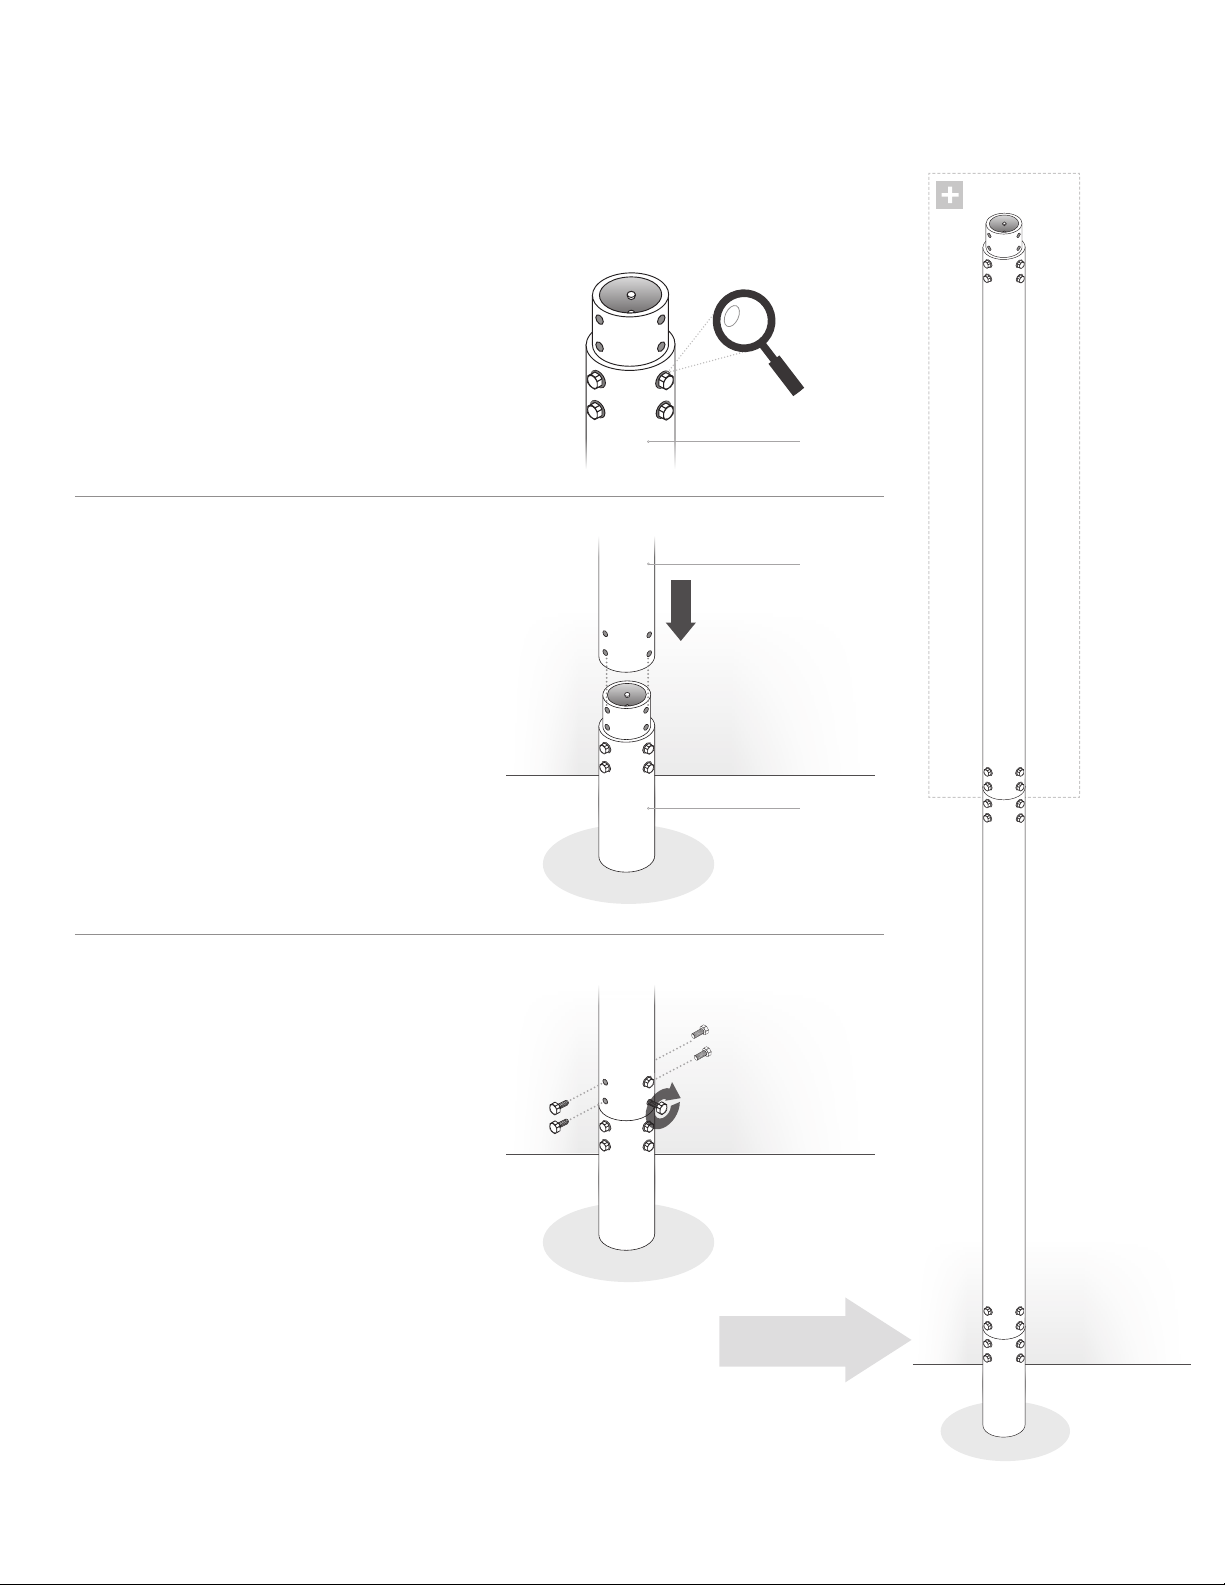
INSTALLATION
POLE ASSEMBLY
set, ensure all six (6) bolts have
been installed with rubber lock
washers.
Set into min 3200 PSI concrete as per pre-installation instructions on
previous page. Once the concrete has set for 24 hours or concrete is
Remove S2 wrapping and place
bottom section (does not have
collar installed) over S1 collar and
align holes of S2 to collar.
Install six (6) 3/8-16 UNC-2B x
3/4" SS bolts through S2 into the
threaded holes in the collar of S1
and tighten securely.
Repeat steps 2 through 4 to
connect pole section S3 to
assembly.
S2
S1
S1
STEP
1
STEP
2
STEP
3
20' Model Only
STEP
3B
5
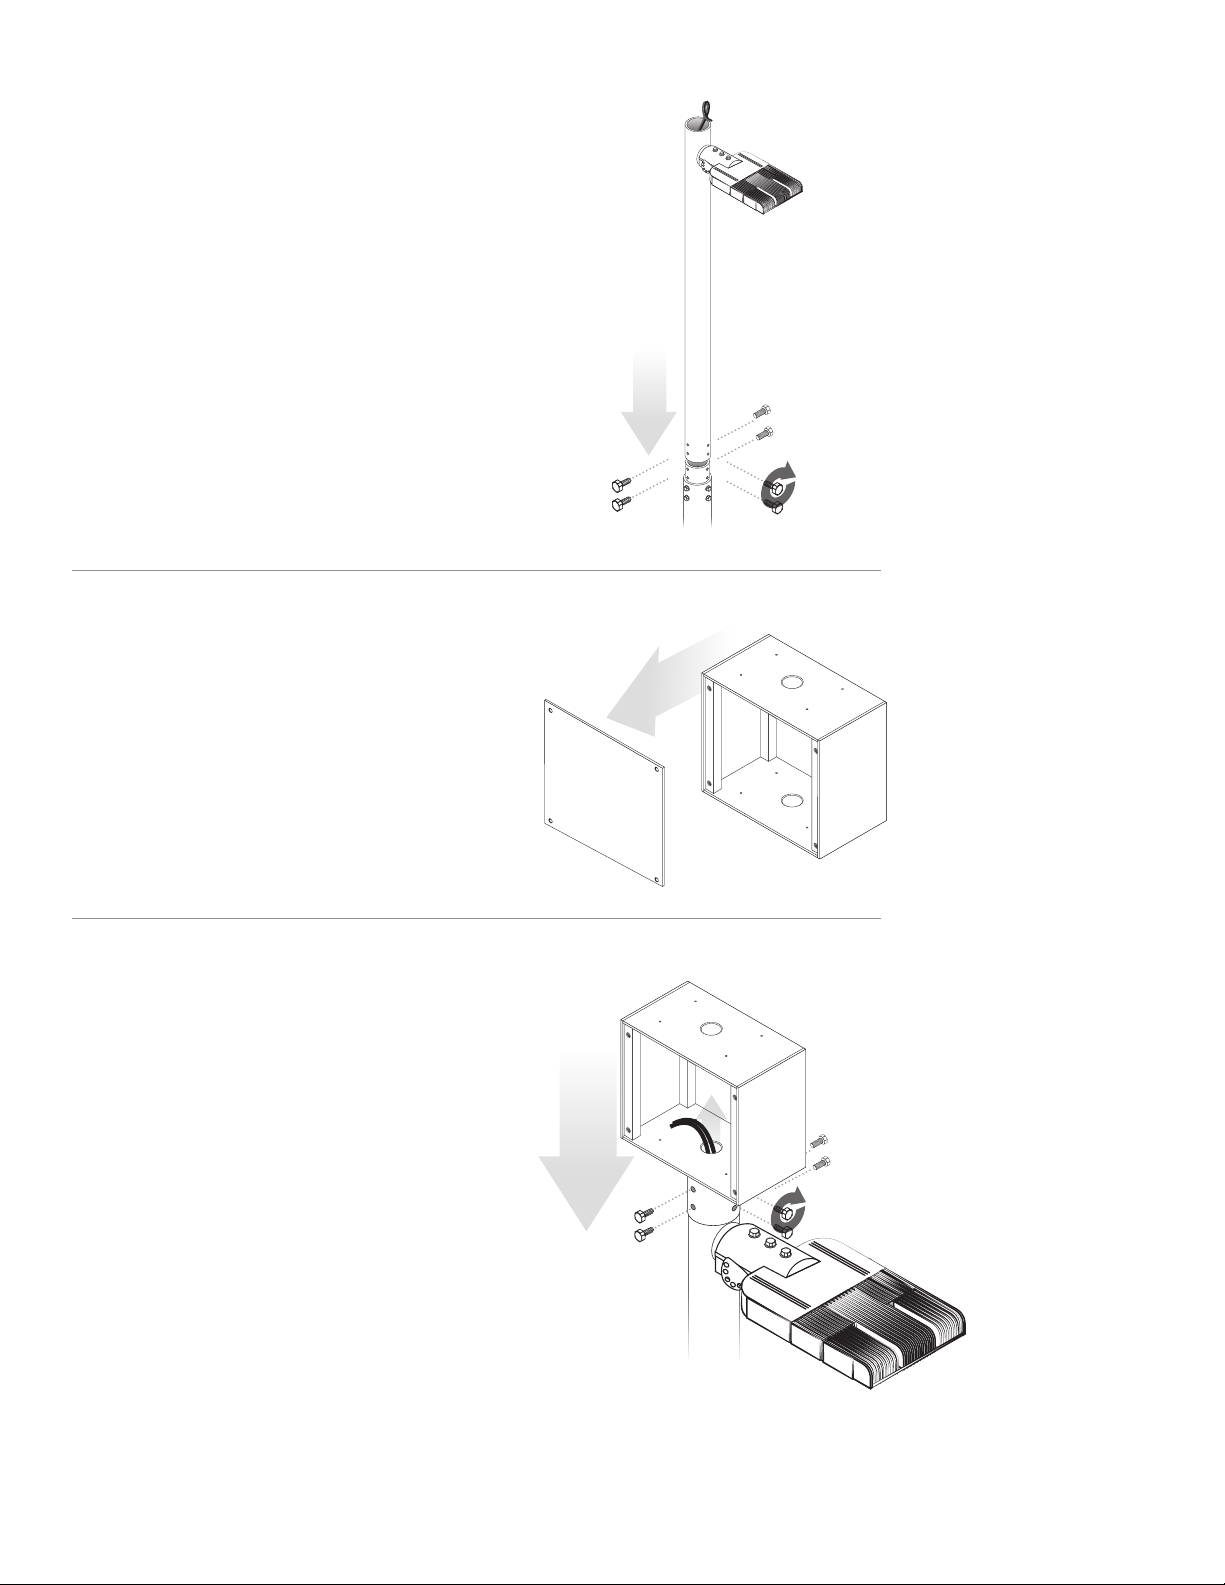
INSTALLATION
BATTERY BOX ASSEMBLY
Place P3 battery box enclosure
on top of T1 pole section, sliding
P3b tenon into place and
aligning the threaded holes.
Fasten tenon using six (6)
3/8-16 UNC-2B x 3/4” SS bolts,
tightened securely.
Feed xture connecting wires
through the hole in the bottom
of the P3a battery box.
Using the same steps from the
pole assembly instructions, attach
section T1 to the top of the pole
assembly.
STEP
1
STEP
2
STEP
3
Remove the front access door
from the battery box (P3a), setting
it and fasteners aside and secure
for re-installation.
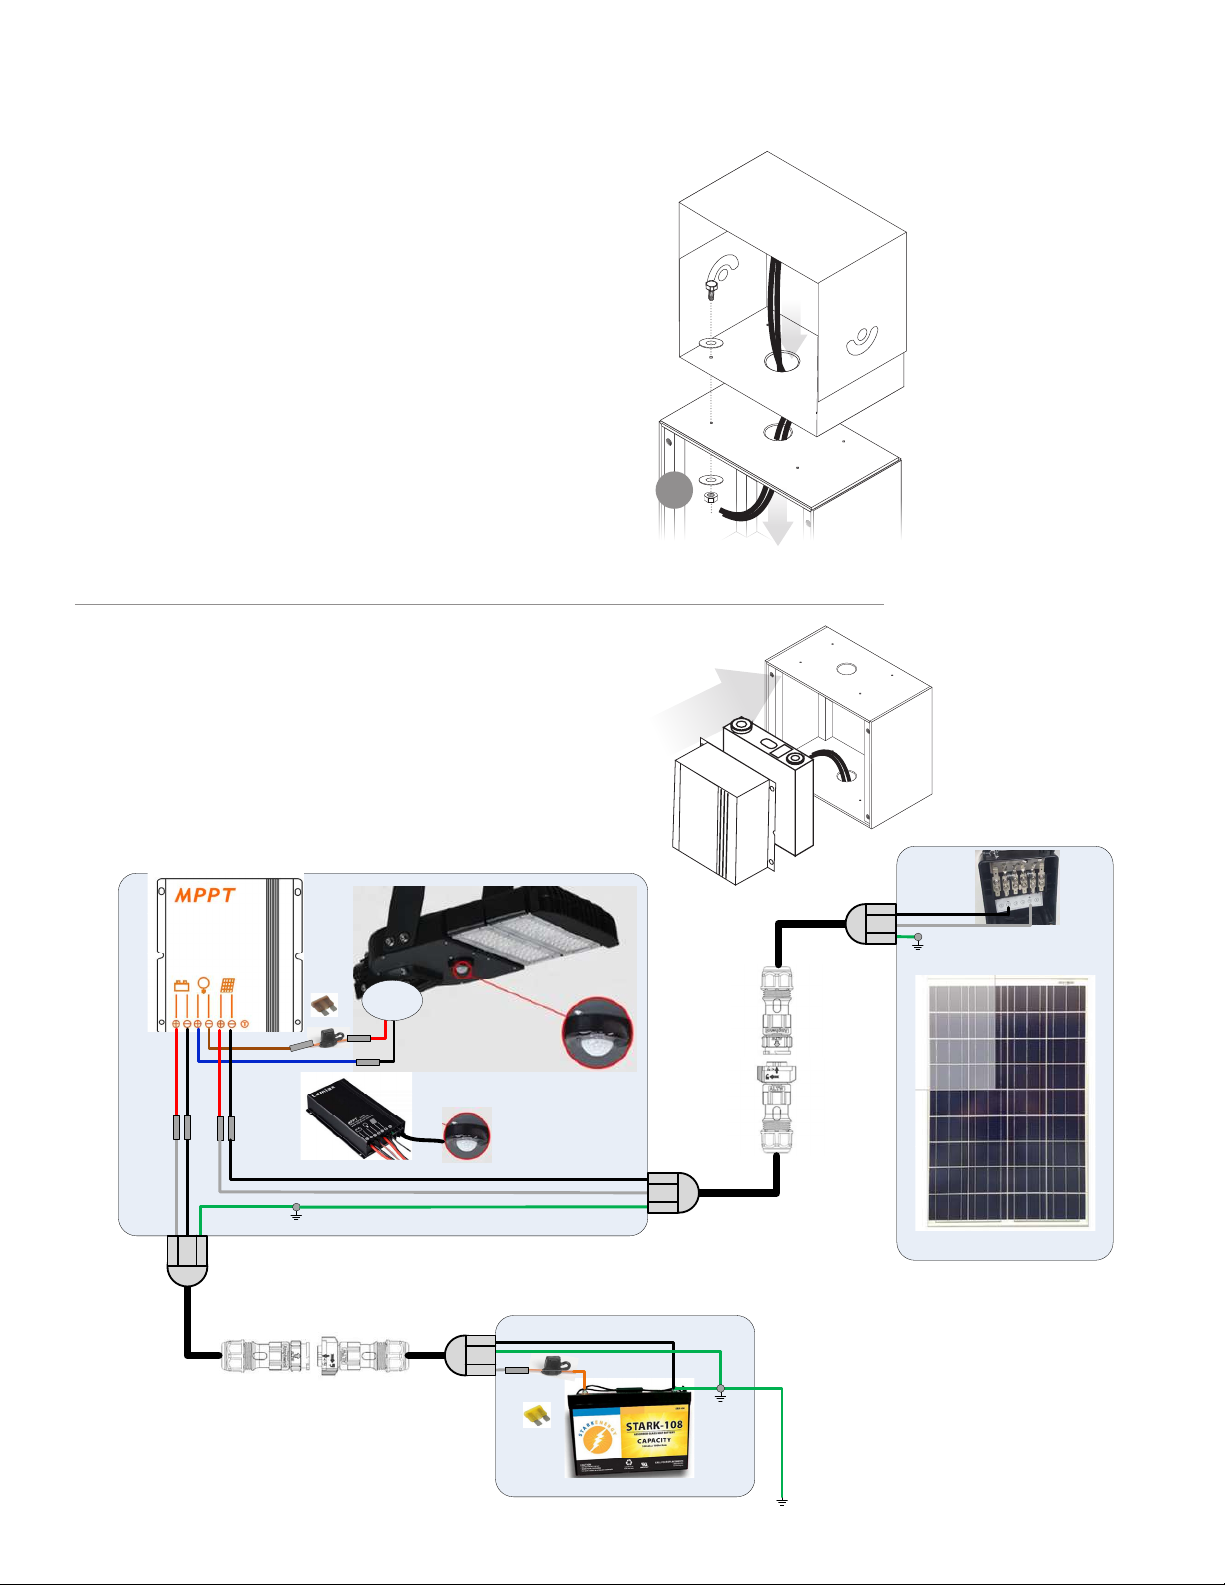
6
INSTALLATION
STEP
1
WIRING
4x
Position the PV Rack Assembly on top
of P3 battery box and align 4 holes. Feed
the PV cable through centre hole. Fasten
securely with hardware provided; nuts
and washers on the inside of P3a battery
box, and bolt head and rubber washer on
the outside.
PV Panel not depicted for
illustrative purposes only.
Connect the C1 controller and B1 battery using
the pre-wired cable set (colour/clip matched).
Load into the P3a battery box along
designated channels and connect the battery
and PV cables as per the drawing below.
STEP
2
BLUE
ISM-125
125W SOLAR PANEL CONNECTIONS
50W LAMP HEAD INTERNAL AND EXTERNAL CONNECTIONS
BATTERY BOX CONNECTIONS
J168-04-SS-G-60
J168-04-SS-G-60
Either MPPT1575-
DCR or MPPT2075-
DCR with 4-Pin PIR
Motion Sensor
BLUE BLACK
BROWN
RED
INSIDE TO
LED
RED
BLACKBLACK
WHITE
GREEN GROUND POINT
INSIDE LAMP HEAD
+-
EARTH OF LAMP
POLE SYSTEM
MUST BE
CONNECTED TO
GROUND ROD
REFER TO LOCAL
CODE
GROUND
POINT INSIDE
BATTERY BOX
FHAC0002LXN
0287005.PXCN
5A FUSE
20A FUSE
WHITE
BLACK
4220311
4220311
ALL WIRING MINIMUM 14 Ga.
RING TERMINALS SIZED TO FIT WIRES SELECTED
PIR Sensor Connector
to In-line 4-Pin Free
Hanging Plug
CC-03BMMB-QL8APP CC-03BFFB-QL8APP
14/3 300-Volt Black Portable Power SJOOW Cord
FHAC0002LXN
0287020.PXCN
RED
BLACK
GREEN
BLACK
WHITE
GROUND POINT TO
PANEL FRAME
BLACK
WHITE
4220311
4220311
14/3 300-Volt Black
Portable Power
SJOOW Cord
12V, 108Ah
CC-03BFMB-QL8APP CC-03BMFB-QL8APP

7
Test light by covering PV panel with
cloth provided using clips to conrm
light comes on.
Remove cloth and re-install cover for
P3a battery box.
Adjust trunnion to the irradiance
degree previously calculated, or use
the solar angle calculator located at
www.solarelectricityhandbook.com/
solar-angle-calculator.hml
Your DIYSolar Off-Grid light is now
fully assembled and ready for use!
STEP
2
STEP
3
STEP
4
INSTALLATION
FINALIZATION & TESTING
CONGRATULATIONS!
FINAL ASSEMBLY
Tighten all bolts, and ensure all
connections to the controller are tight.
STEP
1
14' 20'

8
WARRANTY INFORMATION
Please retain this manual and ll in the relevant details on the back cover,
as they will be required for any warranty claims.
Ecopower Inc. (“Seller”) warrants to the original Buyer of the Seller’s products (and not to
any subsequent owner or user) that products manufactured or sold by Seller is free of defect
in material and workmanship at the time of purchase and for the warranty period listed
below from the original date of purchase when the product is used under normal operating
conditions for its intended use and when properly installed in accordance with Seller’s
instructions.
. Seller makes no warranty
regarding the performance, application or suitability of the Seller’s product. It is the sole
and exclusive responsibility of Buyer to determine the performance, application and
suitability of any and all products of Seller for Buyer’s intended purposes and uses. It is the
sole responsibility of Buyer to thoroughly read the Seller’s installation and maintenance
instructions before installing and using any product. This limited warranty shall not cover
defects caused by: (i) normal wear and tear associated with usage; (ii) failure to install the
products in accordance with Seller’s installation instructions; (iii) modication or alteration of
the products by any party other than Seller; (iv) abuse or use of the products that are not in
accordance with Seller’s instructions.
Standard warranty period on Ecopower LED lighting products carries and
applies from the date of purchase based on normal recommended usage in accordance
with applicable specication sheets, installation instructions and packaging details. This
warranty period is based on the rated lamp life of the luminaire and the operating hours of the
luminaire. For example, a luminaire rated at 50,000 hours equates to 5,000 operating hours
per year (approximately 13.6 hours per day) at the product approved operating temperature.
Therefore, the warranty is only valid for up to 50,000 operating hours or 10 years, whichever
comes rst.
Finish Paint, Powder Coat or Galvanized Finished poles carry a warranty.
Galvanized + Powder Coat Finish carries awarranty. Warranty length can
be affected by special request nishes. We do not recommend White for most applications
without combination with galvanization as age and weather can compromise the nish.
Projects that require a white nish may have their warranty adjusted. Please contact the Seller
to conrm warranty on white nish applications.
Mishandling of the battery cell may cause heat, re and deterioration in performance if
not maintained properly and my limit warranty period. Warranty will be void if product is
tampered with, pierced, dropped or thrown, combined with other batteries or cells that were
not provided by seller, location of product if exposed to high heat, immerse or wet battery cells
with water or sea water.
• LAG has a 2 year full replacement, 5 year prorated warranty period
• EcoNorth EcoLiFe has a 5 year full replacement, 10 year prorated warranty period

9
• The panels carry a thirty (30) year power output warranty unless otherwise noted on the
product itself.
• The panels carry a ten (10) year product warranty on materials and workmanship.
• The controller carries a XX (XX) year warranty
. Buyer acknowledges that no guarantees or assurances
have been made as to the results that may be obtained from the use of the products sold
hereunder whether used singly or in combination with other items.
. No salesperson, representative or agent of Seller is authorized to make any
guarantee, warranty or representation that contradicts the terms contained in this limited
warranty. Any waiver, alteration, addition or modication to the warranties contained
herein must be in writing and signed by authorized representatives of Seller to be valid,
binding and enforceable. Seller does not assume responsibility for any defective product
not manufactured by Seller to which a Seller product is attached. All statements, technical
information or recommendations relating to the products are based upon tests believed
to be reliable but do not constitute a guarantee or warranty. Seller shall not under any
circumstances whatsoever be liable to any party for loss of prots, diminution of good will or
any other special, consequential or incidental damages whatsoever with respect to any claim
made under this limited warranty. Some provinces/states (or jurisdictions) do not allow the
exclusion or limitation of incidental or consequential damages, so this limitation may not
apply in all circumstances.
. In order to obtain service under this limited warranty, Buyer
must rst go to the Sellers website and ll in the application form for Return Authorization
found at (https://ecopowerinc.com/rma). This form must also be accompanied by appropriate
documentation and descriptions. If requested, Buyer must deliver the alleged defective
product, at Buyer’s sole expense and risk, within thirty (30) days after Buyer became aware of
the defect, together with a copy of the bill(s) of sale to: Ecopower Inc., Attn: Warranty Claims,
360 Exeter Road, Unit 3, London, Ontario, Canada N6E 2Z4.
. Seller’s sole obligation and liability under this
limited warranty shall be, in Seller’s sole discretion, and only during the limited warranty
period, either to repair or replace product, with respect to which Buyer noties Seller of
Buyer’s claim of alleged defect or nonconformity under this limited warranty by delivering
such product to Seller as outlined herein, and which is determined by Seller to be defective or
nonconforming under this limited warranty. Seller has the right to determine if the product
should be destroyed in eld to assist in limiting the replacement time and justication of
the defective product. If Seller determines that the limited warranty applies, then Seller will
reimburse Buyer for reasonable shipping costs and expenses incurred by Buyer in returning
the defective or non-conforming product. Product replaced by Seller under this limited
warranty shall be warranted for the balance of the original limited warranty period or ninety
(90) days, whichever is longer. Seller does not assume responsibility for delays in replacement
of products subject to this limited warranty.
DIY
Technical support is available for troubleshooting issues with your DIYSolar
Off-Grid Contractor Kit. You will require your bar code number, and place and date
of purchase. Fill out the information in the boxes above for easy future reference.
Table of contents


