Clas Ohlson DQF2,5-UK User manual

ENGLISH SVENSKA NORSK SUOMI
Generator
Art.no Model
18-3055 SDQF2,5-UK
30-9561 SDQF2,5

2
ENGLISH
Generator
Artno: 18-3055 model: SDQF2.5-UK
30-9561 SDQF2.5
Please read the entire instruction manual before using and save it for future use.
We apologise for any text or photo errors and any changes of technical data.
If you have any questions concerning technical problems please contact our Customer
Service Department (see address on reverse.)
Content
Safety 2
Product description 4
Before rst use 6
Use 7
Care and maintenance 9
Transport 11
Trouble shooting 12
Disposal 12
Specications 13
Safety
Generators give off poisonous carbon monoxide when in operation. This gas is both colour-
less and has no scent, so not being able to smell or see the gas does not mean that it is not in
your immediate surroundings. Breathing in this gas can cause headaches, dizziness, sleepi-
ness or fatality.
- The generator may only be used outside and may not be installed indoors.
- Make sure that the safety distance in relation to other objects is sufcient so that
ventilation is good around the generator.
The generator can give off ammable and explosive fumes which can cause serious burns or
fatality. A naked ame nearby can cause an explosion, even if it is not in direct contact with
the gas.
- Do not use the generator near a naked ame.
- Do not smoke near the generator.
- Place the generator on a rm and even surface
- Always turn the generator off before lling up with fuel. Let the generator cool down for at
least two minutes before you unscrew the lid to the fuel tank. Unscrew slowly to avoid the
pressure from the fuel tank
- Do not ll too much fuel in the tank because the fuel may expand when in operation. Do
not ll up to the top of the tank.
- Wipe away eventual spills before starting the generator.
- Always empty fuel tank before storage or transportation of the generator.
- Before transportation, turn off the fuel tap and connect the sparkplug.

3
ENGLISH
General risk warning.
Read instructions.
Do not expose the generator
to rain and damp.
Wear head protection, eye protection/
visor and ear defenders.
Thegeneratorgeneratesahigh-voltage,whichcanresultinfatality
- The generator may only be used for electrical devices either connected directly or with an
extension cable. Never connect the generator to the electrical system in a building without
the assistance of a qualied electrician. If the connection is performed incorrectly you may
expose yourself to a back current to the mains, which can lead to injury or fatality. The
connections must correspond to local laws and prescriptions.
- Never connect the generator together with another source of power, for example, another
generator or inverter.
- Use the earth-breaker in places where the voltage stream conducts easily, for example,
on panel roofs, or when working with steel.
- Never use the generator in rain or damp environments.
- Never use the generator near water, for example, near beaches, bridges or pools
- Never touch damaged cables or sockets.
- The generator may never be used by children or other persons who do not possess
sufcient knowledge.
Thegeneratorbecomesveryhotwheninuse.Temperatureswithintheexhaust
pipecanexceed65°C
- Never touch the hot surfaces. Take notice of the warning signs on the generator, which
refer to these surfaces.
- Allow generator to cool before you touch the motor or surfaces that have become hot
during operation.
Incorrectuseofthegeneratorcanleadtodamageorshortenitslifespan
- Use the generator only for what it is intended.
- Place the generator on dry and even surfaces.
- Make sure the generator is standing evenly and not leaning.
- Allow the generator to rev up for a few minutes before connecting any electrical devices.
- Immediately turn off and disconnect electrical devices that do not work.
- Do not exceed the generator’s power capacity by connecting more devices than the
generator can manage.
- Do not turn on the electrical devices until they are connected to the generator.
- Turn off all connected electrical devices before turning off the generator.
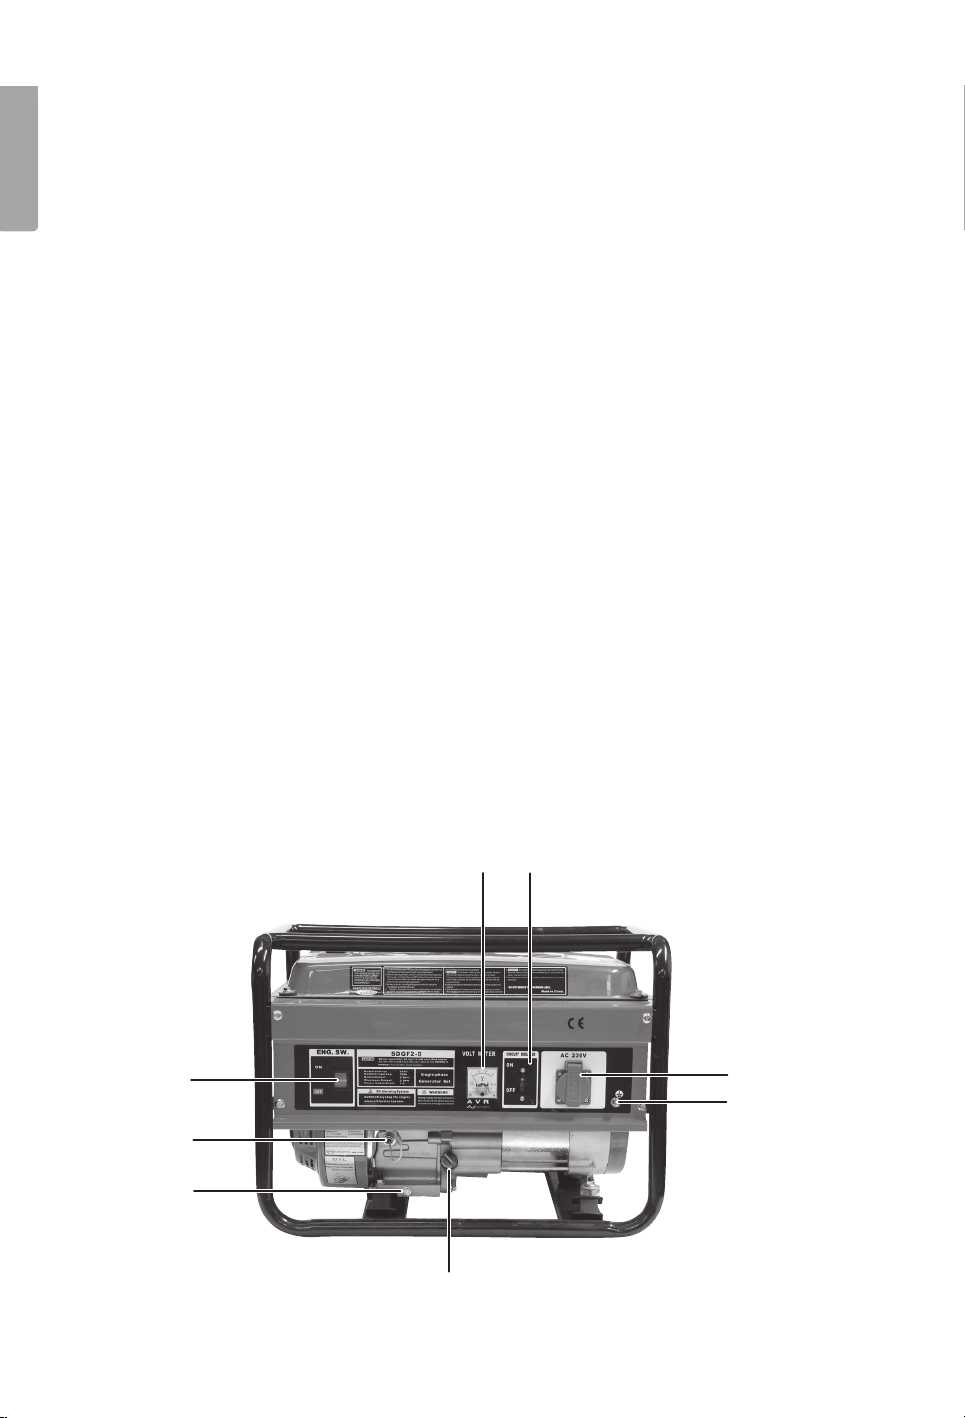
- The generator is equipped with an earthed connection (2) which is connected to the
generator’s frame, chassis and the output’s (1) earth. Ask an electrician about which
prescriptions apply to special types of connections.
Apart from the safety prescriptions above, also familiarise yourself with the generator’s
warning signs.

ENGLISH
Productdescription
Packagecontent
- Generator
- Screwdriver groove/star
- Fixed spanner 8 & 10
- Sparkplug
Productdescription
1. Output 230 V
2. Earthed connection
3. Circuit breaker alternating-current
4. Voltmeter
5. Motor stop On/Off
6. Filling plug/dipstick
7. Sensor for oil monitor
8. Tank lid
9. Fuel tank
10. Fuel level gauge
11. Frame
12. Generator
13. Silencer
14. Starting handle
15. Fuel tap
16. Fuel lter
17. Air lter
18. Spark plug cover
19. Choke
20. Oil drainage plug (x2)
21. Drainage plug carburettor
5
7
20
6
1
2
3

5
ENGLISH
10
9
13
12
8
11
1
15
16
17
18
19
21
20

6
ENGLISH
Transport pad
Beforerstuse
Follow these two steps before you use the generator for
the rst time.
A. Pleaseremovethesetransportprotection
devicesbeforeusing!
B. Fillwithoil
The generator comes without oil, and that is why you must ll it with oil before you use the rst
time. The recommended oil type is SAE 10W 30 – do not use 2 speed oil or motor oil with
additives.
1. Make sure the generator is on a at surface.
2. Unscrew the lling plug for the motor oil (6).
3. Use a funnel and ll the oil up to the top. The motor may contain 6
decilitres.
4. Screw tight the lling plug.
C. Fillupwithfuel
Warning!
- Never ll the fuel tank near a naked ame.
- Make sure the fuel tank is not over owing. Wipe away eventual spills.
- Make sure the generator is on a at surface.
6
20

7
ENGLISH
1. Unscrew the tank lid.
2. Carefully pour the lead-free fuel into the tank. The tank may contain 15 litres. Remember
that the fuel can expand in the tank, so do not ll right to the top.
3. Screw tight tank lid again.
4. Wipe away eventual spills.
Important:
- Never use mixed oil fuel, but only use clean fuel in the tank.
- Never use old fuel.
- Avoid getting dirt or water in the fuel tank.
- Do not allow fuel to remain in the tank for long periods because the fuel ages making the
generator more difcult to start.
Use
Checkbeforeeverystart
Oil
If the oil level is too low the generator will turn off automatically in order to avoid damage.
However, you should check the oil level before each start in order to ensure that the amount is
sufcient. If the generator should lean, the same problem may arise as if the oil level were low.
Fuel
Check the fuel level and ll up when necessary.
Start
WARNING! Disconnect from all electrical sources from the generator before you start.
5
1. Turn on the fuel tap (15).
2. Open the choke (19).
3. Turn the motor stop to (5) “ON”.
4. Slowly pull the start-cord until it comes to a stop. Then pull it quickly to start the motor.
5. When the motor has started and has been running for about one minute, set the choke to
half-open. After a further half-minute’s running time, open the choke fully.
6. Allow the generator to run for several minutes before connecting a device to it.
15
19

8
ENGLISH
Operation/running
You may connect devices that run on 230 Volt, 50 Hz alternating currents. Maximum power is
2500 W during regular operation, then 2700 W intermittently (for example, when turning on a
fridge).
The total output of the devices connected to the generator may not exceed the generator’s
own rated output. To calculate the output being used to run the device you can check the
output on the devices’ nameplates or in their manuals. If you cannot nd any information con-
cerning the output, calculate it by using the following formula:
Output = Volt x Ampere
Connectingdevices
ATTENTION! Make sure you only connect devices that indicate that they manage 230
Volt, 50 Hz.
1. Make sure the devices are not switched on when you connect them.
2. Turn the generator’s circuit breaker for alternating-current to “ON”.
3. Turn on the connecting devices in the order of the output they require. Start with the
device that requires the most.
Turningoffthegenerator
1. Turn off all connected devices and disconnect them from the generator.
2. Turn the generator’s circuit breaker for alternating-current to “OFF”.
3. Allow the generator to run for few minutes without any connected devices before turning
off. This helps to stabilise the generator’s temperature.
4. Turn the motor stop to “OFF”.
5. Turn off the fuel tap.
WARNING!
Allow the generator to cool down properly after running before you touch surfaces that
have become hot during use.

9
ENGLISH
Maintenanceandcare
Recommendedmaintenanceschedule
WARNING!
Never perform maintenance when the generator is up and running.
Every
use
Every
month or
20 hours
Every third
month or
50 hours
Every sixth
month or
hundred hours
Once a year
or every 300
hours
Motor oil Check oil
level
X
Change X
Air lter Check X
Clean X*
Fuel lter Clean X
Sparkplug Check X
Fuel tank Check fuel
level
X
Clean X
*if the generator is standing in a dusty environment the lter should be cleaned more
often.
Oil
If the oil level is too low, the generator turns off automatically to avoid damage. However, you
should check the oil level for every start in order to ensure that the amount is sufcient.
Changingoil
It is important to change the oil if it has been polluted with dirt or if it has been mixed with water.
1. Place a receptacle beneath the generator that the oil can run into.
2. Use the rm 10 mm spanner and loosen the oil drainage plugs (20). Let the oil run down
into the receptacle. [insert image 30-9561 V]
3. Put back the oil drainage plugs and tighten well with the spanner.
4. Make sure the generator is standing on a at surface and open the lling plugs for oil (6).
5. Use a funnel and ll up with SAE 10W-30 oil until it is completely full. (The generator
should be standing at)
6. Screw back the lling plugs.
ATTENTION! Never pour waste oil down the drain, but always handle the waste oil in
an environmentally safe manner. If you are not sure how to proceed, please contact
your local council.

10
ENGLISH
Airlter
Regular maintenance of the air lter provides the carburettor with the amount of air needed.
Check now and again that the air lter is not blocked with dirt.
1. Open the clips to the air lter’s hood.
2. Remove the lter and clean the empty lter
chamber
3. Clean the lter with water and detergent. Allow
to dry.
4. Soak lter in motor oil and squeeze out any
residual oil
5. Replace the lter rmly and seal the hood with
the clips.
Fuellter
Cleaning the fuel lter.
1. Turn off the fuel tap (15).
2. Unscrew the hood to the fuel lter (16).
3. Clean the hood with a cloth or brush.
4. Screw back the hood again tightly.
Sparkplug
If the sparkplug is in good condition it should be
clean and intact. Inspect the sparkplug as follows:
1. Remove the spark cable (18) from the
sparkplug.
2. Unscrew the sparkplug with the spark plug key
(22).
3. Inspect the sparkplug. If it is in bad condition,
change the sparkplug. For the correct kind of
sparkplug, see under specications.
4. If you are going to use the same sparkplug
again, clean it with a steel brush before you
screw it back in place.
5. Replace the sparkplug cable.
15
16
18
22

11
ENGLISH
Emptyingthefueltank
Before long storage of the generator you ought to empty the fuel tank.
1. Turn off the fuel tap (15).
2. Remove fuel lter (16).
3. Empty the fuel lter of fuel.
4. Place a receptacle beneath the generator and open the fuel tap to empty out the fuel.
5. Replace the fuel lter (16).
6. Store fuel in a safe manner.
ATTENTION! Do not store fuel from one season to another because the fuel may age.
Cleaning
Always keep the generator in a cool and dry place. When necessary, you can clean the cover
with one or more of the following:
- A slightly damp cloth.
- Those soft branch
- A vacuum cleaner
- Air pressure cleaner
Transport
ATTENTION! Do not put anything on top of the generator if it is still hot after use!
Do the following before transportation or long storage of the generator:
- Empty the fuel tank.
- Disconnect sparkplug cable from sparkplug.
- Keep the generator’s ventilation holes clear.
- Keep the generator in a cool and dry place.

12
ENGLISH
Troubleshooting
Problem Possible court Possible solution
The motor won’t
start.
- Motor stop is “OFF”.
- The fuel tap is closed
- Choke is open.
- The fuel is empty.
- The fuel is polluted or old.
- The sparkplug is dirty
- The sparkplug is damaged.
- The generator is not placed
on an even surface
- The oil level is low
- Turn motor stop “ON”.
- Turn on fuel tap.
- Close choke.
- Fill up with fuel.
- Change and ll up with new fuel.
- Clean sparkplug.
- Change sparkplug.
- Lift the generator to a at surface
to prevent it from switching off
automatically due to low oil level.
- Fill up or change oil.
The motor is
running but the
generator is not
providing any
current.
- The circuit breaker (3) is
“OFF”.
- Poor connections or cables.
- The device connected is not
working.
- Turn circuit breaker (3) “ON”.
- If using extension cable, change
it.
- Connect another device.
The generator is
running but is not
running all con-
nected devices.
- The generator is overloaded
- Short-circuit in one of the
devices connected
- The air lter is dirty.
- Disconnect one of connected
devices
- Disconnect one of the faulty
or short-circuited connected
devices
- Clean or change air lter.
Disposal
When disposing of product it should be done in accordance with local rules and
regulations. If you are unsure as to how to proceed please contact your local
council.

13
ENGLISH
Specications
Motor 1 cylindrical angled 24º OHV air cooled 4 rate
Motor output 6.5 HP
Tank volume 15 l
Running time/tank at 50% load 10 hours
Motor oil SAE 10W-30
Oil volume 0.6 l
Sparkplug F7RTC
NGK: BPR6ES
Champion: RN9YC
Bosch: WR7DC
Voltage 230 V / 50 Hz (3600 rpm)
Rated output generator 2500 VA
Noise level LwA 94 dB (A)
Dimensions 59 x 43 x 44 cm
Weight 42 kg

1
SVENSKA
Elverk/generator
Artnr: 18-3055 modell:SDQF2.5-UK
30-9561 SDQF2.5
Läs igenom hela bruksanvisningen före användning och spara den sedan för framtida bruk.
Vi reserverar oss för ev. text- och bildfel samt ändringar av tekniska data. Vid tekniska
problem eller andra frågor, kontakta vår kundtjänst (se adressuppgifter på baksidan).
Innehållsförteckning
Säkerhet 14
Produktbeskrivning 16
Före första användning 18
Användning 19
Skötsel och underhåll 21
Transport 23
Felsökningsschema 24
Avfallshantering 24
Specikationer 25
Säkerhet
Elverk avger giftig koloxid under drift. Denna gas är både lukt- och färglös, så även om du
varken känner lukten av eller ser gas så kan den nnas i din omgivning. Inandning av denna
gas kan leda till huvudvärk, yrsel, dåsighet eller dödsfall.
- Elverket får endast användas utomhus och ej byggas in.
- Se till att säkerhetsavståndet till andra föremål är tillräckligt så att ventilationen är god runt
elverket.
Elverket kan avge brännbara och explosiva bränsleångor som kan orsaka allvarliga brännska-
dor eller dödsfall. En öppen låga i näheten kan orsaka explosion även om den inte kommer i
direkt kontakt med gasen.
- Använd inte elverket nära öppen låga.
- Rök inte i närheten av elverket.
- Placera elverket på fast och jämnt underlag.
- Stäng alltid av elverket före påfyllning av bränsle. Låt elverket svalna i minst 2 minuter
innan du skruvar av locket till bränsletanken. Skruva långsamt för att minska trycket i
bränsletanken.
- Fyll inte för mycket i bränsletanken eftersom bränslet kan expandera under drift. Fyll inte
upp i toppen på tanken.
- Torka alltid bort eventuellt spillt bränsle innan du startar elverket.
- Töm alltid bränsletanken före förvaring eller transport av elverket.
- Före transport, stäng bränslekranen och koppla bort tändstiftet.

15
SVENSKA
Allmänna varningar för
riskmoment.
Läs bruksanvisningen.
Utsätt inte elverket för regn
eller fukt.
Använd skyddshjälm, skydds-
glasögon/visir och hörselskydd.
Elverketalstrarhögspänningsomkanorsakadödsfall
- Elverket får endast användas till elektriska apparater anslutna antingen direkt eller med en
förlängningssladd. Anslut aldrig elverket till det elektriska systemet i en byggnad utan hjälp
av en kvalicerad elektriker. Utförs anslutningen på fel sätt kan du råka ut för bakström
till elnätet, vilket kan leda till skador eller dödsfall. Anslutningarna måste följa lokala
föreskrifter och lagar.
- Koppla ej ihop elverket med någon annan strömkälla t.ex. annat elverk, växelriktare.
- Använd jordfelsbrytare på platser där strömmen leds lätt, som t.ex. plåttak eller vid
stålarbeten.
- Använd ej elverket i regn eller fuktiga utrymmen.
- Använd ej elverket nära vatten t.ex. strand, brygga, pool
- Rör aldrig skadade kablar eller eluttag.
- Elverket får ej användas av barn eller andra personer utan nödvändig kunskap.
Elverketblirmyckethettunderdrift.Temperatureriavgasröretsnärhetkan
överstiga65°C
- Rör aldrig de heta ytorna. Var uppmärksam på varningsskyltarna på elverket som
utmärker dessa ytor.
- Låt elverket svalna innan du rör motorn eller ytor som blir heta under drift.
Felaktiganvändningavelverketkanledatillskadorellerförkortadess
livslängden
- Använd elverket endast för avsett ändamål.
- Placera elverket på torra och jämna ytor.
- Se till att elverket står plant och ej lutar.
- Låt elverket vara igång i era minuter innan du ansluter några elektriska apparater.
- Stäng omedelbart av och koppla ifrån elektriska apparater som inte fungerar.
- Överskrid inte elverkets effektkapacitet genom att ansluta er apparater än elverket klarar.
- Slå inte på elektriska apparater innan de är anslutna till elverket.
- Stäng av alla anslutna elektriska apparater innan du stänger av elverket.
- Elverket är utrustat med en jordanslutning (2) som är kopplad till elverkets ram,
motorchassi och uttagets (1) jord. Rådfråga en elektriker om vilka föreskrifter som gäller
för inkoppling vid ert speciella ändamål.
Förutom ovanstående säkerhetsföreskrifter, bekanta dig även med elverkets
varningsskyltar.

16
SVENSKA
Produktbeskrivning
Förpackningsinnehåll
- Elverk
- Skruvmejsel spår/stjärna
- Fast nyckel 8 & 10
- Tändstiftsnyckel
Produktbeskrivning
1. Uttag 230 V
2. Jordanslutning
3. Strömbrytare växelström
4. Voltmeter
5. Motorbrytare On/Off
6. Påfyllningsplugg/oljesticka
7. Givare för oljevakt
8. Tanklock
9. Bränsletank
10. Bränslenivåmätare
11. Ram
12. Generator
13. Ljuddämpare
14. Starthandtag
15. Bränslekran
16. Bränslelter
17. Luftlter
18. Tändstiftshatt
19. Choke
20. Oljedräneringsplugg (x2)
21. Dräneringsplugg förgasare
5
7
20
6
1
2
3

17
SVENSKA
10
9
13
12
8
11
1
15
16
17
18
19
21
20

18
SVENSKA
Säkring
Föreförstaanvändning
Följ dessa 3 steg innan du använder elverket för första gången.
A. Skruvabortdomtvåtransportsäkringarna.
B. Fyllpåolja
Elverket levereras utan olja, så därför måste du fylla på olja innan du använder elverket för
första gången. Rekommenderad typ är SAE 10W 30 – använd inte 2-taktsolja eller motorolja
med tillsatser.
1. Se till att elverket står på en plan yta.
2. Skruva av påfyllningspluggen för motorolja (6).
3. Använd en tratt och fyll på olja upp till kanten. Motorn rymmer 6 dl.
4. Skruva fast påfyllningspluggen igen.
B. Fyllpåbränsle
VARNING!
- Fyll aldrig på bränsletanken i närheten av öppen låga.
- Se till så att bränsletanken inte blir överfull. Torka bort eventuellt spill.
6
20

19
SVENSKA
1. Se till att elverket står på en plan yta.
2. Skruva av tanklocket.
3. Häll försiktigt blyfri bensin i tanken. Tanken rymmer 15 liter. Tänk på att bränslet kan
expandera i tanken, så fyll inte tanken ända upp till kanten.
4. Skruva fast tanklocket igen.
5. Torka bort eventuellt spill.
VIKTIGT:
- Använd aldrig oljeblandad bensin, utan häll endast ren bensin i tanken.
- Använd aldrig gammal bensin.
- Undvik att få smuts eller vatten i bränsletanken.
- Låt inte bensin nnas kvar i tanken under längre perioder eftersom bensinen då kan bli
gammal och elverket blir svårt att starta.
Användning
Kontrolleraförevarjestart
Olja
Om oljenivån är för låg stängs elverket av automatiskt för att förhindra skador. Dock ska du
kontrollera oljenivån före varje start för att säkerställa att mängden är tillräcklig.
Skulle elverket luta kan samma problem uppstå som om oljenivån var låg.
Bensin
Kontrollera bränslenivån och fyll på vid behov.
Start
VARNING! Koppla från all elektrisk belastning från elverket innan du startar.
5
1. Öppna bränslekranen (15).
2. Sätt choken (19) i stängt läge.
3. Sätt motorbrytaren (5) i läge ”ON”.
4. Drag långsamt i startsnöret tills du möter motstånd. Dra då snabbt för att starta motorn.
5. När motorn har startat och varit igång i ca en minut, sätt chokereglaget i halvöppet läge.
Efter ytterligare en halvminuts drift, öppna choken helt.
6. Låt elverket vara i drift i era minuter innan du ansluter någon apparat till det.
15
19

20
SVENSKA
Drift
Du kan ansluta apparater som drivs med 230 Volt, 50 Hz växelström. Maximal effekt är
2500 W under regelbunden drift, och 2700 W intermittent (t.ex. vid start av ett kylskåp).
Den totala effekten av de apparater som är anslutna till elverket får inte överstiga elverkets
egen märkeffekt. För att beräkna den effekt som går åt för att driva de apparater du ansluter,
kontrollera effekten på apparatens märkskylt eller i dess bruksanvisning. Om du inte hittar
någon uppgift på effekten kan du beräkna effekten med följande formel:
Effekt = Volt x Ampere
Anslutningavapparater
OBS! Se till att du endast ansluter apparater som är märkta att klara 230 Volt, 50 Hz.
1. Se till att apparaterna inte är påslagna när du ansluter dem.
2. Sätt elverkets strömbrytare för växelström i läge ”ON”.
3. Slå på de anslutna apparaterna i tur och ordning efter den effekt de kräver.
Börja med den apparat som kräver mest.
Attstängaavelverket
1. Stäng av alla anslutna apparater och koppla därefter bort dem från elverket.
2. Sätt elverkets strömbrytare för växelström i läge ”OFF”.
3. Låt elverket vara igång i era minuter utan anslutna apparater innan du stänger av det.
Detta hjälper till att stabilisera elverkets temperatur.
4. Sätt motorbrytaren i läge ”OFF”.
5. Stäng bränslekranen.
VARNING!
Låt elverket svalna ordentligt efter drift innan du vidrör ytor som blir heta under
användning.
This manual suits for next models
1
Table of contents
Languages:
Other Clas Ohlson Inverter manuals