EcoSmarte Swim Spa Instruction Manual
ECOsmarte Planet Friendly® | 612-866-1200 | ECOsmarte.com | Bloomington, MN 1
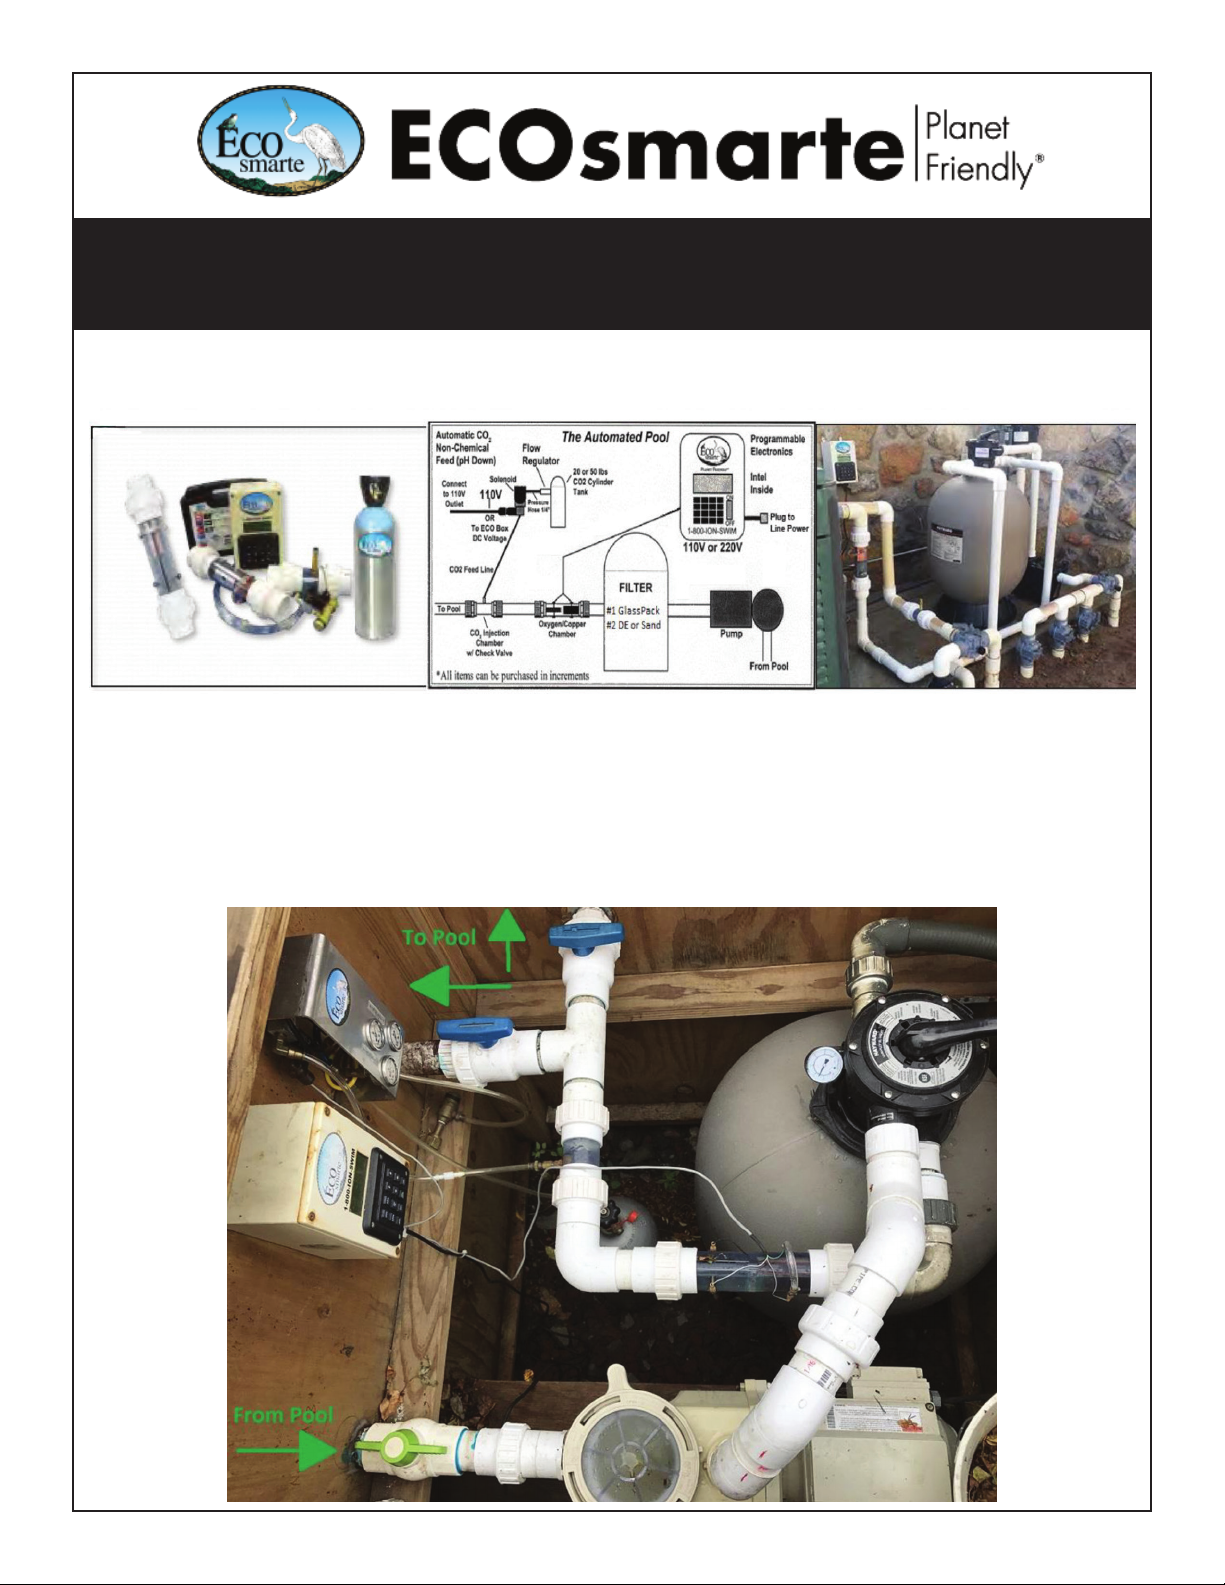
Installing an ECOsmarte Programmable
Pool and Spa System
Swim Spa, Small Pool, Endless Pools®, or Hydroworx®
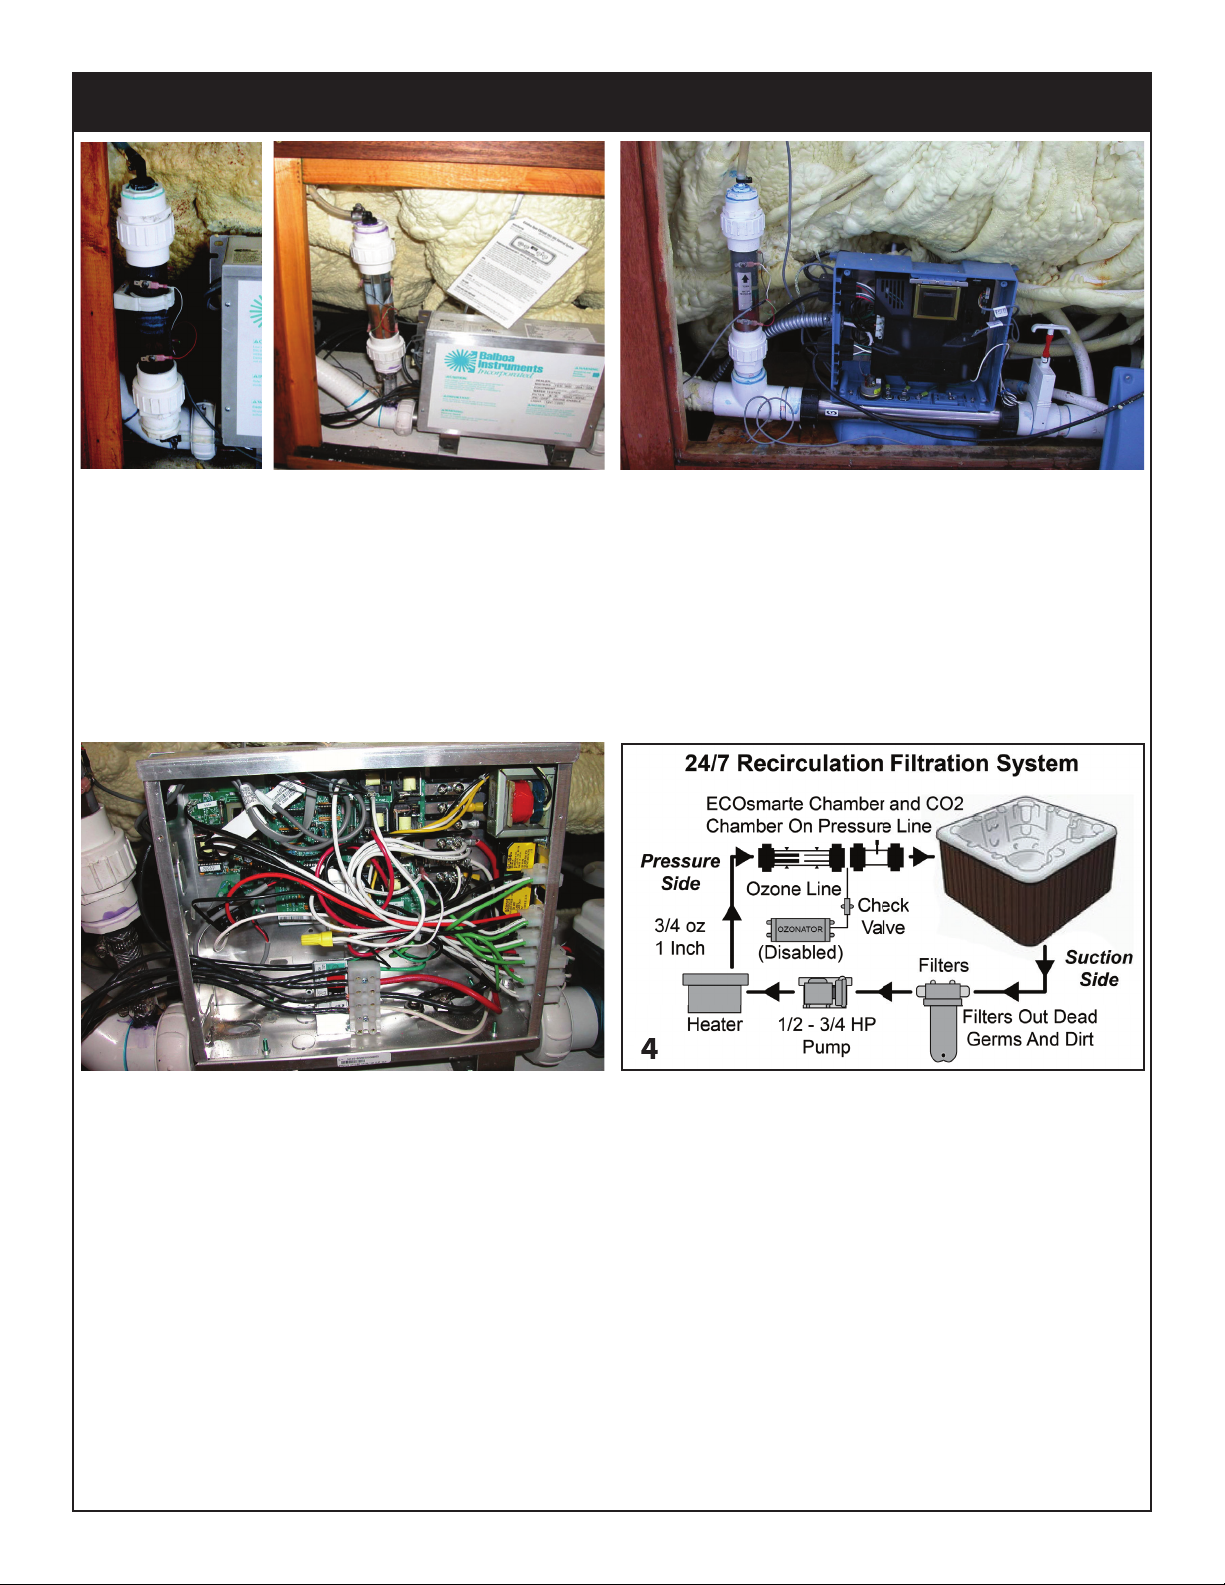
Step1: Determine the proper location for the control box, electrode chamber (requires 11”of pipe space
after the pump), and CO chamber (requires 7”of pipe space after the Electrode Chamber) The CO
chamber will be installed after the electrode chamber If you have a pool heater make sure that there is
at least 12”of pipe between the chamber and the heater inlet⁄ outlet
TOP VIEW OF EQUIPMENT VAULT
ECOsmarte Planet Friendly® | 612-866-1200 | ECOsmarte.com | Bloomington, MN
2
Step 2: Mount the control box with 2 screws using the brackets that are attached to the back of the box.
Use the proper screws for the material you are mounting the box to. (Wood, Brick, Concrete, etc...) The
control box must be within 10 feet of the outlet and chambers.The Chamber can install vertically, see the
top of page one or on page ve.
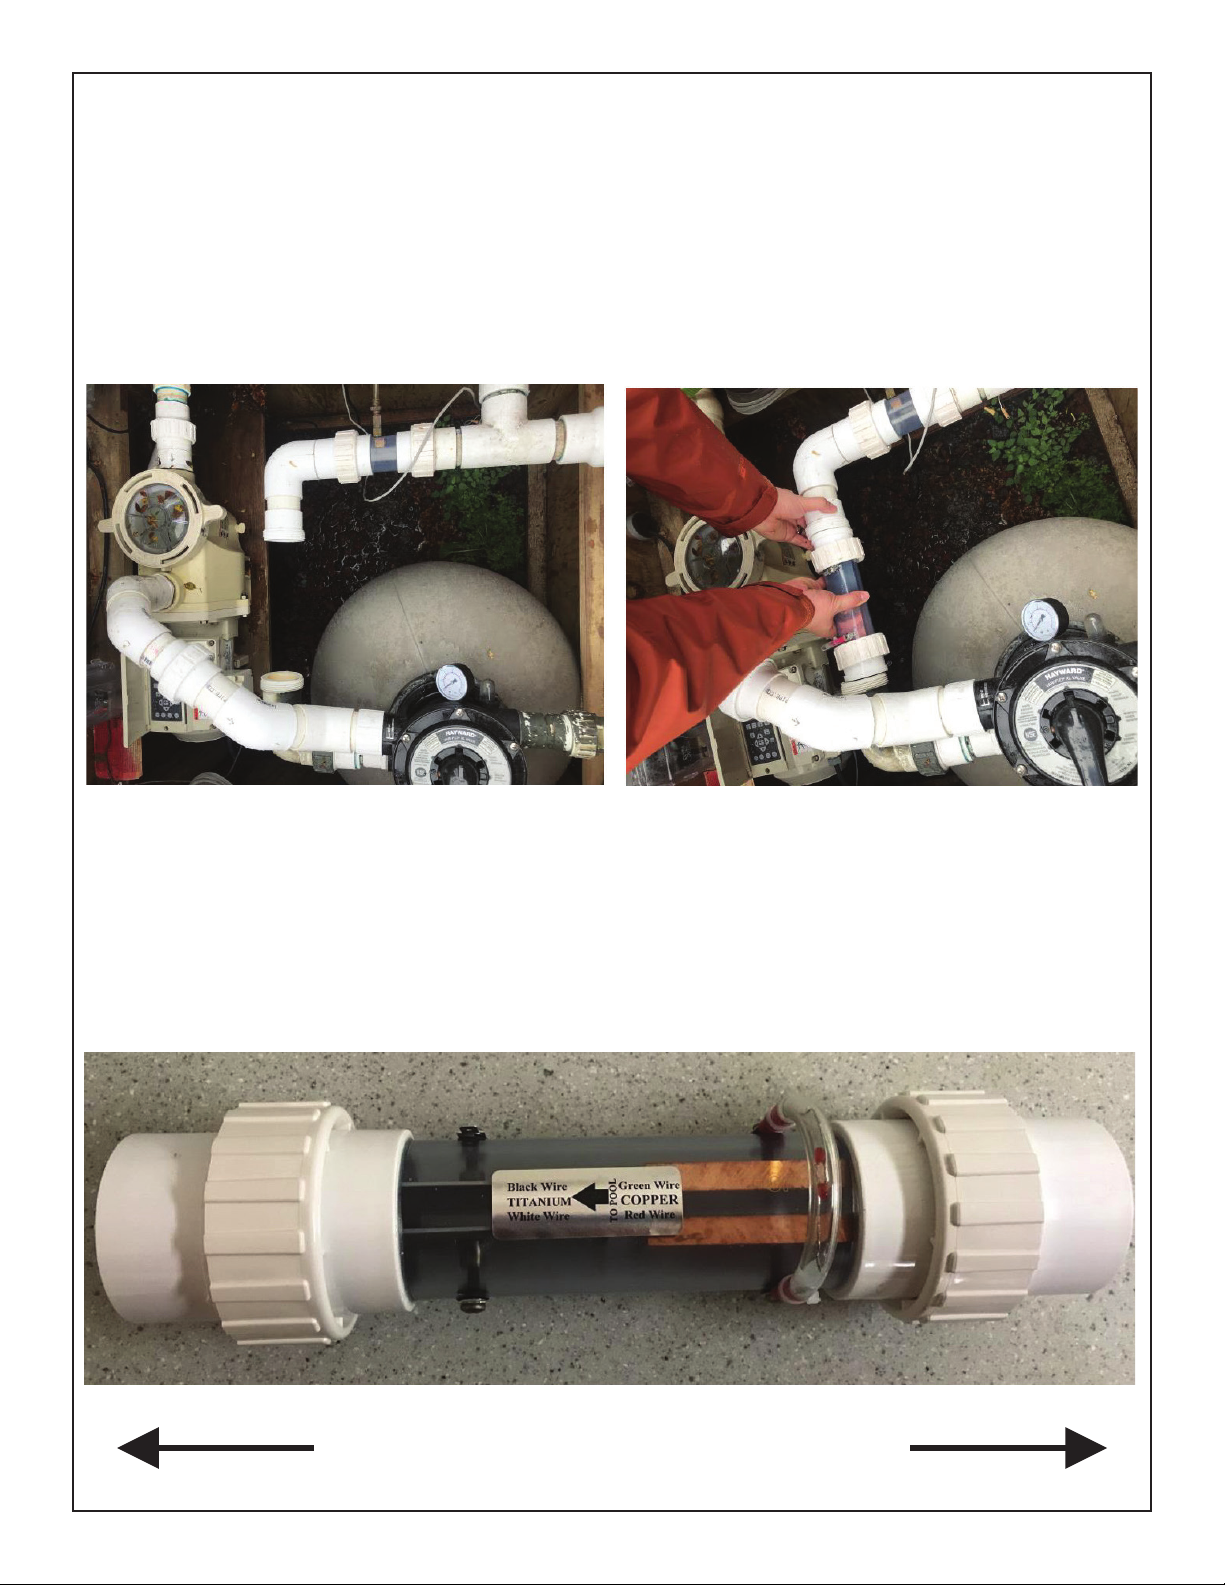
Step 3: Install the electrode and CO chambers If cutting into an existing pipe the electrode chamber will
require you to cut an 11” section The CO chamber will require a 7”section of pipe cut out The male ends
of the unions are attached to the chambers out of the box They will be glued onto the freshly cut ends of
the pipe Before gluing slide the ends onto the pipe and check to see if the chamber fits into the space
Use a PVC specific primer and glue to attach the union ends to the pipes Allow 30 minutes for the glue to
dry and then install the chambers using the threaded unions There is a sticker on the electrode chamber
showing the proper orientation for installation The CO injection nozzle points away from the electrode
chamber Tighten unions by hand as much as possible You may or may not need a slip joint pliers (auto
motive oil filter pliers) to tighten further
ARROW INDICATES FLOW CO INJECTION CHAMBER
INSTALLS AFTER COPPER⁄ OXYGEN CHAMBER
TO THE POOL⁄ SPA⁄ CO TO THE PUMP
ECOsmarte Planet Friendly® | 612-866-1200 | ECOsmarte.com | Bloomington, MN 3
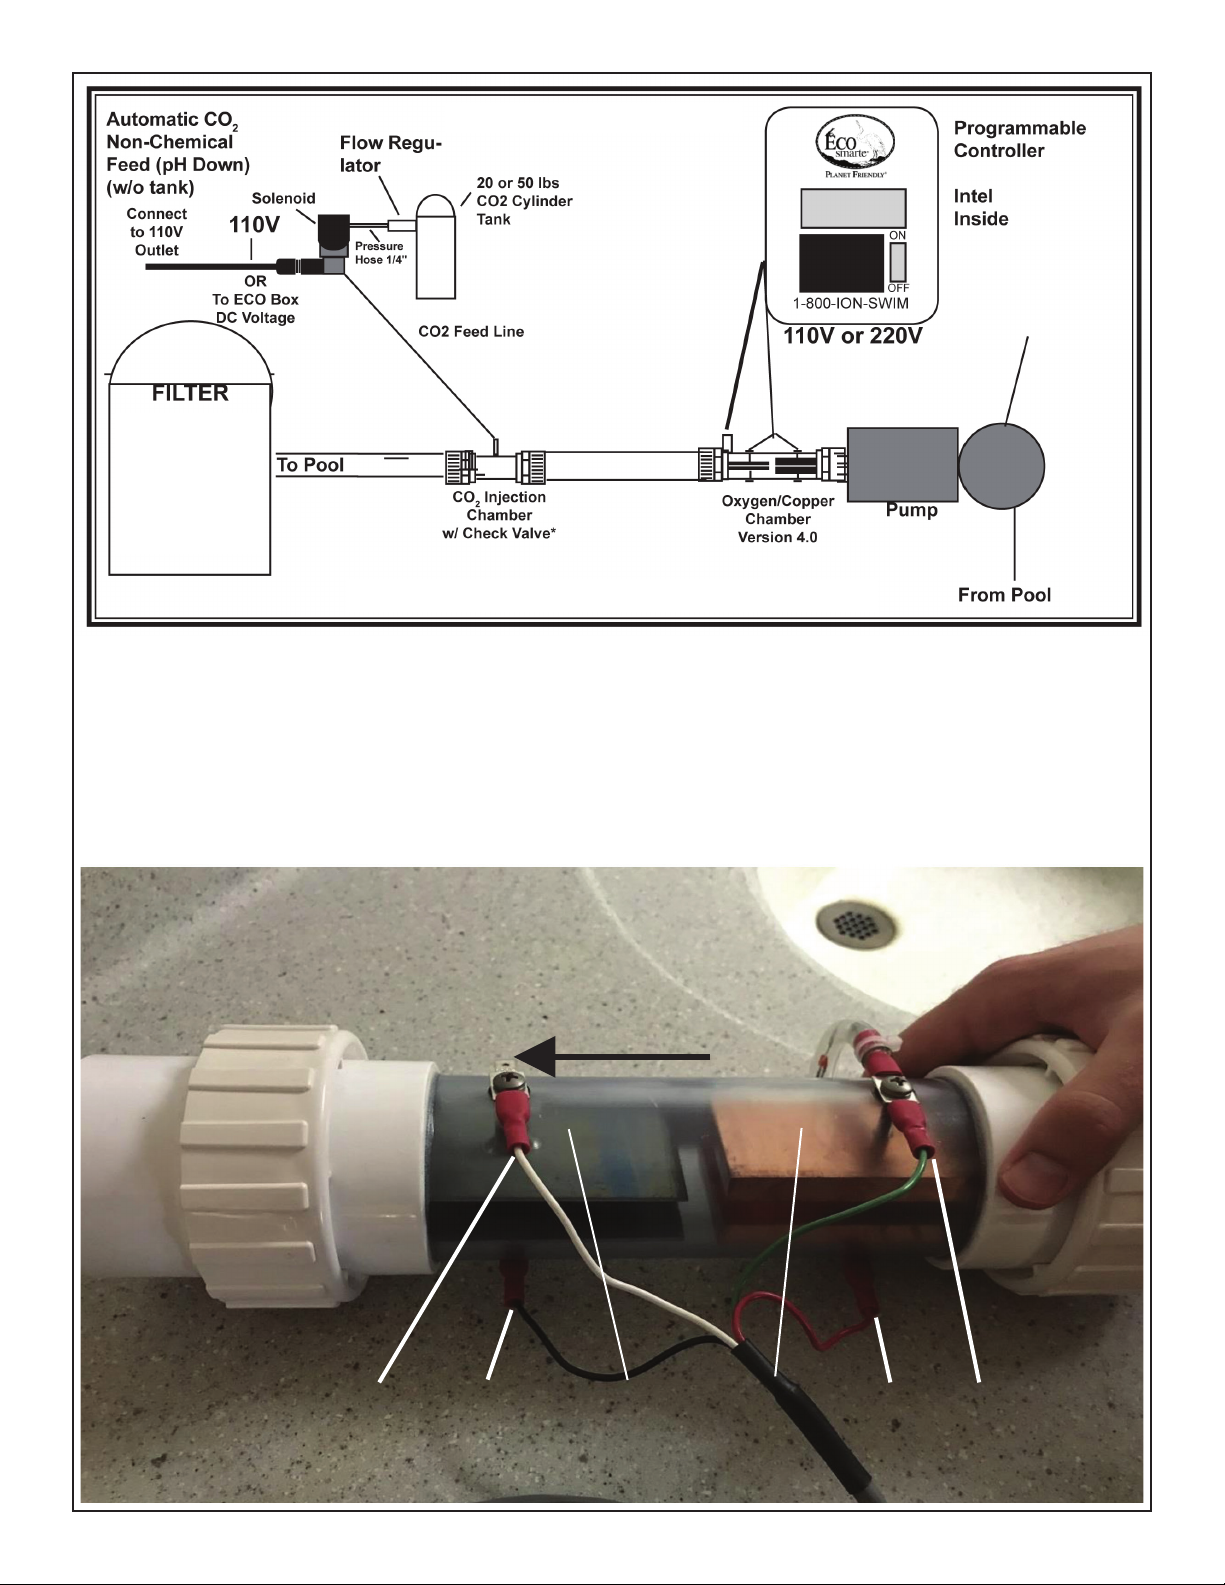
The Automated Pool
Or Spa
(Optional 2-Tank Manifold
Larger Pools)
** Must Go After ECO Chamber, Can Be Vertical
Step 4: Connect the chamber wires from the Control Box to the electrode chamber. Attach each wire to
one electrode bar as seen in the picture below.
BLACK AND WHITE LEADS TO TITANIUM RED AND GREEN LEADS TO COPPER
WATER FLOWS THROUGH THE CHAMBER
FROM THE COPPER SIDE TOWARDS THE TITANIUM
WHITE BLACK TITANIUM COPPER RED GREEN
In Order of Quality
1) DE
2) GlassPack®
3) Sand
4) Cartridge
ECOsmarte Planet Friendly® | 612-866-1200 | ECOsmarte.com | Bloomington, MN
4
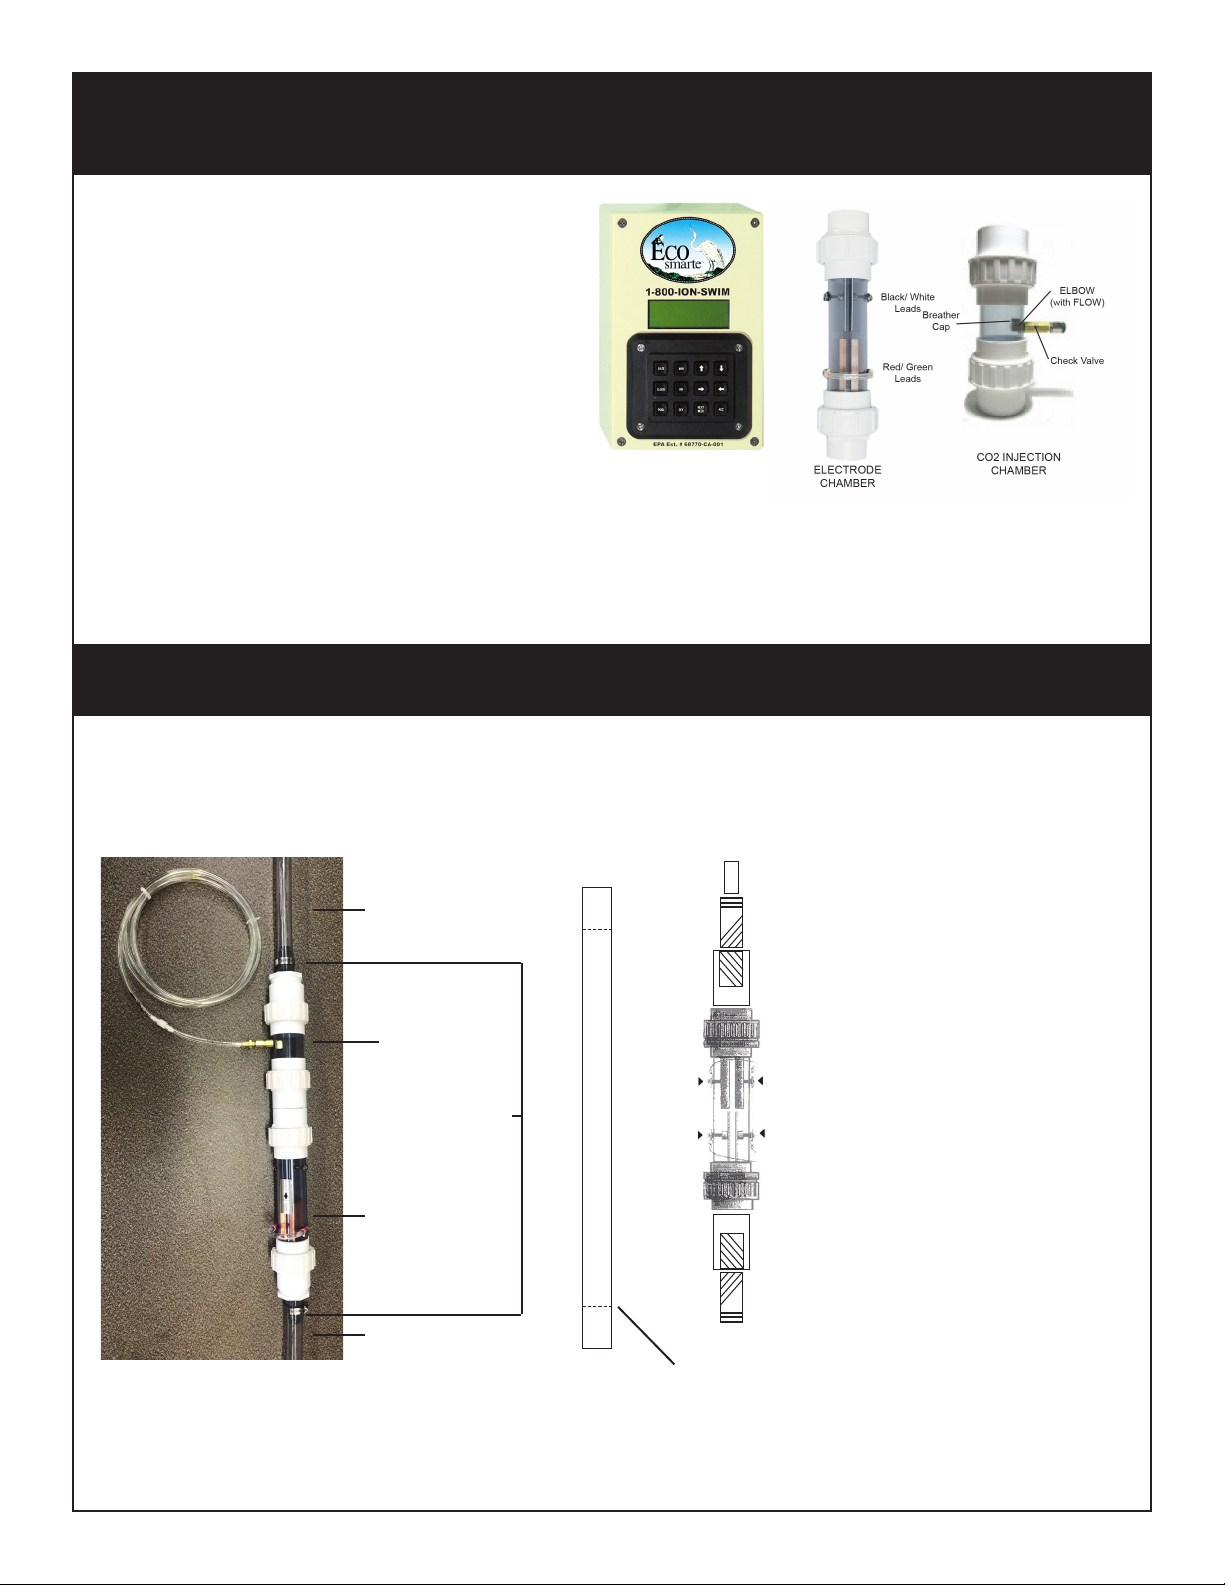
ECOSMARTE
CHAMBER
Cut ozone line at least 3”from the tee. Glue 1 ½”slip x ¾” threaded adapter into the end of the electrode
chamber. Apply glue to the threaded end of ¾”thread x ¾” barbed adapter and quickly assemble ttings.
(See diagram) Glue barbed end of the adapter to clear the ozone line. Repeat process for the opposite end
of the electrode chamber. You electrode chamber is either 1½”or 2”. The CO Chamber is 2”.
Installing an ECOsmarte Programmable Spa System
For Spas, Swim Spas, and Endless Pools®
The Electrode Chambers may be installed
anywhere on the ozone line reduced down
between ⁄”and 1” with our Quick Change
Unions. The ECOsmarte Electronic Box can
be installed indoors or outdoors, but keep the
box close to the spa or pool for easy access. The
Electronic Box is water-resistant and comes
with prewired leads connected to the Electrode
Chamber. If the installation requires any
additional wires, you may order it from your local
ECOsmarte dealer or the ECOsmarte Factory.
Small Pools, Endless Pool®, and Swim Spas will require a 110v GFCI outlet within 10 feet of both the
ECOSmarte control box and chambers. This outlet used on the Endless Pool® or the Hydroworx® is US
Building Code since 2009.
For Spas Equipped with Ozone Line (Specify 110v or 220v) or Ozone Spa Shell Fittings
This Is A Side Stream Loop As With Ozone, Goes From Pipe To Ozone Jet
Note: Most spas are“ozone ready” even if you do not have ozone installed. Elbows may be required to
complete installation where space is limited. Normally two cuts are not required.
To Jet
From “T” or Tap
3/4” Ozone Tubing
to Jet
CO2 Chamber
Allow For 30 Inches
of Vertical Space To
Fit Chambers
Electrode Chamber
3/4” Ozone Tubing
From “T” or Tap
3/4” Clear Tubing to Jets
3/4” readed x 3/4” Barbed Adapter
1 1/2” - 2” Slip x 3/4” readed Adapter
Oxygen “OXIDIZE”
(Black/ White Paired Leads)
Copper “IONIZE”
(Red/ Green Paired Leads)
1 1/2” - 2” Slip x 3/4” readed Adapter
3/4” readed x 3/4” Barbed Adapter
Cut the line at least three inches from the Tee
ECOsmarte Planet Friendly® | 612-866-1200 | ECOsmarte.com | Bloomington, MN 5
Swim Spa Chamber Install Options
Vertical Chambers guarantees the water is fully in the cell.
ONLY 24/7 Recirculation Installs Can Be Horizontal and Inline (lower right).
A “T” from ANY recirculation or pressure line can be connected to the ozone jet.
Ozone tubing can be 3/8” to 3/4” in diameter.
Your programmable ECOsmarte box will overcome those manufacturers without
ozone programming and allow you to program six to eight hours oxygen per day.
1 1
1) ECOsmarte Copper/ Oxygen Chamber
“T” from Pressure Line to 3/8”OZONE Tubing
(Front Cabinet)
3
3) ECOsmarte Copper/ Oxygen Drilled and Tapped
Adapted to 3/4”OZONE Line
(Front Cabinet)
2
2) ECOsmarte Chambers
“T” from Pressure Line to 5/8”OZONE Tubing
(Side Cabinet)
4
4)“T” O 24 Hour Recirculation
Pump Line to 3/4” ozone tubing loop.
Common instvall many swim spa brands.
These are the ONLY horizontal spa.
4
ECOsmarte Planet Friendly® | 612-866-1200 | ECOsmarte.com | Bloomington, MN
6
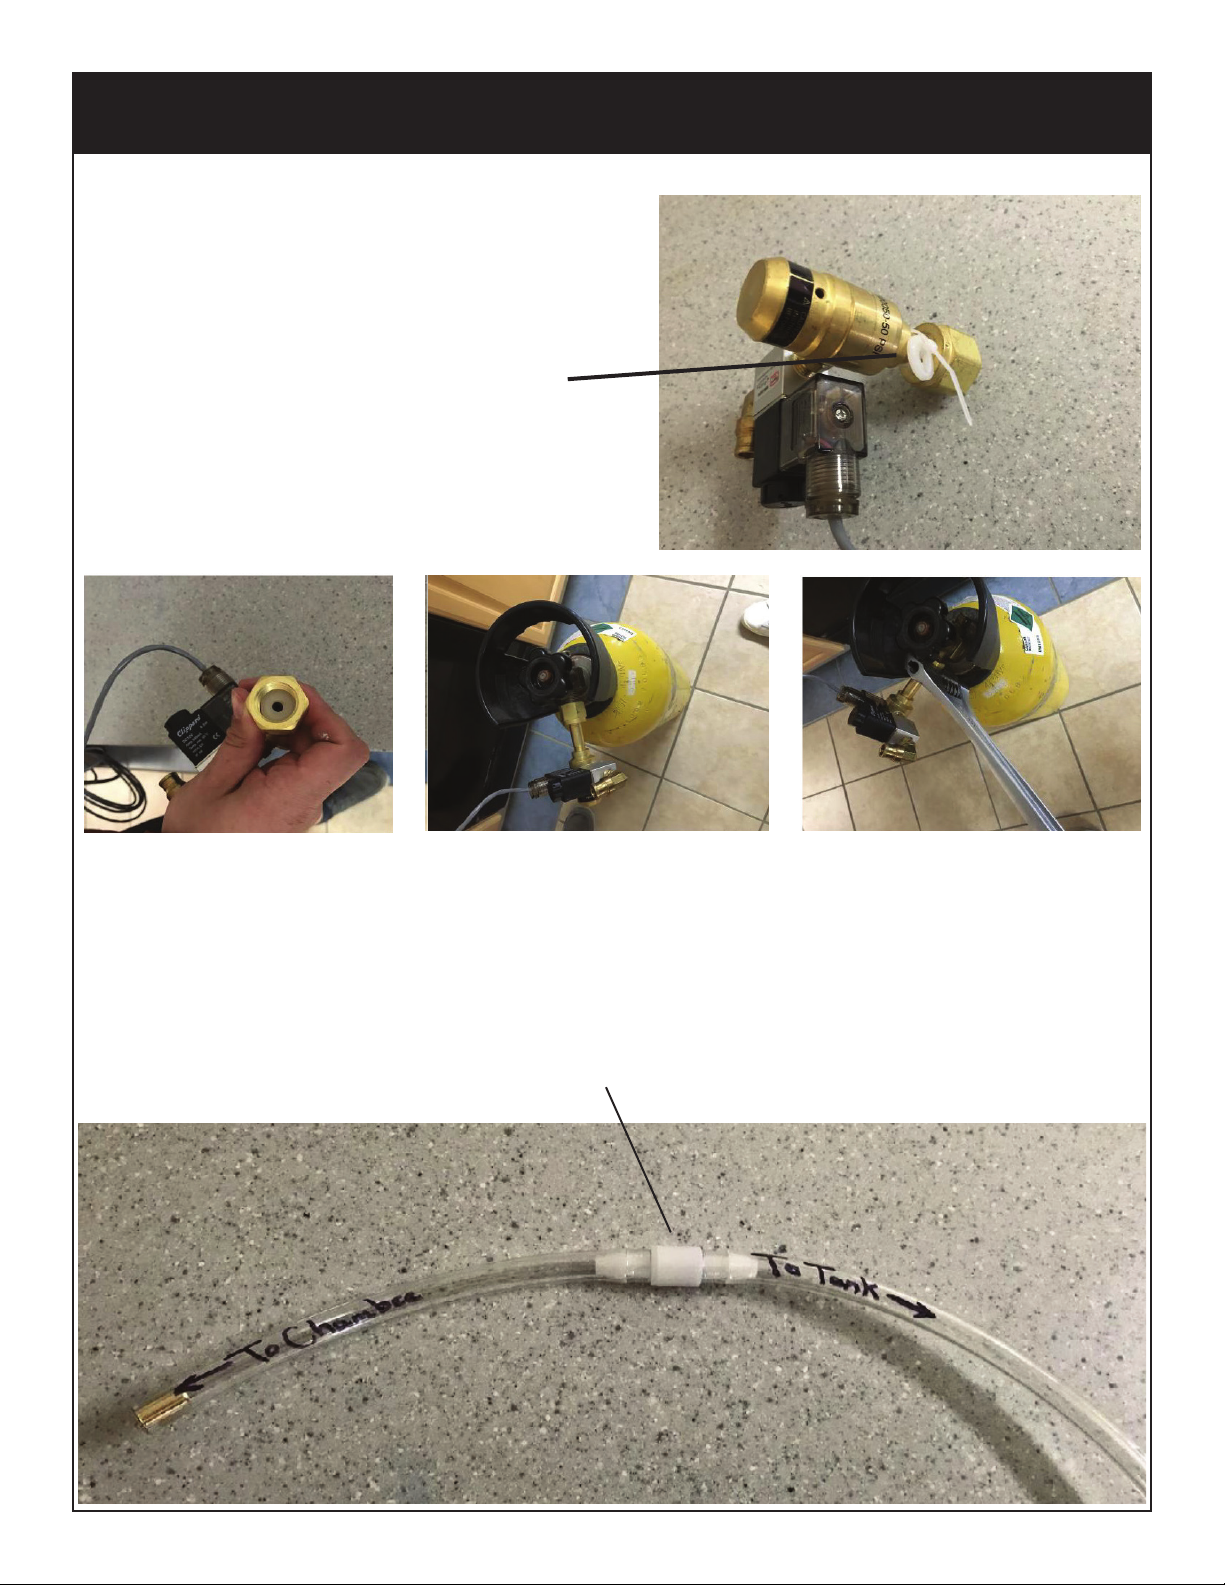
Connecting The CO2 Tank To The System
Step 5: Connect the CO regulator to the tank. Please
ensure that the tank valve is closed during this
process. There is a small nylon washer attached to
the regulator which should be used to perform this
task.
DO NOT LOSE THE NYLON WASHER
Place the washer into the threaded section of the
regulator, and thread the regulator on to the tank as
far as possible by hand.
Use a wrench to nish securing the regulator if necessary. If you feel that you need excessive force to
tighten the regulator, unscrew it and start again. The solenoid has an indicator light and the CO2 ACC key-
pad has an “ON”setting to check for leaks. (Dishwasher soap at every connection.)
Step 6: Find CO connection tubing. Locate the white plastic valve near one end of the tubing. We have
hand-written near that valve which side to connect to the chamber that you installed, and which side to
connect to the regulator assembly.
INLINE CHECK VALVE #2 (White)
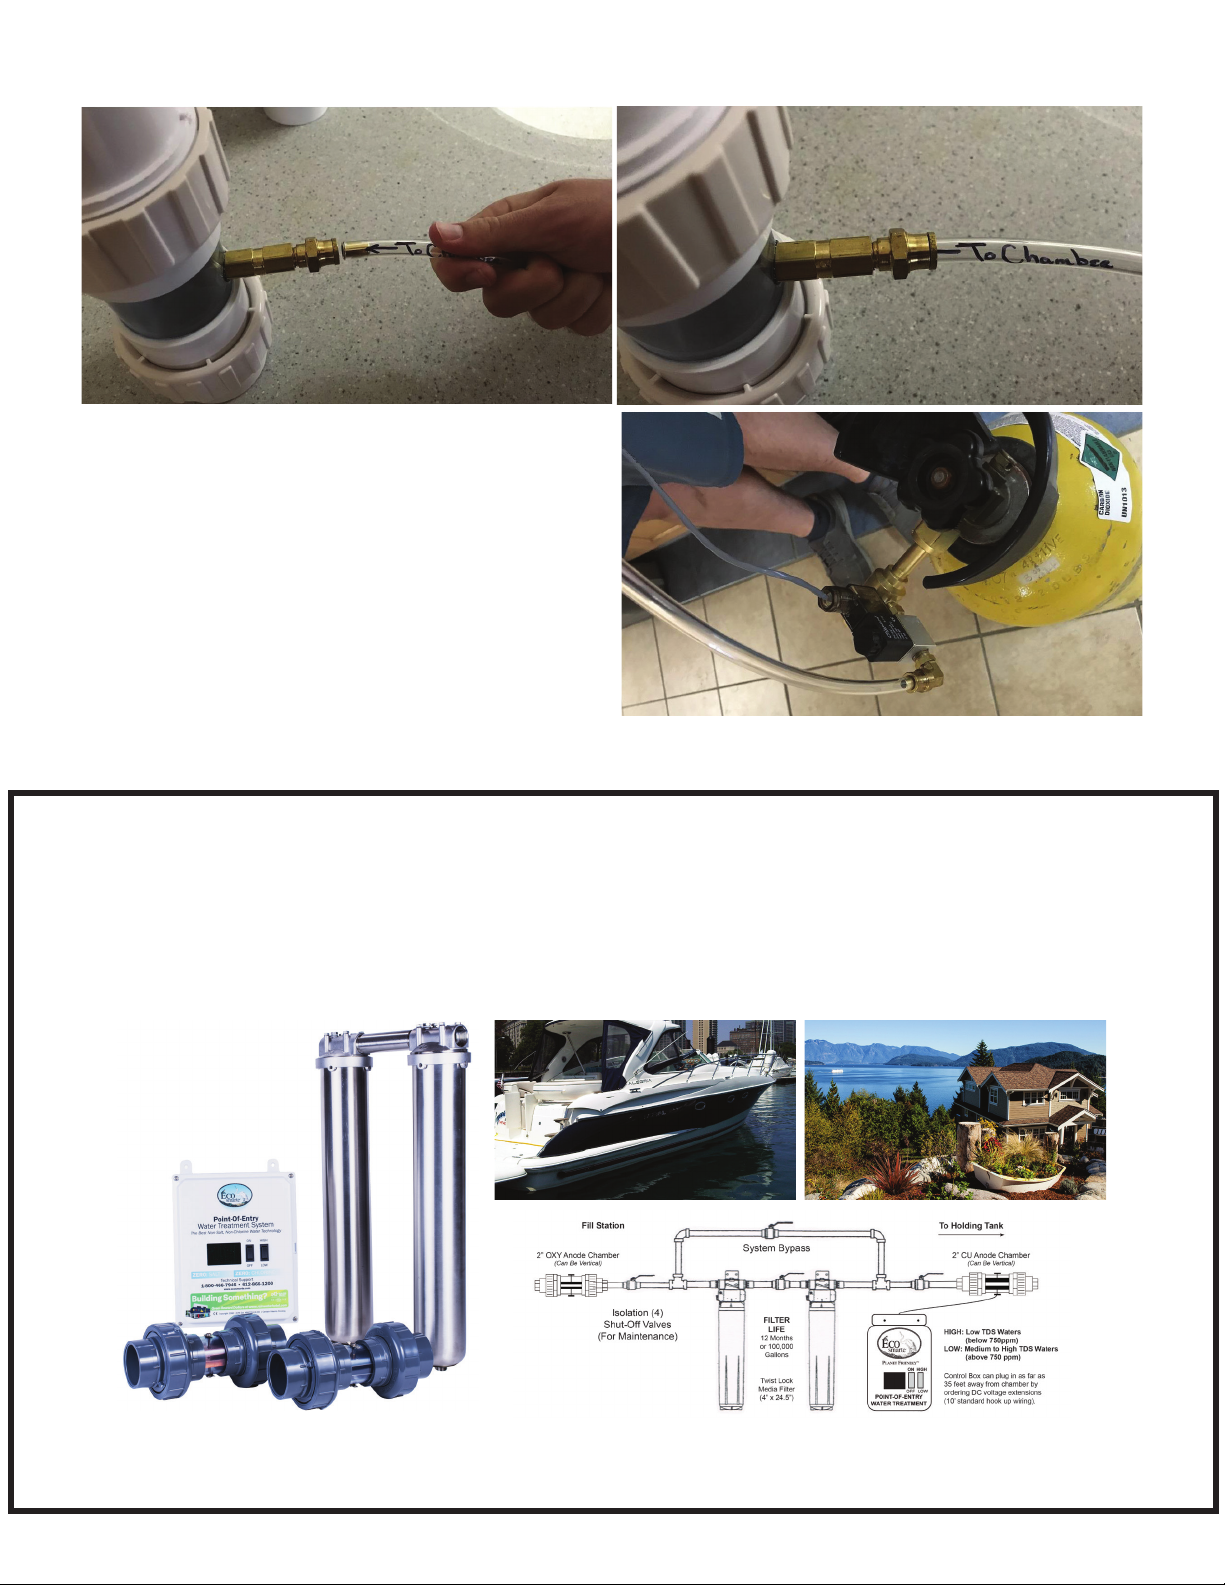
ECOsmarte Planet Friendly® | 612-866-1200 | ECOsmarte.com | Bloomington, MN 7
Push the proper end of the tubing into the chamber as far as it can go. The brass insert should not be visible.
Connect the other end of the tubing to the elbow
that is attached to the regulator assembly. Push
the tubing in as far as it can go.
The brass insert should NOT be visible.
The Programmable System is now fully installed,
and you can begin balancing the water levels and
setting the Control Box as shown in your owner’s
manuals. Inground pools over 10,000 gallons can
consider a switchover manifold.
Video avaiable available on ECOsmarte Cloud’s
YouTube chanel or on ecosmartecloud.com.
NEW Dual Stainless Steel
Zero Backwash Water Filtration System
Made for your Yacht, Diesel Pusher, or Lake Home
Ideal for Well Water Fills With Spas
Gets rid of rust and odors.
Interested? Give Us a Call: 612-866-1200

ECOsmarte Planet Friendly® | 612-866-1200 | ECOsmarte.com | Bloomington, MN
8
Programmable Swim Spa or Endless Pool
At start-Up Lower pH with Liquid Acid to 6.8 at fresh ll (1-2 cups) muriatic acid
Before programming SET UP TIME and DATE ON THE CONTROLLER.
Set the clock by pressing the“CLOCK” twice. Set the day of the week and date by using the “ “ buttons
to set the day and times and“NEXT” button to move to the next setting.
Conrm lter cycle is running on your pool or spa pump and set your fresh ll ionize. The “MAN”button on
the control box puts copper out constantly. ION time equals POOl run time.
Take your rst copper test after your Fresh Fill Ionize hours and if greater than, 0.4ppm PUSH your OXIDIZE
Button. DO NOT IONIZE MORE THAN 12 HOURS WITHOUT A TEST.
12 Hours
16 Hours
Weekly
Ionize
Daily
CO2
Daily
Oxygen
Fresh Fill
Ionize
Size
(Gallons)
1500 to 1800 Gallons
2500 to 3500 Gallons
10 Minutes
16 Minutes
12 Minutes
16 Minutes
6-8 Hours
6-8 Hours
WEEKLY IONIZE:
2:22:20P 1/01/2020
Pool 10:00A- 4:00P-
Oxy 10:00A- 4:00P-
Ion 10:00A- 10:10A-
From Next Week
WEEKLY IONIZE:
2:22:20P 1/01/2020
Pool 10:00A- 4:00P-
Oxy 10:00A- 4:00P-
Ion 10:00A- 10:16A-
From Next Week
DAILY CO2
Use Keys To Set
Run Time (MM:SS)
CO2 12:00
Press NEXT When Done
From ACC
DAILY CO2
Use Keys To Set
Run Time (MM:SS)
CO2 16:00
Press NEXT When Done
From ACC
1500 to 1800 Gallons
2500 to 3500 Gallons
Setup your ION mode.
The NEXT WEEK feature allows you to set a DAY and a TIME period for Copper Ionization to occur. The
ionization will occur once per week on the day and the time selected with this feature. It is NOT
recommended that future ION settings be programmed without an operating history. The actual ION
time needed is often less than one full OXY cycle with the exception of 10,000-gallon or more inground
pools in high heat climates.
Special Note:
If you select manual or ION, which will turn ION on for the POOL run time, or OXY run time, the setting for
NEXT WEEK will need to be reset. In addition, no OXY or ION will actually occur outside the time
parameters entered for the pool. ION will runtime frame selected everyday, manual matches the pool time
programming
Full Details
in the
Programming
Booklet
ECOsmarte Planet Friendly® | 612-866-1200 | ECOsmarte.com | Bloomington, MN 9
Warning: Never set OXY or ION to start and stop during times when your pool pump is not running.
Setting Multiple Days of Ionization
Manual Function
The Manual feature is used to set the Ionization time to be equal to the POOL run time. This feature is
usually used at start-up when you ll your pool or need to make a gross adjustment in the copper level in
your water.
To activate this, simply push the “MAN” key once. This will set your ION time to be equal with your POOL
run time, and your OXY time will read NONE. Your pool will now Ionize when your pump is running.
If you need to manually Ionize longer, simply go into your POOL setup, and change the start and stop
times of your pump. Then return to the“Home Screen”and press the“MAN” key to change the ION start
and stop times.
Your screen will now look as shown:
Actual ION hours required to get your rst residual will be a function of total gallons, TDS (total dissolved
solids), and pH below 7.2 of your pool. A water test seeking 0.5ppm copper should be taken before 10
hours of POOL and ION running time have passed. The pH will rise during initial ionization, therefore,
daily adjustments may be necessary at rst on inground pools between 3,500 and 50,000 gallons.
The manual override key “MAN” is the most convenient method to put copper constantly into your pool.
Select the “OXY” key to switch the unit back to oxygen equal to your programmed POOL run time.
Refer to Programming Manual for more keypad operation details.
2:22:20P 1/01/2020
Pool 10:00A- 4:00P+
Oxy None
Ion 11:00A- 11:16A-
AUTOMATION
Your water will become predictable after three weeks and the ION and CO2 values can auto repeat for
weeks after dialing them in with water tests. Set “ION”to come on the day before you or your service tests
the copper each week.
Use Keys To Set
Day Run Start Stop
SU OFE 10:00A- 4:00P-
Press NEXT When Done

ECOsmarte Planet Friendly® | 612-866-1200 | ECOsmarte.com | Bloomington, MN
10
ELECTRODE and CO CLEANING PROCEDURE (Twice Yearly)
WHEN CLEANING DO NOT DISASSEMBLE OR USE ANY ABRASIVE ITEMS ON ELECTRODE OR CO2 CHAMBERS.
1. Mix solution 5-parts water to 1-part acid in a bucket. When adding acid to water be careful not to
spill or be downwind when pouring.
2. Disconnect terminal clips. The Red & Green wires attach to the copper chamber, the Black & White
to the titanium chamber. If uneven electrode wear is noted on copper electrodes you must reverse the
position of the Green & Red terminal clips after cleaning. Disconnect the CO assembly from the CO
chamber, do not disconnect the injector or check valve from the chamber.
3. Place the entire Titanium, Copper, and CO Chambers in the bucket for 10 to 15 minutes. The
build-up will slowly dissolve. DO NOT scrape the surface of the electrodes. If you will be cleaning
yourself, consider cleaning caps to cut acid use and speed process. Cleaning caps from your dealer will
cut acid use and simplify this procedure.
4. Remove chambers from the bucket and rinse with garden-hose pressure. Make sure to rinse your
hand as well.
5. Wipe terminal clips dry and reconnect leads after reinstalling Electrode and CO Chambers in the
pressure line. Remember: Red & Green connect to the copper side, Black & White to the titanium.
ECOsmarte Copper Electrodes are not protected under the ve-year warranty. The life of copper
electrodes depends on multiple factors. Worldwide the life of copper electrodes averages three years.
You can extend the life of the electrodes by following the directions in the Owner’s Manual. Remember
to shut o the Electronic Box when water is not circulating through the Electrode Chamber. The Copper
Electrodes will continue to ionize if the electrodes are in solid contact with the bolts. If the electrodes
corrode free of the bolts, then it is time to replace them. Do not replace your titanium bolts with stainless
or brass substitutes. You will receive new bolts when you purchase electrodes from your dealer.
Suggested Scheduled Spa or Small Pool
Maintenance with ECOsmarte System
EVERY THREE TO SIX MONTHS:
Exchange the lter for the spare one. Spray it o
and then place the dirty lter in a solution of
4oz. Trisodium Phosphate (TSP), and a 2-1 mix of
2 parts water and 1 part muriatic acid mix for at
least 12 hours. Remove and THOROUGHLY
rinse the lter. Let is dry so that the bers have a
chance to normalize. You may wish to purchase a
Rubbermaid container for your lter
maintenance. Six months of running life on your
cartridge is the best you can expect. Own TWO
sets, change annually. Discard bromine
cartridges.
ONCE A YEAR:
Soak your Electrode Chamber with the lter
(Spa must be drained).
Every Fill:
In areas with hard water soak your Electrode
Chamber EVERY FILL. (Includes CO) 3-6 Months
Backwash: Timing & Method for
Endless Pools or Swim Spas with a Sand Filter
Backwash your GlassPack Media at either
a 6-10lb lter pressure rise or every 6 to 8 weeks.
Whichever is rst.
1. Turn pump o.
2. Set lter to backwash.
3. Turn pump on.
4. Backwash for 2 1/2 minutes.
5. Turn pump o.
6. Set lter to rinse.
7. Turn pump on.
8. Rinse to Clear Sight Glass (30 seconds)
9. REPEAT the above 8 steps to provide your lters
with an adequate backwash method.
A 5-minute backwash will leave algae spore
in the center of the lter.
Backwashing the media twice is required
to purge the algae.

ECOsmarte Planet Friendly® | 612-866-1200 | ECOsmarte.com | Bloomington, MN 11
5 - Wire Stripper/ Crimper/ Cutter
6 - Pipe Cutter
7 - Glue and Primer
8 - Drill
MATERIALS REQUIRED FOR SPAS
1 - Two (2) 1½”x ¾” Slip by Thread Reducer Brushing
2 - Two (2) ¾”x ¾” Barb by Male Thread Fittings
3 - Two (2) ½”x ¾” Barb by Male Thread Fittings
4 - Four (4) Hose Clamps 1”
5 - One (1) ¾” Clear Flexible Hose
6 - Six (6) Zip Ties
7 - Three (3) Female Wire Connectors
COMPATIBLE PRODUCTS
- Algaecide 40, 60
- Non-Chlorine Shock - Potassium-Based Only
(GLB OxyBrite is the best)
- Calcium Chloride or Hardness Increaser
- Sea Klear: requires backwash at 48 hrs.
Complete List Located on:
www.ecosmartecloud.com
1 - Phillips Screwdriver
2 - Flathead Screwdriver
3 - ½” Drill Bit
4 - ½”Tap
ABSOLUTELY INCOMPATIBLE
PRODUCTS
- Any Algaecide w/metal
- Any SOLID CHLORINE
- Any metal remover
- Scale Control or Clarier
- Sodium-Based Non-Chlorine Shock
- Enzymes
- Alkalinity Up/ Powdered pH Down or Up
TOOLS REQUIRED FOR POOLS OR SPAS
ADDITIONAL PARTS CO2 CONTROL
1 - Two (2) 2”x 3/4” Slip by Thread Reducer Bushing (CO2)
2 - One (1) 3/4” Clear Flexible Hose
3 - One (1) 20lb Cylinder for Outside of Cabinet, Changes Once a Year
OR
Two (2) 5lb Cylinder for Inside Cabinet, Changes Quarterly with New Waterll
1 2 3
31 2
4
8
7
7
6
6
5
5
1
2
3
4
Selecting A Tap For Side Stream (On Ozone Line)
Pressure side of the lter pump one, ideally between shut o valves. Take care to allow heater union
release. Ideally, select the tap after the pump AND after the heater.

ECOsmarte Planet Friendly® | 612-866-1200 | ECOsmarte.com | Bloomington, MN
12
ECOsmarte Spa and Pool Start-Up Sheet
Mechanical Principals
1 - The ECOsmarte will use the “IONIZE”mode on the day the water rst lled and heated only.
2 - The ECOsmarte Controll Box will circle lights when water is owing due tolter cycle OR when the spa
is heating.
3 - The ECOsmarte Control Box is in the“HIGH” and “OXIDIZE” mode 95% of the time after the initial
0.4ppm to 0.7ppm copper level is achieved. Your controller settings“AUTO REPEAT”
4 - At Start-Up the spa will not “IONIZE” (generating copper ppm in the water) if the pH is above 7.3
Start-Up and Operating Principals
1 - Remove lters and ll spa through the lter area
2 - Turn on the disconnect, the spa will start to heat
3 - Check pH and adjust to 6.8 using liquid acid (Use Cups for Spas and Use Gallons for Inground Pools)
4 - Then switch ECOsmarte Box to“IONIZE” for 8 or 16 hours based on gallons. (See page 8 for more info)
5 - After 8 hours check the copper level (must be 0.5ppm - 0.6ppm). Check after 36 hours for an inground
pool with more than 8000 gallons.
NOTE: For an accurate copper reading the pH level must be 6.8 - 7.2. Therefore you should check the
pH three times the rst week, twice the second week, and once a week every week thereafter until your
program “ AUTO REPEATS”
6 - Switch ECOsmarte Box to“OXIDIZE” when copper is above 0.4ppm.
DO NOT EXCEED EIGHT HOURS PER DAY ON SPA OXIDIZE OR SIXTEEN HOURS PER DAY ON POOL
7 - Close cover and allow spa or pool to heat to the desired temperature. ECOsmarte works best over 70°F.
Coming Soon:
ECOsmarte’s WiFi Control Box will allow you to connect to your
smart-phone and display the real-time pH level and adjust
settings remotely.
There is currently a waiting list for 2021.
Go To Our
Interactive Website or
Download Our Free App
www.ecosmartecloud.com
24/7 FREE Interactive Help
Let us know if you are interested
about our soon to be WiFi option.
ECOsmarte WiFi Control Box | Coming in 2021-22
WELCOME TO THE ECOSMARTE CLOUD
The ECOsmarte Cloud is designated for users to monitor the status of their swimming pools and other
devices while on the go. The cloud will help in viewing and regulating pH and copper levels and keep
customers regularly updated. Please Log In using the menu bar at the top of the screen and create a
profile fo ryour pool and begin to track and enter data.
WELCOME TO THE ECOSMARTE CLOUD
The ECOsmarte Cloud is designated for users to monitor the status of their swimming
pools and other devices while on the go. The cloud will help in viewing and regulating pH
and copper levels and keep customers regularly updated. Please Log In using the menu
bar at the top of the screen and create a profile fo ryour pool and begin to track and enter
data.
Pool
CO2 Manual
Copper
Ion
Oxy
Tempurature: 19 C/66 F
12:02am
Monday 9/1/2013
Trouble Shooting
Contact Us
Tutorials
Tempurature: 19 C/66 F
Settings
ENTER
8:00am - 9:00pm
8:00am - 9:00am
Monday
8:00am - 9:00pm
on
off
pH: 7.0
on
off
on
off
WiFi
www.ecosmartecloud.com
1-800-IONSWIM
612-866-1200
Power pH CalciumChamber
New Touchscreen Control Box*
Remote monitor your pool or spa from
a phone, tablet, or computer.
Make CO2 pH adjustments as needed.
*Only applicable to Programmable Users
BETA Sites limited to the Continental U.S.
Email or cell phone alerts, CO2 tank empty alerts, Factory monitoring in 2015
Sensors send the information, you adjust the times.

ECOsmarte Planet Friendly® | 612-866-1200 | ECOsmarte.com | Bloomington, MN 13
This manual suits for next models
3
Table of contents
Popular Hot Tub manuals by other brands


Thermasol
Thermasol SS-84 installation instructions

Strong Spas
Strong Spas Acrylic Spa owner's manual

ViSAGE
ViSAGE FM-588D user manual

American Standard
American Standard 3051.110.AXX Specification sheet

Bestway
Bestway 54113 Monaco owner's manual

Dimension One Spas
Dimension One Spas 01510-1030 Installation & owners guide

Image Fitness
Image Fitness Renew 615 Spa user manual

Vita Spa
Vita Spa L100 SERIES owner's manual

treesse
treesse Fusion Spa Series installation manual

Dimension One Spas
Dimension One Spas 01510-1030E Rev A Owner's installation guide

American Standard
American Standard CADET ELITE CORNER 2775E SERIES installation instructions

Jacuzzi
Jacuzzi Aura installation manual