Vita Spa L100 SERIES User manual

h e a l t h a n d r e l a x a t i o n f o r l i f e
L100 SERIES
OWNER’S MANUAL
IMPORTANT SAFETY INSTRUCTIONS
VITA INTERNATIONAL
2320 N.W. 147th Street Miami, Florida 33054

PAGE 2
h e a l t h a n d r e l a x a t i o n f o r l i f e
L100 SERIES
OWNER’S MANUAL
IMPORTANT SAFETY INSTRUCTIONS
VITA INTERNATIONAL
2320 N.W. 147th Street Miami, Florida 33054

L100 SERIES
OWNER’S MANUAL
VITA INTERNATIONAL
2320 N.W. 147th Street Miami, Florida 33054
OWNER’S RECORD
DATE PURCHASED: _____________________________________
DATE INSTALLED: _______________________________________
DEALER: _______________________________________________
ADDRESS: _____________________________________________
_______________________________________________________
TELEPHONE: ___________________________________________
SERIAL #: ______________________________________________
MODEL #: _____________________________________________
To contact our Technical Service Department, please write to Vita International, 2320
NW 147th Street, Miami, FL 33054 or call 1-305-685-2063, during normal business
hours, Monday through Friday, 8:30 am to 5pm, EST.
The Serial Number is located along the base of the spa. Please verify that the serial
number is noted on your dealer’s purchase contract.
❋
❋
GENERAL INFORMATION
•Owner's Record and Service Information
frontpiece
•Important Safety Instructions........... 2-3
•Manufacturer's Do's and Don'ts ................................ 3
• WARNINGS ................................................................................. 4
SET UP AND INSTALLATION
•Site Selection/LOCAL CODES................. 5
•Clearances...................................................... 6
•Electrical Requirements
and Installation........................................7-11
•Cover Installation....................................... 12
OPERATION INSTRUCTIONS
• Initial Startup.............................................. 13
A. Setting Temperature.............................. 13
B. Auto Heat And Economy Mode....... 13
C. Setting Current Time............................. 14
D. Setting Filtration Cycles........................ 14
• Using Your Spa .........................................14
A. Displaying Time or Temperature .... 14
B. Water Jet Therapy ..................................... 14
C. Turning on the Light ............................ 15
• Special Features ...................................... 15
A. Automatic Jets Purge on 2 Pump
Systems ........................................................... 15
B. Memory .................................................... 15
C. System Reset ......................................... 15
D. Panel Lock .............................................. 15
E. Freeze Protection .................................. 15
F. Flow Protection ...................................... 16
G. Overheat Protection ............................ 16
H. Ozone Generator Monitor ................ 16
• Add Start Up Chemicals..........................16
• Jet Operation ............................................ 17
A. Three Way PowerDiverter Valve .......... 17
B. Turbo Massage Jet ............................... 17
C. Directional and Rotational Massage Jets 18
D. Directional Mini Massage Jet ............18
E. Air Control ............................................... 19
F. Cluster ....................................................... 19
SPA MAINTENANCE
Filter Maintenance ..................................... 20
Draining Your Spa ...................................... 20
Winterizing Your Spa ................................. 21
Natural Redwood........................................ 21
Cover Maintenance.................................... 21
Care of Acrylic Surface and Spa Pillows . 21
Spa Light Colors &Lenses ...................... 22
Spa Light Bulb Replacement ................. 22
Diverter Valve Cleaning ........................... 22
WATER QUALITY & MAINTENANCE
•Sanitizing ..................................................... 23
•pH Control ................................................. 23
•Important Maintenance Procedures . 24
•Balancing Spa Water ....................... 25-27
•Water Maintenance Do’s and Don'ts 28
•Water Troubleshooting .................... 29-30
DIAGNOSTICS & TROUBLESHOOTING
•Diagnostic Messages .............................. 31
•LCDDisplay ................................................ 32
TABLE OF CONTENTS

PAGE 1
Congratulations!
Thank you for the purchase of your new VITA SPA. You are now the proud owner of one
of the most comfortable and therapeutic spas in the world.
This Owner’s Manual has been designed to familiarize you with your Vita Spa
operations and general maintenance. We suggest that you take some time to carefully
review it. Please keep this manual available for reference.
If you have any questions regarding your Vita Spa set-up, operations, or maintenance,
please contact your Authorized Vita Spa Dealer.
Consumer satisfaction is important to us. We welcome your comments and suggestions.
Sincerely,
Eric Dormoy,
President
DM Industries, Ltd.

PAGE 2
WARNING – To reduce the risk of injury,
do not permit children to use this product
unless they are closely supervised at all
times.
DANGER –RISK OFACCIDENTAL DROWNING.
Extreme caution must be exercised to
prevent unauthorized access by children.
To avoid accidents, ensure that children
can not use the spa unless they are
supervised at all times.
A ground terminal (pressure wire con-
nector) is provided on the control box
inside the unit to permit connection of a
minimum No. 8 AWG (8.4 mm2) solid
copper bonding conductor between this
point and any metal equipment, metal
water pipe, metal enclosures of electrical
equipment, or conduit within five feet
(1.5m) of the unit.
DANGER – To reduce the risk of injury to
persons, DO NOT remove suction fittings.
The suction fittings on this spa are sized
to match the specific water flow created
by the pump. Should the need arise to
replace the suction fittings or the pump,
be sure that the flow rates are compati-
ble. Never operate the spa if the suction
fittings are broken or missing. Never
replace a suction fitting with one rated
less than the flow rate marked on the
original suction fitting.
Install the spa – so proper drainage is
provided for the compartment containing
electrical components.
DANGER – RISK OF ELECTRICAL SHOCK –
Install at least 5 feet (1.5 m) from all
metal surfaces. (A spa may be installed
within 5 feet of a metal surface if each
metal surface is permanently connected
by a minimum No. 8 AWG (8.42 mm2)
solid copper conductor attached to the
wire connector on the terminal box that is
provided for this purpose). National
Electrical Code ANSI/NMFP A70-1993.
DANGER – RISK OF ELECTRICAL SHOCK-
Do not permit any electrical appliances,
such as a light, telephone, radio, or televi-
sion within 5 feet (1.5 m) of the spa.
WARNING – TO REDUCE THE RISK
OF INJURY:
A. The water in a spa should never exceed
40 degrees Celsius (104 degrees F).Water
temperatures between 38 degrees C
(100 F) and 40 degrees C (104 F) are
considered safe for a healthy adult. Lower
water temperatures are recommended for
extended use (exceeding 10 minutes)
and for young children.
B. Since excessive water temperatures
IMPORTANT SAFETY INSTRUCTIONS
WHEN INSTALLING AND USING THIS ELECTRICAL EQUIPMENT, BASIC SAFETY
PRECAUTIONS SHOULD ALWAYS BE FOLLOWED, INCLUDING THE FOLLOWING:
SAVE THESE INSTRUCTIONS

PAGE 3
have a high potential for causing fetal
damage during the early months of
pregnancy, pregnant or possibly preg-
nant women should limit spa temper-
ature to 38 degrees C (100 F).
C. Before entering a spa, the user should
measure the water temperature with
an accurate thermometer, since the
tolerances of water temperature regu-
lating devices vary.
D. The use of alcohol, drugs, or med-
ication, before or during spa use,
may lead to unconsciousness with
the possibility of drowning.
E. Persons suffering from obesity or with
a medical history of heart disease, low
or high blood pressure, circulation sys-
tem problems, or diabetes, should
consult a physician before using a spa.
F. Persons using medication should con-
sult a physician before using a spa
since some medication may induce
drowsiness, while other medication
may affect heart rate, blood pressure
and circulation.
DO AND DON’TS
DO Make sure the spa is connected to a Ground Fault Circuit Interrupter (GFCI) pro-
tected circuit. This GFCI is required by the National Electrical Code (NEC). and
must be installed by licensed electrician. Test the GFCI monthly.
DO Test the water with your hand before entering the spa to be sure it is comfortable.
DO Remember that wet surfaces can be slippery. Take care when entering and exit-
ing the spa. Only enter by way of the steps in the spa. Do not step on spa edges
or filter lids.
DO Use the thermal cover when the spa is not in use, empty or full.
DO Take steps to prevent the intrusion of sand and dirt into the spa.
DO Maintain proper water chemistry.
DO Clean the filter cartridge weekly.
DON’T Use the spa for long periods of time at temperatures over 104ºF.
DON’T Operate the spa without water. Turn the circuit breaker off before emptying the
spa and while it is empty.
DON’T Store chemicals in the spa’s equipment compartment.
DON’T Open the electrical box. There are no user serviceable parts inside.
DON’T Operate the pump(s) on hi-speed for extended periods of time with the cover on.
Extended hi-speed pump operation will cause a slow heat build-up due to water
friction, which could trip the spa’s hi-limit thermostat.
PAGE 4
WARNINGS
Prolonged immersion in water that is warmer than normal body temperature can result in a
dangerous condition known as HYPERTHERMIA. The causes, symptoms, and effects of
hyperthermia may be described as follows: Hyperthermia occurs when the internal temper-
ature of the body reaches a level several degrees above the normal body temperature of
98.6 degrees F. The symptoms of hyperthermia include dizziness, fainting, drowsiness, lethar-
gy, and an increase in the internal temperature of the body. The effects of hyperthermia
include (1) unawareness of impending hazard, (2) failure to perceive heat, (3) failure to rec-
ognize the need to exit the spa, (4) physical inability to exit the spa, (5) fetal damage in preg-
nant women, and (6) unconsciousness resulting in a danger of drowning.
WARNING – The use of alcohol, drugs, or medication can greatly increase the risk of fatal
hyperthermia in spas. Persons taking medications that induce drowsiness such as tranquiliz-
ers, antihistamines or anticoagulants should not use the spa. Pregnant women and persons
with a medical history of heart disease, circulatory problems, diabetes or high blood pressure
should consult their physician before using the spa.
Children are especially sensitive to hot water. At no time should children have unsupervised
access to the spa. The use of elevated decking may encourage children to climb onto the
thermal cover – IT IS NOT DESIGNED AS A SAFETY OR CHILD RESISTANT COVER!
Every Vita Spa comes with a thermal cover which is provided with locking straps. Install the
locks for your child’s safety.

PAGE 5
INSTALLATION INSTRUCTIONS
SITESELECTION /PREPARATION:
The spa must be installed on a structural-
ly strong, solid and reasonably level sur-
face. The majority of the weight of the
spa is placed under the footwell area of
the spa. This area must be firmly sup-
ported at all times. The site should allow
for drainage away from the equipment
compartment in which the electrical com-
ponents are housed. Take into account
the following when considering prospec-
tive sites.
Vita Spas have a loading capacity in the
range of 57lbs/sq ft to 83 lbs/sq ft.
Refer to your actual model for exact
loading requirements.
LOCAL CODES:
There may be certain restrictions and/
or requirements that are particular to
your locality.
DELIVERY PASSAGEWAY:
Doors, halls, stairs, etc. may pose obstruc-
tions to deliver the spa to its intended
site.
MAINTENANCE:
Trees, lawn, placement surfaces, etc. can
create extra work in keeping your spa area
clean and safe. Please be advised that
placing your spa on dirt or grass may
increase the amount of debris inadvertent-
ly brought into the spa water on the feet of
users or by the wind. The intrusion of this
debris into the spa water may cause harm
to your equipment as well as the spa sur-
face and is not covered under warranty.
PRIVACY AND
WIND SHIELDING:
A sheltered environment can result in
lower operating and maintenance costs.
You may also want to take into considera-
tion your privacy during times of the year
when trees may be barren, having the spa
located where you have a view of a peace-
ful sunset, where you may be able to catch
soothing breezes, or your view and the
view of your neighbors may also be some-
thing that you should address prior to the
final installation of your spa.

PAGE 6
Spa
Location
1
2
345
6
CLEARANCES
CHECK THE FOLLOWING AREAS PRIOR TO SPA DELIVERY
1. STEPS - We suggest no more than six without a landing.
2. TREE BRANCHES - Clearance for spa passage.
3. TIGHT CORNERS - Make sure there is space to maneuver.
4. STORAGE SHEDS, DOG HOUSES, WOOD PILES - Remove out of the way.
5. GATES: CLEARANCE FOR PASSAGE OF SPA - Does gate need to be removed
from hinges?
6. OVERHANGS AND GUTTERS - Anything overhead, as well as drain pipe
locations, must allow for spa passage.
PAGE 7
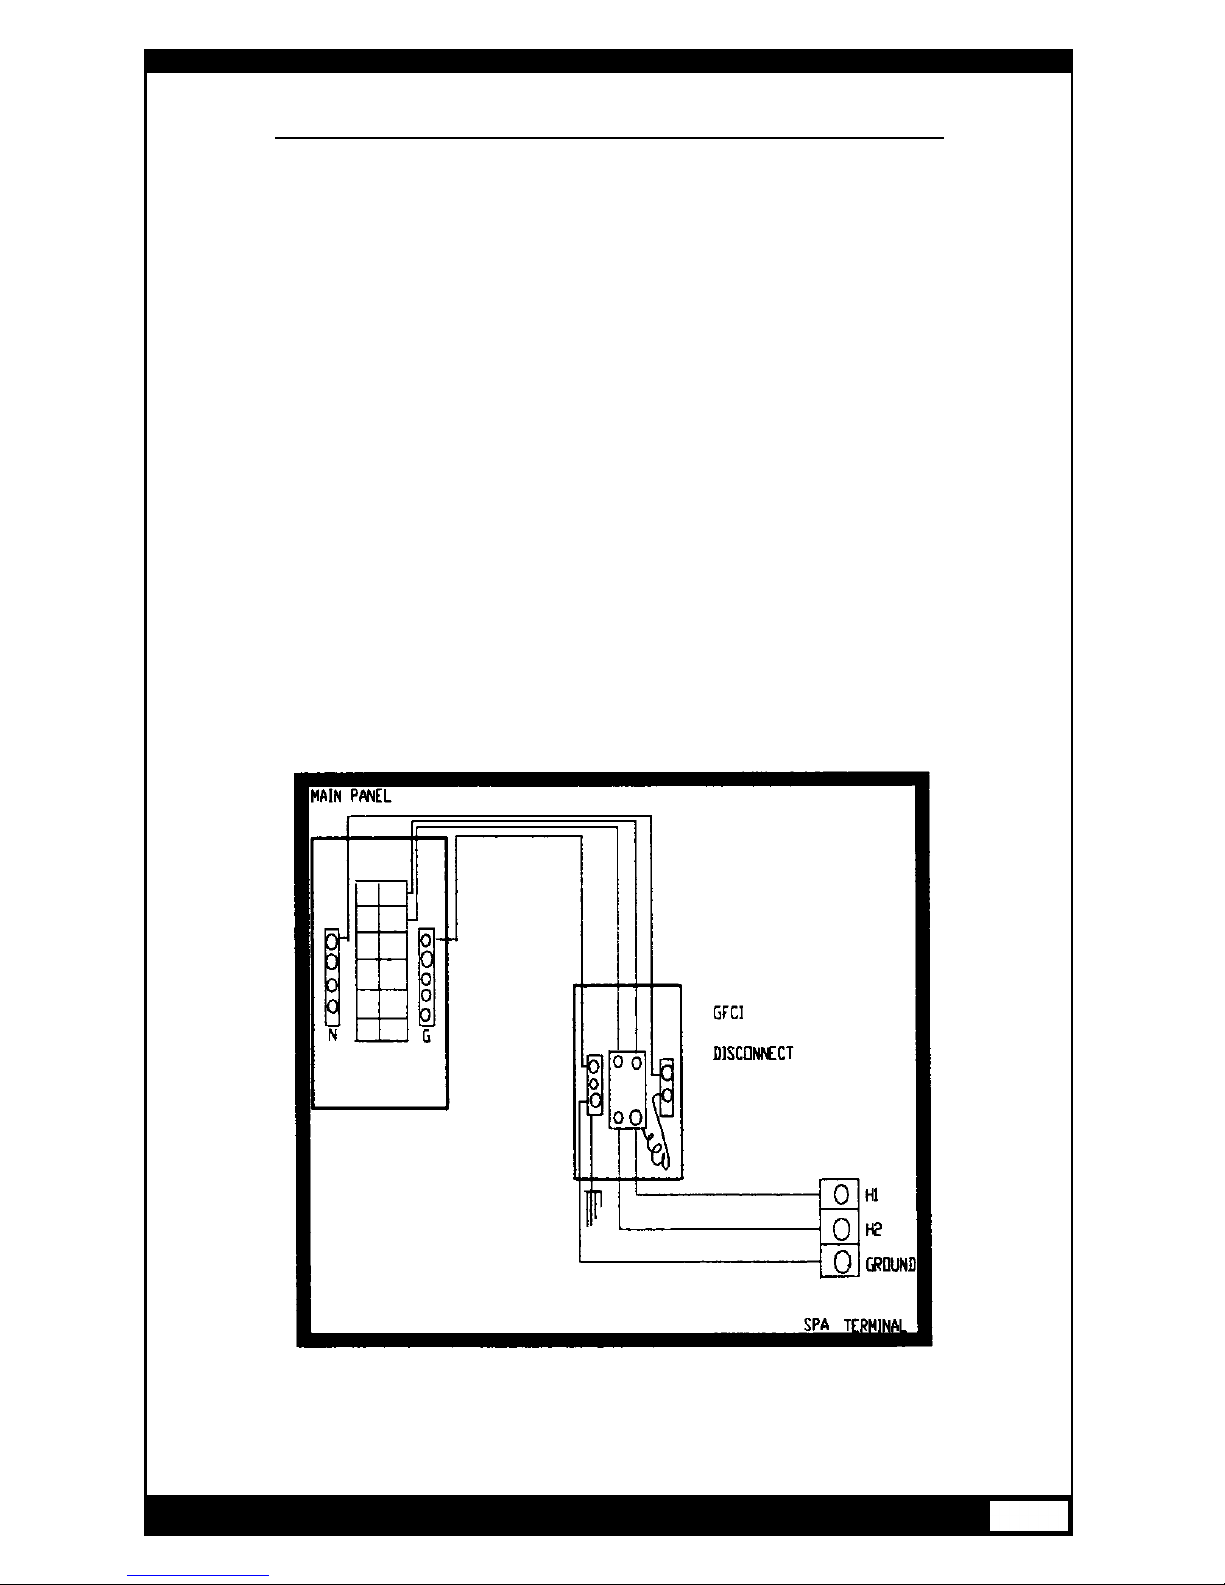
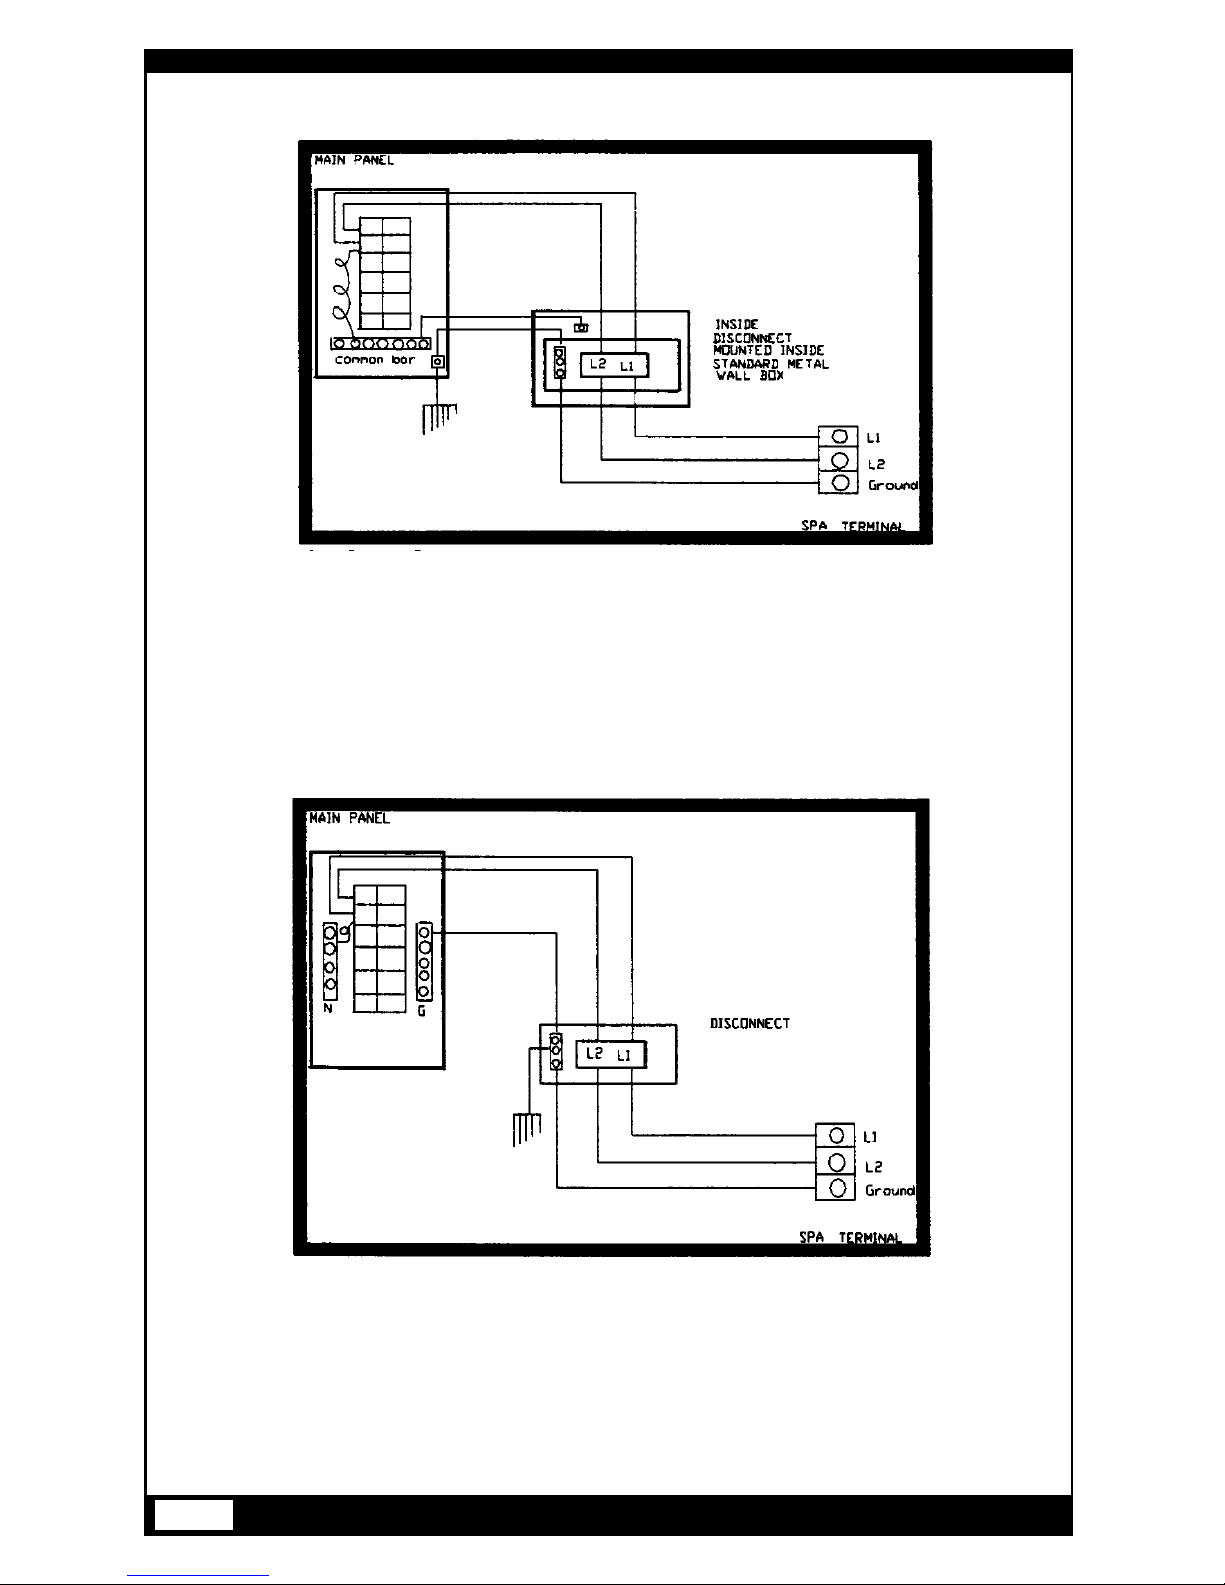
WIRE YOUR SPA PER ONE OF THE DIAGRAMS MOST SIMILAR TO YOUR HOUSE PANEL
ALL WIRES FEEDING THE SPA ARE TO BE THE SAME GAUGE. GROUND WIRES ARE TO
BE INSULATED AS WELL. WHEN USING A GROUND ROD, THE GROUND WIRE TO THE
ROD SHOULD BE #6 BARE COPPER.
ALL SPAS REQUIRE THE USE OF AN ISOLATED GFCI PROTECTED CIRCUIT. THE INSTAL-
LATION OF A DISCONNECT IS REQUIRED NO MORE THAN TEN (10) VISUAL FEET
FROM THE SPA AND NOT LESS THAN FIVE (5) FEET.
THIS REQUIREMENT IS TO ASSURE THAT WHEN POWER IS DISCONNECTED FROM THE
SPA, POWER CAN NOT BE INADVERTENTLY TURNED BACK ON.
ELECTRICAL REQUIREMENTS AND INSTALLATION
SEPARATE NEUTRAL & SOLID
GROUND

PAGE 8
COMMON NEUTRAL GROUND BAR
IN MAIN
SEPARATE NEUTRAL & WEAK
GROUND OR ROMEX WIRE USED TO
FEED GFCI WITH UNDERSIZED
GROUND WIRE

PAGE 9
GFCI IN PANEL WITH SEPARATE
NEUTRAL AND SOLID GROUND TO
PANEL
GFCI IN PANEL WITH COMMON
NEUTRAL BAR AND/OR ROMEX
WITH UNDERSIZED WIRE USED TO
FEED DISCONNECT.
PAGE 10
GFCI MOUNTED IN PANEL AND
DISCONNECT MOUNTED INSIDE TO
COMMON WALL WITH METAL
STUDS OR WITH METAL
MOUNTING BOX.
GFCI IN PANEL WITH WEAK GROUND
OR ROMEX WITH UNDERSIZED
GROUND WIRE USED TO FEED
DISCONNECT

PAGE 11
1. The spa must be permanently con-
nected (hardwired) to the power
supply. No extension cords or plug-
type connections are to be used in
conjunction with the operation of the
spa. Failure to supply power to the
spa that is not in accordance with
these instructions could create a
potential health hazard and will void
both the manufacturer’s warranty and
the independent testing agency list-
ing.
2. The National Electrical Code (NEC)
requires that the power supply to
this spa must be a dedicated,
ground fault circuit (GFCI) protected
circuit with no other appliances or
lights sharing power on this circuit.
3. Refer to the wiring diagram posted
inside the electrical equipment door
to determine the current, voltage, and
wire size requirements for your spa.
4. THHN type wire is recommended.
The wire size for the distance of the
wire run must conform to NEC and
local electrical codes.
5. To ensure proper connections use
copper conductors only.
DO NOT USE ALUMINUM WIRE.
6. The spas’ power terminal strip is
located within the electrical control
box.
7. Feed supply conductors through
power supply inlets provided on
the spa and install into the control
box. Modifications to the electrical
equipment box are not permitted.
Drilling holes in the electrical con-
trol box to provide access for wires
in areas other than those provided
for will void the manufacturer’s
warranty and the independent
testing agency listing.
8. Connect wires to terminal block (TBI)
color for color. All wires must be con-
nected or damage may result.
TIGHTEN SECURELY!
ALL WIRING TO THE SPA SHOULD BE IN ACCORDANCE WITH ALL LOCAL
AND NATIONAL ELECTRICAL CODES. ALL WIRING SHOULD BE PERFORMED
BY A LICENSED ELECTRICIAN KNOWLEDGEABLE IN THE OPERATION AND
WIRING OF A GFCI PROTECTED SYSTEM.
PAGE 12
INSTALLING THE SPA COVER
1. Position the cover squarely over the spa.
2. Position the locks for the tie-downs on the sides of the spa. You should allow approx-
imately 1/2” to 3/4” slack in the straps for ease of insertion into the locks and to allow
for material shrinkage during temperature changes.
3. Using the screws provided, attach the locks and insert the cover tie-down straps.
Utilizing the cover anytime the spa is not in use will reduce heat loss and thereby
reduce the amount of running time required to make up that loss by the heating sys-
tem.
Keep cover fastened down at all times when not in use.
DANGER - RISK OF I NJURY
To reduce the risk of potential injury:
1. Never leave a spa uncovered or unattended.
2. Never leave a spa cover unlocked.
3. Do not stand, sit, or lie on the cover.
ALWAYS REMOVE SNOW FROM THE COVER. THE COVER HAS NOT BEEN
DESIGNED TO SUSPEND THE WEIGHT OF WET SNOW.
COVER INSTALLATION
Key
Cover
Tie Down
Strap
Lock
Screws (2)
PAGE 13
NOTE: For best results, read each
step carefully and entirely before
proceeding to the next.
FILLING YOUR SPA
Wipe the interior of the spa with a damp,
soft cloth to remove any residue that
may be on the surface. Fill with a garden
hose by inserting the nozzle of the hose
in the filter inlet. (After filling is complete,
remember to put the filter cartridge in
place prior to starting the spa.) As the
spa is filling, check in the equipment
access area for any leaks. On occasion, it
may be necessary to hand tighten a
union fitting that may have come loose
during transit. Also check that the gate
valves are pulled out to the open position
and that the hose bib is closed. Continue
to fill to the water line.
NOTE: If your water is extremely hard, it
is preferable to fill the spa halfway with
hard water and the rest with softened
water. Never fill the spa entirely with soft-
ened water.
OPERATING INSTRUCTIONS
WATER LINE
INITIAL START UP
Your L100 Series spa has been factory
programmed for your convenience. Once
properly connected, the filtration pump
and heater will automatically come on
and heat the spa to 102 F.
Initial temperature, day, time and filtra-
tion cycles can be set and changed by
following the instructions shown below.
A. SETTING TEMPERATURE:
1. Press “PROG” to display water tem-
perature.
2. Press “UP” or “DOWN” arrows to
choose the desired temperature.
Notice the heater icon flashing.
3. Wait 30 seconds or press any function
buttons (“Jet” or “Light”) to exit the
programming mode.
B. AUTO HEAT AND ECONOMY
MODE
Your spa has been designed to operate
in two heater control modes: AUTO
HEAT (“AH”) and ECONOMY (“ECO”).
In the AUTO HEAT mode, the pump and
heater will turn on whenever the water
temperature falls 1 degree below the
chosen temperature . Your spa has been
preset to start upon activation in the
AUTO HEATmode. The spa water will
be automatically heated to the tempera-
ture you choose or to the preset temper-
ature of 102 F.
In the ECONOMY mode, the pump and

PAGE 14
D. SETTING FILTRATION CYCLES
Filtration cycles have been preset at the
factory from 8 AM to 10 AM and from 4PM
to 6 PM. They can be changed as follows:
1. Press and hold the “PROG” button for
5 seconds to enter the programming
mode. “AH” will flash on the display. If
you are already in the programming
mode, go to the step 2 directly.
2. Press “PROG” three times to show
the filter cycle schedule. Notice the flash-
ing filter icon.
3. Press “UP” and “DOWN” to change
the hour.
4. Press “JET” button to change the filter
from “-” (Off) to “F” (ON) or vice versa.
5. Wait 30 seconds or press the “LIght”
button to exit the programming mode.
USING YOUR SPA
A. DISPLAYING TIME OR TEMPERA-
TURE
Pressing the “PROG” button will switch
the display between current time and
current water temperature.
B. WATER JET THERAPY
Your spa is equipped with one or two thera-
py pumps that can be activated as follows.
Jet Button:
SINGLE PUMP SYSTEM: L115 & L130
1. Press “JET” to activate the Relaxation
Therapy mode.
2. Press “JET” to activate the Power
Therapy mode.
3. Press “JET” to turn pump off
heater will only come on during pro-
grammed hours. (See “Setting Filtration
Hours”). Note that, if at the end of filtra-
tion cycle the water is not at the chosen
temperature, the pump and heater will
not continue to run until that tempera-
ture is reached. This mode is used for
energy conservation, the same way you
would control your heat or air condition-
ing in your house. The clock icon will be
displayed when in ECONOMY mode.
To switch to the ECONOMY mode:
1. Press and hold the “PROG” button for
5 seconds to enter the programming
mode. “AH” will flash on the display.
2. Press “UP” or “DOWN” button to
change between ECONOMY (ECO) and
AUTO HEAT (AH). Observe the clock
icon when in ECONOMY mode.
3. Wait 30 seconds or press “Light” but-
ton to exit the programming mode.
C. SETTING CURRENT TIME
1. Press and hold the “PROG” button
for 5 seconds to enter the programming
mode. “AH” will flash on the display. If
you are already in the programming
mode, go to step 2 directly.
2. Press “PROG” one more time to
show the Hour. Observe the flashing
clock icon and PM indicator. No indicator
means AM.
3. Press “UP” or “DOWN” to select the
current hour.
4. Press “PROG” one more time to
show the minutes.
5. Press “UP” or “DOWN” to select the
current minute.
6. Wait 30 seconds or press the “Light”
button to exit the programming mode.

PAGE 15
and held until power returns. All settings
existing at the time of the power failure
will be restored when power returns.
C. SYSTEM RESET
Anytime there is reason to believe that
your spa electronic system is not operat-
ing properly, perhaps as a result of light-
ing or other interference, like your PC at
home, your spa system can be simply
reset by holding down the “DOWN”
arrow button for 5 seconds while in the
time display mode. The system will be
reset, maintaining all the settings you had
in memory.
D. PANEL LOCK
The Selectron 100 spa panel can be
locked to keep children or others from
using any of the spa functions. To deacti-
vate all buttons, make sure “Time”
is displayed. Use “PROG” button to
change to “Time” display if needed.
Then hold the “UP” arrow button for 5
seconds. Notice the flashing lock icon.
The panel is locked. To unlock the panel,
hold the “UP” arrow button for 5 sec-
onds again. The flashing lock icon will dis-
appear and all spa functions will be
accessible.
E. FREEZE PROTECTION
If temperature in the spa plumbing falls
below 50 degrees Fahrenheit (10
degrees Celsius) the water pump(s) will
turn on and run for at least one minute.
The display will show “ICE”. After one
minute, if the water is still below 50
degrees F (10 degrees Celsius), the
heater will turn on and raise the water
temperature 10 degrees F.
DUAL PUMP SYSTEM: L160
1. Press “JET” to activate the Relaxation
Therapy mode.
2. Press “JET” to activate pump #1
Power Therapy mode.
3. Press “JET” to activate pump #2
Power Therapy mode.
4 Press “JET” to de-activate pump #1.
5 Press “JET” to de-activate pump #2.
Note that for safety, all jet modes will
automatically turn off after 30 minutes.
Reactivate any therapy mode as indicat-
ed above.
C. TURNING ON THE LIGHT
Your spa is equipped with an underwater
light. Press the light button to activate
and de-activate the light. If left on, the
light will automatically turn itself off after
6 hours.
SPECIAL FEATURES
A. AUTOMATIC JETS PURGE ON 2
PUMP SYSTEMS
Once each day, at 10 AM the jet
pump(s) will automatically run for one
minute to circulate potential stale water
in the piping. This is a normal function of
the spa. The display will show “BJ2P”
while this takes place. Note that this fea-
ture only affects 2 pump systems
(L160).
B. MEMORY
All settings that are entered into your spa
controller will be permanently retained in
its solid-state memory. In the event of a
power failure, the time will be captured

PAGE 16
F. FLOW PROTECTION
If the flow of water through the heater is
insufficient, the spa controller will auto-
matically turn the heater off to prevent
overheating. The display will show “FLO”,
indicating a flow restriction caused by a
clogged filter, shut gate valves or by a
malfunction in the pressure switch. Call
for service if you cannot pinpoint the
cause.
G. OVERHEAT PROTECTION
If the water temperature inside the spa
reaches 112 F, the display will show
“HILI” (High Limit) and the heater will be
disabled. If the water temperature contin-
ues to rise and reaches 115 F due to fric-
tion in the pumps and plumbing system,
the entire system including all pumps will
be disabled. In “HILI” condition, DO
NOT ENTERTHE WATER. Remove the
cover and allow the water temperature to
cool down to 104 F. Then, reset the sys-
tem by holding down the “PROG” button
for 5 seconds while in time display
mode. If the “HILI” message returns, call
for service.
H. OZONE GENERATOR MONITOR
If your spa is equipped with a Vitazone
ozone generator, the ozone bulb is mon-
itored by the spa controller. Should the
bulb burn out, or should the ozonator
fail, the message “03” will appear on the
display, signaling the need for service.
Note that this feature will not be available
if your spa is equipped with an ozonator
that is not a “VitaZone”.
ADD START UP CHEMICALS
Carefully follow the directions and add
the start-up chemicals recommended to
you by your dealer. Contact your dealer
to clarify any questions you may have.
Your spa comes ready for the Vita exclu-
sive “Sparkle Clear” natural mineral
purification cartridges. Combined with an
ozonator, “Sparkle Clear” offers an alter-
native to Bromine or other chlorine sani-
tizers. Sparkle Clear and ozone will make
your spa look cleaner, smell cleaner, feel
softer and eliminate skin or eye irritation.
Ask your dealer about Vita Spa’s “Sparkle
Clear” sanitizing alternative.
Other manuals for L100 SERIES
1
Table of contents
Other Vita Spa Hot Tub manuals

Vita Spa
Vita Spa 100 Series User manual

Vita Spa
Vita Spa Spa User manual

Vita Spa
Vita Spa DUET User manual

Vita Spa
Vita Spa LX series User manual

Vita Spa
Vita Spa L100 SERIES User manual

Vita Spa
Vita Spa xStream User manual

Vita Spa
Vita Spa GRAPHIC SERIES User manual

Vita Spa
Vita Spa L200 series User manual

Vita Spa
Vita Spa M15 Series User manual
Popular Hot Tub manuals by other brands


Arctic Spa
Arctic Spa ARCTIC ESSENTIALS Y Series owner's manual

Marquis Spas
Marquis Spas Quest Operating and troubleshooting guide

American Spas
American Spas AM745L-W owner's manual

Aquatic
Aquatic AI28AIR7242TO Specification sheet

Aquatic
Aquatic AI7240R Specification sheet

Aquatic
Aquatic HOTSOAK 55 AI7242OHS Specification sheet