Ecosoft EcoSwitch Plus UK User manual
EcoSwitch Manual EN 2.6 © 2022 Ecosoft BV
1
EcoSwitch
Manual
EN
V2.6
VC2318
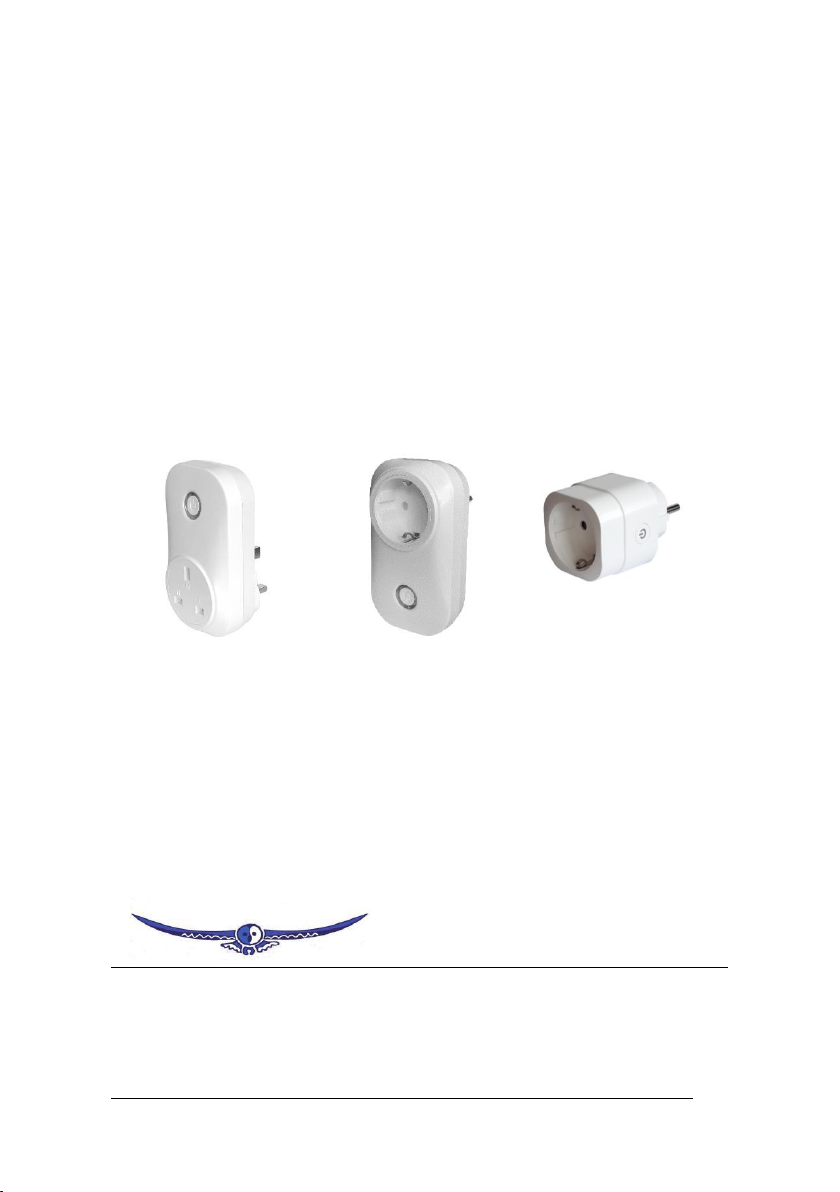
EcoSwitch Plus
UK
EcoSwitch Plus
EU
EcoSwitch
EU
Ecosoft
Ecosoft BV
Blauw-roodlaan 140
2718 SK Zoetermeer
Netherlands
Telephone
+31(0)79 3471000
Fax
+31(0)79 3618092
Email
info@ecosoftenergie.nl
Website
www.ecosoftenergy.com

EcoSwitch Manual EN 2.6 © 2022 Ecosoft BV
2
Contents
1Introduction.................................................................. 3
2Installing the EcoSwitch................................................ 5
3Getting started with the EcoSwitch .............................. 9
3.1 Access the EcoSwitch web interface ...............................9
3.2 The EcoSwitch Energy Planner ......................................10
3.3 Switch the EcoSwitch on and off manually..................10
3.4 Change the network name of the EcoSwitch after
installation..................................................................................11
3.5 Change the EcoSwitch device name .............................11
3.6 Change the login credentials of the EcoSwitch ...........12
3.7 Install a new version of the firmware ..........................12
4Using the EcoSwitch Energy Planner............................13
4.1 Configure Energy planning based on price data .........13
4.2 Random variation in the planning ................................17
4.3 Configuring time blocks .................................................17
4.4 Electrical power price data.............................................19
5Information Pages .......................................................21
5.1 Events ..............................................................................21
5.2 Energy Use ......................................................................21
6Problem Solving...........................................................23
7Ecosoft Energy app ......................................................24
7.1 Introduction ....................................................................24
7.2 Ecosoft Energy App –The menu ...................................25
7.3 Ecosoft Energy App –Hourly Prices ..............................26
7.4 Ecosoft Energy App –Free Energy Planner ..................26
7.5 Ecosoft Energy App –My EcoSwitches .........................28
8Other information .......................................................30
8.1 Built-in power limiter .....................................................30
8.2 Switching currents > 10 A ..............................................30
8.3 Access to open-source code ...........................................30
EcoSwitch Manual EN 2.6 © 2022 Ecosoft BV
3
1Introduction
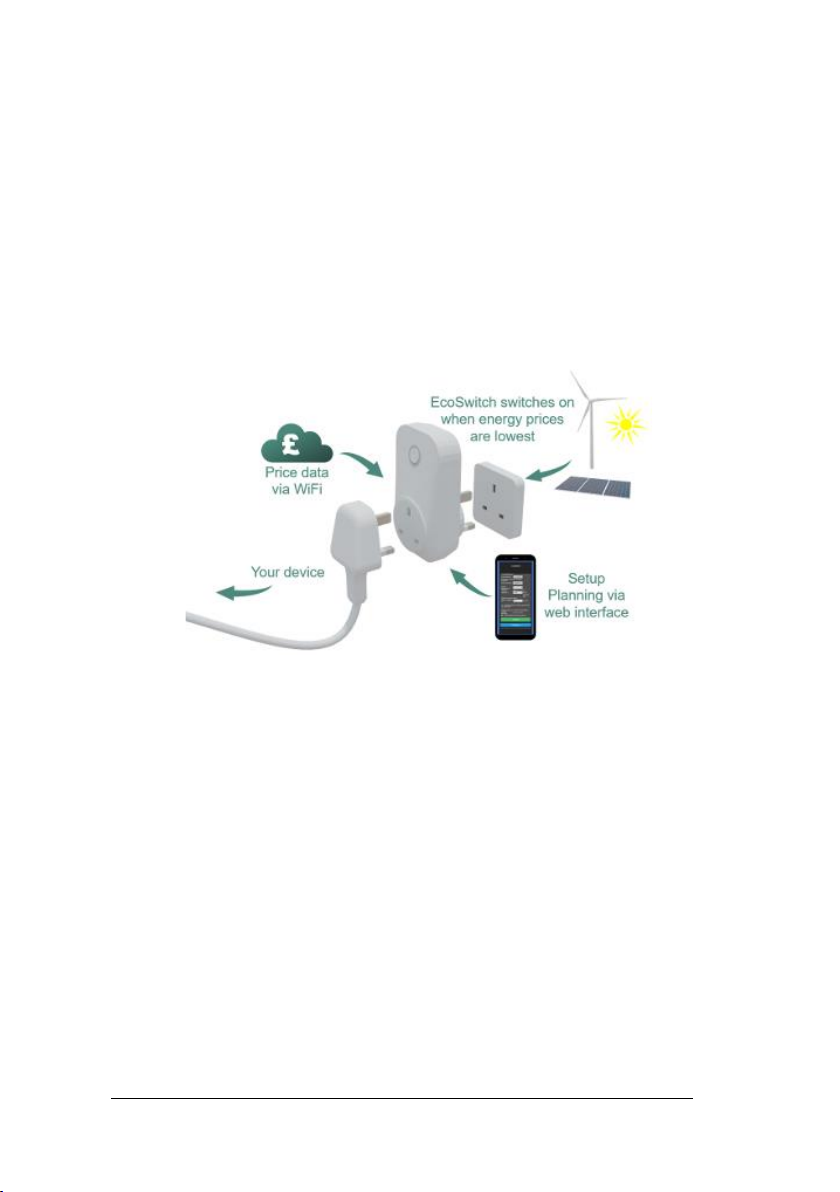
The EcoSwitch is a smart switch you can plug into the wall outlet. Plug
the cable of your electrical device into the switch.
The EcoSwitch retrieves energy prices via WiFi from the internet and
switches on when the price is lowest. In the web interface you can
create a schedule, which determines during which hours (and for how
long) the EcoSwitch is allowed to be switched on. The EcoSwitch will
then calculate a plan that suits your needs.
You can use this switch for, among others:
• Electrical boilers
• Close-in boilers (kitchen boilers)
• Electrical vehicles and PHEV’s
• Waterbeds
• Swimming pools
• Aquaria
Why is the EcoSwitch useful?
Even without reducing your energy consumption, you can reduce
greenhouse gas emission if you choose the best moment to use energy.
If your have a flexible contract with your energy supplier (when pricing
depends on the hour of the day you are consuming energy), you will not
only protect the environment, you will save money as well.

EcoSwitch Manual EN 2.6 © 2022 Ecosoft BV
4
At certain times during the day, there is more electrical power available
from sustainable energy sources, for example solar panels and wind
turbines. This results in less CO2emissions per kilowatt hour. If you
consume power during those hours, the environment will be taxed less.
The EcoSwitch can carry up to 10 Ampères. At 230 Volts this is 2300
Watts electrical power of the connected device.
It is possible to switch currents greater than 10A, but only indirectly,
because 10 A is the maximum for the EcoSwitch. It can be done using
an external relay, an electrical contactor.
EcoSwitch Manual EN 2.6 © 2022 Ecosoft BV
5
2Installing the EcoSwitch
EcoSwitch can access the internet via your WiFi network to retrieve the
current electrical power price data.
The procedure to install the EcoSwitch is this:
●Plug the EcoSwitch into the wall socket.
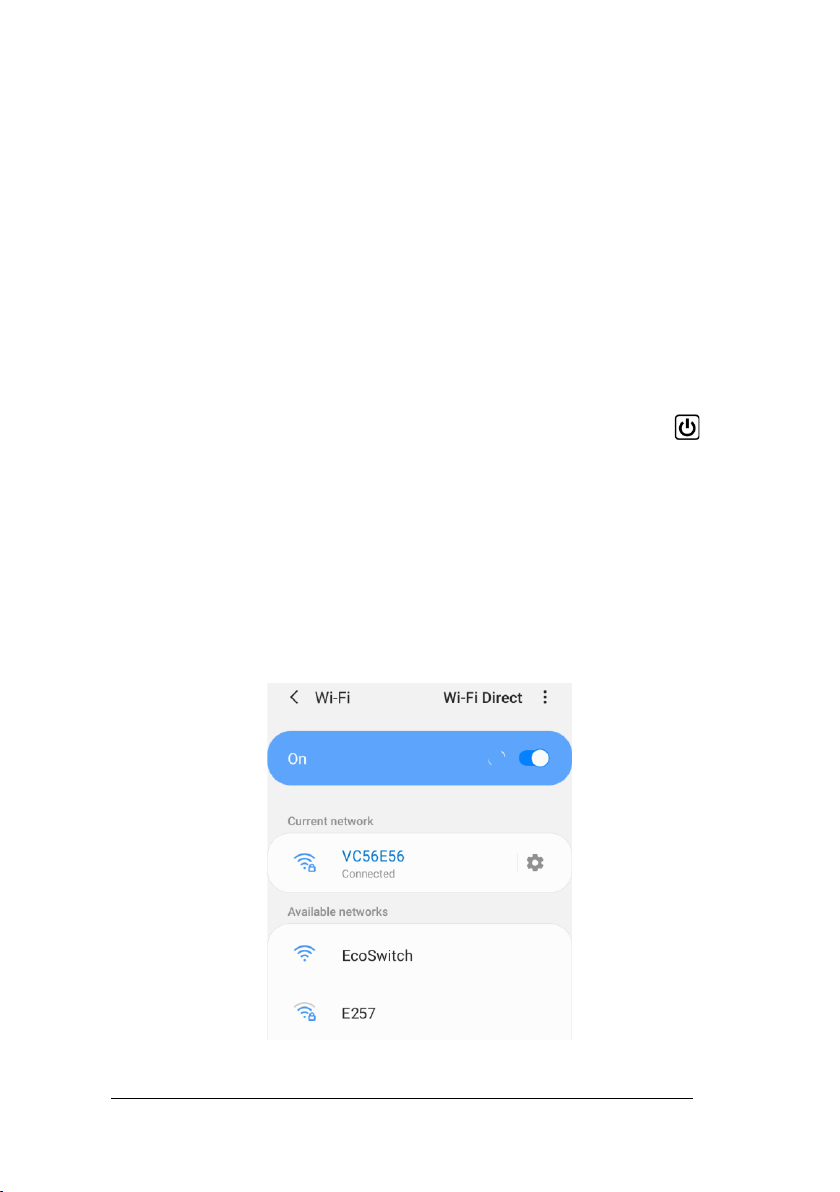
When the EcoSwitch is used for the first time, it will now become a WiFi
Access Point automatically. If you want to make this happen at any
other moment, do the following:
●Press the ON/OFF-button (quickly) 6 times. This button has the
symbol. It is important to do this quickly. If you hear the EcoSwitch
switching on or off, it wasn’t fast enough. Please note it has to be
exactly 6 times.
When the EcoSwitch has become a temporarily WiFi Access Point, a LED
will blink, and then you can connect to the switch directly using your
mobile phone.
●On your phone, go to the WiFi settings and search for new
networks.
This manual suits for next models
2
Table of contents


