ECOSTAR WM12-600 Setup guide

WASHING MACHINE
Owner’s Instruction Manual
Model: WM12-600
•Please read this manual carefully before Washing Machine operation.
• Retain it for future reference.
• Record model number and serial number of the unit.
• See the label attached on the back cover and quote this information
to your dealer when you require service.

READ THIS MANUAL CAREFULLY
You will find many helpful hints on how to use and maintain your washer properly. Just a little
preventative care can save a great deal of time and money over the life of washer. This manual will
guide to many answers to common problems and operations of washing machine.
Contents
Introduction
Usage Method
Rinsing Method
Spinning Method
Special Features
01
03
05
06
06
06
07
08
Safety Information
Safety Precaution & Installation
Preparation Instructions
Quick Start
Washing Method
Structure Instructions 04
04
04
Name of Parts
Accessories
Introduction of Control Panel
Maintenance 09
09
09
Cabinet Maintenance
Cleaning the Lint Filter
Object Dropping outside spin tub
Specifications 11
Main Technical Parameters

Introduction
Warning
Observe the following items in order to prevent from injuring yourself, others and the damage of property:
This graphic represents (forcible execution), and detailed forcible execution items will be
displayed inside the graphics.
This graphics represents (operation prohibited), and detailed prohibitive items will be displayed
inside the graphics.
This graphics represents(cause attention),and detailed cautions will be displayed inside the
graphics.
Please observe following contents of graphics.
Do not install the machine in
damp or rainy environment to
avoid electric shock, fire,
machine failure,or deformation.
Avoid dampness
Do not dismantle the machine
by yourself.
Forbid dismantling
Do not place inflammable
materials like burning candle,
mosquito incense, cigaret etc.
or heating source like electric
stove, calorifier etc. on the machine.
Forbid
Do not spray water directly to
the machine.
Avoid spraying water Forbid
Do not let baby sit on it or place
heavy things on it.
Forbid
Do not wash clothes that are
stined with kerosene, petrol,
alcohl and other flammable
substance.
!
Warning
Caution This will remind you that injury to people and damage to property may occur.
This indicates serious injury or death to human being may be caused.
This appliance is not intended for use by persons (including children) with reduced physical, sensory or
mental capabilities, or lack of experience and knowledge, unless they have been given supervision or
instruction concerning use of the appliance by a person responsible for their safety. Children should be
supervised to ensure that they do not play with the appliance.
Safety Information
1
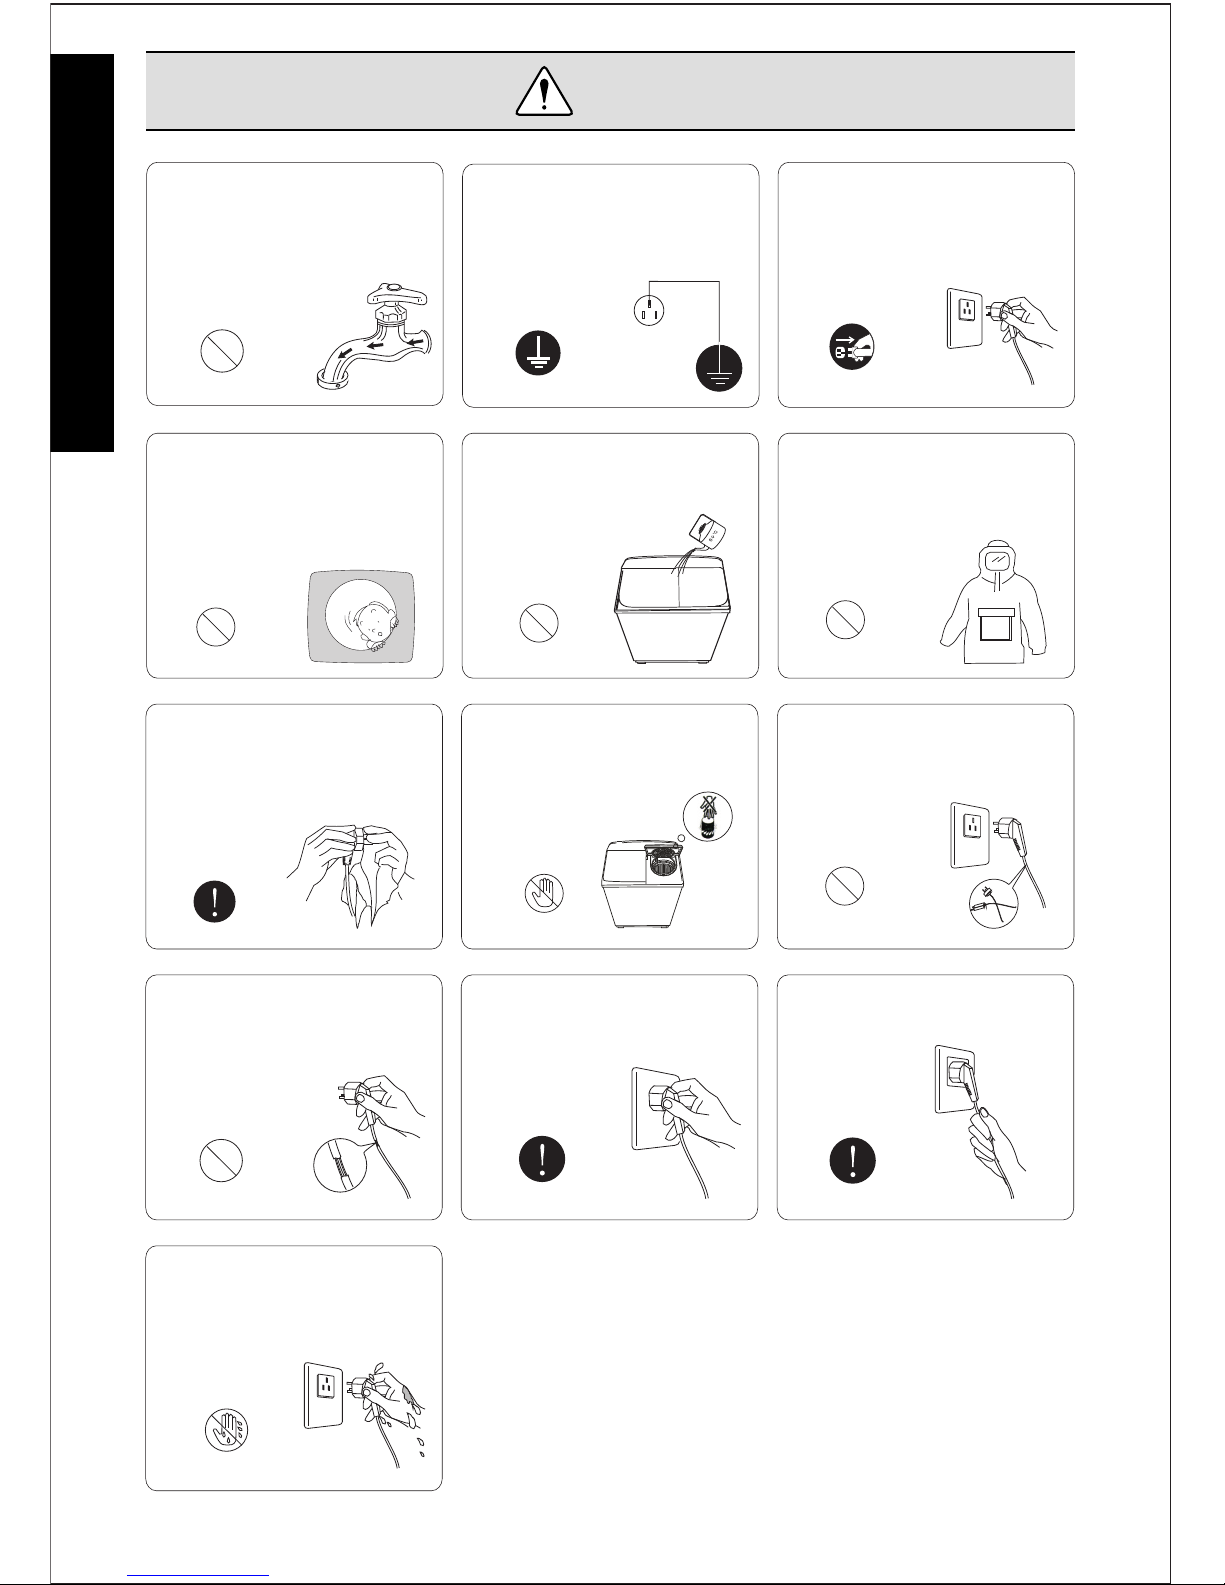
Warning
To avoid electric shock
resulting from electric leakage,
please connect grounding wire
of the plug properly.
Grounding
Do not exceed the max. water
level to avoid water overflowing
and machine failure.
+
Forbid
Forbid
If use warm water, the water
temperature should not
exceed 50℃.
Forbid
Do not wash down-filled coat,
raincoat or similar clothes.
waterproof
Forbid
Do not let baby climb to the
machine or play near running tub
to avoid accident.
Do not insert or unplug the plug
with wet hands to avoid electric
shock.
Forbid wet hands
Unplug the plug from socket
after use.
Unplug the plug
Forbid putting into
Do not replace power cord by
yourself.
Forbid
Wipe off dirty and dust on the
plug often to prevent poor contact
with power supply.
DO not put hands into the
tub/spinner before it stop running.
Forbid
Do not pull the cord when
unplug the plug.
Insert the plug tightly when use.
Do not damage the power cord
and plug to avoid electric shock,
short circuit or fire.
2
Introduction

Attention To Installation
Change the position of the Drain Hose (For LOWER drain system only)
Front
Drain hose
Buckle
Blanket
The ex-factory installation position of the drain hose is located at the spin side.
According to the installation site, the drain hose can also be installed at the wash
side of the machine. The method is as follows:
• Unplug the power cord and empty water in the drain hose completely.
• Spread a piece of soft cloth on the floor (e.g. a blanket) and place the washing
machine on it gently.
• Take the drain hose out from the buckle at the spin side, and put it into the
buckle at the wash side.
• Hang up the drain hose kit.
Installation Site
In order to avoid electrical failure, discoloration and deformation, do not install
the machine in the following places:
• Locations exposed to direct sunlight.
• Locations exposed to rain or snow
• Locations with uneven or unstable ground
Safety Precaution & Installation
3
Safety Precaution & Installation
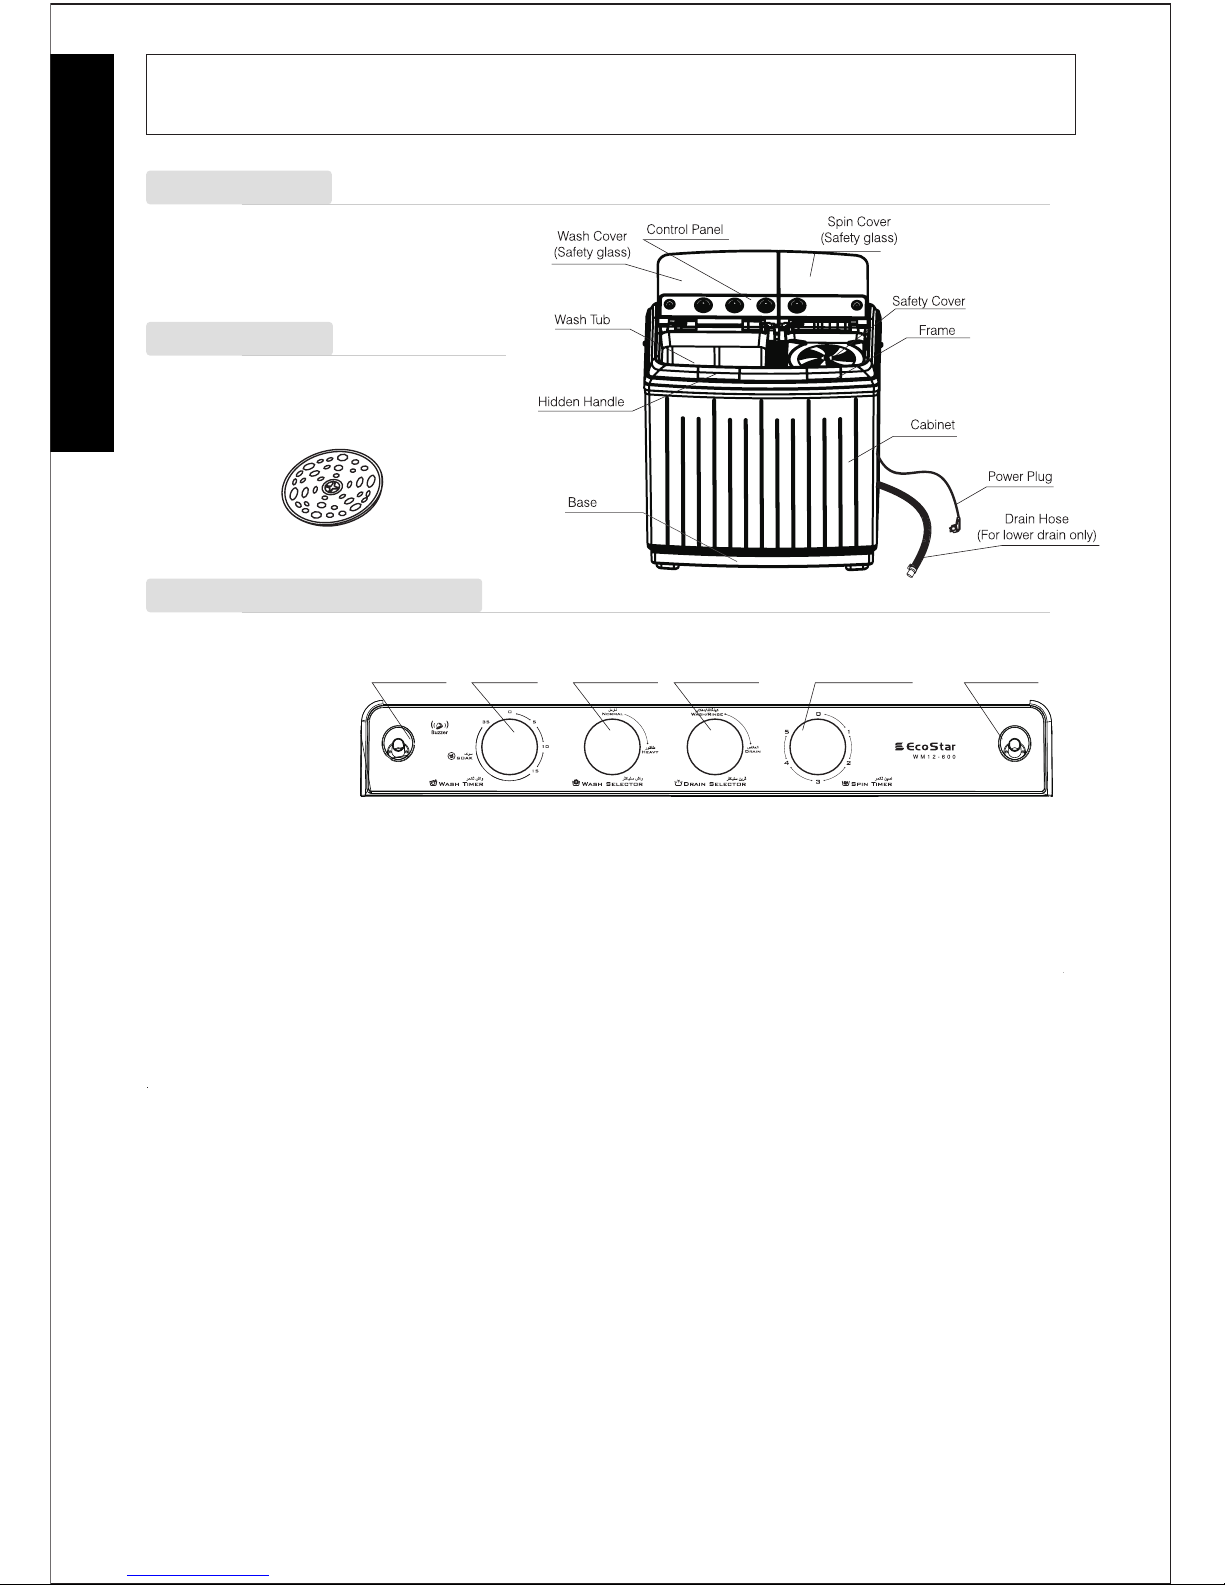
Name of Parts
The figure 1. 1 shows the basic body parts.
Inner spin cover
Accessories
The below accessories come along with the
washing machine.
Figure 1.1
Introduction of Control Panel
• Water inlet: can be used to inject water.
• Wash timer: can be used to select required washing time.
• Spin timer: can be used to select required spinning time.
• Wash selector: Choose “ Normal”or“ Heavy” according to laundry fabric.
• Drain selector: Choose drain for draining the water out from the washing machine.
The drawing above is for reference only, specific drawing is subject to actual models.
(For lower drain only)
Water inlet
Wash timer
Wash selector
Water inlet
Drain selector
Spin timer
Structure Instruction
4
Structure Instruction

• Plug in power and connect the water inlet hose.
• Lay down the lower drain hose and connect it to the house drain.
• Check that there are no objects such as coins, hairpins, mud or sand in the pocket.
• Strings should be knotted in advance to prevent entanglement.
• Clothes can be classified for washing according to the texture, dirty degree and color.
• For small pieces (e.g.,stockings) or fluffy clothes, put them into a nylon net for washing.
Preparation Instructions
Reference of laundry quantity corresponding to different capacities and types of clothes, quantity may
vary according to cloth weight and type.
2.0kg Capacity about 4 pcs. about 3 pcs. about 2 pcs. about 1 pcs.
3.0kg Capacity about 6 pcs. about 4 pcs. about 3 pcs. about 1 pcs.
3.6kg Capacity about 7 pcs. about 5 pcs. about 4 pcs. about 2 pcs.
5.0kg Capacity about 10 pcs. about 7 pcs. about 5 pcs. about 3 pcs.
6.0kg Capacity about 12 pcs. about 9 pcs. about 6 pcs. about 3 pcs.
7.0kg Capacity about 14 pcs. about 10 pcs. about 7 pcs. about 4 pcs.
7.5kg Capacity about 15 pcs. about 11 pcs. about 8 pcs. about 4 pcs.
8.5kg Capacity about 17 pcs. about 12 pcs. about 9 pcs. about 5 pcs.
10.0kg Capacity about 20 pcs. about 15 pcs. about 10 pcs. about 6 pcs.
4.6kg Capacity about 9 pcs. about 6 pcs. about 5 pcs. about 2 pcs.
12.0kg Capacity about 24 pcs. about 18 pcs. about 13 pcs. about 7 pcs.
8.0kg Capacity about 16 pcs. about 11 pcs. about 8 pcs. about 4 pcs.
Laundry Jacket
about 1600 g
Shirt
about 500 g
Uniform
about 650 g
Jeans
about 900 g
5.5kg Capacity about 11 pcs. about 8 pcs. about 6 pcs. about 3 pcs.
The above figure is for reference only, specific weights are subject to actual clothes.
Laundry volume and detergent dosage reference
The dosage of washing detergent varies according to dirty degree and texture of laundries.
Water
level
Fabric Type Laundry
capacity(kg)Water flow Wash time
(minutes)
Detergent
amount(g)
Synthetics,silk,
Delicate fabrics
Cotton or linen
Heavy soils
0-4.5
4.5-8.0
0-8.0
8.0-12.0
0-8.0
8.0-12.0
Low
Mid
Mid
High
Mid
High
Normal
Heavy
Heavy
3
3-5
7
7-10
10
10-35(soak 20)
About
About
About
About
About
About
42
65
65
87
65
87
Usage Method
5
Usage Method

Water level indicator
Quick Start
Washing Method
A. Spraying rinse (rinse in the spin tub)
1. Put the laundry into the spin tub after washing.
2. Turn on the water tap, choose to fill water into the spin tub for 3-4 minutes, and then turn off the water tap.
3. Set the spin timer for 2-5 minutes for rinsing.
The above steps can be repeated.
Rinsing Method
1. Insert the water inlet hose into the water inlet mouth and choose injecting water to
the wash tub. Its important to understand that it has manual insertion of water.
2. Put the laundry into the wash tub, and add detergent into it. When fill water to half
of the desired water level, turn off the water tap and let laundries soak in the solution
for minutes, then fill water to desired water level.
3 Set wash program “Normal” or “Heavy” as per amount and texture of laundries.
4. Turn the wash timer knob to set wash time.
5. After washing, set the drain selector to “Drain” position for draining.
1. Install the washing machine
2. Load the laundry
3. Add detergent and water into the wash tub
4. Turn the wash timer knob to set wash time
8. Take out the laundry from the spin tub
5. Repeat the above steps 3-4 for rinsing
6. Move the laundry into the spin tub and close the spin cover
7. Turn the spin timer knob to set spin time
Usage Method
6
Usage Method

Spinning Method
• To save time, water and energy, can do pre-spinning before rinsing.
• Put laundries which have already been dehydrated into the wash tub.
• After filling water to the desired level, turn off the water tap to save water.
• Turn the “Wash selector” knob to the "Normal” or “Heavy”.
• Set the “wash timer”to the desired time (about 3-5 minutes)for rinsing.
• After rinsing, put the washing materials into the spin tub to spin for 1 to 5 minutes.
• Drain out the rinsing water in the wash tub.
• The above steps can be repeated.
B. Common Rinse (Rinse in the wash tub)
• Shake out the laundry and put them into the spin tub. • Put the inner spin cover on the laundry. Confirm the
inner spin cover is placed horizontally.
• Close the safety cover and the spin cover. • Refer to the following table to select spinning time.
Incorrect
Correct
Inner
spin cover
Spin tub
About 1
minute
About 50
seconds
Washing materials
Silk
Light clothes
(fiber/blended)
Knitwear (fiber)
Underwear
(cotton)
Slipover
(cotton/linen)
Toweling coverlet
(cotton)
About 1-2
minutes
About 2-3
minutes
About 3-4
minutes
About 5
minutes
Spin time
Usage Method
7
Usage Method
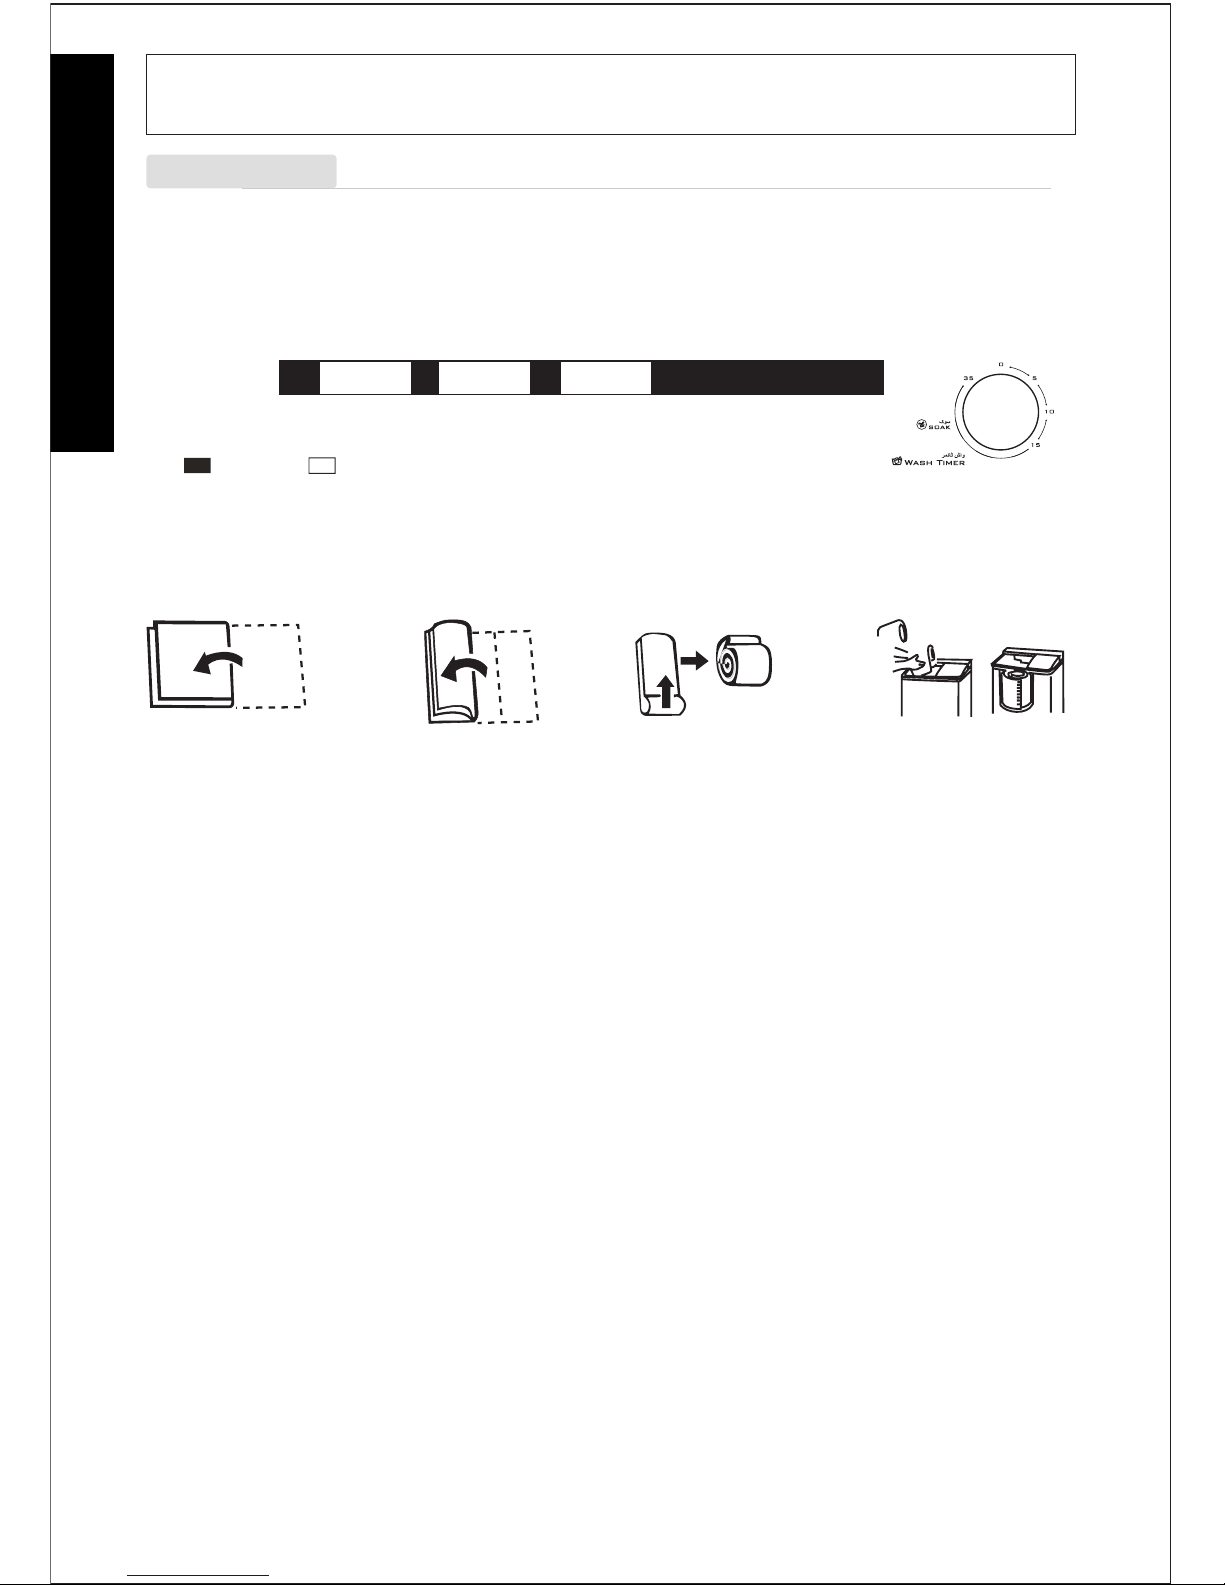
Special Features
Soak function (For machines having soak function only)
For seriously stained clothes, Soak wash is useful to achieve better wash result. 15-35 minutes of the wash timer is
for soak wash:(illustrate as follows)
Work time
about 5 about 5 about 5
Total: 35 (mins)
about 1.5 about 1.5
about 2
Static time
35 15
(unit:)mins
Fold in half along
the long edge
1/3 fold in the
same direction Roll up the blanket Put into the tub with
blanket edge facing down
Washing method of Blankets are as follows:
1. Dilute detergent with adequate water (below 50 C), then pour the solution into the wash tub.
2. Fold the blanket as shown in the below figure, and put it into the wash tub.
Buzzer Function (For machines having buzzer function only)
Function of the buzzer is to alarm finish of washing,and it is helpful to control wash process.
Usage Method
8
Usage Method
This manual suits for next models
1
Table of contents
Other ECOSTAR Washer manuals

Popular Washer manuals by other brands

Tricity Bendix
Tricity Bendix AW 1000 W Operating & installation instructions

Panasonic
Panasonic NA-F60L5WRB operating instructions

GE
GE WSLP1500 Dimensions and installation information

Electrolux
Electrolux EWF1284EDW Service manual

Bosch
Bosch WAN2829BSN User manual and installation instructions

LG
LG TV2516DV3B owner's manual


