EcoWheel ER User manual

1
User Manual

2
Electric scooter ER
Thank you for choosing the EcoWheel ER electric scooter.
The electric scooter design fulfills a new vision of an ecological world.
After three years of development, tuning of every detail and testing of driving characteristics, we
present you with an electric scooter that will become a part of your life. Equipped with state-of-
the-art technology, it turns every city ride into a remarkable experience.
CONTENT
Scooter Components --------------------------- 3
Safety Notice --------------------------- 4
Before the First Ride --------------------------- 4
Opening Electric Scooter --------------------------- 6
Folding scooter --------------------------- 7
Handlebars --------------------------- 8
Description of the display and buttons -------- 9
Battery and Charger --------------------------- 10
Driving Instructions --------------------------- 11
Maintenance --------------------------- 11
The Scooter Malfunction --------------------------- 12
Warranty Conditions --------------------------- 14
3
Electric scooter ER
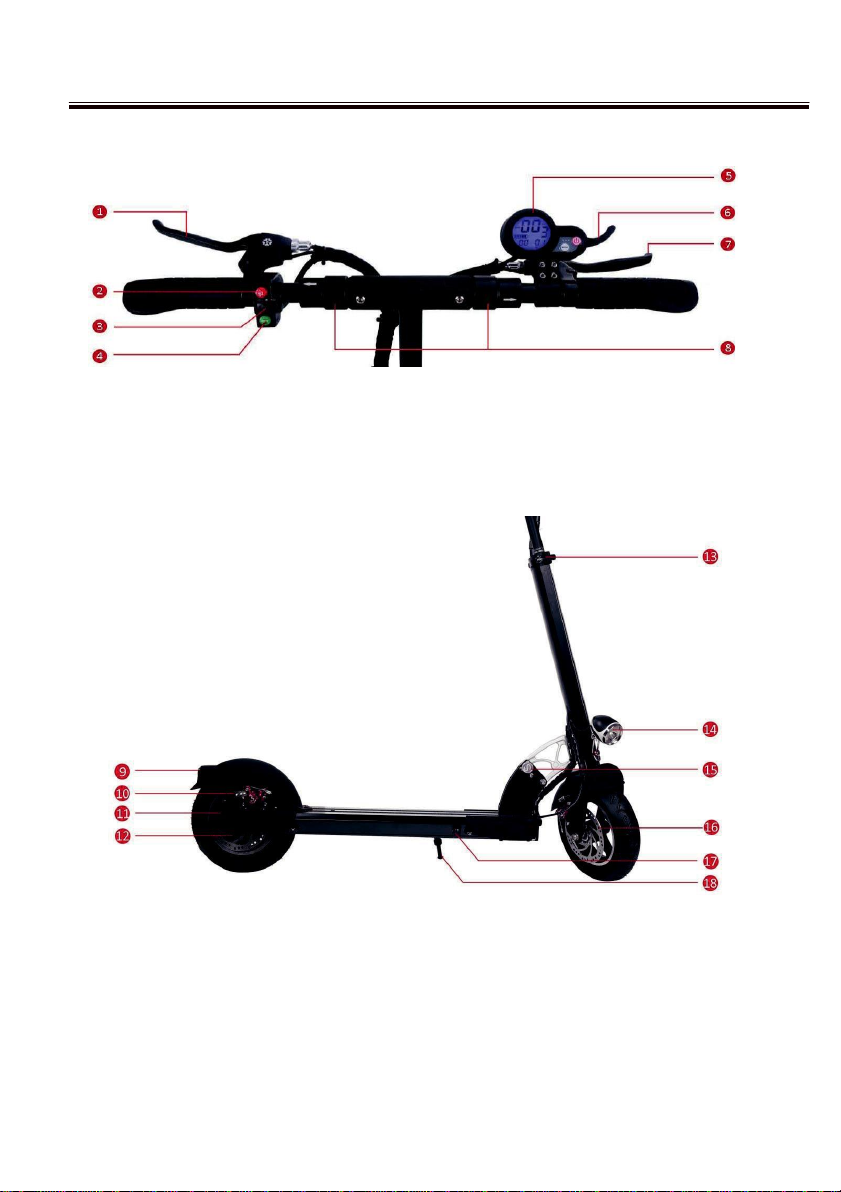
Scooter Components
1 Rear brake lever 2 Front and rear light switch 3 Direction switch. lights (T7 only)
4 Horn switch 5 Multifunction display 6 Lever lever
7 Front brake lever 8 Locking mechanism for the handlebar folding mechanism
9 Rear and brake lights 10 Rear brake 11 Direction indicators (T7 only)
12 Engine 13 Quick Release Sleeve 14 Headlamp
15 Folding Fuse. 16 Front brake 17 Charger connector
18 Stand

4
Electric scooter ER
Safety Notice
1. The scooter is designed to carry one person. The recommended age is from 16 years. The
device is also not intended for people of advanced age or for pregnant women.
2. Wear a helmet and other protective gear, incl. footwear.
3. Before the first ride, try the scooter control in the open air.
4. Avoid dangerous maneuvers or one-hand steering while driving.
5. Do not drive into water, oil or frozen surfaces.
6. Do not use the scooter in frost than -5 °C.
7. Do not immerse the scooter in water deeper than 3 cm. This may cause the battery or motor to
short circuit.
8. If you do not use the scooter for a long time, recharge the battery to about 60% of capacity.
10. Always make sure that you do not violate local regulations, laws and regulations before
using the scooter. If in doubt, contact your local authorities.
11. Check that all parts are well held and that the screws are not loosened. Ex. tighten them or
contact a service center.
12. Do not make unauthorized modifications or maintenance work to reduce the safety of the
equipment.
13. Check the product regularly for wear. Replace worn parts immediately.
14. Follow the manual for maintenance and use. Do not disassemble the device yourself.
15. Check the battery condition before driving. If it is not fully charged, do not start driving.
16. The device is for personal use only. Commercial use is not allowed.
17. Keep your feet relaxed and your knees slightly bent when driving on a flat surface.
18. Other activities (phoning, listening to music) can significantly reduce your driving attention.
19. Do not exceed the maximum load capacity.
Before the First Ride
Check / set before the first ride:
Front light
The light is not attached to the scooter for transport safety reasons. Screw it to the frame, set it in
position and tighten the fixing screw.
Brake levers
Move the brake levers so that they are comfortable to press and tighten the brake lever retaining
bolts.
Display
Loosen the display clamp retaining bolts and turn the display so that it is clearly visible and the
throttle lever is operable - then tighten the mounting bolts. Remove the protective film from the
display.

5
Electric scooter ER
Quick-release sleeve
The handlebar quick-release sleeve should be adjusted to resist when closing, and the
handlebar does not slide down when pushed from above. If the sleeve is too loose, open it,
tighten the knurled nut on the screw axis and close the sleeve.
Brakes
Brakes are factory-set. If the mechanical (disc) brakes are not suitable for you, you can
adjust them - but we recommend you to do so after a
few trips, until the brakes go:
a / braking intensity is adjusted with
the locking screw on the brake lever (1) or the brake
mechanism (2). By loosening the lock nut and
unscrewing the locking screw, the braking intensity will
be higher and the lower will be lowered by screwing in.
Then tighten the lock nut. Ex. you can also loosen the
cable fastening screw (3), move the cable and retighten
the screw.
b / brake pad centering possible
adjust the locking screws (4) on the brake mechanism
- gently loosen the screws, center the brake so that the
brake disc is centered between the plates, tighten the
locking screws.
The handlebar folding mechanism
Handlebars may have a slight fold in the folding
mechanism.
If the play is too large, it can then be adjusted
a locking screw (5) located in the joint mechanism (when
the handlebars are folded, the screw is visible).
Gently turning the screw outward will reduce the clearance a
vice versa.
If the screw is turned too far, the handlebar will not go
fold - in which case the screw must be turned inward.
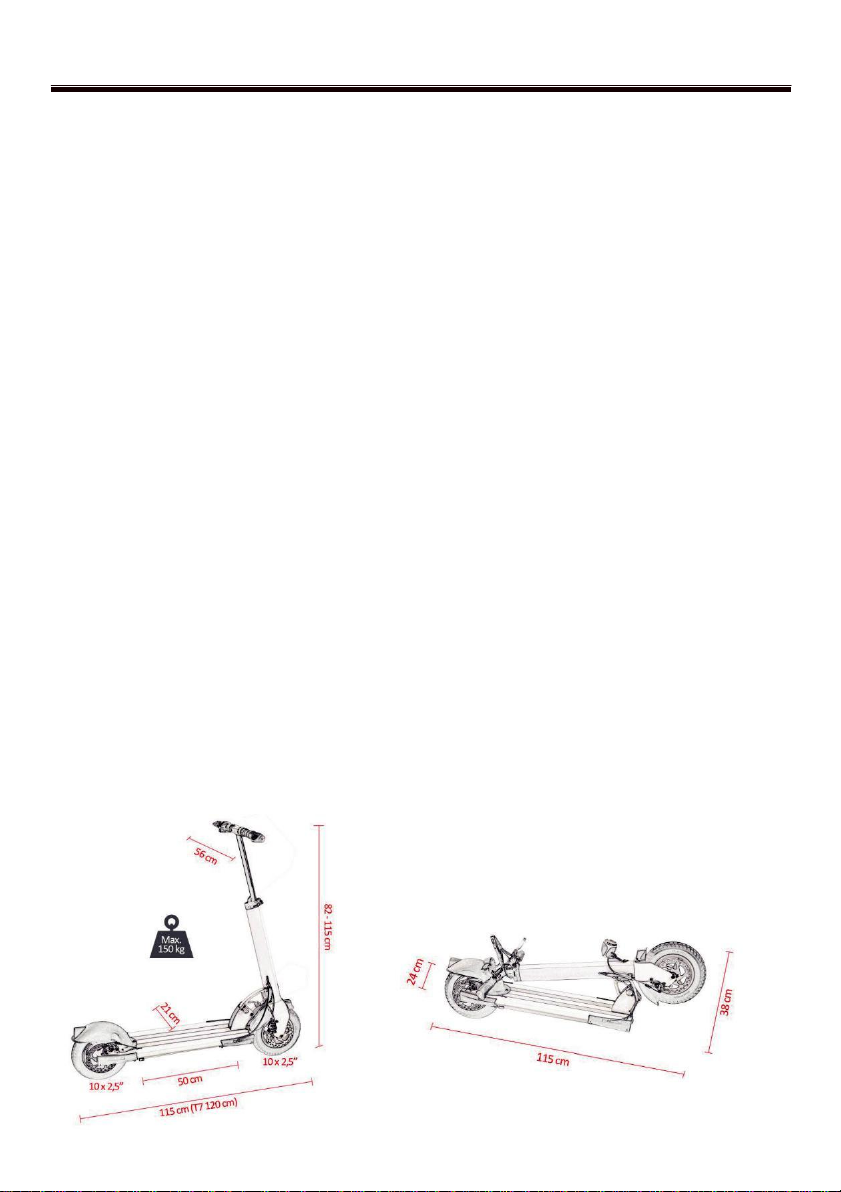
Tire pressure
The optimum tire pressure is 40-50 p.s.i. / 2.8-3.4 bar.
Charge the battery
Charge the scooter to 100% capacity before the first ride - the
control LED on the charger is green.

6
Electric scooter ER
Opening Electric Scooter
The scooter is easy to carry and store thanks to its fast and secure folding mechanism.
STEP 1
STEP 2
STEP 3

7
Electric scooter ER
Folding Electric Scooter
STEP 1
STEP 2
STEP 3

8
Electric scooter ER
Handlebars
Display values at power-up
a / current speed in km / h
b / speed mode: 1 - slow; 2 - medium; 3 - fast (last set)
c / battery charge indicator (display varies according to current load / power input) d / display
time
e / PAS: the gas lever reacts after reflection (if the scooter is at rest, the gas does not react)
Setting the speed mode
The scooter is equipped with three speed modes that adjust the max speed of the scooter. The
last used speed mode is set when the display is turned on. Change speed mode:
1. Press the ON / OFF button briefly - the speed mode number will flash on the display
2. briefly press the MODE button to change the speed mode
3. To save the desired mode, briefly press ON / OFF or leave it for a few seconds
Display functions
When pressing the MODE button briefly, the functions rotate as follows:
•TRIP - distance traveled in km from power on - with long press th. MODE resets the value
•ODO - total distance traveled in km
•CHA - no function
•VOL - current battery voltage (may fluctuate during load)
•DST - no function
•CH TIME - when switched to this function, the display will turn off after 2 hours (countdown
time); suitable for example when charging a mobile phone from a USB port
•TIME - time from display on
After 3 minutes of inactivity, the display will turn off automatically (unless CH TIME
countdown is activated).

9
Electric scooter ER
Description of the display and buttons
Cruise control features
While maintaining power / speed for about 6-10 seconds, cruise control is activated - on the
display
displays the symbol . Cruise control maintains engine power (speed may vary depending on
terrain, for example) without holding the throttle.
Cruise control functions are canceled by pressing the brake or throttle lever. The symbol
disappears from the display.
USB port
On the back of the display is a USB port, which can be used to power / charge a mobile phone or
tablet while the scooter is on.
Display settings
Some other scooter functions can also be adjusted on the display.
Turn on the display and press the ON / OFF and MODE buttons simultaneously for a few
seconds. Press MODE briefly to toggle the function. To adjust the preset value, briefly press
ON / OFF (the value starts to click), then briefly press MODE to increase or ON / OFF to
decrease. To save the set value, leave the display idle for a few seconds.

10
Electric scooter ER
Battery and Charger
Each EcoWHeel electric scooter has its battery and charger. Each scooter and its parts also have
their serial number.
Never charge the battery with a charger other than the one that belongs to the scooter! Otherwise
there is a serious risk of damage or destruction of the battery. Our company is not responsible
for destroying the battery or charger if you do not follow this instruction.
Lithium battery
Charge the battery to 100% before using the scooter for the first time.
To make sure you reach your destination, we recommend that you recharge the battery to full
capacity if the battery indicator shows only two links on the display.
If you do not use the scooter for a long time (more than 2 months), recharge the battery to about
60% of capacity.
The battery has undercover protection. Nevertheless, the battery may undercut during very long
storage without continuous charging or while driving, when the display indicator previously
displayed a low battery capacity, the display suddenly goes out while driving, and you turn the
scooter back on and hold the throttle. If the display goes out due to low battery capacity, it is an
underrun protection signal - then do not turn the electric scooter back on and continue to run
again, otherwise the battery may be damaged.
If the undercharged battery does not respond even when connected to a charger, contact your
dealer.
The battery may also be damaged by abnormal exposure to water, shock, etc. In that case
it is not covered by the warranty period.
Contact your dealer if:
•You smell a strange smell from the battery
•the battery becomes extremely hot during driving
•the battery appears to be leaking
Charger
The smart charger supplied to the scooter automatically disconnects the charger when the battery is
100% charged - it has overcharging protection. For reasons of safety and optimum battery life, we do
not recommend leaving the scooter attached to the charger after the battery is fully charged.
Charging procedure
1. Remove the protective cover of the charging connector (socket) located on the right side of the
scooter step and insert the connector (plug) of the charger.
2. Connect the charger to the mains (220 V).
3. The charging process works when the LED on the charger is lit red. When the battery is charged,
the LED light turns green.
4. After charging the battery, disconnect the charger from the power outlet and the charger connector
(plug) from the scooter connector.
5. Close the charging connector on the scooter with the protective cap.

11
Electric scooter ER
Always charge the battery in a dry and ventilated environment. Never cover the charger while it
is charging, otherwise it may be damaged. The charger is designed for indoor use. The charger
may be damaged by abnormal exposure to water, shock, etc. In this case, the warranty period is
not applicable.
Driving Instructions
Before the ride
1. Choose a free space.
2. Unfold the scooter as described above.
3. Adjust the handlebar height.
Drive
1. Press and hold ON / OFF button, the speed mode is set to last used.
2. Depending on the situation, you can set a different gear - see. section Description of the
display and buttons.
3. The scooter is equipped with the Safe Start function. Keep one foot on the foot and the other
to bounce off the ground, then gently add gas. Tilt slightly forward when accelerating. For better
stability, keep the front foot facing in the direction of travel and the rear foot turned 70-90 °to
the front.
4. Press the brake lever (s) when you need to slow down or face a person or other obstacle while
driving. On the one hand, it disconnects the motor and, on the other hand, brake the scooter.
Always brake with the rear brake (left lever) first. When braking, tilt slightly backwards to
protect the frame and handlebar folding mechanism from excessive wear.
Stopping
Holding the brake lever interrupts the motor power and stops. Place one foot on the ground
before stopping completely.
Avoid sudden braking, otherwise there is a risk of skidding, excessive tire wear or unstable
driving.
Notice
Do not use the scooter under rain or frost below -5 °C (at temperatures below + 5 °C the range
is reduced by up to 30%). If the surface is wet, we do not recommend driving at a speed higher
than 10 km / h and braking sharply, otherwise there is a risk of skidding.
Maintenance
Tire
If the inner tube is damaged or worn, replace it with a new one. Replacement tube and jacket
available from your dealer. Also check the screws on the axes every month to see if they have
been loosened - or if necessary. tighten them.
12
Electric scooter ER
The Scooter Malfunction
Changing the inner tube of the rear wheel
1. Make sure the scooter is disconnected from the charger and the display is off.
2. Place the scooter on a raised place (eg in a chair) so that the wheels are in the air and the
scooter is firmly held at the bottom of the foot.
3. Unscrew the two rear plastic covers.
4. Disconnect the motor cable connectors (on the right side).
5. Loosen the nuts on the motor axis. Remember (take a picture) the order and placement of the
washers on the motor axis.
6. Carefully remove the rear wheel incl. of the engine from the frame - the brake disc is
disengaged from the rear brake.
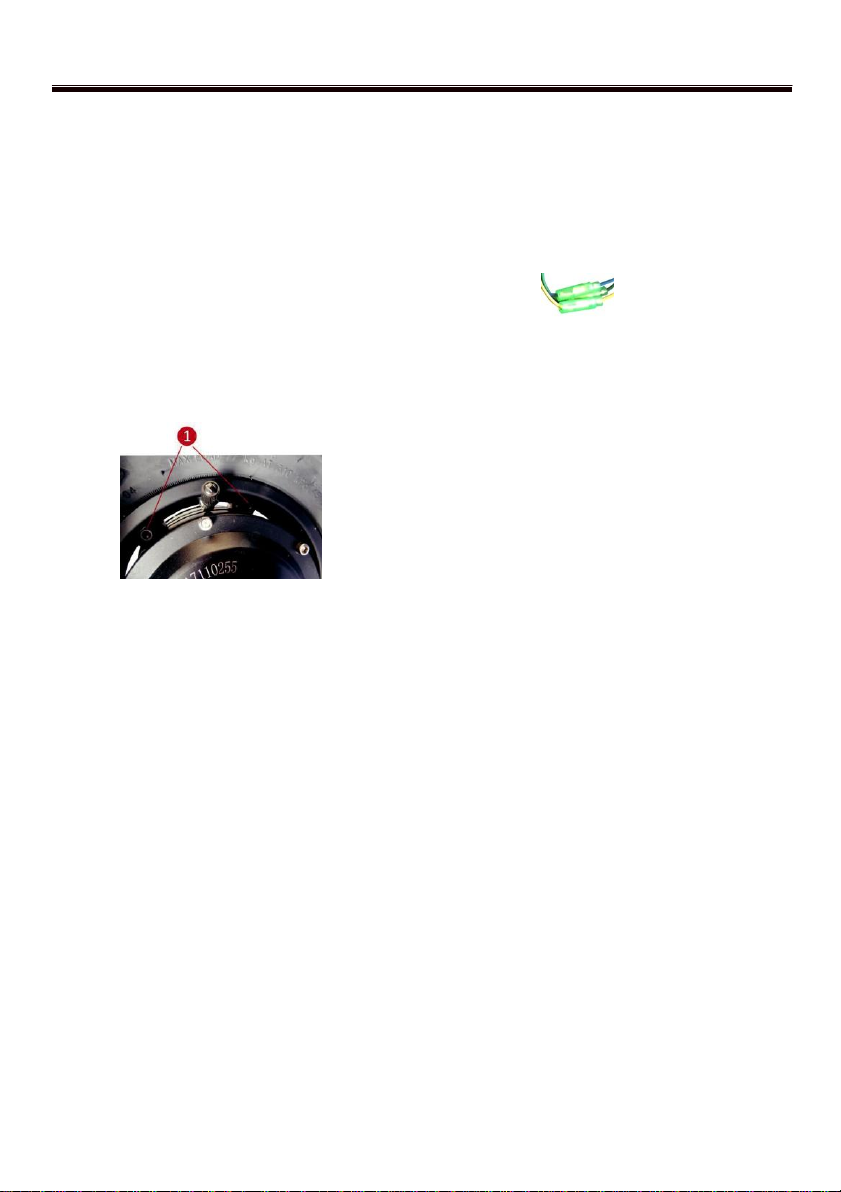
7. Loosen the six screws (1) connecting the rear rim and disconnect it.
8. Remove the defective tube (s) and replace it with a new one. Orient the tire according to the
wheel rotation arrow.
Before joining the rim, you can partially inflate the tube to prevent the tube from getting into the
rim joint.
9. Continue with the previous steps in reverse order. You can lay the frame on its side when
replacing the engine wheel. Fit the wheel so that the motor cable is facing the handlebar and
engage the rounded notch in the wheel axis.
10. Inflate the tire to 40-50 p.s.i. / 2.8-3.4 bar.
Changing the inner tube (tire) at the front wheel
1. Make sure the scooter is disconnected from the charger and the display is off.
2. Place the scooter on an elevated position so that the wheels are in the air and the scooter is
firmly held on the bottom of the tread.
3. Loosen the nuts on the motor axis. Remember (take a picture) the order and placement of the
washers on the motor axis.
4. Carefully remove the front wheel from the frame - the brake disc comes out of the front brake.
5. Remove the inner tube from the front rim and replace it with a new one. For easier removal of
the tire, you can brush the rim with liquid soap. When removing the tire, make sure that the rim,
shell and tube are not damaged - use only good quality mounting levers.
6. Continue with the previous steps in reverse order.
7. Inflate the tire to 40-50 p.s.i. / 2.8-3.4 bar.
Lubrication

13
We recommend lubricating (eg with silicone oil) the handlebar folding mechanism every 3
months (do not use WD40). Electric scooter ER
Brakes
Brake pads wear gradually. Brakes can be tightened after some wear - see. section before the
first ride. If the brake pads are worn, they must be replaced - contact your dealer for spare parts.
Brake Pad Replacement Procedure
1. Remove all screws on the rear fender.
2. Unscrew the locking screws of the brake (1).
3. Tilt the mudguard (the mudguard cannot be removed completely due to the tail light cable)
and carefully remove the rear brake from the brake disc.
4. Loosen the cable screw (2).
5. Unscrew the two screws connecting the brake (3) and open the brake.
6. Remove the brake pads (4) and replace them with new ones.
7. Continue with the previous steps in reverse order.
8. Adjust the brake as shown in the procedure. section before the first ride.
Battery
Battery has min. 600 charging cycles. If the worn-out battery is fully charged and you only drive
half the distance on the scooter when it is purchased, we recommend replacing the battery with a
new one.
Screws
Check the scooter screws and, if necessary, before each ride. tighten them
Do not expose the scooter to sun, frost or very humid environments for long periods of time.
Clean the scooter after use.
14
Electric scooter ER
NNON-FUNCTIONALITY OF THE SCOOTER
If the scooter is not working properly, follow these steps:
a / Check that the scooter is on
b / Check the battery capacity on the display
c / Check that the scooter is not braked
d / Check that the display does not show an error message - see. section Description of the
display and buttons.
If the above check does not help or you have found a fault, contact your dealer.
Warranty Conditions
Warranty is provided for parts or workshop scooter processing. The warranty only applies to
scooters purchased from an EcoWHeel electric scooter dealer.
The warranty period of 2 years is valid for the scooter and its components. The usual wear
(battery capacity, tires, etc.) is not covered by the warranty.
The warranty also does not cover defects caused by:
a / commercial use of the product, accident, abuse, negligence, impact, excessive temperature or
humidity exceeding permitted limits, improper installation, improper use, improper maintenance
or modification of the scooter
b / use of the product contrary to the instructions for use
c / defect caused by other equipment or non-original parts
The warranty will not be accepted if the product has been disassembled or repaired by an
unauthorized person.
Use the warranty at the retailer where you purchased the scooter.
Please keep the original packaging for service scooters.
Table of contents


