manuals.online logo
Brands
  1. Home
  2. •
  3. Brands
  4. •
  5. MOTO NOSTRA
  6. •
  7. Scooter
  8. •
  9. MOTO NOSTRA MN3660W User manual

MOTO NOSTRA MN3660W User manual

This manual suits for next models

2

Popular Scooter manuals by other brands

Segway Robotics Loomo Product information guide

Segway Robotics

Segway Robotics Loomo Product information guide

HL Corp ESX3 instruction manual

HL Corp

HL Corp ESX3 instruction manual

F-Wheel DYU S1 instructions

F-Wheel

F-Wheel DYU S1 instructions

Handicare Fortress 2000 SERIES owner's manual

Handicare

Handicare Fortress 2000 SERIES owner's manual

HYOSUNG SF 50 B manual

HYOSUNG

HYOSUNG SF 50 B manual

HOMCOM 371-004 Assembly instruction

HOMCOM

HOMCOM 371-004 Assembly instruction

Kinroad XT125T-10 instruction manual

Kinroad

Kinroad XT125T-10 instruction manual

PLAYTIVE AS-2448 Instructions for use

PLAYTIVE

PLAYTIVE AS-2448 Instructions for use

Ebinger DONKEY XL User instructions

Ebinger

Ebinger DONKEY XL User instructions

Flyer Mountain Original instruction manual

Flyer

Flyer Mountain Original instruction manual

BackCountry eBikes Storm owner's manual

BackCountry eBikes

BackCountry eBikes Storm owner's manual

Pride Boxter owner's manual

Pride

Pride Boxter owner's manual

equipmed FreeRoam II user manual

equipmed

equipmed FreeRoam II user manual

WESTHILL BIKES LINK user manual

WESTHILL BIKES

WESTHILL BIKES LINK user manual

BAnff eProdigy series Assembly manual

BAnff

BAnff eProdigy series Assembly manual

Winther 475 Assembly instruction

Winther

Winther 475 Assembly instruction

Jetson JBZL17 user manual

Jetson

Jetson JBZL17 user manual

Carrera impel manual

Carrera

Carrera impel manual

manuals.online logo
manuals.online logoBrands
  • About & Mission
  • Contact us
  • Privacy Policy
  • Terms and Conditions

Copyright 2025 Manuals.Online. All Rights Reserved.

1
MONTAGEANLEITUNG
ASSEMBLY INSTRUCTIONS
2
MONTAGEANLEITUNG
ASSEMBLY INSTRUCTIONS
3
MONTAGEANLEITUNG
Gepäckträger vorne
ASSEMBLY INSTRUCTIONS
front rack
Vespa GTS HPE + Super Tech (2019-)
MN3660W / MN3660C / MN3660MB
4
MONTAGEANLEITUNG
ASSEMBLY INSTRUCTIONS
Benötigtes Werkzeug:
Maulschlüssel Weite 10
Ratsche mit Torx T25
Schlitz-Schraubendreher
Feile + Schablone
Tools needed:
open-end wrench size 10
ratchet with Torx T25
slotted screwdriver
file + template
Schablone, Maßstab 1:1 / Template, scale 1:1
5
1
Seitlich mit Hilfe des Schlitz-Schrau-
bendrehers das Emblem entfernen.
Remove the emblem from the side
using the slotted screwdriver.
3
Lenker einschlagen,
Kaskade nach oben abnehmen.
Turn handlebars in, take cascade
away upwards.
2
Schraube von Kaskade lösen
(Torx T25).
Loosen screw from cascade
(Torx T25).
6
MONTAGEANLEITUNG
ASSEMBLY INSTRUCTIONS
4
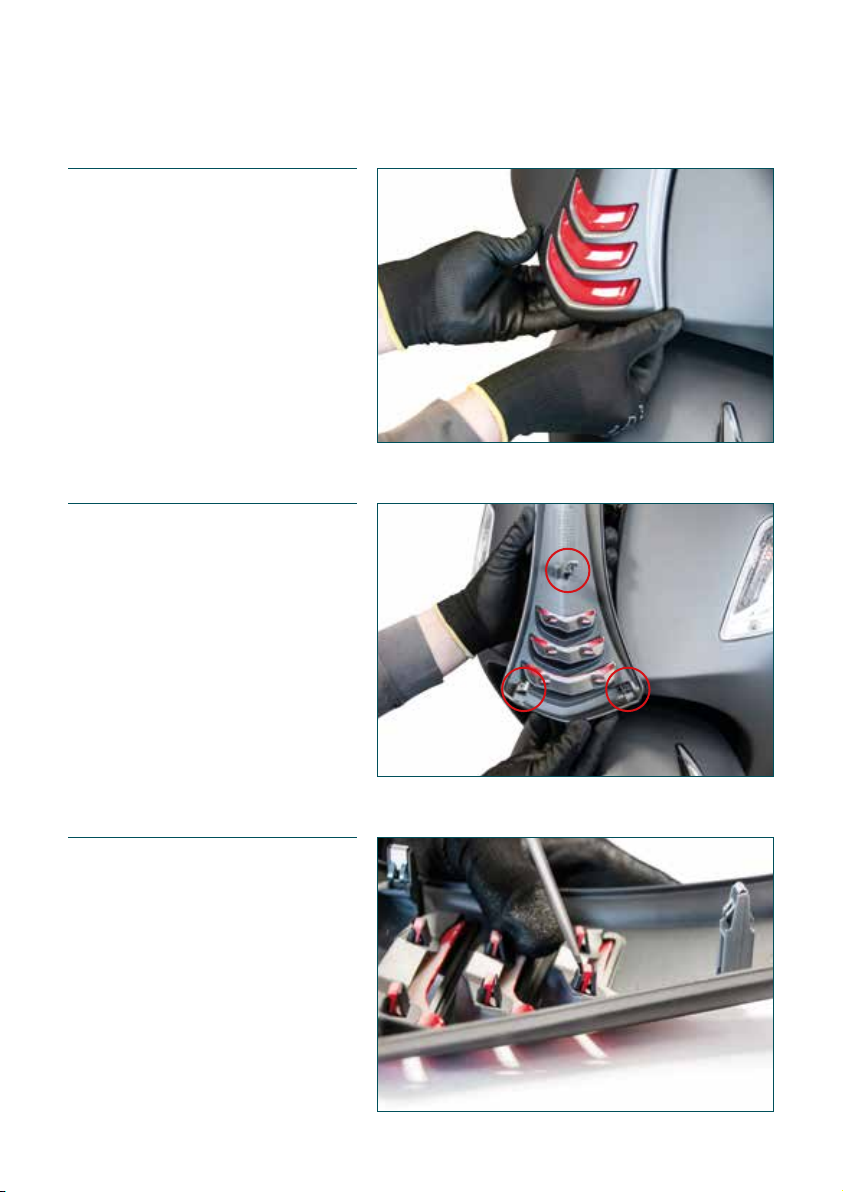
Kaskade durch Ziehen nach unten
und vorne vorsichtig aushängen und
abziehen.
Carefully unhook the cascade by
pulling it down and forward and pull
it off.
6
Anschließend mit dem schmalen
Schlitz-Schraubendreher den oberen
Kaskadeneinsatz lösen und entfernen.
Then loosen and remove the upper
horn grill using the slotted screwdri-
ver.
5
Es gibt drei Befestigungspunkte am
unteren Ende der Kaskade, die zu
lösen sind.
There are three attachment points
at the bottom of the horn cover that
need to be loosened.
7
7
Die Schablone (Seite 4) ausschneiden
und auf der Rückseite platzieren.
Cut out the template (page 4) and
place it on the back.
9
Schablone entfernen.
Remove the template.
8
Die freie Stelle mit einem Edding o.ä.
markieren.
Mark the free space with an Edding
(or similar).
8
MONTAGEANLEITUNG
ASSEMBLY INSTRUCTIONS
10
Mit der Feile den markierten Bereich
wegschleifen.
Use the file to grind away the marked
area.
12
Die Halterung mit der langen Schrau-
be und Unterlegscheibe am Rahmen
befestigen.
Secure the bracket to the frame with
the long screw and washer.
11
Ansicht nach dem Schleifen.
View after grinding.
9
13
Die Kaskade ansetzen und den Halter
durch die Öffnung führen.
Attach the horn cover and guide the
bracket through the opening.
15
Ansicht nach der Montage von Halter
und Kaskade.
View after mounting bracket and horn
cover.
14
Kaskade zur Befestigung unten leicht
andrücken und oben einhängen.
Press the horn cover softly at the
bottom for fastening and hook it in at
the top.
10
MONTAGEANLEITUNG
ASSEMBLY INSTRUCTIONS
16
Den Gepäckträger oben an der Kante
einhängen und ausrichten.
Hook the front rack onto the edge
at the top and align it.
18
Zu guter Letzt die Kaskade oben ver-
schrauben und das Piaggio-Emblem
platzieren.
Last but not least, screw the top of
the horn cover and place the Piaggio
emblem.
17
Den Gepäckträger mit der kleinen
Schraube am Halter befestigen.
Fasten the front rack to the holder
with the small screw.