Ectosense NightOwl User manual
Instructions for Use – NightOwl®Sensor – Healthcare Professional Page 1of 24
NightOwl®Sensor
Healthcare Professional Manual

Instructions for Use – NightOwl®Sensor – Healthcare Professional Page 2of 24
1Document information
These instructions for use were developed exclusively for the healthcare professional
(‘HCP’) and shall not serve to inform patients on their usage of the NightOwl® Sensor.
This labeling information was developed exclusively for the following markets:
Asia-Pacific: Australia, India, New Zealand, Singapore
European Union member states
This labeling information is available in the following languages:
English
French
Consult Commercial Support (see below) if your required language or region is not listed, or if you are not
the intended user of this document.
Store this document for future reference.
2Contacting us
2.1 Technical support
Choose to contact Technical Support over Commercial Support for any questions related to
technical documentation, troubleshooting, or malfunctioning of the sensor.
For support, consider creating a support ticket by contacting us online through
www.ectosense.com/support, even if you have had prior direct contact with an Ectosense representative
through other channels. Contacting Ectosense staff directly through other channels such as email always
results into a longer response time.
For questions regarding a specific sensor, always specify the sensor serial number marked on the sensor
device.

Instructions for Use – NightOwl®Sensor – Healthcare Professional Page 3of 24
2.2 Commercial support
Choose to contact Commercial Support over Technical Support for any questions related to
warranty or replacement programs, pricing, or adaptations of documentation according to your
specific clinical pathway.
2.2.1 Product sourced from Ectosense
In case your product was purchased directly from Ectosense, follow the steps outlined under 2.1 Technical
support.
2.2.2 Product sourced from distributors
In case your product was sourced from a distributor, contact your appointed sales or support
representative directly.

Instructions for Use – NightOwl®Sensor – Healthcare Professional Page 4of 24
Table of Contents
1Document information 2
2Contacting us 2
2.1 Technical support 2
2.2 Commercial support 3
2.2.1 Product sourced from Ectosense 3
2.2.2 Product sourced from distributors 3
3Introduction 6
3.1 Intended use 6
3.2 Intended use cases 6
3.3 Claims 6
3.4 Connection to the NightOwl®Diagnostic System 7
3.4.1 NightOwl®Companion app 8
3.4.2 NightOwl® Software algorithms 8
3.4.3 Ectosense Healthcare Professional app 8
3.4.4 Ectosense Dashboard 8
3.5 Intended Application 9
3.6 Contra-indications 9
3.6.1 General 9
3.6.2 Clinical 9
3.7 General warnings and precautions 9
3.7.1 Precautions 9
3.7.2 Warnings 10
4NightOwl® Sensor system content 10
4.1 Modes and configurations 11
5Using the NightOwl®Sensor 12
5.1 Turning the sensor on and off 12
5.2 Recording configuration and association 13
5.3 Device set-up 14
5.4 Data retrieval 16
5.5 Charging 16
5.5.1 When is charging required? 16
5.5.2 How to recharge the sensor 17
6Care and maintenance 17
6.1 Cleaning 17
6.2 Disinfecting 18
6.3 Maintenance and servicing 18
6.3.1 Firmware updates 18
7Troubleshooting 19
7.1 Indicator lights under normal usage 19
7.2 Issues 19
8Technical Specifications 21

Instructions for Use – NightOwl®Sensor – Healthcare Professional Page 5of 24
8.1 Device and accessories 21
8.2 Disposal 22
8.3 Symbols used on the product labels 23
9Warranty and replacement 23
9.1 Limited Warranty 23
9.2 Outside warranty replacements 24
9.2.1 Lost sensor or charging cradle 24
9.2.2 Loss of other components 24

Instructions for Use – NightOwl®Sensor – Healthcare Professional Page 6of 24
3Introduction
The NightOwl® Sensor is a wireless device designed for comfortable, continuous data recording during an
individual’s sleep.
The device records two signals:
Dual-wavelength photoplethysmography (“PPG”), from which oxygen saturation, peripheral arterial
tone (PAT), and pulse rate channels can be derived.
3-axis accelerometry to capture motion-based activity from which total sleep time (“TST”) and body
position can be derived (depending on the sensor’s placement).
The NightOwl® Sensor was supplied to you either as a stand-alone device or as part of a system for the
diagnosis and monitoring of sleep apnea which further consists of several separate software devices,
together referred to as the NightOwl®Diagnostic System as elaborated in 3.4 Connection to the
NightOwl® Diagnostic System below.
3.1 Intended use
The NightOwl® Sensor is intended to be used for the continuous recording of a patient's pulse waveform
(also known as photoplethysmography, or 'PPG') and motion during sleep or resting, in both the clinical
and the home environment.
The sensor can be worn on the finger, by adults or children aged 13 and over, without requiring direct
supervision of a healthcare provider.
3.2 Intended use cases
1. The patient is provided with the NightOwl® Sensor by a healthcare professional who wishes to
perform a recording of the patient's signals in the home environment as part of a disease
management plan, such as with the NightOwl ®Diagnostic System, or,
2. An individual wishes to add the sensor data to a recording package for sleep patterns and sleep
disturbances.
3.3 Claims
#
Claim
1
The recording of the optical blood volume pulse at spectral peak wavelengths of 660nm (red) and
880nm (infrared).
2
The recording of activity through accelerometry.

Instructions for Use – NightOwl®Sensor – Healthcare Professional Page 7of 24
3.4 Connection to the NightOwl®Diagnostic System
Ectosense’s software tools enable the automated analysis to support healthcare professionals in the
diagnosis and monitoring of patients for sleep apnea, as well as provide means to set-up, manage, and
track these patients.
Together, these tools constitute the NightOwl® Diagnostic System. The NightOwl®Sensor can be used as
part of that system, although it is a medical device on its own and available for other uses as well.
The NightOwl® Diagnostic System is further described in its manual which can be found at:
www.ectosense.com/nightowl-documentation
Where throughout this document reference is made to functionalities of other elements of the
NightOwl® Diagnostic System, a blue text box is shown as illustrated below.
For compatibility of the NightOwl®Sensor with the NightOwl® Diagnostic System, ensure that
the sensor is placed on the finger.

Instructions for Use – NightOwl®Sensor – Healthcare Professional Page 8of 24
3.4.1 NightOwl®Companion app
Description: iOS and Android smartphone application available for download in the respective
app stores
Intended User: patients
Intended Use:
Links patient with the test provider and test configuration by means of a code or unique link
Provides patient with instruction for set-up
Receives data over Bluetooth® Low Energy (BLE) from the NightOwl®Sensor, and sends it to
the NightOwl®Software's cloud environment
Optional: Push questionnaires to patients
3.4.2 NightOwl® Software algorithms
Description: cloud-based algorithm that generates diagnostic reports based on the data
captured by the NightOwl® Sensor.
Intended User: Ectosense runs these algorithms on request of healthcare professionals
Intended Use:
The NightOwl® Softwareis intended for physiological signal retrieval, visualisation, report
generation, analysis and interpretation for the area of direct diagnosis and monitoring of
obstructive sleep apnea.
Claims:
The NightOwl®Software accurately diagnoses patients with obstructive sleep apnea based
on an analysis of the peripheral arterial tonometry ('PAT'), amongst other channels. It
provides the AHI as well as additional parameters relevant for the diagnosis such as total
sleep time and an indication of cardiac irregularities. It displays photoplethysmography-
derived signals and actigraphy, and (optionally) snoring traces.
Medical device Class IIa (Europe).
3.4.3 Ectosense Healthcare Professional app
Description: iOS and Android smartphone application available for download in the respective
app stores
Intended User: the test provider
Intended Use:
Configure offline tests for patients that do not use a smartphone, by linking a patient to a
NightOwl®Sensor.
Download data stored on the NightOwl®Sensor after usage in which no smartphone was
involved and send it along to the NightOwl®Software algorithms.
3.4.4 Ectosense Dashboard
Description: browser-based dashboard at dashboard.ectosense.com/nightowl
Intended User: the test provider

Instructions for Use – NightOwl®Sensor – Healthcare Professional Page 9of 24
Intended Use:
Initiate testing and configure tests
Inspect status of tests and final diagnostic reports
Optional: Order logistical fulfilment by Ectosense
Admins only: Oversee billing and enrollment of related healthcare professionals into a joint
working unit
3.5 Intended Application
The device is intended to be in contact with non-injured skin at the following body site(s):
The distal phalanges (fingertip)
Body application can last for 15 hours or more and application can be repeated daily.
The sensor is re-usable and is supplied with single-use biocompatible adhesives for attachment of the
sensor to the body site.
3.6 Contra-indications
3.6.1 General
Do not use the sensor on regions of the skin that are tattooed, heavily blemished, or rough.
3.6.2 Clinical
Do not use on individuals in critical care.
Any physical or operating condition that restricts blood flow, such as use of a blood pressure cuff,
may cause an inability to determine high quality photoplethysmografic readings.
Do not use on patients with dyes introduced into their bloodstream, such as methylene blue,
indocyanine green, indigo carmine, or fluorescein.
3.7 General warnings and precautions
The following are general warnings and cautions. Further specific warnings, precautions, and notes
appear next to the relevant instruction in the manual, further accompanied with the cautions symbol.
3.7.1 Precautions
A precaution explains special measures for the safe and effective us of the device.
Do not expose the NightOwl® Sensor to excessive forces, such as caused by fall, shock, or impact.
The power plug is designed to be used within 110-240V AC, 50-60Hz. Check if the required voltage
is available before connecting the adapter to the socket.
Instructions for Use – NightOwl®Sensor – Healthcare Professional Page 10 of 24
Always transport and store the sensor, charging cradle, power plug, or charging cable in the
original packaging to ensure that no damage to the components may arise during transportation
and storage.
The finger wrap for adhesion of the sensor should be disposed of after each use.
3.7.2 Warnings
A warning alerts you to possible injury.
Choking hazard! Keep the device and its accessories away from children.
Do not charge or use the device if it is cracked, damaged or if the internal components are visible.
Do not expose the sensor and accessories to temperatures over +60° Celsius (140° Fahrenheit).
Do not eat, swallow, drop, hit, abuse, open, incinerate, burn or short circuit the sensor, its
accessories, or its components.
Electrical Interference from other devices: The sensor has been designed to work satisfactorily in
the presence of mobile phones, laptops or wireless routers. If the sensor data is not being received
by the qualified app on the mobile device, move a short distance to a new location to remove any
possible influence of another strong radio emitter and then retry the data transfer.
Allergic Reaction: prolonged use may cause an allergic reaction in some users. If an allergic
reaction occurs at the sensor placement site, immediately stop the use.
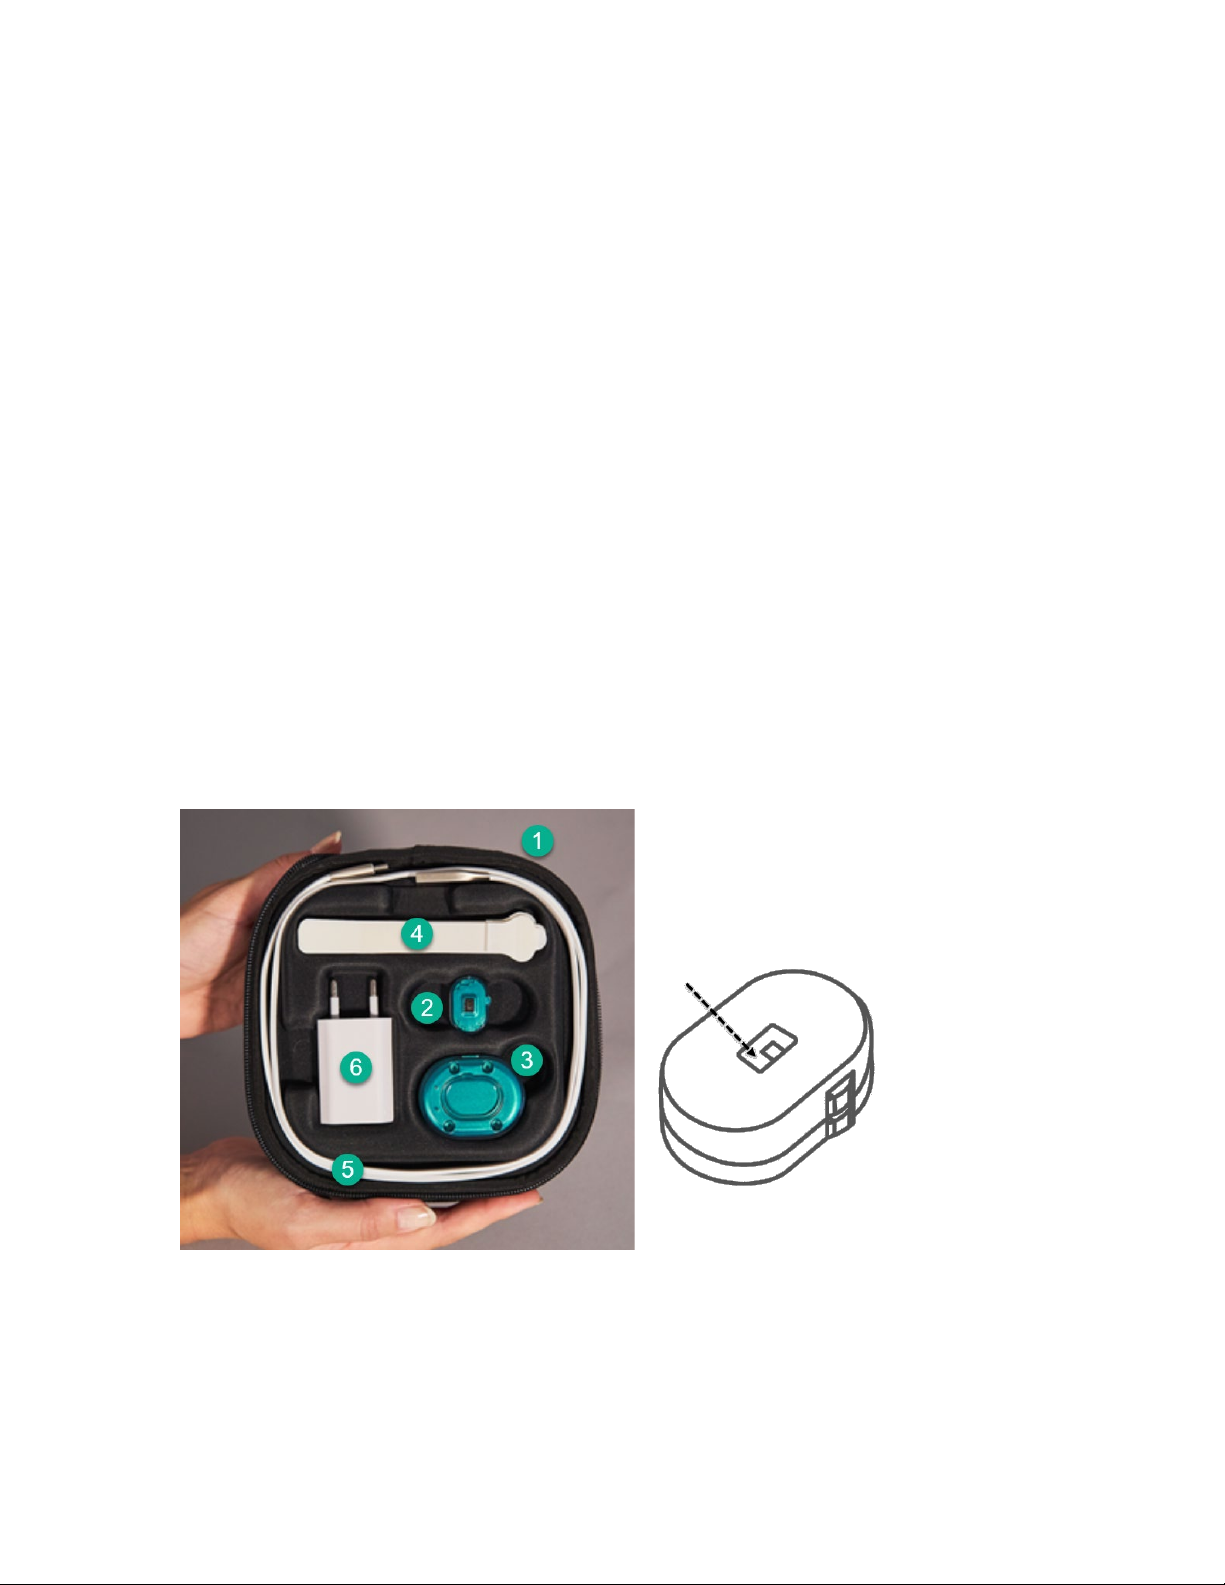
4NightOwl® Sensor system content
The NightOwl® Sensor system includes:
1. Casing with NightOwl® logo, which contains all the elements listed below;
2. Sensor, containing the Optical Module that emits red and infra-red light (see arrow in the
picture above)
3. Charging cradle (USB-C)
Instructions for Use – NightOwl®Sensor – Healthcare Professional Page 11 of 24
4. Disposable finger wraps (single-use)
5. Charging cable (USB-A to USB-C) to connect the charging cradle with the power plug;
6. Power plug with USB-A port (optional, depending on your geography).
Do not use the Sensor with accessories that are not expressly indicated by Ectosense as fit for
use as this may cause damage, injuries, loss of performance, and voidance of the warranty.
In particular, pay attention not to use the charging cradle with a power plug that does not
output 5 VDC 700mA nominal, 1A max.
4.1 Modes and configurations
The NightOwl® Sensor can operate in two modes. Selection of modes is automatic and will not require
active operator intervention.
1. Streaming Mode
When the sensor is turned on, it will first seek to establish a Bluetooth® Low Energy (BLE) connection with
a nearby smartphone with a qualified smartphone app installed (see blue box below).
Upon such connection and subsequent start of the recording, the sensor will stream its data to the
smartphone in real-time, without storing this data on the sensor itself.
NightOwl® Diagnostic System
Ectosense makes available the NightOwl Companion app for patients to connect with the Sensor.
Upon completion of a recording, the NightOwl Companion app automatically uploads the transferred
data to the NightOwl Software for further analysis through WiFi or via an available mobile network
connection.
2. Offline Mode [functionality not enabled yet]
If no qualified smartphone application is found after turning on the sensor (see Streaming Mode), the
Sensor will automatically switch to its Offline Mode. In this mode, the Sensor will store up to 30 hours of
recording on its internal memory, after which the operator is required to download the data through an
active Bluetooth® Low Energy (BLE) connection.
A time-stamp is added to the recording based on the internal clock of the sensor device.
Instructions for Use – NightOwl®Sensor – Healthcare Professional Page 12 of 24
In Offline Mode, memory is constrained to 30 hours of recording.
After 10 hours, the sensor will automatically turn off to preserve memory. Upon reaching full
memory, the sensor will overwrite the oldest recording present on the memory.
NightOwl® Diagnostic System
Ectosense makes available the Ectosense Healthcare Professional app to download the data off the
Sensor over a BLE 5 connection using an Android smartphone or tablet.
This app also allows to associate the sensor with a patient.
5Using the NightOwl®Sensor
5.1 Turning the sensor on and off
Turn on the sensor by firmly pressing the push button using your nails for at least 0.5 seconds. The sensor
will vibrate and the Optical Module will start to emit red light.
The indicator light will briefly turn green (0.5 seconds) to indicate that no data is left on its memory. If this
light appears, the sensor can be provided to a new patient without the risk of overwriting prior recording
sessions still stored on the memory.
If the indicator light blinks purple, the sensor does not contain a sufficient battery charge for a 10 hour
recording and will require to be recharged first (see 16 Charging).
Turning the sensor on will put the sensor in Streaming Mode in which it will try to establish a BLE
connection with a qualified smartphone app. Absent such connection, it will automatically proceed to
Offline Mode and start loggings data on the sensor memory. Upon establishing a Bluetooth connection,
the indicator lights will turn blue for 2 seconds.
Turn off the sensor by firmly pressing the button until the Optical Module ceases to emit red light.
NightOwl® Diagnostic System
In Online Mode and using the NightOwl® Companion app, the sensor will be turned off automatically
when the patient indicates on the app to be awake, and there is no further need to turn the sensor
off manually.
Instructions for Use – NightOwl®Sensor – Healthcare Professional Page 13 of 24
5.2 Recording configuration and association
The configuration of recordings and associating the sensor with a patient or test is optional and takes
place within the NightOwl® Diagnostic System.
NightOwl® Diagnostic System
Healthcare professionals can use the Ectosense Dashboard to create a test and input patient details,
or leave it to the patient to input further details in the NightOwl® Companion app.
Streaming Mode
The following parameters can be configured in the Ectosense Dashboard for each test:
Amount of testing nights
Questionnaires [optional]
These parameters will be applied to the recording when the patient downloads the app through a
unique link embedded in the email sent to that patient upon creation of a test.
Note that these patient-specific parameters will not apply if no email address was provided into the
Ectosense Dashboard. If you do not enter the patient’s email, or if you supply the patient with physical
instruction papers which include a different activation code, your standard unit settings will be applied,
and any patient-specific deviations therefrom are not possible.
Offline Mode
In the Offline Mode, patients do not use a smartphone and therefore a different method is required to
associate a patient or test with a recording from the NightOwl® Sensor.
When using our Ectosense Healthcare Professional app, you will be required to link a test that you have
previously created in the Ectosense Dashboard with a unique sensor by establishing a BLE connection
with that sensor. At this time, the app will prompt you to associate it with patient information. If you
do not associate the sensor with patient information at that time, you will be prompted to do so when
you download the data off that sensor using a Bluetooth connection again (see 5.4 Data retrieval).
For further information on the workings of the NightOwl® Diagnostic System and how to configure
tests, consult the NightOwl® Diagnostic System Manual available at:
www.ectosense.com/nightowl-documentation
Instructions for Use – NightOwl®Sensor – Healthcare Professional Page 14 of 24
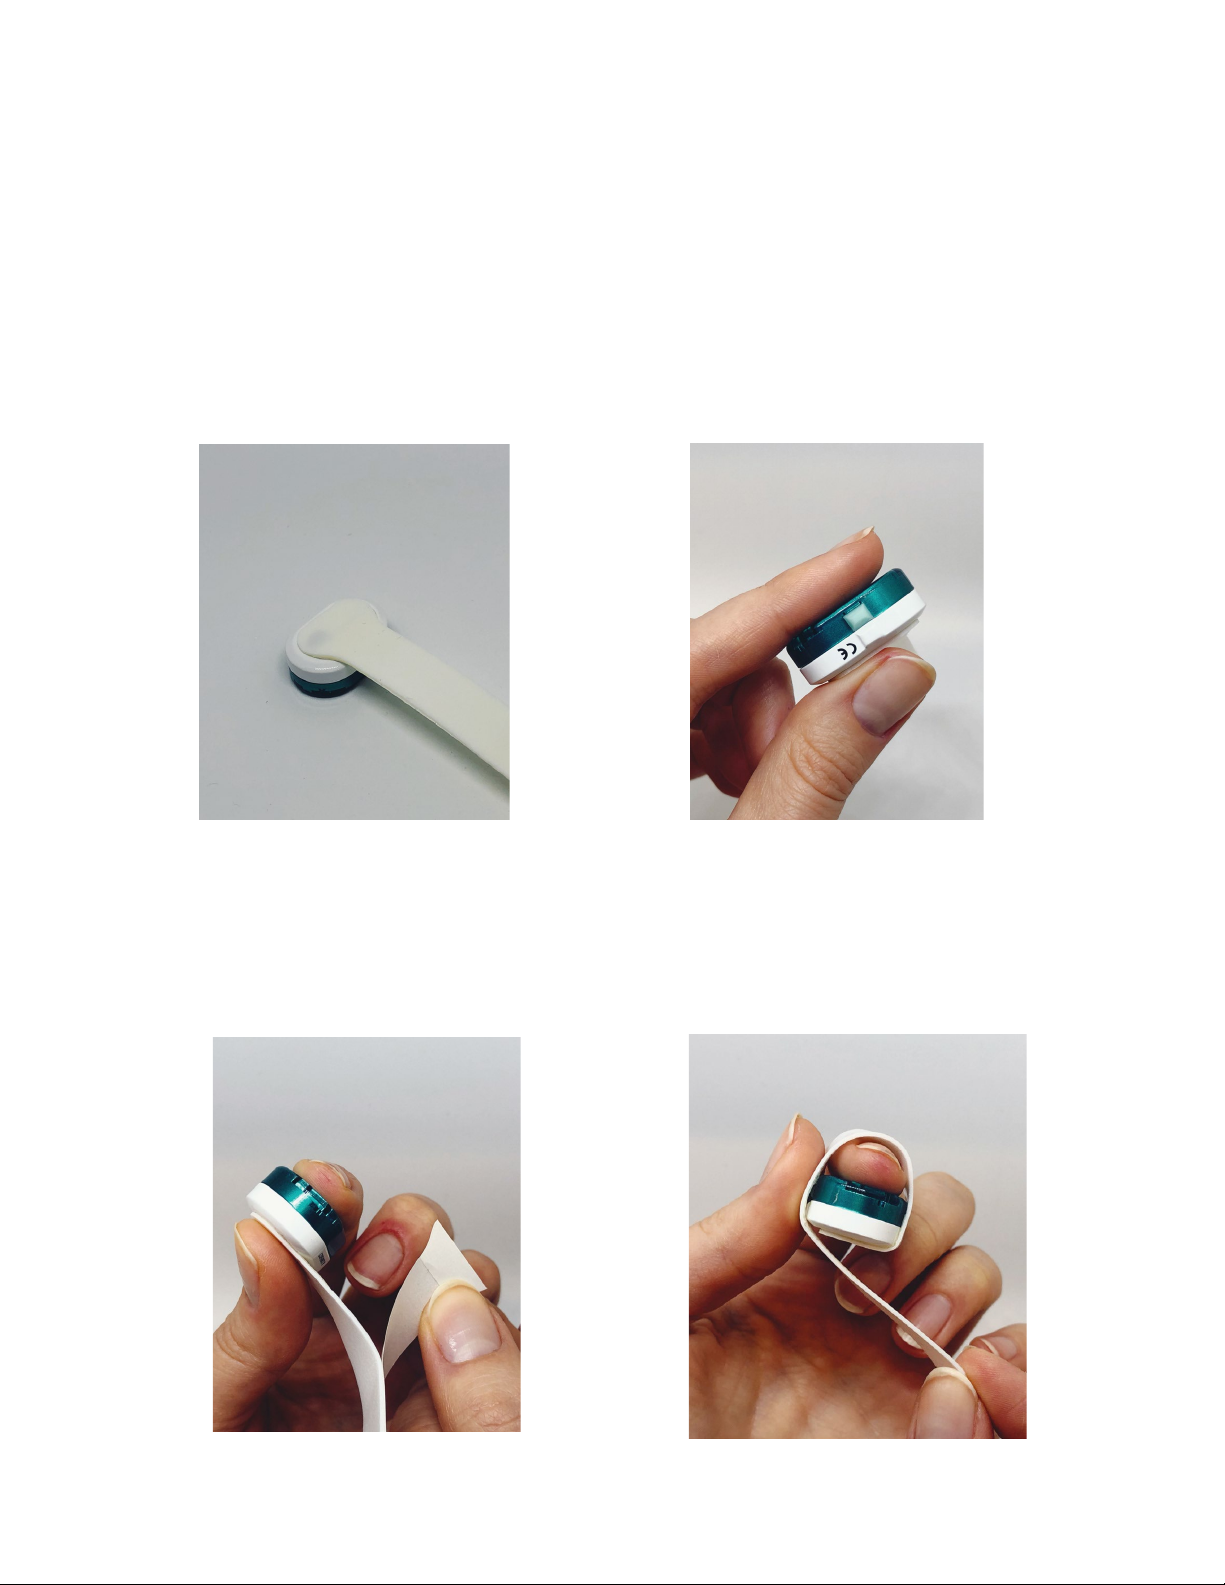
5.3 Device set-up
3. Turn on the sensor.
4. Place the sensor with the white side up.
5. Take a new adhesive and remove its top liner
on the round sided end.
6. Adhere the round, sticky side of the adhesive
on top of the white side of the sensor
1. Place the finger on the green side of the
sensor. Make sure the finger is aligned with
the sensor and it rests flat on the sensor.
2. Preferably, the sensor is worn on the index
finger of your non-dominant hand to minimize
signal distortion due to motion.
8. Remove the second part of the liner
9. If the wrap breaks or gets damaged
during the application, just take a
new one.
7. Wrap the adhesive snugly around the finger, so
that it does not move around. If ever the
adhesive feels uncomfortably tight, rewrap it
more loosely.

Instructions for Use – NightOwl®Sensor – Healthcare Professional Page 15 of 24
NightOwl® Diagnostic System
Online Mode
Patients using the Online Mode will be guided through
extensive instruction videos on the smartphone
application which introduce all the above-mentioned
steps.
Ectosense also provides paper-based Step-by-Step
Instructions (Online Mode) that can be further tailored
to your process and pathway and can aid in explaining
the test to your patients (see example to the right).
Offline Mode
You will need to distribute the paper-based Step-by-Step
Instructions (Offline Mode) to your patients. These
instructions will contain all the above-mentioned steps.
For more information and examples, consult the NightOwl®Diagnostic System Manual
and the
available paper-based Step-by-Step Instructions at the following web page:
www.ectosense.com/nightowl-documentation
10.The sensor is now correctly
applied.
Instructions for Use – NightOwl®Sensor – Healthcare Professional Page 16 of 24
5.4 Data retrieval
Recordings performed in the Online Mode do not require further data retrieval.
Recordings performed in the Offline Mode are stored internally on the sensor and require further data
retrieval. This data download is to be performed over BLE and requires a qualified smartphone or tablet
app.
Whether data is still present on the sensor can be checked by turning the device on: if a short green light
does not immediately appear, data is still available for downloading.
NightOwl® Diagnostic System
Ectosense provides the Ectosense Healthcare Professional Android smartphone/tablet app to download
data stored on the Sensor over a BLE 5 connection.
Downloading data over the smartphone will automatically clear the memory of the sensor afterwards.
5.5 Charging
5.5.1 When is charging required?
The sensor requires at least 10 hours of recording capacity before it can start to record data. If the battery
does not meet that criterium, the sensor will emit a continuous purple light and should be charged.
When fully charged, the battery of the sensor lasts at least 30 hours.
We recommend that you advise your patients to recharge the sensor after each (nightly) recording. Doing
so ensures that the sensor is returned to you in a state that does not require recharging before dispensing
it to another patient, and can save valuable time to the operator.
While in Online Mode, battery depletion will break the connection with the smartphone app.
In Offline Mode, battery depletion will end the recording but all data will remain stored on the memory
of the sensor. A small recharge will subsequently be required prior to being able to download the data off
the sensor.
To preserve battery and battery storage capacity, in Offline Mode the sensor will automatically shut down
after 10 hours.
Instructions for Use – NightOwl®Sensor – Healthcare Professional Page 17 of 24
5.5.2 How to recharge the sensor
The power plug is designed to be used within 110-240V AC, 50-60Hz. Check if the required
voltage is available before connecting the adapter to the socket. Failure to do so can lead to
damage to the sensor, charging cradle, power plug, or charging cable.
The sensor can only be charged using the supplied wireless charging cradle.
To bring a depleted battery up to 10 hours of usage requires approximately 60 minutes of charging. A
complete recharge requires approximately 4 hours.
To charge the sensor:
1. Find a power source and connect the power plug and charging cable to it.
2. Connect the charging cable to the charging cradle.
3. Position the sensor into the charging cradle with its green side up such that the sensor fits in the
charging cradle’s cavity. A blue indicator light will appear on the charging cradle to indicate that
the sensor is charging.
4. The sensor is fully charged when the blue indicator light on the charging cradle switches off. Make
sure this is not due a disconnection with the electricity source.
It is safe to leave the sensor on the charging cradle even when charging is complete.
6Care and maintenance
Regular cleaning and maintenance should be carried out on the NightOwl® Sensor as described below.
6.1 Cleaning
Never use abrasive agents, chlorine-containing substances, acetone, or other solvents to clean
the device.
Do not immerse the sensor or charging cradle and ensure that no fluids penetrate the products.
Do not attempt to sterilize the device, as this could cause unobservable damage to the inside
of the unit.
1. Turn off the sensor and ensure the charging cradle, charging cable, and power plug are
disconnected from any source of power.
2. Clean the following parts with a damp cloth and a mild liquid soap: sensor and charging cradle.
Ensure that no liquid enters the USB-C port of the charging cradle.
3. Leave the cleaned parts to dry.
Instructions for Use – NightOwl®Sensor – Healthcare Professional Page 18 of 24
It is recommended to subject the sensor to cleaning as described above in between use by different
patients. Recommend patients to perform such cleaning at home when the sensor remains with them for
an extended period of time.
6.2 Disinfecting
After cleaning the sensor as instructed above, disinfect the device as follows:
1. Apply undiluted disinfectant to a clean non-dyed disposable cloth.
2. Wipe all surfaces of the sensor.
3. Leave the disinfectant on the sensor for five minutes.
4. Wipe residual disinfectant from the sensor with a clean, dry, undyed disposable cloth.
The following disinfectants can be used on the sensor:
70% Ethyl alcohol or isopropyl alcohol (IPA)
Mikrozid
Cavicide
6.3 Maintenance and servicing
Other than routine cleaning, there is no additional maintenance or calibration required.
There are no user serviceable parts. Do not attempt to open the device or any of its
components
Any device failure should be communicated to Technical Support (see 2 Contacting us) after carefully
reading the 7Troubleshooting section of this document.
6.3.1 Firmware updates
The embedded software on the sensor (“firmware”) can be updated over a BLE connection with a qualified
smartphone app.
NightOwl® Diagnostic System
The firmware can be updated automatically prior to a patient starting a recording if he or she is using
the NightOwl® Companion app, or can be manually updated using the Ectosense Healthcare
Professional app under the assistance of a technical representative.

Instructions for Use – NightOwl®Sensor – Healthcare Professional Page 19 of 24
7Troubleshooting
7.1 Indicator lights under normal usage
Indicator light
Meaning
Online Mode
Purple blinking
The battery is too low – recharge the sensor.
Blue 2 seconds
A connection with a qualified smartphone app was established
successfully.
Blue blinking
The sensor was previously connected to an app, and has now lost
connection. It is possible that you moved too far away from the
smartphone. Upon getting closer to the smartphone, the
connection should re-establish automatically leading the blue light
to disappear.
Offline Mode
Green 0.5 second flash
The memory does not contain any data and you can proceed with
a new test without risking any overwrite.
Green blinking
The sensor is in the process of clearing data stored on its internal
memory after an Offline Mode recording, as commanded by the
Ectosense Healthcare Professional app.
Purple blinking
The battery is too low – recharge the device.
Charging cradle indicator lights
Blue continuous
Charging and sensor is not fully charged yet.
7.2 Issues
If any problems arise while using the NightOwl® Sensor, take the following actions. If the problem cannot
be solved, contact Technical Support (see 2 Contacting us), unless specified otherwise.
Prior to investigating the problem further, it is advised to reset the sensor by pressing the button for 20
seconds. Upon rebooting, the indicator lights will turn blue three times.
Problem/Possible cause
Action
My sensor does not turn on
1. Press longer than 0.5 seconds.
The sensor does not vibrate when turning on
1. Report the issue to Technical Support.
The indicator lights turned red for 30 seconds
1. The sensor is in error state.
2. Reset the sensor.
Charging cable/power plug/NightOwl casing is
1. Contact Technical Support within the

Instructions for Use – NightOwl®Sensor – Healthcare Professional Page 20 of 24
defective
warranty term, or Commercial Support
when outside of it.
My sensor is heating while charging, resulting in
the sensor having an uncomfortable
temperature
1. Remove the sensor from the charging
cradle and abstain from using the sensor.
2. Report the issue to Technical Support.
The sensor vibrates when turning on, but the
Optical Module does not start to emit light
1. Abstain from further using the sensor.
2. Report the issue to Technical Support.
After sensor application, the user’s skin has
become irritated.
1. Abstain from further using the sensor.
2. Ask the user for any known allergies.
3.
Report the issue to Technical Support,
citing any relevant known allergies.
Connection between sensor and NightOwl®
Companion or Ectosense Healthcare Professional
app is not possible
1. Consult the NightOwl® Diagnostic System
Manual.
The Optical Module emits green light instead of
red
1. Abstain from further using the sensor
2. Report the issue to Technical Support – it
is likely that your sensor will require a
firmware upgrade.
The push button no longer works or requires an
excessive amount of force.
1. Report the issue to Technical Support.
2. If you manage to turn on the sensor
regardless, the sensor is safe for continued
use while you are being helped.
The serial number on the sensor is no longer
visible.
1. Download the Ectosense Healthcare
Provider app on an Android device and log
in with your Ectosense Dashboard account
details.
2. C
ontact Technical Support for further
instructions on how to identify the sensor
by establishing a Bluetooth connection.
Other manuals for NightOwl
1
Table of contents
Other Ectosense Accessories manuals


