Edesa PREMIUM CHG-BD1/HUM User manual

CHG-BD1/HUM
EDESA PREMIUM HUMIDIFIER
Humidificador/Humidificador
Instructions for use
Instrucciones de uso
Instruções de Utilização
ELECTRICAL CONVECTOR WITH HUMIDIFIER
This product is only suitable for well insulated spaces
or occasional use.
EN
CONVECTOR ELÉCTRICO CON HUMIDIFICADOR
Este producto solo es adecuado para espacios bien aislados
o para usos ocasionales.
ES
CONVETOR ELÉTRICO COM HUMIDIFICADOR
Este produto destina-se a ser instalado apenas em espaços
bem isolados ou a uso ocasional.
PT
EN
2
U0638789
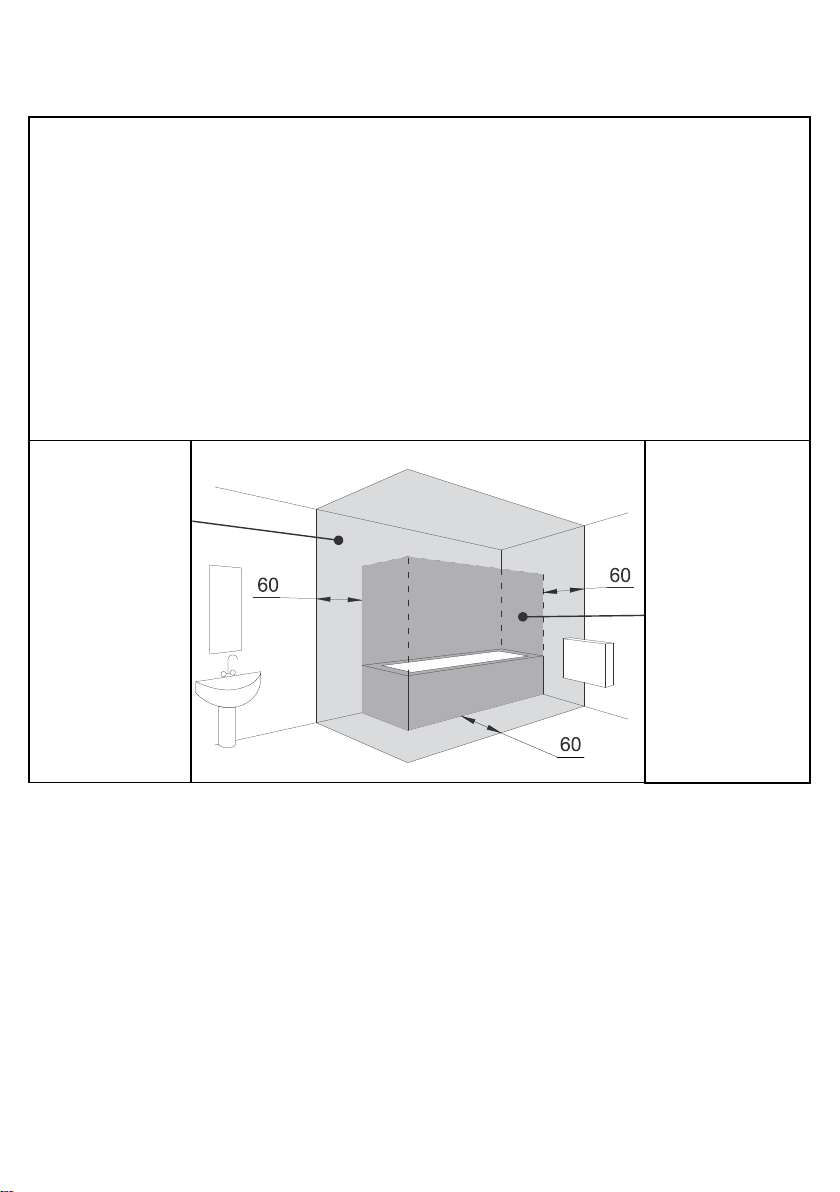
EN –Where to install the device? (The dimensions are given in
centimetres).
ES –¿Dónde se puede instalar el dispositivo? (Las distancias se
indican en centímetros).
PT –Onde deve ser instalado o aparelho? (As dimensões são
expressas em centímetros).
EN –volume 2
ES–volumen2
PT –volume 2
EN –volume 1
ES–volumen1
PT –volume 1

EN
3
EN –Do not install the appliance.
ES –Dónde no debe instalarse el aparato.
PT –Não instale o aparelho.
80
12
30
50
30
30
80

EN
4

EN
5
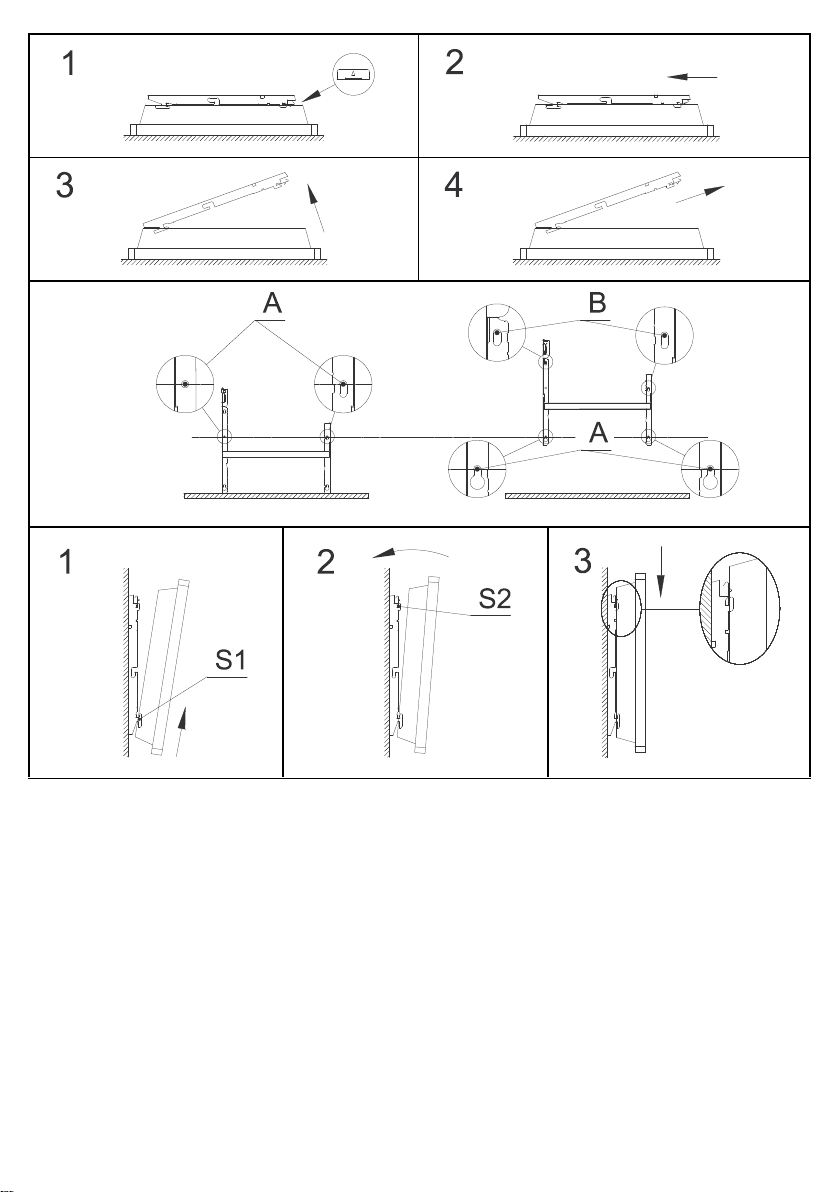
EN –Wall mounting version (A, B –Drilling points).
ES –Versión para montaje en pared (A, B: puntos de perforación).
PT –Versão mural (A, B –pontos de furação).
EN
6

EN
7
WARNING (EN)
Caution, hot surface. WARNING: Some parts of this
product may become very hot and cause burns on
contact. Special care must be taken if children and
vulnerable adults are present.
- Children under 3 years must be kept away from this appliance,
unless they are constantly supervised.
- Children between 3 and 8 years should only put the unit on or
off, provided that the latter has been placed or installed in a normal
position and that these children have supervision or have received
instructions on using the machine safely and understand the potential
hazards. Children aged between 3 and 8 years must not connect or
adjust or clean the device and perform maintenance.
- This unit can be used by older children at least 8 years and by
people with physical, sensory or mental reduced capabilities or lack
of experience or knowledge, if they are monitored correctly or
instructions for using the appliance safely are given to them and if the
risks were apprehended. Children should not play with the appliance.
Cleaning and user maintenance should not be performed by children
without supervision.
- If the power cable is damaged, it should be replaced by the
manufacturer, his after-sales department or by a person of similar
qualification to avoid any danger.
- This appliance may only be plugged in or connected by an
authorized person, according to valid regulations and rules.
- Before the first use, hold the device at room temperature for at
least half an hour.
- With the first setting in heating mode, a light odor and smoke
can appear corresponding to the combustion of factory grease is
possible, which could remain on the device after it was assembled.
- Do not block the outlet of the humidifier tube when the
appliance is operating in the humidifier mode.
- Before moving, cleaning or filling the device, switch off it and
unplug the power cord.
- If you detect a strange smell or noise coming from the
humidifier, switch off the device, unplug the power cord and contact

EN
8
the after-sales service at the number indicated in the warranty form
included with this manual.
Caution: For safety reasons, and to avoid overheating, do
not cover the heating appliance.
Appliances carrying this symbol must never be disposed
of with household waste, but must be collected separately
for recycling. At the end of their life, products must be
collected and recycled according to local regulations and
ordinances.
When an appliance is installed at a higher altitude, the air
output temperature rises (around 10°C per 1000 m rise in
ground).
The humidifier in high level mode provides a flow rate of
100 ml/h, which must be taken into account when using
the device in rooms with a large area.
- The user manual for the appliance is available from the after-
sales department, on the number shown on the warranty form
included with this manual.
INSTALLATION (EN)
Where to install the device? (see page 2)
- This appliance has been designed to be installed in residential
premises. Please consult your dealer if other circumstances apply.
- It must be installed in accordance with professional standards,
and comply with the regulations in force in the country of installation.
- The appliances are class II and protected from water splashes
to IP 24. They may therefore be installed in volume 2 of shower
rooms. It is forbidden to install the device in volume 1. It must be
impossible for anyone using the shower or bath to reach the
appliance’s controls, however.
- Respect minimum distances to obstacles when positioning the
appliance.
- The appliance’s support bracket allows to maintain a free
space behind the appliance so as not to interfere with its adjustment.
The gap between the appliance and the wall shall not be obstructed
in any way.

EN
9
- This device is equipped with a user absence sensor in order to
make it easier to detect the absence of the user in the room, avoid
installing the device in narrow corner or behind furniture.
Do not install the appliance (see page 2, 3)
- In a draught that could affect its adjustment (beneath a
centrally-controlled mechanical fan unit, etc.).
- Underneath a fixed mains socket or near curtains or any other
flammable materials.
- In area 1 of the bathroom.
- The air outlet grid and control unit must be visible at the top of
the appliance. It is forbidden to mount a vertical device horizontally
and vice versa.
Your model can be installed both in portable (mobile) and wall
mounted version.
Portable (mobile) version
-CAUTION: the appliances which are not equipped with plug
cannot be used in mobile version (with feet kit).
- The appliance must be placed on a horizontal surface. Please
refer to the installation instructions on page 4 of this booklet or to the
instructions attached to the feet kit art. 0517000/
0517550/0517300/0517400 (not supplied, tu buy separately).
-CAUTION: When moving the device with a full humidifier, do
not tilt the appliance to avoid water leaking from the tank.
- In case of falling down or leakage from the humidifier, it is
recommended to disconnect the device from the power supply,
remove water from the external surfaces of the device and leave it to
dry for 24 hours.
- Do not use the device in rooms with a small space if they
contain persons who are unable to leave the room on their own,
unless they are under constant supervision.
Wall mounted version (see page 5)
- For the better effect of heating, it is recommended to install the
device at a height of 1 m from the floor level or under the window
slits. To ensure normal circulation of the air flow and of the water mist
from the humidifier, it is not allowed to cover the convector with
furniture and other objects closer than 0.8 m.

EN
10
- Release the appliance’s latching bar. We recommend you
place the appliance flat on the ground. Use a screwdriver to raise the
tongue of the fitting, carefully so as not to distort it. While keeping the
tongue raised, push the latching bar downwards to release the
latches at the top. Pivot the latching bar around the lower latches.
Remove the latching bar.
- Fix the latching bar. Place the latching bar on the floor against
the wall. Locate the drilling points A. These show you where the lower
fastenings are. Lift the latching lug, aligning it with the drilling point A
to locate the drilling points B. These show you where the upper
fastenings are. Drill the four holes, and insert the plugs. If extra
support is needed, use special plugs (e.g.: in plasterboard). Position
the latching bar and screw in place.
Lock the appliance onto latching bar
Place the appliance at an angle on the supports S1. Pivot the
appliance to place it on the supports S2. Lower the appliance onto
latching bar. The appliance clicks in place, showing it is fixed and
latched. To release the appliance from the latching bar, use a flat-
head screwdriver and push the tongue (top left of the latching bar
behind the appliance) towards the wall. Lift the appliance while
holding the tongue with the screwdriver. Swing it forward then lift it
off the supports S1.
Electric connection
- The power supply to the appliance is 220 - 230V, 50Hz - 60Hz.
- In damp atmospheres, such as bathrooms and kitchens, the
junction box must be located at least 25 cm from the floor.
Grounding is forbidden.
Do not install the device above or under a power outlet. The
appliance must be connected to the power supply in accordance with
the standards and regulations in force in the country of installation.
USING HUMIDIFIER MODE (EN)
WARNING: Use only clean, cool tap water to fill the tank. Filtered
or distilled tap water are recommended in hard water areas.
Never use any liquid solution other than the recommended
water and cleaning agent inside this instruction.
Appliance must always be unplugged during filling and
cleaning.

EN
11
Filling
- The volume of the humidifier water tank is 0.5 liters.
- Before filling the humidifier with water, make sure that the drain
stopper of the humidifier is tightly screwed.
- To fill the humidifier with water, do the following:
1. Take the handle of the water tank and lift it up
2. Pull the water tank to the right
3. Turn the water tank upside down. Turn the valve counterclockwise.
Fill the tank with recommended water

EN
12
4. In order to avoid leakage it is not recommended to fill the water
tank above this mark.
5. Install valve by turning it clockwise. Make sure no water leaks.
6. Place the water tank in the upper position in the opening of the
humidifier and push the tank in until it stops.
7. Move the water tank to the bottom. Water will immediately begin
to flow into the humidifier.

EN
13
- Before refilling, completely empty the water tank and the
humidifier's internal water tank, and then refill it with water. This
keeps the water fresh.
- The device has a special compartment for aromatic liquids
located below the water tank.
- To add a flavored liquid, do the following:
1. Pull the essential oil support to the right without removing it
completely.
2. Carefully add a few drops of essential oil to the sponge.
3. Slide the essential oil support back into the appliance.

EN
14
MAINTENANCE (EN)
ATTENTION! All operations are performed only with the device
completely de-energized!
In order to maintain the performance of the appliance, you should
use a vacuum cleaner or a brush twice a year to remove the dust
from the upper and lower grids.
To ensure effective and continuous operation of the humidifier, it is
necessary to perform cleaning procedures regularly (once a week).
Cleaning the humidifier prevents solid deposits (scale) that often
appear when using hard water. Do not leave water in the tank for a
long time. It should always be fresh. If you are not going to use the
device for a long time, dry the water tank and drain the water from
the humidifier's internal tank using the drainage system at the bottom
of the product. Non-observance of the cleaning mode may result in
failure of the humidifier and void the warranty.
Every three years, a maintenance engineer should check the inside
of the appliance.
In a polluted atmosphere, dirty marks could appear on the
appliance's grill and nozzle of humidifier. This is because of the poor
quality of the ambient air. In this case, it is advisable to check that
the room is properly ventilated (fan, air intake, etc.) and that the air
is clean. Such dirty marks are no reason to have the appliance
replaced under the terms of the warranty.
The casing of the appliance can be cleaned with a wet lint free micro
fiber fabric, do not use abrasive products.
Cleaning of the humidifier
Attention! Never use to clean the device abrasive, aggressive or
flammable cleaning products such as alcohol and strong acidic
mixtures, solvent (acetone) and solvent/oil-based products,
mixtures of alkaline and bleaching agents, air fresheners,
fragrant oils, hot water which could damage the surface and
parts of the device.
To avoid scale formation, use citric acid solution (10 grams
citric acid per 100 ml of water) or vinegar (50 ml of 4% acetic
acid solution per 100 ml of water).
- Remove the water tank from the device
EN
15
- Unscrew the drain stopper of the humidifier counterclockwise
(before performing this item, place a container for water under the
humidifier drain hole that remains in the internal case of the
humidifier)
- Install the drain stopper back into the humidifier by turning it
clockwise
- Fill the water tank with recommended cleaning liquid
- Install the tank into the humidifier and leave at least 4 hours
(better at night)
- After the required time has expired, flush the tank and the
internal container of the humidifier with clean water
STORAGE (EN)
- If the appliance is not in use, unplug the appliance
- Before leaving the device for storage, drain the water from the
tank and from the internal container of the humidifier using the
drainage system
- Clean the humidifier before and after long-term storage
according to the cleaning instructions
- Store the device in the original packaging in a dry, ventilated
area, in the absence of contact with a chemically aggressive
environment
TRANSPORTATION (EN)
Transportation is carried out by all modes of transport in covered
vehicles, to prevent mechanical damage to the external enclosure
and the temperature indicator. The possibility of spontaneous
movement (fall down) of the device in the middle of the vehicle must
be excluded
UTILISATION OF ALTIS ECOBOOST 2 HUMIDIFIER (EN)
Atlantic brand founded in 1968 is known for its specialization in heating systems, thermal comfort and energy
saving technologies. New ALTIS ECOBOOST 2 HUMIDIRIER model purchased by you comes with 50 years of
experience and innovations.We hope that ourproduct will fullymeet your needs. Thanks for yourtrust in Atlantic
brand! For more detailed information about all our solutions, please visit our website: www.atlantic-comfort.com
OPERATING PRINCIPLE
- Increasing and decreasing temperature (7°C to 30°C in
Manual Mode only) without further mandatory confirmation
- Navigation through the menu;
- Confirmation;
- Switching off;
- Blocking, unlocking

EN
16
HEATING OPERATION MODES
The appliance has 4 operating modes:
MANUAL
The appliance constantly maintains the temperature set in the settings
PROG
The appliance runs an internal program configured for each day of the week. Once the appliance is switched on, the
user can set the following adjustment ranges:
Monday, Tuesday, Thursday and Friday, Comfort from 6.00 to 8.00 and from 18.00 to 22.00. Wednesday Comfort
from 6.00 to 8.00, from 12.00 to 14.00 and from 18.00 to 22.00. Saturday and Sunday, Comfort from 6.00 to 22.00.
The user can change the specified ranges and set up to 3-time ranges in Comfort mode for each day of the week.
Duringexecutionof these Comfort ranges, the set temperature can be adjusted with or . Outsidethe Comfort
ranges, the set temperature is the Eco temperature, which can be set in Temp. ECO section (see “Menu in PROG
mode” section).
Your device is equipped with a function that allows your device to anticipate the heating when you use
programming. When you set the programming of your device, it will anticipate the heating according to the time
of rise in temperature so that your room is at the right temperature when you arrive.
For example: if you set your programming with a comfortable return at 15:00, the unit will start before you can
anticipate the heating of your room (between 10 minutes and one hour).
AUTO
The appliance independently controls the transitions between COMFORT and ECO temperature modes
depending on the human presence in the room.
OFF
The mode OFF - turning off the heating mode (does not affect the operation of the humidifier).
HUMIDIFIER OPERATION MODES
The appliance has 5 operating modes:
MANUAL
The device constantly maintains the humidity level set in the settings. It is possible to choose 3 levels of steam
supply: high, medium, low.
PROG
The humidifier follows the program installed in the PROG menu for heating. For the humidifier work in the PROG
mode, it is necessary to start the PROG mode in heating, respectively.
AUTO
The device independently controls the on/off humidifier, depending on the presence of a person in the room.
For the humidifier to operate in AUTO mode, it is necessary to start the AUTO mode in heating, respectively.
LIGHT
Mode LIGHT - on/off light indication of the humidifier operation (LED indicator at the nozzle of a humidifier in the
form of a drop). When the LIGHT function is activated, during operation of the humidifier, the indicator lights up
in blue. If the water level is low, the indicator lights up red, even when the LIGHT function is deactivated.
OFF
The mode OFF - turning off the humidifier mode (does not affect the operation of the heating).
SWITCH
On the back of the appliance’s control unit there is On/Off button.
Use this switch only when you stop the heating/humidifier for a long time (out of heating season). To energize
the appliance, set theOn/Off button into position. If the appliance is disconnected from the supply voltage, you
will have to re-set the date and time when switching on your appliance.
FIRST USE
Select your language, and then date and time. When you switch on the appliance for the first time:
-MANUAL mode for heating will be activated.
-the set temperature will be 20°C.
-humidifier mode will be deactivated.
TURNING THE HEATING ON/OFF
To turn the heating off, press and hold down . Confirm "OFF" command by pressing . To switch the
appliance on, press and hold down .
CONTROL LOCK
To prevent changing the settings by children, you can lock the appliance controls by pressing and holding down
button. Select “Lock” and confirm by pressing . To unlock the controls, select “Unlock”» .

EN
17
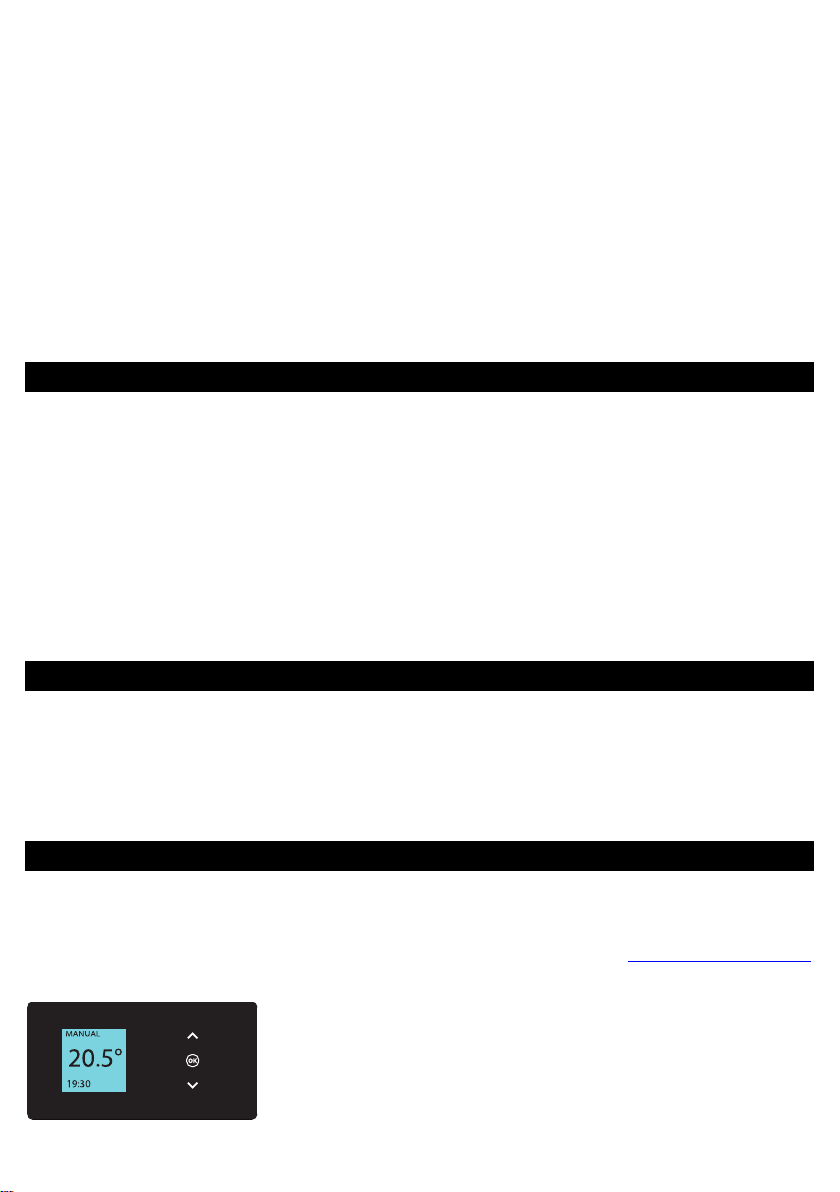
TEMPERATURE SETTING
In MANUAL mode:
MANUAL
Increase using (max 30°C).
Decrease using (min 10°C).
Can be decreased additionally to 7°C (anti-freezingtemperature, which is unchangeable) using
.
20.0°
19:30
In PROG mode:
PROG
If the display shows PROG, you can set the programming range in Comfort mode.
Increase the temperature using (max 30°C).
Decrease the temperature using (min 10°C).
20.0°
19:30
PROG
ECO
If the display shows PROGECO, you can set the programming range in ECOmode. To change
the temperature in ECO mode range, go to Temp. ECO menu (see “Menu in PROG mode”
section).
16.0°
19:30
PROG
If the anti-freezing temperature (7°C) is set, then when switching to ECO mode programming
range the display will show 6°C (automatic decrease by 1°C)
7.0°
19:30
When returning from ECO programming range to Comfort programming range, the display will show the
temperature that was pre-set in Comfort mode, or, if it is the first use, the temperature set in MANUAL mode.
EN
18
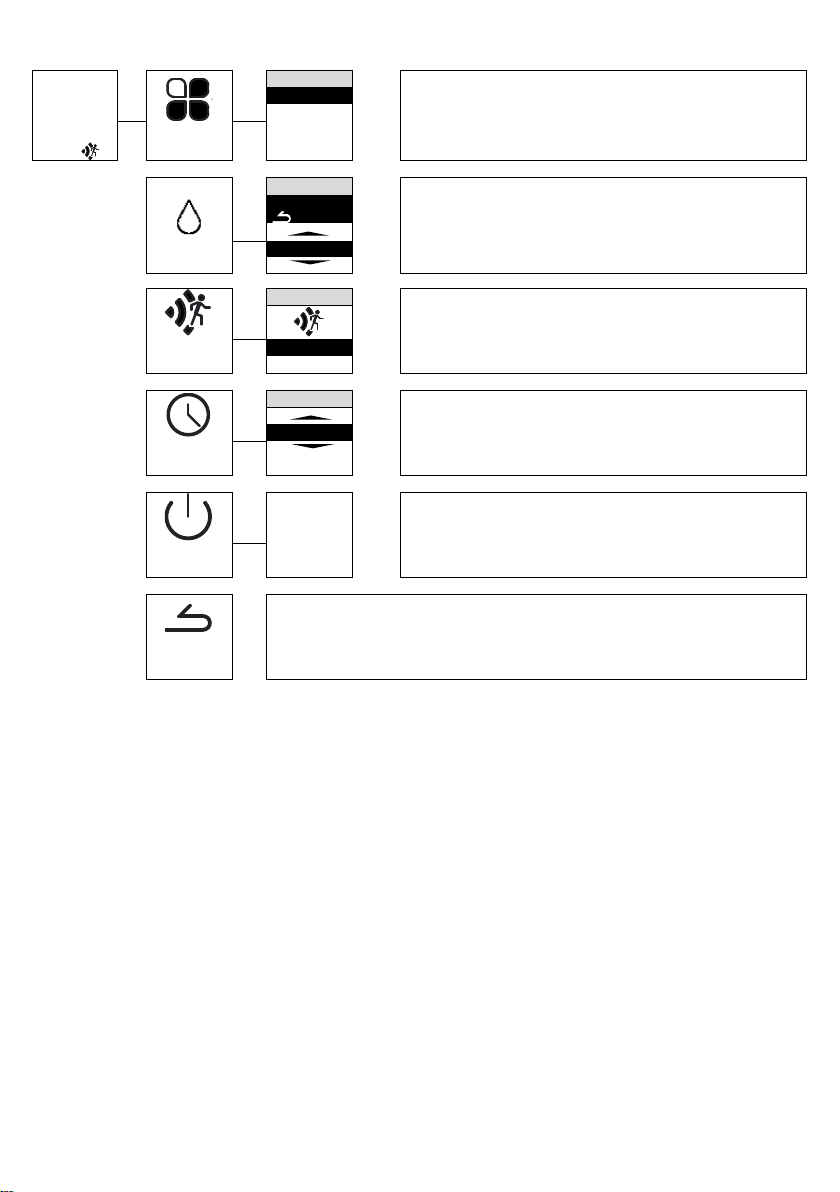
Menu in heating MANUAL mode
MANUAL
Mode
Mode
To go back to main screen. The temperature can be set.
20.0°
MANUAL
PROG
AUTO
12 : 00
OFF
Humidifier
Humidifier
Setting up the device in the humidifier mode
MANUAL
Boost
Activation or deactivation of the Boost function.
Increase the heating intensity, depending on the presence of the
user in the room.
Boost
Enable
Disable
Clock
To set the day and time.
Monday
Clock
12 : 00
Turn off
To switch the appliance off.
Turn off
To go back to start screen.
Back

EN
19
Menu in heating PROG mode
PROG
Mode
Mode
To go back to main screen. Internal program is already preset. It can
be changed through Programming.
20.0°
MANUAL
PROG
AUTO
12 : 00
OFF
Humidifier
Humidifier
Setting up the device in the humidifier mode
MANUAL
ECO temp.
To set the temperature for unoccupied period (6°C to 19°C).
outside
COMFORT
ECO temp.
15.0°
Up to 3 Comfort time ranges can be programmed
for each day of the week.
- Select the day using . Confirm :
- Select using .Confirm .
- Select the start time using or .
- Confirm .
- Select the end time using or .
- Confirm .
Programming
Monday
Thu
6:00
7:00
Mon
Frid
8:00
9:00
Programming
Tues
Sat
--:--
--:--
Wed
Sun
Monday
6:00
7:00
8:00
9:00
--:--
--:--
You can copy the program from a certain day to
another day(s):
- Select . Confirm .
- Scroll through the days using or .
- Select the day, to which the program is copied
using .
- To confirm the copying, select “Copy”.
- Confirm .
Monday
Tue
Frid
Wed
Sat
Thu
Sun
Copy to
Occupation
Activate or deactivate the "Occupation" function. The transition from
"Comfort" to "ECO" is automatic depending on the detection of the
presence of the user in the room.
Occupation
Enable
Disable
Clock
To set the day and time.
Monday
Clock
12 : 00
Turn off
To switch the appliance off.
Turn off
To go back to start screen.
Back

EN
20
Menu in heating AUTO mode
АUТО
Mode
Mode
Presence detection is activated. Automatic switching between
Comfort and Eco modes depending on detection of the user’s
presence in the room.
20.0°
MANUAL
PROG
AUTO
12 : 00
OFF
Humidifier
Humidifier
Setting up the device in the humidifier mode
MANUAL
ECO temp.
To set the temperature for unoccupied period (6°C to 19°C).
outside
COMFORT
ECO temp.
15.0°
Clock
To set the day and time.
Monday
Clock
12 : 00
Turn off
To switch the appliance off.
Turn off
To go back to start screen.
Back
Table of contents
Languages:
Popular Humidifier manuals by other brands

Carro
Carro ME-F800W user manual

Air-O-Swiss
Air-O-Swiss AOS 7142 Instructions for use

Vava
Vava VA-AH012 instruction manual

DriSteem
DriSteem MP Installation, operation and maintenance manual

Bionaire
Bionaire BU5110-CN Instruction leaflet

Herrmidifier
Herrmidifier 707U Installation, operation and maintenance instructions

Neptronic
Neptronic SKD Series Installation instructions and user manual

Stulz
Stulz DRH-04 instructions

Global
Global 246135 user manual

Cooper & Hunter
Cooper & Hunter MALDIVES Series instruction manual

New Air
New Air AU-400 instruction manual

AIRINNOVATIONS
AIRINNOVATIONS MH-703 Instruction manual and warranty information


