Edesa PL-211 User manual

MANUAL DE
CARACTERÍSTICAS,
UTILIZACIÓN Y
CONSERVACIÓN
PANTALLA mantenedora de
calor
HEATER LAMP
pmc

2
INDICE
1. Garantía ............................................................................. pág 3
2. Descripción, características y especificaciones .............… pág 3
3. Instalación y puesta en marcha ………………………….. pág 4
4. Riesgos y precauciones de uso ………………………….. pág 4
5. Mantenimiento y conservación ………………………….. pág 5
INDEX
1. Warranty................................................................................. page 6
2. Description, characteristics and specifications.................….. page 6
3. Instalation and start-up ............……………………..…….... page 7
4. Risks and cautions......................………………………….... page 7
5. Maintenance and preserving.....………………………......... page 8
6. Electrical diagrams....................…………………………..... page 12
7. Certification............................................................................ page 14
8. Appendix............................................................................ page 15

3
1.- GARANTIA
Se responsabilizará únicamente de los defectos de fabricación, quedando
excluidas la manipulación o utilización incorrecta del material por parte del cliente o
usuario. El servicio de la mano de obra y los desplazamientos son siempre por cuenta
del cliente. Se declina toda responsabilidad por los defectos imputables al transporte,
siempre que no se realice la reclamación oportuna en un máximo de 24 horas después
de recibir la mercancía.
1.- DESCRIPCION, CARACTERISTICAS Y ESPECIFICACIONES
El objeto para el que se ha diseñado este elemento es el de ser instalado en un
buffet de autoservicio. Está especialmente concebido mejorar la presencia y las
condiciones de exposición de los alimentos mediante el aporte de la iluminación
necesaria o iluminación y calefacción en el caso de las pantallas de calor.
La pantalla mantendora de calor en ningún caso sirve para calentar
alimentos, únicamente realiza una aportación de calor complementaria a la del
elemento técnico inferior. En cualquier caso, los alimentos expuestos deben haber sido
calentados previamente.
Esta pantalla está preparada para poder incorporar un termómetro de lectura
digital de Edesa (no incluido) en el caso de haya sido instalada sobre cualquier otro
elemento de la gama y desee ofrecer la temperatura de éste último a los clientes.
POTENCIAS INSTALADAS
PMC 240 W
SISTEMAS DE FUNCIONAMIENTO INSTALADOS:
El aporte de luz y calor mediante se realiza
lámparas halógenas ECO (bajo consumo) protegidas mediante cristal pirolítico.
INSTALACIÓN Y PUESTA EN MARCHA

4
La instalación in situ y la puesta en marcha de este mueble deben ser realizadas
por personal técnico cualificado.
Evite las fuentes directas de calor, frío, humedad, rayos solares y rayos
ultravioletas en la ubicación definitiva del presente elemento. Estufas, radiadores, aire
acondicionado, etc. pueden influir negativamente en su correcto funcionamiento.
Compruebe que la tensión y la frecuencia de la red coinciden con las descritas en
la placa de características. Es imprescindible que la instalación eléctrica donde se vaya a
conectar el aparato disponga de toma tierra, así como de la debida protección de
magnetotérmico y diferencial. No conecte otros aparatos alimentándolos con la misma
acometida eléctrica.
Elimine el plástico protector y los residuos adhesivos que cubren el acero.
Instalación sobre una encimera de la propiedad:
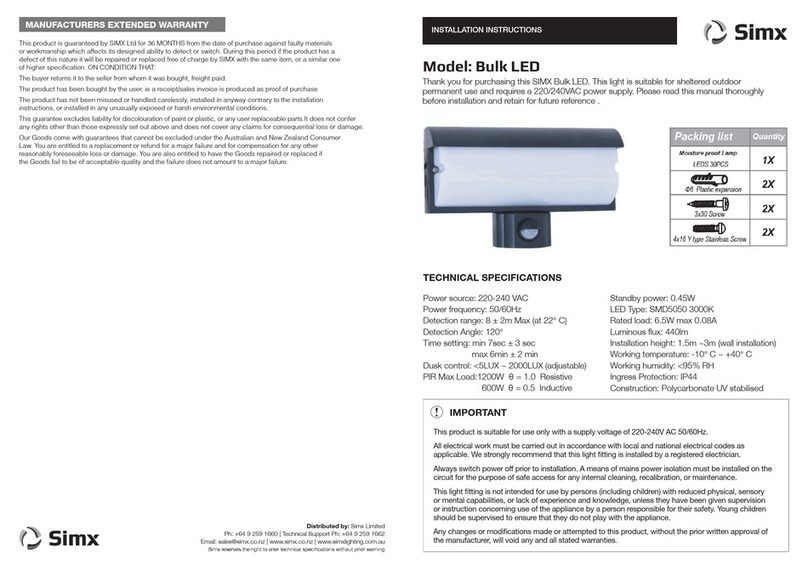
Anexo al presente manual encontrará los orificios que deberá practicar a la
encimera para la instalación de la pantalla.
Una vez pasada la acometida eléctrica de la pantalla, proceda a su sujeción
mediante los tornillos suministrados.
El encendido de la pantalla se realiza mediante el interruptor de puesta en
marcha ubicado en la propia pantalla. Dicho interruptor deberá iluminarse.
RIESGOS Y PRECAUCIONES DE USO
El aparato debe ser reparado únicamente por personal cualificado. Antes de
cualquier manipulación, avise a su distribuidor.
Si no va a usar el aparato durante largos periodos de tiempo, procure que se
quede desconectado de la red y limpio.
Procure que no incidan sobre el aparato fuentes externas que perjudiquen su
rendimiento (calefacción, fuentes de calor directas o similares).
Todo el aparato está construido mediante chapas de acero inoxidable por lo que
presenta riesgos de corte inherentes a su diseño y a su construcción con chapas de
pequeños espesores. Extreme la precaución manipulándolos y limpiándolos.
Las pantallas calientes pueden alcanzar temperaturas considerables (máx. 48º C
en un local a 25º C) por lo que presentan riesgo de quemadura.

5
No permita, en ningún caso, que los niños manipulen el aparato.
MANTENIMIENTO Y CONSERVACION
EL MANTENIMIENTO TECNICO DEBE SER REALIZADO POR EL
SERVICIO DE ASISTENCIA TECNICA DE SU DISTRIBUIDOR.
LIMPIEZA
Para realizar las labores de limpieza del aparato es recomendable desconectarlo
previamente de la red. No salpique agua a los componentes eléctricos.
Para limpiar el acero inoxidable utilice una esponja o bayeta, agua tibia y jabón
neutro. No utilice productos abrasivos, disolventes, limpiadores de metales o
detergentes no diluidos. Seque posteriormente con un paño.
AVERÍAS
Algunos problemas se deben a causas que se eliminan fácilmente sin necesidad
de avisar al servicio técnico. Lea el cuadro adjunto atentamente:
PROBLEMA PROCEDIMIENTO
El aparato no funciona. Verifique que el aparato está debidamente conectado a la toma
de corriente, que los fusibles están en buen estado y que no ha
saltado el limitador automático de potencia.
La pantalla calienta o ilumina
poco Verifique el buen estado del fluorescente o las lámparas
halógenas (según modelo). Si es preciso sustituir alguna de
ellas se recomienda avisar a su Servicio de Asistencia Técnica.
Ha efectuado todas las revisiones
básicas y el problema persiste.
Póngase en contacto con su distribuidor o con su Servicio de
Asistencia Técnica.

6
1.- WARRANTY
The warranty will only cover manufacturing defects, excluding any incorrect
handling or use of the material by the clients or users. Labour costs and travelling
expenses are always on the account of the client. Any responsibility for defects
attributable to transport will not be accepted, unless the relevant claim is placed within a
maximum period of time of 24 hours after receiving the goods.
1.- DESCRIPTION, CHARACTERISTICS AND SPECIFICATIONS
The purpose for which this equipment has been designed is to be built into a
self-service buffet and is specially conceived to improve the presence and the display
conditions of food by means of the provision of the necessary lighting or heating in the
case of the heated gantries.
The heated gantries are not suitable in any case to heat up the food, they
only provide additional heat to the lower technical element. In any event, the food
displayed must have been previously heated.
This gantry is designed to include an Edesa digital thermometer (not included) in
the case it has been installed on another element of the range and you want to display
the temperature of the latter to the clients.
POWER INSTALLED
PMC 240 W
INSTALLED OPERATION SYSTEMS:
The illuminated gantries (PL) include high performance and low consumption
fluorescent TL5 technology.
The heated gantries provide light and heat by means of ECO halogen lamps (low
consumption) protected with pyrolytic glass.
INSTALLATION AND START-UP
The in-situ installation and start-up of this appliance must be carried out by
qualified technical personnel.
Avoid having direct sources of heat, cold, humidity, sunlight and ultraviolet rays
in the final location of this appliance. Heaters, radiators, air conditioning, etc. can have
a negative influence on the correct operation of the same.

7
Check that the voltage and frequency of the electricity supply network coincide
with those described in the characteristics plaque. It is essential that the electricity
installation where the appliance is to be installed has an earth connection, as well as the
necessary protection of a thermal magnetic switch and a circuit breaker. Do not connect
other appliances in the same electric socket.
Remove the outside plastic and any remaining adhesive covering the steel.
Installation on a worktop of the owner:
Attached to this manual you will find the holes that should be made on the
worktop.
The gantry must be then fastened down with the bolts provided.
You can switch on the by pressing the start-up switch located on the itself. Said
switch should light up.
RISKS AND USE PRECAUTIONS
The appliance must be only repaired by qualified personnel. Please contact your
distributor and do not attempt to open this appliance.
If the appliance is not going to be used for long periods of time, make sure it is
cleaned and disconnected from the mains electricity supply.
Make sure that external sources do not influence the appliance that may
prejudice its performance (direct sources of cold or similar).
This appliance is made of stainless sheet steel and there are risks of cutting
inherent in its design and to being made of thin sheet steel. Please take extra special care
when handling it and cleaning the same.
The hot s can reach fairly high temperatures (maximum of 48º C in premises at
25º C) and consequently there is a risk of burns.
Do not allow children to handle the appliance under any circumstances.
MAINTENANCE AND CONSERVATION
ANY TECHNICAL MAINTENANCE MUST BE CARRIED OUT BY
YOUR DISTRIBUTOR’S TECHNICAL ASSISTANCE SERVICE.

8
CLEANING
In order to clean the appliance it is recommendable to firstly disconnect the same
from the mains electricity supply. Do not splash water on the electric components.
To clean the stainless steel use a sponge or cloth, tepid water and neutral soap.
Do not use abrasive products, solvents, metal cleaning liquids or undiluted detergents.
Dry with a cloth afterwards.
MALFUNCTIONING
Some problems are due to causes that are easily resolved without having to
contact the technical service. Please read the following table carefully:
PROBLEM PROCEDURE
The appliance does not work. Check that it is correctly connected to the electricity socket and
that the fuses are in good condition and that the automatic
power limiter has not tripped.
Does not heat or heats up very
little. Check the fluorescent or the halogen lamps (depending on
model). If any of them needs to be replaced, we recommend
contacting the Technical Assistance Service.
All the basic checks have been
carried out and the problem
remains.
Contact your distributor or your Technical Assistance Service.

9

10
POSICIÓN Y DIMENSIONES DE LOS TALADROS

Edesa Hostelera S.A.
c/ Can Milans 13
Pol. Ind. Can Milans
08110 Montcada i Reixac
España
DECLARACION DE CONFORMIDAD CE
EC DECLARATION OF CONFORMITY
Directiva del consejo con la que se declara conformidad:
Council directive to which conformity is declared:
DC/73/23/ECC, BAJA TENSIÓN / LOW TENSION
DC/89/336/ECC, COMPATIBILLIDAD ELECTROMAGNÉTICA /
ELECTROMAGNETIC COMPATIBILITY
Aplicación de las Normas:
Application of the Standards:
EN-60335-1 Seguridad / Security
IEC/EN-60598-1 Luminarias / Lighting
Tipo de equipo/Type of equipement: Pantallas con iluminación y/o calefacción
Foodshields with light or/and heat
Año / Year: 2011
Modelos / Models: PL-211, PL-311, PL-411, PL-511, PC-211, PC-311, PC-411, PC-
511, PMC
Edesa Hostelera S.A. declara que los equipos especificados cumplen con las
Directivas y Normas mencionadas.
Edesa Hostelera S.A. hereby declare that equipements specified above conform to
the above Directives and Standards.
This manual suits for next models
8
Table of contents
Languages:
