Edgeonup PT50A Industrial User manual

Instructions For Use of Your
PT50A Industrial, PT50B & PT50C Sharp
Edge Sharpness Tester
manufactured by
Pictured PT50B
Thank you for purchasing a PT50 Series Sharp . From now on you will know with precision how sharp
the edges on your best knives, scissors, woodworking tools and industrial cutting edges really are.
Always use caution when handling sharp edges and protective gloves are always a safe bet!

The PT50A Industrial edge tester is the only edge tester in the PT50 Series that is warrantied by Edge On
Up for medical, light industrial and commercial use. The PT50A includes a steel measurement platform,
our fastest processer, 1 gram of resolution and a heavy duty strain gauge sensor.
The PT50B is the favorite of professional sharpeners, knife and scissor enthusiasts, and woodworkers
worldwide. With its 5 grams of resolution and steel measurement platform the PT50B is designed for
both endurance and accuracy.
The PT50C was developed specifically with the home chef in mind with 25 grams of resolution. The
PT50C includes our disposable clip system for fast and easy measurements at home.
Assembly - There is little assembly required with your PT50 Series instrument. Mount the Knife Fulcrum
with magnetic base on the round platform ring and place the test clip holder with test clip inserted (or
Test Media Fixture as pictured above if purchased) inside the platform circle. Aluminum Test Media
Fixtures come to you preloaded and ready to measure.
Battery - Two AAA batteries are already installed in your PT50
The operation of all PT50 Series Sharp units is identical except as noted in this manual.
Disposable Clip System - While the EOU Disposable Clip System utilizes BESS Certified test media in its
construction, EOU test clips have not yet received full certification from BESSU. Test Clips are
manufactured by EOU and not BESSU. In their unaltered state Test Clips will generate a very reliable 20%
deviation (lower and across all measurement ranges) than the BESS Standard. To convert a Test Clip
measurement to a BESS measurement simply multiply the test clip result by (1.2). If the test media
tension is relieved in the test clip by working one leg of the clip forward and then back test clips match
BESS scores perfectly. It is this de-tensioning process and the more limited range of test clips that are
the subjects of continued discussions with BESSU. Test Clips are tensioned to meet the needs of our
medical and test laboratory customers more fully. Tensioning also makes home kitchen use more simple
and safer.
Sharp ™determines the sharpness of edges the same way you do - by measuring the amount of force
required to cut through a medium. When a knife or other cutting edge requires the application of a
great amount of force to cut or slice through a material then you know that it is dull. In that same
manner Sharp measures, very precisely, the force required to sever a carefully engineered standard
test media. The number displayed by the PT50 after a test is completed will be your BESS C scale score.
Please consult the graph at the end of this manual for more information on the BESS. This number
represents the number of grams of pressure required to sever the test media with your cutting edges.
The lower the number the sharper the edge. The PT50 Series displays force readings in either 1, 5 or 25
gram increments, depending on the model you have purchased, and from 0 - 2000 grams.
Your PT50 Series unit has a simple three button operation. ON/OFF, TARE/ZERO and BACKLIGHT. The
two null buttons are used at the factory for calibration purposes. After factory calibration is set you
should never need worry about additional calibration because your PT50 Series instrument re-calibrates
itself automatically upon every power-up. Just make certain that the instrument is resting on a flat and
stable surface when the instrument is powered up.

Although you will typically try to begin the measurement process with the display sitting at zero, in fact,
zeroing is not always required nor necessary. The measurement system employed by Sharp is a
"greater than" methodology meaning that the instrument is always looking for the maximum amount of
pressure applied to the test media during any one measurement event. As an example, let's say that we
are measuring a knife edge that will, eventually, require more than 300 grams of pressure to sever the
test media. If the PT50 display is reading 100 grams when the measurement process begins, force
applied to the test media by the knife edge will not begin to register until more than 100 grams of
pressure is applied to it. So, in this case. whether or not the display reads "100" or "0" at the beginning
of the measurement process has no effect on the final test result.
Power the unit up with the ON/OFF button, allow the unit to self-calibrate and when the display reads
"0" grams, perform the measurement. Once the cutting edge has severed the test media the
measurement is complete and your BESS score will be shown on the display. Reload test media, TARE
the unit out to "0" and begin your next measurement.
Other Forms & Types of Edges - This manual speaks primarily to knife edges but, in fact, the PT50A and
PT50B are used across the world for measuring all sorts of edges like those used by woodworkers,
milliners, and industry. Only the PT50A though is recommended for edges that may frequently exceed
1000 BESS scores and for moderate industrial use. Scissors, wood turning tools and circular blades are
just a few of the different cutting edges that may be measured with your PT50 Series instrument.
Usually it is just a matter of "fixturing" the edge you want to measure. Sometimes this may be as simple
as holding the edge in your hand and sometimes fixtures designed specifically for the cutting edge may
be required. Always use caution when measuring these edges and protective gloves are always a good
bet.
Hand Held Measurements - All sorts of "different" shaped edges may be measured with your PT50
Series unit but most of these oddly shaped cutting instruments will be found in industry.
Sometimes the quickest and most
efficient way to take a measurement is
by simply setting the fulcrum piece
aside and holding the cutting edge in
your hand(s). Our ID75A is pictured
here but the principle is the same for
PT50 Series instruments.
This method is not advocated for at home users and industrial users should take care and wear
protective gloves when attempting hand-held measurements. The same rules here apply as for knife
edges. Gentle downward force while holding the cutting edge as close to vertical as possible. Edges that
measure over 500 on the BESS should be secured in a mechanical fixture and should not be attempted
using the hand-held method.

TEST MEDIA CLIP FIXTURE - Your basic instrument
package for the PT50 C and PT50A Industrial unit (PT50A
also includes aluminum Test Media Fixture) includes 25
disposable test clips and a slotted base to hold the test
clips in place. Disposable clips and base may also be
purchased separately and used with the PT50B in place
of the aluminum Test Media Fixture. Place a test clip in
the center of the slot (see picture at left) and then
conduct a sharpness test. Dispose of the test clip after
the measurement has been conducted. Test clips have a 0-1200+ structural range. Edges that measure
more than 1200 on the BESS are well beyond dull for kitchen use and in most industrial applications as
well. Disposable Test Media Clips are particularly useful for those who need to take edge measurements
infrequently or who may suffer from reduced dexterity in their hands or fingers. Test clips also allow
some tool edges to be measured that cannot be measured using the aluminum Test Fixture.
TEST MEDIA FIXTURE (Aluminum) - If purchased separately (standard PT50A & PT50B) the aluminum
test fixture (pictured in use on the cover page of this manual) comes to you loaded with test media. You
should have enough test media on the spool to conduct at least 100 tests. Test media refill canisters are
available in two packs (part #TM02). Make a visual inspection and mental note of how the test media is
threaded across and around the fixture. Here is how you reload the test media after a test has been
conducted:
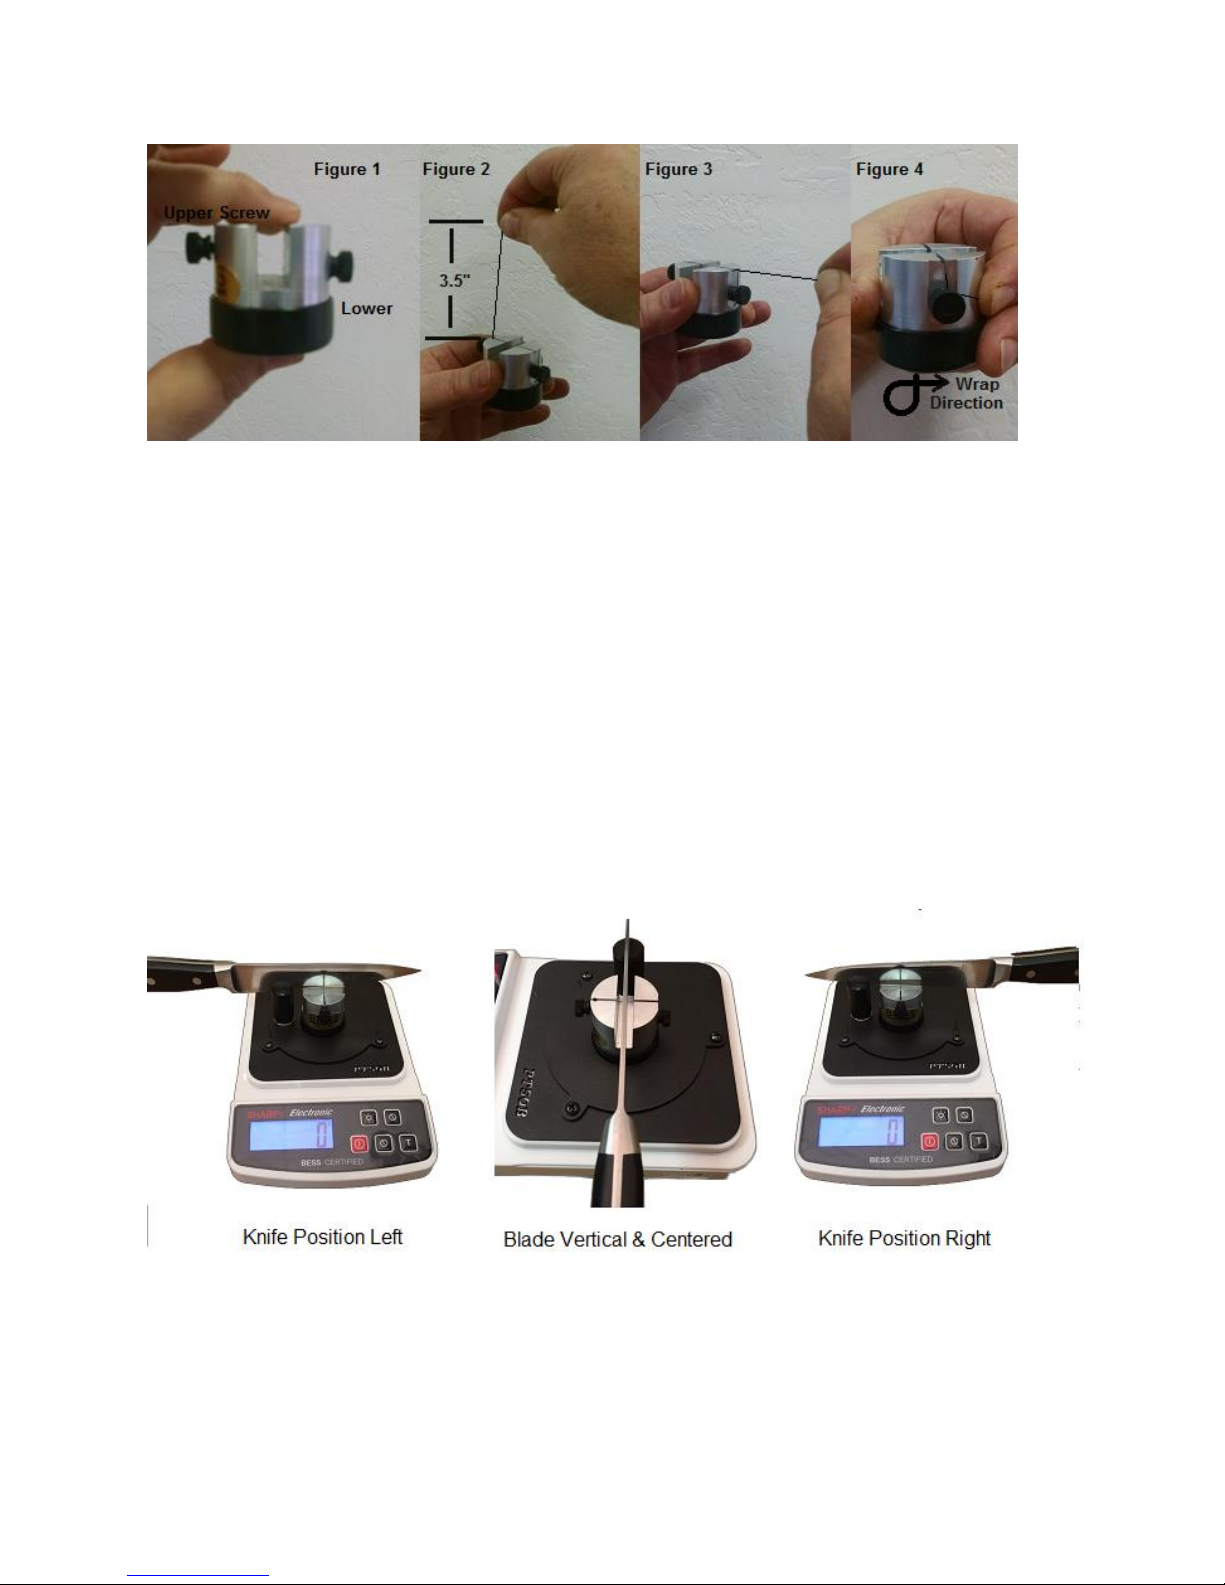
Note: These instructions are written and pictured with the test fixture held in the left hand. You may
switch this process if you are "other handed".
1. Loosen both plastic thumb screws. In Figure 1 The top screw need only be backed off one full turn
but the bottom (lower) screw should be backed out several turns. Remove and discard from around the
lower screw, any residual test media that may be left over from a previous test
2. In Figure 2 pull out about 3.5 inches of test media then retighten the top screw with only light
pressure.
3. In Figure 3 pull the test media across the top of the test fixture with the test media resting in the
shallow groove.
4. In Figure 4 pull the test media end down and then around the threaded shaft with a clockwise motion.
Make certain that test media remains seated in the groove while you are doing this. Wrap the test
media one turn about the threaded portion of the screw.
5. Note in Figure 4 how the index finger of the left hand pinches and holds the test media against the
side of the test fixture. This prevents slack from forming in the test media and frees the right hand to
tighten the lower screw. Pinch the test media against the side of the fixture while you tighten the lower
screw.
Reloading the test fixture will take less than ten seconds once you have mastered it. The goal here is to
simply pull the test media across the gap in the fixture with no slack (slight tension) in the test media. Do
not over tension the test media. Over tensioning is neither helpful nor necessary.
How to Position the Knife for Measurement
There are two possible mounting methods for your knife or edge and either is acceptable. The photo
below shows a mounting method that allows sharpness levels to be measured very close to the knife
handle (Knife Position Right) and the other (Knife Position Left) will allow measurements very close to
the tip or point of the knife. In either case the knife blade must be seated and remain seated (via
downward pressure) in the fulcrum while the opposite end (handle or tip) is pushed or pulled down into
the test media. The fulcrum acts like a hinge or pivot point for the knife blade and affords excellent
control and safety during the testing process.
It makes no difference whether the upper or lower screw in the test fixture faces you during a
measurement sequence. Just make certain the wide slot in the test fixture is squarely aligned with the
narrow slot in the fulcrum. It is possible that some styles of knife blades will be too thick to seat in the

bottom of the fulcrum slot but that is OK. Just make certain that the knife edge remains in the slot and
that the sides of the knife blade are held in a vertical position during the measurement process. If the
majority of the edges you measure are thick then you may want to widen the slot in the fulcrum using
an ordinary hand saw blade (i.e. hacksaw blade). Don't let the top side of the knife blade (spine) tip
toward or away from you during the measurement process or it could skew your results slightly. Our
center photo above shows proper positioning of the knife, as viewed from above, during the
measurement process. Blade vertical, fulcrum and test fixture slots aligned and centered.
Remember Slow and Easy! We're not chopping carrots (at least not yet!) but measuring the sharpness
of an edge. Your downward movement with the knife should be slow and deliberate. Try to find a seated
position with arms resting on the worktop for greater control and stability. If you can clearly see the
increase in force tick upward on the display either in 5 or 25 gram increments (depending on the
instrument you have purchased) then you know that you have taken the measurement correctly. When
the test media severs, the measurement is complete and your BESS score for that edge will be shown on
the display.

Email us at edgeonup.com with questions - we respond!
This manual suits for next models
2
Table of contents
Popular Power Tools manuals by other brands


HOGERT
HOGERT HT4R625 instruction manual

VARO
VARO POWERPLUS POWE10025 quick start guide

Powermatic
Powermatic PJ1696 Operating instructions and parts manual

Campbell Hausfeld
Campbell Hausfeld DG460300CK S Operating instructions and parts manual

Huskie Tools
Huskie Tools REC-6430 Operation manual

Hilti
Hilti DX 9-HSN manual


