EdgeStar FP430 User manual
EdgeStar, 8606 Wall St, Suite 1600, Austin, TX 78754
support.edgestar.com • [email protected] • edgestar.com
FP430 FP630 FP861
Document Type: Service Manual
Version: V2.0 05202019

CONTENTS
CONTENTS..................................................................................................................................1
SAFETY PRECAUTIONS.............................................................................................................1
ELECTRICAL SAFETY.............................................................................................................2
GENERAL SAFETY..................................................................................................................3
SPECIFICATIONS........................................................................................................................4
COMPONENTS............................................................................................................................5
WIRING DIAGRAM.......................................................................................................................5
TROUBLESHOOTING FLOW CHARTS.......................................................................................6
TROUBLESHOOTING TIPS AND NOTES...................................................................................8
DISASSEMBLY FOR TEMPERATURE CONTROLLER REPLACEMENT ..................................9
COOLING SYSTEM....................................................................................................................10
AC TRANSFORMER AND DC POWER SUPPLY REPLACEMENT..........................................11
DIFFERENCE BETWEEN OLD AND NEW PARTS...................................................................13
SAFETY PRECAUTIONS
WARNING: This manual and the information contained herein is intended for use
by certified technicians. The manufacturer or seller is not responsible for the
interpretation or misuse of the information provided, nor does it assume any
liability in connection with its use.
The safeguards and warnings indicated in this manual do not cover all possible
conditions which may occur. Common sense, caution, and care must be
exercised.
To prevent electric shock, always unplug an appliance from the power supply before attempting
any service.
Disconnect the power cord by grasping the plug, not the cord.
Do not bypass, cut, or remove the grounding plug.
Prevent water from spilling onto electric elements or the machine parts.
Always refer to the rating label on the appliance for rated current and voltage.
Always check line voltage and amperage.
Always use exact replacement parts.
Any attempt to repair a major appliance may result in personal injury and property damage.

Electrical Safety
Do not exceed the power outlet ratings.
It is recommended that the unit be connected to its own circuit.
A standard electrical supply that is properly grounded in accordance with the National Electrical Code
and all state and local codes and ordinances is required.
Do not use outlets that can be turned off by a switch or pull chain.
Always turn the unit off and unplug it from the outlet when cleaning.
Unplug the unit if it is not going to be used for an extended period of time.
Do not operate the unit with a power plug missing the ground plug, a damaged cord, or a loose socket.
Be sure the appliance is properly grounded.
Do not bypass, cut, or remove the grounding plug.
If the power cord is damaged, it must be replaced by the manufacturer or a qualified technician.
Do not use extension cords or power strips with this unit. You may need to contact an electrician if it is
necessary to use a longer cord or if you do not have a properly grounded outlet. Do not modify the
power cord’s length or share the outlet with other appliances.
Do not start or stop the unit by switching the electrical circuit’s power on and off.
Immediately unplug the unit if it makes strange sounds, emits an odor or smoke and contact customer
service.
Do not remove any part of the casing unless instructed by an authorized technician.
Before the appliance is removed from service or discarded, remove any doors and cut off the power
cord.

General Safety
Always unplug an appliance from the power supply before attempting any service. Disconnect the power
cord by grasping the plug, not the cord.
Do not allow children or pets to play on or in the appliance.
This machine is not intended for use by persons (including children) with reduced physical, sensory or
mental capabilities, or lack of experience and knowledge, unless they have been given supervision or
instruction concerning use of the machine by a person responsible for their safety.
Do not install or store this appliance where it will be exposed to the weather.
Disconnect from the power socket before cleaning or maintenance.
If the plug (power cord) is damaged, it must be replaced by the manufacturer or an authorized service
representative.
This machine shall be repaired only by an authorized service representative. Only genuine replacement
parts should be used.
If connected to a circuit protected by fuses, use time-delay fuses with this appliance.
Do not lean items against the glass door.
Please do not close the door with excessive force. If it is found difficult to close the door, please check for
obstruction.
When you plan to dispose of this unit in the future, please comply with the local waste disposal
regulations. Remove any doors so that children and pets will not be trapped in the unit.

Specifications
Model
FP430
FP630
FP861
Voltage /
Frequency
AC: 115V~60 Hz
DC: 12/24 V
AC: 115V~60 Hz
DC: 12/24 V
AC: 115V~60 Hz
DC: 12/24 V
Amperage
0.75 A
0.8 A
1.0 A
Input Power
65 W
75 W
80 W
Color
Grey with black trim
Grey with black trim
Grey with black trim
Storage Capacity
43 qt.
63 qt.
83 qt.
Refrigerant
R134a
R134a
R134a
Temperature
Range
-8° F to 50° F
-8° F to 50° F
-8° F to 50° F
Dimensions (Height
x Width x Depth )
20 13/16” x 24
11/16” x 17 11/16”
20 11/16” x 28 1/8” x
17 7/8”
23 3/8” x 28 3/16” x
18 3/4”
Weight
48.5 lbs.
61.7 lbs.
66.2 lbs.
Note: Technical data and performance information are provided for reference only. Specifications are
subject to change. Check the rating label on the portable fridge / freezer for the most accurate
information.

Components
Wiring diagram
NOTE: Due to the difficulty in replacing a faulty
temperature probe this unit comes pre-installed with
two (2) probes. If a faulty temperature probe is
suspected simply connect the unused probe in place
of the faulty probe. (not shown in image)
NOTE: Fuse is located within the DC plug
connector. (15-amp fuse, twist off red top and
unscrew the 1 screw if needed to locate)
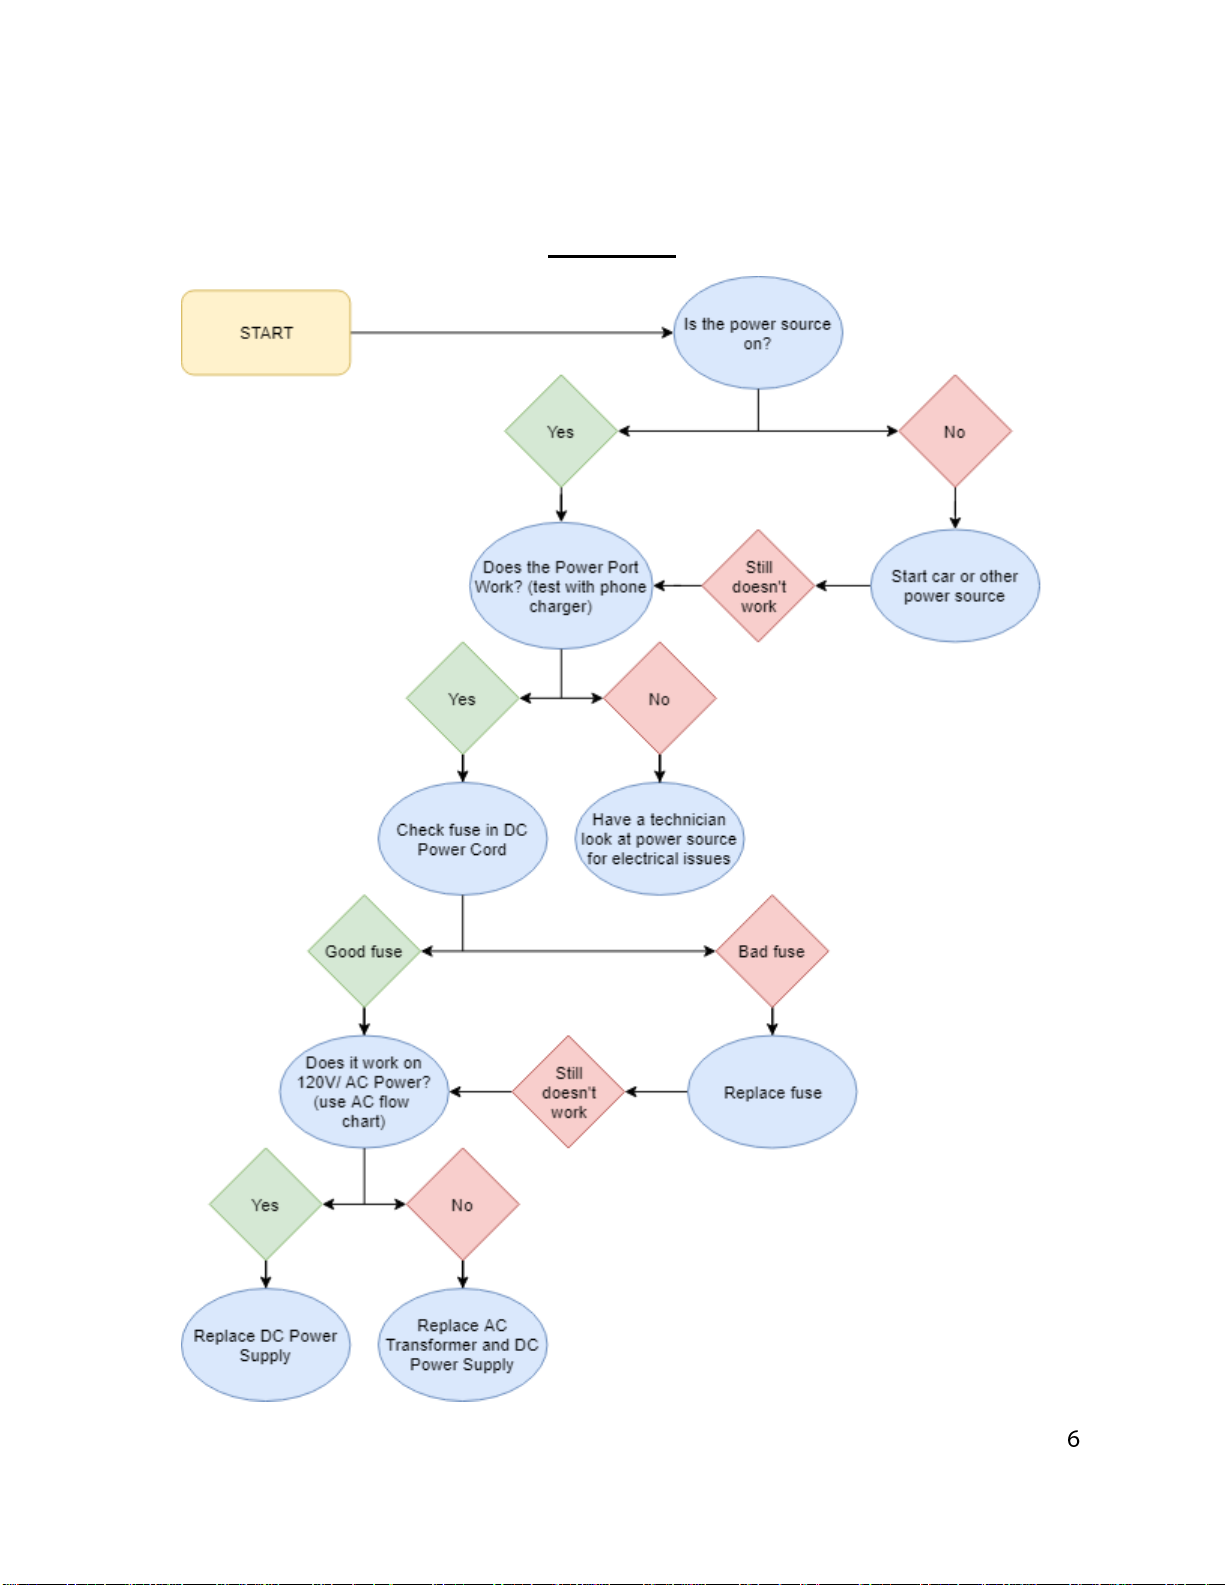
Troubleshooting Flow Charts
DC Power

AC Power

Troubleshooting Tips and Notes
Use of a multi-meter / voltage reader is recommended for proper diagnosis.
Determining the point at which power is not properly passing into or through a
component is the best method for determining component failure.
If the unit does not appear to be receiving power:
Ensure that the power source is providing the proper voltage to the unit.
When using 12V DC, the digital readout will show the factory setting 10.0V DC.
To ensure that suitable battery voltage can be maintained the controller has been
programmed to offer three (3) cut-out levels: 11.8, 10.7, and 10.0V DC.
When using 24V DC, the digital readout will show the factory setting 22.2V DC.
To ensure that suitable battery voltage can be maintained the controller has been
programmed to offer three (3) cut-out levels- 25.0, 23.5 & 22.2V DC. Check and
verify the power supply cord(s) are free from defects / damage.
Check for loose connections between power source and unit.
When inspecting internal components, always check for loose connections.

Disassembly for Temperature Controller Replacement
Remove control panel cover, this is a sticker, use a flat tip
screwdriver lift the sticker up and remove carefully.
Remove four (4) screws from control panel using a
Philips screwdriver.
Remove screws (2) from cabinet on the bottom of the unit.
On the older version located on the face of the cover.
Remove screws (2) circled below.
Remove wire connectors as shown in picture, there is an
extra temperature probe connector if ever needed.
Replace with new controller
Other manuals for FP430
3
This manual suits for next models
2
Table of contents
Other EdgeStar Freezer manuals

EdgeStar
EdgeStar CMF151L-1 User manual

EdgeStar
EdgeStar FP430 User manual

EdgeStar
EdgeStar CMF151L-1 User manual

EdgeStar
EdgeStar BWC70SS User manual

EdgeStar
EdgeStar CWR461DZ User manual

EdgeStar
EdgeStar BBR900BL User manual

EdgeStar
EdgeStar CBR1501SG User manual

EdgeStar
EdgeStar BWC120SS User manual

EdgeStar
EdgeStar VBR Series User manual

EdgeStar
EdgeStar CBR901SG User manual


