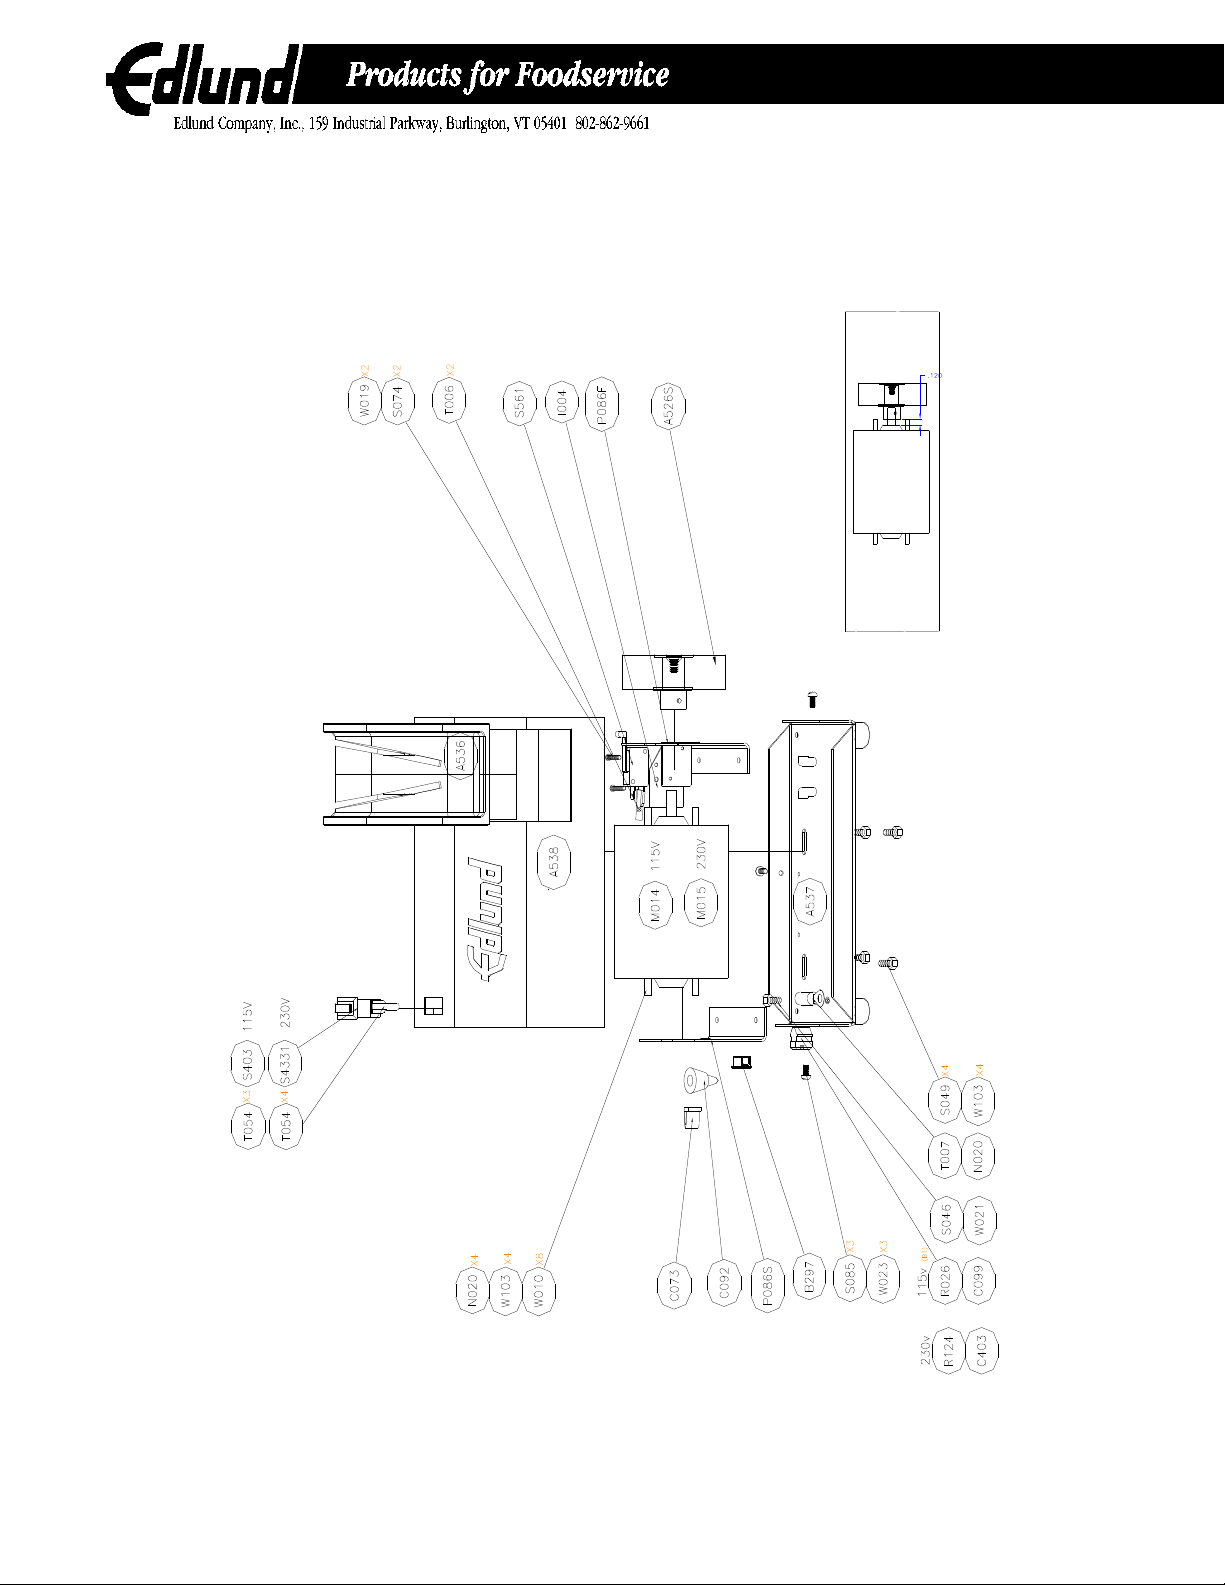
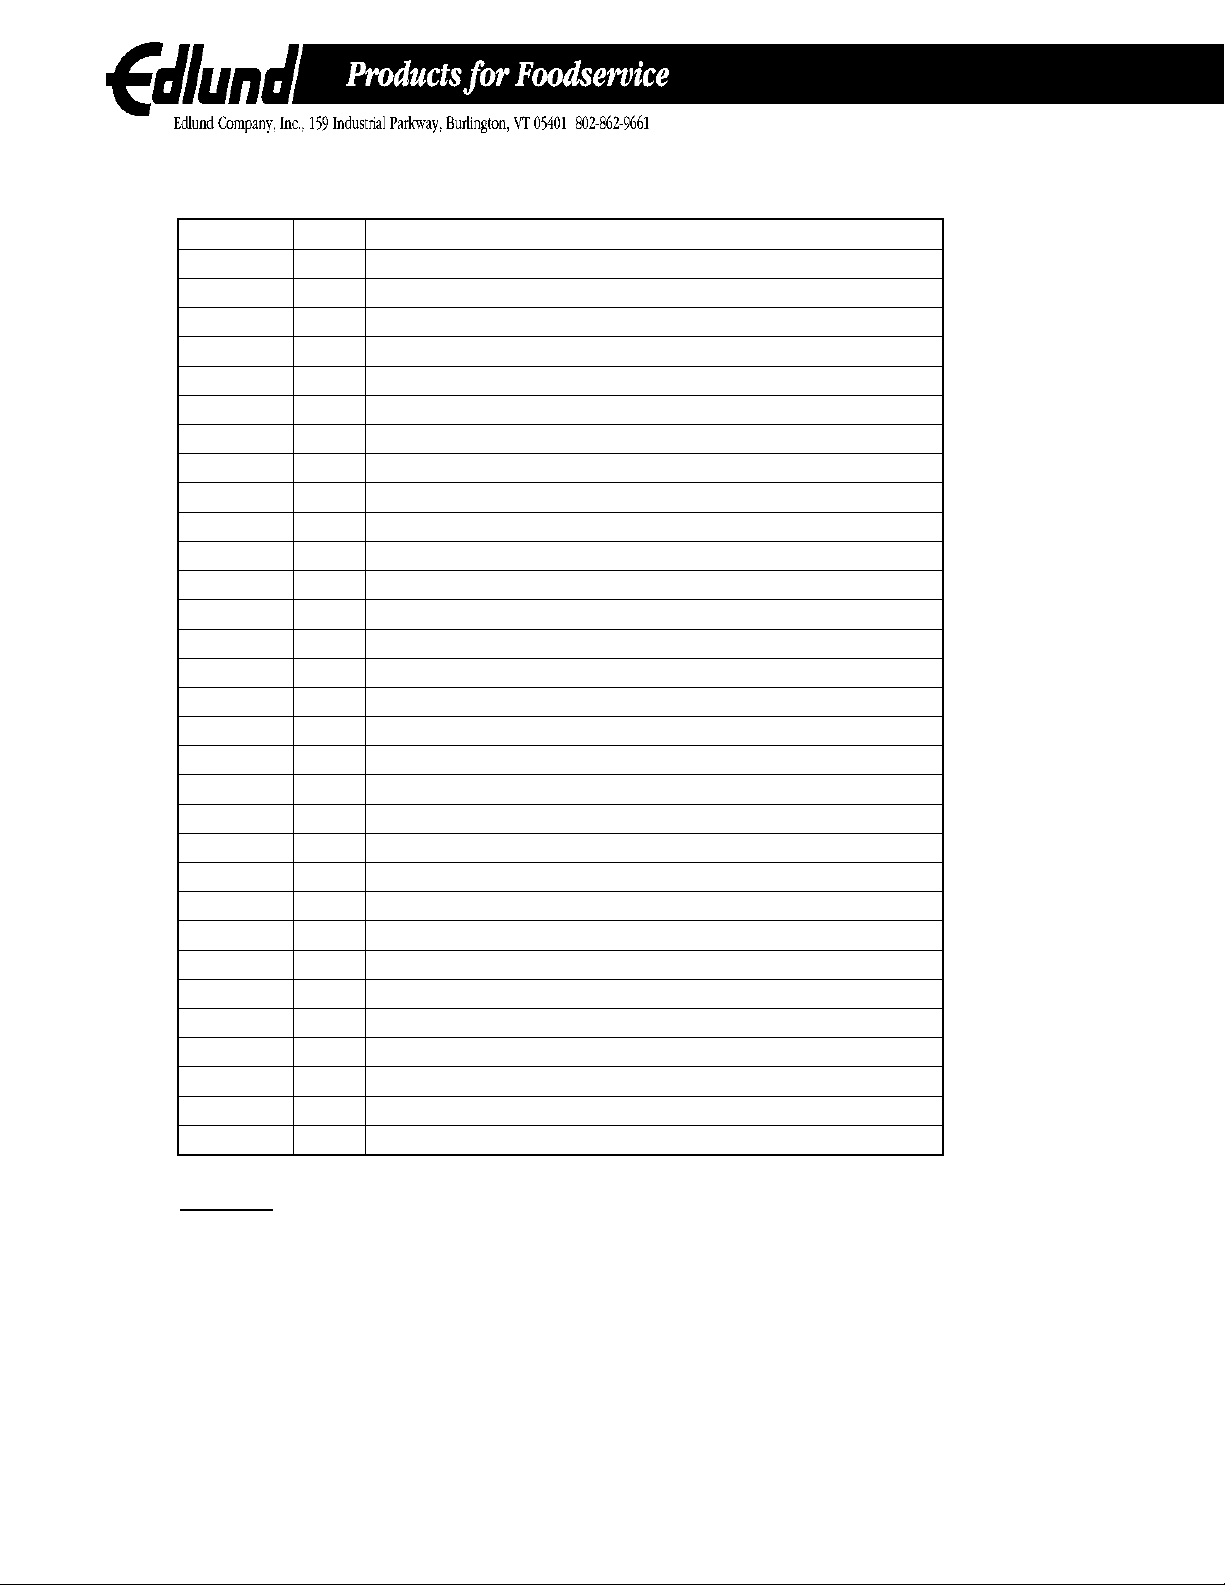
EDLUND M161 User manual

M161 REV. B (NOV. 2005)
PRODUCT MANUAL- M161
MODEL 401 NSF ELECTRIC KNIFE SHARPENER-
WITH SNAP IN KNIFE GUIDE
(for serial #’s higher than 4155 built after may 2002)
Please read thoroughly before operation and keep for future reference

M161 REV. B
2
Model 401 Knife Sharpener Specifications
Model No. 401
Power Requirements 115 volt, 1.5 Amps, 50 – 60 HZ
230 volt, 0.5 Amps, 50 – 60 HZ
Speed 1550 RPM
Size 4” D x 4 ¾” H x 9 ¾” W
(102mm x 121mm x 248mm)
Weight 8.9 lbs. (4.0 kg.)
1. Knife Sharpener Description
The Edlund Company Inc manufactures the Model 401 knife sharpener. It is approved by the
appropriate certifying organizations. The knife sharpener uses a 3-inch diameter by one-inch wide
grinding wheel to sharpen knives and other utensils. The sharpener consists of a grinding wheel,
which is mounted on an arbor and attached to a drive motor. The motor is mounted to a stainless
steel base using motor mounting plates. The sharpener is enclosed in a stainless steel housing
with a plastic knife guide assembly secured to the base with the snap in guides. The unit is
equipped with a rocker switch to turn the motor on or off and a safety interlock switch which will not
allow the unit to operate if the plastic knife guide is not in place.
2. Knife Sharpener Operation
To operate, plug the power cord into a grounded outlet with the same voltage as listed on the
bottom of the knife sharpener base. Turn the unit on using the rocker switch and then use the
following steps.
1. Sanitize your hands and knife prior to sharpening.
2. Hold knife against the outside edge of the left slot.
Warning! Hold knife firmly so that it will not be pulled away by
the rotation of the grinding wheel.
3. Pull the knife through in a horizontal motion keeping pressure on
the wheel light and even.
4. Hold the knife against the outside edge of the right slot and pull
through in a horizontal motion keeping pressure on the wheel light
and even.
5. Repeat steps 2-4 until the desired edge is achieved.
6. Sanitize knife and hands.
Initial sharpening of knives may require several passes to create
the correct angle of the knife. Subsequent sharpening will only
require a few passes to achieve a sharp, long lasting knife-edge.

M161 REV. B
3
3. Cleaning Instructions
Warnings! Never clean or maintain knife sharpener without unplugging it from the electric
source.
Never submerge or place knife sharpener in water.
Never blow out unit using and air gun- metal may blow inside of the motor and damage it.
The knife sharpener must be cleaned after each use.
Unplug the unit from the power source and remove the
knife guide. To remove the knife guide press the two
plastic tabs (located underneath and towards the front
of the sharpener) towards each other and then lift the
blue knife guide upwards (see figure on right). Gently
shake out the accumulated grinding dust from the
inside into a waste receptacle. Wipe the exterior and
knife guide using a damp cloth.
When the cleaning is complete insert the knife guide
into the knife sharpener cover and make sure that the
plastic tabs snap back into place.
Trouble Shooting Guide
An Edlund authorized service technician should do all repairs. Call the Factory or Authorized dealer for more information.
Problem Cause Correction
1. Cordset not plugged into outlet. 1. Plug cordset into outlet with same voltage as listed
on rating label.
2. Actuating switch inoperative. 2. Replace switch.
3. Broken wire in cordset. 3. Unplug cordset. Check continuity of each wire and
replace as required.
4. Broken wires or loose terminal. 4. Check for loose wires, check continuity of internal
wires and replace or repair as required.
5. Motor failure. 5. Replace motor.
1. Grinding wheel is contacting knife
guide. 1. Check to see if wheel is contacting knife guide.
Realign wheel using procedure listed in assembly
procedure.
2. Motor fan has become loose and is
contacting motor stator.
2. Replace motor.
3. Grinding wheel loose on motor shaft.
3. Remove knife guide. Check for loose wheel on arbor
or loose arbor on motor shaft. Tighten to appropriate
torque. Reassemble and align grinding wheel.
IV. Grinding wheel
wobbles badly when
sharpener is turned on.
1. Motor drive shaft may be bent. 1. Replace motor.
1. Worn grinding wheel. 1. Replace grinding wheel using grinding wheel
replacement procedure in this manual.
1. Knife sharpener will
not start.
II. Motor hums when
switch is actuated.
III. Knife not contacting
grinding wheel when
placed against knife
guide surface and
brought all the way to
bottom of slot.
To remove guide:
Press tabs together and
lift guide upward

M161 REV. B (NOV. 2005)
Knife guide
4. INSTRUCTIONS FOR REPLACING GRIND WHEEL
The grinding wheel is designed to last up to several years based on normal use (this may vary
depending on use). The grinding wheel is fully worn out and needs replacing when the knife no
longer makes contact with the wheel while positioned against the plastic knife guide. A
replacement wheel and arbor can be ordered from your local Edlund dealer as part number
#A526S. To replace the grinding wheel, first unplug the unit from the power source. Remove the
knife guide. Loosen the setscrew (use a 3/32” Allen wrench) until you are able to slide the wheel
and arbor off of the motor shaft (FIGURE 1). Replace with the new wheel and arbor, the factory
sets the stone and arbor with Shim (S291). This shim should be placed between the motor and
the wheel. The wheel should be placed flush against the shim and the setscrew tightened. Next
remove the shim and the wheel will be set .120 inches away from the motor
FIGURE 1. ATTACHING WHEEL
Replace the knife guide. The grinding wheel should be aligned after installation so that an equal portion of
the wheel is visible in the left and right knife guide slots when the knife guide is in place (FIGURE 2). The
knife sharpener is now ready for use.
FIGURE 2. PROPERLY INSTALLED STONE
Shim
Setscrew

M161 REV. B
5
Part Reference
ARBOR
ATTACHED
TO MOTOR
(MOTOR IS NOT PART OF A526S)

M161 REV. B
6
PARTS LIST
PART # QTY DESCRIPTION
A526 1 ASSEMBLY, #395/401 GRIND WHEEL
A536 1 ASSEMBLY, 401 SNAP IN KNIFE GUIDE
A537 1 ASSEMBLY, #401 SNAP IN BASE
A538 1 WELDMENT, #401 SNAP IN COVER
B297 1 BUSHING,1/2"SNAP,3/8"ID
C073 1 CLAMP, #201 CABLE
C092 1 CONNECTOR, #390/395/CH-5000 LEAD
C099 1 CORD SET, REGULAR 7', 18/3, GRAY
I004 1 INSULATOR, ECO MICRO SWITCH PAD
M014 1 MOTOR, 395/401 115V #7163-7783
M015 1 MOTOR, 395/401 230V
N019 4 NUT, 10-32 PLATED HEX
N020 1 NUT, 10-32 S/S HEX
P086F 1 PLATE, 401 S/S MOTOR MTG. FRONT
P086S 1 PLATE, 401 S/S MOTOR MTG. BACK
R023 1 WASHER, #8 S/S LOCK
S049 4 SCREW, 10-32 X 3/8 S/S HEX HEAD
S074 2 SCREW, 4-40 X 5/8 BRASS RHM
S085 3 SCREW, 8-32 X 1/4 S/S RHM
S403 1 SWITCH, CH-350 USA LIGHTED ROCKER
S4331 1 SWITCH, 230V
S561 1 SWITCH, 401 INTERLOCK MICRO
T006 2 TERMINAL, #203/266 FEMALE, 3/16
T007 1 TERMINAL, ECO ROUND TONGUE
T054 (3)(4) TERMINAL, 1/4" FEMALE FULLY INS
W010 8 WASHER, #10 S/S FLAT
W017 4 WASHER, #10 EXT. TOOTH LOCK, PTD
W019 2 WASHER, #4 INTRL TOOTH LOCK, S/S
W023 3 WASHER, #8 S/S LOCK
W103 4 WASHER, #10 S/S INTERNAL TOOTH LOCK
W105 1 WASHER, 1/4" S/S FLA
Warranties:The Edlund Company warrants these products to be free from defects in material and
workmanship for a period of one year from date of purchase. The company’s obligation under this
warranty is limited to repairing or replacing without charge any parts or parts found to be defective under
normal use. It is the responsibility of the purchaser to return the entire unit to the factory or a factory
service branch, transportation charges prepaid. This warranty does no cover parts that must be replaced
under normal use, including knives and drive gears on can openers. The company authorizes no other
warranty, written or verbal. Carrier is responsible for merchandise in transit to you.
This manual suits for next models
1
Table of contents
Other EDLUND Accessories manuals
Popular Accessories manuals by other brands

GOLDENSEA UV
GOLDENSEA UV UVT72 quick start guide

Waterford
Waterford E61 Owners & installation manual

Angelcare
Angelcare AC-SP owner's manual

ABB
ABB ClimaECO SBS/Ux.0.1 Series product manual

USA Measurements
USA Measurements US-5011 User's & technical manual

ACR Electronics
ACR Electronics FPR-10 PROGRAMMER Product support manual