Edmo GAYA VANITY UNIT User manual

INSTRUCTION FOR WALL-FIXING OF VANITY UNIT “GAYA”
Vanity unit Gaya with 2 draw rs L.(cm. 60-23
5/8
) (cm.70- 27
9/16
) (cm.90-35
7/16
)
Sugg st d dim nsions for wall-fixing of Gaya Vanity units
350 - 13
25
32
306 - 12
3
64
532 - 20
15
16
850 - 33
15
32
180- 7
3
32
338 - 13
5
16
12 - 0
15
32
460 - 18
7
64
500 - 19
11
16
605-23
13
16
705-27
3
4
905-35
5
8
12 - 0
15
32
Pag . 1

B for You start:
•During unpacking, pl as ch ck-up th product, if it is compl t and not b ing damag d.
•Suppli d supporting brack ts/fixings syst m and scr ws ar only for solid, full wall. Tak car , by yours lf, that you ar
using th right scr ws for wall typ – in cas of doubts, pl as consult prof ssional staff.
•Cl an th room and th surfac , th ar a must b dry and without dust or powd r.
•Pl as r ad compl t ly th s instructions.
•Tak car that you hav got all n c ssary and corr ct work tools, pl as s th following list of “n c ssary tools”.
Saf ty:
•Handl with car th cardboard box s and packaging, avoiding risks to damag furnitur .
•Bathroom furnitur is h avy and n ds 2 p opl to support/transport and install it.
•During wall drilling, first ch ck-up that th r ar no hidd n pip s or cabl s insid th wall.
•Us saf ty-glass s during drilling arrang m nts.
•B for l ctrical conn ction, disconn ct th main Voltag pow r supply.
Disclaim r/ Exclusion of liability
•Pl as notify Your D al r imm diat ly, if th r ar any damag or d f cts. Th Manufactur r cannot b h ld
r sponsibl for any installation costs, which can r sult from damag d or d f ctiv product during installation.
•Always dispos th packaging mat rials r sp cting th nvironm nt.
N c ssary tools (not suppli d)
RULE SPIRIT LEVEL PENCIL
TWIST DRILL ELECTRIC HAND-DRILL SILICONE
SCREWDRIVER
RUBBER HAMMER
Pag . 2

B for installation of Vanity unit, you must r mov and pull out th draw rs.
1) R mov th plastic cap with a scr wdriv r and push th l v l-hook upward.
2) Pull out th draw r by pulling it towards yours lf and upward, k ping push d down th 2 l v ls-hook,
h r inaft r push th guid s towards insid th cabin t, so you avoid to crash against th m during
ass mbly. R p at th arrang m nt with th inf rior draw r too.
L
H
H
LL1- 2 MM
=
cm.50 -19
11
16
L1
Ø8 - 0
5
16
LL1- 0
5
64
=
L= xt rnal distanc of supports L1= insid distanc of sid s (- mm.2 -0
5/64
) H= approx. cm.71 – 27
61/64
3) At th wall, mark th points, wh r you will drill th hol s for th Vanity wall-fixing. Th n drill th hol s,
ins rt th dow ls insid th wall hol s, scr w th supporting plat s to th wall, using th suppli d
scr ws. Pag . 3

4) Hang th Vanity unit to th wall, by m ans of suitabl wall brack ts, which ar alr ady fix d at ach sid of th unit.
B
A
5) Adjust th h ight of th Vanity unit, turning th scr w (B) of both supports till furnitur is at right horizontal l v l. Hang th
furnitur , hooking th brack ts onto wall-mounting plat s and turn th scr ws (A) b longing to th furnitur brack ts.
6) At th wall, pl as mark th points, wh r you will drill th hol s, in ord r to fix th supporting “L” bar, holding
th furnitur . Pag . 4

7) For conv ni nc you may unhook th Vanity unit from th wall, aft r marking th hol s positions. Mak th hol s
with th drilling machin , wh r pr viously indicat d with th p ncil, ins rt th appropriat suppli d dow ls in
th wall-hol s and adjust th supporting brack ts, turning th scr ws.
8) R plac th Vanity unit to its original position.
9) Silicon th upp r dg s of th furnitur , th n lay down th top xactly corr sponding th c nt r of th Vanity
unit.
10) B for you install th draw rs, pull out th sid guid s and lay th draw r on th m. Clos it, until th draw r is
approach d to th sid s. At this mom nt you will h ar a click, which m ans th right automatic lock of th draw r
to th guid s.
Pag . 5
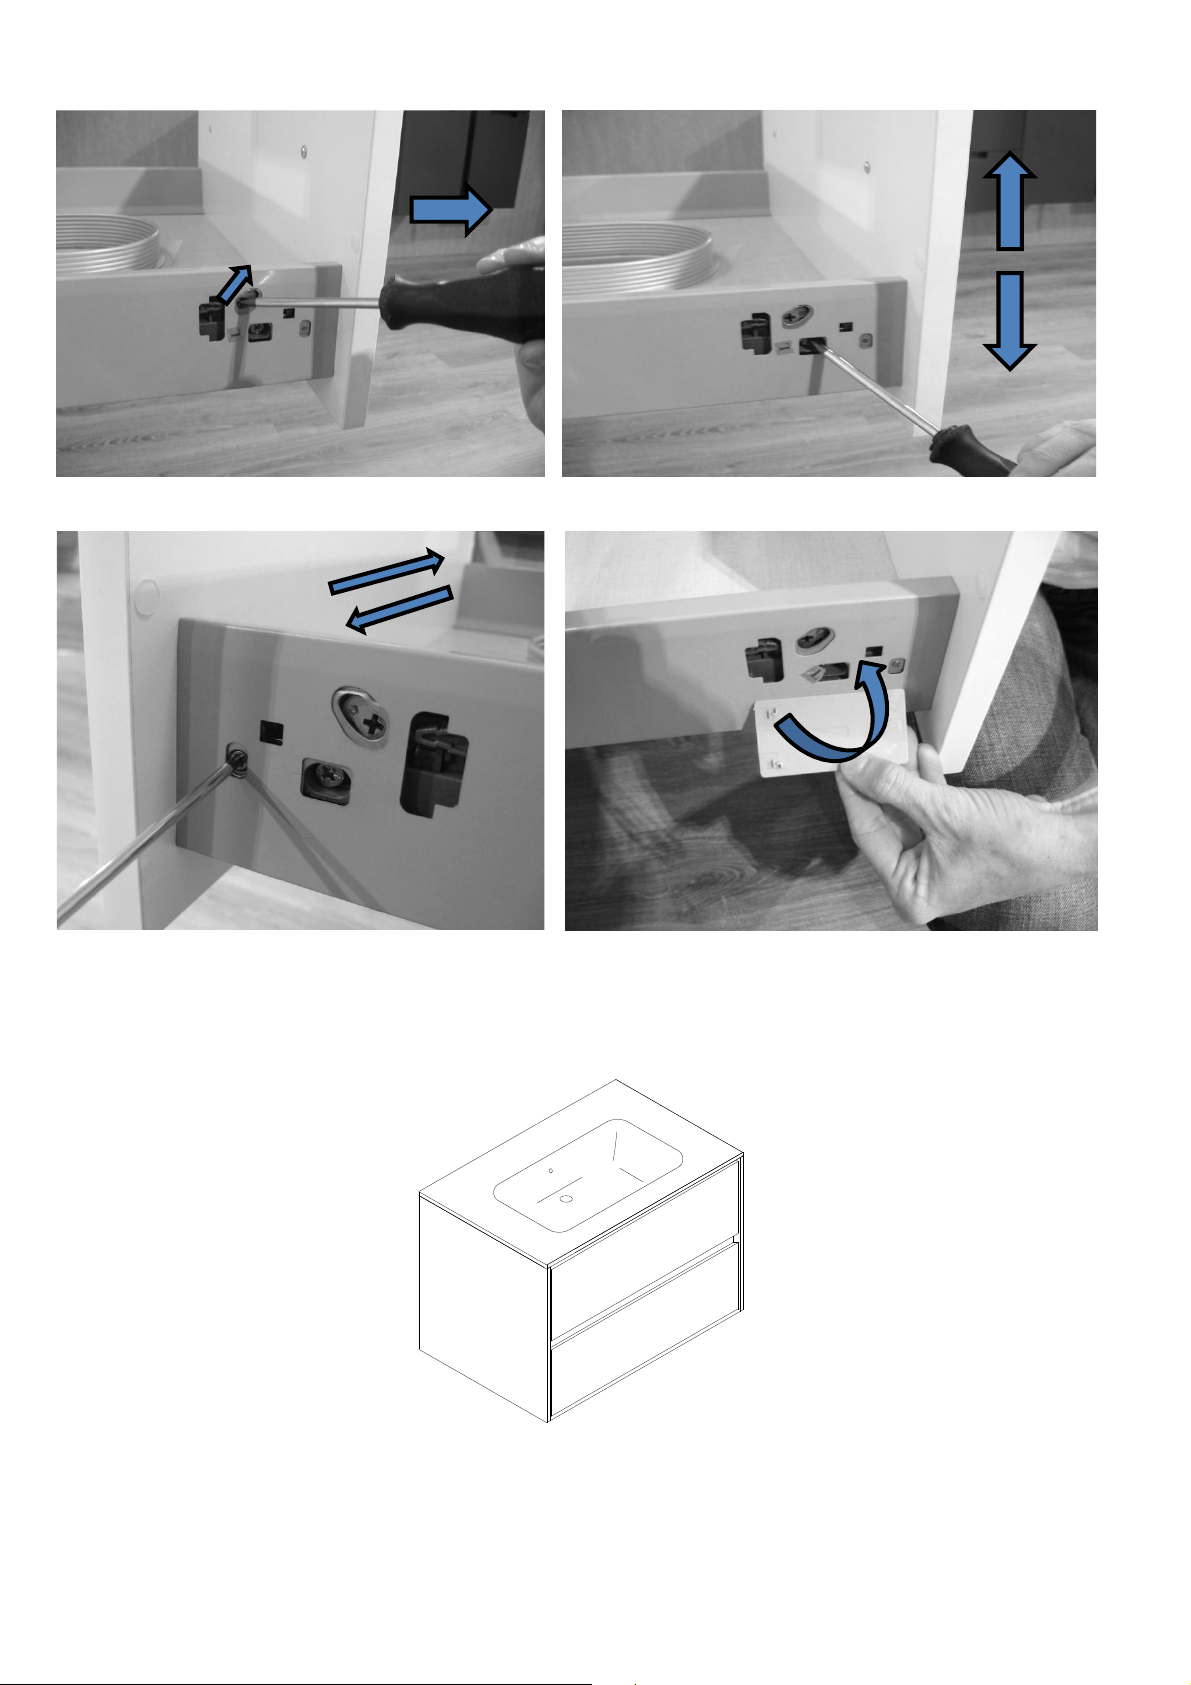
Unhook and adjust th draw r
11) to unhook th front, turn th indicat d scr w. 12) to adjust th front h ight, turn th indicat d scr w.
13) to adjust horizontally th draw r-front, turn th scr w as indicat d.
14) Wh n you nd all th adjustm nts arrang m nts, r -install th plastic cov r as in pictur indicat d.
Thank You to hav chos n our bathroom furnitur !
Pag . 6
Table of contents
Other Edmo Indoor Furnishing manuals


