effeuno P134 GARA MECH User manual
OVEN MOD. GARA Pag. 1 / 10
INSTRUCTIONS MANUAL
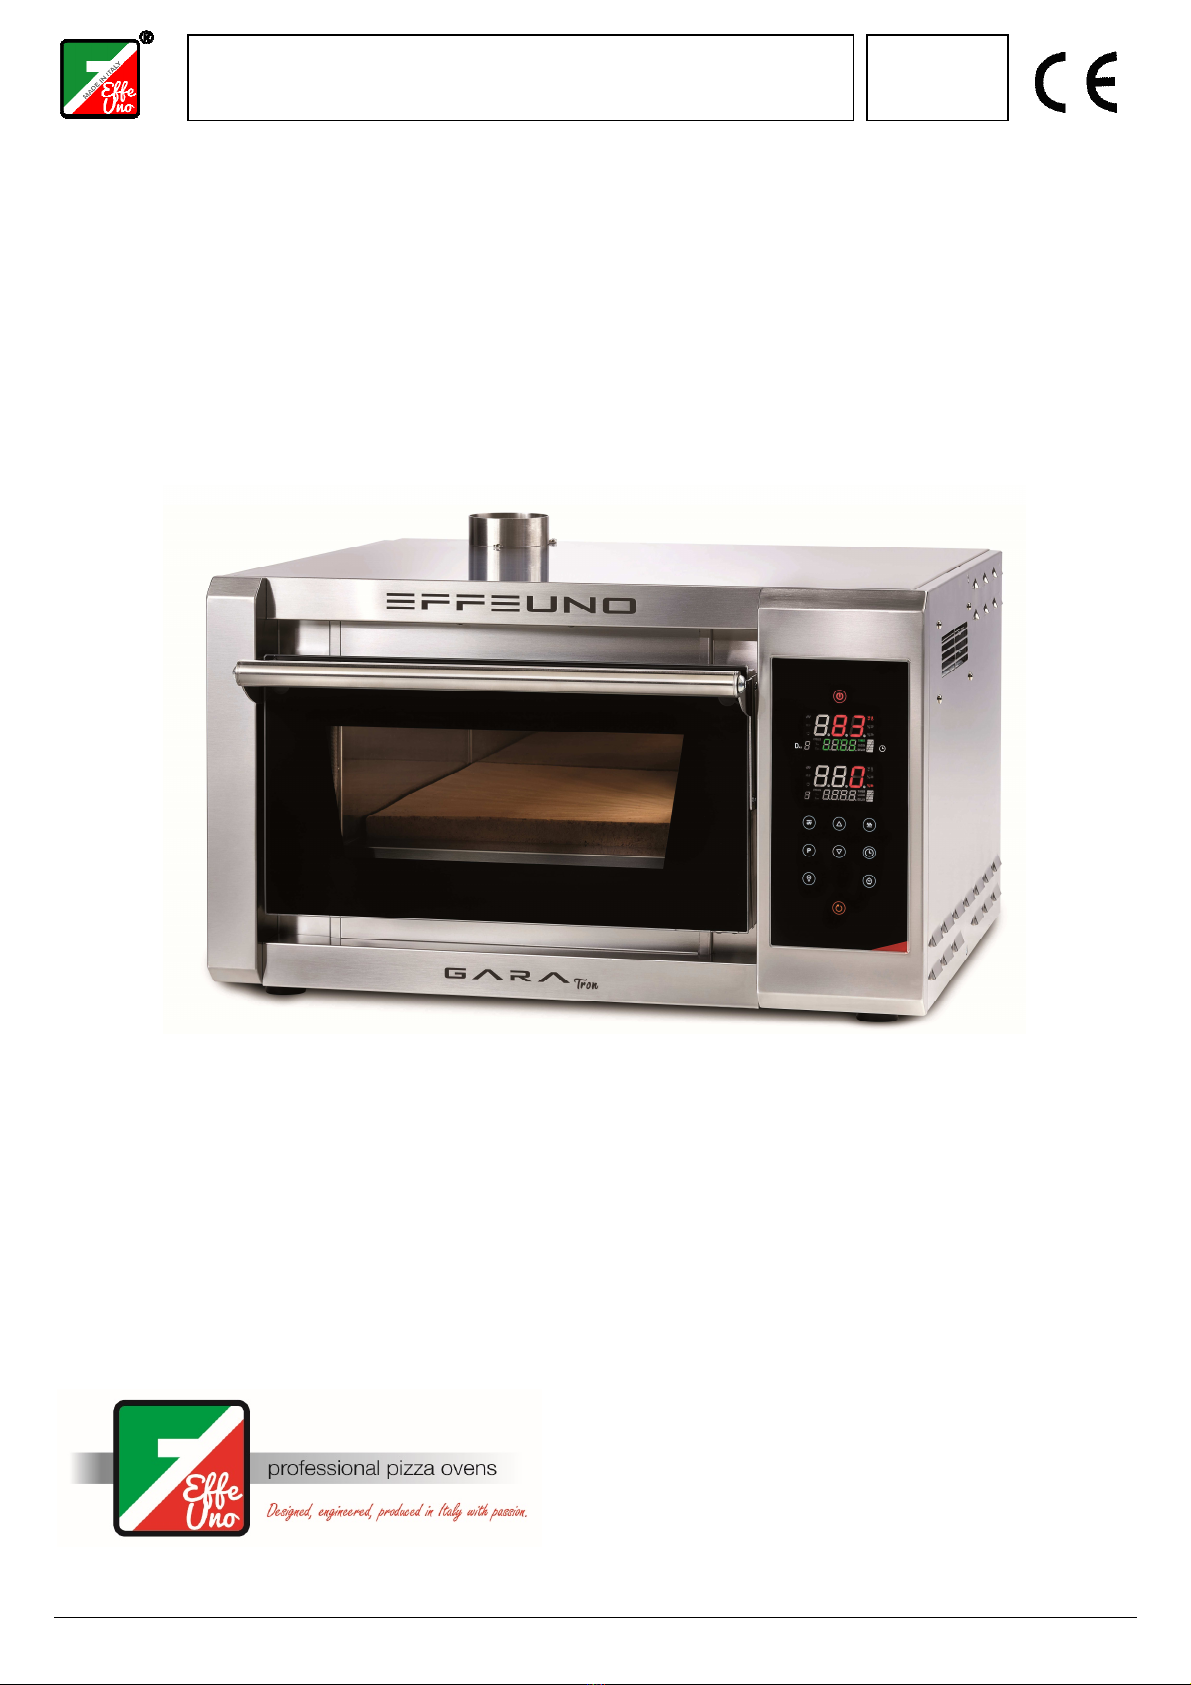
Professional Electric Oven mod. LINEA GARA
Release
01-2019
G A R A
Il Team EffeUno S.r.l.
www.effeuno.biz
Commerciale [email protected]
Commerciale estero [email protected]
Service service@effeuno.biz
OVEN MOD. GARA Pag. 2 / 10
INSTRUCTIONS MANUAL
Professional Electric Oven mod. LINEA GARA
Release
01-2019
Dear Customer,
T ank you for c oosing our professional oven GARA, built and
andmade in our factory in Italy.
In order to use t e equipment at its best we kindly suggest you, before
going on wit any operations, to read carefully t is instruction
manual.
We apply ourselves every day to offer you t e best in terms of
performances, usability and reliability to try to ac ieve and overtake
your expectations.
T is w is ing, even if in a small part, to ave contributed to realize
one of your dream.
We remain at your disposal for any request.

OVEN MOD. GARA Pag. 3 / 10
INSTRUCTIONS MANUAL
Professional Electric Oven mod. LINEA GARA
Release
01-2019
INDEX Pag.
1. Introduction 3
2. Note 4
3. Information on the dangers caused by improper use 4
4. Important notice 5
5. Appliance packing 5
6. Oven installation 6
7. Information about electrical plant 6
8. Connecting to the electrical net 7
9. Appliance description 8
10. Indication for the appliance use 8
11. Prepare the oven for the first use 8
12. Normal use of the oven 8
13. Pizza backing 9
14. Oven maintenance 9
15. Guarantee conditions 9
16. Ovens technical specifications 10
17. EC declaration of conformity 10
1 - INTRODUCTION
ATTENTION: READ CAREFULLY THE WHOLE MANUAL BEFORE UNPACKING, INSTALLING AND
USING THIS PRODUCT.
Dear Customer, thank you for choosing a quality product manufactured by us.
Our expert production follows the guiding principle of the strictest quality control of each component so as to
guarantee that our products will function efficiently far into the future. The mechanical, electrical, and electronic
parts were designed and manufactured to guarantee reliability and high-quality functioning.
The use of parts that are not original could cause functioning problems or damage to the product. Therefore,
always ask for any spare parts from authorized dealers to return the product to perfect working order.
All the machines we manufacture are made using modern technology and systems of tested reliability. We
systematically refer to the current standards and regulations for mechanical products, specifically the UNI
standards and the CEI standards for electric and electronic equipment. The units that are described in this
manual, like all our products, are manufactured according to criteria of good practice and in strict compliance
with the European directives and related regulations.

OVEN MOD. GARA Pag. 4 / 10
INSTRUCTIONS MANUAL
Professional Electric Oven mod. LINEA GARA
Release
01-2019
2 - NOTE
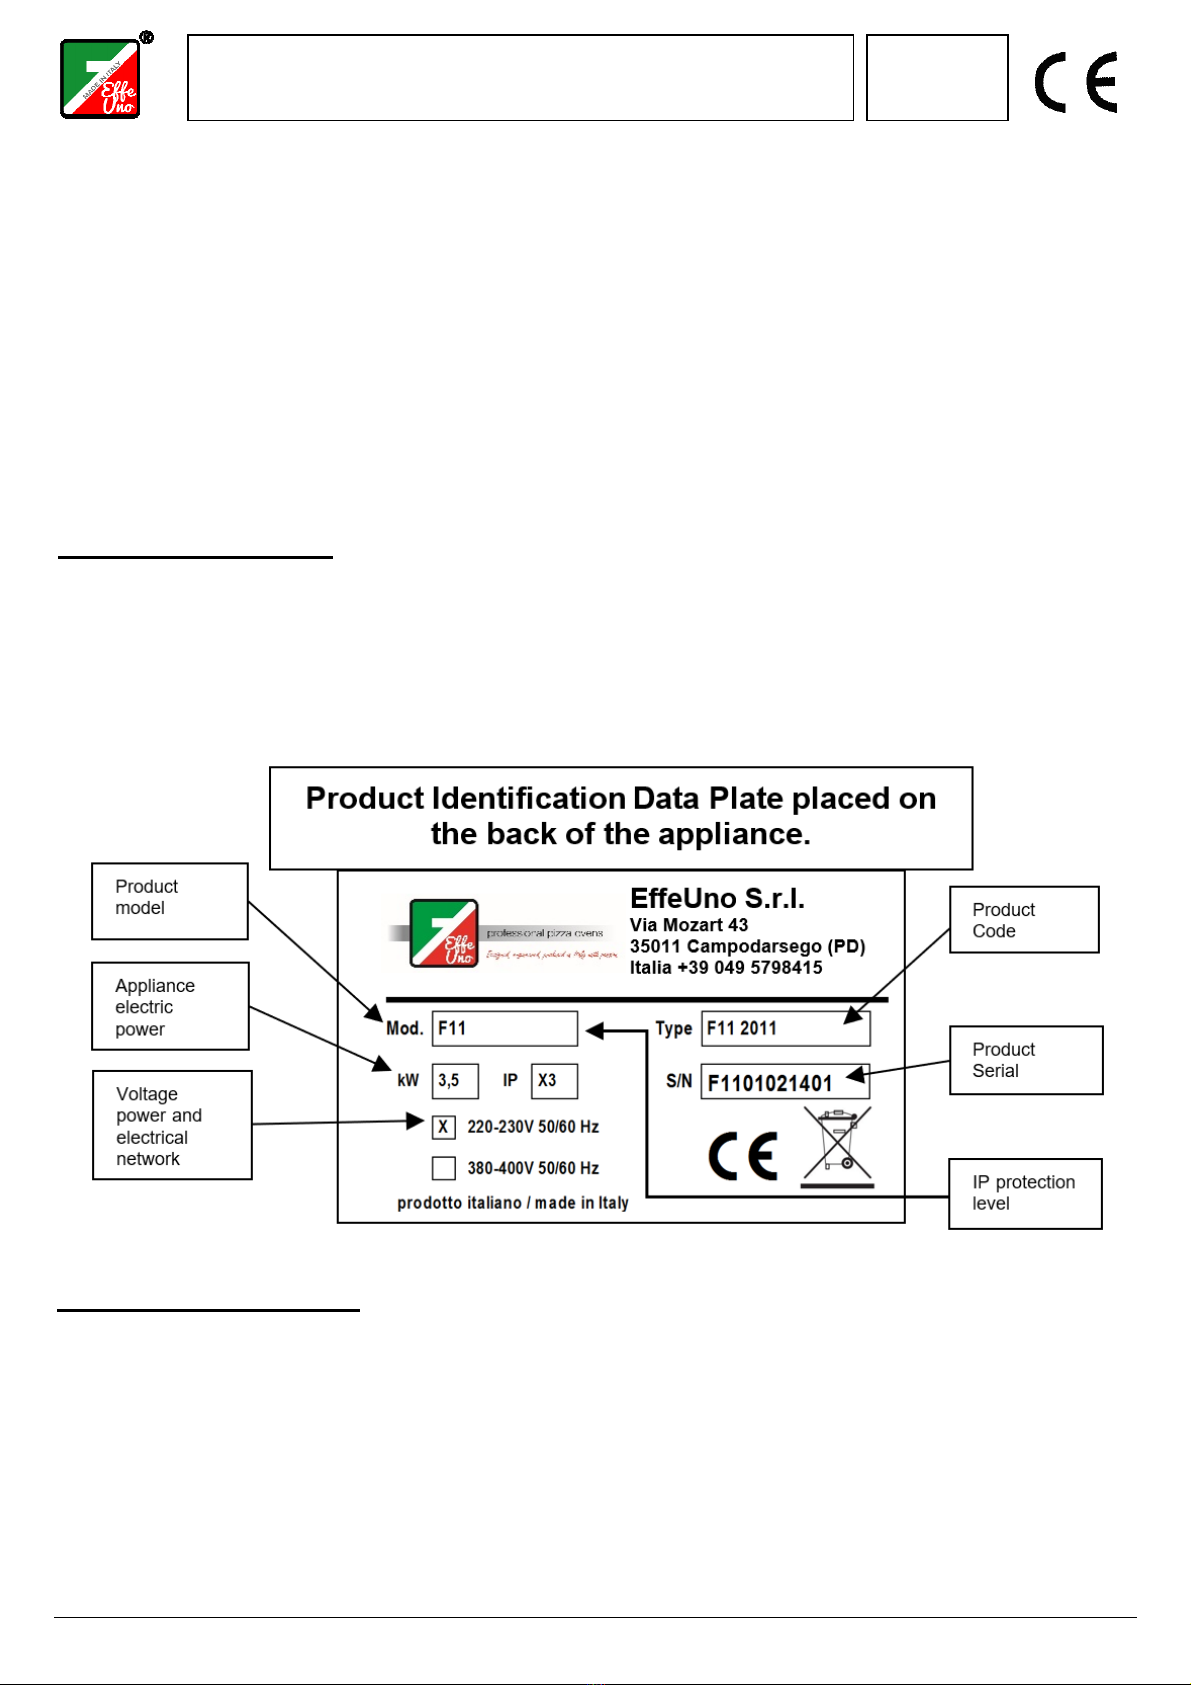
The unit that is iIIustrated or described could be different from
your unit because of commerciaI or technical reasons,
depending from the standards and safety regulations in force
in the different countries in Europe or in the world. The
technical specifications and dimensions, the described
functionings, and any equipment mentioned are not binding
and could be changed without notice and without incurring
into any obligation. The figures show a generic unit only for
illustrative purposes. The manufacturer EffeUno S.r.l. reserves
the right to make ELECTRICAL-TECHNICAL-ESTHETICAL
changes on this device and / or replace parts without prior
notice, if considered more appropriate, in order to always offer
a reliable, better, long-term and with advanced technology product.
3 - INFORMATION ON THE DANGERS CAUSED BY AN IMPROPER USE
Even though these ovens are equipped with a control thermostat, they must be personally supervised by the
user for the entire length of the operating cycle.
- Although the ovens described in this manual are extremely simple, we would like to provide you with
information on the dangers that cannot be eliminated from the safety measures adopted by the designer and
information on the dangers that could be caused by the improper use of the oven and by the use of certain
accessories
- Keep the following in perfect condition the oven power cable, the oven plug socket, all the power supplies
and oven distribution box protection equipment and disconnection switch equipment.
- Adequately protect the power supply cable from becoming damaged in any way, change it immediately if
there is any problem with it or if it does become damaged (even if it is damaged only on surface)
- At least once every 15 days check the efficiency of the "lifesaving" differential switch located on the oven's
power supply circuit by pressing the test button
- Do not install the oven outside, under a roofing or under a temporary cover
- Do not use the oven for warming or drying animals or similar
- Do not spray water, combustible liquids, or liquids of any type inside the oven or nearby the oven.
- The ovens must be used exclusively by personnel who have been trained in the use of electric appliances.
They must be informed about damages caused by improper use or use the oven not in accordance with the
instructions in this manual or with normal diligence.
- The user must know the required information about the unit and must be of the required legal minimum
working age in the Country where the oven is installed
- Do not perform any type of cleaning or maintenance before cleaning the oven, turn the power supply
disconnection switch to the O/OFF position, remove the plug from the power socket, and put a sign up to
announce that this operation is taking pIace. Wait until the oven is completely cooled down; this will take many
hours!
While the oven is in operation or while it is cooling down pay attention! heat and electricity are invisibles.
- When the user is sick or in bad physical condition, even if only slightly, this could reduce his level of
vigilance, he should NOT use these ovens or any other equipment . The oven must always work with the
operator’s control in order to ensure it is used in a proper way.
- Do not use the appliance at less than a 5m minimum distance from other machines like fryers or others,
which oils, flours or similar substances can come out from.
- These units must not be used for any purpose not expressly specified in this manual.
- Encrustation of carbonized food on the walls or on the bottom of the oven can be removed with a non-cutting
tool or wire brush. Use protective gloves to perform this operation. If the deposits on the refractory stones are
thick and difficult to remove by regular means, replace them with other original
refractory stones.
- The user must not repair the oven, disassemble parts of the oven, work on the electric circuits, nor make any
changes in the unit. Only specially trained technical personnel may service the unit.
P134 GARA MECH
OVEN MOD. GARA Pag. 5 / 10
INSTRUCTIONS MANUAL
Professional Electric Oven mod. LINEA GARA
Release
01-2019
- Do not get on or climb onto the oven or the oven 's frame.
- Do not allow that the oven is used by children or incapables, without adapted surveillance. The oven must
always work with the operator’s control in order to ensure it is used in a proper way. Children must be
supervised, to ensure that they don’t play with the appliance.
- Do not pIace your hands, your arms, or any other part of your body inside the oven.
- Do not use the oven for any other purpose besides cooking pizzas and similar foods.
- Do not pIace packages of sealed foods in the oven such as metal cans or cans made of other materials. The
high temperature in the oven could cause them to explode, with serious consequences for the oven and for
the operator.
- Never dip t e appliance in water; t e appliance must not be cleaned by water jet or steam cleaner, it
can compromise t e electrical safety of t e oven!!!!
- Moreover keep a distance of at least 20 cm between the oven and the furniture/walls around. As a support
for the appliance, don’t use materials different from stainless steel and/or marble.
4 - IMPORTANT NOTICE
Place the unit in a protected position from moisture sources or water taps to prevent that he device can be
achieved by water spray. The installation area must be well-lighted and sufficiently large to allow to the
operator enough space around the unit or at least on two sides. If the unit is installed on a support with a metal
structure, this support must not have wheels so as to prevent the serious danger of ripping the power cable, as
well as other possible damage, if the unit is moved imprudently.
5 - APPLIANCE PACKING
The unit and accessories packing is made of sturdy corrugated cardboard placed on a sufficiently sturdy pallet
for external protection. Inside this packing, the unit is protected by shockproof polystyrene.
In compliance with UNI standards, the packing outside shows the protection symbols, which identify the
contents to the shippers. The adopted symbols are - HIGH do not turn upside-down. - FRAGILE, do not
pIace any loads on this box.
Depending on dimensions and mass, these units must be hoisted and moved exclusively with suitable
mechanical means. Absolutely do not manually hoist or move the unit. The manufacturer have no
responsabilities for improper or inadeguate movings. Always use safe operating methods and take all
precautions indicated for moving bulky loads.
When the unit is delivered, with the shipper's presence, carefully check that there is no damage to the packing
Table of contents
Other effeuno Oven manuals

Popular Oven manuals by other brands

Brandt
Brandt FC 222 user manual

aumate
aumate TOA20M04N-1E instruction manual

Maytag
Maytag CWE4100AC - 24" Single Electric Wall Oven Dimension Guide

Kernau
Kernau KBO 1076 S PT B instruction manual

Bosch
Bosch HB 37 N Series User manual and installation instructions

Electrolux
Electrolux EOD5420AA user manual


