Egnater Tourmaster 4100 User manual

TOURMASTER 4100
Owner’s Manual
TOURMASTER 4212
TM
TM

TOURMASTERTM
INSIDE THIS OWNER’S MANUAL
Greetings from Bruce Egnater......................................... 3
Important Information..................................................... 4
Safety Precautions............................................................. 5
4100 & 4212 Specications............................................... 6
Quick Start Guide............................................................. 7
Finding the Sound You Want ........................................... 8-9
The Rear Panel Explained................................................ 10-11
Connecting Your Speakers ............................................... 12
Power Cord / Main Fuse / Voltage Selector .................... 13
The Channels..................................................................... 14
The Effects Loop ............................................................... 15-16
Tube Biasing ...................................................................... 17-18
Warranty Information...................................................... 19
2

Greetings………..
I would like to personally thank you for choosing Egnater as your “Tone Partner”. Our
goal is to provide you with the best tools we can to help you express yourself to the
commitment to helping you achieve that goal is our passion. Our hope is that you will
the sound that is “in your head”.
Thank you for putting your trust in Egnater.
Best Regards,
Bruce Egnater
3

TOURMASTERTM
IMPORTANT INFORMATION
Please keep this instruction manual for future reference and for the duration of owning
this Egnater TourmasterTM 4100 / 4212. Please carefully read and understand the instructions
inside this user’s manual before attempting to operate your new amp.
This instruction manual includes essential safety information regarding the use and
maintenance of the TourmasterTM 4100 / 4212. Take special care to heed all warning symbols
WARNING
TO PREVENT FIRE OR
SHOCK HAZARD, DO NOT
EXPOSE THE AMPLIFIER TO
WATER OR MOISTURE. DO
NOT OPERATE NEAR ANY
WATER SOURCE
WHAT’S THE MEANING OF THIS?
e lightning flash with an arrow
triangular symbol is intended to alert
the user to the presence of non-
insulated “dangerous voltage” within
the products enclosure, and may be of
sufficient magnitude to constitute a
risk of electric shock
1) Read these instructions.
2) Follow all instructions.
3) Keep these instructions.
4) Heed all warnings.
all other external devices.
while transporting it over wet surfaces as water
might splash onto the unit.
6) Clean only with dry cloth.
7) Do not block any ventilation openings and operate
in accordance with manufacturer’s instructions.
8) Do not install near heat sources such as radiators,
stoves or other devices that may produce heat.
9) Do not defeat the safety purpose of the
polarization or grounding-type plug. A polarized
plug has two blades with one wider than the other.
A grounding-type plug has two blades and a third
grounding prong. The wide blade or the third
prong is provided for your safety. If the provided
for replacement of the obsolete outlet.
10) Protect the power cord from being walked on or
pinched, particularly at the plug and the point
Egnater Amps.
when not in use.
Servicing may be required when the unit has been
damaged in any way such as when power-cord or
WHAT’S THE MEANING OF THIS?
e exclamation point triangular
symbol is intended to alert the user to
the presence of important operating
and maintenance (servicing) instruc-
tions in the user manual accompany-
ing this amplifier
!
plug is damaged, liquid has been spilled into the
unit, the unit has been exposed to moisture or rain,
does not operate normally, or has been dropped.
corrosion of electrical contacts.
15) Keep the unit out of extended or intense direct sun
by yourself. Refer to authorized service center.
17) Do not remove rear metal grill. No user serviceable
parts inside.
WARNING Handle the power supply cord
with care. Do not damage or de-
form; it may cause electric shock
or malfunction when used. Hold
plug attachment when removing
from wall outlet. Do not pull on
the power cord.
4

1. READ INSTRUCTIONS – All the safety
and operating instructions should be read
before this product is operated.
2. RETAIN INSTRUCTIONS – The safety
and operating instructions should be re-
tained for future reference.
3. HEED WARNINGS – All warnings on
the
and in the operating instruc-
tions should be adhered to.
4. FOLLOW INSTRUCTIONS – All
operating and use instructions should be
followed.
5. WATER AND MOISTURE –
The ampli-
example, a bathtub, washbowl, kitchen sink,
laundry tub, wet basement, or near a swim-
ming pool, and the like.
6. CARTS AND STANDS – The
ampli-
should be used only
with a cart or stand that
is recommended by the
manufacturer.
An
and cart
combination should be
stops, excessive force, and uneven surfaces
may cause the
and cart combina-
tion to overturn.
7. WALL OR CEILING MOUNTING
– The product should never be mounted to a
wall or ceiling.
8. HEAT –
should be situated
away from heat sources such as radiators,
heat registers, stoves, or other
9. POWER SOURCES – This product
should be operated only from the type of
power source indicated on the rating label.
If you are not sure of the type of power
supply to your home, consult your product
dealer or local power company.
10. GROUNDING OR POLARIZATION
– This product may be equipped with a po-
larized alternation-current line plug (a plug
having one blade wider than the other). This
way. This is a safety feature. If you are un-
able to insert the plug fully into the outlet,
try reversing the plug. If the plug should
replace your obsolete outlet. Do not defeat
the safety purpose of the polarized plug.
11. POWER-CORD PROTECTION
– Power-supply cords should be routed so
that they are not likely to be walked on or
pinched by items placed upon or against
them, paying particular attention to the cord
in correspondence of plugs, convenience
receptacles, and the point where they exit
from the
.
12. CLEANING – The
should
be cleaned only as recommended by the
manufacturer. Clean by wiping with a cloth
slightly damp with water. Avoid getting
water inside the
.
14. NON-USE PERIODS – The power
cord of the
should be unplugged
from the outlet when left unused for a long
period of time.
– Care should be taken so that objects do
not fall and liquids are not spilled into
the enclosure through openings.
16. D
– The
should be serviced by
A. The power-supply cord or the plug
has been damaged; or
B. Objects have fallen, or liquid has been
spilled into the
; or
C. The
has been exposed to
rain; or
D. The
does not appear to
operate normally or exhibits a marked
change in performance; or
E. The
has been dropped, or the
enclosure damaged.
or biasing
17. SERVICING – The user should not
attempt any service to the
beyond
that described in the operating instructions.
All other servicing should be referred to
18. VENTILATION – Slots and openings
in the cabinet are provided for ventila-
tion and to ensure reliable operation of the
product and to protect it from overheating,
and these openings must not be blocked
or covered. The openings should never be
blocked by placing the product on a bed,
sofa, rug, or other similar surface. This
product should not be placed in a built- in
installation such as a bookcase or rack.
19. ATTACHMENTS – do not use attach-
ments not recommended by the product
manufacturer as they may cause hazards.
20. ACCESSORIES – Do not place this
product on an unstable cart, stand, tripod,
bracket, or table. The product may fall,
causing serious injury to a child or adult,
and serious damage to the product. Use
only with a cart, stand, tripod, bracket, or
table recommended by the manufacturer,
or sold with the product.
21. LIGHTNING – For added protection
for this product before a lightning storm,
or when it is left unattended and unused
for long periods of time, unplug it from
the wall outlet. This will prevent damage
to the product due to lightning and power-
line surges.
22. REPLACEMENT PARTS – When
replacement parts are required, be
sure the service technician has used
-
facturer or have the same characteristics as
the original part. Unauthorized
shock, or other hazards.
23. SAFETY CHECK – Upon completion
of any service or repairs to this product,
ask the service technician to perform
safety checks to determine that the product
is in proper operating condition.
FOLLOW THESE SAFETY PRECAUTIONS
CAUTION: To reduce the risk of electric shock, do not
remove any cover. No user-serviceable parts inside. Refer
servicing to qualified service personnel only.
The lightning flash with arrowhead symbol within the equilateral triangle is intended to alert the use to the
presence of un-insulated “dangerous voltage” within the product’s enclosure that may be of sufficient
magnitude to constitute a risk of electric shock.
The exclamation point within the equilateral triangle is intended to alert the user to the presence of important
operation and maintenance (servicing) instructions in the literature accompanying this amplifier.
To prevent electric shock, do not use this polarized plug with an extension cord, receptacle or other outlet unless the blades
can be fully inserted to prevent blade exposure.
CAUTION
5

TOURMASTERTM
TOURMASTERTM 4100 / 4212 SPECIFICATIONS:
10 to 100 Watts RMS Presetable
1meg Ohm
94k Ohms
4 Ohms, 8 Ohms Or 16 Ohms - Selectable
EFFECTS LOOP
4k7 Ohms
EFFECTS LOOP
250k Ohms
5% At Rated Output
Eight Selected GroovetubesTM / Egnater
12AX7A / ECC83
Four Selected GroovetubesTM / Egnater 5881
+6db @ 120hz
+8db @ 3.2khz
-50dBv To 0dBv
4100 Head 27” (W) x 11” (D) x 10.5” (H)
4212 Combo 27” (W) x 11” (D) x 22” (H)
4100 Head 60 lbs
4212 Combo 95 lbs with
2x12” Egnater / CelestionTM
Elite 80 Speakers
6
Not a manual reader?
The TourmasterTM 4100 (Head) and 4212 (Combo) represent the latest in tube guitar amp technology. Our aim in
creating the TourmasterTM models is to offer an extensive array of useable tones and features while keeping things
more in depth descriptions of some of the cool features, simply read further in the manual. Please note the
TourmasterTM 4100 head and 4212 combo have all the same controls and features. The only difference between
the two is that the panel layouts are reversed to read properly in their respective cabinets.
Admittedly the front panel is a bit daunt-
of the TourmasterTM as four separate
amps in one box. Each channel has an
identical set of controls that are simply
repeated four times. That is where the
similarity ends.
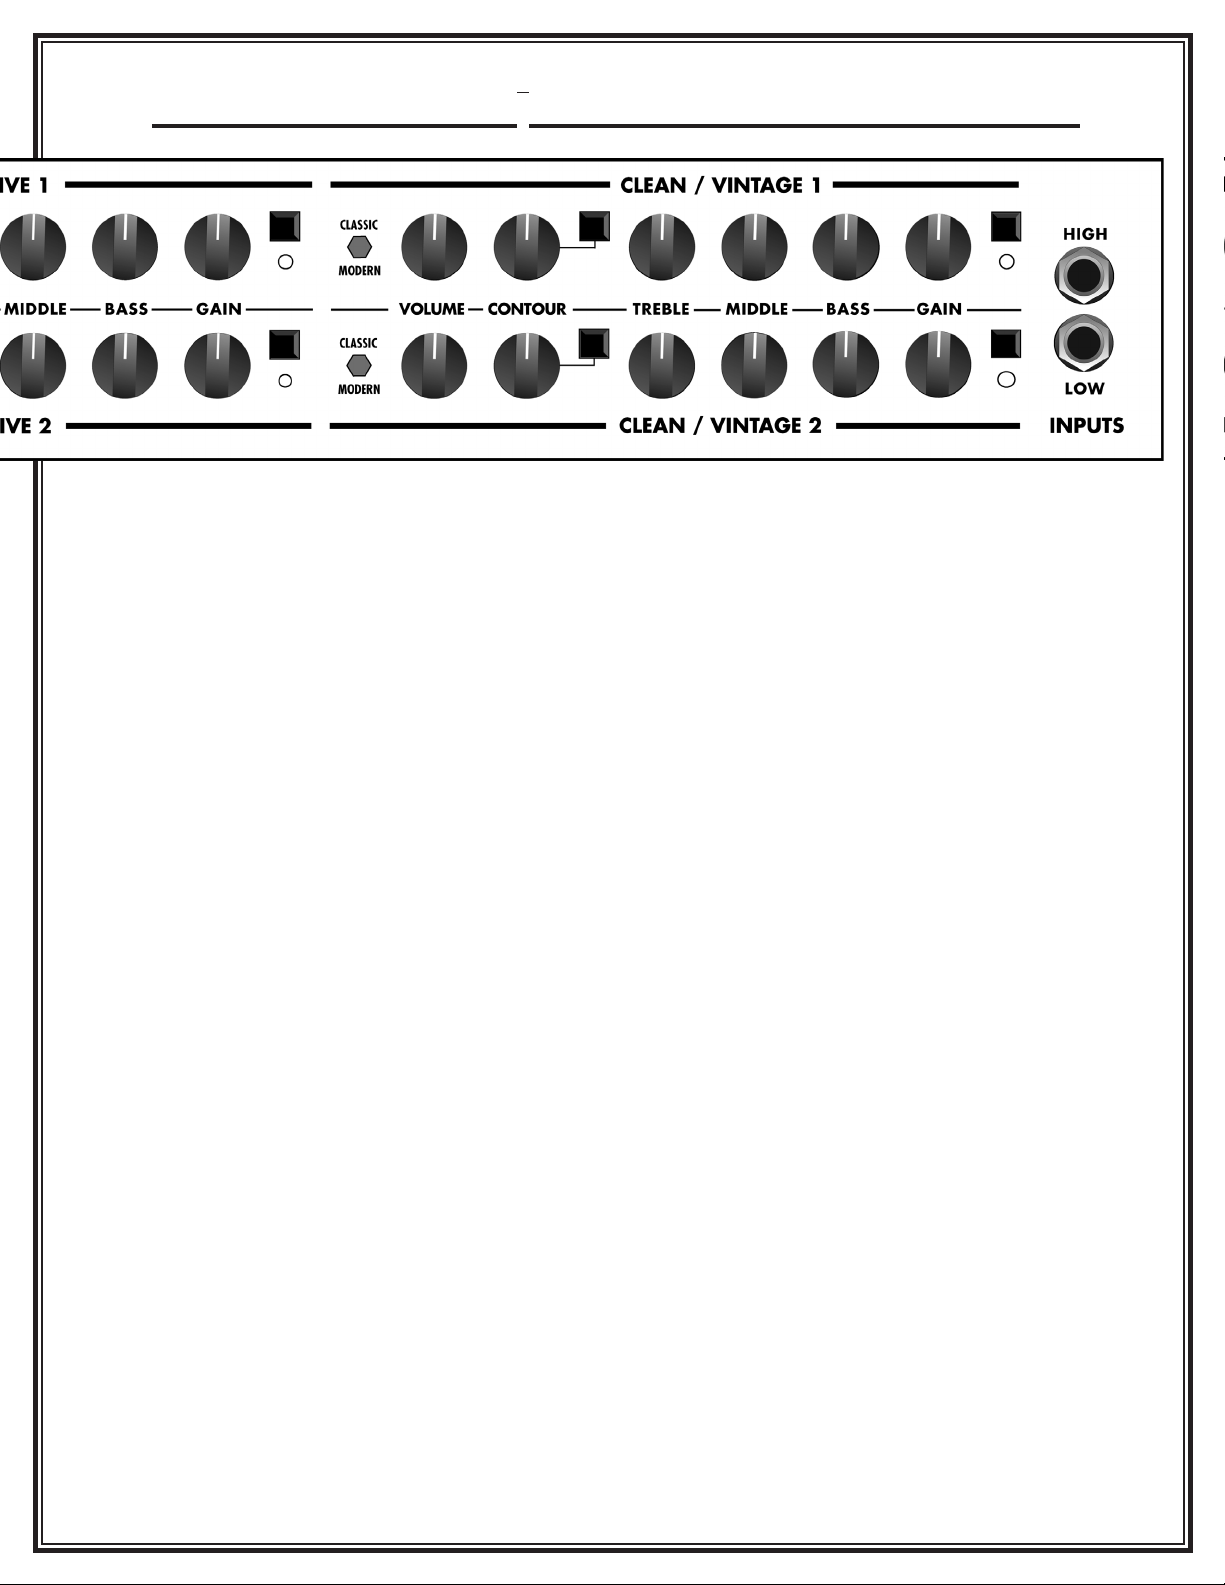
INPUTS: There are two instrument
inputs. The HIGH input is the hotter of
the two. Plugging in here will give you
the maximum gain. If your guitar has
very high output pickups, using the Low
input may provide more clean headroom.
Use the one that works best for your
guitar and playing style.
CLEAN/VINTAGE 1 is the cleanest
of the four. Within this channel lives
a range of Classic tones ranging from
pristine sparkle with the voicing switch
set to MODERN to a punchy, aggressive
drive (think clean JTM) in the CLASSIC
mode. Pressing the button to activate the
CONTOUR control opens an entire new
range of beautiful clean, almost acoustic,
CLEAN/VINTAGE 2 has a very similar
voicing to the Clean/Vintage 1 channel.
We’ve added more gain so this channel
can be “pushed” into mild overdrive.
Sweet blues and classic rock tones are
easily coaxed out of this channel. Again,
the contour knob adds another level of
OVERDRIVE 1: From AC/DC crunch
to modern rock, this channel covers a lot
of bases all by itself. Dial down the gain
and the feel is pure classic rock. Push the
gain and enter into more modern, satu-
rated territory. Scoop the mids with the
CONTOUR control for monstrous metal
or set it for classic British rhythm.
OVERDRIVE 2: The Tourmaster’s
-
cious gain with a wide range of tones
to suit the ‘80s shredder as well as the
heaviest modern metal player. Scoop
the mids with the powerful CONTOUR
control for massive crunch or push
the midrange for a solo tone that cuts
through with serious authority.
MASTER SECTION: The controls
here have an effect over all channels
simultaneously. The MASTER VOL-
UME simply adjusts the overall volume
of the amp. This allows you to turn
everything up or down without upsetting
the balance between the four channels.
MASTER REVERB sets the overall
level of the internal spring reverb.
MASTER PRESENCE and DENSITY
provide BASS and TREBLE boost in the
circuits in the power amp, you can boost
the depth and bite without loosing pre-
and clarity are enhanced. Be forewarned,
these powerful controls should be used
sparingly at higher volumes. If overused,
the sound can get muddy and cause ex-
cessive speaker breakup or sound brittle
and overly bright. Tighter, punchier bass
will be achieved with the lowest possible
settings of the DENSITY control.
BIG TOGGLE SWITCHES: Two of
these. The one labeled OFF and ON
turns the power OFF and ON. Pretty
straight forward. The one next to it
labeled STANDBY and PLAY has a
main POWER on and the switch in
the STANDBY position, the tubes are
warmed up and ready to go. When
fully on and ready to rock. When turning
the TourmasterTM on from a cold start,
always have the switches in the OFF and
STANDBY positions respectively. Turn
-
ute or so for the tubes to warm up. Then
switch to the PLAY position.
TOURMASTERTM QUICK START GUIDE
7

TOURMASTERTM
FINDING THE SOUND YOU WANT!
Below are some suggested knob settings to get you started. Keep in mind these are merely suggestions.
8

FINDING THE SOUND YOU WANT! con’t
A FEW TIPS FOR FINDING YOUR SOUND
1)
2) There should be a reasonably balance between the channel volume controls and the main mas-
ter volume knob. This means, for example, you should not have all the individual channel volumes
cranked way up and have the main volume control just “barely cracked open” or viceversa. Find a
sensible balance between the volume knobs so you can make volume adjustments easily.
3) Use the master DENSITY and PRESENCE controls sparingly. Too much presence boost will tend
to sound shrill and offensive to listeners directly in front of your speakers. Your tone will also tend to
be excessively bright when mic’d through a PA. Too much DENSITY boost can make your low end
overbearing. This is hard on your speakers. This may cause excessive speaker breakup / distortion
that could lead to premature speaker burnout. Excessive DENSITY boost will also upset your bass
player, which may be good or bad thing....
9

TOURMASTERTM
Looks like a lot of stuff doesn’t it?
Don’t worry. It’s really easy.
EFFECTS LOOP: This is where
you can plug your external effects
gadgets in. To use the loop, simply
run a high quality shielded cable
from the SEND jack to the input of
your effects. Connect another high
quality shielded cable from the ef-
fects unit out to the RETURN jack.
For now, the simplest setup will be
to use the loop in the SERIES mode
so set the pushbutton switch to the
OUT position. We will explain the
PARALLEL mode in the EFFECTS
LOOP section later in this manual.
The loop can be activated a few dif-
ferent ways. One way is to simply
set the slide switch to MASTER.
The loop is now active on all chan-
nels and can not be turned on or off
via the footswitch. You also have
the option of presetting when the
loop is on. You can set it up so that
the loop only becomes active when
you use the CLEAN channels by
setting the slide switch to CLEAN/
VIN 1&2. Conversely, you can
have the loop only turn on with the
OVERDRIVE channels by setting
the slide switch to OVERDRIVE
1&2. If you prefer to control the
slide switch to REMOTE/OFF.
You can now use the EFFECTS
button on the footpedal to turn the
loop on and off. Easy so far right?
To set the loop SEND LEVEL and
RETURN LEVEL/MIX, plug your
effects unit in and activate the loop
using one of the methods above.
Set the SEND LEVEL to “0” and
Now, while switching the loop on
and off, adjust the send level until
there is no volume change when
switching the loop on and off. Also
note that there is no noticeable in-
crease in distortion or noise. If you
hear distortion or noise, refer to the
EFFECTS LOOP section on Page
that are not made to use in a loop. If
you notice a severe loss of volume
or treble, or an increase in distortion
when activating the loop, this is an
indication that the pedal is being
overloaded and should not be used
in the loop.
FOOTSWITCH: Plug in the
TourmasterTM footpedal controller
using the special supplied 8-pin
A standard MIDI
cable will not prop-
erly function with
the pedal.
POWER GRID:
This is a really
cool feature your
-
masterTM amps. Using this group of
5 slide switches, you can set the
power output for each channel indi-
vidually. As you can see there is a 3
position slide switch corresponding
to each channel and a single FULL
POWER/ HALF POWER slide
switch. We suggest starting with
all the channel slide switches in the
100 watt position and the FULL/
HALF power switch at full power.
This will tell the POWER GRID
circuit to produce the full 100 watts
do is decide if 100 watts or 50 watts
is what your maximum power will
be and set the FULL/HALF power
switch accordingly. Next is the cool
stuff. Let’s say you want channel
one to be a big, full, beautiful, clean
sound. You need lots of power for
that so leave the CLN/VIN 1 slide
in the highest power position. Now
you decide you want channel 2 to be
more like a little Fender
Deluxe™. You can easily have
the amp reduce the power (watts)
automatically when you switch to
channel two by selecting one of
the lower power settings on the
CLN/VIN slide switch. This will
give you some power tube breakup
and compression (sag) at just the
right volume. Repeat these steps for
the other channels. Now, not only
10

THE REAR PANEL
do you have a wide array of tones
available from the preamp chan-
nels, but you can introduce any
amount of power tube distortion
you wish, all preset and automatic.
power setting for any channel, the
less preamp gain you will want to
use. So reduce the channel GAIN
control and increase the channel
MASTER as you reduce the power.
You will be much more pleased
with the results, trust us.
RECORD OUT: This output is
designed as a direct feed to a PA
mixer or for recording. The output
response of a microphone placed
at the edge of the cone of a 12”
speaker. As we all know the ideal
spot to mic a speaker is at the edge
(not the center) of the cone, right?
TUBE BIASING: This neat fea-
ture allows setting the bias properly
when an authorized technician
changes the power tubes. PLEASE
read the detailed section on TUBE
BIASING later in this manual to
fully understand its function. This
is important stuff for your safety
and the life of your amp. Don’t
mess around until you understand
how the Tube Biasing works and
only have an authorized service
center replace or check tubes.
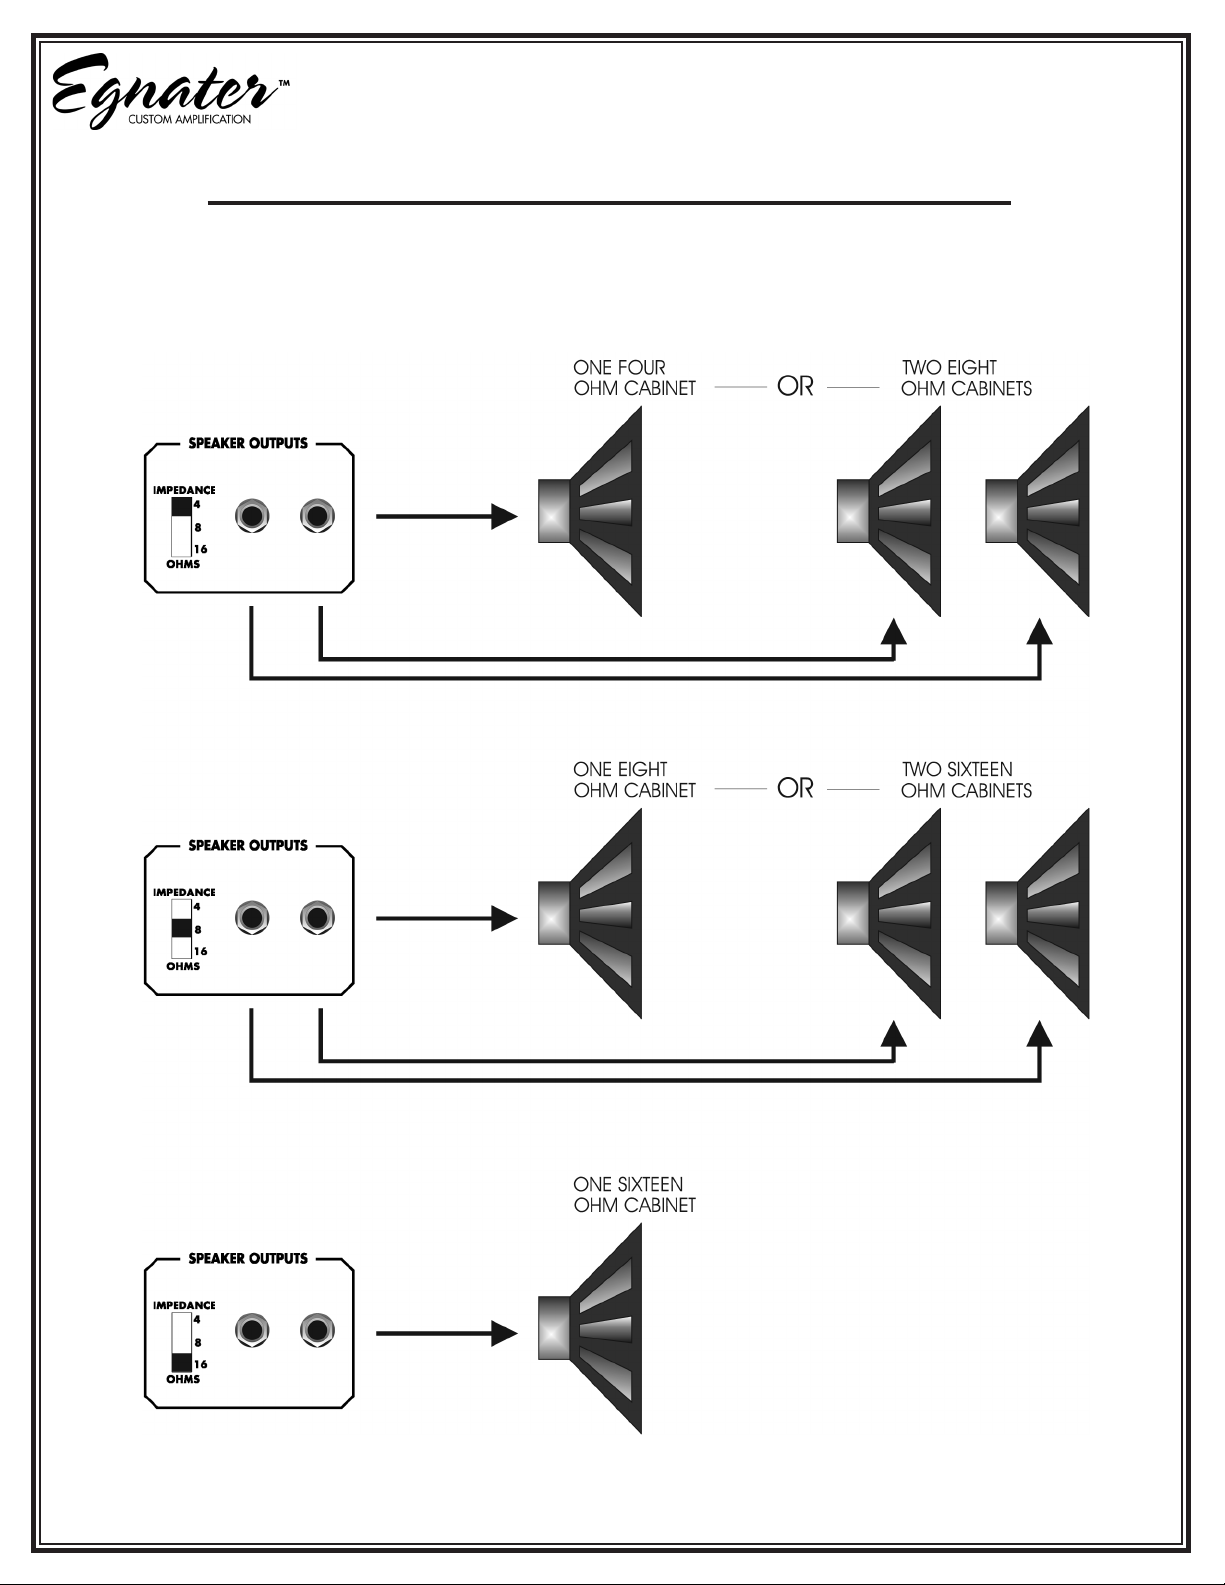
SPEAKER OUTPUTS: This is
where you connect your amp to
your speakers. Let’s start with a
few really important precautions.
1) NEVER, EVER operate your
amp without speakers plugged in.
This is a terrible thing to do to any
tube amp and can cause severe
damage to power tubes and trans-
formers.
2) Always set the rear panel imped-
ance selector switch to match the
total impedance of your cabinet(s).
The correct setting for the 4212
combo using only the internal
speakers is 8 ohms.
3) Always use a good quality,
heavy gauge speaker cable (not a
shielded guitar cable) to connect
your 4100 head to the cabinet(s).
11
TOURMASTERTM
The two speaker outputs on the TourmasterTM 4100 are wired in parallel. This means if you plug two cabi-
nets into the amp (one per speaker output jack), the cabinets are effectively wired together (in parallel).
See below for the proper impedance switch settings for different combinations of cabinets.
12
CONNECTING YOUR SPEAKERS

TM head or combo have detachable IEC type grounded power cord
that plugs into the AC inlet connector. Always use the appropriate type of power cord in your country or
region. Below are a few precautions pertaining to this connection.
1) Always plug your amp into a properly grounded 3 prong AC outlet.
2) Never plug your amp into an ungrounded outlet.
3) Never remove or break off the 3rd prong safety ground pin from the power cord.
4) Never use a damaged or ungrounded power cord.
5) Always use the proper value and type fuse according to the rear panel markings.
6) Be sure the AC selector switch is set to the correct voltage in your country or region and
13
Power Cord / Main Fuse / Voltage Selector
VOLTAGE
SELECTOR
SWITCH
MAIN POWER
FUSE LOCATED
WITHIN THIS
HOLDER

TOURMASTERTM
Earlier in this manual you found a
brief description of the four indi-
vidual channels. The following sec-
tion will help explain the different
features and how they affect your
tone. Remember to take advantage
of the master PRESENCE and
DENSITY controls to enhance
the depth and brightness of all the
channels.
CLEAN / VINTAGE 1:
As we said earlier, this channel
is the cleanest of the four. The
BASS, MIDDLE and TREBLE
controls are basically the familiar
passive style tone controls found
in 80% of guitar amps over the
past few decades. We have chosen
to voice them with a bit of a Brit-
headroom. The most pristine tones
are typically achieved by cutting
the MIDRANGE and setting the
VOICING switch to MODERN.
Of course, you can turn down the
MIDRANGE knob but often that
is just not enough, especially with
humbucking pickups. This is where
the CONTOUR knob comes in.
The additional control makes the
TourmasterTM tone circuit one of the
most versatile around. To activate
the CONTOUR control, depress
the pushbutton next to the knob and
turn the control to hear how effec-
tive the midrange cut can be for
your clean sound. It can almost turn
your humbuckings into single coils
and your single coils into a more
acoustic tone. For more of a Vin-
switch to CLASSIC. This revoices
the channel to have a bit more
drive, more midrange and tighter
low end much like the cool old
amps from the 60’s ad 70’s. The
cleanest tones are achieved in ei-
ther mode by setting the VOLUME
knob full up (or close to it) and us-
ing the GAIN control to control the
loudness. Even though the intent of
this channel is for beautiful clean
sounds, it can be pushed into mild
overdrive by increasing the GAIN
control and reducing the VOLUME
accordingly. The breakup is quite
raw and “in your face”. Great for
classic rock. Please refer to the
SUGGESTED SETTINGS for a
good starting point. These settings
are merely just that…suggestions.
They provide a good starting point
to aim in the right direction.
CLEAN / VINTAGE 2:
This channel is voiced very much
like the CLEAN / VINTAGE 1
channel except we’ve added more
gain. It can play almost as clean as
channel 1 but can also create some
really cool overdrive tones. All of
the control functions are basically
the same as channel 1. Classic
overdrive tones are best created
with the VOICING switch set to
CLASSIC and the CONTOUR
control off. You’ll get that great old
midrange bark that was so much a
part of the early British rock scene.
If a more modern crunch is your
style, try cutting the MID-RANGE
or switching on the CONTOUR
and backing down the CONTOUR
knob. Keeping the BASS knob
lower will help to tighten and
volume knob can be quite effective
for cleaning up the tone. Classic
Zep or even some sweet blues can
be effortlessly coaxed out of this
channel. You could probably play
all night on this channel alone.
Again, check out the SUGGEST-
ED SETTINGS.
OVERDRIVE 1:
As we said, this channel covers a
lot of bases all by itself. With the
GAIN control set lower, VOICING
set to CLASSIC and CONTOUR
off, this channel is pure classic
rock. British invasion revisited. See
BRIT GRIND in the SUGGESTED
SETTINGS. Brit grind not your
thing? Switch in the CONTOUR,
set the VOICING switch to MOD-
ERN, crank the GAIN and enter
modern rock territory. Many great
high gain tones are here - experi-
-
TOUR even more and enter the
modern metal rhythm world.
OVERDRIVE 2:
High gain heaven (or hell). De-
pends on your point of view. In
the ultimate in aggressive drive.
MIDRANGE up and CONTOUR
sustain so prevalent in the days
of hot rod solos. Switching to the
MODERN mode pours on “over
the top” gain and sustain for days.
Try the MODERN SOLO setting
in the SUGGESTED SETTINGS.
Outrageous metal grind is simple to
conjure up. Cut the MIDRANGE,
activate the CONTOUR, turn up
the BASS and TREBLE and pre-
pare to crush the opposition.
THE CHANNELS
14

THE EFFECTS LOOP OPERATION
The TourmasterTM effects interface
allows you to connect and control
your effects in a number of differ-
ent ways.
1) You will need to make a few
preliminary decisions on how you
wish to use the loop. First you
must select the SERIES or PAR-
ALLEL mode. Both are explained
below. Each mode has its own
advantages and disadvantages.
Choose the one that best suits your
effects gadgets.
1) SERIES LOOP MODE:
Basically an insert patch point.
When an external effect is patched
into the series send and return
jacks, the path is interrupted
and 100% of the signal is routed
through the effect. This puts
some special demands on the ef-
fects unit. It must be essentially
transparent, meaning it shouldn’t
“mess” with your tone. The input
and output levels must be properly
set for maximum headroom and
lowest noise and it needs to oper-
ate at line level. Proper setting of
the levels can be achieved using
the following method.
a) Set your amp/preamp volume
levels for normal playing levels.
Connect a high quality shielded
cable from the series SEND jack
to the EFFECT input.
b) Adjust the effects SEND level
to “just peak” while playing your
most aggressive licks.
c) Now connect another high
quality shielded cable from the ef-
fect output to the return jack.
d) Adjust the effects unit output
level and/or the loop RETURN
level to match the volume you
heard before connecting the
return cable. You can check this
by switching the loop in and out
while playing and verifying there
that is no substantial volume
difference. This is called “unity
gain”. A cool “techie” phrase for
“you get out what you put in”.
e) If your effects unit does not
have any sort of level indica-
tors, try setting the return level to
level until unity gain is achieved
using the above method.
2) PARALLEL LOOP MODE:
This is a more specialized loop. It
has the advantage of maintaining
your dry signal (it doesn’t mess
with your tone), while allowing
you to mix in the amount of ef-
fect you want. The TourmasterTM
parallel loop mode is a bit differ-
ent than most guitar amp loops.
Typically, parallel loops found on
mix control that turns down the
dry signal (messing with your
tone) while simultaneously turning
up the effects level. The Tourmas-
terTM parallel loop is unique in that
it never messes with your dry tone.
It simply mixes in the amount
of effects using the RETURN
LEVEL/MIX knob, much like the
effects buss on a mixing console.
The direct signal remains unal-
tered and the effects are simply
mixed back in. There are a few
basic rules that must be adhered
to. This also puts some limitations
on using the parallel loop.
a) Your effects unit must be set
for 100% wet. This requires you to
set the mix levels on the effect so
that there is no dry signal pass-
ing through the unit. Think of the
mixing console again. You would
not want to have any dry signal
going through the effects buss
because you would then be mixing
in not only the effect, but also the
unwanted dry signal that comes
out of the effects unit. This can
even be detrimental to your tone
because the dry output signal of
many effects units are out of phase
with the input. Consequently,
as you turn up the effects return
knob, you may actually be mixing
the “icky” out of phase signal back
in with your awesome dry signal
and…you guessed it….mess-
ing with your tone. Often loops
on guitar amps are said to “suck
tone”. This “tone sucking” is more
likely caused by improperly set-
ting the effects mix than the loop
design.
15

TOURMASTERTM
THE EFFECTS LOOP OPERATION con’t
uses, advantages, disadvantages and
limitations of each loop.
a) The series loop, by nature of
the fact that it breaks the direct path
and processes 100% of the signal,
makes it so that essentially any line
level gadget will work. You can
use echo, reverb, noise reduction,
tremolo, equalizers etc in this loop.
Remember to follow the procedure
for setting “unity gain”.
Advantages are:
just about any effect. No special
requirements, other than the “unity
gain” settings are needed.
Basically Plug and Play.
Disadvantage is that your entire
signal passes through the effects unit
and may …… mess with
your tone.
b) The parallel loop, on the other
hand, has more limited uses but has
the distinct advantage of not mess-
ing with your tone. This loop is ide-
ally suited for what are called “time
based effects”. This includes echo,
of effects work in parallel with your
direct signal (think about the mixer
again). Now the bad news…remem-
ber the dry signal is always present.
You cannot use effects that require
processing 100% such as equalizers,
noise reduction/gates, tremolo or
compressor/limiters.
Advantages are:
Doesn’t mess with your tone.
Easy to adjust the effects level with
the return level knob.
Disadvantage is limited use and may
require reprogramming your effects
unit.
4) Special Notes:
a) A concern is the fact that many
multi-effects units have a combina-
tion of all of the different effects.
This means, using the parallel loop,
you must be aware of which effects
can and can’t be used. For ease of
operation, we recommend using
the series loop if you intend to use
a mix of different “time based” and
non-time based effects in one unit.
b) The loop is designed for use
with a professional level effects
unit. Many guitar level effects
pedals are not made to work in an
effects loop. This is simply because
they are made to plug a guitar into.
The typical signal level in any ef-
fects loop is higher than what comes
out of your guitar. You will know
an effect is not made for pro level
if, when you plug it into the loop,
you notice distortion and a loss
of volume. If you do experience a
distortion problem with effects, this
can often be remedied by reducing
the master controls on the individual
channels and increasing the main
master setting.
Whew!!
Now that you have selected SERIES
is how and when you want the loop
to turn on or off. You have four op-
tions for controlling the loop.
1) Set the slide switch to RE-
MOTE/OFF. This mode allows you
to turn the loop on and off “on the
2) Setting the slide switch to
MASTER simply turns the loop on
full time and disables with the foot-
switch.
3) Placing the switch in the
CLEAN/VIN 1&2 causes the loop
to automatically turn on when you
are using either one of the CLEAN/
VINTAGE channels. This setting is
useful when you have
an effect such as a limiter or
compressor, or other effect, that
typically sounds cool on clean
sounds but doesn’t work well on
overdrive channels.
4) Setting the switch in the OVER-
DRIVE 1&2 position turns the loop
on only when you play through ei-
ther of the OVERDRIVE channels.
This is an excellent way to have gate
or noise reduction gadget on the
OVERDRIVE channels only when
using really high gain.
IMPORTANT NOTE:
When the slide switch is in the RE-
MOTE/OFF position, the EFFECTS
button on the footpedal is active and
can be used to turn the loop on and
channel you are playing through.
When the slide switch is set to
MASTER, the loop is always on and
the EFFECTS button on the pedal is
not active. Placing the slide switch
in the CLEAN/VIN 1&2 position
will automatically turn on the loop
whenever either one of the CLEAN/
VINTAGE channels is on. In this
mode, the EFFECTS button on the
footswitch will be inactive when
playing through either CLEAN/
VINTAGE channel. When the slide
switch is set to OVERDRIVE 1&2,
the loop will automatically switch
on when playing through either
of the OVERDRIVE channels. In
this mode, the EFFECTS pushbut-
ton will not be active when playing
through either of the OVERDRIVE
channels. So, from this explanation
we see that the EFFECTS push-
button on the pedal can be used to
turn the loop on and off only in the
modes where the loop is not prepro-
grammed to turn on automatically.
16
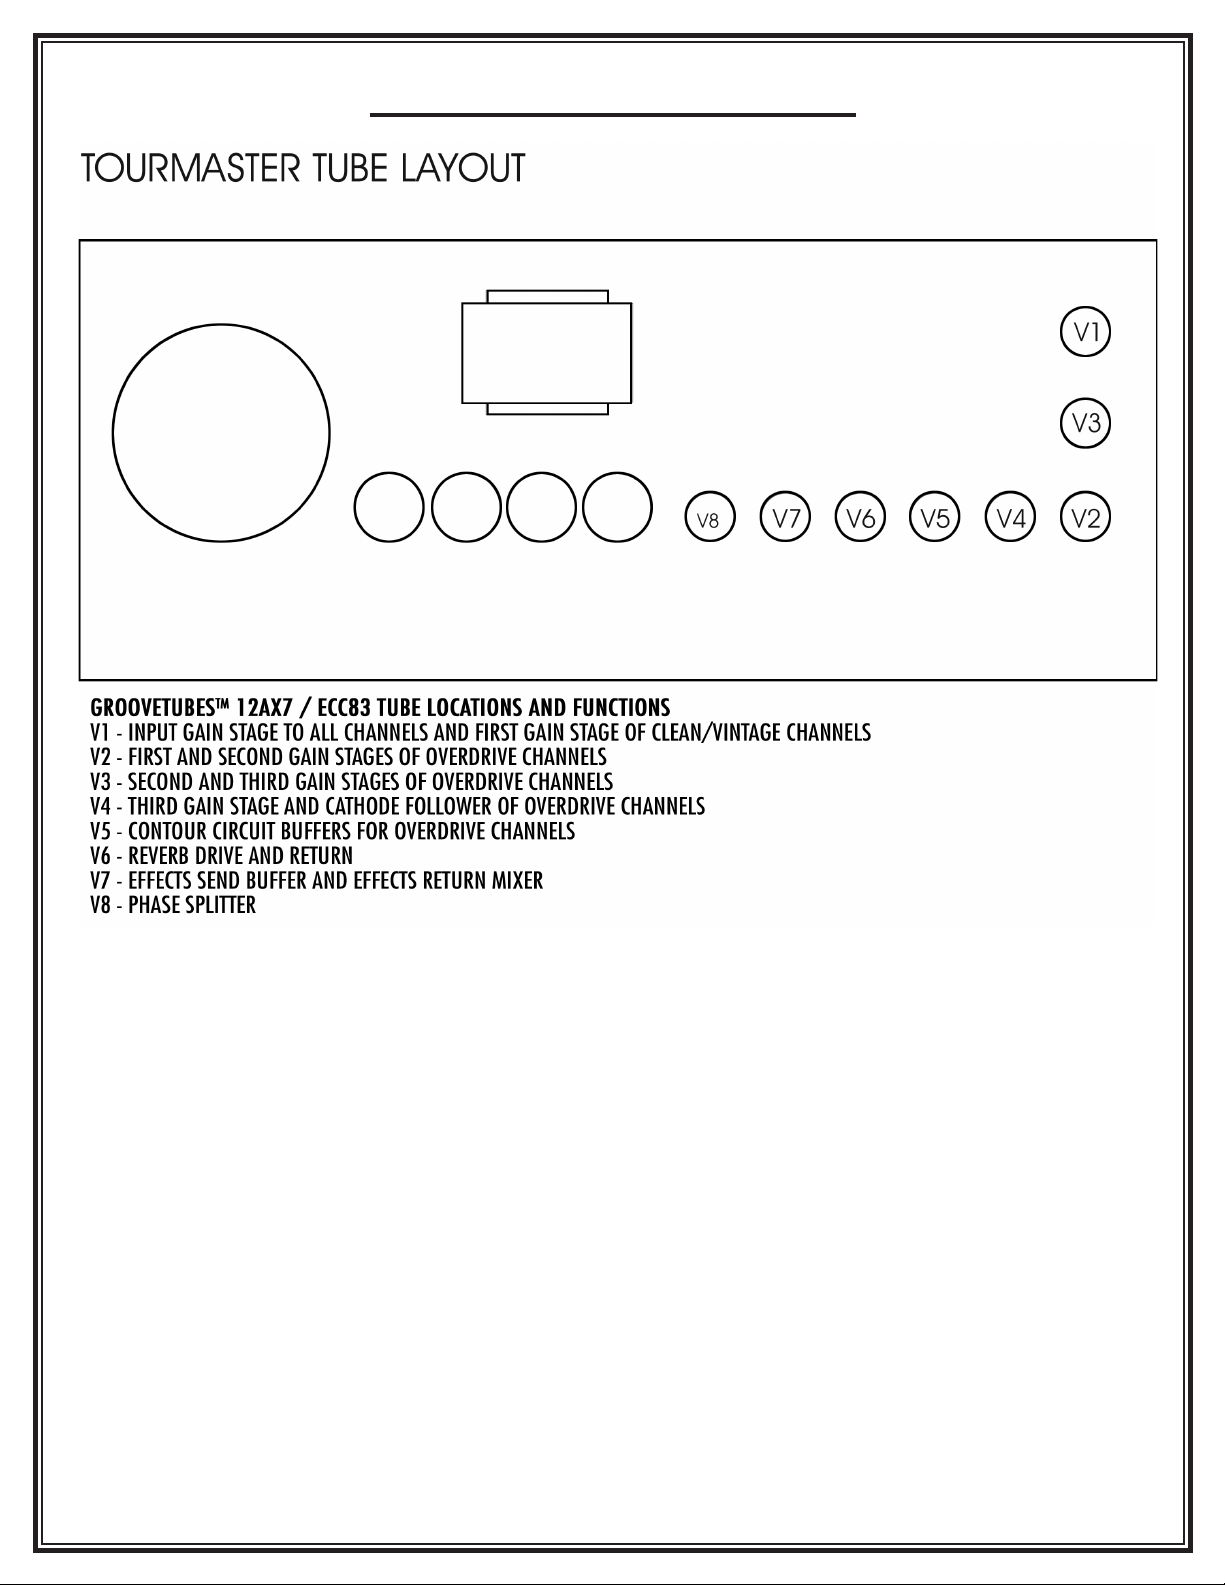
WHAT IS BIAS?
Simply put, it is a circuit inside the
-
through the power tubes, much like
the idle speed on a car. There is an
optimum setting where the engine
(hot) enough to keep it from stall-
ing (distorting) but not too fast
(hot) to cause excessive wear and
overheating. Get it?
WHY DON’T ALL AMPLI-
FIERS HAVE BIAS OR IDLE
CURRENT ADJUSTMENTS?
Most do have some provision for
that but typically involve remov-
ing the amp chassis from the box,
exposing you to very dangerous
high voltage. Special test equip-
ment and knowledge of amp cir-
cuits and tubes is also needed. Not
a skill most musicians possess and
shouldn’t need to.
WHY WOULD I WANT TO
ADJUST THE BIAS?
Your TourmasterTM comes with
specially tested and graded high
performance 5881s from Groove
Tubes. You are welcome to try
other types of tubes though, for
reliability, we recommend staying
with a 5881/6L6/KT66 tube type.
Each type has unique sonic and
electrical characteristics. Because
they are all different, each requires
a correct bias setting for safety, reli-
ability and optimum performance.
The following instructions are for
authorized technicians only, do
not attempt yourself:
You will need a decent quality
digital voltmeter capable of
measuring in the 100 to 200 milli-
volts DC range. .
blade screwdriver to turn
the adjustment control that is re-
cessed inside the grommet on
the rear panel.
1) Turn the amp on, standby
switch in the play position. All con-
POWER TUBE BIAS
17

TOURMASTERTM
trols all the way down.
POWER GRID slide switches to
100 watts and the FULL/HALF
power switch to FULL power. Turn
the meter on and set for reading
DC millivolts. Consult the meter
instructions for how to do this
properly. Since all meters are
different it is extremely important
that you thoroughly understand
what you are looking at on the
meter display.
a) Insert the black (negative)
test lead into the panel hole
labeled GROUND.
b) Insert the red (positive)
test lead into the panel hole
labeled HOT.
c)
driver, turn the BIAS ADJUST
control to obtain a
reading between 115mVDC
and 130mVDC.
IMPORTANT: The bias adjust-
ment control is active ONLY with
the POWER GRID switches in the
100 watt settings and the
FULL/HALF power switch in the
FULL position.
4) When making these measure-
ments, be aware you are seeing
the sum current of all four power
tubes. It is recommended that pow-
er tubes be replaced in matched
sets. Let’s say you have a set of
new tubes and you set the BIAS
control for a reading of 120mVDC.
If all the tubes are matched and
drawing the same current, each
one is idling at 30mADC, which is
quite comfortable. Now consider
if your tubes are very mismatched.
One tube could be drawing a
very low 10mADC for example,
while another might be idling at
50mADC, which will not make for
a long lasting, happy tube. In
addition, your tone will suffer
because your amp can only per-
form as well as the weakest link.
It’s kind of like having one low tire
on your car. Of course it will still
drive but the performance will be
adversely affected.
Displays differ from one meter to
the next. Some may indicate, for
example, 120.0 for 120 millivolts.
Others may show .120 for 120 mil-
livolts. Knowing how your meter
works if of the utmost importance.
You should always check the bias
readings whenever you replace
output tubes and readjust if need-
ed.
ADVANCED THEORY
(FOR THOSE WHO CARE):
Those authorized service techni-
cians with electronic knowledge
may notice we are referring to
current draw but are making
measurements in millivolts. Ohms
law states that I=E/R or current
(I) equals voltage (E) divided by
resistance (R). Inside the amp is a
one ohm resistor in the cathodes of
the output tubes. The external test
point allows access to this resis-
tor. When you measure across the
resistor at the rear panel test points,
you are reading the DC voltage
drop across a one ohm resistor.
Referring to ohms law, if R=1 in
the formula, then I = E or current
equals voltage. So when you read
for example, 120mV you are also
seeing the equivalent value of cur-
rent or 120mA.
WARNING: DO NOT be tempted
to run your tubes hotter than the
maximum recommended value.
as you destroy your expensive
tubes and possibly damage your
amp, of course voiding your war-
ranty! Also, in case you haven’t
found out the hard way yet, power
tubes get extremely hot (as high as
800 degrees)!!!!
WARNING: Do not remove rear
metal grill.
WARNING: Do not attempt
to check or replace tubes by
yourself. Refer to authorized
service center.
WARNING: Never touch the
tubes while the amplier is
turned ON. You can severely
burn your ngers and hands!
18

LIMITED WARRANTY
Thank you for choosing Egnater. Egnater manufactures
combos and speaker cabinets. Egnater takes great pride in
thoroughly testing each product prior to shipment.
AMPLIFIERS, COMBOS AND SPEAKER
CABINETS: Egnater offers a three (3) year warranty
to the original purchaser that an Egnater product will be
free from defects in material and workmanship. A dated
sales receipt will establish coverage under this warranty.
This warranty does not cover service or parts to repair
damage caused by accident, neglect, abuse, normal &
wear, disaster, misuse, abuse, over-powering, negligence,
inadequate packing or shipping procedures and service,
been authorized or approved by Egnater. If this product
is defective in materials or workmanship as warranted
above, your sole remedy shall be repair or replacement as
provided below.
TUBES: Egnater warrants the original purchaser that the
from defects in material and workmanship for a period of
90 days from the original date of purchase. A dated sales
receipt will establish coverage under this warranty. This
warranty will automatically terminate 90 days after the
original retail sales date. This warranty is in lieu of all
other expressed warranties. If tubes fail within the 90 day
warrant period your sole remedy shall be replacement of
tubes as provided below.
RETURN PROCEDURES: In the unlikely event that a
defect should occur, follow the procedure outlined below.
Defective products must be shipped, together with proof
of purchase, freight pre-paid and insured to the Autho-
rized Egnater Service Center or directly to Egnater. If a
product must be returned to Egnater for warranty replace-
ment/repair, a Return Authorization Number must be
obtained from our Customer Service Department prior to
shipping the product.
Please contact our Customer Service Department for the
Authorized Egnater Service Center nearest you. Products
must be shipped in their original packaging or its equiva-
lent; in any case, the risk of loss or damage in transit is
to be borne by the purchaser. The Return Authorization
Number must appear in large print directly below the
shipping address. Always include a brief description of
the defect, along with your correct return address and
telephone number.
When calling to inquire about a returned product, always
refer to the Return Authorization Number. If Egnater de-
termines that the unit was defective in materials or work-
manship at any time during the warranty period, Egnater
has the option of repairing or replacing the product at no
additional charge, except as set forth below. All replaced
parts become a property of Egnater. Products replaced or
repaired under this warranty will be returned via ground
shipping within the United States-freight prepaid. Egnater
is not responsible for costs associated with expedited
shipping, either to Egnater or the return of the product to
the customer.
INCIDENTAL OR CONSEQUENTIAL DAMAGE:
In no event will Egnater be liable for any incidental or
consequential damages arising out of the use or inability
to use of any Egnater product, even if an Egnater dealer
has been advised of the possibility of such damages, or
any other claim by any other party. Some states do not al-
low the exclusion or limitation of consequential damages,
so the above limitation and exclusion may not apply to
may also have other rights which may vary from state to
state.
FOR YOUR PROTECTION: Please complete and mail
the Purchase Information Card within (10) ten days of the
date of purchase so that we may contact you directly in
the 1972 Consumer Product Safety Act.
CUSTOMER SUPPORT: Our dedicated staff is ready
to help you with any warranty or product questions you
19

TOURMASTERTM
Boutique Amps Distribution
3402 Slauson Ave., Maywood, CA 90270
www.EgnaterAmps.com
This manual suits for next models
2
Table of contents
Other Egnater Amplifier manuals

Egnater
Egnater TOL ie4 User manual

Egnater
Egnater Tweaker User manual

Egnater
Egnater Rebel-30 Head User manual

Egnater
Egnater Armageddon User manual

Egnater
Egnater M4 User manual

Egnater
Egnater Rebel-20 User manual

Egnater
Egnater Rebel-30 Head User manual

Egnater
Egnater TWEAKER-88 User manual

Egnater
Egnater TWEAKER-40 HEAD User manual

Egnater
Egnater VENGEANCE User manual


