EGT EGT-300 User manual

•
•
•
•
•
•
•
•
•
•
•
•
•
Precaution for safe use.
Be sure to read the product to make it more secure.
The advantages of Hydrogen water generator
Precautions for safe use.
Name of each part.
Product conguration.
How to install before use.
Installation overview.
How operate the system.
How to replace lter.
How to remove remained electrolytic water.
Filter conguration.
Trouble shooting chart
Specications
Certicate of warranty
…
…………………………
………………………………
………………………………
………………………
………………………………
…………………………
………………………………
………
……………………………
……………………………
……………………………
……………………………
2p
4p
5p
6p
7p
8p
12p
13p
14p
15p
16p
17p
18p
Hydrogen Rich Water Purifier
EGT-300 User’s Manual
2
・The characteristic of EGT Hydrogen Water Purifier
Generation of High-Concentrated Hydrogen-Rich Water
Slim and Compact Design
with LED Lightning
•With system control from automatic control
program, hydrogen water with more than
a certain concentration is always provided
by controlling generation of hydrogen, dissolution
timing, concentration control of hydrogen water etc.
(At present, regular concentration of hydrogen
(DH) based on sample device: DH 1,000~1,300 ppb)
(Unit to product Hydrogen-reduced water with the
function of controlling concentration of dissolved
hydrogen: Invention patent).
Easy Filter Replacement
NSF/ANSI 42 Recognized Filter
Material
Adoption DC 12V for Safety

3
Before using a product, please make sure to read "Precautions for Safe Use" carefully and use it appropriately.
• After reading, please keep it in a place where anyone can see at any time.
• Appearance may be subject to change without notice in order to improve the quality of a product.
Precautions for Safe Use.
In the event that serious injury or death may occur in violation of instructions given.
In the event that minor injury or product damage in violation of instructions given.
These graphical figures are symbols for calling a user’s attention to anything and operation which
might cause a hazard.
For the part with these symbols, please read it carefully and follow the instructions to avoid a hazard
that may occur.
When using your appliance, always follow basic precautions, including the following.
Warning
Caution
WARNING
Do not attempt to dissemble or operate the device on your own.
It may cause product damage.
Do not grasp dispensing valve, when moving machine.
Do not place anything on the top of machine.
Connect only to a cold water supply.
Make sure not exceed 3 meter water tubing hose from cold water supply and
do not pull down tubing line.
Do not damage product.
Doing so may causes injury or product damage.
Check with your state and local public works department for plumbing and
sanitation code.
Do not install where the temperature and humidity are high.
For residential and light commercial use only.
Do not use this appliance for other than the intended use.

4
Precautions for Safe Use.
CAUTION
Do not wipe with thinners, benzene, alcohol etc.
Please use it in a safe place with no slope.
Do not connect to a hot water pipe, only cold water taps line.
Connect only to a cold water supply.
Do not move machine when operating.
Make sure the system is plugged into a live 110 - 220 V AC outlet.
Avoid installing the unit where it could be exposed to water or moisture, other heating system.
If the main body falls in the water or water leak from inside of cabinet, immediately disconnect
the plug and then take it out of water.
When the unit is not in use for a long period of time. Please unplug the unit from the outlet
and shut the osupply valve.
If the machine has not been used for a long time, run water through it for 5 minutes or
10 liters over.
Filters should be replaced on schedule and do not change filter set position arbitrarily.
Use only factory authorized filters.
Make sure filter replacement time.

5
1
1
2
3
4
5
2
3
4
5
6
6
7
7
8
8
Middle valve
Feed Water Supply
9
9
Side Panel Fixing Screw
Power Supply
Water Spigot
Water Lever
Side Panel
Drip Tray Grill
Drip Tray
• Name of each part

6
• Product configuration
Inside Structure
1
2
3
4
5
6
7
8
9
10
Hydrogen Generator Module
Device
Hydrogen Generator Module
Drain Cap
LED Light
Drip Tray
Water Spigot
Carbon Filter
UF Membrane Filter
PCB Cover
Pressure Regulator(Reducer)Filter Head
5
8
2
1
6 7
4
910
3

7
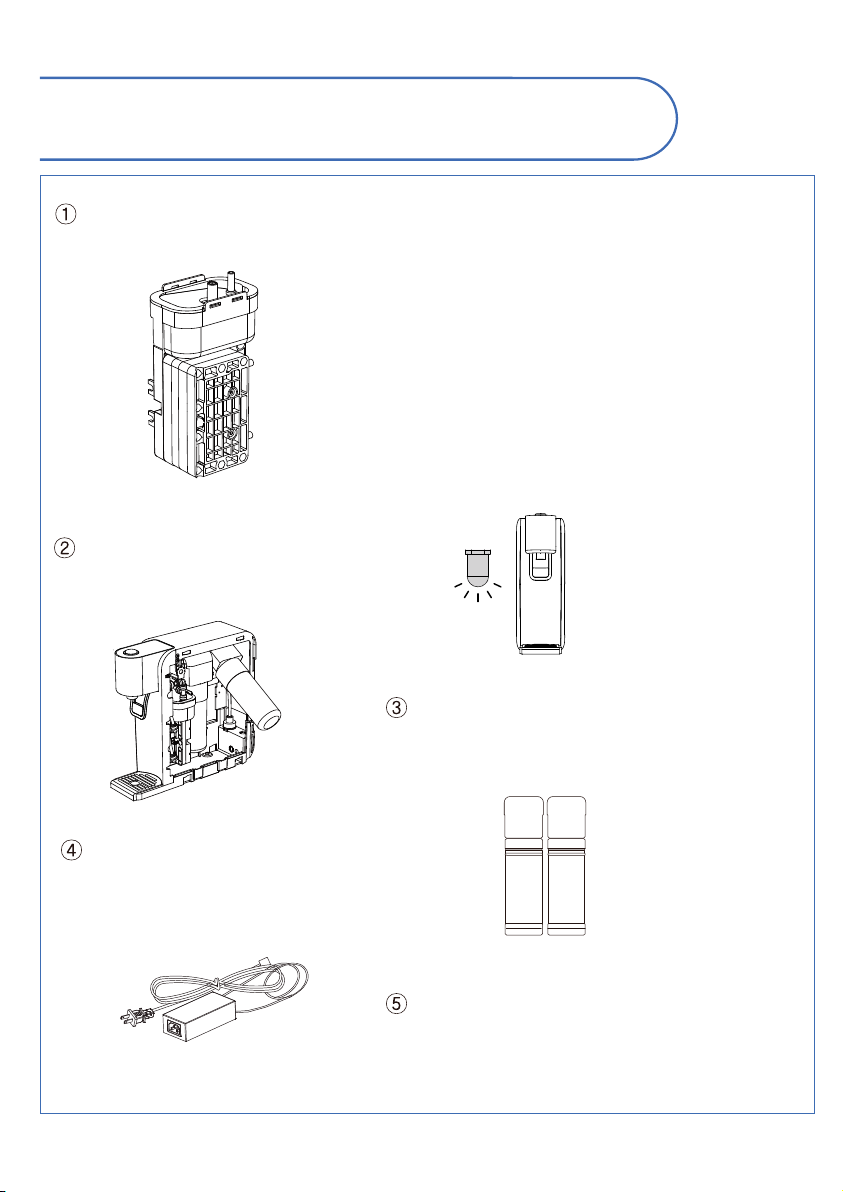
Package content
• How to install before use
Please check feed water sources.
Do not use the system on microbiologically
unsafe drinking water.
Please set length of tube between the product and the RO water tank or water bottle within 1m.
More than1meter may result in poor pump performance or reduce water flow.
When connecting to water bottle, fix it so that the water supply tube is immersed in the bottled water bottle.
•
•
Notice: After finishing installation, please run about 2 liters of the water to flush the system.
Please check the components received against your packing slip to make sure
you have all the parts
Diverter ( Optional )
Tubing (1/4 Inch)
Electric adapter and plug
(AC 100~240V,DC 12V 5A)
User’s manual
Adapter valve
⑥Tube outlet deco ( Optional )
Diverter adapters ( Optional )
• Precaution for safe installation
8
• Installation Overview
1. Do not use warm or hot water, as may this damage the machine.
2. Please be sure to turn oadater valve when connecting water supply.
3. Check for any sign of leakage all tubing connections.
4. Check the tubing line is all straight position.
5. Do not let power cord hang over the edge of the table or counter, or touch hot surfaces.
6. Do not operate machine before finishing installation work.
7. Do not install it where the temperature and humidity are high. Keep it in a place it may not be
adversely aected by temperature, sunlight, dust, salt, sulfur content, etc.
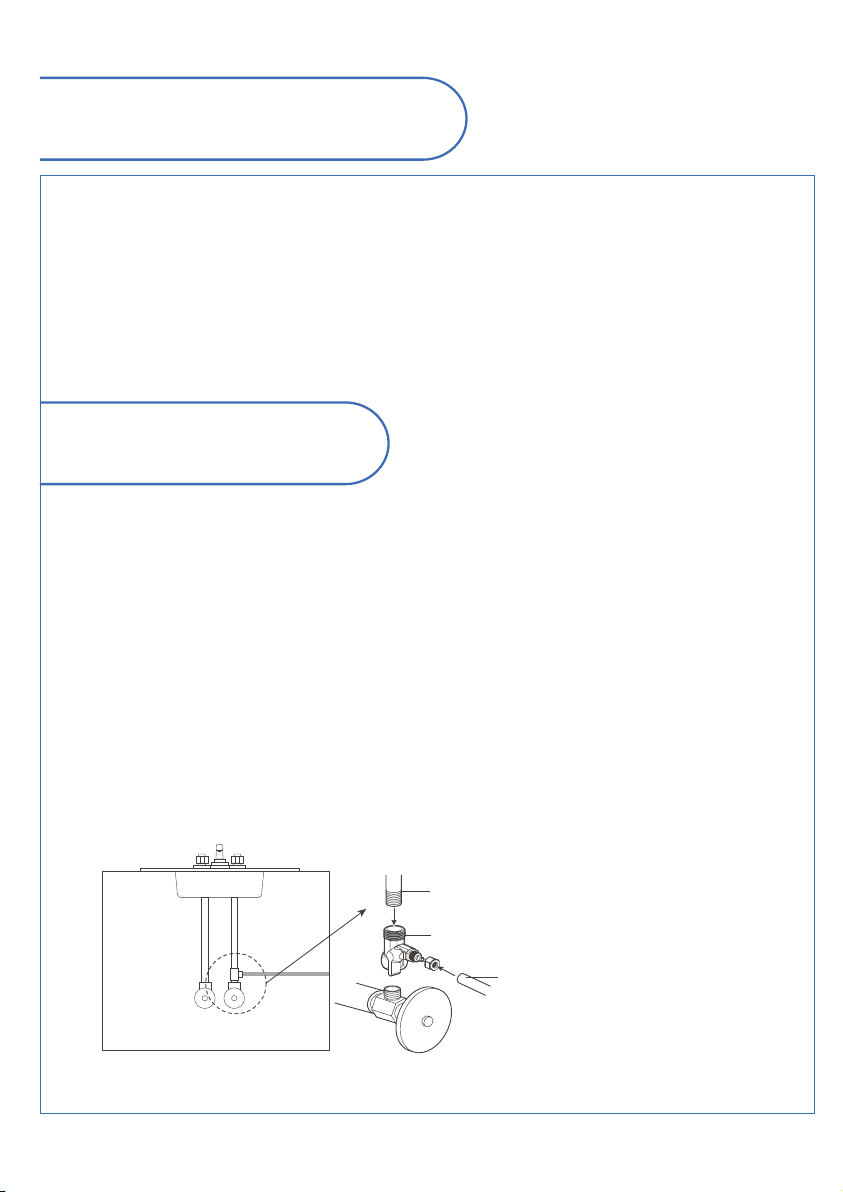
Under Sink Type
A typical connection using the included adapter valve is shown in the illustration below.
Connect diverter for water supply to cold water pipe and inhale water up to 1/4inch
●
●
Caution
Please be sure to turn oadapter valve.
Please be sure to connect to a cold water pipe.
Firmly push the inlet water tubing onto the water inlet collar.
Respectively not escape.
Screw nut onto the diverter.
Caution. Install a tubing in a correct position.
Turn on the adapter valve.
Check any sign of leakage all tubing connections.
Cold water pipe
Adapter valve
Inlet water tubing
Middle valve for inlet water
Hot Cold
9
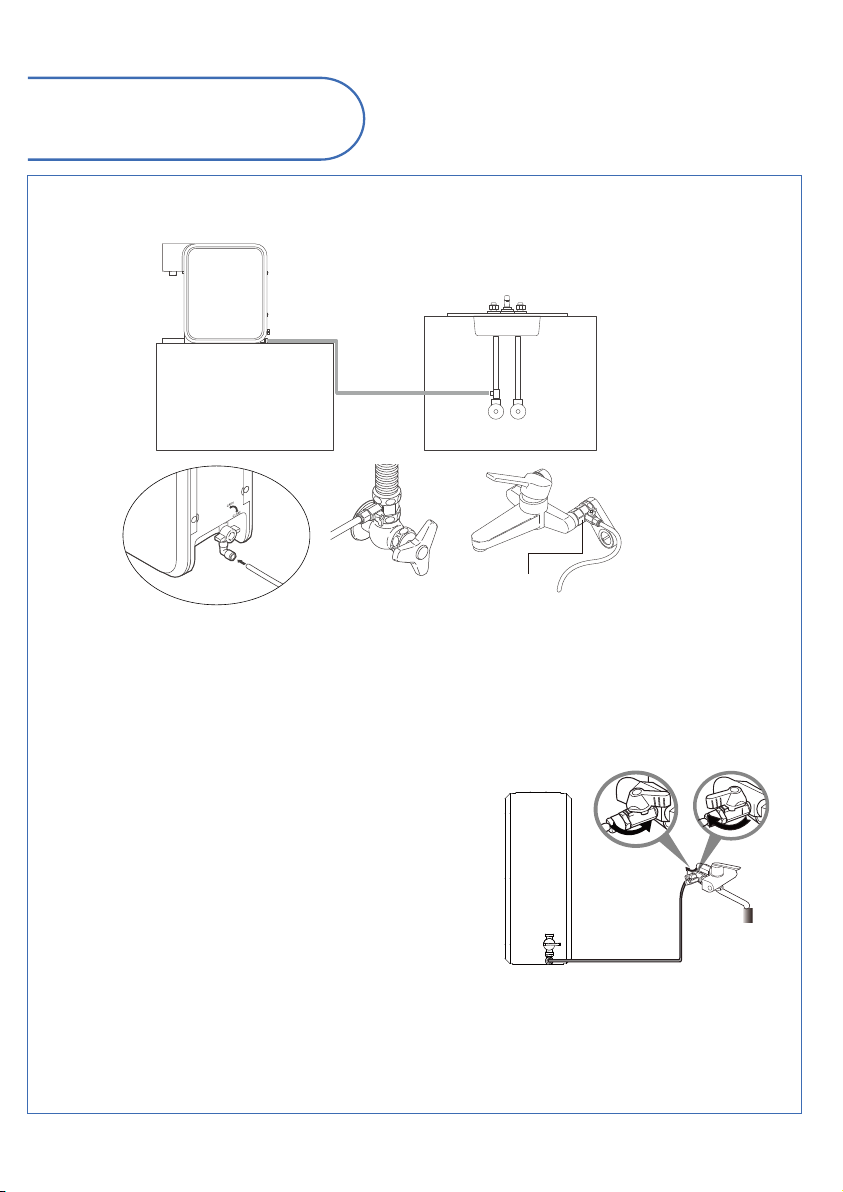
• Installation Overview
Counter Top Type
Connect Water Lines
※
For the first time use, please press and hold dispenser and flush 2 liter water over.
Hot
Adater valve Adater valve
Sink
Cold
Inlet water tubing
Middle valve for
inlet water
①Insert the inlet water tubing to water inlet collar located on the rear of the unit.
②Connect the another end of tubing to the water filter inlet of the adaptor value.
③Turn on the middle valve for inlet water.
④Turn on the water supply valve.
You are now ready to turn the water main back on.
As the system fills, check for leaks and make sure that everything is connected properly.
Run the water to flush the system for about 5 minutes.
You any notice some carbon dust in the water initially.
This is normal and harmless. After flushing the system you should be able to check for clarity
of the water in a clear glass.
•
•
Feed water supply tube
Feed water supply valve
Close Open
10
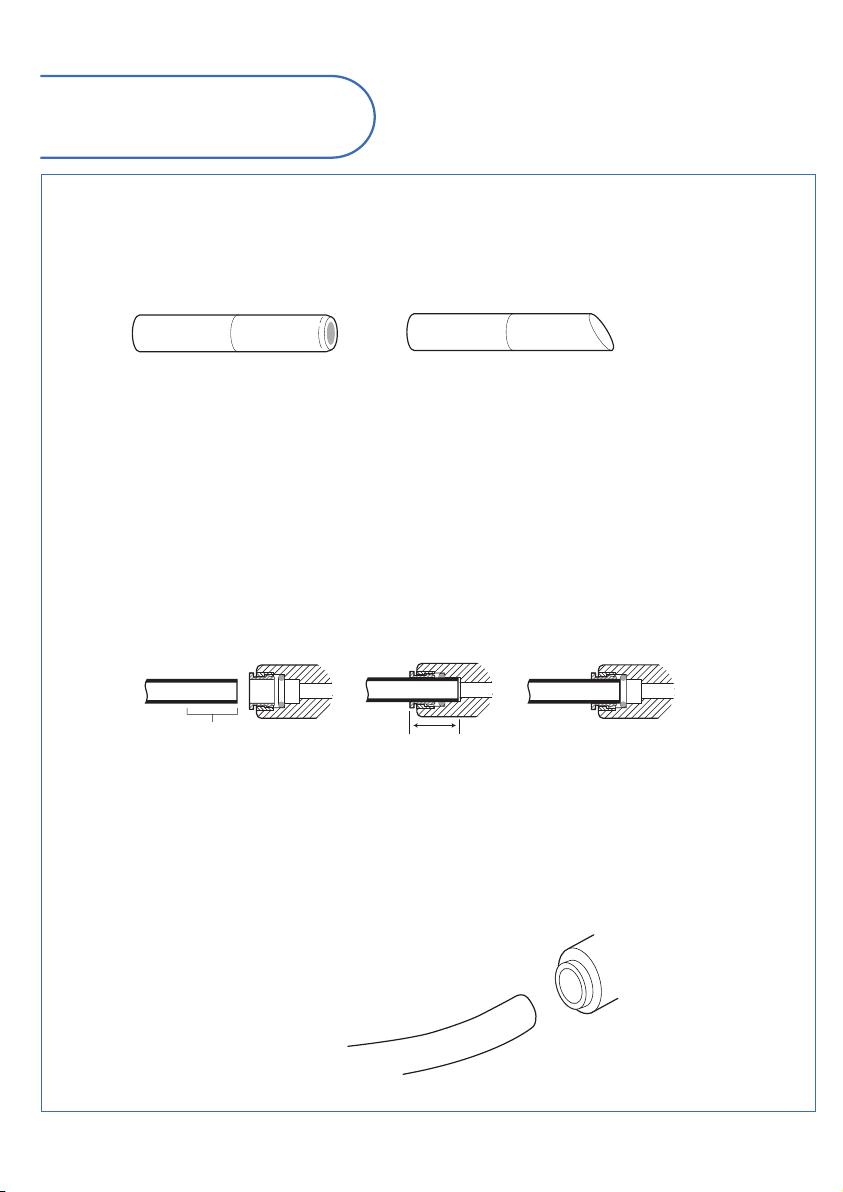
• Installation Overview
①Measure 3/4” from the ends of tubing ( inlet end) and mark with a pencil.
( Check for roundness, smoothness, cut, nicks, flat spots, and sharp edges.)
②
③
Push the tubing firmly into each fitting on the manifold until the line is flush with the Fitting collar.
(If the tubing is removed, re-cut the end, measure, mark and re-insert).
The tubing must be fully inserted to avoid leaks
(To remove tubing, depress and hold white collet; pull tubing out to remove).
④Pull out slightly on tubing to ensure a good seal. Do no pull too hard or it may damage related parts.
⑤install the other end of the tubing from the inlet side of the manifold of the feed water adapter.
Insert plastic tab to ensure quick- connect fitting cannot come undone.
⑥
①
②
Remove plastic tab from fitting.
Push the collet inward and hold with a finger while pulling the tubing out.
Make sure the collet is pushed evenly on all sides. If only one side is pushed, the tubing
will not be removable.
Making Tubing Connections (Tubing is not performance - tested or certified by NSF)
To Disconnect Tubing :
CORRECT INCORRECT
collet (depress to remove tubing)
tubing
Tubing correctly cut and connected
end of tubing round and smooth.
with no cuts, nicks or at spots
Incorrect partial engagement
correct full 3/4”
11
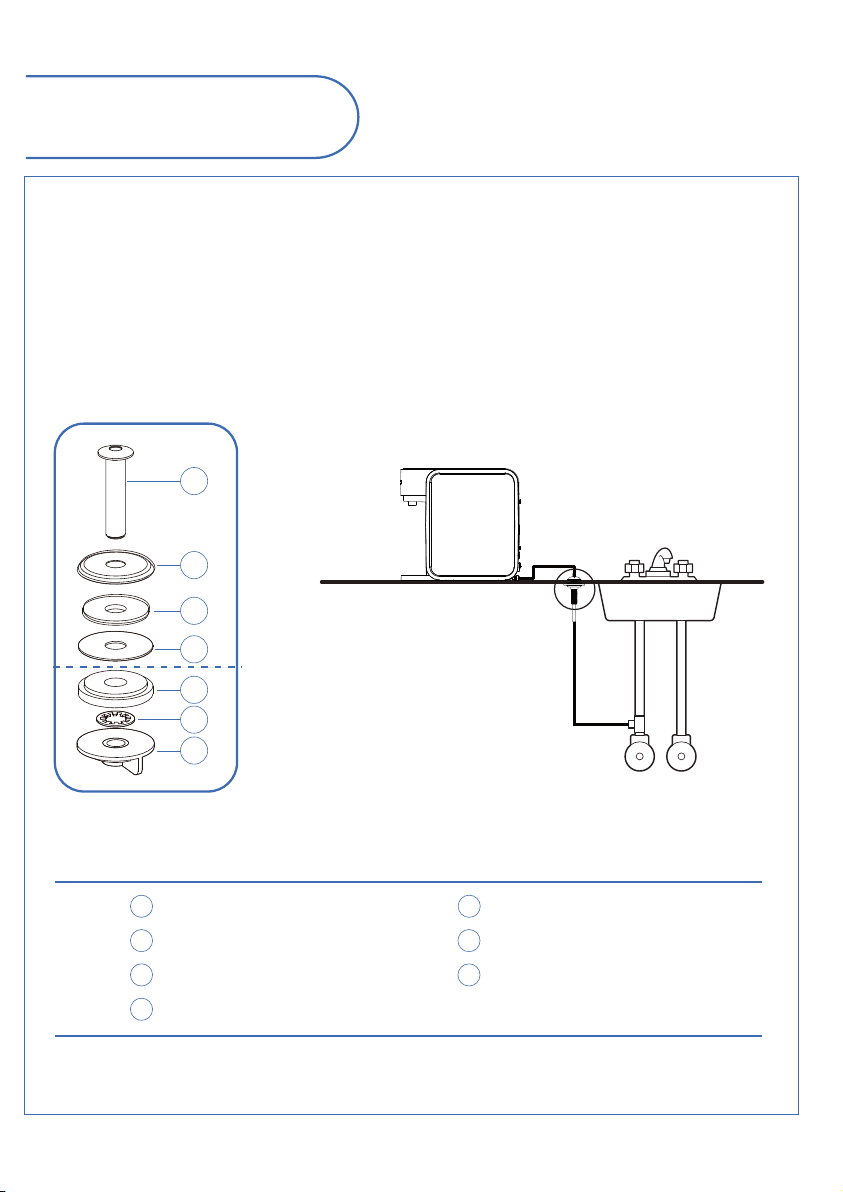
• Tube Outlet Deco Mounting Installation ( Optional )
①Insert base cover and gasket onto mounting bolt tube outlet deco.
Insert mounting bolt through the drilled hole in the fixture.
Place washer and lock washer and fixing nut onto the mounting bolt. Position tube outlet deco
on fixture, then tighten nut securely.
②
③
④Insert standard tube.
Mounting surface
1
2
3
4
5
6
7
5
Washer ( Φ37 )
4
Rubber washer ( Φ41.5 )
1
Fixing nut ( Φ43.5 )
2
Lock clip ( Φ21.5 )
3
Block locating washer ( Φ42 )
7
Tube outlet deco (Φ11 )
6
Escutcheon plate ( Φ45 )
Cold Hot
Sink
• Installation Overview

12
• How to operate the system
• How to use
When push dispensing water lever to machine,
Water comes out from water spigot.
When leave the dispensing lever, water will not
come out to water spigot.
Push

13
• How to replace filter
Shut othe adapter valve and the middle valve.
Make sure the water has been completely drained from the system.
Remove the screw at the rear of the unit and slide the right-hand
panel to open cover.
Turn the cartridge to the left (counterclockwise) and
pull the cartridge straight down to remove it.
Insert new cartridge and turn right.
Align the cover with the groove of the body and slide it forward,
then fix it with the fixing screw.
Open the water supply valve on the back of the product.
CLOSE
OPEN
CLOSE
OPEN
CLOSE
OPEN

• How to remove remained electrolytic water
Remove the screw at the rear of the unit and
slide the right-hand panel to open cover.
Remove the plug from the end of the drain
hose on the right side of the electrolyzer.
Rotate the hose low enough to allow the water
inside the electrolyzer to come out.
Push the button to remove any water remaining in the
electrolyzer. ( If you do not use the product for a long time,
be sure to remove any water remaining in the electrolyzer.)
※
Storing electrolyzer for a long period without removing water may contaminate the inside of the
electrolyzer.
Drain hose
Drain hose
End plug PUSH
After empty the remaining water,
insert end plug into the drain hose and rotate
it to its original position.
Shut othe adapter valve and the middle valve.
Make sure the water has been completely drained from the system.
Align the cover with the groove of the
body and slide it forward,
then fix it with the fixing screw.
End plug
14
CLOSE
OPEN
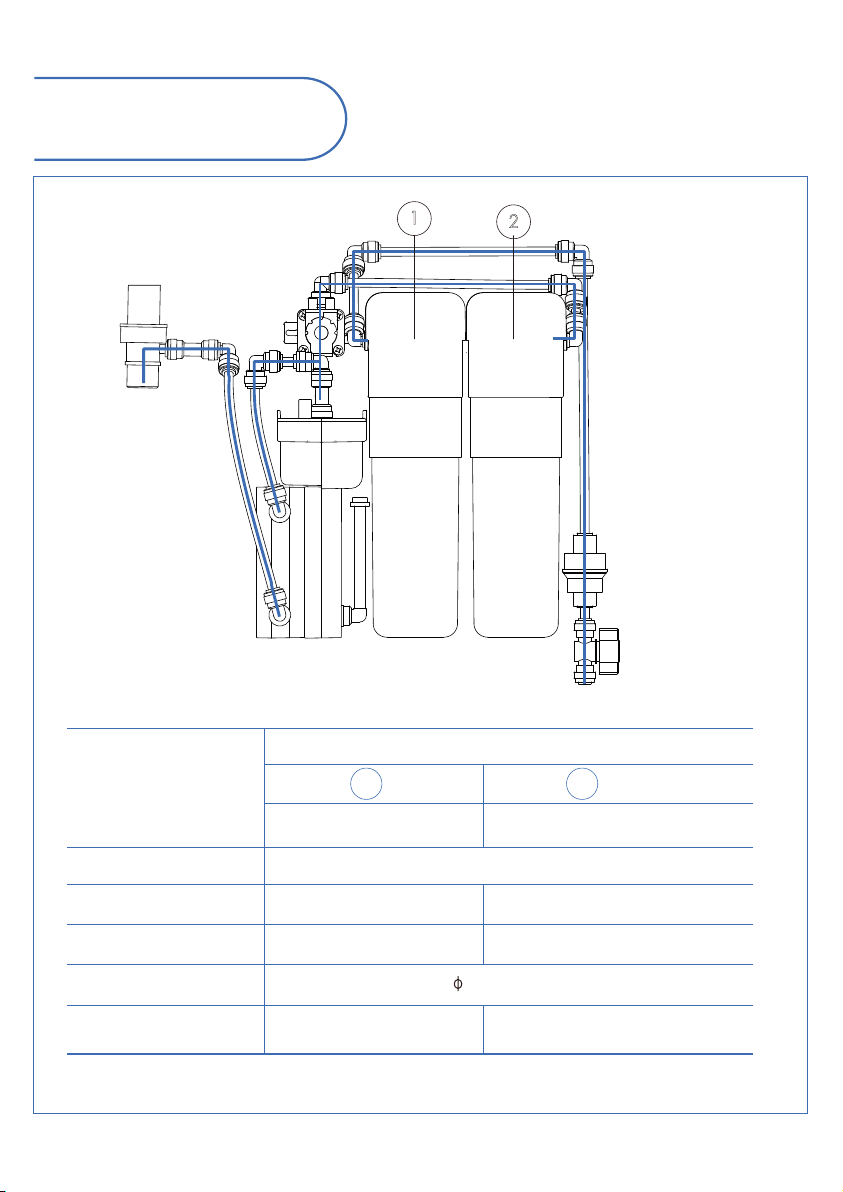
・Filter Configuration
Inlet Water
Outlet Water
Housing material
Filter component
Capacity( Liter/ Gallon)
Dimension
Weight
polypropylene
1,800L/475 gallon 3,600L/951 gallon
67()×203(H)
Pre Carbon Filter
Filtration
Carbon Block
270g/6lb
UF Membrane Filter
Polysulfone
240g/5lb
1 2
12
15

16
Check out before requesting help and reporting product failure.
Before calling customer’s support, check the following and if you still need help
please contact customer support.
※
※
・Trouble Shooting Chart
Symptoms Causes Measures to Be Taken
Significantly less water
comes out
Cold water shut ovalve
not fully open
Power adapter not fully
installed
Power adapter not fully
installed
Damaged Blue LED
Fitting and parts are not
firmly connected
Filter life is ended or filter
is clogged
No lights in the
display
Significantly less
Hydrogen Rich water
comes out
Water leaks from
machine
Bubble in the water
Strange working
sound
Water tastes and smell
strange
• Make sure all shut ovalves are fully
opened
• Replace the filter
• Replace filter
• Shut oadapter valve and unplugged.
Contact your dealer or customer support
Filter life is ended or filter
is clogged
Filter life is ended or filter
is clogged
Long term unused
If water pressure is low • Is not crimped or bent
•
Make sure power adapter is fully installed
in back of electronic module and plug is
completely installed in outlet
• It is broken. Contact your dealer or
customer support. Without led light,
water still comes out from spigot
• Make sure power adapter is fully installed
in back of electronic module and plug is
completely installed in outlet
• Shut oadapter valve and unplugged.
Refer to replace filter and open side panel,
Check the leakage point
• Shut oadapter valve and contact
your dealer or customer support
Filter is not sealed properly
Hydrogen Bubble
• Check where the filter is installed and
contact your dealer or customer support
• Will disappear soon
Less drain water when First
time use
Operating sound, Hydrogen
generating sound
• Drain 10 liters out from machine
• This is normal
• Replace the filter or drain 10 liters out
from machine
If water comes out from
O outlet hole
2

• Specifications
17
EGT - 300
100 ~ 240 V, DC 12 ( 50/60 Hz )
65 W
Quick-Changing Filtration
Pressure Limit 0.2 MPa ~ 0.4 MPa (29 psi ~ 58 psi )
Temperature Limit
119 mm (W) x 363 mm (D) x 340 mm (H)
(4.7 inch (W) x 14.3 inch (D) x 13.5 inch(H))
4.5 Kg / 9lbs
5 ℃~ 40℃ (41 ˚F ~ 104 ˚F )
Hydrogen Rich water Purifier
Model
119 mm 363 mm
340 mm
Power Requirement(Volt)
Power Consumption
Water Intake
Filtration System
Condition of Feed Water
Product Dimension
(W x D x H )
Product Weight
Mechanical

• Memo
18

• Memo
19
Product warranty
Name of the
product.
Hydrogen rich water
purier Name of model.
EGT-300
Manufacturing
number.
The date of
purchase.
Contact information
of sales ofce
A sales agent.
Contact information.Customer name.
Address.
EG Tec
1FL. 317-59, Seja-ro, Jeongnam-myun, Hwaseong-Si, Kyunggi-do, Repulbic of Korea
Postal code No. : 18516
Tel
Email
Homepage
: 070-4814-4901
egtplus@naver.com
: www.egtplus.com
1.
2.
3.
4.
5. After purchasing the product, please fill out the form of the warranty and keep it.
1. This product will be repaired free of charge in case of any defect in manufacturing or normal operation
within the warranty period.
Warranty details.
Even during the warranty period, the following cases will be repaired at a cost.
Poor performance and failure occurred after the warranty period has expired.
Failure due to incorrect or careless handling of consumer.
Damage caused by intention or negligence of the consumer.
Failure caused by repair or alteration at a place other than our service center or retail store.
Failure due to abnormal power supply or faulty of connected equipment.
In case of the part reaches its end-of-life.
Failure or defect in the product due to natural disasters.
If there is no product warranty, or if there is no item on the date of purchase or dealer.
Failure occurs after the expiration of the warranty period will be repaired at a cost.
This product has been passed the comprehensive inspection through the strict quality control at the factory.
If the product malfunctions, please contact the dealer or customer service center.
When requesting the repair service, the warranty should be presented.
Any defect occurring within the warranty period (one year from the date of purchase) will be free of charge
from the dealer or customer service center. However, even if it is within the warranty period, if it is covered
by the charged warranty service, the warranty, it will be repaired at a cost.
2.
3.
MSIP-REM-EgT-EGT-100
Table of contents
Other EGT Water Filtration System manuals


Popular Water Filtration System manuals by other brands


HATHASPACE
HATHASPACE HSP001 quick start guide

Applied Membranes
Applied Membranes L Series Operation, maintenance & instruction manual

WaterLogic
WaterLogic WL270 Service manual

Veolia
Veolia ELGA MEDICA-D 7 MKII US Operator's manual

3M
3M 3MPF101 Installation and operating instructions

Beko
Beko CLEARPOINT S040 Installation & operation instructions


