EGT EGRO-80 User manual

Water Purier
R.O(Reverse Osmosis) Purier
EGRO - 80

2
.......................................................... 3
............................................................. 4
................................................................. 5
6
.....................................................................
.....................................................................
7
............................................................... 8
9
10
.............................................................................
.............................................................................
......................................................................................
..........................................................................
11
...................................................................... 12
......................................................................
.......................................................................
13
14
15
Contents
Precautions for Safe Use
•
For the safer use of a product, please make sure to read
the following notes carefully.
The characteristic of Water Purier
Precautions for Safe Use
Name of each part unit
Product conguration
How to install before use
Installation Overview
How to operate the system
How to replace lter
Filter Conguration
Trouble Shooting Chart
Specications
Memo
Certicate of warranty
1
2
3
4
5
6
7
8
9
10
11
12
13

The characteristic of Water Purier
Provides clean and healthy hydrogen water in
real time by connecting with EG TEC Undersink
(EGU-900).
Built-in high performance booster pump produces
abundant ow rate under any hydraulic condition.
Neat and stylish design
5-step ltering system ensures the highest level
of water purication performance.
Excellent durability with toughened glass.
3

4
•
•
•
Before using a product, please make sure to read "Precautions for Safe Use" carefully and use it
appropriately.
•
Do not attempt to dissemble or operate
the device on your own.
It may cause product damage.
-
-
•
Do not damage product.
Doing so may causes injury or product damage.
Precautions for Safe Use.
After reading, please keep it in a place where anyone can see at any time.
Appearance may be subject to change without notice in order to improve the quality of a product.
In the event that serious injury or death may occur in violation of instructions given.
Warning
Caution In the event that minor injury or product damage in violation of instructions given.
-
•Do not place heavy object on top system.
May cause damage the water purier.
•Connect only to a cold water supply.
-
•Make sure eash lter replacement time.
If not, may cause bad smell and testy.
-
•Please install the machine in a place of
cool, ventilation and soundness but
away from hot objects.
May cause re.
-
•When the system is not in use for an
extended period of time. shut of the
system is not completely and shut off
the water valve.
When restarting purier, 4~5 Liters out.
•When installing the system, avoid place
or areas with excessive heat, humidity
direct sunlight, andlor areas that are
exposed to rain or snow.
•
-
-
-
•
•
•
•
Use factory authorized replacement lter
only. Unauthorized replacement lters
will lower the water quality and taste.
When dispose of waste materials
(waste lter) according to the procedures
abolish.
May cause environmental pollution and injuries.
Install the system on a at and sturdy
surface.
May cause maifuction.
Water purier that has been subjected
to any use that is different than or
inconsistent with the use instructions
in the water purier user Manual.
Do not use benzene or other caustic
cleaning chemicals.
May cause become discolor or skin a pain
water purier.

5
Name of each part of unit
1 2 3 4 5
6
7
5
7
Cover
8
Body
6
Cover Glass
1
Power DC 24V
2
Water Inlet
5
Booster Tank
3
Water Outlet
4
Drain
8

6
Product configuration
Package content
1
2
3
11
2
2
3
3
4 5 6
4
5
6
RO Membrane Filter
Sediment Filter
Sediment Filter
Pre carbon Filter
High pressure switch
7Low pressure switch
8Booster Pump
Post carbon Filter 9
10 Auto shut off valve
Resistance
Tubing (1/4 Inch)
User’s Manual
Adapter valve
4Drain clamp
5DC 12V Adapter
6Fitting seperator
Please check feed water sources.
Do not use the system on microbiologically unsafe drinking water.
Notice : After finishing installation, please run about 2 liters of the water to flush the system.
Manual
2
1
8
3
10 9
4 5 6
7

7
How to install before use
Installation Overview
②
Please be sure to turn offadapter valve when connecting water supply.
Check for any sign of leakage all tubing connections.
③
Check the tubing line is all straight position.
④
Do not let power cord hangover the edge of table or counter, or touch hot surfaces.
⑤
⑥
Do not operate machine before finishing installation work.
Do not install it where the temperature and humidity are high. Keep it in a place it may
not be adversely affected by temperature, sunlight, dust, salt, etc.
⑦
①
Do not use warm or hot water, as may this damage the machine.
A typical connection using the included adapter valve is shown in the illustration below.
Connect diverter for water supply to cold water pipe and inhale water up to 1/4 inch.
Caution
Please be sure to turn offadapter valve.
Please be sure to connector to a cold water pipe.
Firmly push the inlet water tubing onto water inlet collar.
Respectively not escape.
Screw nut onto the diverter.
Caution
•
•
Install a tubing in a correct position.
Turn on the adapter valve.
Check any sign of leakage all tubing connections.
Cold water pipe
Adapter valve
Inlet water tubing
Middle valve for inlet water
Hot
Drain
Drain pipe
Drain clamp
Cold

8
Installation Overview
Measure 3/4” from the ends of tubing ( inlet end) and mark with a pencil. ( Check for
roundness, smoothness, cut, nicks, flat spots, and sharp edges.)
Push the tubing firmly into each fitting on the manifold until the line is flush with the
Fitting collar. (If the tubing is removed, re-cut the end, measure, mark and re-insert).
Tubing must be fully inserted to avoid leaks (To remove tubing, depress and hold white
collet pull tubing out to remove).
Pull out slightly on tubing to ensure a good seal. Do no pull too hard or it may damage
related parts.
Install the other end of the tubing from the inlet side of the manifold to the feed water
adapter.
Insert plastic tab to ensure quick- connect fitting cannot come undone.
Remove plastic tab from fitting.
Push the collet inward and hold with a finger while pulling the tubing out. Make sure the
collet is pushed evenly on all sides.
If only one side is pushed, the tubing will not be removable.
Making Tubing Connections
(Tubing is not performance - tested or certied by NSF)
To Disconnect Tubing.
CORRECT INCORRECT
Tubing correctly cut and connected
end of tubing round and smooth.
with no cuts, nicks or at spots
Incorrect partial engagement
①
①
②
②
③
④
⑤
⑥
collet (depress to remove tubing)
tubing
correct full 3/4”

9
How to use
Opening the facet valve knob in the open direction automatically operates, and puried water
is discharged through the outlet
Turn the faucet valve knob in the closing direction to stop the water discharge.
①
②
How to operate the system
Faucet valve
Faucet valve
Open
Close
Open
Close

10
How to repace lter
Fitting
Filter
Fitting separator
Adapter valve
Open
Close
Adapter valve
Open
Close
Close the adapter valve to shut off the water supply.
①
①
Close the booster tank valve to shut off the water.
②②
Open the booster tank valve.
⑦⑦
Connect the power DC 12V jack
⑧
Open the facet valve to remove the water inside the product.
After the water has been removed, close the facet valve.
③
③
Disconnect the power DC 12V jack.
④
Remove the front panel by pulling it to the front.
⑤
Remove the tting on the top of the lter
and replace the lter.
(Replace with new lter and assemble in
reverse order.
⑥
Open the adapter valve. (After supplying raw water, check whether
the lter connection is leaked.)
⑨
Open the Faucet vlave and use it after about 2 liters of water has been extracted
⑩
⑩
Open Open
Close Close
Open
Close
⑤
⑥
④
⑧
⑨

11
Filter conguration
Housing material
Filter component
Capacity
( Liter/ Gallon)
Exchange cycle 3 month 6 month 6 month 24 month 12 month
Dimension
polypropylene
67
(
φ
)
×260
(H)
67
(
φ
)
×318
(H)
55
(
φ
)
×280
(H)
Filtration
450L/100 gallon
Sediment
Filter
polypropylene
1
900L/198 gallon
polypropylene
Sediment
Filter
2
1,200L/264gallon
Pre Carbon
Filter(GAC)
Carbon
3
RO Membrane
Filter
3,600L/792gallon
Poly Amaide
4
1,800L/396 gallon
Post Carbon
Filter
Carbon Block
5
14 5
23
Booster Tank
Inlet
Pump

12
Trouble shooting chart
/
Symptoms
Signicantly less water
comes out.
Cold water shut off valve
not fully open.
Power adapter not fully
installed.
Filter life is ended or
lter is clogged.
Causes Measures to Be Taken
Make sure all shut off valves are fully opened.
Replace the lter.
Make sure power adapter is fully installed
in back of electronic module and plug is
completely installed in outlet.
Water leaks from
machine.
Shut off adapter valve and unplugged.
Refer to replace lter and open side panel,
Check the leakage point.
Fitting and parts are
not rmly connected.
Filter is not sealed
properly.
Check where the lter is installed and
Contact to your dealer or, customer supporter.
Water tastes and
smell strange.
Shut off adapter valve and unplugged.
Contact to your dealer or, customer supporter.
Filter life is ended or
lter is clogged.
Long term unused. Replace the lter or Drain 10 liters water out
from machine.
※
※
Check out before requesting help and reporting product failure.
Before calling customer’s support, check the following and if you still need help,
please contact to customer supporter.
13
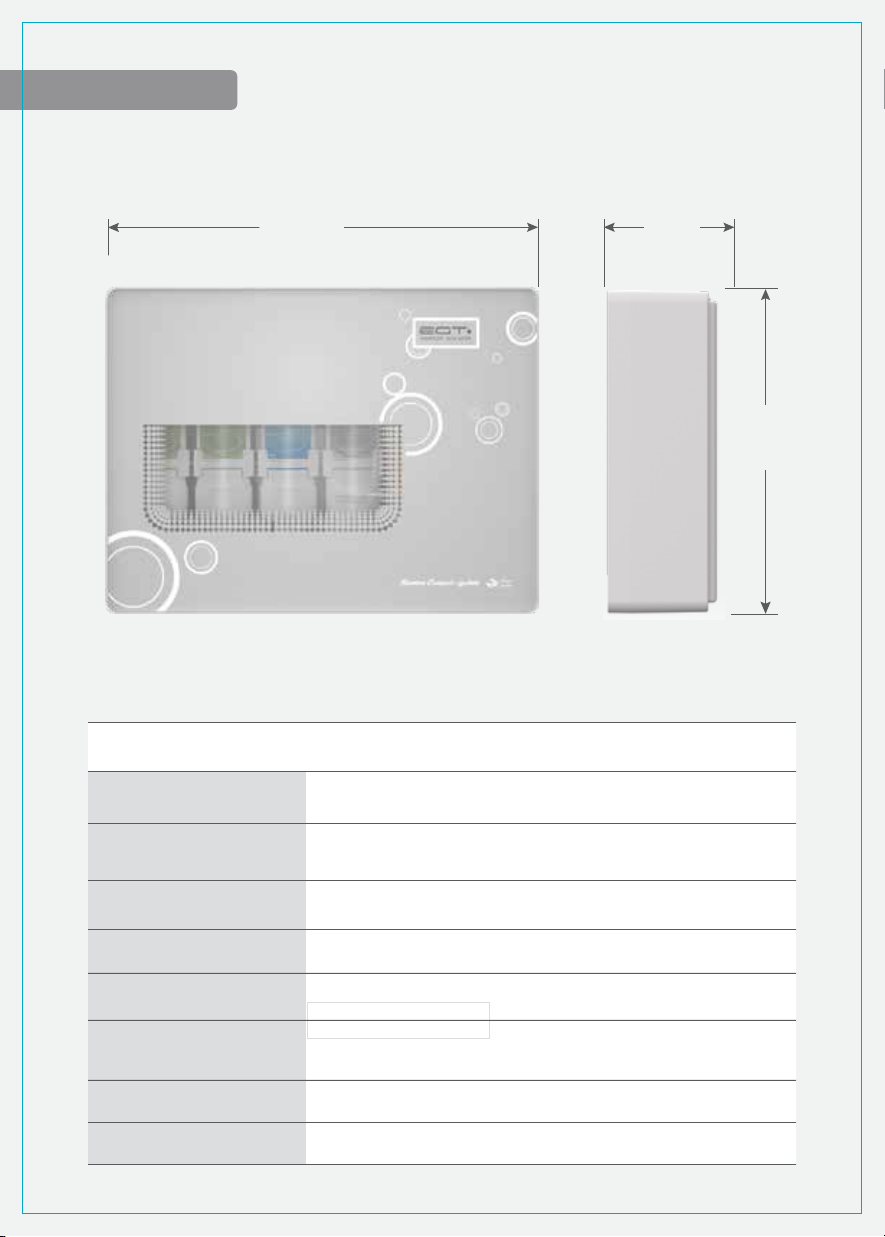
Specications
470 mm 119 mm
354 mm
Reverse Osmosis Purier
EGRO - 80
DC 24V
Drinkable Water
470 mm (W) x 119 mm (D) x 354 mm (H)
(18.5 inch (W) x 4.7 inch (D) x 13.9 inch(H))
80 GPD
Model
Power Requirement(Volt)
Water Pressure
Supply water type
Working Temperature
Product Dimension
(W x D x H )
Ro membrane
6.4 kgWeight
Over 0.05 Mpa
5℃ ~ 45℃(41℉ ~ 113℉)

14
Memo

Certicate of warranty
1.
1.
2.
3.
4.
5.
This product has been passed the comprehensive inspection through the strict quality
control at the factory.
Any defect occurring within the warranty period (one year from the date of purchase)
will be free of charge
from the dealer or customer service center. However, even if it is within the
warranty period, if it is covered
by the charged warranty service within this warranty, it will be repaired at a cost.
If the product malfunctions, please contact the dealer or customer service center.
When requesting the repair service, the warranty should be presented.
After purchasing the product, please fill out the form of the warranty and keep it.
Warranty details
This product will be repaired free of charge in case of any defect in manufacturing or
normal operation within
the warranty period.
Even during the warranty period, the following cases will be repaired at a cost.
Poor performance and failure occurred after the warranty period has expired.
Failure due to incorrect or careless handling of consumer.
Damage caused by intention or negligence of the consumer.
Failure caused by repair or alteration at a place other than our service center or retail store.
Failure due to abnormal power supply or faulty of connected equipment.
In case of the part reaches its end-of-life.
Failure or defect in the product due to natural disasters.
If there is no product warranty, or if there is no item on the date of purchase or dealer.
Failure occurs after the expiration of the warranty period will be repaired at a cost.
2.
①
②
③
④
⑤
⑥
⑦
⑧
3.
Serial number
Date of
purchase
Dealer
Product name Reverse Osmosis Purier Model name EGRO-80
Contact number
of dealer
Contact
Customer's
name
Address
15

Water Purier
R.O(Reverse Osmosis) Purier
EGRO - 80
Table of contents
Other EGT Water Filtration System manuals


Popular Water Filtration System manuals by other brands


Panasonic
Panasonic ET-RFV200C operating instructions

MANN+HUMMEL
MANN+HUMMEL ProVent Series Installation and maintenance manual

Pentair
Pentair freshpoint GRO-350B Installation and operating instructions

Klimawent
Klimawent STRONG-2000-N Use and maintenance manual

Dantherm
Dantherm ELITE 400 Service manual

Pall
Pall T200 Series Service instructions

Aqua Free
Aqua Free Germlyser D Instructions for use

Watkins Wellness
Watkins Wellness Freshwater Salt System owner's manual

JNS Aquaria
JNS Aquaria FR-S quick start guide

OptiPure
OptiPure BWS350 Installation, operation & maintenance manual

Bestway
Bestway 58500 owner's manual

GE
GE 215C1044P010-3 Owner's manual and installation