Eigenharp Tau User manual

Tau Quick Reference.
For Setup: Factory Tau 1
For software version 1.3.29 and above

Contents
1. Eigenharp Terminology
2. Layout overview
3. Choosing Splits
4. Split 1
5. Split 2
6. Split 3
7. Percussion Keys
8. Keygroups
9. Drummer controls / Recorder controls
10. Scales / Tonics
11. Advanced controls
12. Advanced Drummer
13. Advanced Mixer
14. Advanced Cello
15. Advanced Clarinet
16. Advanced Synth
17. Advanced Audio Unit 1, 2, 3 and 4
18. Advanced MIDI 1
19. Advanced Sampler 1,2 and 4
20. Advanced Sampler 3
21. Advanced MIDI 2
22. Advanced Scales
23. Advanced Headphone controls
24. Pedal Calibration
25. Arranger 1 and 2
1Eigenharp Terminology
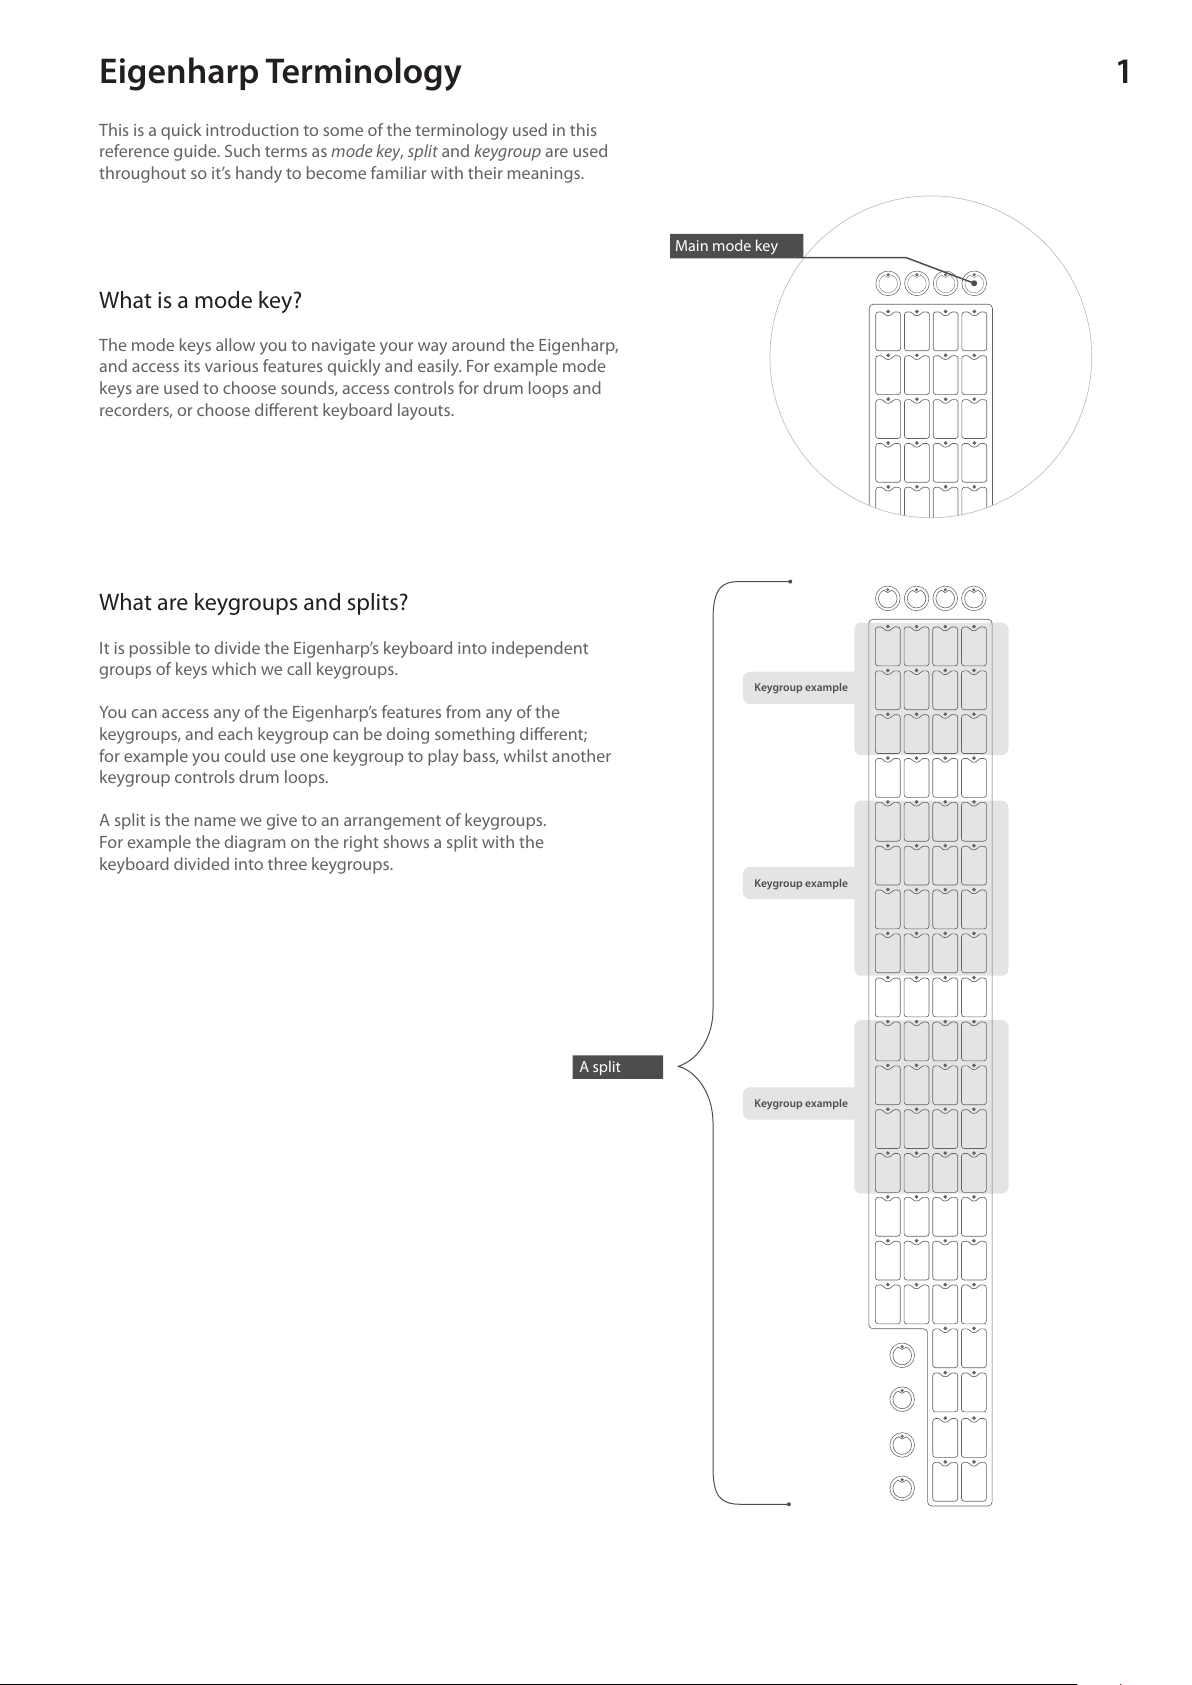
What is a mode key?
The mode keys allow you to navigate your way around the Eigenharp,
and access its various features quickly and easily. For example mode
keys are used to choose sounds, access controls for drum loops and
recorders, or choose dierent keyboard layouts.
This is a quick introduction to some of the terminology used in this
reference guide. Such terms as mode key, split and keygroup are used
throughout so it’s handy to become familiar with their meanings.
What are keygroups and splits?
It is possible to divide the Eigenharp’s keyboard into independent
groups of keys which we call keygroups.
You can access any of the Eigenharp’s features from any of the
keygroups, and each keygroup can be doing something dierent;
for example you could use one keygroup to play bass, whilst another
keygroup controls drum loops.
A split is the name we give to an arrangement of keygroups.
For example the diagram on the right shows a split with the
keyboard divided into three keygroups.
Keygroup example
Main mode key
A split
Keygroup example
Keygroup example
2
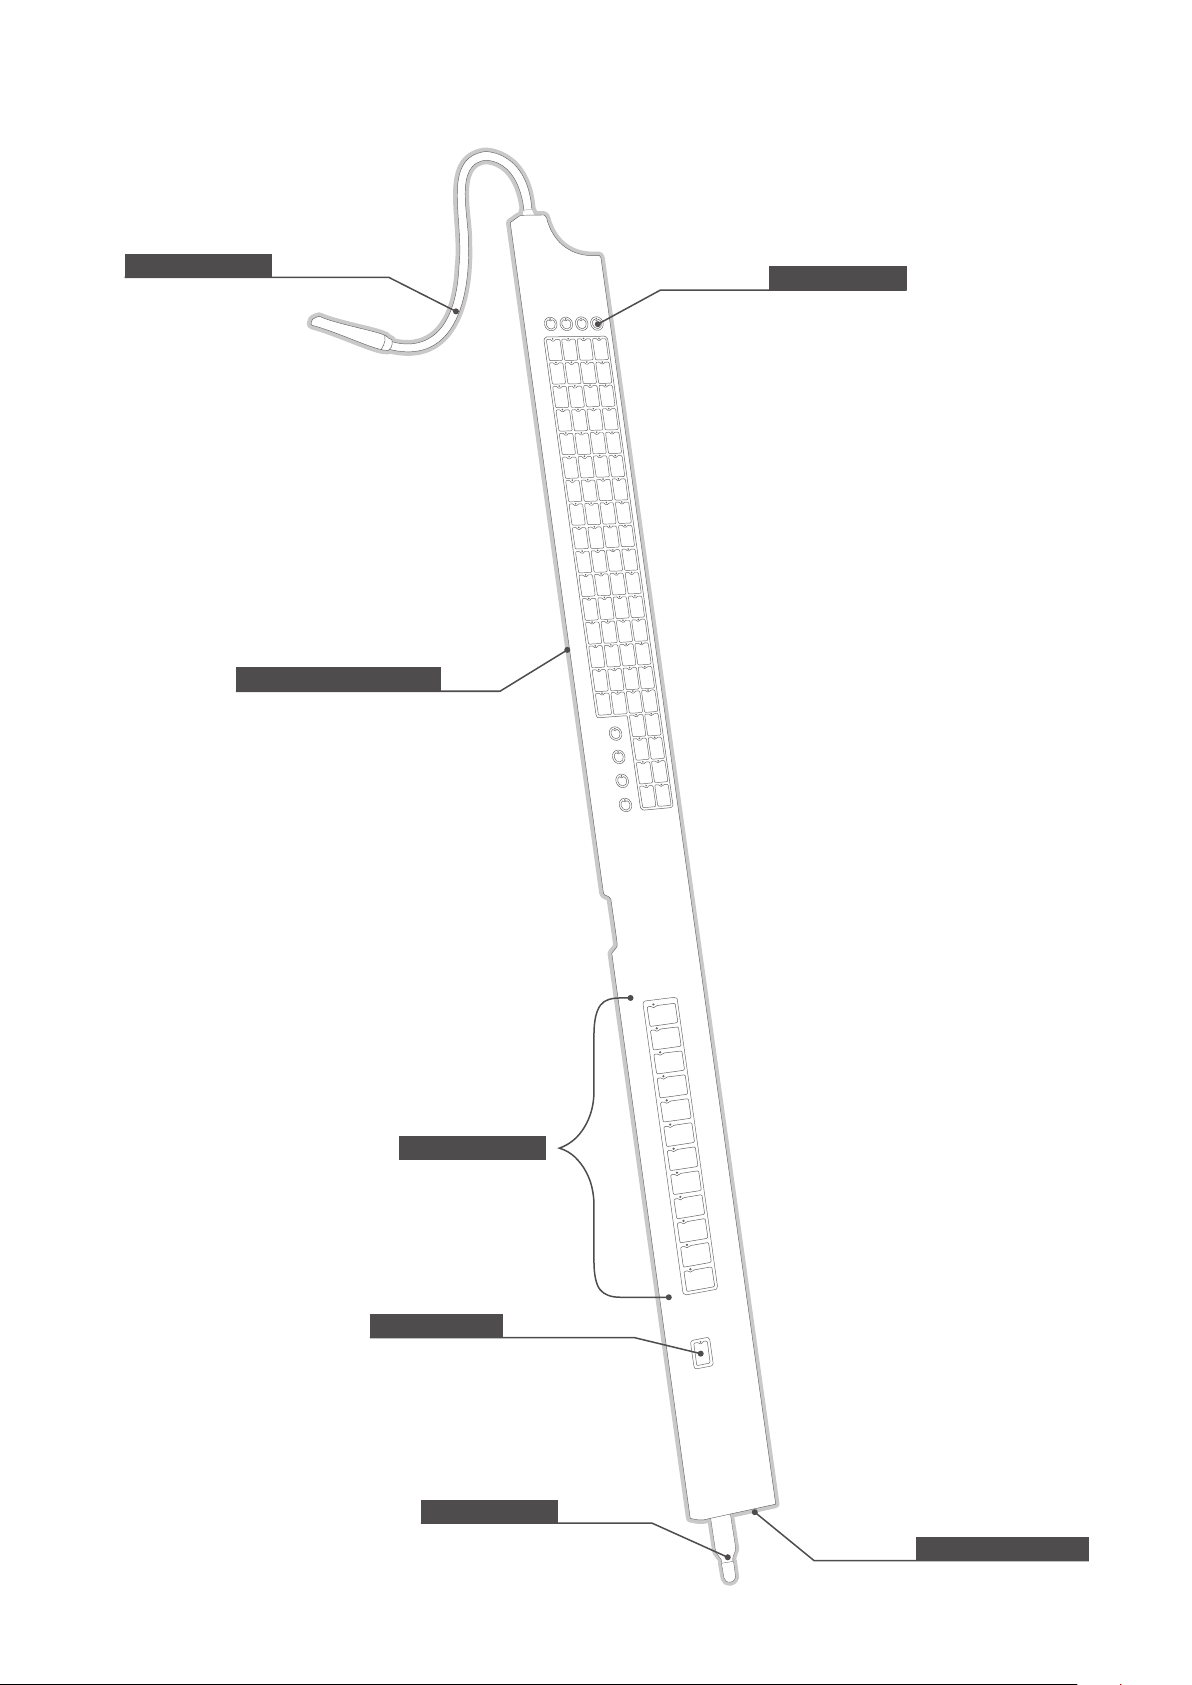
Strip Controller (on reverse)
Base Station connector
These are the main elements of the Eigenharp Tau.
Layout overview
Main mode key
Breath Pipe
Percussion keys
Keyboard lock
Instrument Foot
3Choosing Splits
Pushing and holding the main mode key gives you access to three splits and both of the arrangers. The currently
selected split is lit green. To select the desired split, press its corresponding key and it will turn from red to
green, then release the mode key.
Main mode key
Arranger 2
Split 3
Split 2
Arranger 1 Split 1
Metronome start/stop

4Split 1
Keygroup 1
Octave down
Octave up
This contains keygroup 1.
Keygroup 1 mode key
Metronome start/stop Main mode key

5Split 2
This contains keygroup 2 and keygroup 3.
Keygroup 3
Keygroup 2
Octave down
Octave up
Keygroup 2 mode key
Keygroup 3 mode key
Metronome start/stop Main mode key

6Split 3
This contains keygroups 4, 5 and 6.
Keygroup 6
Keygroup 4
Keygroup 5
Octave down
Octave up
Keygroup 4 mode key
Keygroup 5 mode key
Keygroup 6 mode key
Metronome start/stop Main mode key

7Percussion Keys
Choose between this keygroup’s dierent functions by pressing the percussion mode key.
Percussion mode key
Sampler 3
Sampler 4
Audio Unit 3
Audio Unit 4
MIDI output 2
‘Cello
Scroll Keys
8
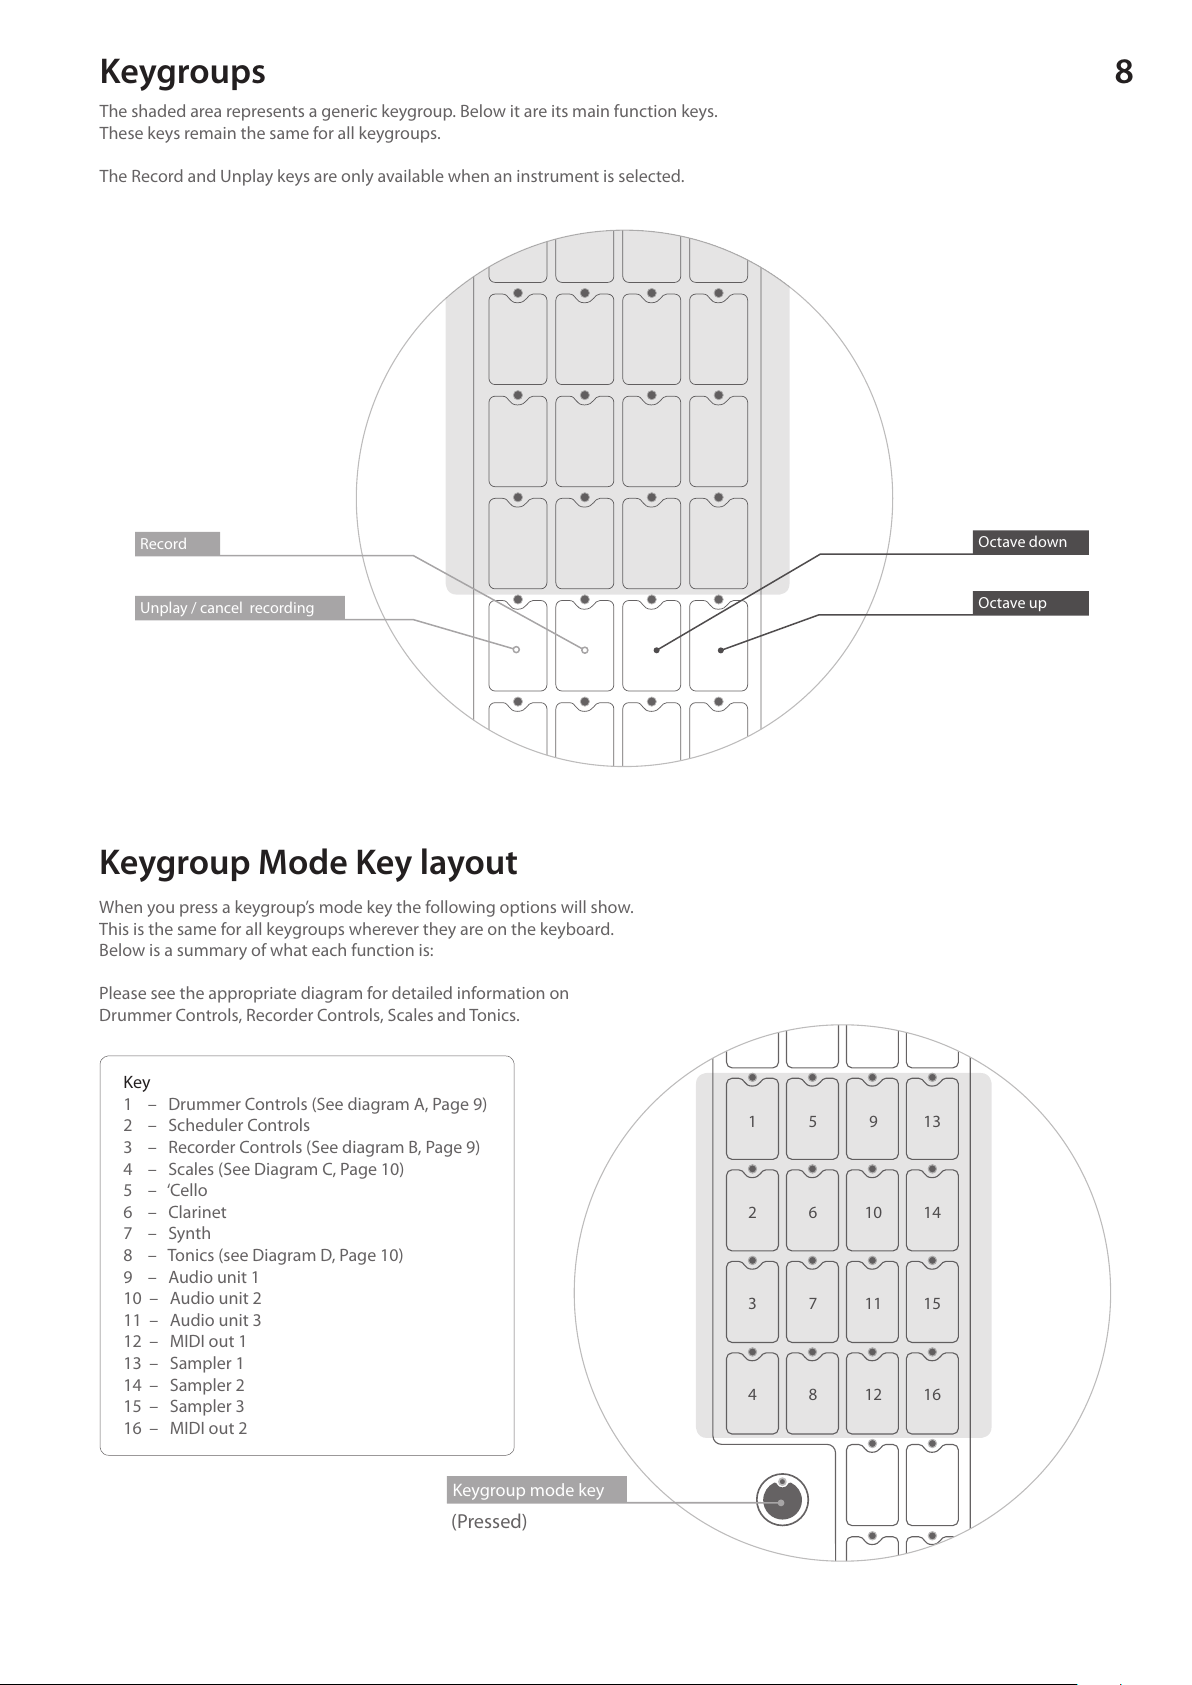
Keygroup Mode Key layout
When you press a keygroup’s mode key the following options will show.
This is the same for all keygroups wherever they are on the keyboard.
Below is a summary of what each function is:
Please see the appropriate diagram for detailed information on
Drummer Controls, Recorder Controls, Scales and Tonics.
Key
1 – Drummer Controls (See diagram A, Page 9)
2 – Scheduler Controls
3 – Recorder Controls (See diagram B, Page 9)
4 – Scales (See Diagram C, Page 10)
5 – ‘Cello
6 – Clarinet
7 – Synth
8 – Tonics (see Diagram D, Page 10)
9 – Audio unit 1
10 – Audio unit 2
11 – Audio unit 3
12 – MIDI out 1
13 – Sampler 1
14 – Sampler 2
15 – Sampler 3
16 – MIDI out 2
(Pressed)
Keygroup mode key
Keygroups
The shaded area represents a generic keygroup. Below it are its main function keys.
These keys remain the same for all keygroups.
The Record and Unplay keys are only available when an instrument is selected.
Unplay / cancel recording
Record Octave down
Octave up
1 5
7
10 142 6
8
11 153
9
12 164
13

9Diagram A - Drummer controls
Diagram B - Recorder controls
Each of the keys labelled 1-12 represents a drum loop – pressing any of
these will turn the loop on or o. To play drum loops the metronome
must be running.
The recorder controls allow you to set how many bars you
will record for, unplay recordings and cancel recordings.
To record you must rst start the metronome, please see the
drummer controls for more detail. Each numbered key in the
diagram represents the number of bars you will record for, e.g. key
1 = 1 bar, key 2 = 2 bars, key 3 = 3 bars, key 4 = 4 bars, etc.
The key marked ‘U’ will unplay all recorded loops that are currently
playing. The key marked ‘C’ will cancel all armed recorders. Please
be aware that once you unplay a recording it will be deleted. To
stop recordings without deleting, use the Scheduler.
The key marked ‘O’ toggles overdub mode. Turned on, additional
recordings for the same instrument create new takes that play
simultaneously. Also, the‘unplay’key deletes only the last take,
allowing loops to be built up and tore down with one instrument.
Once you have selected how many bars you would like to record
for, you must arm the recorder. The record arm key is located
at the bottom of your playing keygroup, this key will arm the
recorder for your currently selected instrument.
Next to the record arm key you have an unplay/cancel key. Note
that these keys will only appear once you have selected an
instrument. Please refer to the Keygroups diagram below.
Key
1 – Drummer voice 1 play/unplay
2 – Drummer voice 2 play/unplay
3 – Drummer voice 3 play/unplay
4 – Drummer voice 4 play/unplay
5 – Drummer voice 5 play/unplay
6 – Drummer voice 6 play/unplay
7 – Drummer voice 7 play/unplay
8 – Drummer voice 8 play/unplay
9 – Drummer voice 9 play/unplay
10 – Drummer voice 10 play/unplay
11 – Drummer voice 11 play/unplay
12 – Drummer voice 12 play/unplay
Metronome start/stop
Clicker on/o
Tap tempo bar key
Tap tempo beat key
1 5
7
102 6
8
113
9
124
1 6
12
16
32 C
O
24 U
2 8
3
4
Unplay /
Cancel recording
Record

10
1 5
7
8
2 6
3
4
Diagram C - Scale controls Diagram D – Tonic controls
This page will allow you to change scales for each keygroup.
The scale keys can be customised, however the default scales
are arranged as follows:
This page will allow you to change tonics for each keygroup,
arranged as follows:
C E G#
F# A#
G B
C# F A
D
D#
Key
1 – Major
2 – Harmonic Minor
3 – Melodic Minor
4 – Chromatic
5 – Blues
6 – Pentatonic
7 – Diminished
8 – Whole Tone
1 2 4
3 5
6
124
3 5
6
A note about Scale and Tonic controls
Scale controls Tonic controls
Each keygroup can have its own scale and tonic.
As you can see in the diagram, we have a second mode key
(scale/tonic mode key), this allows you to select which
keygroup you are choosing the scale and tonic for.
Press and hold this key and you will see a group of lit keys
which represent the available keygroups – the green key
is your selected keygroup. This view is generic for both the
Scale and Tonic controls. Choose key 1 in the diagram to
access the scale/tonic controls for keygroup 1, key 2 for
keygroup 2 etc., through to keygroup 6.
Choose the key marked ‘Global Scale/Tonic’ controls to set
the scale/tonic of all keygroups simultaneously.
Scale mode key
Tonic mode key
Global Tonic
controls
Global Scale
controls

11
Advanced controls (On split 1)
The advanced controls are accessed on Split 1 by pressing keygroup 1’s mode key.
The layout of the advanced control keys corresponds with the layout of the instruments and
standard controls that become available when you hold down a keygroup’s mode key.
There are no advanced controls for the recorder and scheduler hence the gap between the key
labelled 1 (advanced drummer controls) and the key labelled 2 (advanced scale controls).
Octave down
Octave up
Keygroup 1 mode key
Main mode key
6
8
11 16
7
9 14
12 17
10 15
13 18
5
1
2
3
Key
1 – Drummer
2 – Scales
3 – Mixer
4 – Pedal Calibration
5 – ‘Cello
6 – Clarinet
7 – Synth
8 – Headphone
9 – Audio unit 1
10 – Audio unit 2
11 – Audio unit 3
12 – MIDI out 1
13 – Audio unit 4
14 – Sampler 1
15 – Sampler 2
16 – Sampler 3
17 – MIDI out 2
18 – Sampler 4
4

12
The Drummer Loop Browse Key
numbers refer to their respective
Drummer Voice. For example;
Key 1 = Drummer Voice 1,
Key 2 = Drummer Voice 2, etc.
The Drummer Voice Volume Key
numbers refer to their respective
Drummer Voice. For example;
Key 1 = Drummer Voice 1,
Key 2 = Drummer Voice 2, etc.
Advanced Drummer controls
4
3
2
1
12
11
10
9
8
7
6
5
Drummer Voice
Volume Keys
41
80 100 120 140
32
Key
1 – Mixer browse
2 – Inline FX plugin browse
3 – Inline FX GUI show/hide
4 – Inline FX bypass on/o
V – Volume
P – Pan
FX1 – FX send 1
FX2 – FX send 2
D – Delay send
Keygroup 1 mode key
This control page will allow you to edit drummer volumes and browse dierent drum loops for each drummer voice.
The main controls allow you to edit the master volume, pan and FX sends for all drummer loops.
Key
1 – Metronome browse
2 – Tempo nudger
3 – Tempo up (1 bpm)
4 – Tempo down (1 bpm)
80 – Tempo to 80 bpm
100 – Tempo to 100 bpm
120 – Tempo to 120 bpm
140 – Tempo to 140 bpm
Drummer Loop
Browser Keys
4
3
2
1
12
11
10
9
8
7
6
5
Main Controls
4
3
2
1
FX2
FX1
D
P
V
Main mode key

13
Octave down
Octave up
Key
1 – FX send 1 plugin browse
2 – FX send 1 GUI show/hide
3 – FX send 2 plugin browse
4 – FX send 2 GUI show/hide
5 – Mixer browse
6 – Audio device browse
Advanced Mixer controls
Master Volume
Master Pan
Key
V – Volume
P – Pan
FX1 – FX send 1
FX2 – FX send 2
D – Delay send
V
V
V
V
P
P
P
P
FX2
FX2
FX2
FX2
FX1
FX1
FX1
FX1
Sampler 1
Sampler 2
Sampler 3
Sampler 4
V
V
V
V
P
P
P
P
FX2
FX2
FX2
FX2
FX1
FX1
FX1
FX1
Audio unit 1
Audio unit 2
Audio unit 3
Audio unit 4
V
V
V
V
P
P
P
P
FX2
FX2
FX2
FX2
FX1
FX1
FX1
FX1
‘Cello
Clarinet
Synth
Drummer
This control mode will allow you to change the volume, pan and FX sends for each
instrument. You can also choose your audio device or alter the master volume and pan.
Keygroup 1 mode key
Main Controls
21 3
5
4
6
Main mode key

14Advanced Cello controls
Key
1 – Recorder overdub on/o
2 – Mixer browse
3 – Cello convolver impulse response browse
4 – Inline FX plugin browse
5 – Inline FX GUI show/hide
6 – Inline FX GUI bypass on/o
7 – Monophonic Mode on/o
V – Volume
P – Pan
FX1 – FX send 1
FX2 – FX send 2
D – Delay send
Octave down
Octave up
Keygroup 1 mode key
Main mode key
5
6
7
4
3
2
1
FX2
FX1
D
P
V
Main Controls

15Advanced Clarinet controls
Key
1 – Recorder overdub on/o
2 – Mixer browse
3 – Inline FX plugin browse
4 – Inline FX GUI show/hide
5 – Inline FX GUI bypass on/o
6 – Monophonic Mode on/o
V – Volume
P – Pan
FX1 – FX send 1
FX2 – FX send 2
D – Delay send
Octave down
Octave up
Keygroup 1 mode key
Main mode key
5
6
4
3
2
FX2
FX1
D
P
V
Main Controls
1
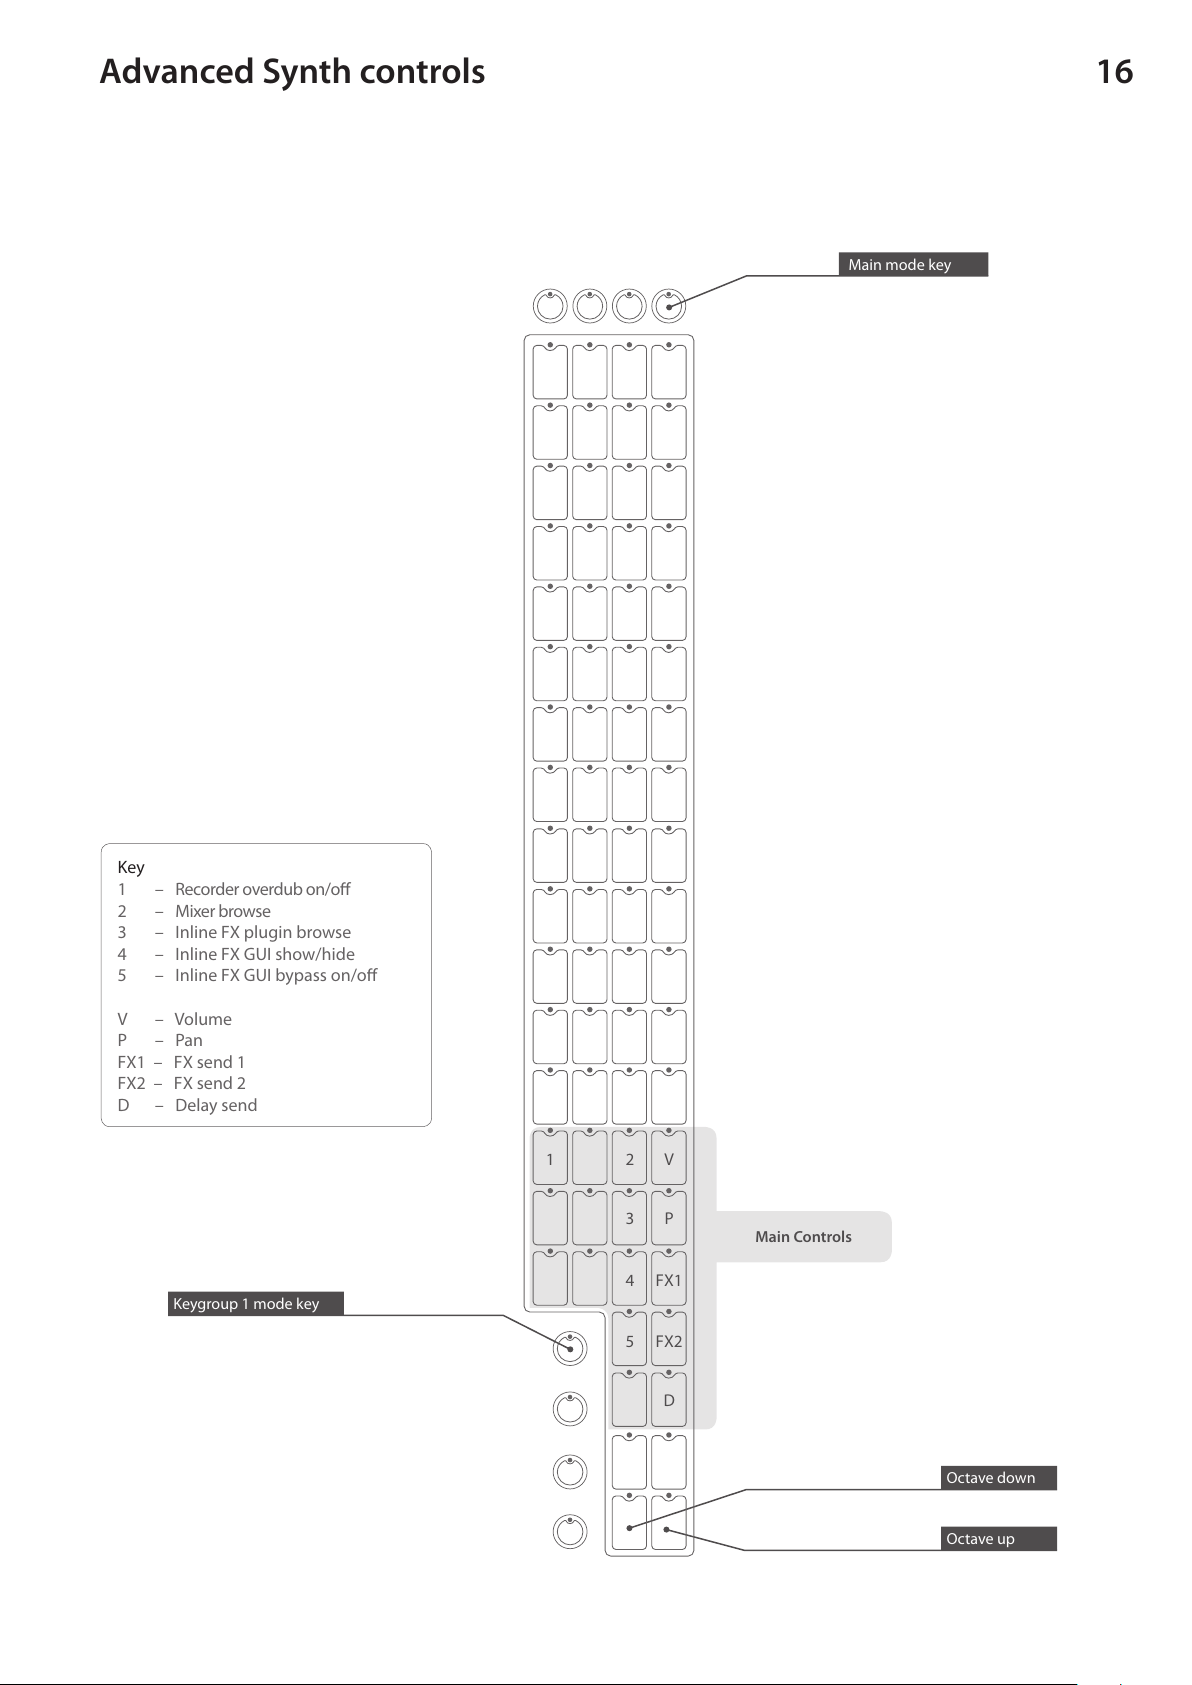
16Advanced Synth controls
Key
1 – Recorder overdub on/o
2 – Mixer browse
3 – Inline FX plugin browse
4 – Inline FX GUI show/hide
5 – Inline FX GUI bypass on/o
V – Volume
P – Pan
FX1 – FX send 1
FX2 – FX send 2
D – Delay send
Octave down
Octave up
Keygroup 1 mode key
Main mode key
5
4
3
2
FX2
FX1
D
P
V
Main Controls
1

17Advanced Audio Unit 1, 2, 3 and 4 controls
Key
1 – Recorder overdub on/o
2 – Audio Unit plugin browse
3 – Audio Unit GUI show/hide
4 – Mixer browse
5 – Inline FX plugin browse
6 – Inline FX GUI show/hide
7 – Inline FX GUI bypass on/o
V – Volume
P – Pan
FX1 – FX send 1
FX2 – FX send 2
D – Delay send
Octave down
Octave up
Keygroup 1 mode key
Main mode key
This page will allow you to select a MIDI channel, e.g. key 1 – MIDI channel 1, key 2 = MIDI channel 2, etc.
You may also choose polyphonic mode by pressing the key marked ‘PM’on the diagram. In polyphonic mode
each note is sent out on its own MIDI channel.
Main Controls
7
5
6
4
3
2
FX2
FX1
D
P
V
MIDI Channel
Select
PM
4
3
2
1
12
11
10
9
8
7
6
5
15
16
14
13
Key
PM – Polyphonic mode
1-16 – Active MIDI channel
1

18Advanced MIDI 1 controls
Octave down
Octave up
Keygroup 1 mode key
Main mode key
This page will allow you to select a MIDI channel, e.g. key 1 – MIDI channel 1, key 2 = MIDI channel 2, etc.
You may also choose polyphonic mode by pressing the key marked ‘PM’on the diagram. In polyphonic mode
each note is sent out on its own MIDI channel.
5
4
3
2
MIDI Channel
Select
PM
4
3
2
1
12
11
10
9
8
7
6
5
15
16
14
13
Key
PM – Polyphonic mode
1-16 – Active MIDI channel
Key
1 – Recorder overdub on/o
2 – MIDI output port browse
3 – MIDI input port browse
4 – MIDI clock enable
5 – MIDI clock latency Main Controls
1
Table of contents


