EILISON FITMAX User manual

To claim your LIFETIME WARRANTY
register on our website www.eilisonglobal.com
within 7 days of delivery
For complaints/queries- email us on
FITMAX
VIBRATION
PLATE
SKU KM-818
eilisonglobal | eilisonofficialglobal |
Eilison Global | eilisonglobal

Fitmax Vibration Plate
-
+
Time
-
+
Speed
On/O Program
P
Start Stop
2
BRAND STORY
Health and happiness are interrelated. You can be the richest, most successful
person but if you are not healthy, you will never be at peace mentally.
Unfortunately, this is something that people realise a little too late in life.
Fortunately, we are here to give you a small reminder of this fact.
Sometimes we wish to start the journey of a healthier, fitter life but we lack
guidance. We don't know where and how to start. Eilison was started with the
intention of giving just that.
We, the founders of the brand, have witnessed this first hand with people in
our lives. Situations where health was taken for granted or ignored due to lack of
proper assistance, only to regret it later. Our aim is to make sure it does not happen
to anybody else. We are not here only to sell the best quality products. We are here
to ensure you have the best quality lifestyle.
1

WHAT’S IN YOUR PACKAGE
Vibration Plate Power Cord Loop Bands Remote
TECHNICAL DATA
Product Name
Brand Name
Warranty
Max load
Function
Oscillation Movement
Bluetooth Speakers
Fitmax Vibration Plate
Eilison
Lifetime
350lbs/159kg
Oscillation
Pivot (Up & Down)
Yes
Vibration Speed Level 1-120
Display
Power
Voltage
LCD Display
300W
110 V AC
TABLE OF CONTENTS
1. Technical Data
2. What’s in your package
3. About the product
4. Step by step guide to operate it
5. Remote Functionality
6. Standing position
7. Horizontal adjustments
8. Safety Precautions
9. What else you got?
43

Eilison Fitmax vibration plate uses noiseless powerful motor to generate
pivot oscillations. Helps in lymphatic driange, increase bone density, improves
blood circulation, reduce belly fat, reduce weight.
ABOUT THE PRODUCT STEP BY STEP GUIDE TO OPERATE IT
Follow Below Steps for Setup
1. Remove Fitmax vibration plate from packaging
2. Attach power cord to the vibration plate and connect it with a source of power
supply
3. Insert AAA batteries in remote
4. Insert both loop ropes on bottom sides of vibration plate using hook on elastic
bands to clamps under the base of machine
Anti-Slide
Slipper Surface
Piano Paint
& ABS Plastic
LCD Touch-
Screen
Non-Slip
Rubber Feet
6
5
Program Button
(P1, P2, P3, P4, P5)
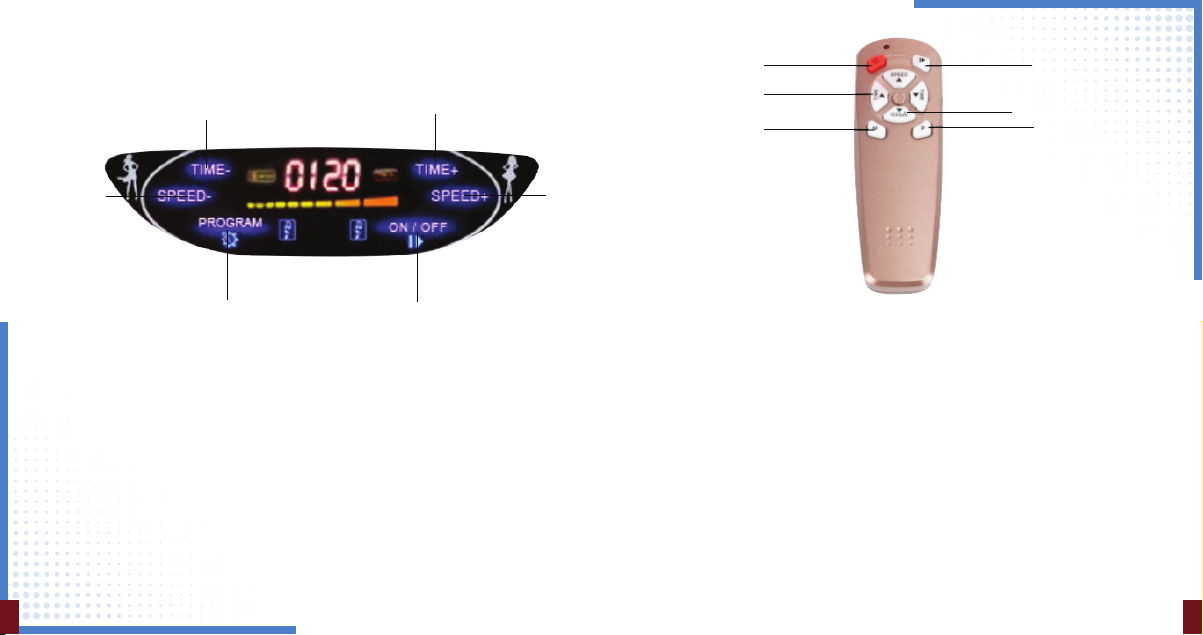
UNDERSTANDING DISPLAY
REMOTE FUNCTIONALITY
Step-1: Press power button to turn On or O your machine.
Step-2: Manual Mode
• Use time and speed button to use time duration and speed for your
manual workout.
• Now press start button
• While machine running you will able to increase/decrease speed not time.
Step-3: Auto Mode
• Press Pbutton to toggle between 5 auto modes.
• To start machine vibrating press start button after pressing Pbutton.
• In auto mode you will not be able to change timer and speed.
Power Button Start/Pause
Adjust Speed
Select Auto Program
Adjust Time Duration
Select Level
87
Power On/O
Button
Speed
Decrease
Button
Time Decrease Button Time Increase Button
Speed
Increase
Button

HOW TO CONNECT BLUETOOTH
Step-4: M Mode
Press Mbutton
• In this Mode speed level will be at 20, 50 and 110 and workout time
will be 15 minutes.
Note: In auto mode you will not be able to change time or speed.
To change time or speed you need to stop the machine.
• In manual mode only speed can be change while machine is running.
• To change time, first stop the machine using start button then set time and
then press start button again.
• For stopping machine any time press stop button.
• Max timing that can set is 15 minutes.
• Speed Level 1-120.
1. Each program has 15 minutes of cycle.
2. Number in each rows show speed level of machine at above mentioned minute.
• Go to “Bluetooth settings of your device.
• Connect to ZZ10
• Play any music of your choice
• Volume can be control from connected device only
Below chart shows how speed varies in each program modes after each
minute
Great for starting out.
• Detoxification
• Increased bone
density
• Improved balance
• Lymphatic drainage
• Improved postural
control
Great for increased
intensity.
• Fat loss
• Muscle growth
• Highly increased
bone density
• Power accumulation
• HGH release
Perfect for people
with arthritis and
fibromyalgia
• Joint maintenance
• Improved postural
control
• Fat loss
• Increased bone density
• Improved postural
control
• Improve balance
• Cellulite removal
P1
109
Speed Program 15 14 13 12 11 10 9 8 7 6 5 4 3 2 1
Low 12 4 6 8 10 13 15 12 9 8 8 10 13 15 12
28 14 8 14 8 20 8 14 8 14 14 8 20 8 14
312 23 29 38 49 6 68 76 48 29 38 49 56 68 76
49 13 16 21 24 35 67 50 38 30 21 24 35 67 50
523 55 23 55 23 55 23 55 23 55 55 23 35 23 55
Medium
High

STANDING POSITION
Horizontal Adjustment
Stand with your feet close together for an “easy” workout and stand with your
feet further apart for “medium” and “intense” workouts.
(Incorrect adjustment may cause noise)
If any noise caused, please see below adjustable feet as below
SAFETY PRECAUTIONS:
Please keep this manual in a safe place.
WARNING: To reduce the risk of burns, fire, electric shock, or injury to persons,
please read the following important precautions and information before
operating the vibration platform.
1. It is the responsibility of the owner to ensure that all users of vibration
platform are adequately informed of all warnings and precautions.
2. Operate vibration platform only as described in this manual.
3. Place the vibration platform on a level surface. To protect the floor or carpet
from damage, place a mat beneath vibration platform.
4. Keep the vibration platform indoors, away from moisture and dust. Do not place
the vibration platform in a garage or covered patio, or near water.
5. Do not operate vibration platform where aerosol products are used or where
oxygenis being administered.
6. Keep children under the age of 12 and pets away from vibration platform
at all times.
7. Vibration platform should not be used by persons weighing more than
350lbs/159kg.
Note: Use vibration plate on flat hard surface.
1211

A. WARRANTY
Eilison oers lifetime warranty of the product. In case there arises any issue or
problem with the product, it shall be our responsibility to arrange for repair or
replacement.
To avail the warranty, register on our website within 7 days of delivery.
Follow these steps for registration:
Visit https://eilisonglobal.com/warranty-registration
Fill in the details Click "Send"
B. COMPLAINTS AND QUERIES
We are striving hard to deliver the product to your satisfaction. Sometimes due to
unavoidable circumstances like in-transit damage or manufacturing defect, there
can arise any issue with the product. For all such or any other complaints/ queries,
WHAT ELSE YOU GOT?
8. Never allow more than one person on vibration platform at a time.
9. Keep the power cord and the surge suppressor away from heated surfaces.
10. Never leave the vibration platform unattended while it is running.
Always unplug the power cord when it is not in use.
11. Operate the vibration platform only as described in this manual
12. Inspect and tighten all parts of vibration platform regularly.
13. Wrong usage could influence the stability of vibration platform.
For example, the post is made to support you during an exercise to keep
you balance. One should NOT PUSH the post for stretching or use the post to
create more tension.
14. Never insert or drop any object into any opening on the vibration platform.
15. DANGER: Always unplug the power cord before cleaning vibration platform
and before performing the maintenance and adjustment procedures described
in this manual, Never remove the motor hood unless instructed to do so by on
authorized service representative. Servicing other than the procedures in this
manual should be performed by an authorized service representative only.
16. Vibration platform is intended for in-home use only. Do not use vibration
platform in any commercial, rental, or institutional setting.
1413
This manual suits for next models
1
Table of contents
Popular Fitness Equipment manuals by other brands

Hoist Fitness
Hoist Fitness KL2403 owner's manual

AbCoaster
AbCoaster Personal series owner's manual

Master Gym
Master Gym E383 WORKOUT AND USER’S MANUAL

Crosscall
Crosscall X-ARMBAND quick start guide

biodex
biodex UPPER BODY CYCLE Installation & operation manual

V2
V2 V2 AERO XL 125 Instructions for mounting

CYBEX
CYBEX Arc Trainer 600A Owner's service manual

Taurus
Taurus TF-MS Assembly and operating instructions

Orbit
Orbit ArizonaMist instructions

KingsBox
KingsBox Mighty Power Rack CX-37 II quick start guide

Nielsen-Kellerman
Nielsen-Kellerman StrokeCoach operating manual

Deltech Fitness
Deltech Fitness DF7600 Assembly instructions


