Master Gym E383 User manual

CONTENTS INDEX:
Important safety information
Bolts included
Introduction
Diagram of pre-assembled components
Tools
Assembling instructions
Warm up
Training
WORKOUT AND USER’S MANUAL
MODEL:E383
KEEP FOR FUTURE REFERENCE

INTRODUCTION
Congratulations on purchasing Master Gym®. This uniquely designed
exercising system was designed to provide users with an effective yet
low impact at home workout. The Master Gym’s non-slip pedals,
comfort fit handlebar and sturdy stretching rubber bands, gives users
the safe and low impact work out in the comfort on their home.
The unit’s non-slip legs keeps the machine stable and secure during
each workout. The Master Gym was designed with 5 major functions:
exercise, strengthen, tone muscles and joints, as well as to enhance
the movement coordination of the upper and lower limbs:
1. The handlebar exercise helps to gently enhance mobility to your
shoulders, elbows and wrists.
2. The iso-stretching exercise with the rubber bands helps to strength-
en and tone your arms, chest and back.
3. The sliding movement of the pedals activates your joints and the
muscles of your legs to enhance blood flow and stimulate your
muscles.
4. The lifting of the pedals sideways helps to exercise your quadriceps
and buttocks.
5. Using the handlebar and pedals at the same time will develop better
upper and lower limb movement coordination and strengthen your
muscles.
Performing these 5 exercises on a daily will help users regain muscle
strength and stay fit in a low-impact and effective way- your joints
won’t say no!
Master Gym® is so versatile. You can use all of the components
simultaneously or you can remove the upper part of the unit, so you
can target your legs while sitting comfortable in any chair.

PARTS INCLUDED
Open end wrench Allen wrench

IMPORTANT SAFETY INFORMATION
Please carefully read the following information before using the product.
1.
CAUTION: Before assembling or using your Master Gym, it is
important and recommended that each user read the user guide
completely before beginning. The user guide will show you how to
properly assemble your Master Gym, maintain your device and provide
recommendation on how to achieve effective and safe workout. It is
recommended that you keep this user guide for future reference.
2.
Your health may be affected due to excessive or incorrect use of
your Master Gym. It is recommended that you visit your physician
before beginning any workout program as they will advise what is best
for your health.
3.
People suffering from heart diseases or those who have been not
allowed to perform physical activities shall not use this unit unless they
obtain a medical permission by your physician.
4.
To avoid potential injury, use caution when lifting or moving the
Master Gym.
5.
Should you feel dizzy, with nausea or with other abnormal
symptoms, please stop your activity and seek immediate medical
attention.
6.
People suffering from injuries or recovering from a surgery shall not
use Master Gym® unless they receive permission from their physician.
7. This device is not intended for therapeutic purposes.
8. It is recommended that you adequate sporting garments when
using the device.
9.
It is important that you stay hydrated both during and after
exercising.
10.
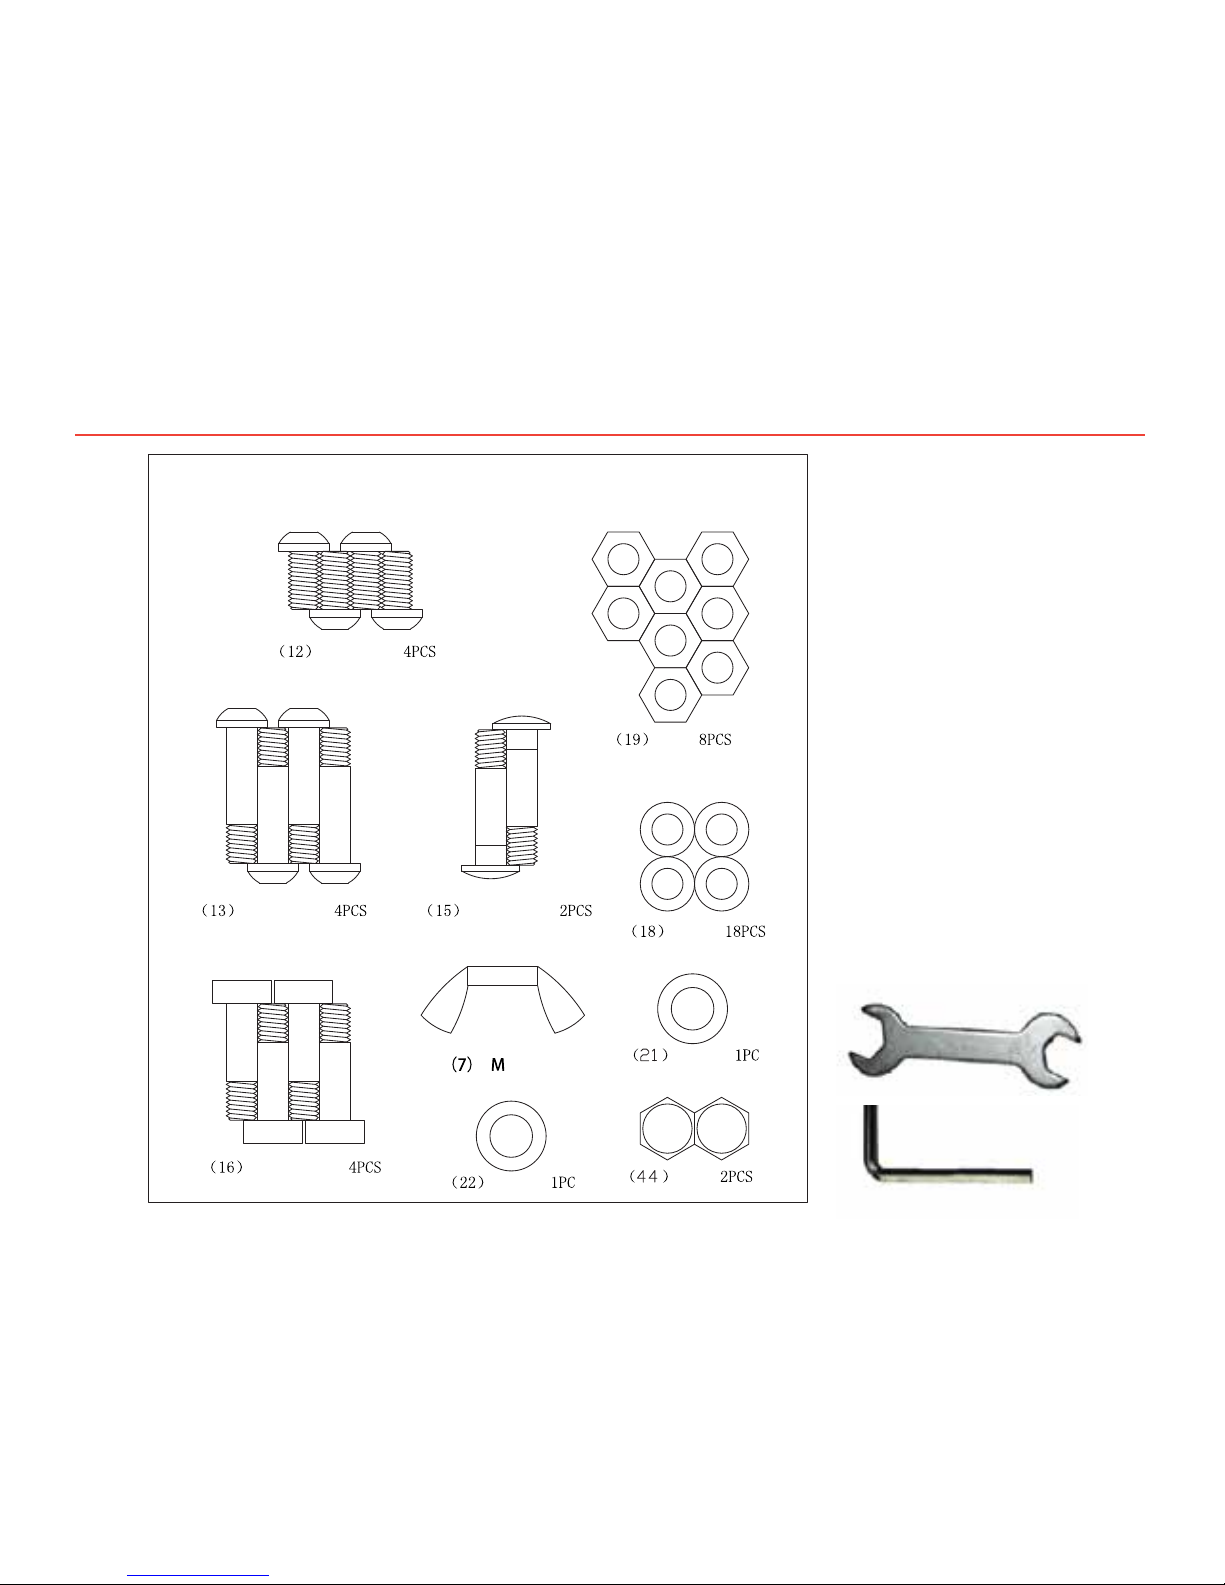
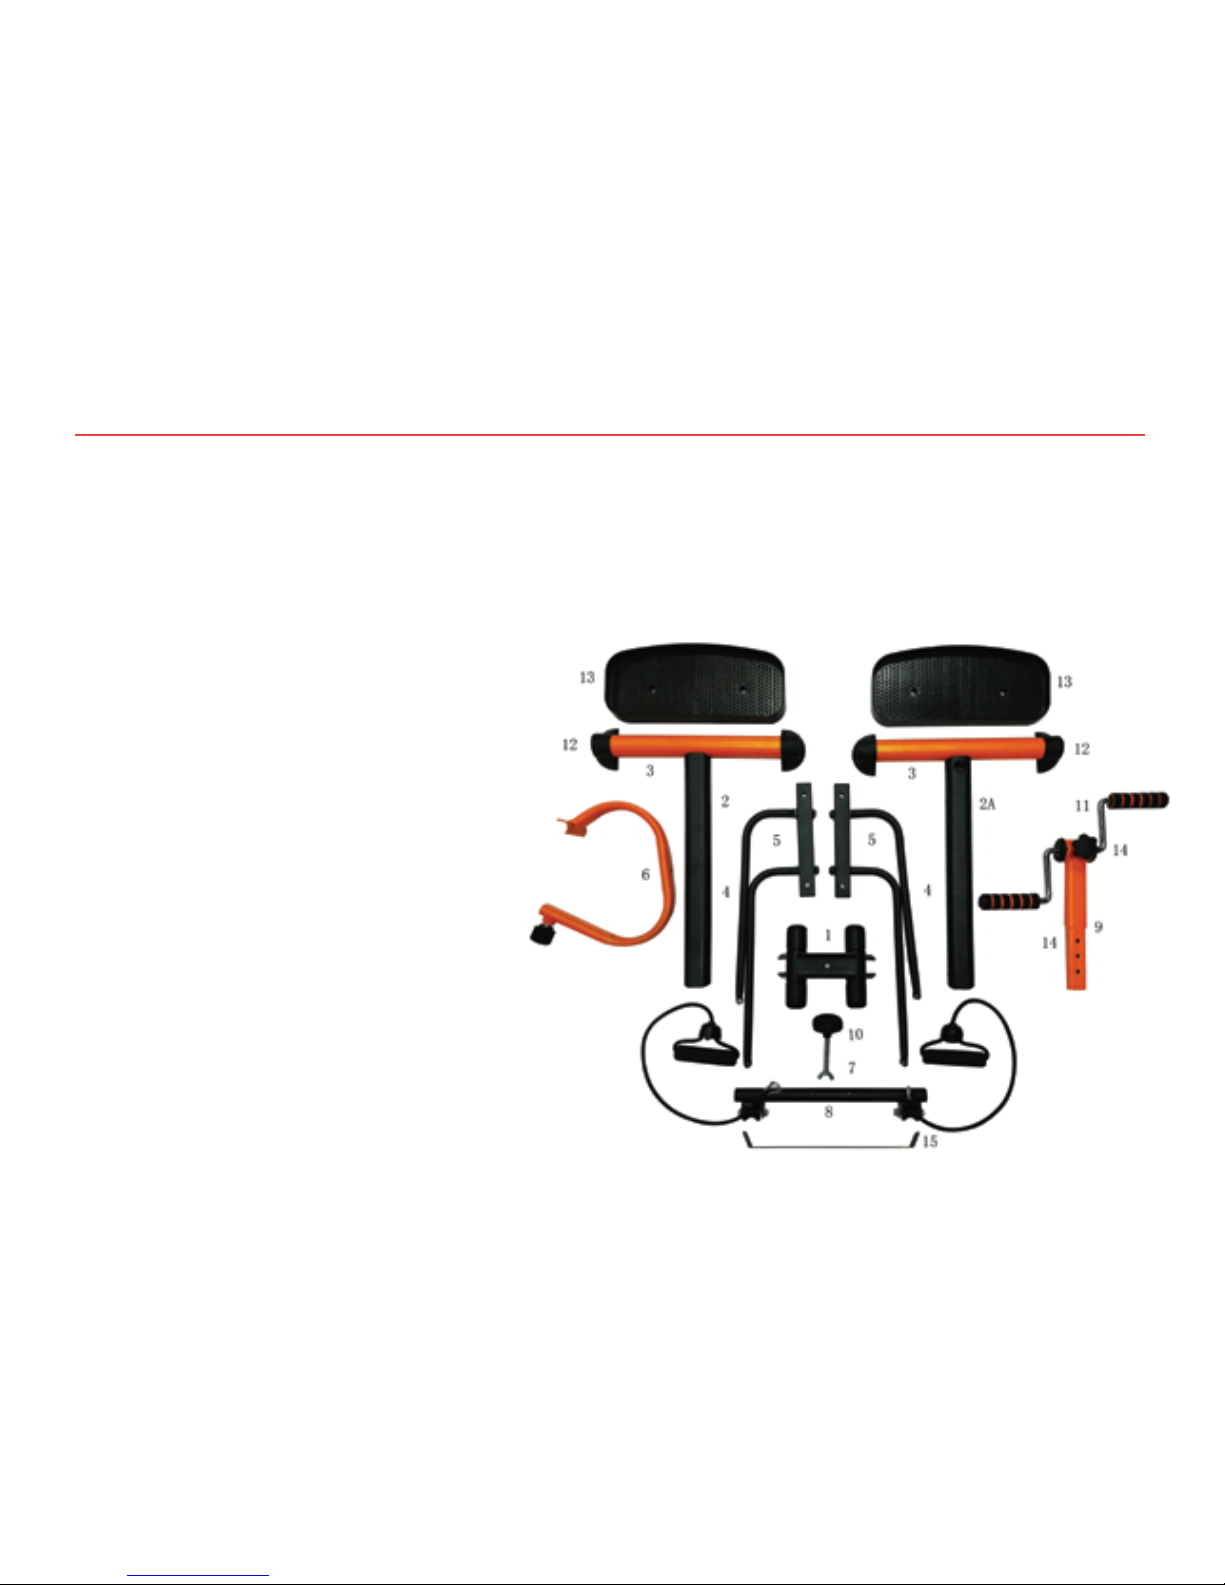
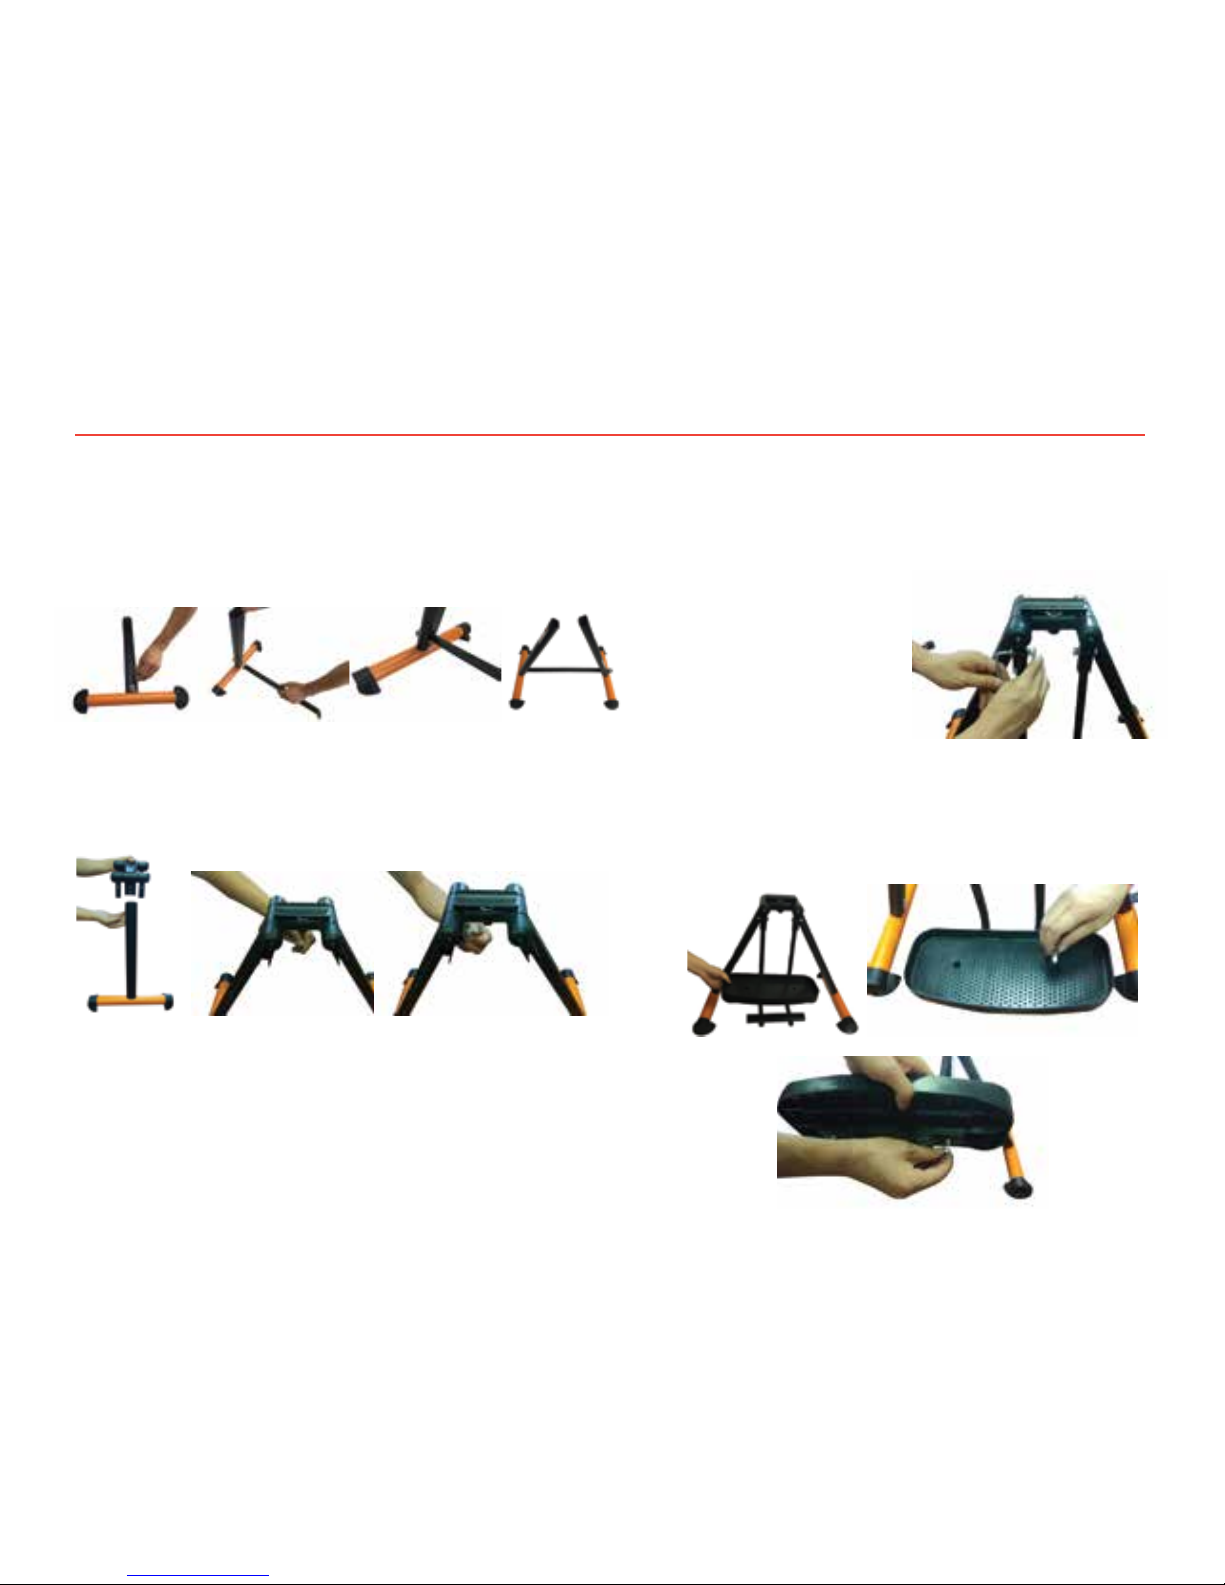
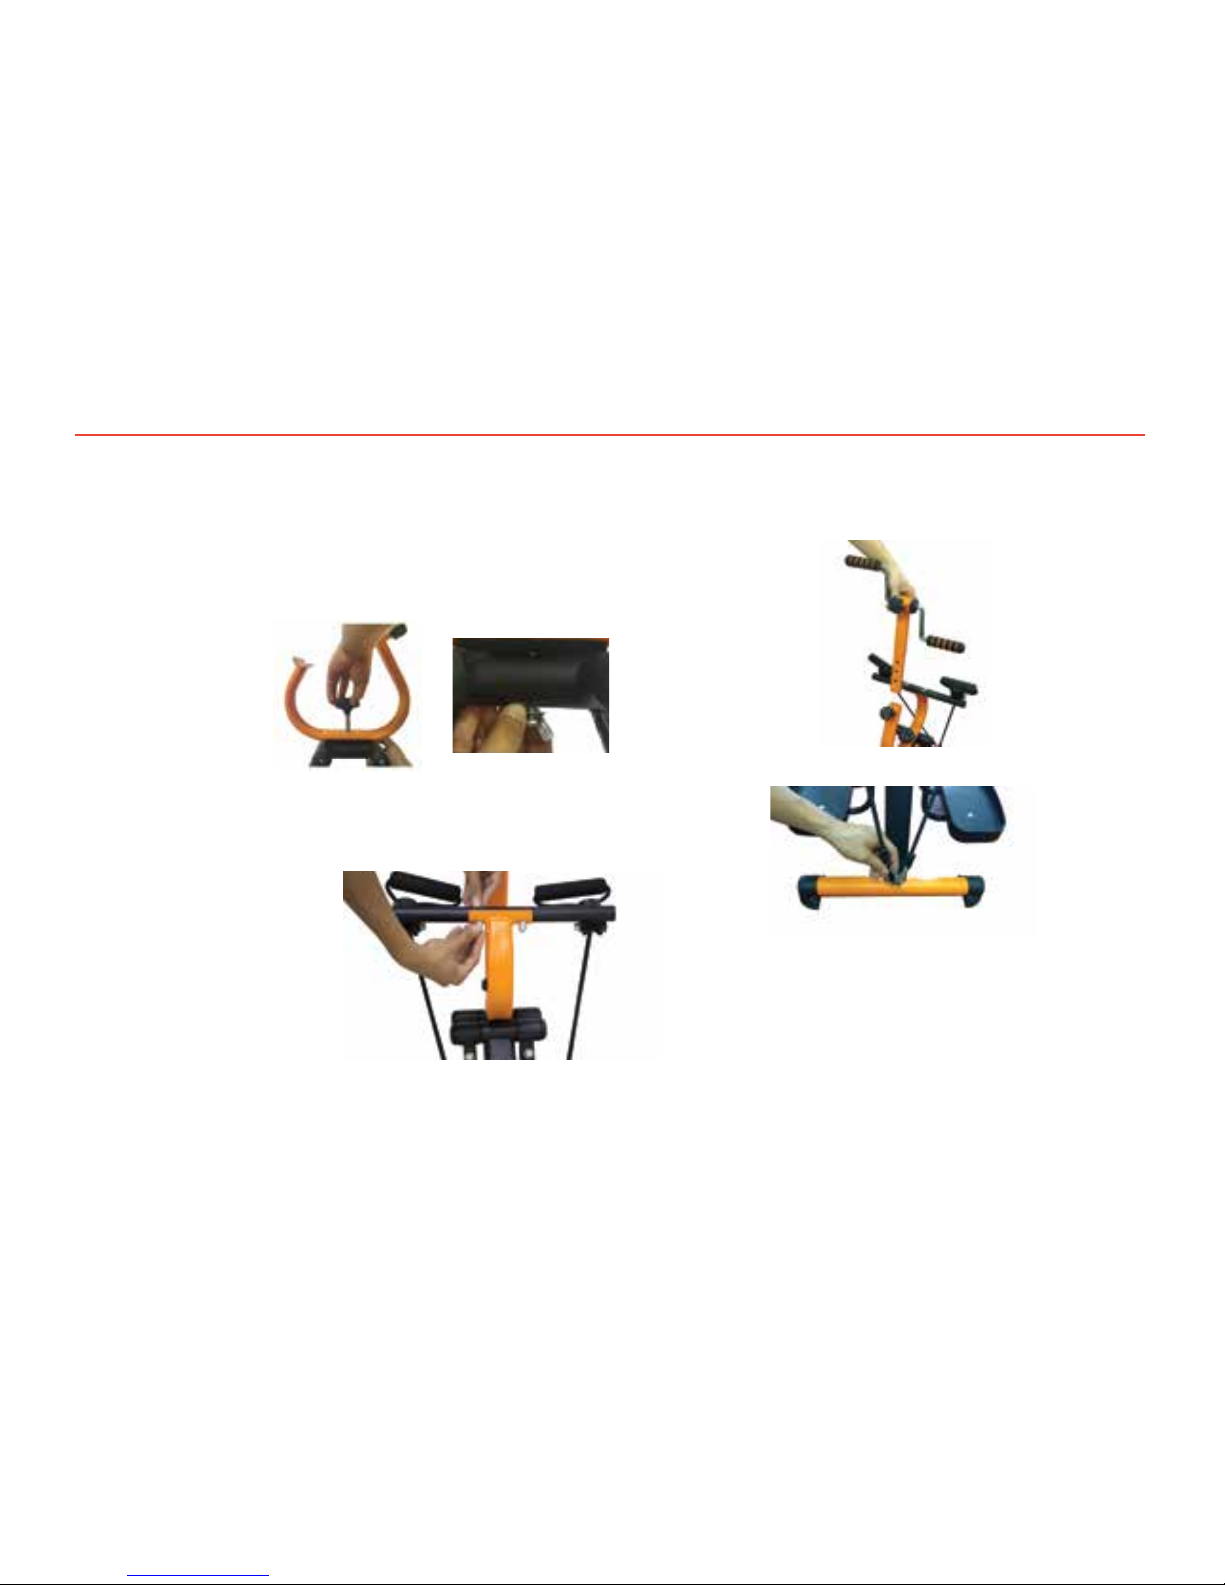
When assembling your Master Gym, ONLY use recommended
tools and instructions to assemble the parts of the unit.
11.
Make sure all bolts, nuts and connectors are properly adjusted
before using the device for the first time.
12.
Before using your Master Gym, make sure that is placed on a
steady and dry surface. Make sure the surrounding area is clear of any
objects that may harm you during your exercise. We suggest placing it
on a carpet for greater traction.
13.
Always use Master Gym® seated on a comfortable and steady
chair. The image of the product may vary.
14. Immediately after each training session, please clean and remove
the drops of sweat from the Master Gym®. When cleaning your Master
Gym, do not use ANY harsh cleansers. Soap and water ONLY.
15. If the device is not working properly, please discontinue use to
avoid any injury or misuse.
16. Master Gym® is intended for indoor use only. Please do not use
the unit outdoors as weather conditions may affect the unit’s
performance. Keep away from water and humidity.
17. The device is not intended for children. Do not use if you are under
the age of 21 years old.
18. The maximum weight limit for Master Gym® users should not
exceed 265 pounds
19. Master Gym® is intended for indoor use only. Please do not use
the unit outdoors as weather conditions may affect the units
performance. Keep away from water and humidity.

DIAGRAM OF PRE-ASSEMBLED PARTS
Once you open your Master Gym® box you will see your product
pre-assembled as shown in the illustration below.
1Frame
2Rear support tube
2A Tube with a loop for the stretching rubber bands
3Base bars already attached to the support tubes (2 and 2A)
4Swing tubes
5Backpedals
6Handlebar and roller strip holding tube
7Wing nut
8Roller strip and stretching rubber bands
9Handlebar height adjustment tube
10 Frame Knob
11 Handlebar knob
12 Non-slip rubbers assembled to the base bars
13 Non-slip pedals
14 Handlebar
15 Steel bar
NOTE: The images and diagrams in this manual are for reference
only. The actual appearance and technical parameters are
subject to change without previous notice.

Lower Part Assembly
1. Remove the bolts from the support tubes (2 and 2A) and insert the
steel bar. Fix them with the same bolts previously removed.
2Insert the frame (1) into the rear support end (2).Repeat the
procedure with the opposite end and adjust it with the bolts (12) and
lock washers (18) use both, the open end wrench and the Allen
wrench.
Note: Make sure the loop for the stretching rubber bands is facing
outwards.
3. Insert the swing tubes (4) into the frame (1) (one end at a time) and
tight them using bolts (13) and lock washers (18) (2 per bolt), hold it
with the Allen wrench and tighten with the open end wrench. Repeat
the procedure with the opposite end.
4. Place the non-slip pedal (13) on the backpedal (5) and introduce the
hexagonal screws (16) from top to bottom. Fix them with the nuts (19)
and lock washers (18) with the open end wrench. Repeat the
procedure with the other non-slip pedal.
ASSEMBLY INSTRUCTIONS

Upper Part Assembly
5. Once the lower part of the Master Gym® is assembled, add the
handlebar and roller strip holding tube (6) by using the frame knob (10)
and the lock washer (22), fix it properly with the wing nut (7).
6. Place the roller strip and stretching rubber bands (8) on the
handlebar and roller strip holding tube (6), afix them properly with the
bolts (15) and nuts (44), use the open end wrench.
Note: Make sure the rollers
where the rubber band pass
through are facing towards the
inner side of the roller strip
holding tube curve
ASSEMBLY INSTRUCTIONS
7. Insert the handlebar height adjustment tube (9), into the handlebar
and roller strip holding tube (6) and hold with the knob and select the
desired height.
8. Finally hook the stretching rubber bands to the loop of the tube (2A).
9. In case you wish to remove the upper part, reverse the process.

WARM UP
Warming up is an important part of your training and it must be the
starting point of every session. Prepare your body for more demanding
exercise by warming up and stretching your muscles. Repeat these
exercises at the end of your activity in order to reduce the possibility of
muscle pain. Thus, we recommend the following:
•LEG STRETCHING
In order to complete the following exercise you must
seated on a steady chair. Lift your legs oneat a time;
stretch them to the front without moving your thigh
away from the chair. Lower the stretched leg and
bend it as much as possible. Repeat from 10 to 15
times.
• FEET AND ANKLE STRETCHING
Move your right foot upwards and downwards.
Stretch it as much as possible without causing pain
(repeat from 10 to 15 times) and then do the same
with your left foot.
You shall either seat on a surface where your
feet may be at an elevated position from the
floor, or lay down. Move your feet inwards
and outwards of your body center as shown
in the illustration (repeat from 10 to 15 times).
Repeat exercise switching to your left foot.
• CALF STRETCHING
Stand in front of a Wall, at a distance which will allow you
to place both hands on the Wall up to the chest with
your arms stretched making contact with the palms of
your hands. Slightly lean frontwards bending your
knees. Place one foot behind the other and keep your
heels firmly planted on the floor. Now start leaning slowly
towards the wall until you feel how your calf muscles
stretch. Remain so for about 15 to 30 seconds. Repeat
it three more times with each calf.
• HEAD LEANING
Lean your head to the right for five seconds, feel the
left side of your neck stretching. Next, lean your head
to the left for five seconds and feel how your neck s
right side muscles stretch. Lean your head backwards
for five seconds and finally lean your head on your
chest for three seconds. Repeat 10 times.
• SHOULDER LIFTING
Lift your left shoulder towards your ear for five seconds
and then, as you lower your left shoulder, lift your right
shoulder just like you did with the left one for five more
seconds. Repeat 10 times.
• WRIST MOVEMENT
Move your wrists sideways with your hands open and
fingers extended as shown in the illustration. Repeat
from 15 to 20 times

EXERCISE 1 EXERCISE 2
EXERCISE 3 EXERCISE 4 EXERCISE 5
TRAINING
Now you are ready to enjoy the benefits of exercising with your Master
Gym®. Keep in mind that if you consistently follow the recommended
training exercises, you will start to look better and feel better too! We
suggest you to train at least three times a week using your Master Gym. It
is also recommended that you record your daily activity and exercises as a
great way to track your progress. Because Master Gym is so versatile and
is easily adjustable, you target which areas of your body you would like to
focus on every day.
Recommended movements for the lower part of your body
SLIDING:
This exercise will provide you with mobility
to your joints, inner and lateral muscles of
your legs.
• Sit down on a chair and place your feet on
the pedals.
• Softly slide your feet alternately
backwards and frontwards.
• Smoothly slide both feet back and forth.
• Slide one of your legs in
diagonal as shown in the picture
• Repeat the same movement with your other leg.
• Slide the pedals to the sides (both at the same time preferably)
in order to work with and strengthen the external muscles of the
legs and buttocks.
• You can also do it alternately.

EXERCISE 1 EXERCISE 2 EXERCISE 3
Types of movements for the upper part of your body
Should you need to complement your exercise, fix the upper part
of the gym.
EXERCISE FOR THE ARMS:
Adjust the level of intensity by turning the handlebar knob (11).
Place your hands on the handles and start rotating.
Mixed exercises: The activity of the handlebar along with the pedals
simultaneously helps developing better limb coordination.
Place your feet on the pedals and your hands on the handlebar. Start
exercising by moving your legs and arms simultaneously.
Exercises with stretching rubber bands: They will help you to
strengthen your arms, chest, abdomen and back.
Note: in order to have greater stability, it is extremely important
that when exercising your arms, especially with the stretching
rubber bands, your feet are always on the pedals
• Place your feet on the pedals
• Hold the rubber bands
• Stretch both rubber bands simultaneously
towards you and place a bit of pressure on
the pedals
• Pull the rubber bands alternately
• Turn your forearms and
pull the rubber bands
towards you at the
same time
TRAINING

EXERCISE 4 EXERCISE 5
• Slide one of your legs in
diagonal as shown in the picture
• Repeat the same movement with your other leg.
• Slide the pedals to the sides (both at the same time preferably)
in order to work with and strengthen the external muscles of the
legs and buttocks.
• You can also do it alternately.
• Turn your forearms and pull the rubber
bands alternately
• Hold the rubber bands and take them to
your chest while moving your elbows to
the sides while bending them
We strongly recommend finishing exercising with cool-down
movements in order to avoid future injuries.
Warm up exercises can also be performed for this purpose.
TRAINING

• Hold the rubber bands
• Stretch both rubber bands simultaneously
towards you and place a bit of pressure on
the pedals
• Pull the rubber bands alternately
• Turn your forearms and
pull the rubber bands
towards you at the
same time
DO NOT
STAND UP
WHEN YOU
USE IT

ÍNDICE DE CONTENIDOS:
• Turn your forearms and pull the rubber
bands alternately
• Hold the rubber bands and take them to
your chest while moving your elbows to
the sides while bending them
We strongly recommend finishing exercising with cool-down
movements in order to avoid future injuries.
Warm up exercises can also be performed for this purpose.
Información de seguridad importante
Tornillería incluida
Introducción
Diagrama de las partes pre-ensambladas
Herramientas
Instrucciones de armado
Calentamiento
Entrenamiento
MANUAL DE USUARIO Y WORKOUT
MODELO:E383
LEA ESTE INSTRUCTIVO ANTES DE USAR EL PRODUCTO
Y CONSÉRVELO PARA FUTURAS REFERENCIAS

INFORMACIÓN DE SEGURIDAD IMPORTANTE
Por favor lea cuidadosamente Ia siguiente información antes de usar su producto.
1.
Antes de ensamblar y utilizar el equipo de entrenamiento, por favor,
es muy importante que lea todo el contenido del manual. Lléve a cabo
únicamente Ia correcta instalación, mantenimiento y usa del equipo
para lograr un entrenamiento efectivo y seguro. Debe asegurarse de
conocer bien el uso del equipo y las advertencias de seguridad. Por
favor, tenga a Ia mano este manual de instrucciones en caso de que
surja alguna duda.
2.
Su salud puede verse afectada par un entrenamiento incorrecto o
excesivo. Consulte a su medico antes de iniciar un programa de
ejercicios. Él podra definir el esfuerzo maximo (pulso, energía,
duración, etc.) con el que debera entrenar y puede darle informacion
precisa y detallada.
3.
Tenga cuidado al levantar o mover el gimnasio para evitar lastimarse
Ia espalda.
4.
Si se siente mareado, con nausea u otros síntomas anormales, por
favor detenga Ia actividad y consulte de inmediato a su medico.
5.
Personas con enfermedades cardiacas o a quienes el medico les
haya prohibido hacer actividad física, no deben usar esta unidad hasta
obtener Ia autorización requerida.
6.
Personas con lesiones o que se esten recuperando de alguna
cirugía no deben usar el Master Gym® a menos que el medico de su
autorización.
7. Este aparato no está diseñado para propósitos terapéuticos.
8. Ensamble su producto tal como se indica en el manual.
9.
Revise el correcto ajuste de tornillos, tuercas y conexiones antes de
usar el aparato por primera vez.
10.
Vista ropa y zapatos de entrenamiento adecuados cuando use
este aparato.
11.
Siempre recuerde mantenerse hidratado mientras el ejercicio se
lleve a cabo.
12.
Coloque el gimnasio en una superficie nivelada, estable y seca. Se
recomienda utilizar sabre un tapete para mayor estabilidad.
13.
Mantenga el producto alejado de humedad y agua.
14. Antes de comenzar el entrenamiento, remueva todos los objetos
en un radio de 2 metros del artefacto.
15. No use agentes limpiadores agresivos en el aparato.
16. Sólo use las herramientas recomendadas para armar las partes de
Ia unidad.
17. Limpie las gotas de sudor del Master Gym® inmediatamente
después de terminar su ejercicio.
18. Sólo realice entrenamiento en el aparato cuando esté funcionando
correctamente.
19. En caso de requerir alguna reparación acuda con su distribuidor
autorizado.
20. Esta unidad sólo puede ser utilizada por una persona a la vez.
21. No es recomendable que este aparato sea utilizado por niños.
22. Este producto esta diseñado sólo para uso domestico.
23. El peso maximo del usuario que utilice Master Gym® debe ser
120 kilogramos.
24. Siempre utilice Master Gym® sentado en una silla cómoda
y estable. La imagen del producto puede variar.

TORNILLERÍA INCLUIDA

INTRODUCCIÓN
Master Gym® es un sistema de ejercicio diseñado para las personas
en edad avanzada.
Proporciona un suave movimiento por medio de sus pedales
antideslizantes, manubrio y Iigas de tensión.
Sus patas anti-derrapantes lo convierten en un aparato seguro y
estable. Cuenta con 5 funciones para ejercitar, fortalecer, tonificar
músculos y articulaciones, así como tambien, a mejorar Ia
coordinación de las extremidades:
1. El movimiento del manubrio le ayuda a dar movilidad a hombros,
codos y muñecas.
2. El ejercicio de isotensión con las Iigas, sirve para tonificar y fortificar
brazos, pecho y espalda.
3. El movimiento de deslizamiento de pedales, activa articulaciones y
músculos de las piernas.
4. El levantarniento de los pedales hacia los Iados ayuda a ejercitar
cuádriceps y glúteos.
5. El uso del manubrio y pedales al mismo tiempo, desarrollan una
mejor coordinación de las extremidades.
Estos cinco ejercicios ayudan a las personas en edad avanzada a
recobrar Ia fuerza de sus músculos y a ponerse en forma, siendo este
aparato anti-impacto amigable con las articulaciones, sin correr riesgo
de lastimarse.
Master Gyrn® es tan versátil, que puede utilizarse todo en conjunto,
pero también se puede desmontar Ia parte superior para únicamente
ejercitar las piernas. Todo esto desde una cómoda posición en una
silla.

14 Steel bar
DIAGRAMA DE PARTES PRE-ENSAMBLADAS
AI abrir Ia caja de Master Gym® usted encontrará su producto
pre-ensamblado como se muestra en Ia siguiente imagen.
1Bastidor
2Tubo de soporte posterior
2A Tubo con anillo para Iigas de tensión
3Barras de base ya unidas a los tubos de soporte (2 y 2A)
4Tubos de balanceo
5Contrapedales
6Tubo portamanubrio y porta barra de rodillos
7Tuerca de mariposa
8Barra de rodillos y Iigas de tensión
9Tubo de ajuste de altura del manubrio
10 Perilla del bastidor
11 Perilla del manubrio
12 Gomas antiderrapantes ensambladas en las barras de bases
13 Pedales antideslizantes
14 Manubrio
15 Barra de acero
NOTA: Las imágenes y esquemas de este manual son sólo de
referencia. La vista y parámetros técnicos pueden cambiar sin
previa aviso.
Llave Española / Llave AIIen

INSTRUCCIONES DE ARMADO
Parte inferior
1. Retire los tornillos de los tubos de soporte (2 y 2A) y ensamble la
barra de acero. Fije con los mismos tornillos que retiró.
2. lntroduzca el bastidor (1) al extremo del soporte posterior (2). Repita
el paso anterior con el lado opuesto y ajuste con los tornillos (12) y
rondanas (18) utilizando Ia llave española y allen.
Nota: Asegurese que el anillo para las Iigas de tensión quede
hacia afuera.
3. lntroduzca los tubos de balanceo (4) en el bastidor (1) (un lado a Ia
vez) y fijelos utilizando los tornillos (13) y rondanas (18) (2 por tornillo),
sujetando con Ia llave Allen y apretando con Ia llave española. Repita
el paso con el lado opuesto.
4. Coloque el pedal antideslizante (13) sobre el contra pedal (5) e
introduzca los tornillos hexagonales (16) de arriba hacia abajo
fijándolos con las tuercas (19) y rondanas (18) usando Ia llave
española. Repita el paso anterior con el otro pedal antideslizante.

INSTRUCCIONES DE ARMADO
Parte superior
5. Una vez que tenga ensamblada Ia parte inferior de su Master Gym®
le pedimos unir el tubo porta-manubrios y porta barra rodillos (6)
utilizando Ia perilla del bastidor (10) y Ia rondana (22), fije bien con Ia
tuerca de mariposa (7).
6. Coloque Ia barra de rodillos y Iigas de tensión (8) sabre el tubo porta
manubrios y porta barra de rodillos (6), fijelos con los tornillos (15) y
tuercas ( 44), utilice Ia llave española.
Nota: Cuide que los rodillos
donde pasan las Iigas queden
hacia el lado interno de Ia curva
del tubo portabarra de rodillos
7. lnserte el tubo de ajuste de altura del manubrio (9), al tubo
porta manubrio y porta barra de rodillos (6) y sujete con Ia
perilla, seleccionando Ia altura más cómoda.
8. Finalmente, enganche las Iigas de tensión al anillo del tubo (2A).
9. En caso de querer retirar Ia parte superior, invierta el proceso.

CALENTAMIENTO
El calentamiento es una parte importante de su entrenamiento y debe
de ser el inicio de cada sesión. Prepare su cuerpo para un ejercicio
más vigoroso al calentar y estirar los músculos. AI final de su actividad,
repita estos ejercicios para reducir los problemas de dolores
musculares. Por lo que le sugerimos los siguientes:
• INCLINACIONES DE CABEZA
Incline Ia cabeza hacia Ia derecha durante cinco
segundos, sienta el estiramiento del lado izquierdo
del cuello. A continuación, incline Ia cabeza hacia Ia
izquierda por cinco segundos y sienta el estiramiento
muscular del lado derecho del cuello. Incline hacia atrás
durante cinco segundos y por último, deje caer su
cabeza sabre el pecho durante tres segundos.
Repita 10 veces.
• LEVANTAMIENTO DE HOMBROS
Levante el hombro izquierdo en dirección al oído por
cinco segundos y posteriormente, a medida que
baje el hombro izquierdo, levante su hombro derecho
de Ia misma forma por otros cinco segundos.
Repita 10 veces.
• MOVIMIENTO DE MUNECAS
Con las manos abiertas y los dedos extendidos,
realice movimientos con Ia muneca hacia los Iados,
como se ilustra en Ia imagen.
Repita de 15 a 20 veces.
•ESTIRAMIENTO DE PIERNAS
Para el siguiente ejercicio usted deberá de sentarse
en una silla o banco firme. Eleve alternadamente
las piernas, extendiéndolas hacia el frente sin
despegar el muslo de Ia silla. Descienda Ia pierna
que estaba extendida y flexiónela todo lo que sea
posible. Repita de 10 a 15 veces.
• ESTIRAMIENTO DE PIES Y TOBILLOS
Mueva el pie derecho hacia arriba y hacia
abajo, estirando lo más que se pueda sin
provocar dolor (de 10 a 15 repeticiones)
y posteriormente continúe con el pie
izquierdo.
Usted deberá de sentarse en un lugar que le
permita mantener sus pies elevados del
suelo o recostarse. Mueva sus pies hacia
adentro y hacia afuera del centro de su
cuerpo, como se muestra en la imagen
(de 10 a 15 repeticiones). Repita la misma serie
ahora con el pie izquierdo.
• ESTIRAMIENTO DE PANTORRILLA
Manténgase de pie frente a una pared, a una distancia
que le permita colocar ambas manos sobre ésta, a la altura
del pecho, con los brazos estirados haciendo contacto con
las palmas. Inclínese ligeramente hacia el frente, doblando
las rodillas. Coloque un pie detrás del otro y mantenga
los talones firmemente plantados en el suelo.
Ahora comience a inclinarse lentamente hacia la pared hasta
que sienta el estiramiento en los músculos de las pantorrillas.
Mantenga el estiramiento de 15 a 30 segundos y repítalo tres
veces más con cada pantorrilla.
Table of contents
Languages:
Popular Fitness Equipment manuals by other brands

SportsArt Fitness
SportsArt Fitness C572R owner's manual

Drive
Drive AGF-6X instruction manual

Crivit
Crivit HG02360A Operation and safety notes

Technogym
Technogym SYNCHRO Excite + Service and maintenance manual

Body Solid
Body Solid EXM-1500.4 owner's manual

Star track fitness
Star track fitness IMPACT owner's manual

NordicTrack
NordicTrack MTN 740 NTCCM58020 user manual

Janssen Fritsen
Janssen Fritsen Madrid Assembly and user's manual

Teeter
Teeter FitSpine X Series Assembly instructions

FITFIU FITNESS
FITFIU FITNESS BP-20 instruction manual

Shogun
Shogun NORD-EX instruction manual

Hoist Fitness
Hoist Fitness PTS-LAT owner's manual