EKOBUY ekb10150 User manual

USB 3.0 to 2.5” SATA HDD/SSD Adapter
with UASP Support
ekb10150
*actual product may vary from photos
N T C MPATIBLE with 3.5” Desktop Hard Drive
Instruction Manual
All manuals and user guides at all-guides.com

all-guides.com

Contents
Product verview 1
Introduction 2
Packaging Contents 2
System Requirements 2
Installation 3
Hard are Installation 3
peration 4
Connecting the HDD/SSD 4
Po ering the Drive Enclosure 4
Disconnecting the HDD/SSD 4
Initializing the HDD/SSD 5-6-7-8
Specications 9
Technical Support 10
Warranty Information 10
0
Instruction Manual
All manuals and user guides at all-guides.com

Product verview
1
Instruction Manual
All manuals and user guides at all-guides.com

Introduction
Contents
1x USB 3.0 to Sata 2.5” HDD/SSD Adapter
1x Introduction Manual
System Requirements
•Computer System ith Available USB 3.0(5 Gbit/s) port or USB
2.0 Port (480Mbps)
•2.5” SATA hard drive or solid state drive
•Microsoft® Windo s® 2000/XP/Server 2003/Vista/Server 2008
R2/7/8/10 (32/64-bit), or Apple® Mac® OS 9.x/10, or Linux®
2
Instruction Manual
All manuals and user guides at all-guides.com

Installation
Hardware Installation
WARNING! Hard drives and storage enclosures require careful handling,
especially hen being transported. If you are not careful ith your hard
disk, lost data may result. Al ays handle your hard drive and storage
device ith caution. Be sure that you are properly grounded by earing
an anti-static strap hen handling computer components or discharge
yourself of any static electricity build-up by touching a large grounded
metal surface (such as the computer case) for several seconds.
Note: This adapter cable ill only ork ith 2.5” hard drives, and solid
state drives. 3.5” Hard drives and optical drives require a high po er
load than cannot be provided via the USB bus.
Connect the SATA Connector to the SATA reciprocal on your 2.5” SATA
hard drive/ solid state drive.
Connect the USB connector from the cable to a USB port on the host
computer system (optimal perfomance ith USB 3.0, back ard
compatibile ith USB 2.0/1.1).
3
Instruction Manual
All manuals and user guides at all-guides.com

peration
Connecting the Hard Drive / SSD
Once the cable has been attached to a computer, and the necessary
soft are ill automatically install, and the drive ill be accessible as
though it ere installed ithin the system.
Prior to using the drive, it ill need to be formatted according to your
operating system requirements. To format your ne ly attached hard
drive, or create partitions, please consult the documentation that
accompanied your operating system at the time of purchase.
Powering the Drive
The hard drive adapter requires no external po er supply, as it is
capable of receiving enough po er from the USB Bus to hich it is
connected
Disconnecting the Hard Drive
Windows
Select the “Safely remove Hard are and Eject Media” icon, located in the
task bar.
Select the USB Storage Device from the list that appears.
Wait for the message indicating that it is no safe to remove the device.
Note: Removing the connected drive prior to receiving notication
that it is safe to do so, could result in losing or corrupting data
stored on the drive. Once the Safe to Remove Hard are message
appears, please disconnect the enclosure from the computer by
removing the USB connection.
4
Instruction Manual
All manuals and user guides at all-guides.com

all-guides.com

Mac S X
To safely disconnect the attached drive from the host computer, close
any indo s listing the contents of the removable drive. Once all
indo s are closed, click on the USB storage icon on the desktop, and
drag it to the Trash Can icon on the desktop. Allo 5 seconds before
physically removing the enclosure/drive from the computer.
5
Instruction Manual
All manuals and user guides at all-guides.com
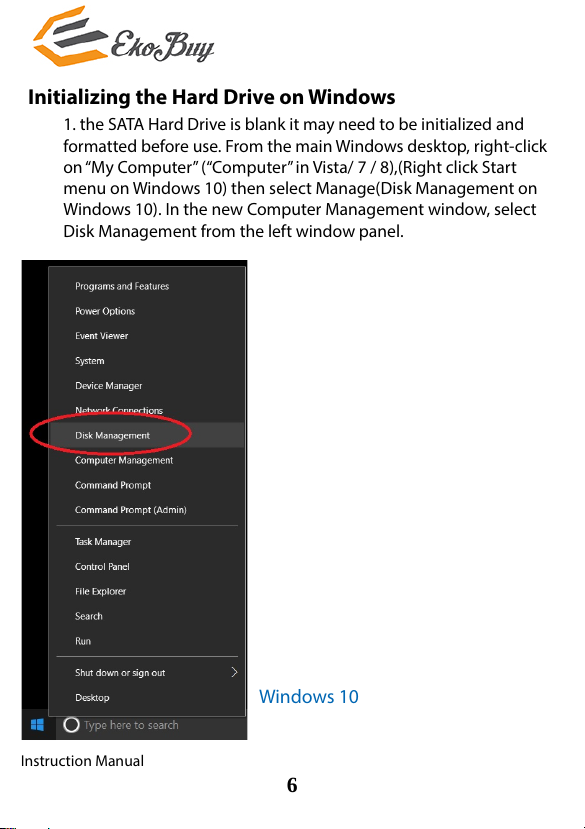
Initializing the Hard Drive on Windows
1. the SATA Hard Drive is blank it may need to be initialized and
formatted before use. From the main Windo s desktop, right-click
on “My Computer” (“Computer” in Vista/ 7 / 8),(Right click Start
menu on Windo s 10) then select Manage(Disk Management on
Windo s 10). In the ne Computer Management indo , select
Disk Management from the left indo panel.
6
Windo s 10
Instruction Manual
All manuals and user guides at all-guides.com

2.A dialog indo should automatically appear, asking you to initialize
the drive. Depending on the version of Windo s, it ill give you
the option of either creating an “MBR” or “GPT” disk. GPT (GUID
partition) is not compatible ith some older operating systems,
hile MBR is supported by ne er and older operating systems.
3.Once initialized, locate the Disk that says it is “Unallocated” (check the
listed hard drive capacity to conrm it’s the correct hard drive) and
then right-click in the section that says “Unallocated” and select
“Ne Partition”.
7
Windo s 7
Instruction Manual
All manuals and user guides at all-guides.com
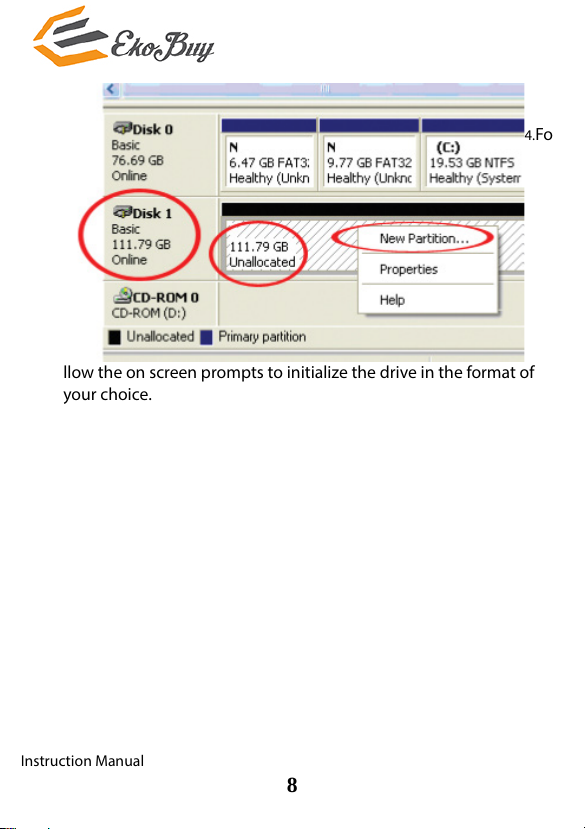
4.Fo
llo the on screen prompts to initialize the drive in the format of
your choice.
8
Instruction Manual
All manuals and user guides at all-guides.com

Specifications
Host Interface USB 3.0 - Blue(Data/Po er)
USB 2.0 – Black(additional Po er)
External
Connectors
1x 15 Pin SATA Po er male
1x 7Pin SATA Data male
1x USB 3.0 type A male Blue(Data and
Po er)
1x USB type A male Black (Additional
Po er)
Max. Data
Transfer Rate USB 3.0 5Gbit/s
Compatible
peration
Systems
Windo s 2000/XP/Server 2003/Vista/
Server 2008/7/8/10, Mac OS 9/10, Linux
9
Instruction Manual
All manuals and user guides at all-guides.com

all-guides.com

Technical Support
EkoBuy’s lifetime technical support is an integral part of our
commitment to provide industry-leading solutions. If you ever need
help ith your product, visit www.ekobuy.com/support and access
our comprehensive selection of online tools, documentation, and
do nloads.
for latest drivers/soft are, please visit www.ekobuy.com/downloads
Warranty Information
This product is backed by a one year arranty.
In addition, EkoBuy arrants its products against defects in materials
and orkmanship for the periods noted, follo ing the initial date of
purchase. During this period, the products may be returned for repair,
or replacement ith equivalent products at our discretion. The arranty
covers parts and labor costs only. EkoBuy does not arrant its products
from defects or damages arising from misuse, abuse, alteration, or
normal ear and tear.
Limitation of Liability
In no event shall the liability of EkoBuy (or their ocers, directors,
employees or agents) for any damages ( hether direct or indirect,
special, punitive, incidental, consequential, or other ise), loss of prots,
loss of business, or any pecuniary loss, arising out of or related to the
use of the product exceed the actual price paid for the product. Some
states do not allo the exclusion or limitation of incidental or
consequential damages. If such la s apply,
EkoBuy, the Ekobuy Logo and other Ekobuy marks are o ned by
AMC Market Ltd (U.K.) and registered
All other trademarks and property of their respective o ners.
10
Instruction Manual
All manuals and user guides at all-guides.com
Other manuals for ekb10150
1
Other EKOBUY Adapter manuals

Popular Adapter manuals by other brands


FSA
FSA Di2 Technical bulletin

NETGEAR
NETGEAR WG121 - 54 Mbps Wireless USB 2.0 Adapter Specifications

Belkin
Belkin 802.11g Wireless Ethernet Bridge user manual

D-Link
D-Link DHP-W307AV user manual

ZyXEL Communications
ZyXEL Communications PLA-400 release note

Wistron NeWeb
Wistron NeWeb DNUR-W7601 user manual


