ekz 100 User manual

EKZ SMART HOME
User Manual
EKZ Smart Home Hub
EKZ 100

2
Table of Contents
Important Safety Information.................................................................... 4
Important Data Privacy Information .......................................................... 5
1. The EKZ SMART HOME ............................................................ 6
2. Setup ......................................................................................... 9
2.1. Install the Hub............................................................................ 9
2.2. Connect the Hub to the App .................................................... 10
2.3. Home Setup: Basic Configuration ............................................ 11
3. Add and control Smart Home Devices ..................................... 13
3.1. Manage Devices by App .......................................................... 13
3.2. Manage Devices by Hub Button .............................................. 16
4. Basic App Functions ................................................................ 17
4.1. Control Devices Individually ..................................................... 17
4.2. Control Device Groups with “Smarts” ..................................... 18
4.3. Create Rules ............................................................................ 20
4.4. Dashboard: Access Favorites and More ................................... 22
4.5. Home Setup Configuration....................................................... 26
4.6. Manage User Account and Hub Connectivity Information ........ 26
5. Voice Control ........................................................................... 28
6. Troubleshooting and Resetting ................................................ 29
6.1. Hub Troubleshooting................................................................ 29
6.2. Reset Compatible Devices to Factory Settings ........................ 30
7. Overview of LED Colors and Hub Buttons ............................... 38
8. Hub Technical Data .................................................................. 40
9. Conformity Declarations........................................................... 41
10. Contact and Support ................................................................ 42

3
EKZ SMART HOME
Time to rethink how we live
Dear Customer,
Do you enjoy modern living? We do, too!
With EKZ Smart Home, your future home will control itself –
with you still being in charge at any time and from anywhere.
This document contains practical information on installation,
operation and troubleshooting for your EKZ Smart Home.
Do you have any more questions?
You can contact us any time at
058 359 56 56

4
Important Safety Information
Before you use the EKZ Smart Home Hub, please read the
following safety information:
1. The installation should be performed by a competent person.
Please do not let your children play with the Hub or Smart
Home devices.
2. Only use the Hub with the original mains adapter supplied. The
device may not be used if the mains adapter or cable are
damaged. The mains adapter of the Hub may only be connected
to a mains supply of ~100–240 V, 50/60 Hz.
3. Only use the Hub in dry interior rooms (not in the bathroom,
kitchen or garden, etc.).
4. Protect the Hub from direct sunlight.
5. Make sure to place Hub at least 10 cm away from furniture,
curtains and walls. This ensures sufficient air circulation. Slight
warming of the Hub is normal during operation.
6. Do not use the Hub in close proximity to devices that generate
a strong magnetic field (such as speakers, motors or
transformers).
7. Never touch the Hub with wet hands.
8. Do not open the Hub or mains adapter. There is a risk of electric
shock.
9. Only use a slightly damp, non-abrasive cloth for cleaning.
Always unplug the Hub from the power supply before cleaning.
Please do not use any cleaning agents.
Please also take note of the service limitations for security-relevant
applications described in Section 9 of our terms of service.

5
Important Data Privacy Information
Data privacy is a matter of trust and your trust is important to us.
We respect your personality and privacy, and we wish to ensure
the protection and legally compliant processing of your personal
data.
We collect personal data and data from your Smart Home to offer
you optimal Smart Home services. Personal data refers to all
information related to an identified or identifiable person (such as
your name and email address). We also collect Smart Home data
generated by Smart Home devices (such as sensor readings,
network status data and your Smart Home names).
Please note that Smart Home data –such as your chosen names
for your rooms and your rules –may also be sent to the EKZ
customer service or third parties under certain circumstances. This
is the case, for example, if our customer service provides support
or if you decide to link your Smart Home with an external voice
service (such as Google Assistant).
Our complete Data Privacy Statement is available here.

6
1. The EKZ SMART HOME
We believe that a modern home should be smart and help
simplify your life. The EKZ Smart Home therefore offers a
complete solution for your intelligent home –making life at home
much easier, more convenient, secure, and fun.
With the EKZ Smart Home Hub, you have received the central
piece of your EKZ Smart Home system. In addition, you only need
–an Internet connection;
–any number of compatible Smart Home devices (such as
motion sensors, smart lighting, flush switches etc.) depending
on the desired application;
–a smartphone or tablet with the EKZ Smart Home App for
controlling your Smart Home system;
for transforming your home into a Smart Home.
The most important elements of the Hub are shown below:
Front side
The large, round Hub button can be found on the front of the
Hub. It is encircled by an LED ring. The LED light indicates the
operating status of the Hub and shines green in normal operation
mode.

8
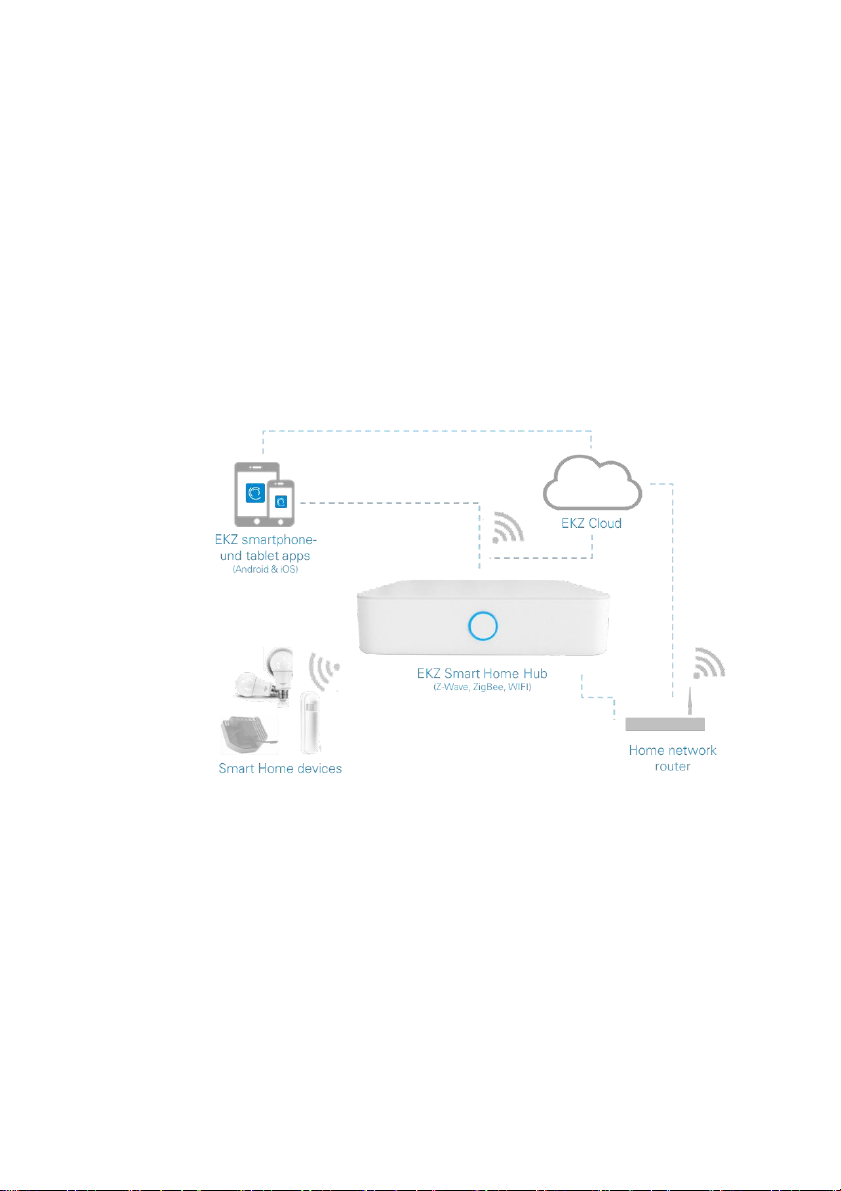
The Smart Home System
The complete system comprises the EKZ Smart Home Hub, your
smartphone or tablet with the EKZ Smart Home App, the EKZ
Cloud, your home network router and your Smart Home devices.
Thanks to the EKZ Cloud, you can also control your Smart Home
on the go using the app.
The EKZ Smart Home Hub connects all smart devices in your
home. It supports several wireless standards (Z-Wave, ZigBee
and WIFI). This means that you can connect devices from various
manufacturers to your smart home.
9
2. Setup
2.1. Install the Hub
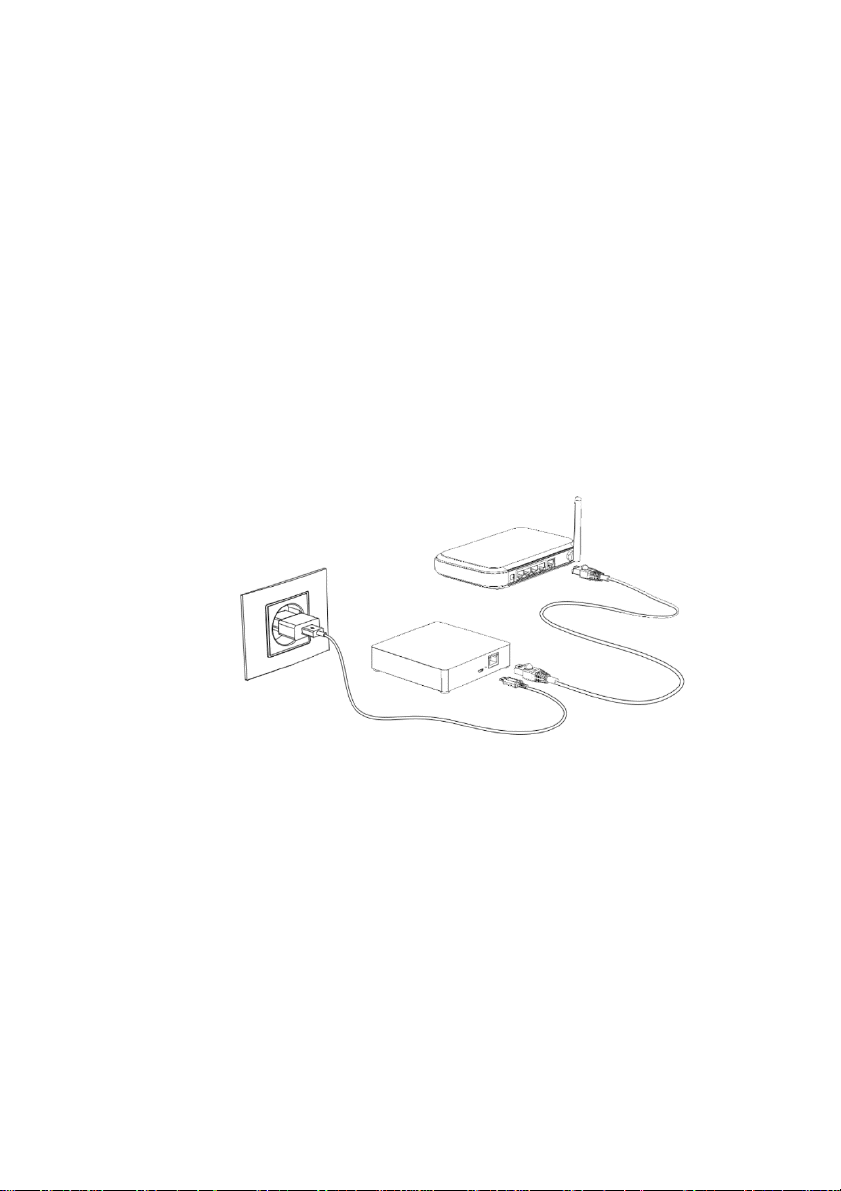
You can set up your Hub in seven easy steps:
1. Connect the Hub to the power socket using the micro USB
cable.
2. Option 1: Connect by network cable
Connect the Hub to your home network router using the network
cable provided.
Option 2: Connect by WIFI
Select the WIFI of the Hub on your smartphone, tablet or PC and
connect with it. The name of the Hub WIFI (its SSID) starts with
“EKZ...”.
Launch a browser and enter the IP address 192.168.1.1. Click the
“wifi config” button on the left side of the browser window. Now
enter the connection data (SSID/name and password) for your
home WIFI to connect the Hub with your WIFI.
If you do not know the name and password of your home WIFI,
you can usually look it up on the router. It is usually printed on the

10
router label. It consists of the name (SSID) and a password (PW).
Please type this data in the corresponding fields on the “wifi
config” page. If you have ever changed your WIFI’s name and/or
password yourself, you have to enter your own chosen data.
Please note that for security reasons we strongly recommend you
always change your default router password.
3. Once the Internet connection has been successfully
established, the Hub LED will blink green after a short moment.
If this does not happen, please repeat the process.
2.2. Connect the Hub to the App
4. Install the EKZ Smart Home App on your smartphone or tablet.
5. Start the app and log in with your myEKZ account. You have
created this account in the smart home onlineshop or in the
myEKZ portal for energy customers. If you do not have a myEKZ
login yet, please register and create a new account. Confirm the
activation link sent to your email address; then confirm a second
time in the browser window that opened up. Then return to the
app and log in.
6. Tap the “+ Add new hub”button in the slider menu and enter
your Hub’s data.
For SID and SN numbers, you can scan the QR code from the
quickstart guide. Alternatively, you can enter them manually. They
are printed on the label on the bottom of the hub.

11
For the license key field, please enter 20 times the number 1 as
shown in the screenshot below.
Adding a new hub: Enter 20 times 1 for license key and the rest are your individual
hub’s data
Give your Hub a name. Optionally, add your address so the hub
can access your local weather. The hub LED will now shine green
continually once it has been successfully added to your account.
2.3. Home Setup: Basic Configuration
Once you have added the Hub to your user account, you can set
up your home. Go to the “Home Setup” tab and click “Manage
layout”. You can either use one of the suggested layouts. Or you
can create your apartment’s custom layout. Just create all the

12
floors and rooms where you might want to use your smart home
devices.
If you would like to add new rooms later, you can always do so
via the “Home Setup” tab and “Manage layout”.
Note: If you delete a floor, all the rooms on this floor will also be
deleted. Devices located in these rooms will then be shown as
“unsorted”.

13
3. Add and control Smart Home
Devices
You can now connect devices from various manufacturers to your
Hub. The EKZ Smart Home currently supports a range of Smart
Home devices with the wireless standards Z-Wave, ZigBee and
WIFI. The up-to-date list of preferentially supported devices can
be found in Chapter 6.2. We continually expand this list.
These preferred devices are also listed first under “EKZ” in the
app’s device provisioning process. The Hub recognizes
considerably more devices but due to the frequent hardware and
software updates of Smart Home products, we only guarantee
full functionality and hence an optimal Smart Home experience
for our preferred devices.
You can add devices in two different ways:
1. By app (recommended)
2. Using the Hub button on the front of the Hub.
3.1. Manage Devices by App
3.1.1. Add devices by app
Place the new Smart Home device close to your Hub.
Go to the “Home Setup” tab in the app and select “Manage
devices”.
On the next screen, tap the “+ Add new device”button on the
top of the screen.
Next, choose the type of device you want to add.
Next, choose the device model from the list you want to add. The
preferred EKZ devices are listed on top for your convenience.

14
The Hub network will now open and wait for the selected new
device. The Hub LED will flash blue slowly (around once per
second). For security reasons, the Hub network opens only for
three minutes. The app will show the remaining time as a
countdown.
Follow the instructions below the countdown to set the device to
connection mode. Most devices require a power supply and must
be activated with a button found on the device.
The app will confirm the successful pairing and the Hub LED will
flash pink four times. You can now assign the device to a room
and give it a new name. From now on, you can control the new
device and use it in rules or Smarts.
All successfully added devices show up in the list of devices in
the “Devices”tab as well as in the “Home Setup” tab in
“Manage Devices”.
Information
–Please note that for security reasons Z-Wave and ZigBee
devices can only belong to a single Hub network. If you would
like to move a device from one Hub to another, you first need
to remove the device from the old Hub network. Like the
configuration process, the removal process may vary slightly
depending on the device and manufacturer.
–If you have trouble adding a device, it often helps to perform a
factory reset before trying it again. We have therefore
compiled the factory reset information for all preferred
devices of the EKZ Smart Home at the end of this document
in Chapter 6.2.

15
3.1.2. Remove devices by app
Place the Smart Home device close to the Hub.
Go to the “Home Setup” tab in the app and select “Manage
devices”. You will see the list of devices.
Click on the three-dots menu of the device you would like to
remove, and select “Exclude device”.
Depending on the device type, the app will lead you through the
process:
1. For ZigBee devices: Please confirm that you really want to
delete the device.
2. For Z-Wave devices: The Hub enters removal mode. Please
follow the instructions of the device manufacturer in order to
confirm removal of the device.
3.1.3. Change device name and location
Go to the “Home Setup” tab in the app and select “Manage
devices”. You will see the list of devices.
Click on the three-dots menu of the device you would like to edit
and select “Edit”.
You can now change the device name and assign it to another
room. Confirm the change by pressing “Done”.

16
3.2. Manage Devices by Hub Button
You can also add new devices using the Hub button on the front
of the Hub. Z-Wave devices can also be removed in this way.
3.2.1. Add devices by Hub button
Place the desired Smart Home device close to the Hub.
Briefly press the Hub button twice on the front of the Hub. The
Hub LED will now flash blue slowly (around once per second).
Now set the device to connection mode. Follow the
manufacturer’s instructions to do so. The devices usually require
a power supply and need to be activated with a button on the
device itself.
Successfully added devices show up in the list of devices. The
Hub LED will flash pink four times as confirmation. Now assign
the device to a room and name it as you wish. You can now
control it and apply rules (switch automations).
3.2.2. Remove Z-Wave devices by Hub button
Briefly press the Hub button on the front of the Hub four times.
The Hub LED will now flash blue quickly (around five times per
second).
Now activate removal mode on the Z-Wave device according to
the manufacturer’s information.
The Hub will flash pink four times once the device has
successfully been removed from the Hub network.
17
4. Basic App Functions
The EKZ Smart Home App provides you with all the necessary
control functions for your Smart Home system. The app allows
you to:
1. Control devices individually
2. Control device groups with “Smarts”
3. Create rules (automations)
4. Control favorite devices, rules and Smarts and access
additional services on the Dashboard
5. Configure your home (“Home Setup”)
6. Review and change user account and Hub connection data
The tabs (tiles) at the lower section of the screen allow you to
switch easily between these basic functions.
4.1. Control Devices Individually
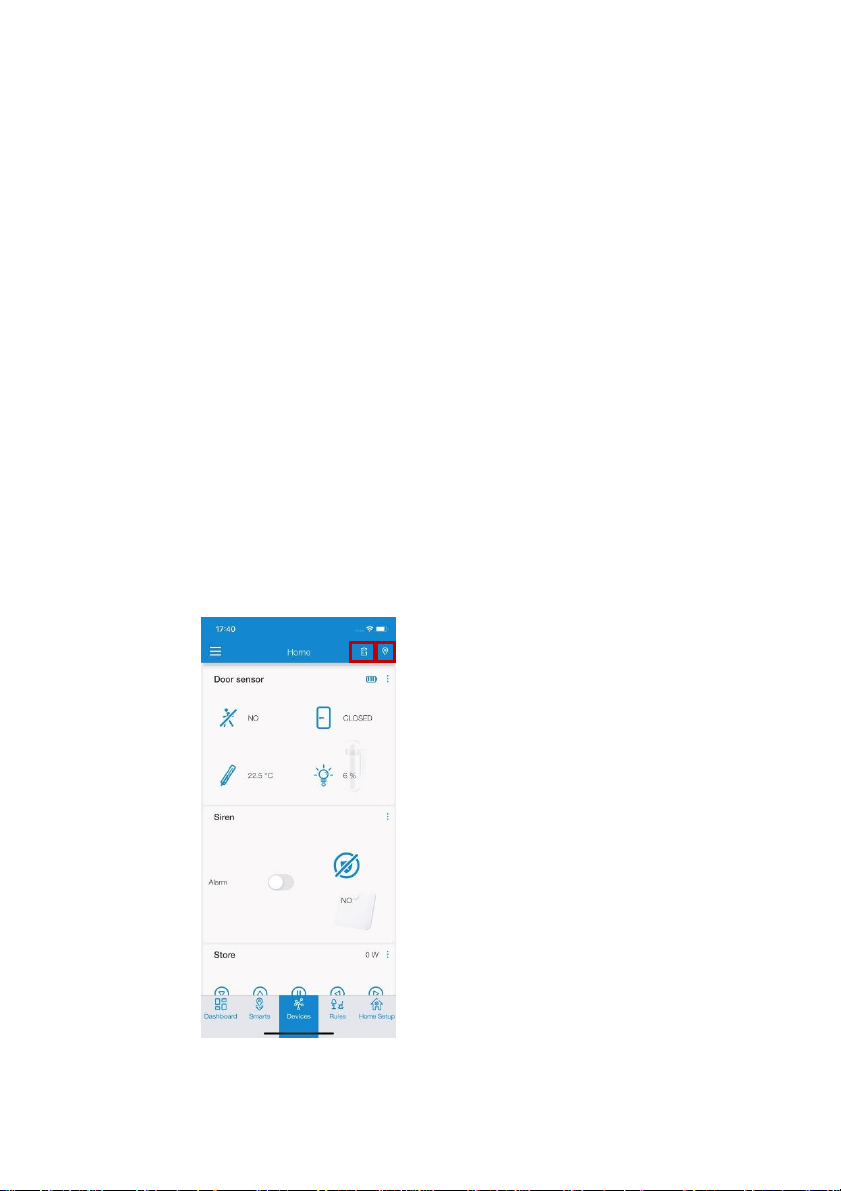
All Smart Home devices that you have added to your Hub are
listed in the “Devices” tab.
Device overview screen and filters
18
Each device has a tile displaying the device status (such as
“closed”for a door sensor). Depending on the device type, other
quick control functions may also be available (e.g., to switch lights
on/off or to change a thermostat’s temperature).
You can access a “Device details” sub menu via the three blue
dots menu in the top right corner on a device tile. Here you can
change the device name and the device location and call up
further technical details.
Use the two small icons on the top right corner (see red boxes in
the screenshot above) to filter the shown devices.
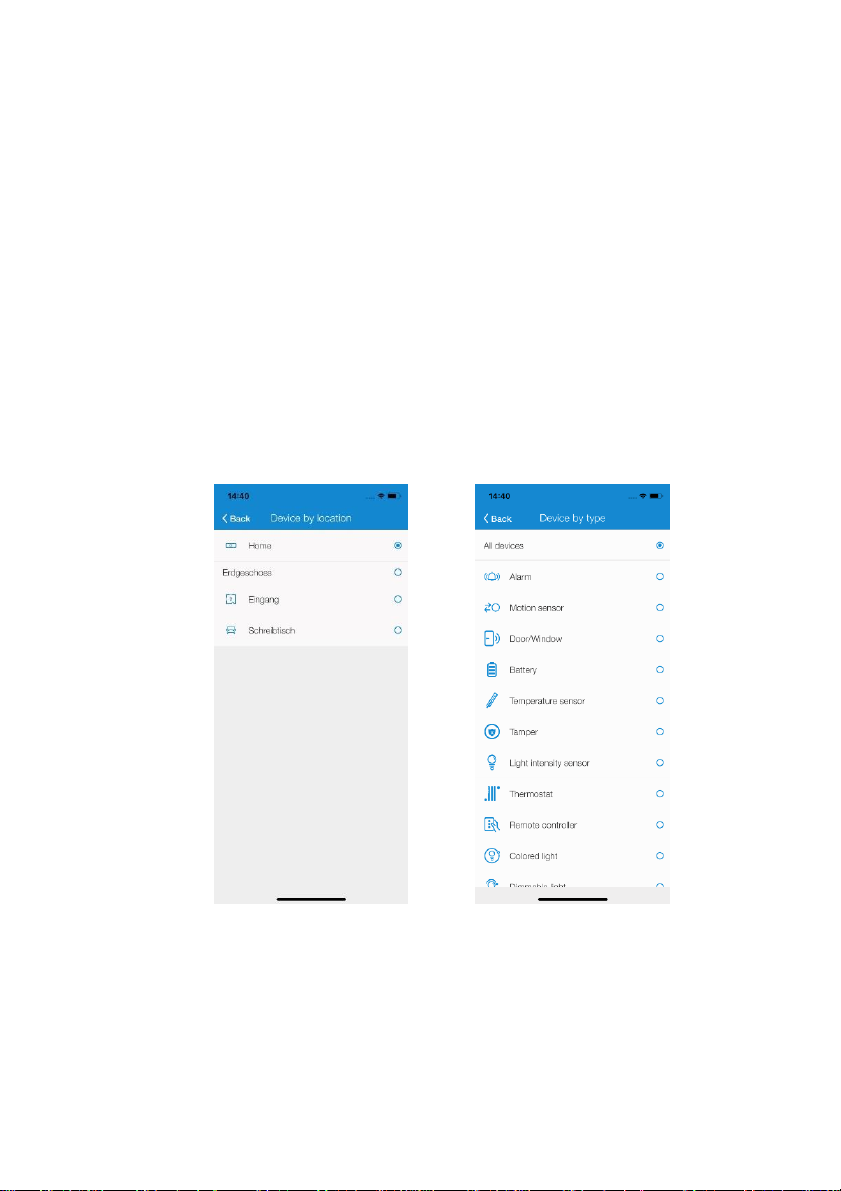
The two filters are:
1. By location
Location filter
2. By device type
Type filter
4.2. Control Device Groups with “Smarts”
The app’s second tab allows you to configure and control
“Smarts”. Smarts automatically group similar devices in one
location, offer useful quick control buttons, and present other,

19
more sophisticated functionalities that could not be easily
programmed with rules.
As soon as you have added devices to a location (like a room or a
zone), the app proposes one or more Smarts for this location.
1. New suggested Smarts
Smarts overview screen
2. Activated Smarts
Active Smarts
Smarts have multiple advantages:
Firstly, they give a useful overview of your home’s status. For
example, the “Sensory Smart” displays a location’s average
temperature if multiple temperature measurements are available.
Secondly, you can control important devices with just one button.
For example, the “Light Smart” allows you to turn on and off
multiple lamps at the same time. The “Heating Smart” changes
the temperature of multiple thermostats at once.
Thirdly, some Smarts offer further functionalities that can be
configured in the three-dots menu on the top right corner of a
Smart’s tile that could not easily be configured by rules.

20
In the three-dots menu, the first option is “Device overview”. It
shows all devices that currently belong to this Smart with their
current status.
The second option, “Configure Smart”, customizes the settings
of the respective Smart. For example, you can record up to four
custom light scenes in the “Light Smart”, which will be available
from the quick control buttons on the “Light Smart” tile. In the
“Absence Smart”, you can define your personal daily schedule
and set the activity levels that your devices shall play while the
“Absence Smart” is active.
The third option, “Configure devices”allows you to add and
deselect the devices controlled by the Smart.
Some Smarts can also be used in rules (see section 4.3).
To delete a Smart, go to the “Home Setup” tab and select
“Manage Smarts”. Here you can also always add back available
Smarts, even after dismissing them from the front tab.
You can look forward to more Smarts becoming available in the
future.
4.3. Create Rules
A rule is a logical sequence following the principle: “IF this
happens, THEN that should happen.” This enables you to
automate your smart home, so that your devices respond
automatically or at the touch of the button. A typical application is:
“IF the motion sensor detects a motion, THEN the lamp should
be switched on.” You can create rules for all your devices and
Smarts.
All your rules can be found in the “Rules” tab. Here you can
create new rules, activate or deactivate rules, run rules manually,
and make changes to existing rules.
Table of contents
Popular Switch manuals by other brands


Barksdale
Barksdale Dynalco SST7200 Installation and operation manual

Zte
Zte ZXR10 2900E Series Command reference

ADTRAN
ADTRAN NetVanta 1238 PoE Specification sheet

Monster Cable
Monster Cable 3-Way User guide & warranty

Cisco
Cisco CBS 220 Series manual

Lutron Electronics
Lutron Electronics RadioRA 2 Integration guide