ELAD EXTIO-232 User manual

www.eladit.com
ELAD EXTIO-232
CAT RS232 interface with band output for FDM-DUO
USER MANUAL
ELAD EXTIO-232 User Manual Rev 4 10/2019
© 2019 ELAD S.r.l. All rights reserved. No part of this document may be reproduced, published, used, disclosed or disseminated
in any form or by any means, electronic, photocopying or otherwise, without prior written permission of ELAD S.r.l.
2
Contents
Revision History ............................................................................................................................................ 2
1 Overview ............................................................................................................................................... 3
2 CAT Commands..................................................................................................................................... 3
3 Band Select Output ............................................................................................................................... 4
4 Firmware Upgrade ................................................................................................................................ 5
Revision History
Revision
Date
Description
Rev 4
10/2019
Update due to DUO-ART support.
Rev 3
10/2017
Layout adjustment.
Rev 2
09/2017
Updated “Firmware Upgrade” section.
Rev 1
07/2017
First version.

ELAD EXTIO-232 User Manual Rev 4 10/2019
© 2019 ELAD S.r.l. All rights reserved. No part of this document may be reproduced, published, used, disclosed or disseminated
in any form or by any means, electronic, photocopying or otherwise, without prior written permission of ELAD S.r.l.
3
1Overview
ELAD EXTIO-232 is a CAT RS232 interface with band output (VOut connector). It allows to connect
external equipment like loop antenna controllers and amplifiers to the FDM-DUO. This interface is to be
connect to the EXTIO DB9 connector of the FDM-DUO and allows external equipment to send CAT
commands to the FDM-DUO. The firmware is upgradable for future CAT commands implementations.
The picture here below shows how to connect the EXTIO-232 interface to the FDM-DUO.
Note that the EXTIO-232 can be used together with the FDM-DUO and the DUO-ART amplifier.
2CAT Commands
EXTIO-232 interface supports :
baud rate of 38400 bauds (other baud rates can be requested),
this list of “Read” commands type :
IF : read general information,
FA : read VFOA frequency,
FB : read VFOB frequency,
MD : read current mode,
DT : read FDM-DUO type (FDM-DUO or FDM-DUOr),
VS : read EXTIO-232 firmware version (“VSM;”).
EXTIO-232 interface does not support :
all the “Set” commands type.
For details information about the CAT commands, please refer to the FDM-DUO User Manual.
To FDM-DUO
Band output
To external equipment

ELAD EXTIO-232 User Manual Rev 4 10/2019
© 2019 ELAD S.r.l. All rights reserved. No part of this document may be reproduced, published, used, disclosed or disseminated
in any form or by any means, electronic, photocopying or otherwise, without prior written permission of ELAD S.r.l.
4
3Band Select Output
The EXTIO-232 interface selects automatically the correct voltage according to the current tuning
frequency. The voltages generated are listed below.
Band
Frequencies
Output Voltage
160m
1.800M - 2.000M
0.33
80m
3.500M - 3.800M
0.66
60m
5.250M - 5.450M
1.00
40m
7.000M - 7.200M
1.00
30m
10.100M - 10.150M
1.30
20m
14.000M - 14.350M
1.60
17m
18.068M - 18.168M
2.00
15m
21.000M - 21.450M
2.30
12m
24.890M - 24.990M
2.70
10m
28.000M - 29.700M
3.00
6m
50.000M - 54.000M
3.30
ELAD EXTIO-232 User Manual Rev 4 10/2019
© 2019 ELAD S.r.l. All rights reserved. No part of this document may be reproduced, published, used, disclosed or disseminated
in any form or by any means, electronic, photocopying or otherwise, without prior written permission of ELAD S.r.l.
5
4Firmware Upgrade
Download the latest version of the EXTIO-232 interface firmware.
Before starting the firmware upgrade, it is recommended to disable all antivirus programs in order to
avoid any inconvenience.
In order to upgrade the EXTIO-232 interface firmware you need to do some preliminary work :
install the Flash Magic software, this program is available here: http://www.flashmagictool.com/
open the EXTIO-232 interface following these steps :
turn the interface upside down,
remove the two screws located on the bottom panel,
turn the interface upside down again and remove the top panel.
Now, follow the steps below to enable the EXTIO-232 interface reprogramming mode :
make sure that the EXTIO-232 interface is connected to the FDM-DUO,
switch off the FDM-DUO, this causes the EXTIO-232 interface to power down,
connect the RS232 port of the EXTIO-232 interface to the RS232 port of your computer using an
RS232 female to female crossed cable,
alternatively you can use an RS232 to USB converter together with an RS232 female to female
crossed cable to connect the EXTIO-232 interface to an USB port of your computer,
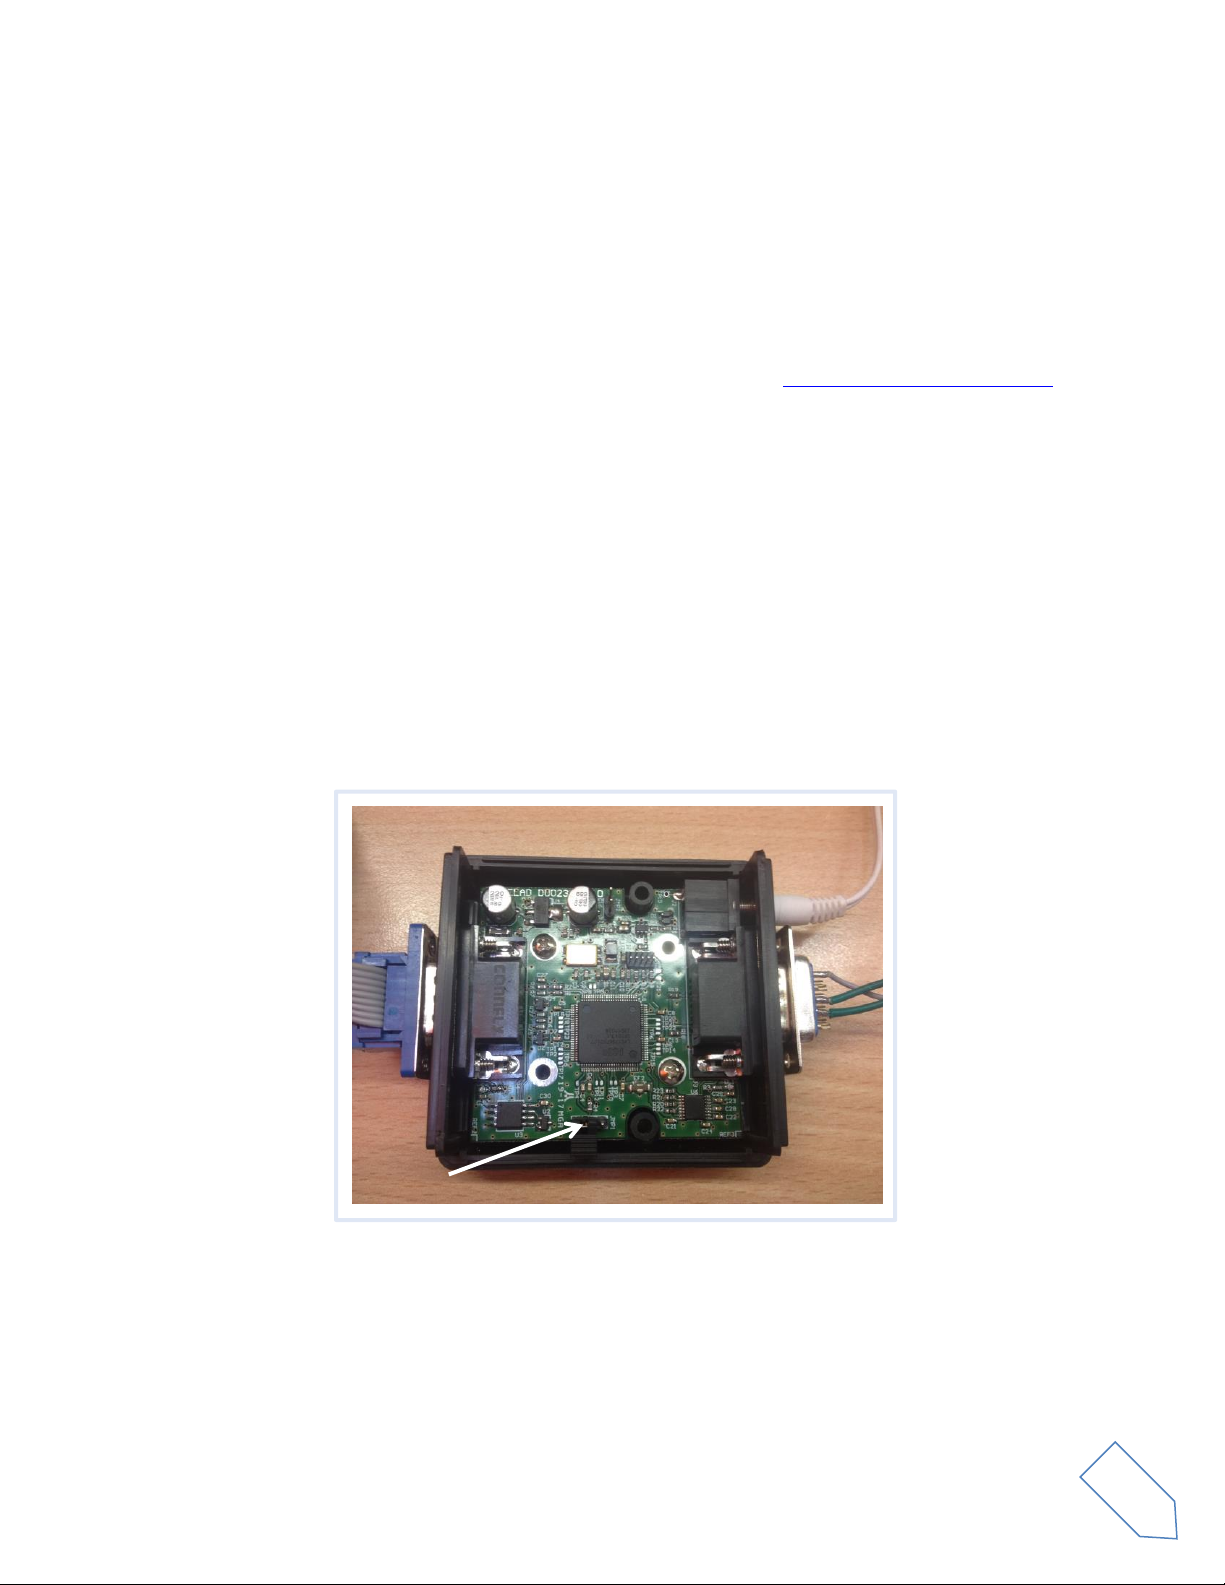
insert a jumper as shown in the picture bellow,
switch on the FDM-DUO.
Notice that after the firmware upgrade process, the jumper have to be removed.
To FDM-DUO
To external equipment
Jumper
ELAD EXTIO-232 User Manual Rev 4 10/2019
© 2019 ELAD S.r.l. All rights reserved. No part of this document may be reproduced, published, used, disclosed or disseminated
in any form or by any means, electronic, photocopying or otherwise, without prior written permission of ELAD S.r.l.
6
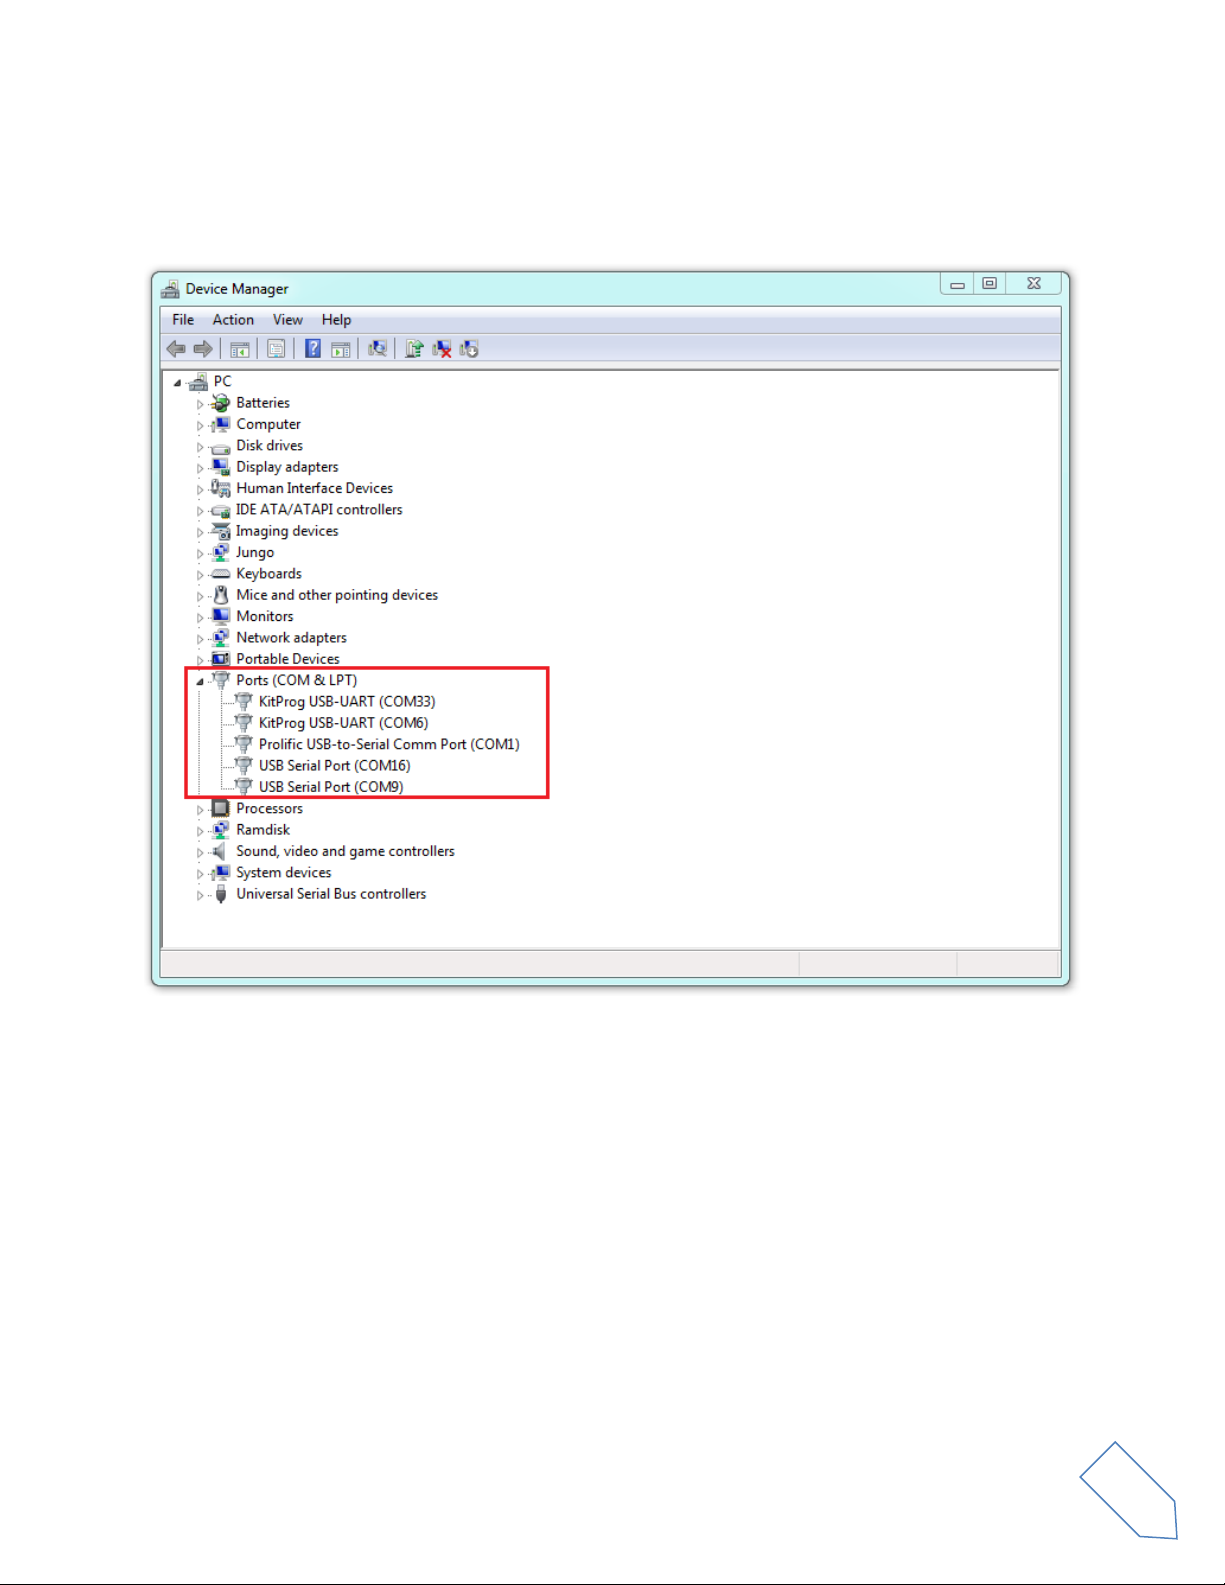
Then you need to identify the COM port number. Open the windows “Device Manager” and expand the
“Ports (COM &LPT)” node. The COM port is listed as :
“Communications Port” if using the computer RS232 port,
or “USB to serial Comm Port” if using an USB to RS232 converter.
In the picture above the COM port number is COM1.

ELAD EXTIO-232 User Manual Rev 4 10/2019
© 2019 ELAD S.r.l. All rights reserved. No part of this document may be reproduced, published, used, disclosed or disseminated
in any form or by any means, electronic, photocopying or otherwise, without prior written permission of ELAD S.r.l.
7
Now, run Flash Magic and set the following parameters.
In the “Step 1 – Communication” section:
Select LPC1766,
COM Port: the EXTIO-232 COM port,
Baud Rate: 230400,
Interface: None (ISP).
In the “Step 2 – Erase” section:
Check “Erase all Flash+Code Rd Prot”.
In the “Step 3 – Hex File” section:
Click on Browse and select the “.hex” file.
In the “Step 4 – Options” section:
Check “Verify after programming.
Check the communication with the EXTIO-232 interface clicking on “ISP”and then on “Read Device
Signature”. If the communication with the EXTIO-232 interface is working, a new window with some
device information is opened.
If the communication is working it is possible to proceed with the firmware programming. Click on
“close”on the “Device Signature” window.
ELAD EXTIO-232 User Manual Rev 4 10/2019
© 2019 ELAD S.r.l. All rights reserved. No part of this document may be reproduced, published, used, disclosed or disseminated
in any form or by any means, electronic, photocopying or otherwise, without prior written permission of ELAD S.r.l.
8
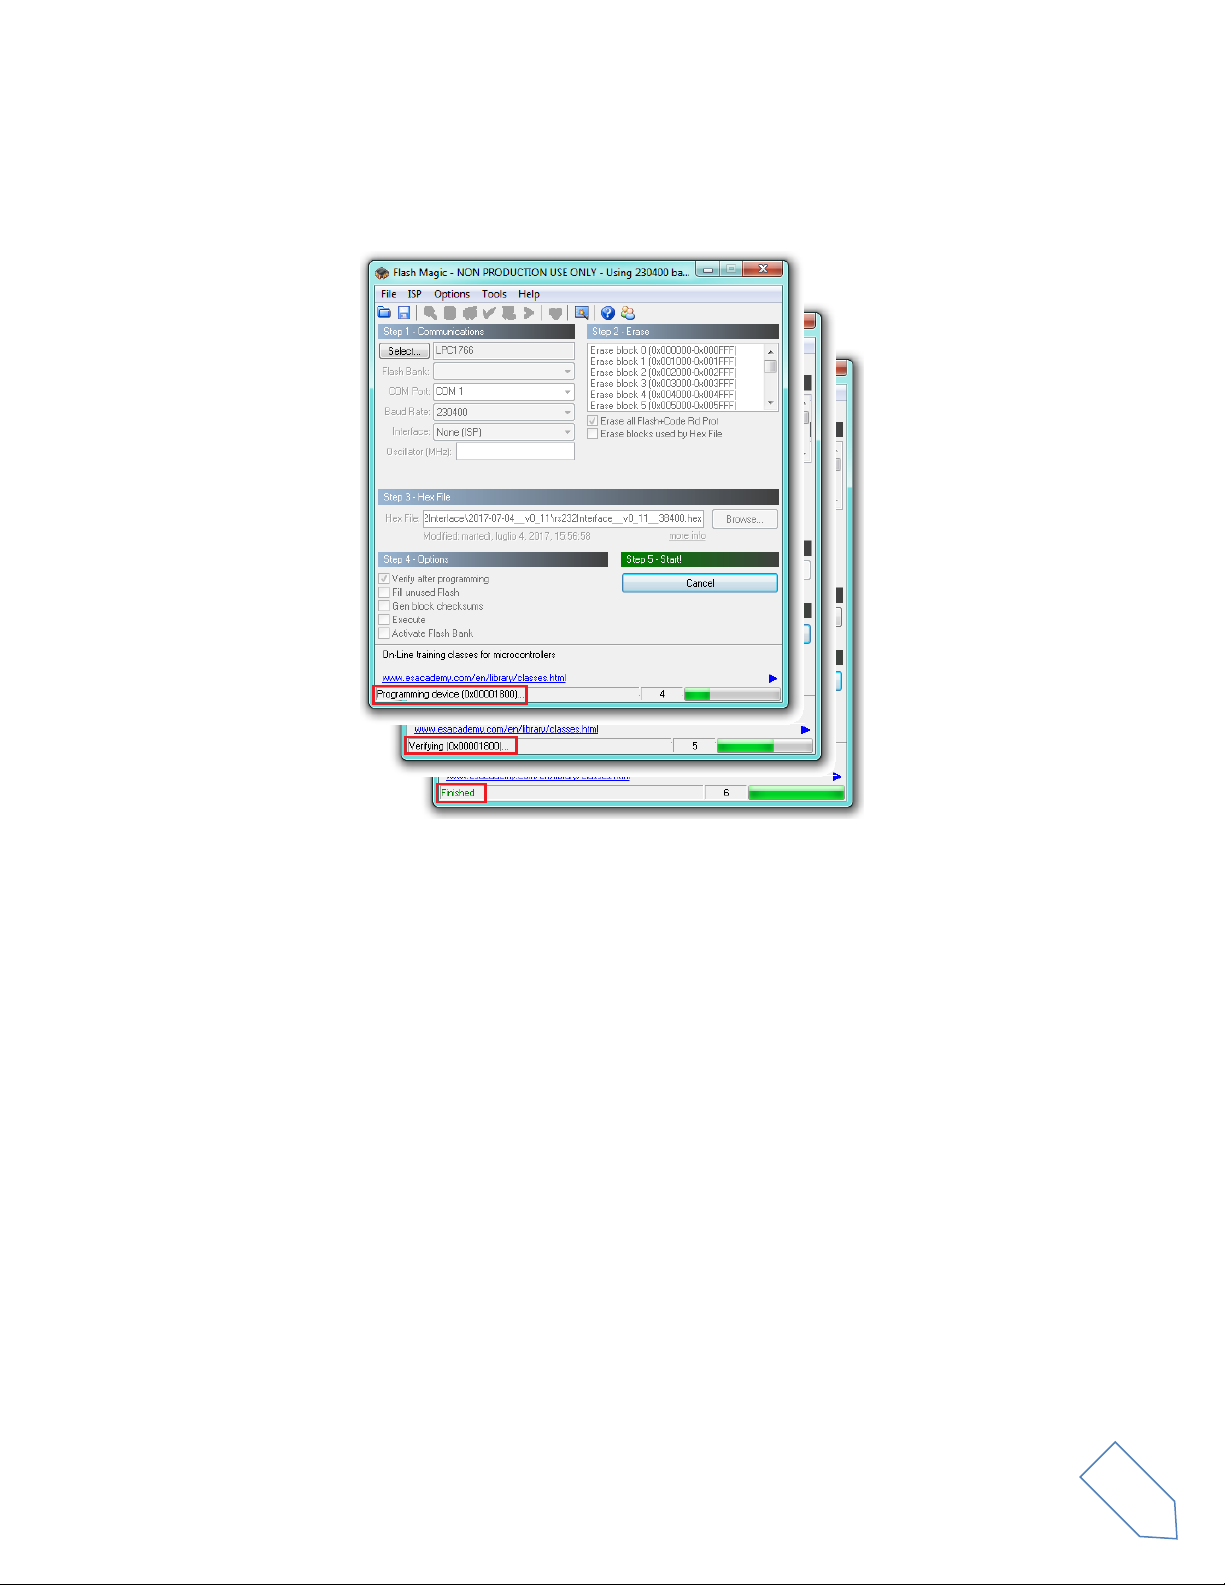
In the Flash Magic main window, click on “Start”to begin the programming. Flash Magic will now
proceed to program the firmware and perform the programming verification. Wait until the end of the
process. It should result like the pictures bellow.
Turn off the FDM-DUO and remove the jumper. Now you can close the EXTIO-232 interface box and use
the EXTIO-232 interface with the upgraded firmware.
If some problems occur during the firmware upgrade procedure, please contact the ELAD technical
assistance.
Table of contents
Other ELAD Recording Equipment manuals


