Elecable USB to HDMI/DP 4K User manual


PRODUCT SUMMARY!
The adapter built-in DisplayLink DL-6950 chip. DL-6950 is the
next generation universal docking solution from DisplayLink.
Based on the industry leading DL3 compression technology
DL-6950 extends the benefits of low latency, pixel perfect,
graphics to high resolution monitors. Plug it in and it works.!
The adapter integrates a USB 3.0 device interface, DL3 codec,
two DisplayPort++ (dual mode) interfaces, or two HDMI 2.0
interfaces, GbE, and audio on one SoC. It is supported by
DisplayLink host software for zero cost on the host and a
seamless transition to 4K docking.!
Features!
•Single USB connector to support up to dual 4Kp60!
•Multiple 4K display on legacy PCs!
•60Hz panel refresh for lowest latency!
•1x 5120x2880p60!
•2x 4096x2160p60 or 2x 3840x2160p60!
•2x 2560x1600p60 or 2x 2560x1440p60!
•Backward compatible with legacy monitors!
•Integrated DP 1.2/DP++ interface!
•Integrated HDMI 2.0 interface!
•HDCP#for protected content playback!
•Integrated 2.0 audio and 5.1 audio!
Setup the Adapter for Windows 7 to 10
NOTE: Before you can begin connecting an additional display, you must
install a driver for the adapter. Please follow these instructions.
1. Install Driver
1. Download the driver from the link https://www.displaylink.com/
downloads select the correct driver for your operating system.

2. Double click on the driver file to start the installation process.
3. Follow the steps to complete the installation.
4. Once the installation is complete, please reboot your computer.
NOTE:
1. If you are working on a company computer, contact your IT specialist
to log in as an Administrator having the rights to install the driver.
2. If the driver was not successfully installed, please temporarily turn off
real-time antivirus protection, then reinstall it.
3. Uninstall other USB graphics drivers (such as SMSC,Fresco Logic,
MCT), They are not compatible with DisplayLink and must be
uninstalled before installing DisplayLink software. It is not possible to
install multiple USB graphics drivers on a PC due to limitations in the
Windows graphics architecture..
2. Connect the Adapter
1. Connect the HDMI or DisplayPort port to your display’s port, then turn
on your monitor.
2. Connect the USB end to your computer's USB3.0 port. Waiting a few
seconds, your PC will automatically detect the second monitor and
display your PC's desktop screen.
NOTE:
Some laptops don’t have enough juice to push the extra pixels of an
external display, connect the power adapter to give it additional power.
3. Configure the Display
1. Extend mode: This is the default setting for a DisplayLink display. The
display is an extension of the Windows desktop, and will be extended
to the right of the main display. Moving the mouse of the right hand
side of the display will move it onto the extended screen. The relative

positions of the extended displays can be configured and is described
below.
2. Mirror!(also known as clone or duplicate) mode: The DisplayLink
display mirrors the content of you main display. Note that in mirror
mode, both displays must have the same resolution, which may not be
optimal for the display. This can make the desktop look stretched or
scaled and there could be black borders around the image on the
screen.
3. Primary or Replace mode: The DisplayLink is the main Windows
display. Replace mode extends primary mode by also disabling the
laptop or tablet screen while connected to the DisplayLink device. This
mode is used if wanting to use your!laptop with the lid closed.
Configuring Display settings
The Windows display settings can be configured under Windows Control
Panel -> Screen Resolution. The easiest way to open the screen resolution
settings is to right click anywhere on the Windows desktop, then choose
"Screen Resolution" from the menu.
Below we describe how to set the various configuration modes:
Configuring extend mode!
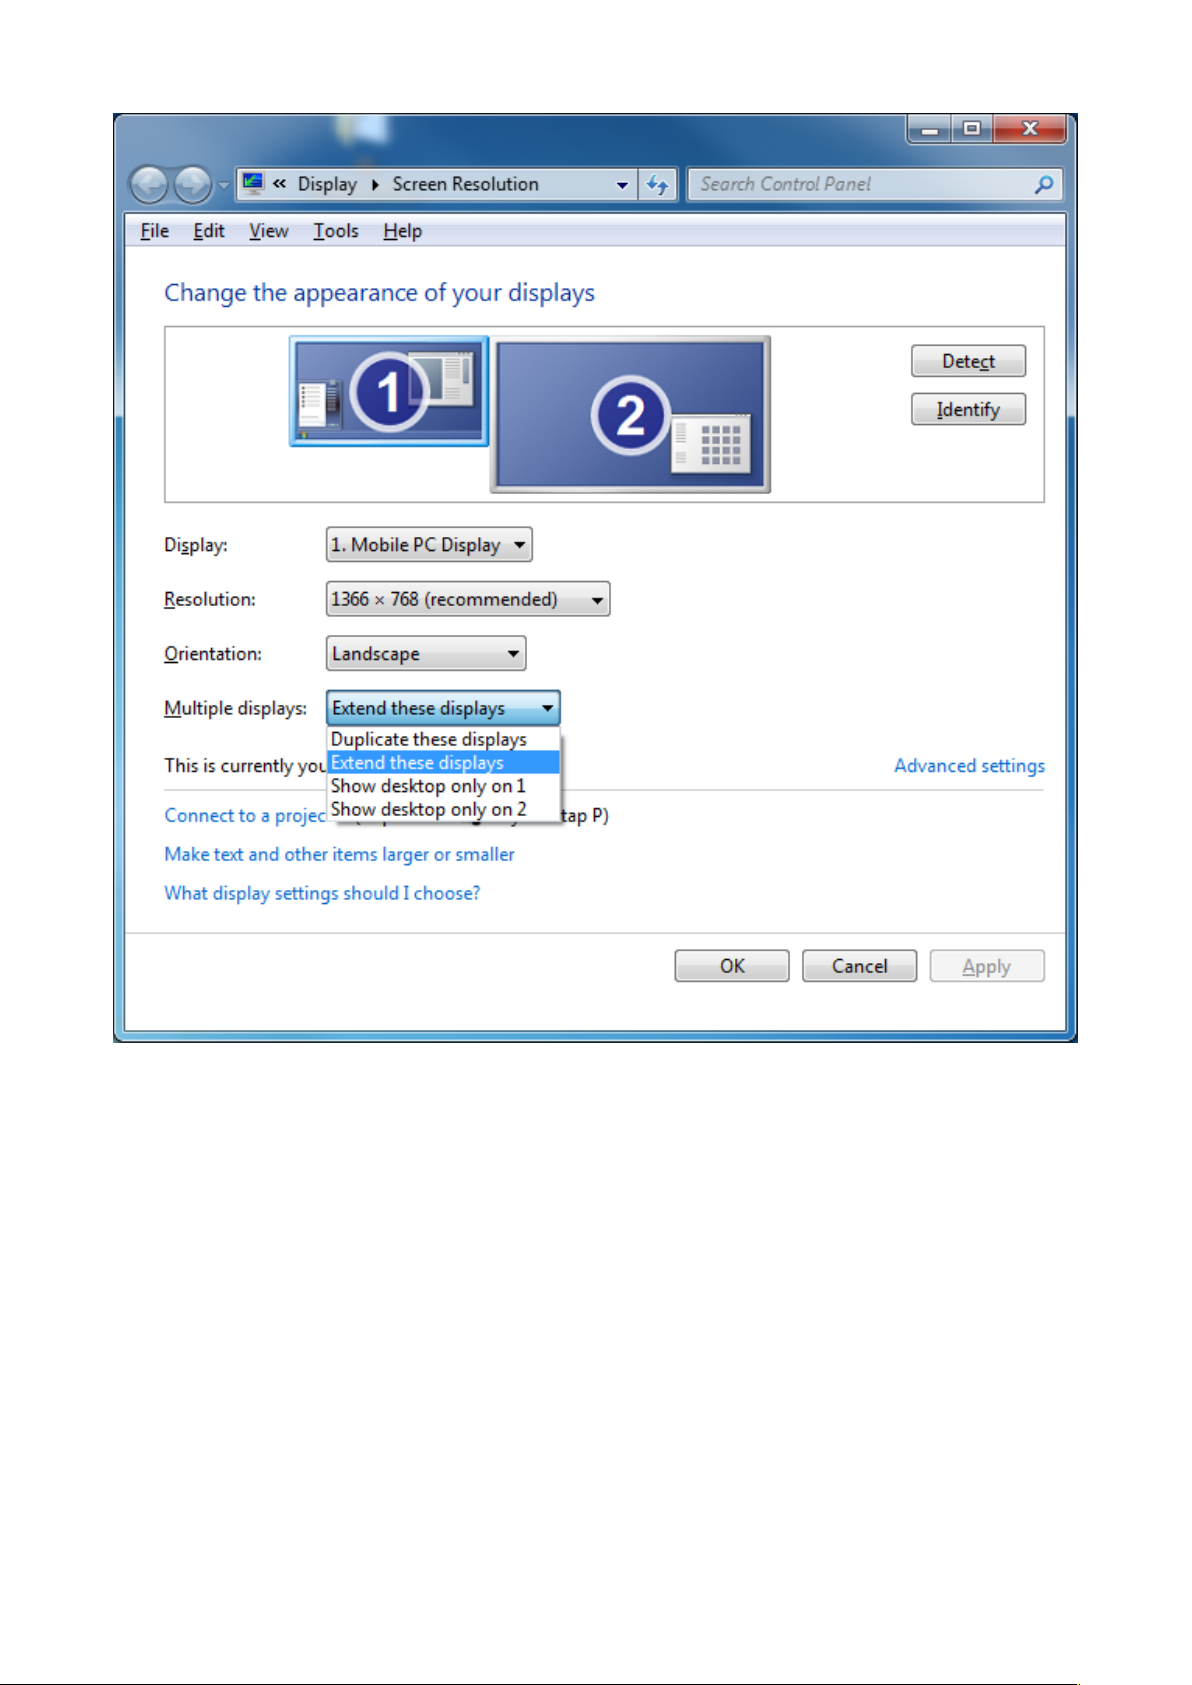
USING THE WINDOWS DISPLAY INTERFACE
To extend the displays, choose "Extend these displays" from the Multiple
displays menu, and click "Apply":
Windows 7 - Windows 8.1
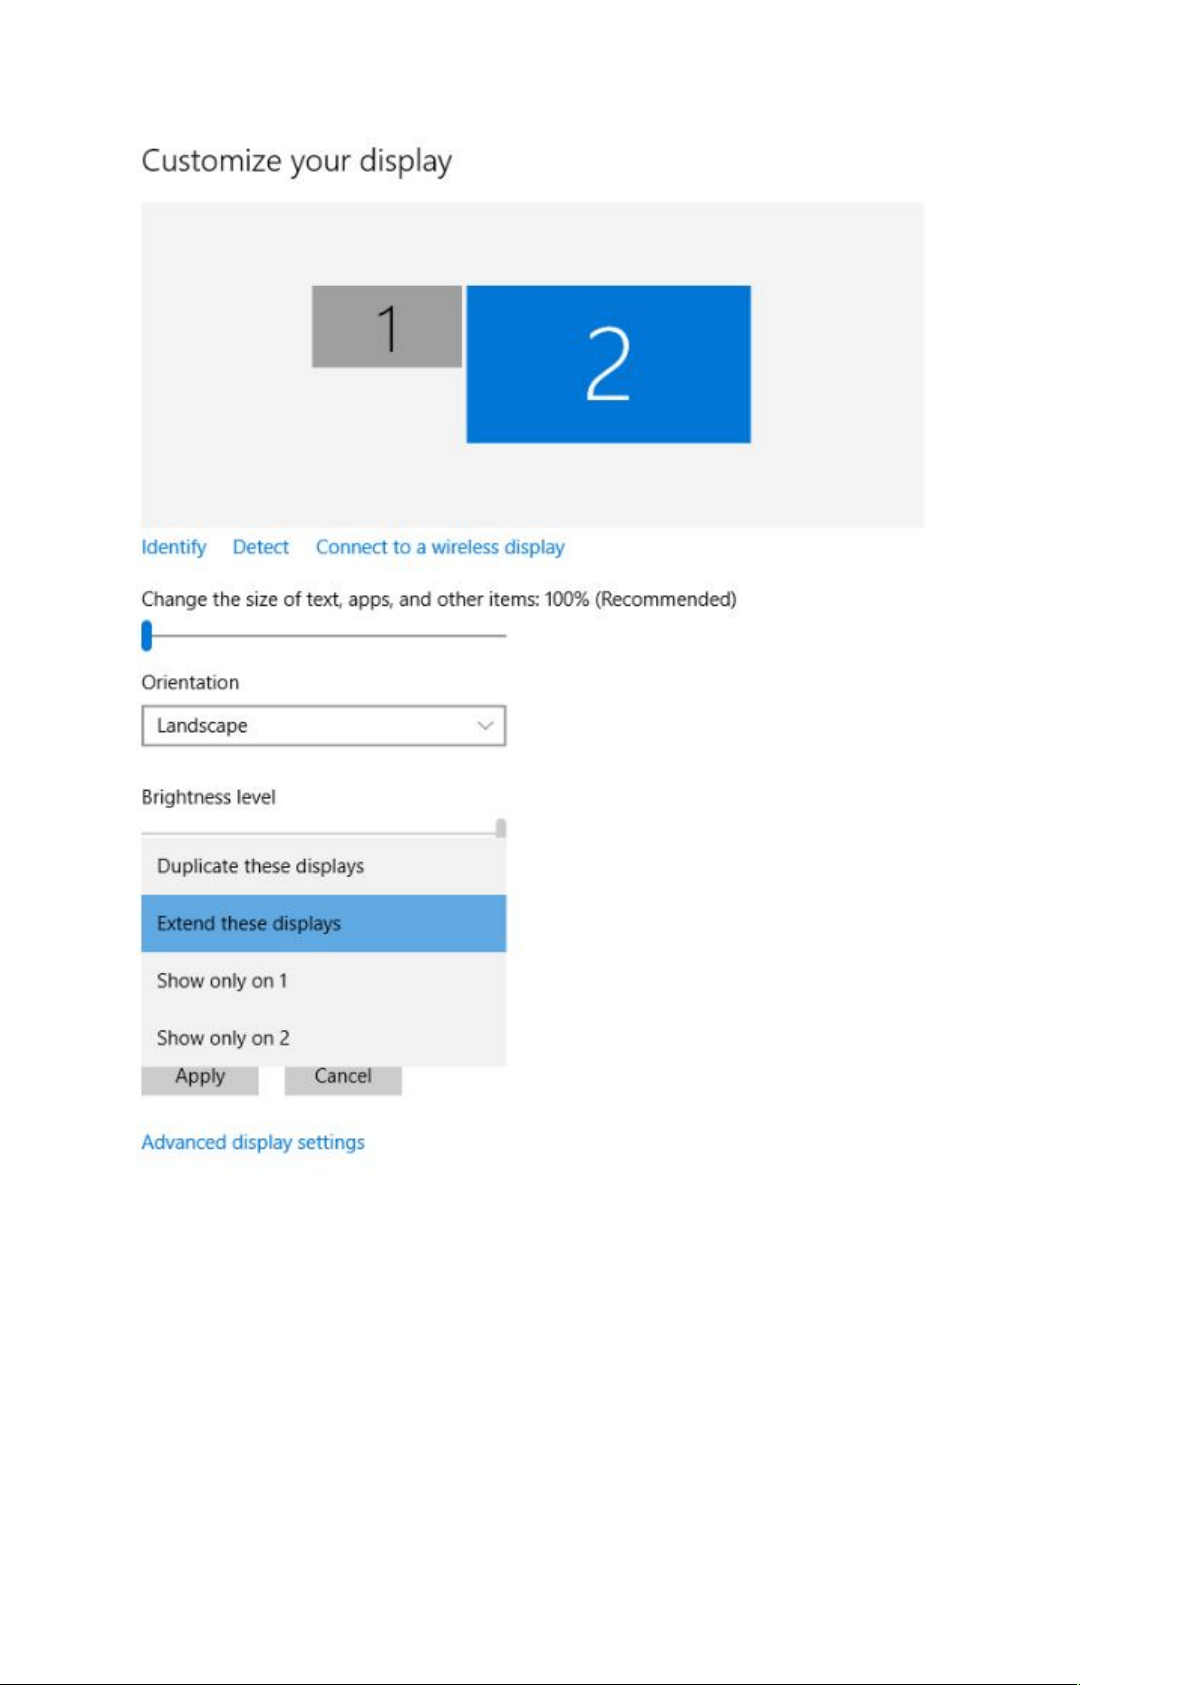
Windows 10
The arrangement of the displays can be changed by dragging the screens
to the correct position, to reflect the physical positions of the displays on
your desk.
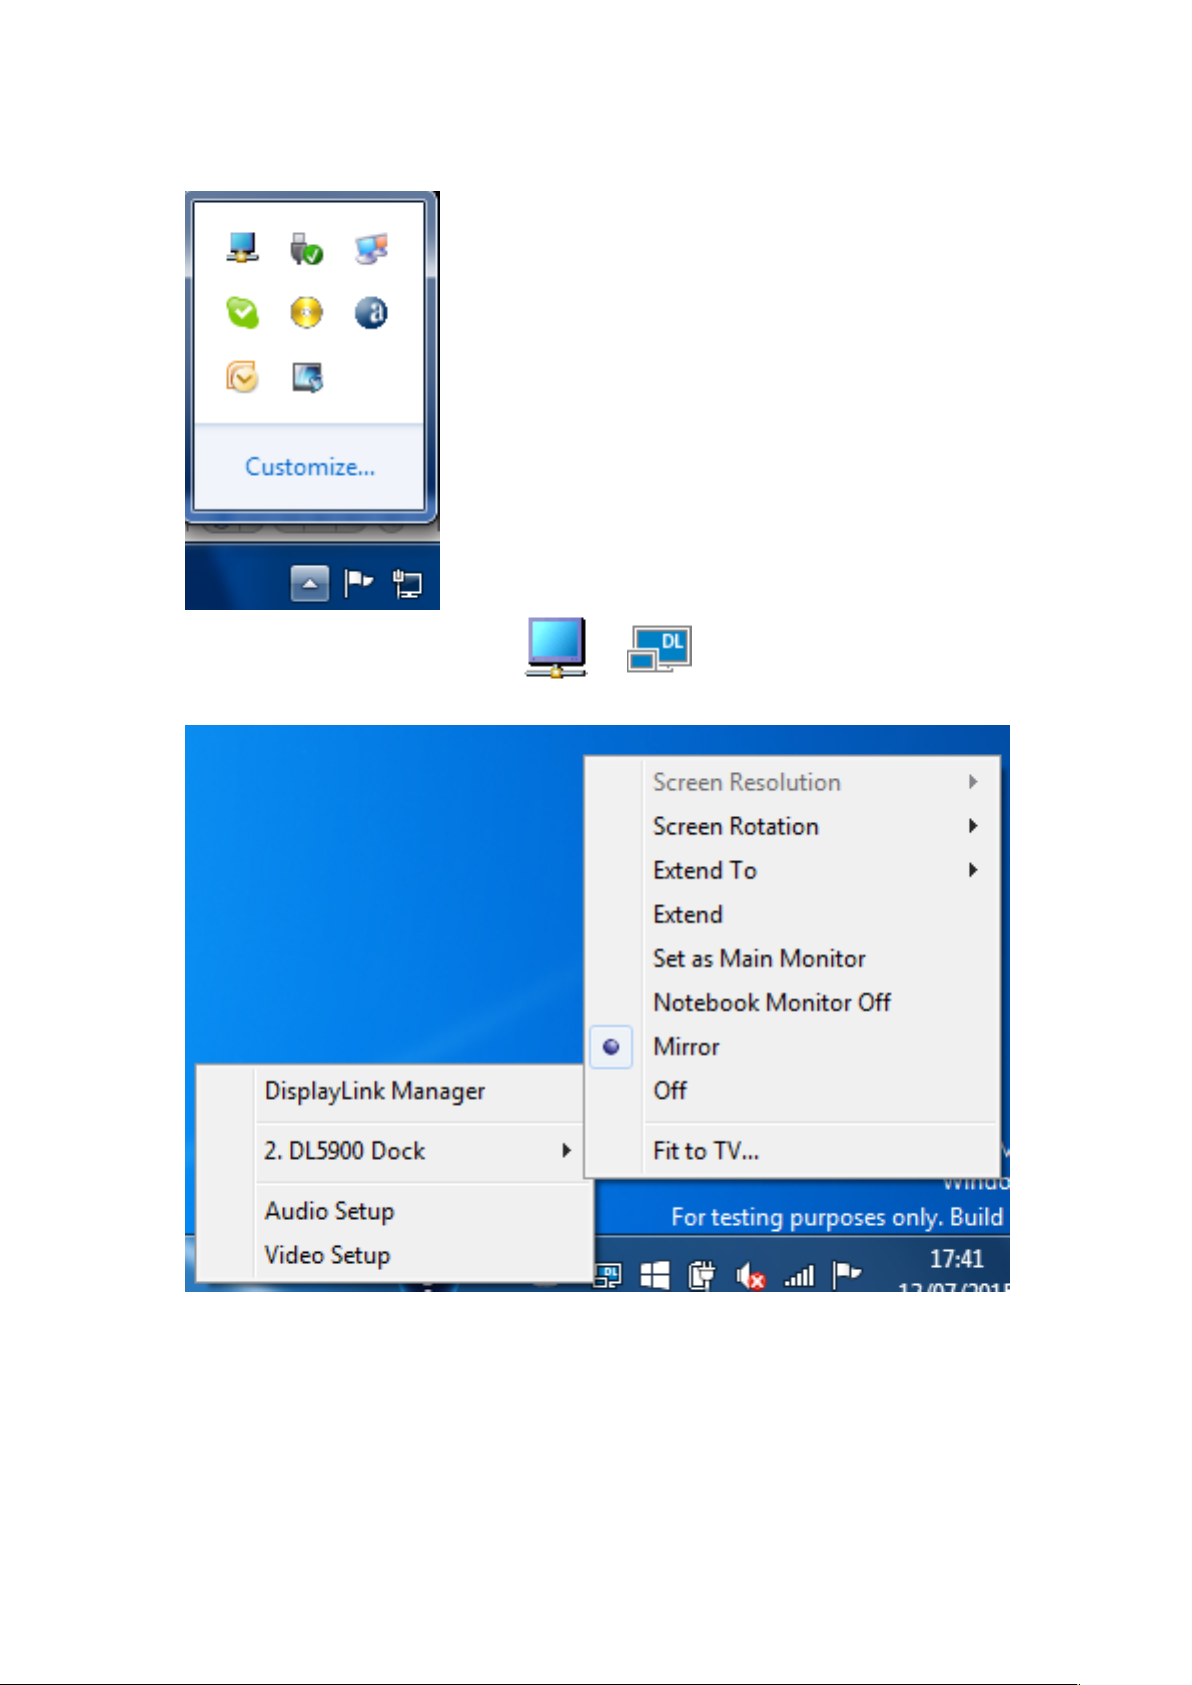
USING THE DISPLAYLINK UI

1. From the taskbar, click the Show hidden icons arrow to show all
available icons.
2. Click the DisplayLink icon:! !or!
A menu appears with several options.
3. Choose "Extend" from the device submenu
Configuring mirror mode

It is possible to only mirror 2 displays using the
windows interface. It is not possible to mirror more
than 2 displays. If you want to mirror more than 2
displays, we recommend 3rd party display
management tools, for example!Actual Multiple
Monitors.
USING THE WINDOWS DISPLAY INTERFACE
To mirror the displays, choose "Duplicate these displays" from the Multiple
displays menu, and click "Apply":
Windows 7 - 8.1

Windows 10

USING THE DISPLAYLINK UI
1. From the taskbar, click the Show hidden icons arrow to show all
available icons.
2. Click the DisplayLink icon:! !or!
A menu appears with several options.!
3. Choose "Mirror" from the device submenu
Configuring Replace mode!

Note that your laptop or tablet display will be re-enabled when the
DisplayLink display is disconnected.
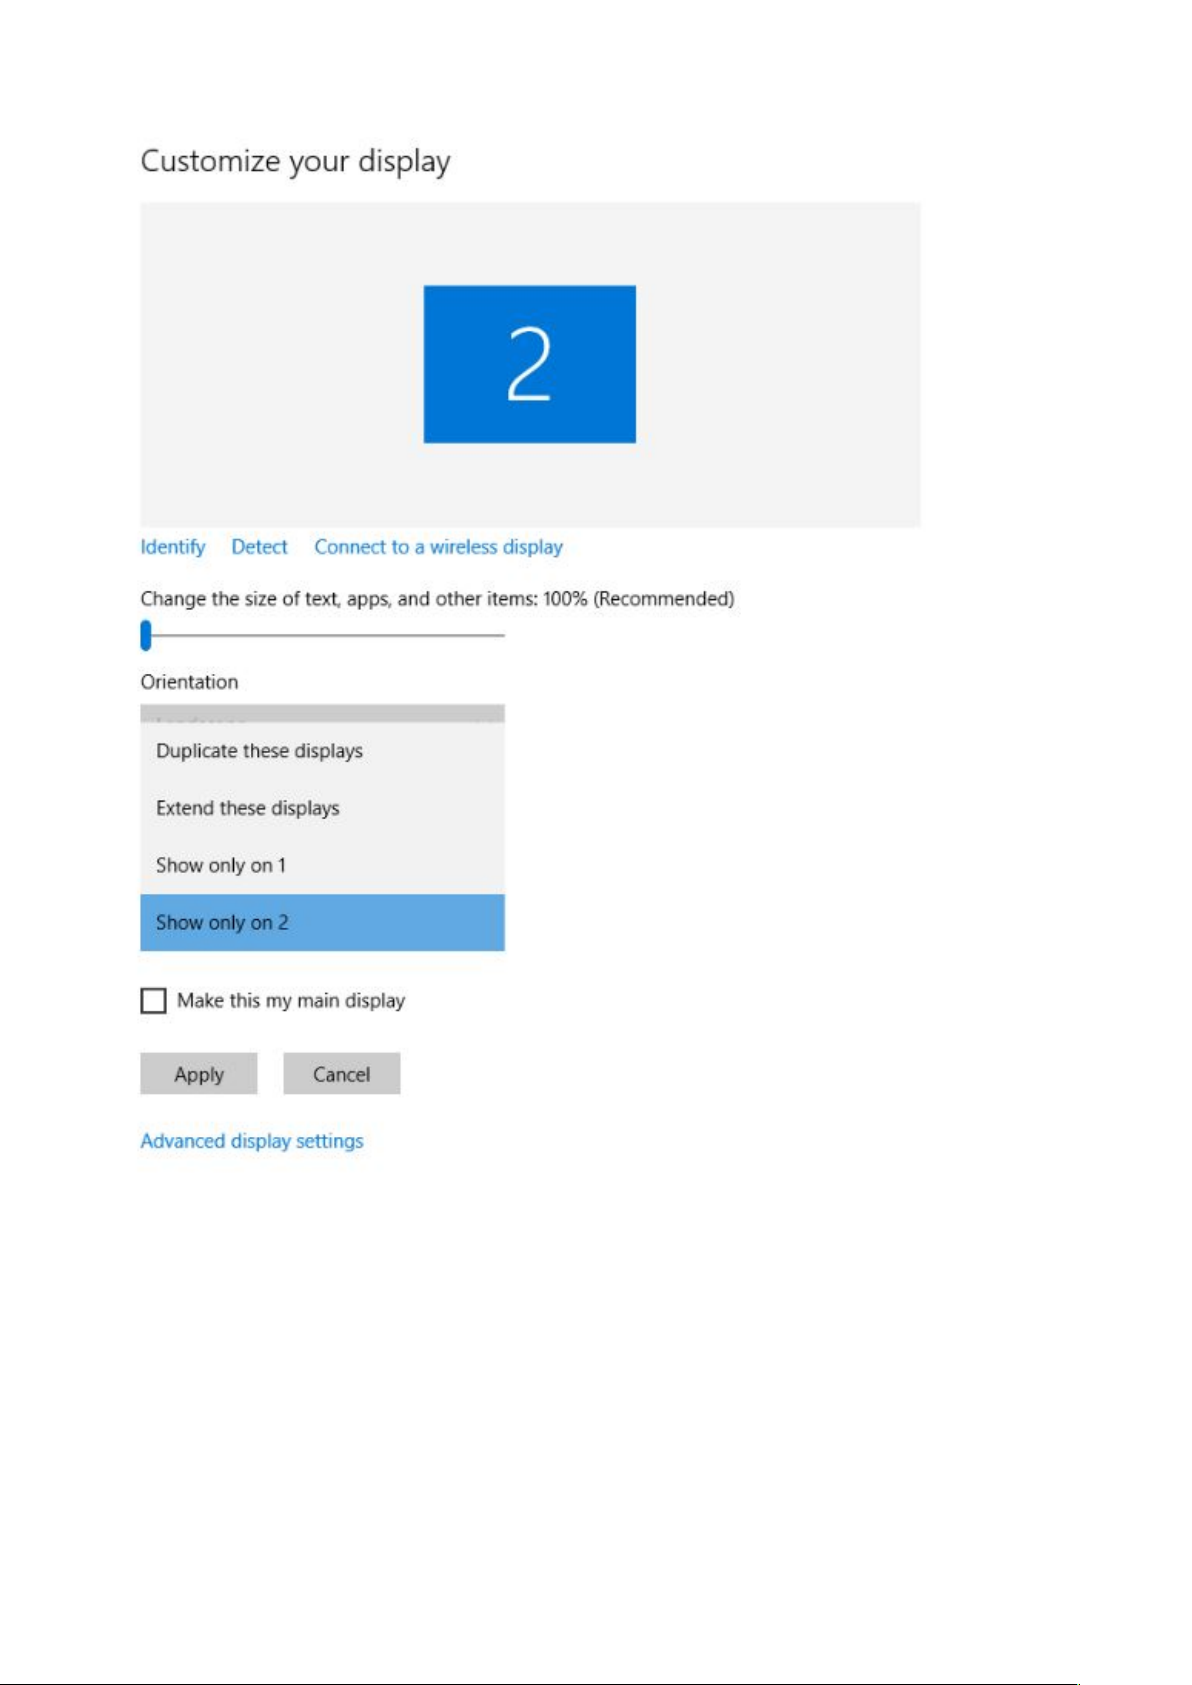
USING THE WINDOWS DISPLAY INTERFACE
To make the DisplayLink display the main display and disable the laptop or
tablet screen, choose "Show desktop only on 2" from the Multiple displays
menu, and click "Apply":
Windows 7 - 8.1
Windows 10
USING THE DISPLAYLINK UI

1. From the taskbar, click the Show hidden icons arrow to show all
available icons.
2. Click the DisplayLink icon:! !or!
A menu appears with several options.!
3. Choose "Notebook Monitor Off" from the device submenu

Setup the Adapter for Mac OS
1. Install Driver
1. Download the driver from the link https://www.displaylink.com/
downloads select the correct driver for your operating system.
2. Double click on the driver file to start the installation process.
3. Follow the steps to complete the installation.
4. Once the installation is complete, please reboot your computer.
2. Connect the Adapter
1. Connect the HDMI or DisplayPort port to your display’s port, then turn
on your monitor.
2. Connect the USB end to your computer's USB3.0 port. Waiting a few
seconds, your PC will automatically detect the second monitor and
display your PC's desktop screen.
NOTE:
Some laptops don’t have enough juice to push the extra pixels of an
external display, connect the power adapter to give it additional power.
3. Configure the Display
(You can also visit website https://support.apple.com/en-sg/HT202351)
When attaching a display that the software has not seen before, the display
will default to being extended to the right of the main display.
To configure the settings for each of your USB attached displays, select
‘Displays’ from the ‘System Preferences’ menu. This will open a ‘Display
Preferences’ window on each of your attached displays allowing you to
configure each display as required.!

It is possible to use the ‘Gather Windows’ button to bring all the ‘Display
Preferences’ windows onto the main display.
Setting the Display Resolutions
To change the display’s resolution, select an available resolution from the
Display Preferences window of the display you wish to change:

The resolutions available depend on both the DisplayLink enabled product
and the capabilities of the connected display.
If you wish to rotate your display, you can configure the orientation using the
‘Rotate’ drop down. Select the appropriate angle of rotation to match your
display’s set up.
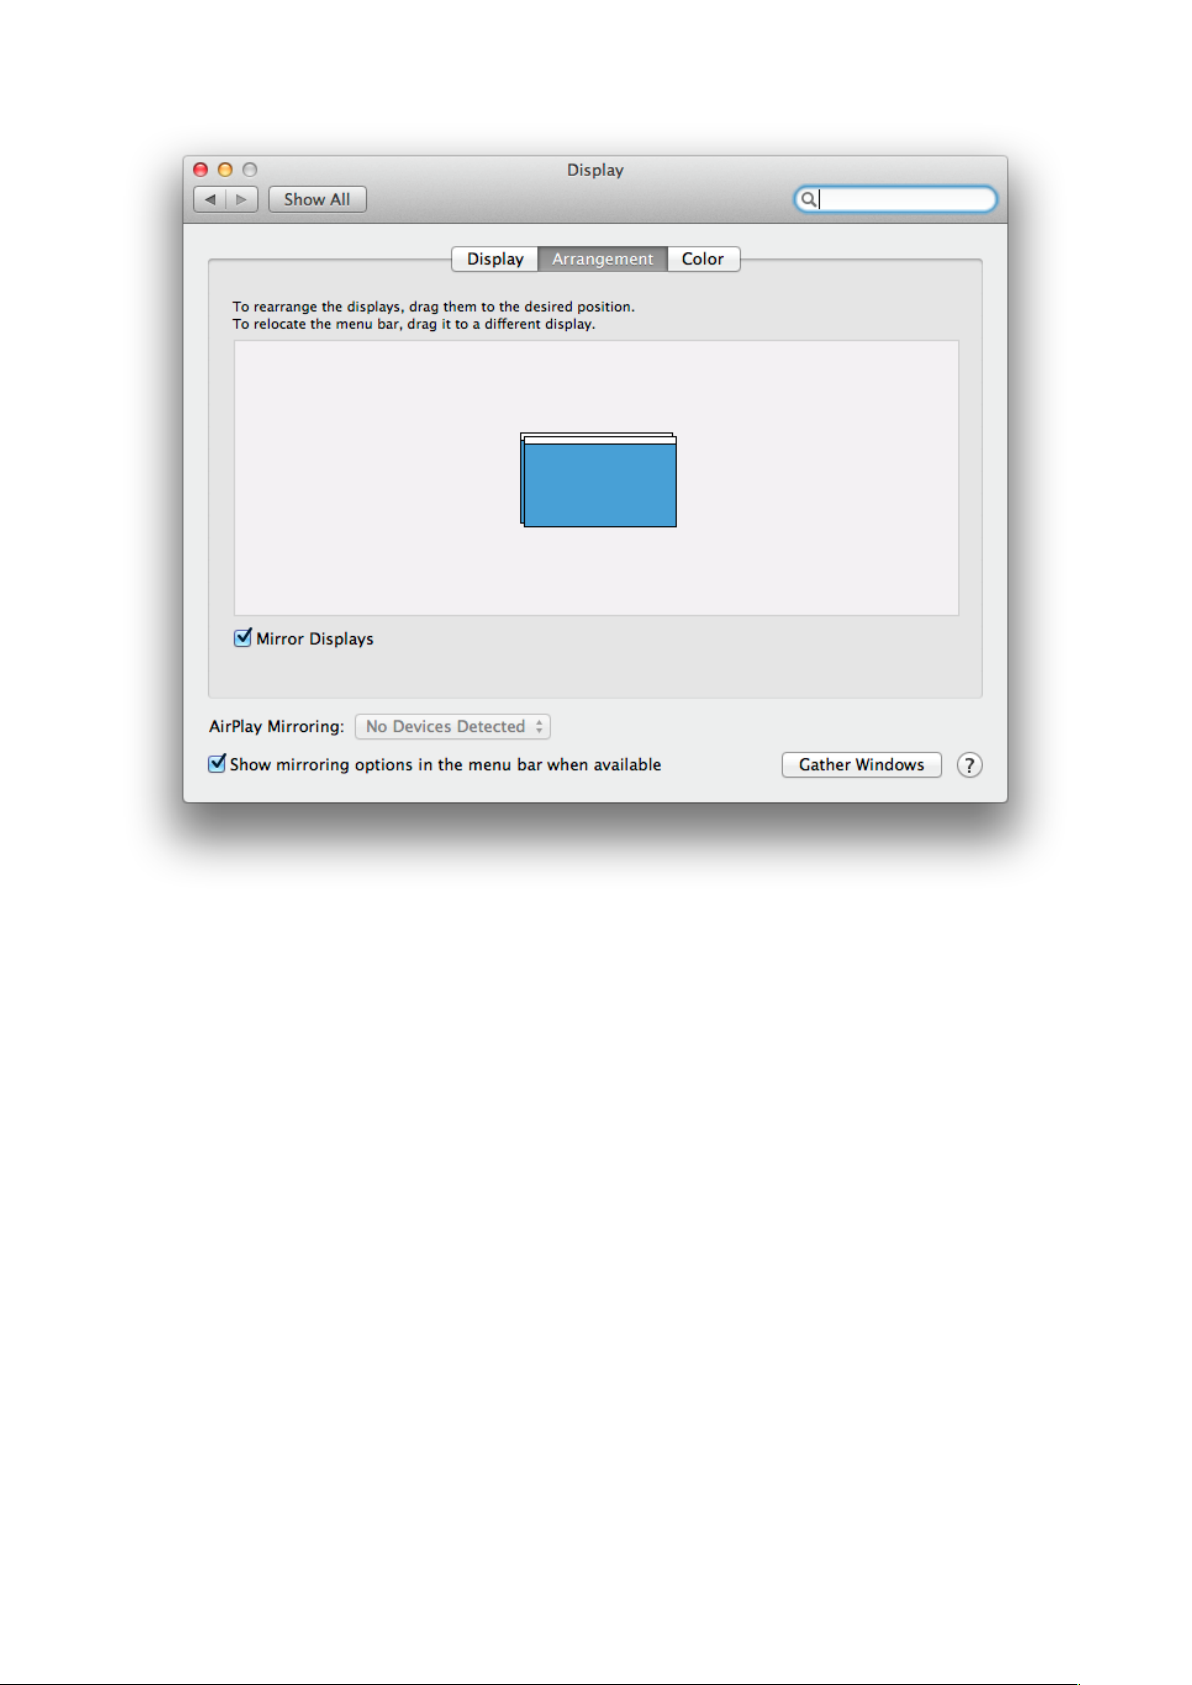
Setting the Position of Displays
If your computer is connected to more than two displays, you can specify
that some are mirrored displays and others show the extended desktop. A
mirrored display shows the same content as the main display whereas an
extended display will be an extension to your existing desktop. You can
arrange your displays so that they match the physical layout of your displays
by selecting the ‘Arrangement’ pane within Display Preferences. This
ensures that you can easily navigate between all connected displays.

To move the position of a display, click and hold the display you wish to
move then drag it to the desired position. The display will be highlighted with
a red border whilst you are moving the display to its new position.
SETTING THE DISPLAY TO MIRROR MODE
When in Mirror mode, additional displays will display what is being shown on
the primary display. Checking the “Mirror Display” on the ‘Arrangement’ pane
enables this feature.
SETTING THE DISPLAY TO EXTEND MODE
To extend connected displays, make sure that the “Mirror Display” on the
‘Arrangement’ pane is unchecked.

USING BOTH EXTENDED AND MIRRORED DISPLAYS
To work with both extended and mirrored displays, turn off mirroring then in
the Arrangement pane press and hold 'cmd' and 'alt' and drag and drop the
display you wish to mirror over the primary display. Repeat this with each
display you wish to mirror, those untouched will remain extending.
CHANGING THE MAIN DISPLAY
You can change which is the main display by moving the Menu Bar between
displays. Changing the main display affects where new windows appear and
the position of the Dock. The ‘Menu Bar’ can be moved so that it is shown on
an alternative display. Clicking the white menu bar and dragging it to the
desired display will perform this action.
Table of contents
Other Elecable Adapter manuals

Popular Adapter manuals by other brands

CommScope
CommScope M30FP-3RCA-110 installation instructions

Grandstream Networks
Grandstream Networks HandyTone 286 Quick install guide

OGEMRAY
OGEMRAY WF76017ST user manual

Huey Chiao
Huey Chiao HCB24 user guide

StarTech.com
StarTech.com 117B-USBC-MULTIPORT quick start guide

AmbiCom
AmbiCom P5T-WL150NUSBX Quick installation guide


