Electric Mirror Ambiance AMB2 User manual
Mirrored Cabinet
Installation Guide ELECTRIC MIRROR®
Installation Guide ELECTRIC MIRROR®
ELECTRIC MIRROR® 425.776.4946 | electricmirror.com |sales@electricmirror.com | © 2023 Electric Mirror. All rights reserved. | 0123.5.U
Page 1
CONGRATULATIONS
You’ve purchased the finest mirrored cabinet available from the global leader in mirror technology. This mirrored cabinet
is quick and easy to install and is designed and manufactured to offer you years of enjoyment.
Please read these instructions thoroughly before beginning installation. If you have any questions, please contact our
Customer Service team at 425.776.4946 or customer.support@electricmirror.com.
APPLICATION
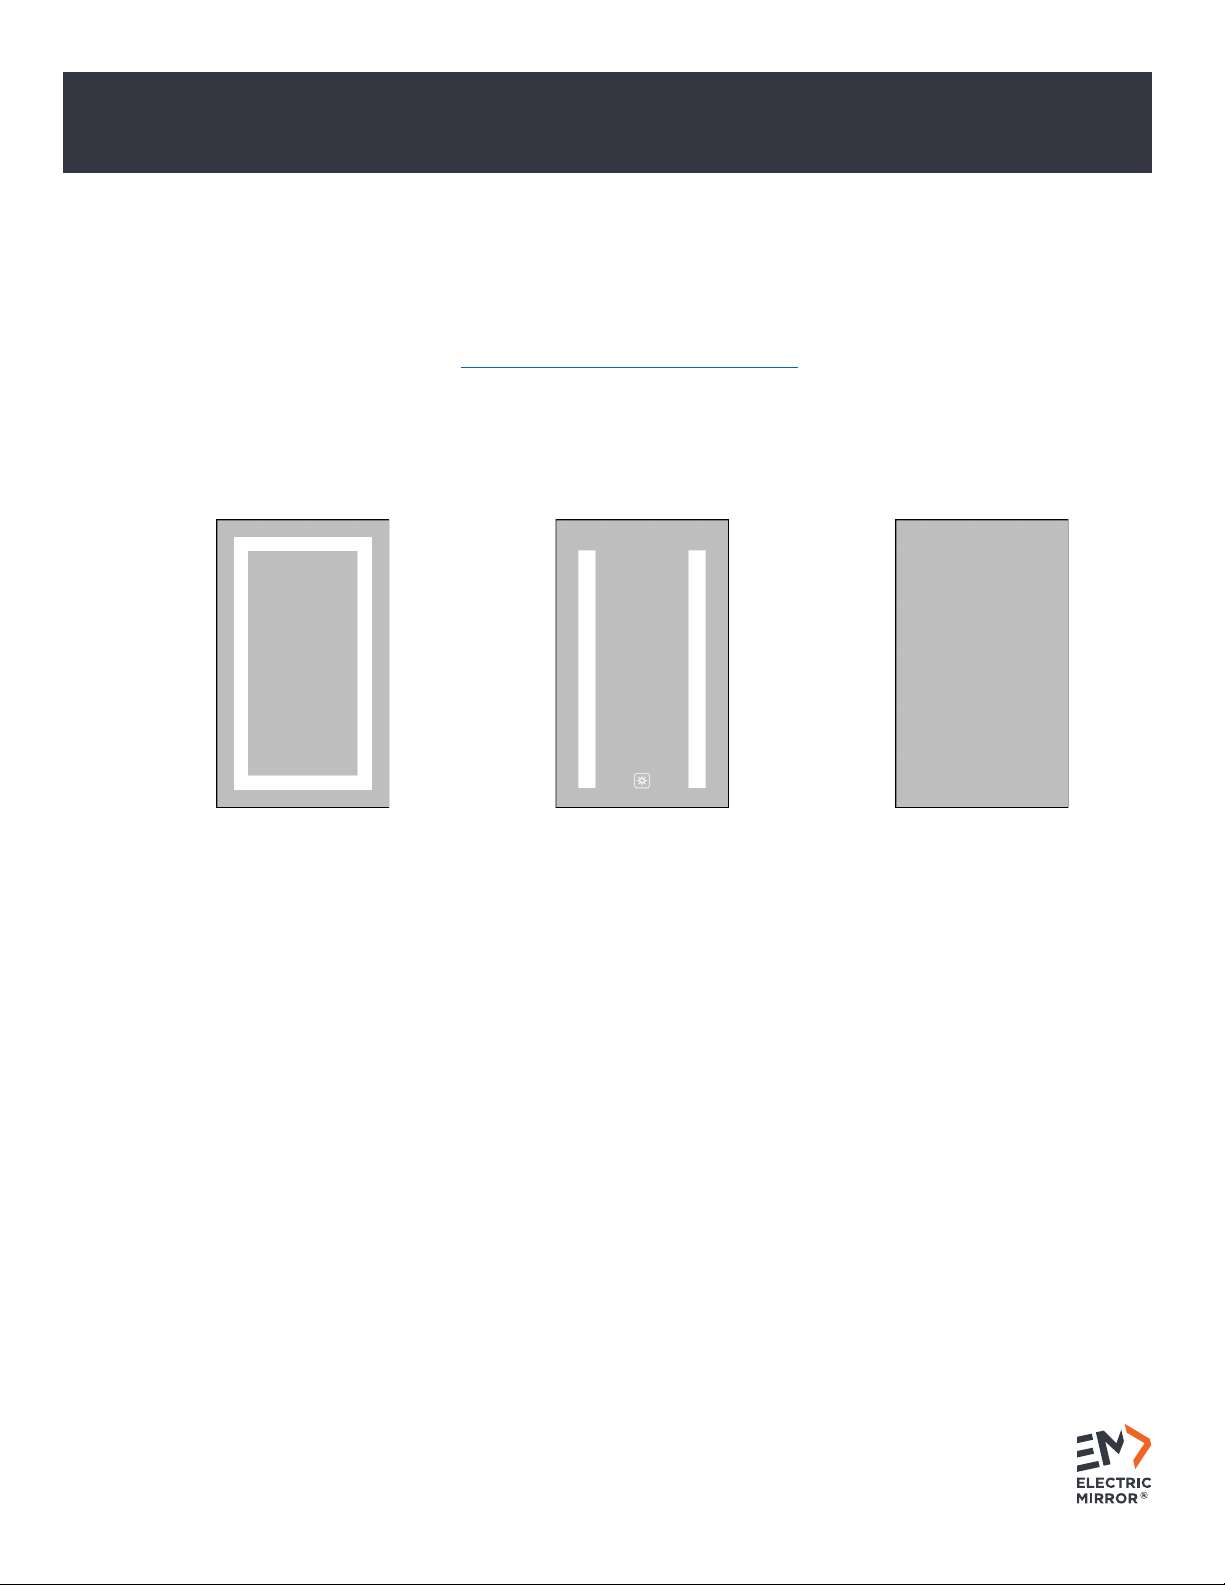
These installation instructions apply to the mirrored cabinets listed below:
Ambiance™ (AMB2)
Ascension™ (ASC2)
Simplicity™ (SIM2)
TABLE OF CONTENTS
1. REVIEW IMPORTANT SAFETY INSTRUCTIONS .................................................................................................................2
2. UNPACK YOUR MIRRORED CABINET ...................................................................................................................................2
3. DETERMINE THE CABINET LOCATION.................................................................................................................................3
4. PREPARE THE WALL FOR HANGING....................................................................................................................................4
5. PREPARE THE ELECTRICAL ......................................................................................................................................................9
6. CONNECT THE ELECTRICAL.................................................................................................................................................... 11
7. INSTALL THE CABINET DOOR................................................................................................................................................ 13
8. ADJUST AND LEVEL THE DOOR........................................................................................................................................... 15
9. INSERT THE SHELVES ................................................................................................................................................................ 16
10. CLEAN THE MIRROR.................................................................................................................................................................. 16
Mirrored Cabinet
Installation Guide ELECTRIC MIRROR®
Installation Guide ELECTRIC MIRROR®
ELECTRIC MIRROR® 425.776.4946 | electricmirror.com |sales@electricmirror.com | © 2023 Electric Mirror. All rights reserved. | 0123.5.U
Page 2
1. REVIEW IMPORTANT SAFETY INSTRUCTIONS
A. Use a qualified electrician.
Your mirrored cabinet must be installed by a qualified technician or electrician. These
instructions assume an electrical connection has already been brought to the cabinet
location in the wall. All electrical components must be serviced by qualified electricians.
Power source must be disconnected prior to servicing components.
B. Read and follow instructions.
For proper installation, read and install the cabinet according to these instructions, and keep a copy for future
use. Failure to follow these instructions voids the warranty.
C. Follow safety precautions.
To prevent injury, the cabinet must be installed according to these instructions. Failure to do so could result in
serious injury or death.
2. UNPACK YOUR MIRRORED CABINET
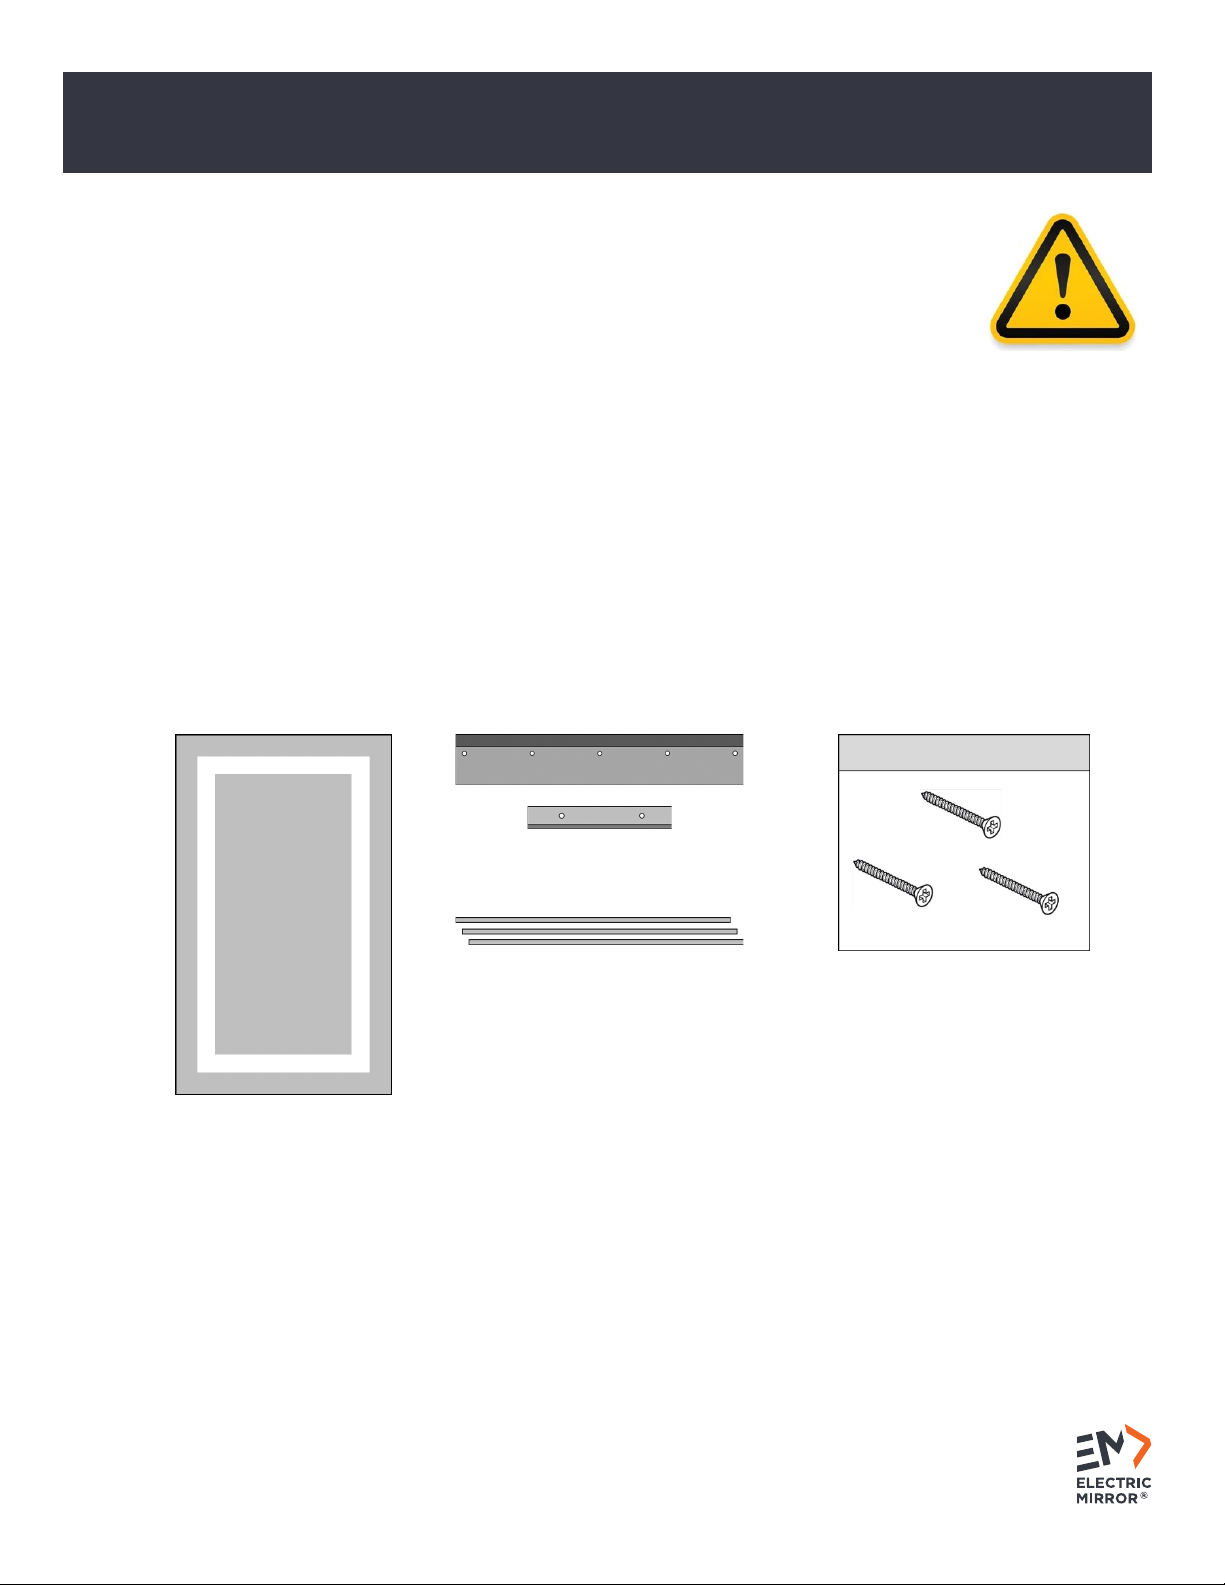
Unpack the box and identify and verify all contents prior to installation. In general, your cabinet will include the
following:
Mirrored Cabinet*
Wall Cleats (for Surface Mounting)
Mounting Hardware
Shelves
*The cabinet glass is fragile. Keep edge protectors in place and rest the cabinet on a cushioned surface. Do
not place it on a hard surface.
Mirrored Cabinet
Installation Guide ELECTRIC MIRROR®
Installation Guide ELECTRIC MIRROR®
ELECTRIC MIRROR® 425.776.4946 | electricmirror.com |sales@electricmirror.com | © 2023 Electric Mirror. All rights reserved. | 0123.5.U
Page 3
3. DETERMINE THE CABINET LOCATION
A. Determine if the cabinet will be surface mounted or recessed.
I. All mirrored cabinets must be mounted in the width x height orientation identified in the part number.
II. If your cabinet will be recessed into the wall, measure the back of the cabinet body (not the flange on
the front of the cabinet body) to obtain the most accurate rough-in dimensions.
III. Keep in mind that a recessed installation needs a wooden rough-in frame, and a surface-mount
installation will be mounted using a cleat for the top and bottom.
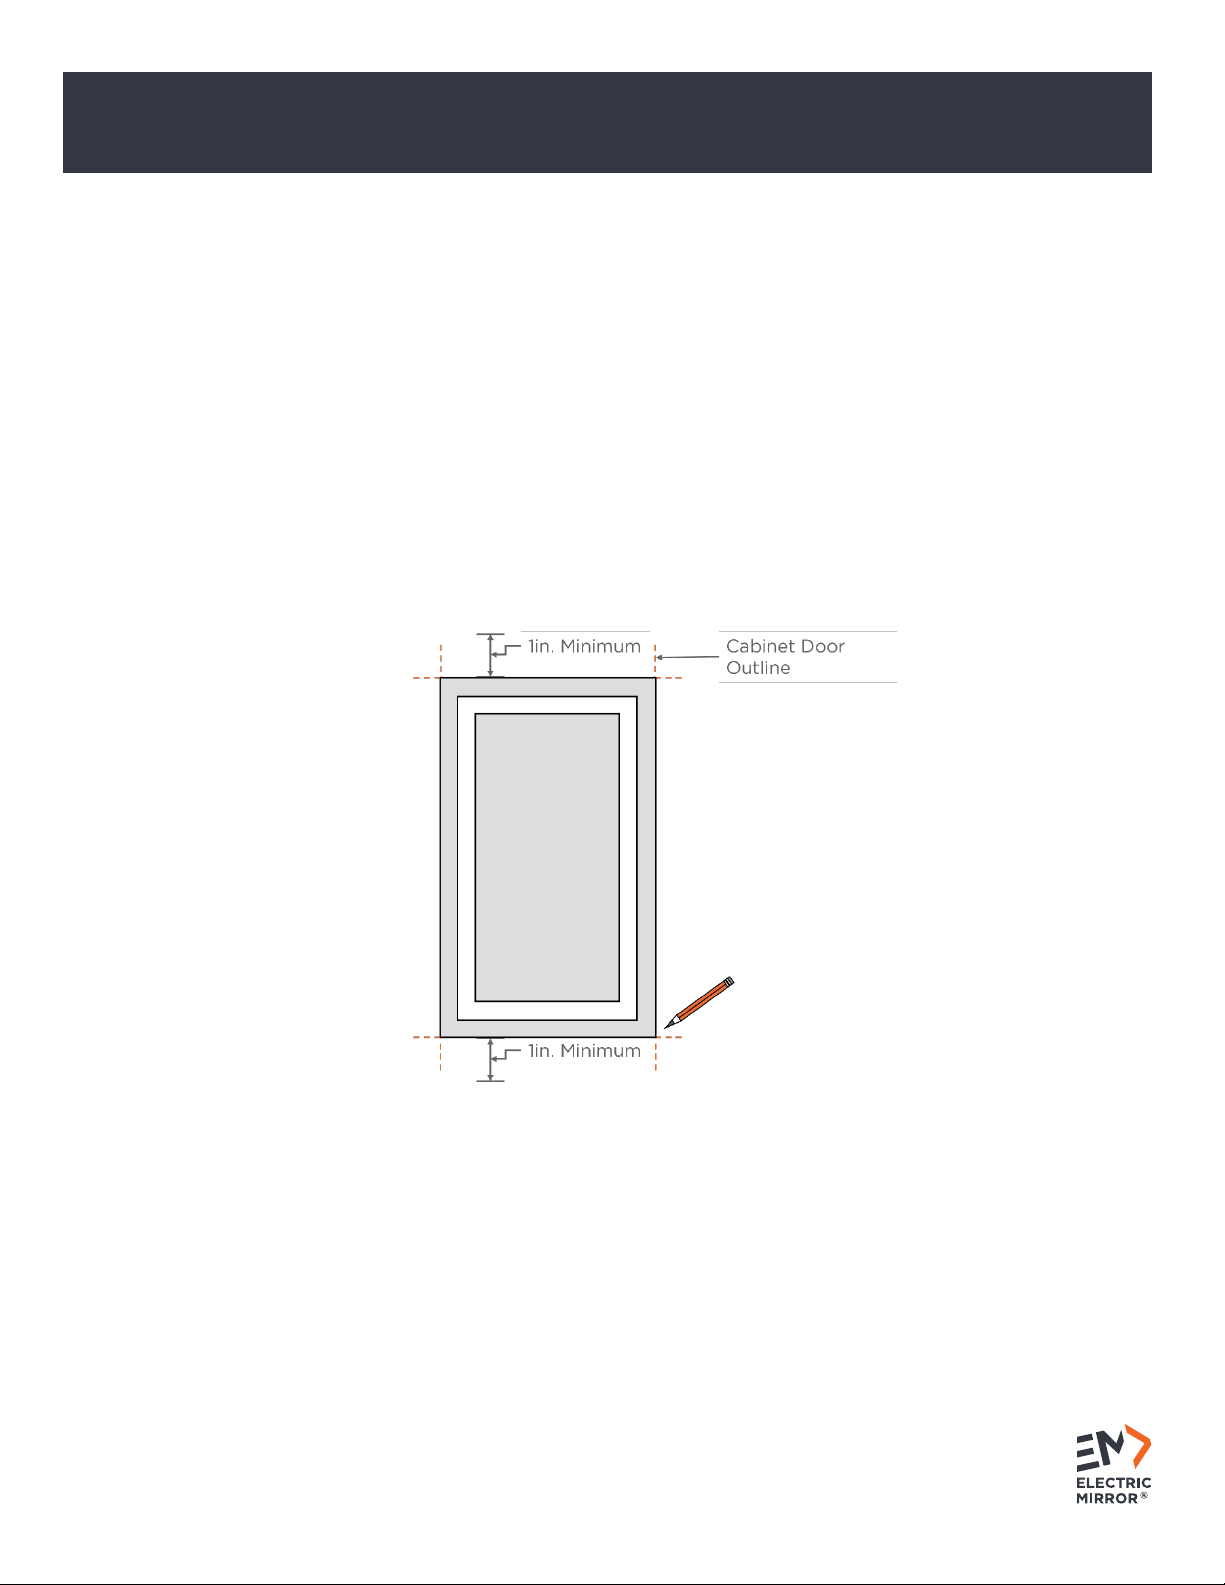
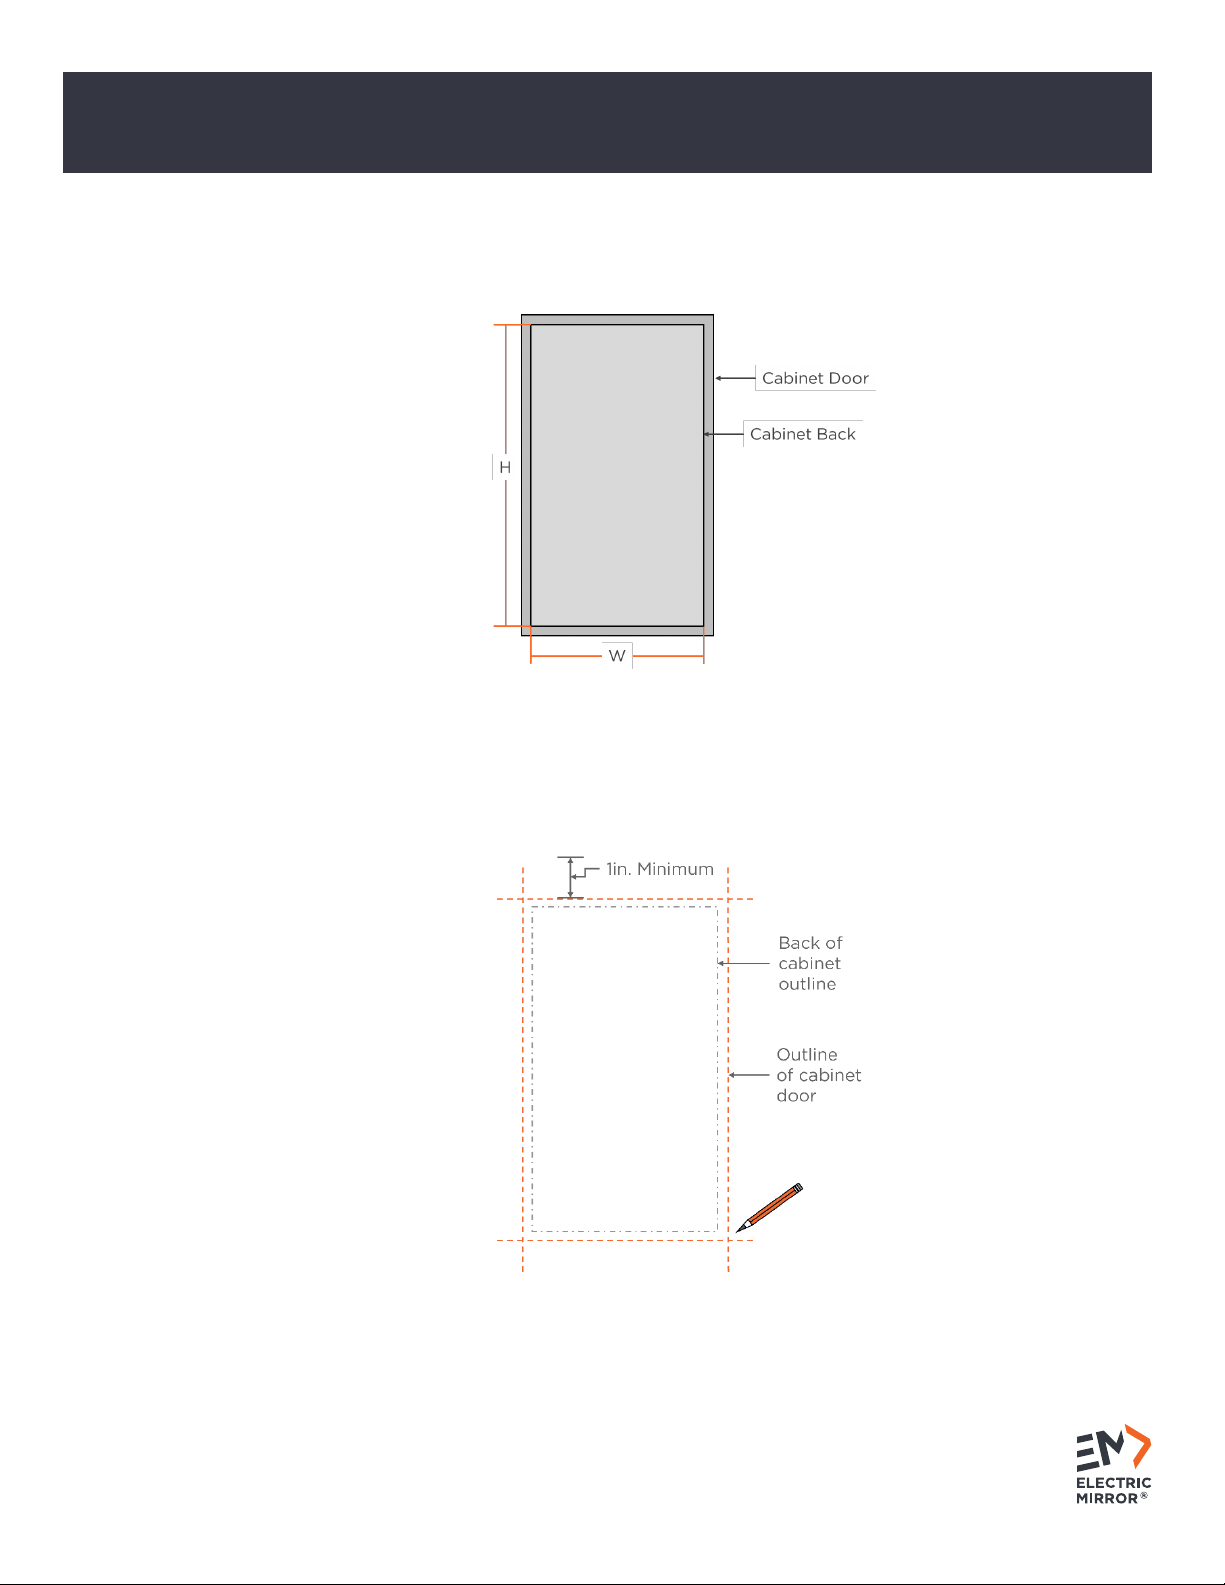
B. Determine and mark the cabinet location on the wall.
I. The top edge of the cabinet door must be a minimum of 1” from the ceiling. The bottom edge of the
cabinet door must be a minimum of 1” from a faucet or any other fixture.
II. For surface mounted cabinets: mount the cabinet to wall studs or a similarly prepared surface.
III. Measure your cabinet door (not the cabinet, as the door is larger) for exact dimensions and mark the
location on the wall.
Mirrored Cabinet
Installation Guide ELECTRIC MIRROR®
Installation Guide ELECTRIC MIRROR®
ELECTRIC MIRROR® 425.776.4946 | electricmirror.com |sales@electricmirror.com | © 2023 Electric Mirror. All rights reserved. | 0123.5.U
Page 4
4. PREPARE THE WALL FOR HANGING
If the cabinet will be surface mounted, begin with step 4A.
If the cabinet will be recessed mounted, begin with step 4B.
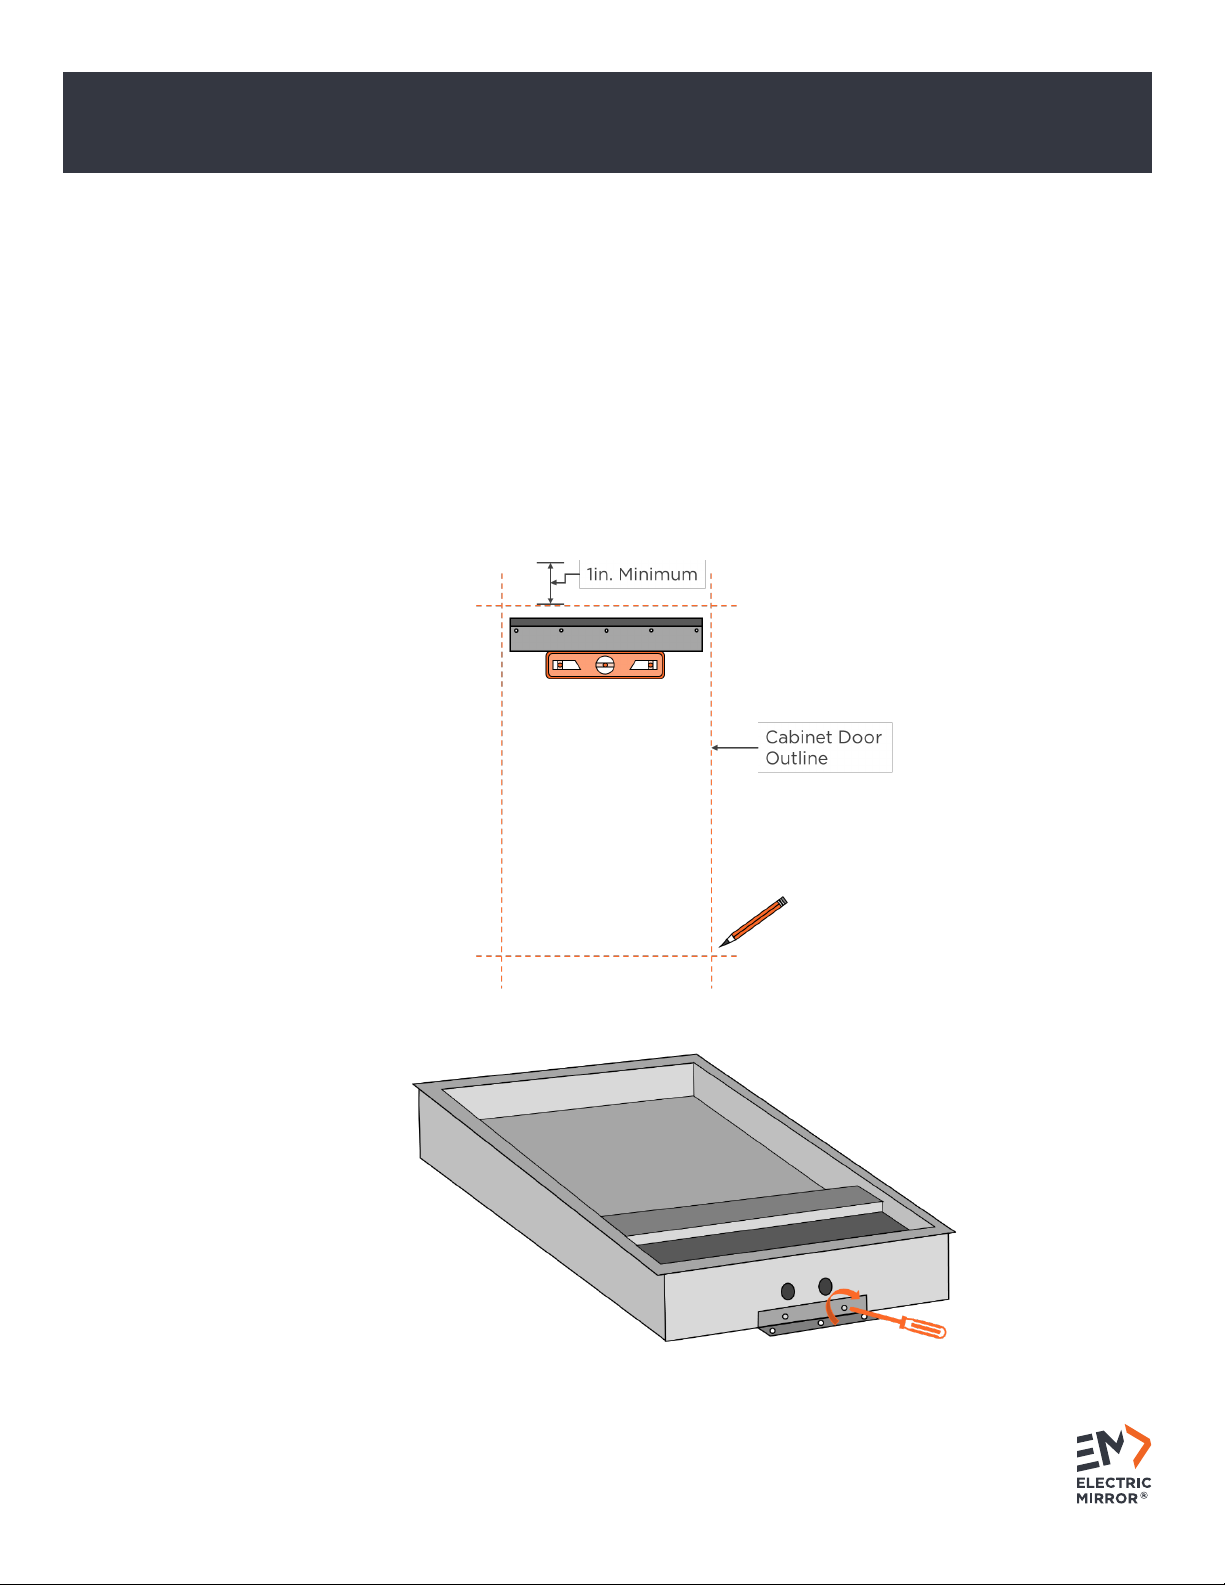
A. Surface mount hanging
I. Start with the top mounting cleat.
a. Using the cleat as a template, locate and mark the mounting holes on the wall according to
Sales Aid drawing which provides detailed dimensions.
b. Ensure screws will be drilled into a stud or suitable backing.
c. Use a level to make sure the cleat is level before affixing it to the wall.
d. Pre-drill holes or use wall anchors as necessary.
e. Secure the mounting cleat to the wall based on this location.
II. Attach the bottom cleat to the underside of the cabinet body.
Mirrored Cabinet
Installation Guide ELECTRIC MIRROR®
Installation Guide ELECTRIC MIRROR®
ELECTRIC MIRROR® 425.776.4946 | electricmirror.com |sales@electricmirror.com | © 2023 Electric Mirror. All rights reserved. | 0123.5.U
Page 5
III. Hang the cabinet body on the wall. Before mounting, pre-feed the electrical whip through the holes that
lead to the power box. See step 6 for wiring instructions.
a. Lower the cabinet onto the hanging cleat attached to the wall.
b. Secure the lower cleat to the wall.
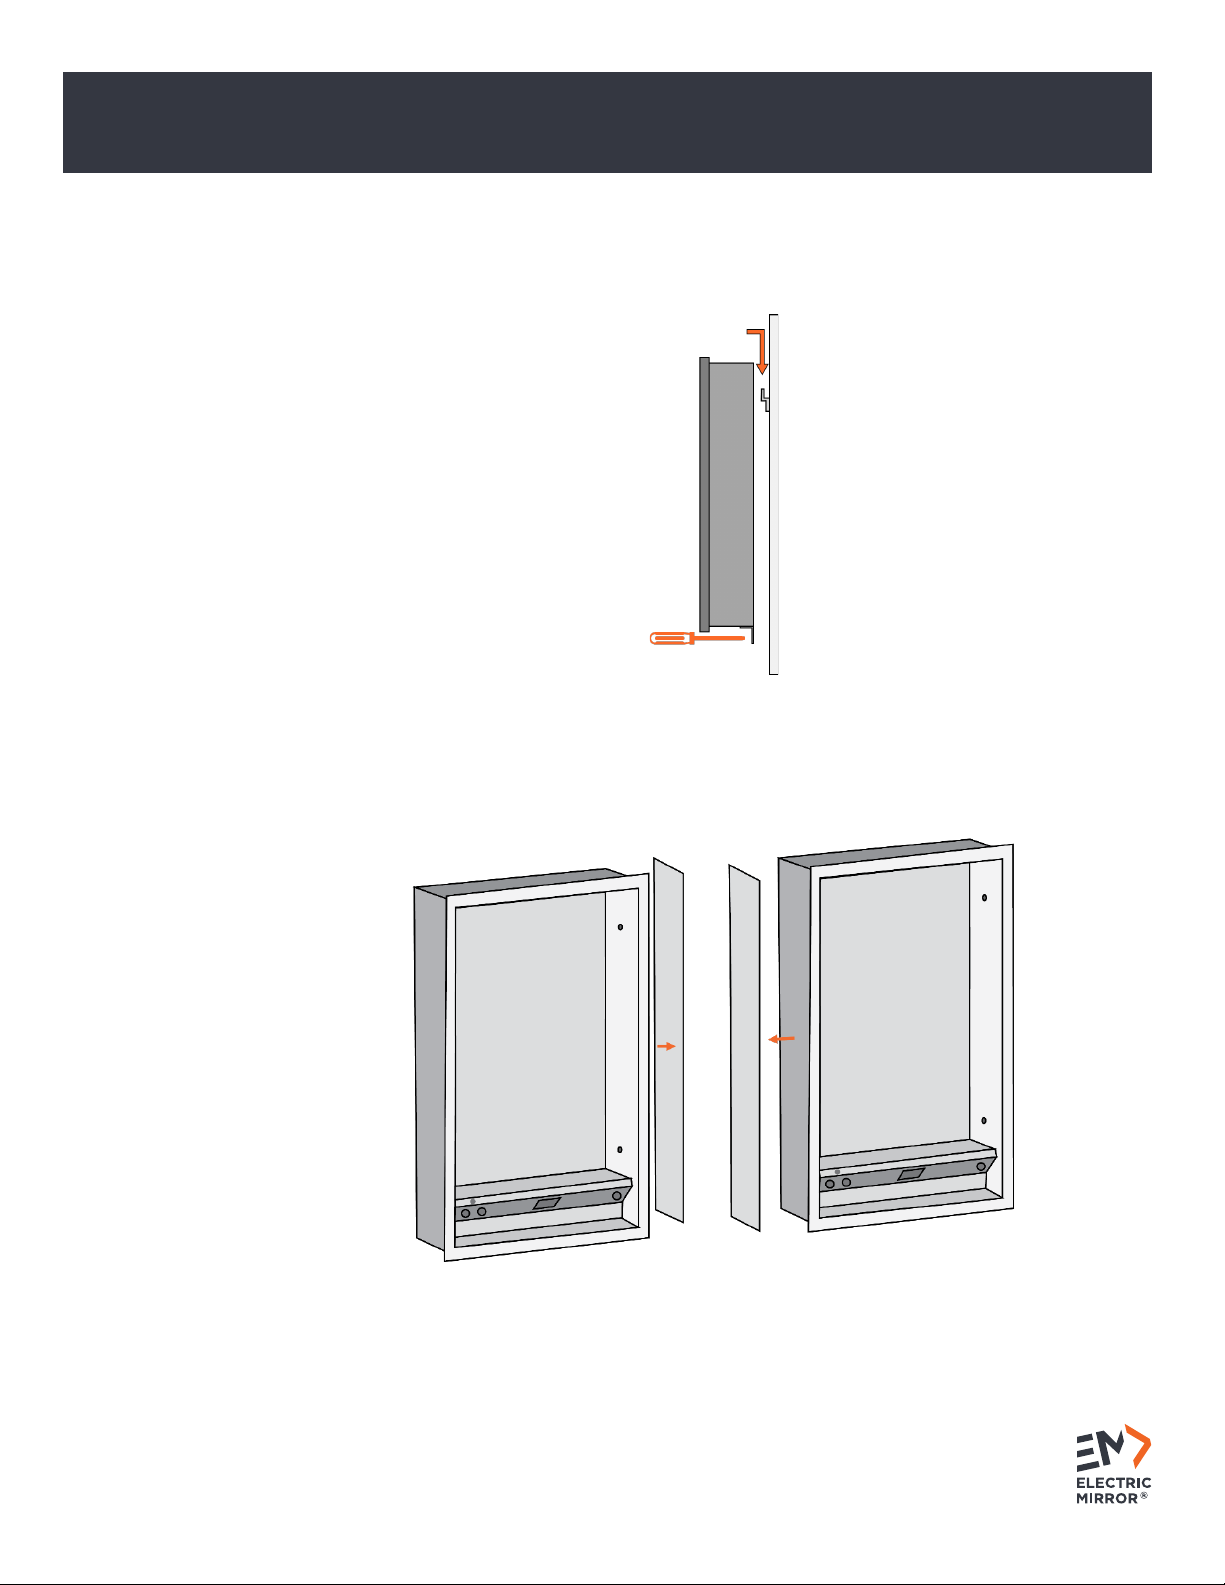
IV. When installing two surface mount cabinets side-by-side, a ganging kit (sold separately) should be used to
ensure cabinets hang level with each other. The ganging kit is inserted between the two cabinet bodies, as
shown below.
a. From the center side of the two cabinet bodies, remove the decorative side panels (See 4B for
details).
Mirrored Cabinet
Installation Guide ELECTRIC MIRROR®
Installation Guide ELECTRIC MIRROR®
ELECTRIC MIRROR® 425.776.4946 | electricmirror.com |sales@electricmirror.com | © 2023 Electric Mirror. All rights reserved. | 0123.5.U
Page 6
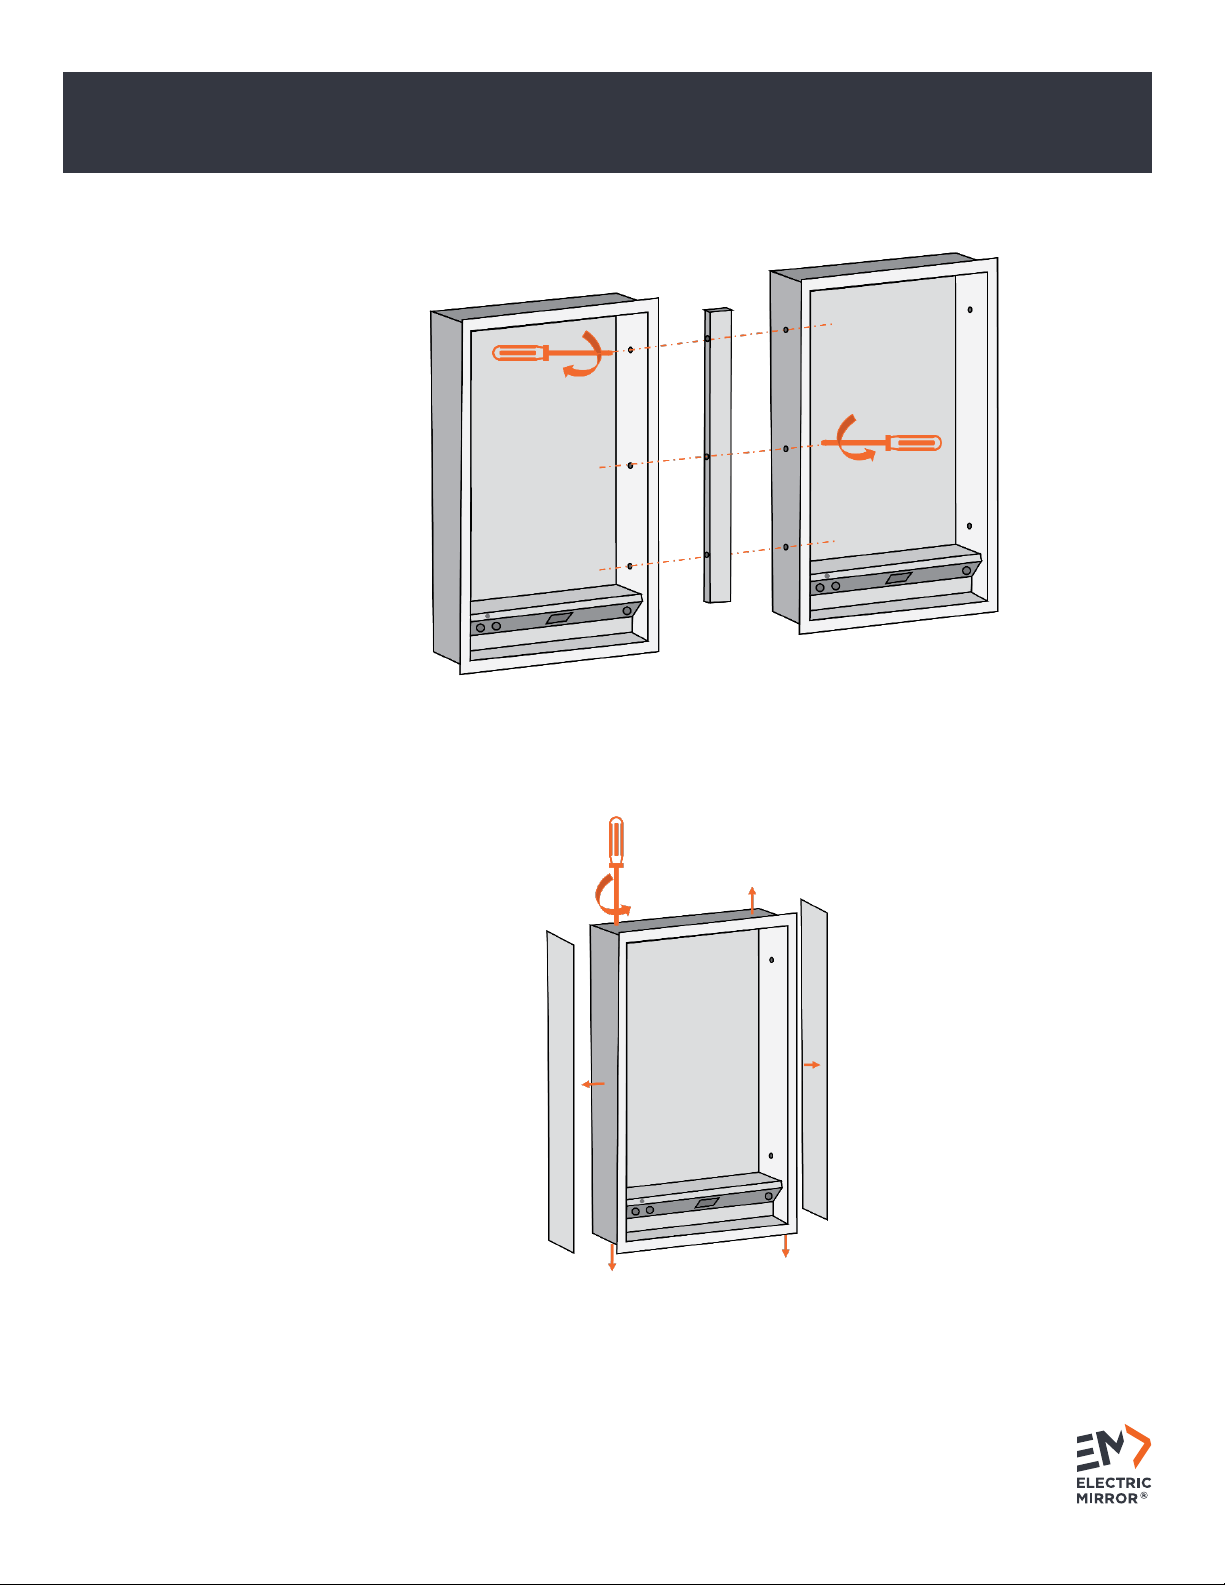
b. Install the ganging kit and secure it through the side walls of the cabinet bodies.
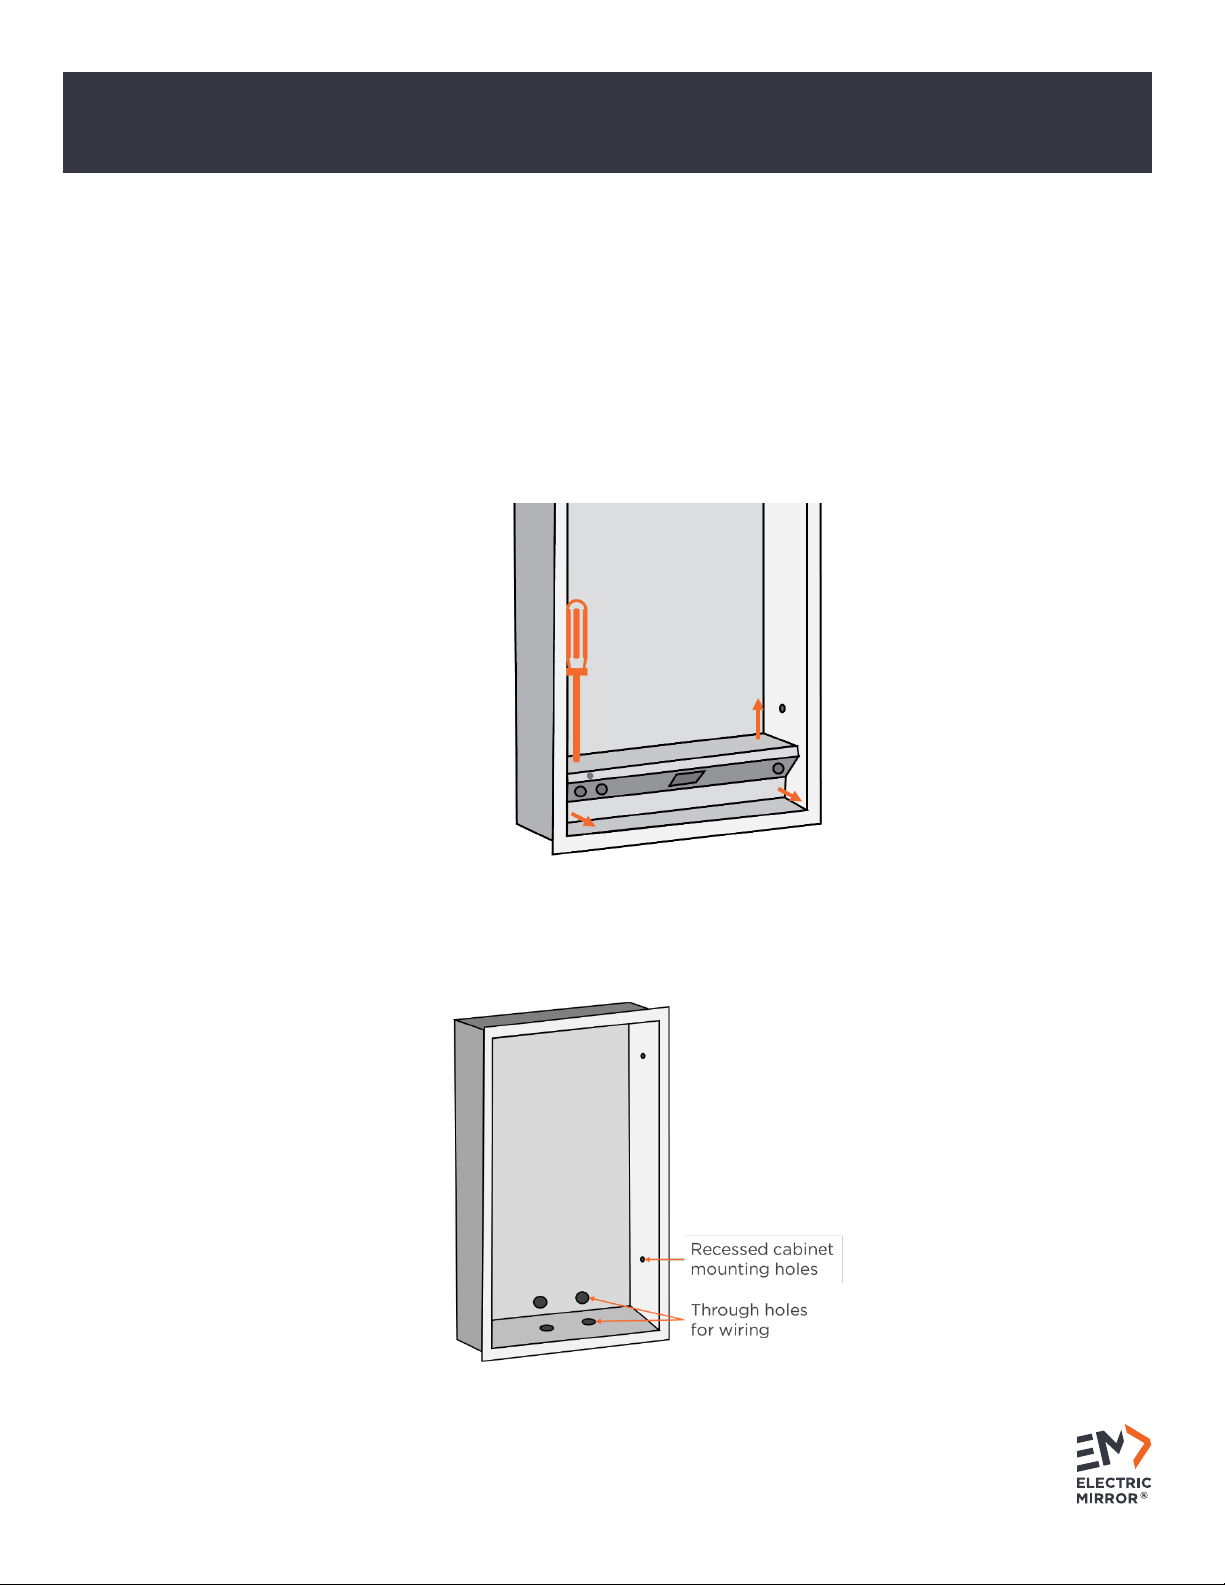
B. Recessed mount hanging
I. Remove the decorative mirror side panels by removing the screws from the top and the bottom of the
cabinet body, then discard the side panels.
Mirrored Cabinet
Installation Guide ELECTRIC MIRROR®
Installation Guide ELECTRIC MIRROR®
ELECTRIC MIRROR® 425.776.4946 | electricmirror.com |sales@electricmirror.com | © 2023 Electric Mirror. All rights reserved. | 0123.5.U
Page 7
II. Measure the exact size of the back of the cabinet body (you already measured the size of the cabinet door
in step 3B).
Back of Cabinet
III. Mark the measured size of the cabinet body on the wall (centered inside the measurements you already
marked for the cabinet door); and cut the recessed opening in the wall along the body (not door)
measurements. The inner sides of the cabinet must be mounted to wall studs or framing.
CAUTION: THERE MAY BE HIDDEN WIRING IN THE WALL. TURN OFF POWER BEFORE CUTTING ANY
HOLES.
Mirrored Cabinet
Installation Guide ELECTRIC MIRROR®
Installation Guide ELECTRIC MIRROR®
ELECTRIC MIRROR® 425.776.4946 | electricmirror.com |sales@electricmirror.com | © 2023 Electric Mirror. All rights reserved. | 0123.5.U
Page 8
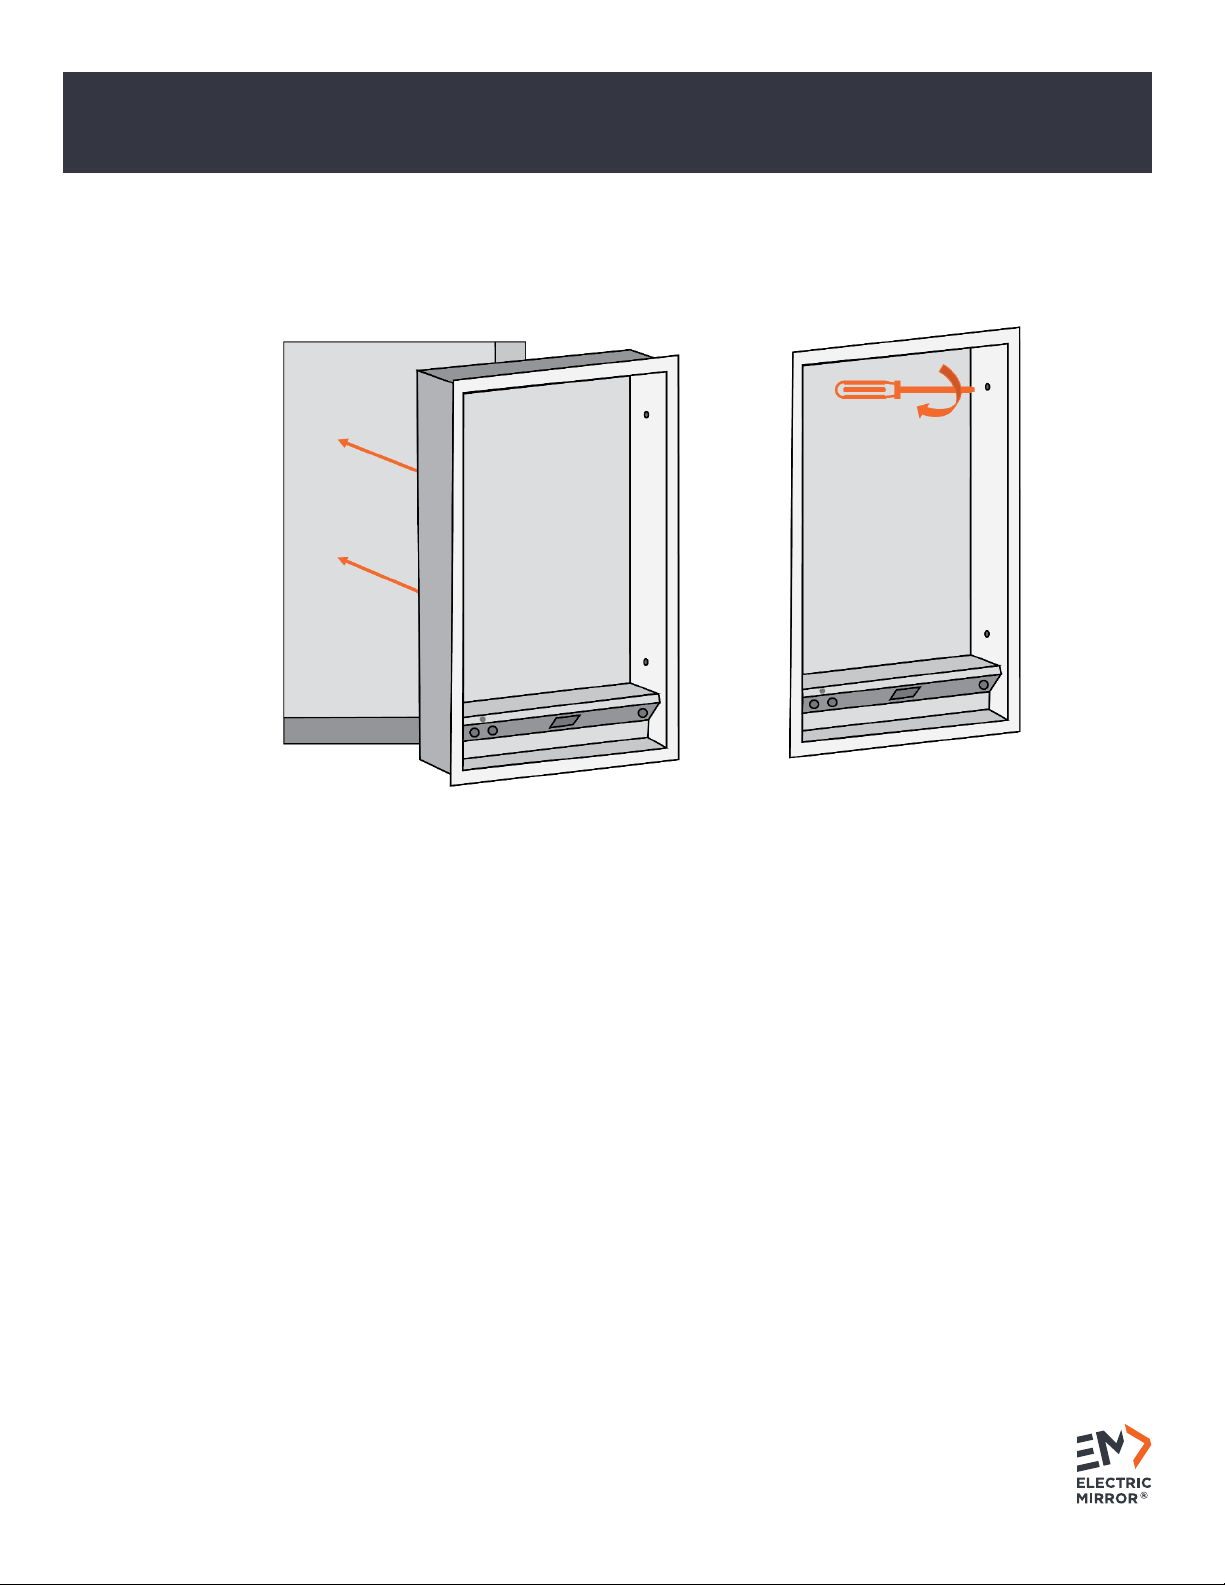
IV. Insert the cabinet body into the recessed opening. Ensure the front flange of the cabinet body is flush to
the wall. Screw the cabinet body into the wall studs or frame using the mounting holes on both inner sides
of the cabinet body.
Mirrored Cabinet
Installation Guide ELECTRIC MIRROR®
Installation Guide ELECTRIC MIRROR®
ELECTRIC MIRROR® 425.776.4946 | electricmirror.com |sales@electricmirror.com | © 2023 Electric Mirror. All rights reserved. | 0123.5.U
Page 9
5. PREPARE THE ELECTRICAL
A. Follow safety precautions.
I. Turn power off to the circuit via the breaker box powering this cabinet.
II. Follow all NEC (National Electric Code) wiring standards for installation.
B. Access the electrical.
I. To access the internal wiring, you will need access to the electrical box in the cabinet. Unscrew the four
screws on the electrical box cover and remove cover.
C. Determine the location where the electrical wiring should come through the wall.
I. There are two entry points into the cabinet.
II. The bottom entry is generally used for recessed installation, and the back is used for surface mount.
Mirrored Cabinet
Installation Guide ELECTRIC MIRROR®
Installation Guide ELECTRIC MIRROR®
ELECTRIC MIRROR® 425.776.4946 | electricmirror.com |sales@electricmirror.com | © 2023 Electric Mirror. All rights reserved. | 0123.5.U
Page 10
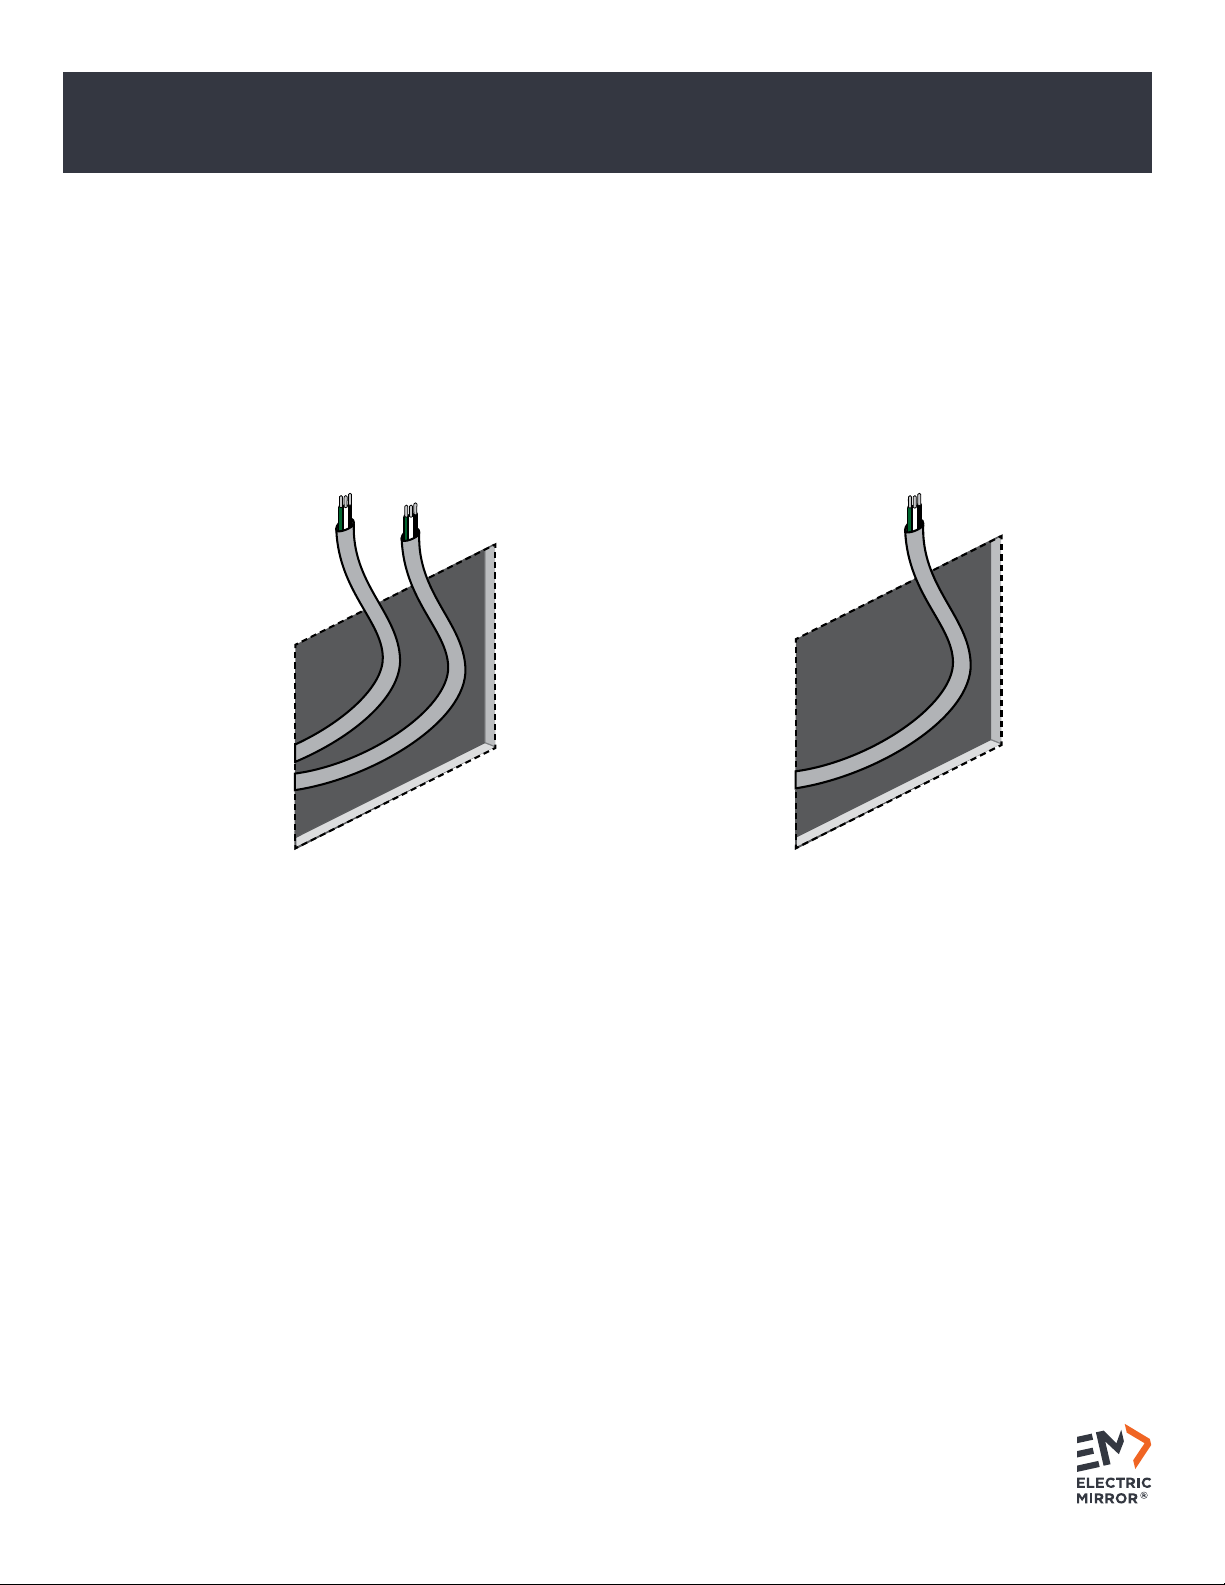
D. Bring electrical power to the mirror location.
I. The circuit(s) for the cabinet outlet must be GFCI protected.
a. The Ascension (ASC) cabinet requires two unswitched 120V 60Hz circuits.
i. A switched circuit is optional for the Ascension in order to turn on/off lights from a wall
switch.
b. The Ambiance (AMB) cabinet requires one switched 120V 60Hz circuit and one unswitched
120V 60Hz circuit.
c. The Simplicity (SIM) cabinet requires one unswitched 120V 60Hz circuit.
II. When bringing out the wiring, leave a 1-foot whip.
Ascension & Ambiance (two circuits)
Simplicity (one circuit)
Mirrored Cabinet
Installation Guide ELECTRIC MIRROR®
Installation Guide ELECTRIC MIRROR®
ELECTRIC MIRROR® 425.776.4946 | electricmirror.com |sales@electricmirror.com | © 2023 Electric Mirror. All rights reserved. | 0123.5.U
Page 11
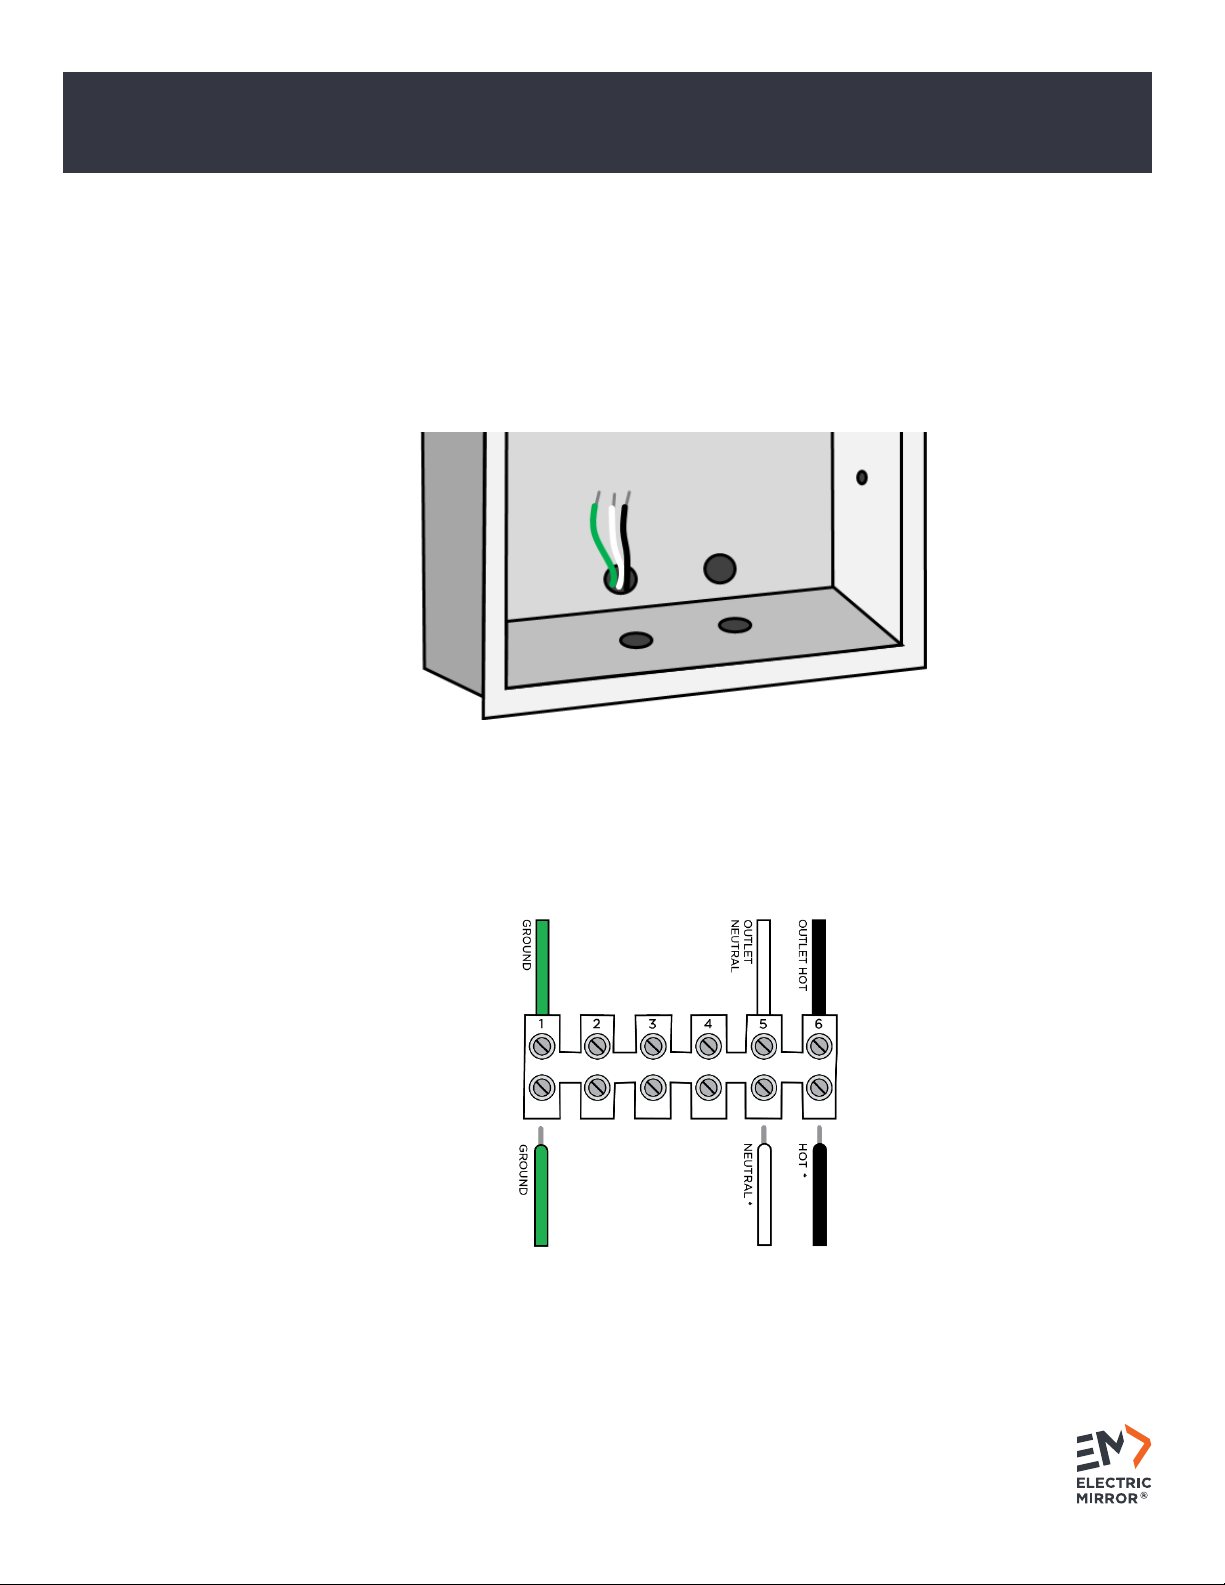
6. CONNECT THE ELECTRICAL
A. Bring the electrical into the cabinet body
I. Inside the electrical box you will find bare wire. You can remove this wire and replace with the whip from
the wall if desired.
II. The wiring from the wall should be brought directly into the cabinet via one or both holes. The bottom
entry is generally used for recess installation, and the back is used for surface mount installation (See
5B).
B. Connect the electrical.
I. For the appropriate wiring configuration, see the image below for your cabinet. Wago connectors are
provided where necessary.
Simplicity (SIM) or other non-lit cabinet
*Outlet needs to be on a GFCI protected circuit.
Mirrored Cabinet
Installation Guide ELECTRIC MIRROR®
Installation Guide ELECTRIC MIRROR®
ELECTRIC MIRROR® 425.776.4946 | electricmirror.com |sales@electricmirror.com | © 2023 Electric Mirror. All rights reserved. | 0123.5.U
Page 12
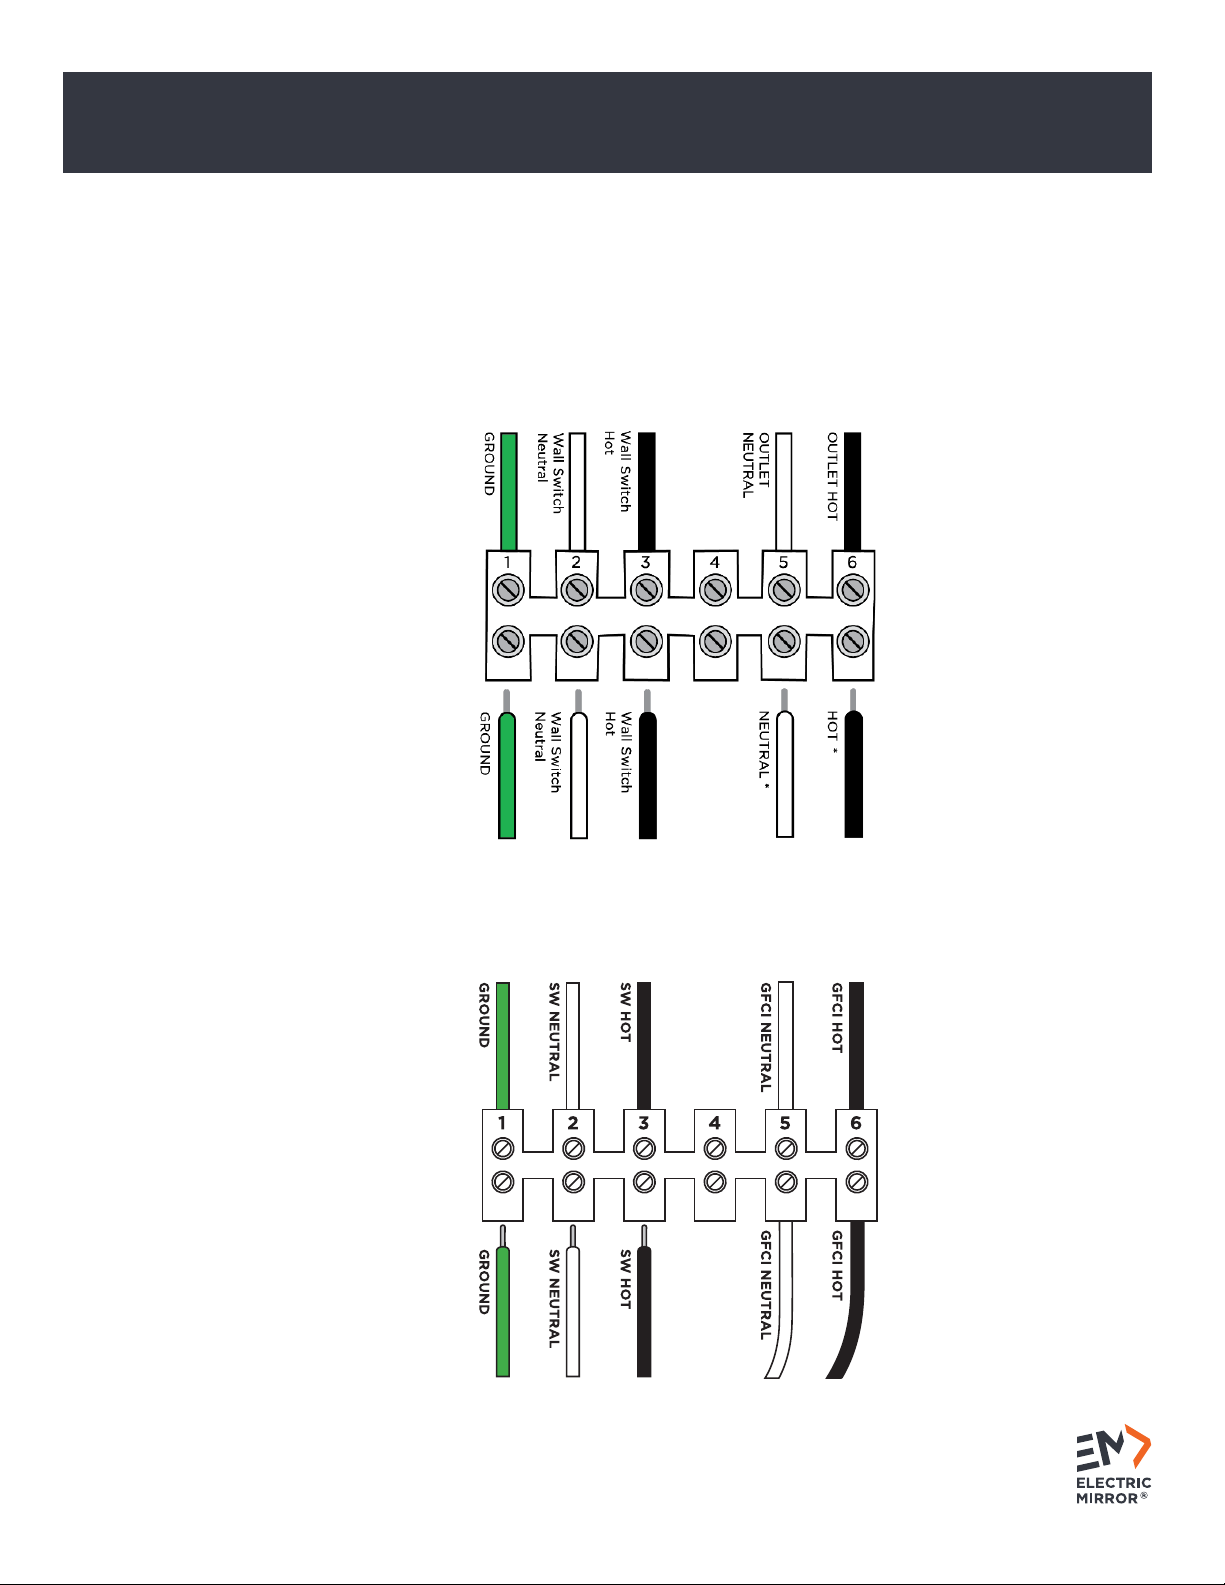
II. After the wiring is completed, secure the electrical box cover back to the cabinet.
III. If your cabinet has capacitive touch dimming on the mirror and/or you are using a dimming switch on
the wall, see the diagrams below.
Ascension (ASC) or other cabinet with touch dimming on the mirror face
(including the use of an on/off wall switch)
*Outlet needs to be on a GFCI protected circuit.
Ambiance (AMB) or another cabinet with wall dimming
Mirrored Cabinet
Installation Guide ELECTRIC MIRROR®
Installation Guide ELECTRIC MIRROR®
ELECTRIC MIRROR® 425.776.4946 | electricmirror.com |sales@electricmirror.com | © 2023 Electric Mirror. All rights reserved. | 0123.5.U
Page 13
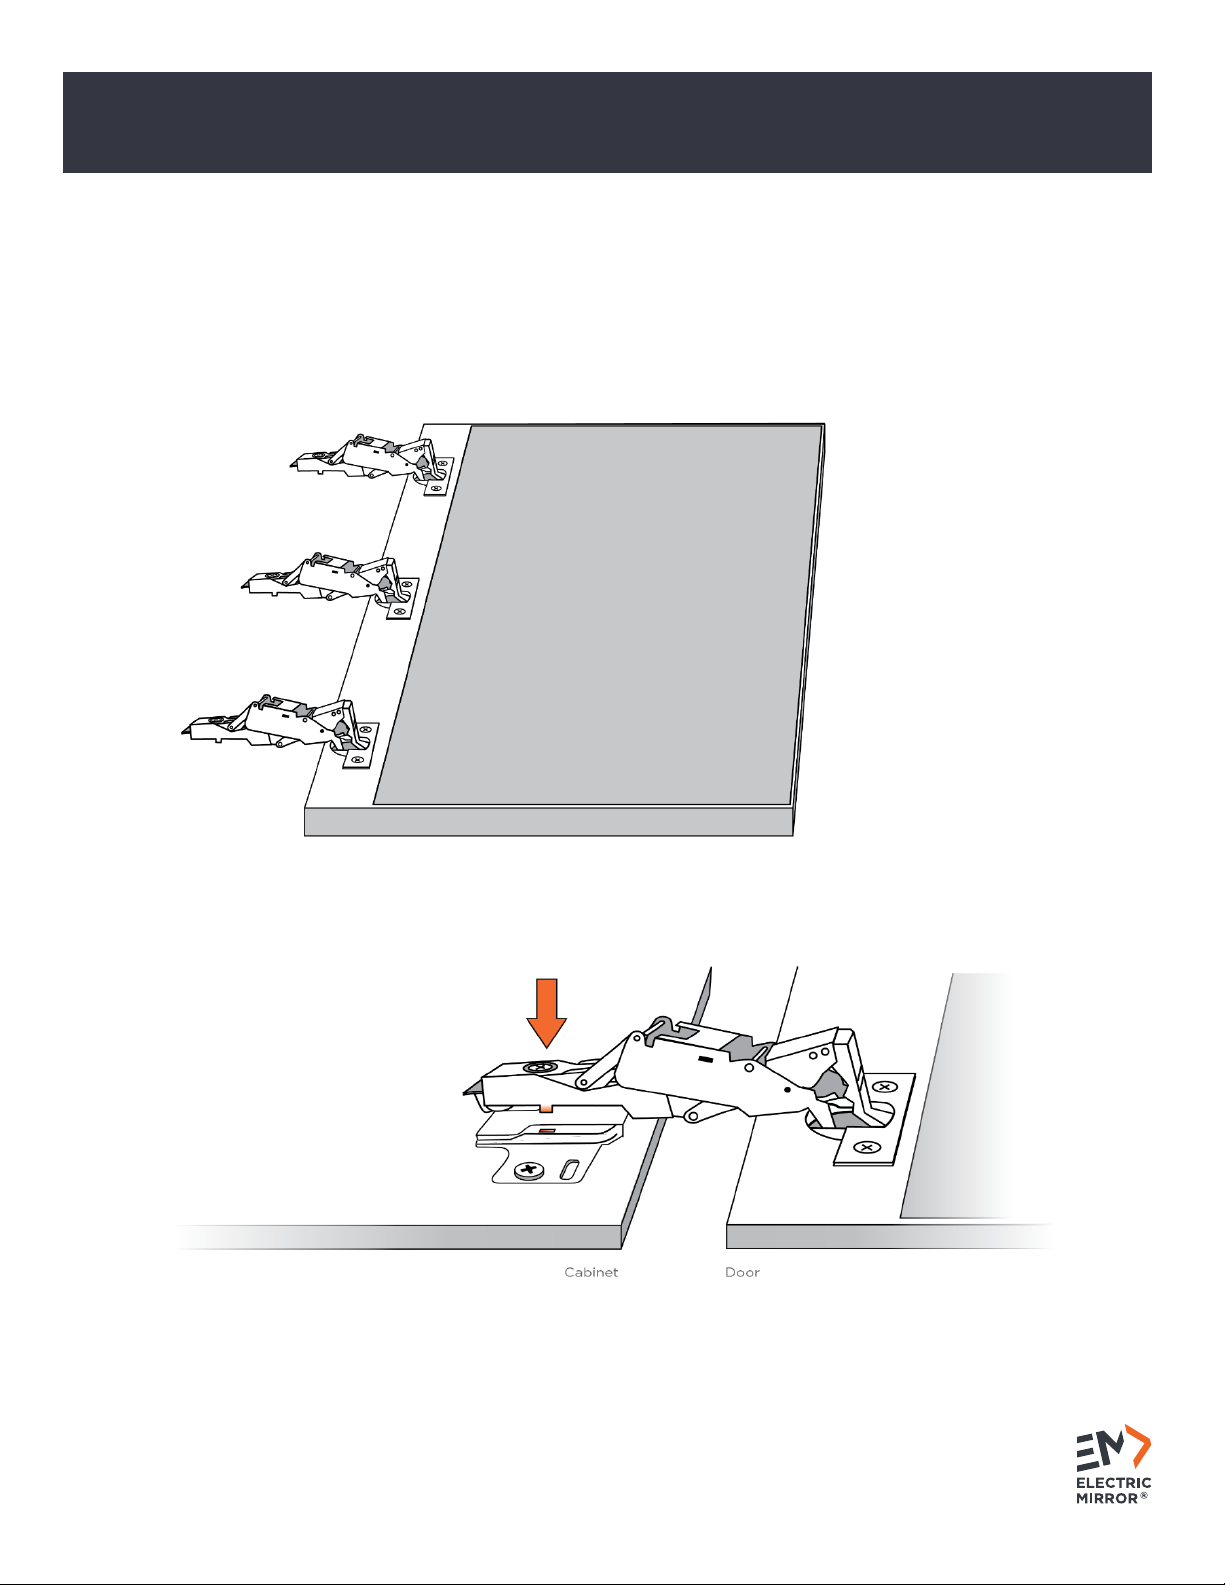
7. INSTALL THE CABINET DOOR
A. Attach the door.
I. Insert the hinges on the door into the hinge receivers on the cabinet body.
II. Hinges are secure when you hear the mechanical click.

Mirrored Cabinet
Installation Guide ELECTRIC MIRROR®
Installation Guide ELECTRIC MIRROR®
ELECTRIC MIRROR® 425.776.4946 | electricmirror.com |sales@electricmirror.com | © 2023 Electric Mirror. All rights reserved. | 0123.5.U
Page 14
B. Connect the door cable.
I. The door cable is mechanically designed to connect in the correct orientation only.
II. Ensure the slot on the connector (from the door) lines up with the tab of the receiver (cabinet body).
III. Rotate the nut on the cable head clockwise to secure it to the cabinet.
Mirrored Cabinet
Installation Guide ELECTRIC MIRROR®
Installation Guide ELECTRIC MIRROR®
ELECTRIC MIRROR® 425.776.4946 | electricmirror.com |sales@electricmirror.com | © 2023 Electric Mirror. All rights reserved. | 0123.5.U
Page 15
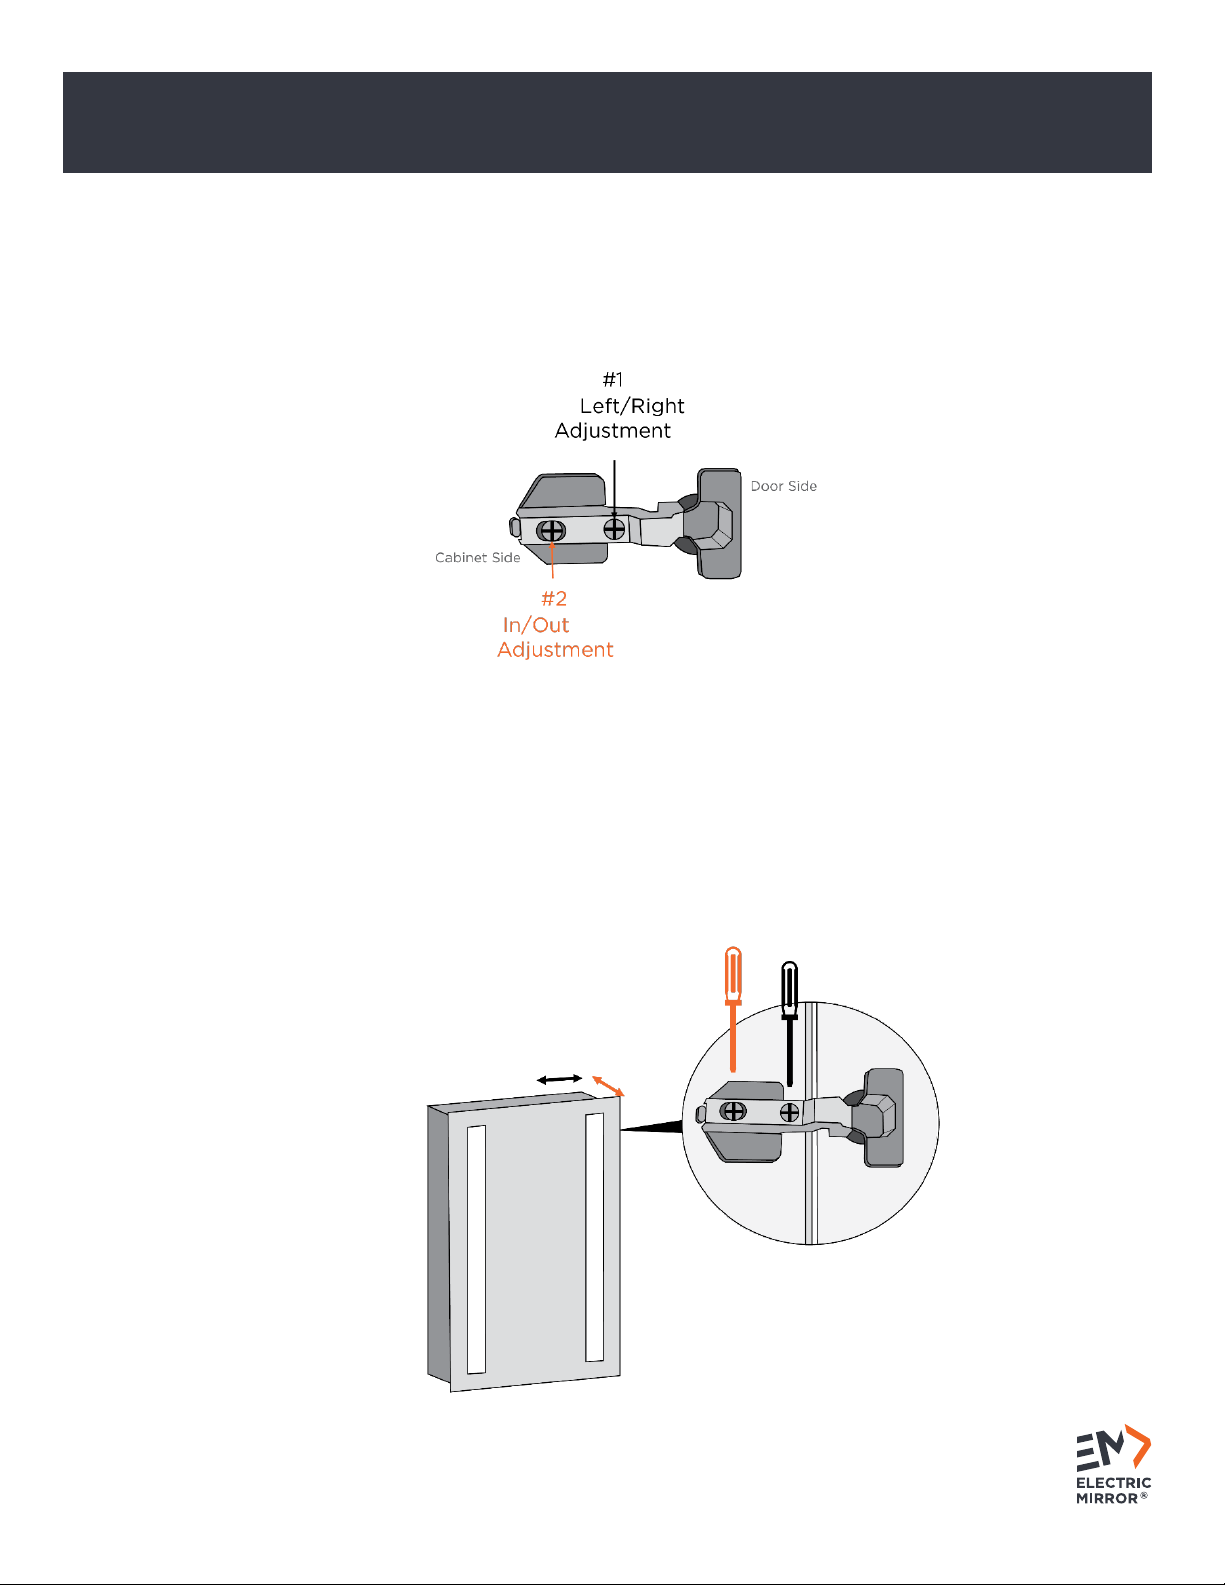
8. ADJUST AND LEVEL THE DOOR
A. Level the door
I. The door will need to be leveled after the installation using two separate screws on each hinge.
II. In the image below, screw #1 will adjust the door left to right and screw # 2 will adjust the door in and out.
B. Adjust the screws.
I. Open cabinet door fully to access screw #1. Using a Phillips screwdriver, turn screw #1 to move the door
from left to right.
a. Close the door to inspect the result of step 8B-I.
b. Readjust the hinge(s) as necessary until the door edges run parallel with the cabinet edges.
II. Turn screw #2 clockwise to move the door away from you.
a. Gaps between the mirrored cabinet and door should be uniform.
b. Close the door to inspect the results of the previous step. Readjust the hinge(s) as necessary until
the door is parallel to the cabinet.
Mirrored Cabinet
Installation Guide ELECTRIC MIRROR®
Installation Guide ELECTRIC MIRROR®
ELECTRIC MIRROR® 425.776.4946 | electricmirror.com |sales@electricmirror.com | © 2023 Electric Mirror. All rights reserved. | 0123.5.U
Page 16
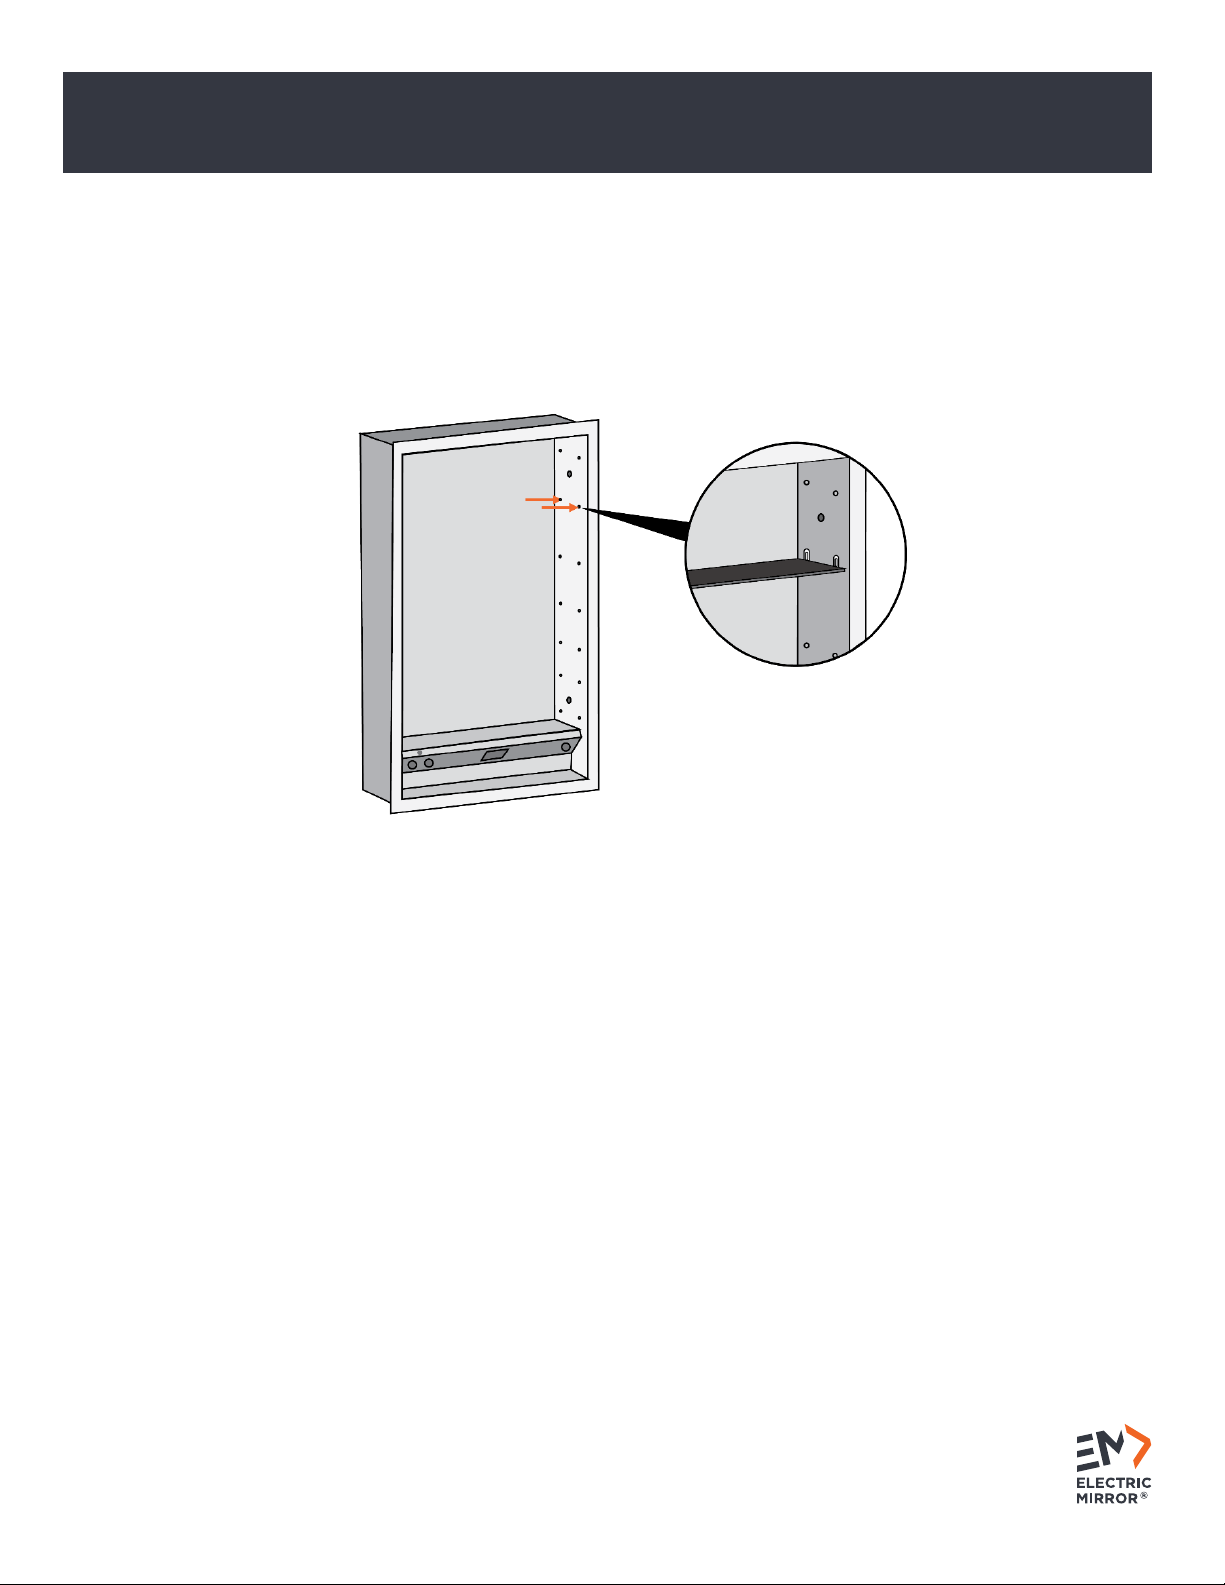
9. INSERT THE SHELVES
A. The cabinet comes with several shelves and shelf pegs.
I. Insert the pegs into the provided mounting holes at the desired height.
II. Place the shelves on the pegs and gently press the sides down until the pegs securely hold the shelves in
place.
10. CLEAN THE MIRROR
A. Use the correct cleaner.
I. The best and safest cleaner is clean, warm water used with a soft cloth.
II. If using a commercial glass or mirror cleaner, be sure to select one that does not contain ammonia or
vinegar.
III. Do not use Windex.
B. Use the correct cleaning cloth.
I. Always use soft, grit-free, and lint-free cloths to reduce the chance of scratching the mirror surface.
C. Use the correct cleaning method.
I. Never spray the water or cleaner directly onto the mirror. Instead, apply it directly to the cloth, then wipe
the mirror.
II. Do not allow the edges of the mirror to get or remain wet.
III. Be sure to dry all joints and edges thoroughly to be certain no water or cleaner comes into contact with
the edge or back surface of the mirror.
This manual suits for next models
2
Table of contents
Other Electric Mirror Indoor Furnishing manuals


Popular Indoor Furnishing manuals by other brands

Regency
Regency LWMS3015 Assembly instructions

Furniture of America
Furniture of America CM7751C Assembly instructions

Safavieh Furniture
Safavieh Furniture Estella CNS5731 manual

PLACES OF STYLE
PLACES OF STYLE Ovalfuss Assembly instruction

Trasman
Trasman 1138 Bo1 Assembly manual

Costway
Costway JV10856 manual


