Electro-Harmonix 22500 User manual

7
22500
Dual Stereo Looper
Congratulations on your purchase of the Electro-Harmonix 22500 Dual
Stereo Looper. lthough the 22500 has a compact footprint it is loaded
with numerous powerful features, including:
•Dual Stereo Loops with either independent or locked loop lengths
•Sequential Looping enables verse/chorus switching
•Parallel Looping allows simultaneous playback of two loops
•Selectable Microphone input with adjustable gain and Phantom Power
•Reverse and Octave functions at the touch of a button
•Undo-Redo your last overdub
•Overdub with adjustable feedback amount
•Create loop lengths that are completely free-form, locked to each other
or quantized to internal rhythms
•100 Loop Banks per SD Card, each bank containing up to 2 loops
•Rhythm Guide with 16 built-in drum loops
•Footswitch selectable for ll Stop, Tap-Tempo, or Rhythm Start/Stop
•USB Port enables backup/restore to PC or M C
•Includes high capacity SD Memory Card for up to 12 hours of loop time
•Optional external Bank-Up/Down Foot Controller (sold separately)
•9.6VDC/500m power supply included
WARNING:
Your
22500
comes equipped with an Electro
-
armonix 9.6
V
DC
-
500mA power supply. The 22500 requires 240mA at 9VDC with a center negative
plug and does not accept batteries. Using the wrong adapter may damage your
unit and void the warranty. Please do not exceed 10.5VDC on the power plug.

2
22500 QUICK START GUIDE
MODES −Selecting / Types / Use
MODE SELECTION & KNOB:
BANK:
OVERDUB:
TRIGGER:
R TEMPO:
R TYPE:
R LEVEL:
ERASE:
• Press and release the MODE knob
to select or deselect modes.
• When a particular mode LED is lit
solid, the mode is selected. Turn
MODE to adjust the value seen on
the display.
• If a mode LED is blinking, no mode
is selected. Turn the MODE knob to
scroll through all the modes.
• When you land on the MODE you
want to adjust, press and release the
MODE knob to enter into the mode.
The selected LED goes solid.
• At this point you can turn the MODE
knob to adjust its value. After doing
so, press and release the MODE
knob to exit out of the mode. The
selected mode LED blinks.
BANK mode allows you to select the
current loop bank. Each SD Card can
hold up to 100 banks, numbered 00
to 99.
LOOP mode is where you change
settings for Loop Lock/Freeform,
Loop Lock Multiply, Quantize,
Parallel/Sequential, and 1-Shot.
LOOP:
Very much like a Feedback control on
a delay effect, the OVERDUB value
sets the loop audio volume loss for
each pass while overdubbing. Set to
100 so the loop never loses volume.
Trigger the start of loop recording
automatically when you start playing
your instrument. Use TRIGGER
mode to set the threshold level. As
the Trigger threshold is set higher,
less signal volume is required to
trigger loop recording.
R(hythm) TEMPO mode displays and
allows adjustment to the tempo. The
displayed tempo is in BPM and
represents the current tempo for
Loops A and B and the Rhythm loop.
R(hythm) TYPE mode displays and
allows you to select a Rhythm. The
22500 comes supplied with 16
Rhythms from the factory. You may
also add your own Rhythm loops, see
page for more information.
R(hythm) LEVEL mode sets the
volume of the Rhythm loop. The
range is 0 to 100.
R LEVEL has a second page which
displays “COPY”. COPY mode
initiates the copy of the factory
default rhythms to the SD Card.
ERASE mode erases either Loop A or
Loop B or both loops simultaneously.
See pages - for an in-depth
explanation of modes.
16 23
26

Recording / Playing / Overdubbing Loops
Press Once
RECORD
END RECORD,
START PLAYBACK
OVERDUB
END OVERDUB,
CONTINUE PLAYBACK
Press Once
Press Once
Press Once
Press Twice
STOP PLAYBACK
LOOP FSW ACTIONS
LOOP A First:
Even though the loops may be completely independent in
Freeform mode, we recommend you always record Loop A
first. When set to Loop-Lock mode, the 22500 requires Loop A
to be recorded first since Loop B’s length is automacally set
by Loop A.
START RECORDING - No Loop in Memory:
NON QUANTIZE MODE:
1. Set LOOP Mode to F nP.
2. Press LOOP A or B’s FSW once to begin recording loop
immediately. REC LED lights.
4-BEAT QUANTIZE MODES:
1. Set LOOP Mode to F 4P.Each bar is 4 beats.
2. Ensure RHYTHM buon is lit.
3. Press STOP/TAP FSW to start Rhythm loop.
4. Press LOOP A’s FSW once. Recording begins on the
following beat 1. REC LED lights.
END RECORDING / SET LOOP LENGTH:
NON QUANTIZE MODE: Press LOOP A or B’s FSW once to end
recording, set the loop length, and begin playback. PLAY LED
lights solid, MEM LED blinks.
4-BEAT QUANTIZE MODE: Press LOOP A or B’s FSW once to
enter Record-End mode. The loop will stop recording when it
reaches the end of the current bar. PLAY LED lights solid,
MEM LED blinks.
The loop immediately begins playback aer the recording
ends. Excepon: in 1-Shot mode, the loop does not play back
immediately. You must press Loop’s FSW to iniate play back.
LOOP PLAY/STOP:
PLAY: If a loop is stopped, press its FSW once to start
playback. PLAY LED lights solid.
STOP: If the loop is playing, overdubbing, or recording, press
its FSW twice to stop the loop. MEM LED blinks or is lit solid.
OVERDUB START/STOP:
OVERDUB START: While a loop is playing, press the loop’s
FSW once to enter overdub. REC, PLAY LEDs lit solid. MEM
LED blinks or is lit solid. If blinking, undo may be performed.
OVERDUB STOP: While a loop is overdubbing, press its FSW
once to end overdub; the loop connues playback. PLAY LED
lights solid, MEM LED blinks indicang undo is available.
3

4
L24P
Digit 1:
L: Loop-Lock Mode
F: Freeform Loop Mode
Digit 2:
Loop Lock Multiple: When
set to Loop Lock Mode,
digit 2 automatically sets the
length of Loop B as a multiple
of Loop A, such as .5x, 1x, 2x
up to 9x. When set to U, the
multiple can be any whole number
set by the user when creating LOOP B.
Digit 2 is blank when set to Freeform mode.
Digit 3:
n: Non-Quantize mode, Quantize is off
2: Quantize to 2/4 bar lengths, each bar 2 beats
3: Quantize to 3/4 bar lengths, each bar 3 beats
4: Quantize to 4/4 bar lengths, each bar 4 beats
6: Quantize to 6/8 bar lengths, each bar 6 beats
b: Quantize to the beat, this is an expert setting
Digit 4:
P: Parallel Mode – the loops
can play simultaneously, in
parallel with each other.
S: Sequential Mode – only
one loop plays at a time.
A1of
A1oF: 1-Shot mode is OFF for LOOP A
A1on
A1on:1-Shot mode is ON for LOOP A
b1of
b1oF: 1-Shot mode is OFF for LOOP B
b1on
b1on: 1-Shot mode is ON for LOOP B
LOOP Mode Explanation
Page 1: Quantize, Parallel/Sequential,
Loop Lock Settings
The settings in LOOP mode dictate how loops are rec-
orded, played back, and interact with each other. In this
mode the following settings can be adjusted:
Page 2 - Loop A 1-Shot Page 3 - Loop B 1-Shot
1-Shot mode: In 1-shot mode the loop audio is played one time
through and then stops; the loop does not continue to play.
•Lock Loop B’s length to Loop A
•Play and record the loops in parallel or sequentially
•Quantize loops to exact bar lengths, synchronized to the 22500’s Rhythm
1
/8th

5
Parallel Loop Recording/Playback Examples
Freeform Mode
f nP FREEFORM
PARALLEL—
QUANTIZE OFF: f 4P
FREEFORM
PARALLEL—
QUANTIZE ON:
In Parallel mode, one or both loops play simultaneously, allowing
you to use the 22500 like a 2 track recorder or two independent
loopers. To follow these examples, please set LOOP Mode to
the settings shown at the start of each section.
•Loops play back simultaneously.
•Each loop may be independently
started or stopped.
•Loop B’s length is independent of
Loop A.
•Either Loop A or B may be recorded
first but default tempo is set by A.
RECORD LOOP A:
1. Press Loop A’s FSW to begin rec-
ording Loop A immediately.
2. Press Loop A’s FSW again to end
recording on Loop A and to set its
length. Loop A will now start playing
back. You could also end Loop A by
pressing Loop B’s FSW to immediate-
ly end Loop A and begin recording
Loop B.
3. While Loop A is playing, you could
overdub onto Loop A by pressing its
FSW, stop Loop A by double-tapping
its FSW, or just let it play.
RECORD LOOP B:
4. Whether Loop A is playing, over-
dubbing, recording or stopped, press
Loop B’s FSW to immediately begin
recording Loop B. If you press Loop
B’s FSW while Loop A is making its
initial recording, Loop A’s length is set
at the moment you press B’s FSW.
5. Press Loop B’s FSW to end rec-
ording and to set Loop B’s length.
Loop B will now start playing back.
6. At this point, you could overdub
onto Loop B by pressing its FSW, stop
Loop B by double-tapping its FSW, or
just let it play.
•Similar to Freeform mode with
Quantize off except Loop A and B’s
lengths are quantized to the nearest
bar. Loop A’s initial recording tempo
establishes the default tempo for
both loops.
RECORD LOOP A:
1. Ensure the RHYTHM button is lit.
Start the Rhythm loop by pressing the
STOP/TAP FSW.
2. Press Loop A’s FSW. Loop A begins
recording on beat 1 of the next bar.
3. Press Loop A’s FSW to end record-
ing. The 22500 will stop recording on
beat 1 of the following bar.
NOTE: Pressing Loop A’s FSW before
the Rhythm loop is playing puts Loop
A in Record-Ready mode. It waits for
you to start the Rhythm loop. Once
you start the Rhythm, Loop A begins
recording on beat 1 of the second bar.
RECORD LOOP B:
4. While Loop A is playing, overdub-
bing, recording or stopped, press
Loop B’s FSW to put B into Record-
Ready mode; Loop B’s REC LED
blinks. Loop B begins recording on
the next bar’s beat 1. If Loop A is
recording its initial loop when you
press B’s FSW, Loop A continues to
record until the current bar finishes
recording.
5. Press Loop B’s FSW to end record-
ing. Loop B continues recording until
the current bar finishes. Loop B then
begins playing back automatically.

6
Parallel Loop Recording/Playback Examples
Loop Lock Mode
L2nP
L24P
LOOP-LOCK
PARALLEL—
QUANTIZE OFF:
LOOP-LOCK
PARALLEL—
QUANTIZE ON:
Continuing examples of Parallel Loop recording and playback,
this time with Loop B’s length locked to Loop A.
•Loop A’s length automatically sets
the length for Loop B.
•Loop A must be recorded first.
•The second digit in Loop Mode sets
the loop multiple for Loop B.
RECORD LOOP A:
1. Record Loop A as done in
Freeform—Quantize Off, on the
previous page.
RECORD LOOP B:
2. Loop B’s record start depends on
the current state of Loop A. If Loop A
is playing or overdubbing, pressing
Loop B’s FSW puts Loop B into
Record-Ready mode; Loop B begins
recording at Loop A’s cycle point. If
Loop A is recording its initial loop or
stopped, pressing Loop B’s FSW
immediately begins recording Loop B.
3. Loop B’s length is automatically
determined by Loop A’s length multi-
plied by the Loop Multiple setting, the
second digit in LOOP mode. For
example, if Loop A is 3 seconds and
the Loop Multiple is set to 2, Loop B’s
length will be 6 seconds. Loop B
automatically stops recording when it
reaches the correct loop length. Both
Loop B’s REC and PLAY LEDs blink
when it is about to stop recording.
PLAYING LOOPs A & B:
4. If you start playing one of the loops,
the other loop—though remaining
silent—will follow along. When you
start the second loop, it begins
playing immediately in sync with the
first loop, as if the second loop was
unmuted.
• Similar to Loop-Lock mode with
Quantize Off except Loop A’s length
is quantized to the nearest bar.
Again, Loop A must be recorded first.
RECORD LOOP A:
1. Ensure the RHYTHM button is lit.
Start the Rhythm Loop by pressing
the STOP/TAP FSW.
2. Record Loop A as done in
Freeform—Quantize On, on the
previous page.
RECORD LOOP B:
3. While Loop A is playing, overdub-
bing, recording or stopped, press
Loop B’s FSW to put B into record-
ready mode; Loop B’s REC LED
blinks. Loop B begins recording on
the next bar’s beat 1. If Loop A is
recording its initial loop when you
press B’s FSW, Loop A continues to
record until the current bar finishes.
4. Loop B’s length is automatically
determined by Loop A’s length
multiplied by the Loop Multiple setting,
the second digit in LOOP mode. For
example, if Loop A is 2 bars and the
Loop Multiple is set to 2, Loop B’s
length will be 4 bars. Loop B automat-
ically stops recording when it reaches
the correct loop length.
PLAYING LOOPs A & B:
5. If the Rhythm loop is playing, Loops
A and B start playback on the first
beat 1 after pressing their respective
footswitches. If no Rhythm loop is
playing then Loop A and B play back
in the same way as with Quantize Off.

Sequential Loop Recording/Playback Examples
Freeform & Loop-Lock Mode
In Sequential mode, only one loop plays at a time, allowing you to
switch back and forth between the 2 loops either immediately or
when one of the loops comes to its end. To follow these examples,
please set LOOP Mode to the settings at the start of each section.
•Loops are switched back and forth
immediately upon pressing their
footswitches.
•Either Loop A or B may be recorded
first but A sets Bank’s default tempo.
RECORD LOOP A:
1. Press Loop A’s FSW to begin
recording Loop A immediately.
2. Press Loop A’s FSW again to end
recording on Loop A and to set its
length. Loop A starts playing back.
3. While Loop A plays, you could
overdub, stop, or continue playback.
RECORD LOOP B:
4. Whether Loop A is playing, over-
dubbing, recording or stopped, press
Loop B’s FSW to immediately stop
Loop A and begin recording Loop B. If
you press Loop B’s FSW while Loop A
is making its initial recording, Loop A’s
length will be set at the time you press
the Loop B FSW.
5. Press Loop B’s FSW to end record-
ing and to set Loop B’s length. Loop B
starts playback.
BACK AND FORTH BETWEEN
LOOPS A & B:
6. Toggle back and forth between the
two loops by pressing the FSW of the
loop that is currently not playing or
overdubbing.
7. Let’s say both loops contain audio
and at the moment Loop B is playing.
If you press Loop A’s FSW, Loop B
immediately stops playback and Loop
A starts.
NOTE: Freeform Sequential can also
be performed with Quantize on.
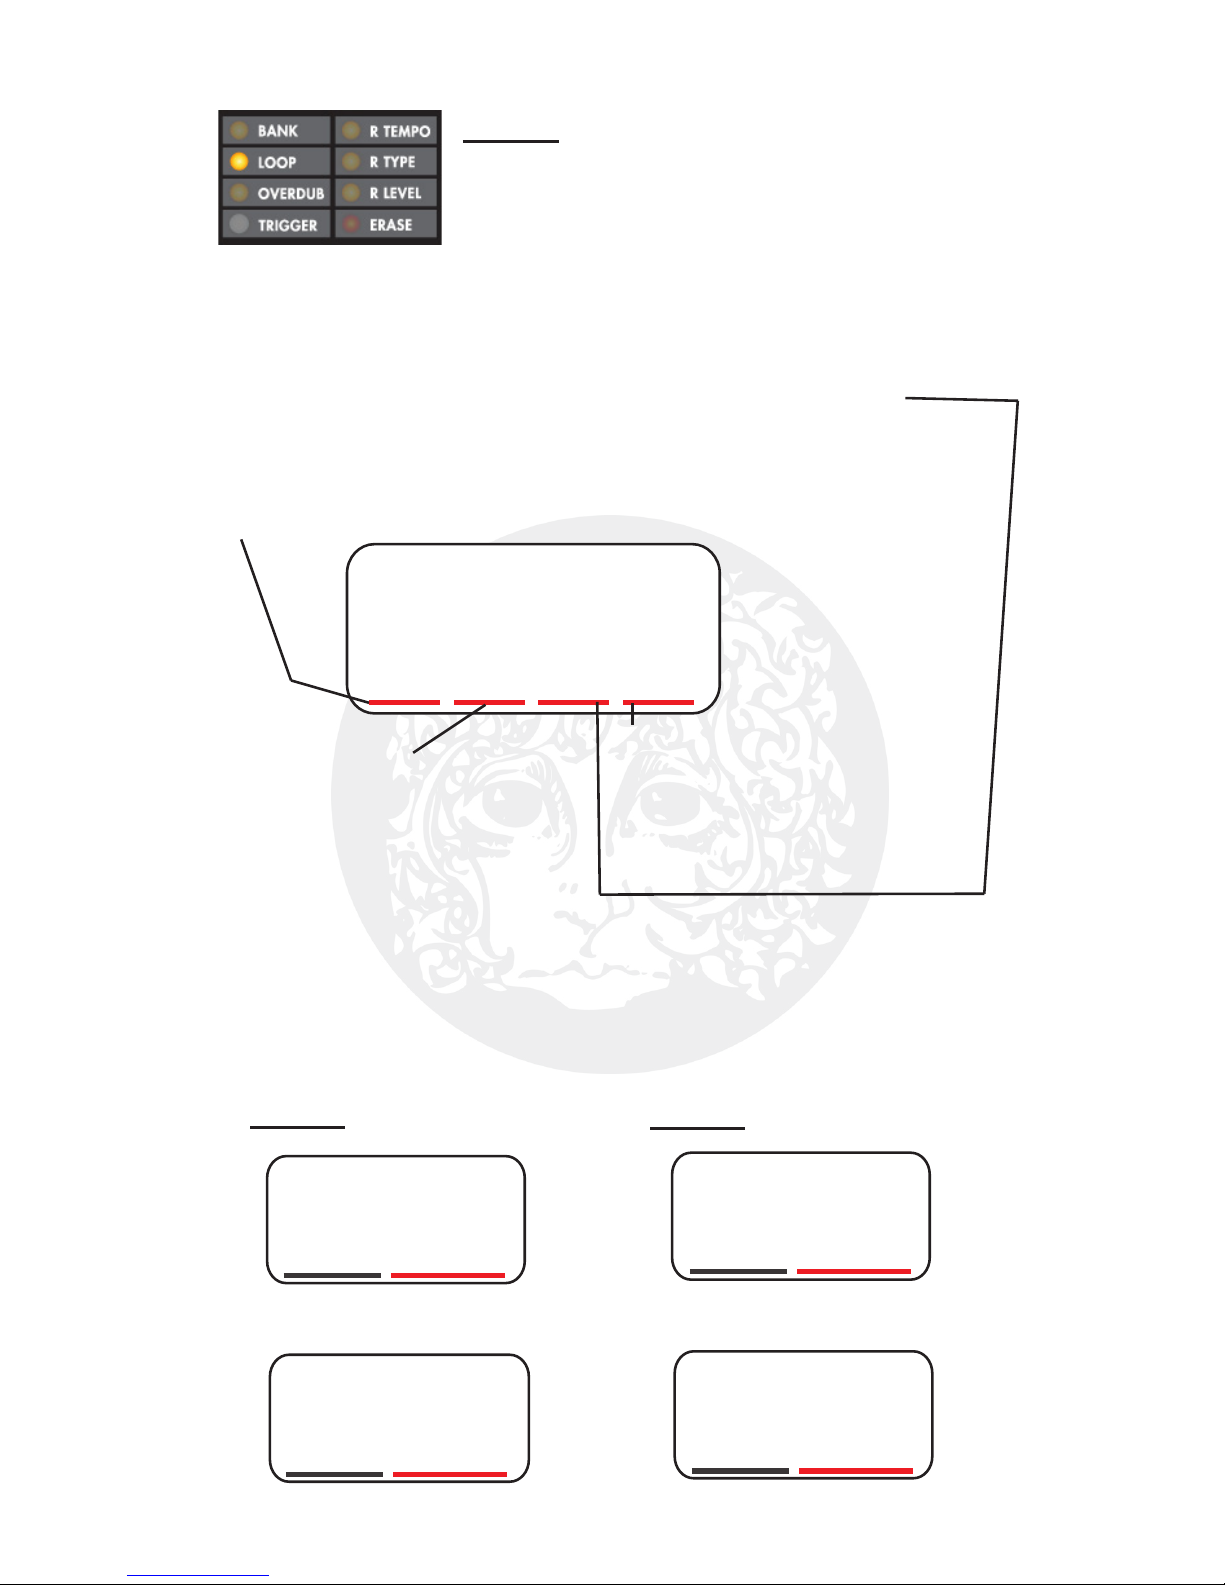
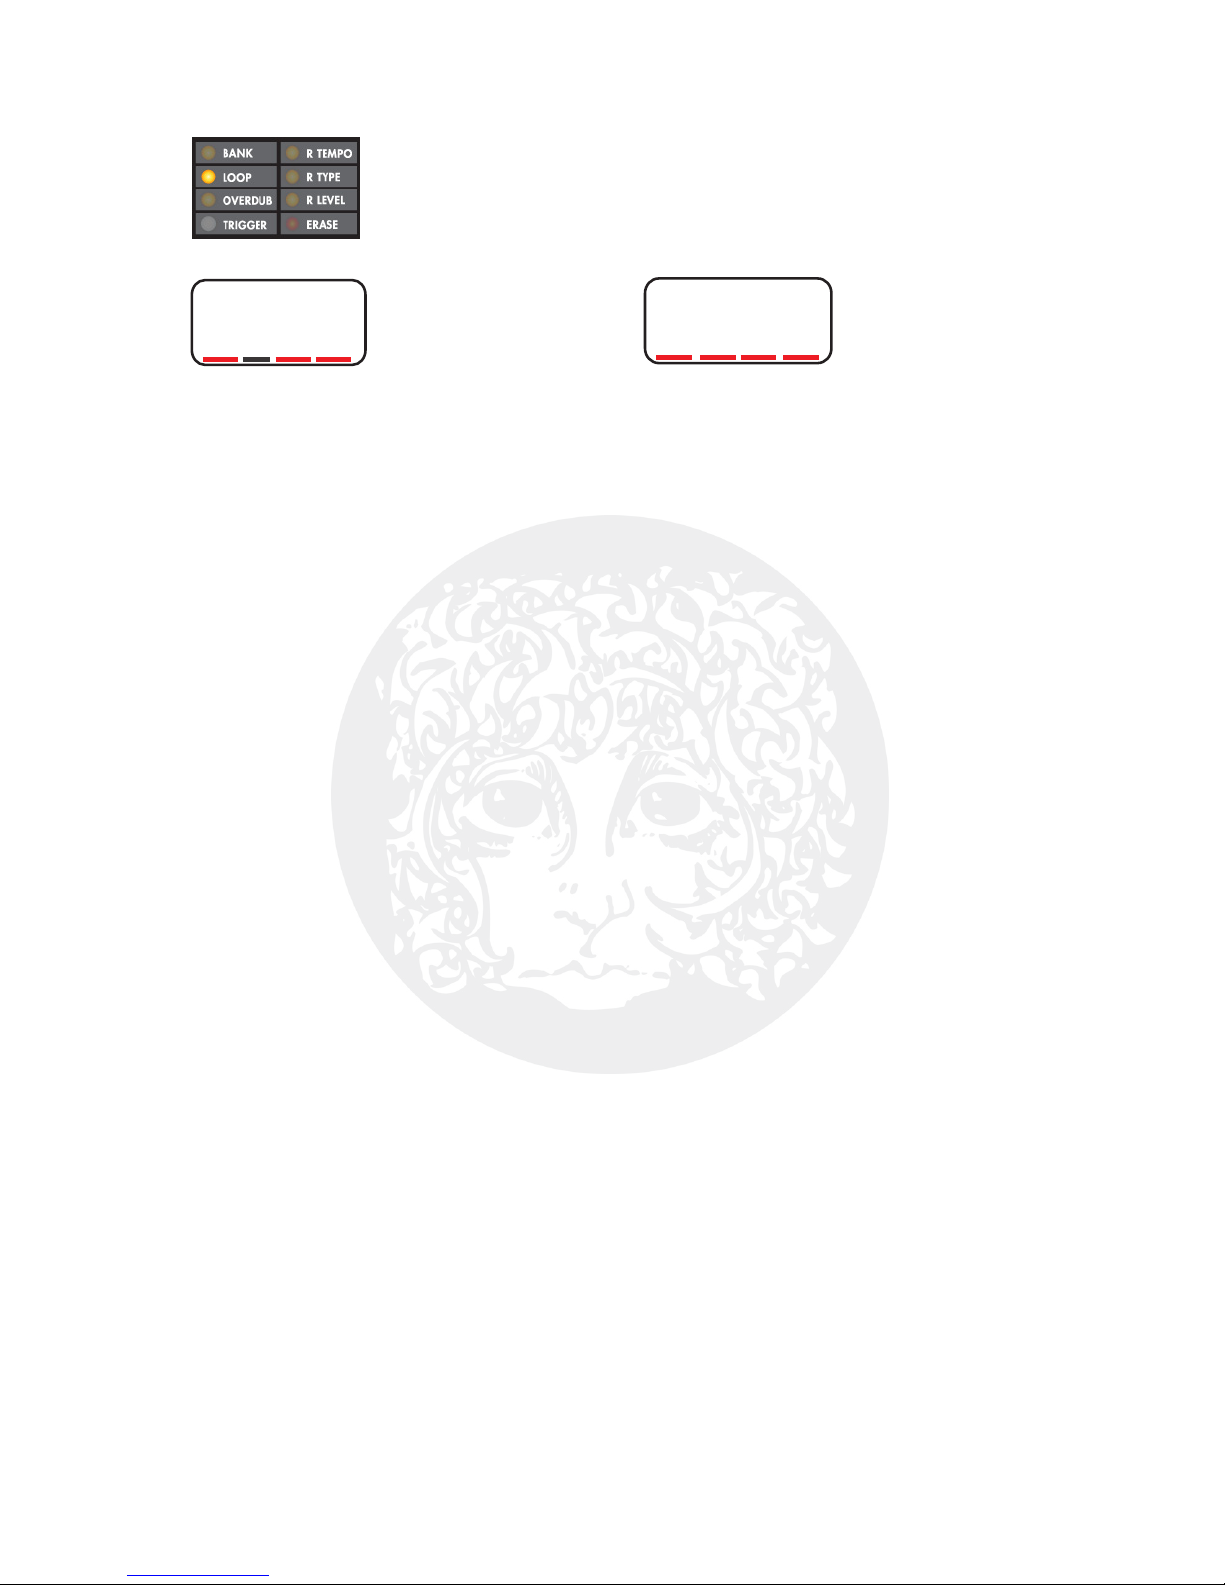
FREEFORM
SEQUENTIAL—
QUANTIZE OFF:
f nS LOOP-LOCK
SEQUENTIAL—
QUANTIZE ON:
•Loops change over when the
currently playing loop ends.
•Loop A must be recorded first.
•Loop A’s length is quantized to the
nearest bar.
•Loop B’s length is a multiple of Loop A.
RECORD LOOP A:
1. Ensure the Rhythm loop is playing.
2. Record Loop A as done in
Freeform—Quantize On, 2 pages back.
RECORD LOOP B:
3. While Loop A is playing or overdub-
bing, press Loop B’s FSW to put B into
Record-Ready mode; Loop B’s REC
LED blinks. When Loop A comes to the
end of its loop, Loop B begins recording
immediately. Loop A stops playback.
4. Loop B’s length is automatically
determined by Loop A’s length multiplied
by the Loop Multiple setting, the second
digit in LOOP mode. For example, if
Loop A is 2 bars and the Loop Multiple
is set to 3, Loop B’s length will be 6
bars. Loop B automatically stops
recording when it reaches the correct
loop length. Both Loop B’s REC and
PLAY LEDs blink when it is about to
stop recording.
BACK AND FORTH BETWEEN
LOOPS A & B:
5. If Loop A is playing or overdubbing
and you press Loop B’s FSW, Loop B
enters Play-Ready mode (B’s PLAY
LED blinks), and waits for Loop A to end
before changing over to Loop B. Same
for going from Loop B to Loop A.
NOTE: Loop-Lock Sequential can also
be performed with Quantize off.
L34S
7

8
22500 USER REFERENCE MANUAL
- CONTROLS & INDICATORS -
LEFT INPUT TOGGLE SWITC (MIC/INST) – The left channel has two input
connector choices: set LEFT INPUT to the down position for the ¼” instrument
input jack or set to the up position for the XLR microphone input.
MIC TRIM Knob – The MIC TRIM knob allows you to fine tune the gain of the
XLR MIC input jack. The maximum gain available at the MIC TRIM knob is
+27dB. Normally it is best to start with MIC TRIM at its maximum setting.
P ANTOM POWER TOGGLE SWITC (ON/OFF) – when set to the upper,
ON position, phantom power is applied to the XLR MIC input jack. Set to the
down position to disable phantom power on the microphone input. CAUTION:
please ensure your microphone can withstand phantom power (+45VDC) before
setting this switch to the ON position. In particular, phantom power is known to
possibly damage ribbon microphones.
INPUT GAIN Knob – The INPUT G IN knob sets the overall gain for both the
LEFT and RIGHT inputs equally. INPUT G IN also sets the output level of your
dry signal at the output jacks. Ideally you would turn up INPUT G IN until you
see the CLIP LEDs light briefly and then reduce the INPUT G IN slightly. If you
need more output level for the dry signal do not be afraid to turn up the INPUT
G IN knob. The maximum gain available at the INPUT G IN knob is +14dB.
Unity gain for the ¼” inputs is located at about 11 o’clock on the INPUT G IN
knob.
When the LEFT INPUT switch is set to MIC, the MIC TRIM knob on the rear panel
first sets the microphone’s gain, and then the INPUT G IN knob further adjusts
the gain. If you attach both a microphone and a Right input, use MIC TRIM to
match the microphone’s level to the Right input. Then use INPUT G IN to set the
input volume for both channels.
CLIP L & R LEDs – When an input signal’s amplitude exceeds the maximum
input level of the 22500’s /D converter, the channel’s respective CLIP LED
briefly lights up. im to adjust the INPUT G IN knob so that these LEDs barely
ever light. However it is also not wrong if they light consistently. Let your ears
decide if there is audible distortion. If distortion is present and it doesn’t sound
right, turn down the INPUT G IN knob.
LOOP A & LOOP B Knobs – These two knobs set the output volume for their
respective loops. The LOOP knob adjusts the output volume for Loop at all
times and the LOOP B knob adjusts the output volume for Loop B at all times.
These knobs are always live and are not saved with loop banks.
REC LEDs for LOOP A & LOOP B – These red LEDs, along with the PL Y and
MEM LEDs, give a visual indication of each loop’s current activity.

9
When the REC LED is lit solid but PL Y and MEM are not lit: the respective loop
is currently recording its initial loop.
When the REC LED is lit solid while also PL Y and MEM are active: the loop is
currently overdubbing onto an established loop. Only one loop can record or
overdub at a time; Loop and Loop B cannot simultaneously record or overdub.
One loop can record or overdub while the other plays though.
blinking REC LED indicates one of two things:
1) You pressed a loop’s footswitch to begin recording a new loop and the loop is
not yet recording but is in Record-Ready mode. Record-Ready occurs if you have
set a Trigger threshold (see TRIGGER mode, page 21) for the loop and now the
22500 is waiting for an audio signal to exceed the threshold at which point it will
begin recording. Record-Ready also occurs when a Quantize mode (see
QU NTIZE, page 19) is enabled: after pressing a loop’s FSW to begin recording,
the 22500 waits for the next bar’s beat 1 or the next beat of the Rhythm loop
and then automatically starts recording on the beat.
2) You are about to finish recording an initial loop. When recording a quantized
loop – during the intended last bar of the loop – press the loop FSW to enter
Record-End mode. The 22500 will record out the rest of the bar while the REC
LED blinks. If you have Loop-Lock mode enabled, when recording Loop B, Loop
B’s REC LED automatically blinks to indicate it is about to stop recording Loop B.
MEM LEDs for LOOP A & LOOP B – If these orange LEDs are lit solid or
blinking, it indicates that a loop is currently in memory. blinking MEM LED
indicates that undo or redo is available for the loop. The table below describes
the MEM LEDs four different states:
MEM LED ST TE WH T IT ME NS
OFF The respective loop is empty; it has no audio
in memory.
ON The respective loop contains audio that may
be played or overdubbed but cannot perform
Undo or Redo.
BLINKING
Rapidly
The respective loop contains audio and you
can perform an Undo function that will erase
the entire loop permanently. This state occurs
right after recording an initial loop and is a
quick way to erase the loop if you are not
satisfied with it.
BLINKING at
Medium Pace
The respective loop contains audio and an
overdub was recently performed. Both Undo
and Redo are available to remove or restore
the last overdub layer.

10
PLAY LEDs for LOOP A & LOOP B – If these green LEDs are lit solid for a
respective loop, the loop is playing. When both the REC and PL Y LEDs are lit for
a respective loop then the loop is overdubbing.
The PL Y LED blinks to indicate the loop is about to start or stop playing. This
occurs when the 22500 is set to Sequential mode with either Loop Lock or
Quantize enabled. In these cases the loop currently playing will finish out its loop
while PL Y blinks before changing over to the other loop. The PL Y LED also
blinks when you are about to finish out the recording of an initial loop with either
Loop Lock or Quantize enabled.
MODE/VAL Knob – The MODE/V L knob has no pointer because it is attached
to a rotary encoder that can be continuously rotated in either direction. The
MODE/V L knob has two functions: 1) to cycle through and choose one of the 8
available modes and 2) once a mode is chosen, to adjust the value of that mode.
When you land on any given mode, the current value of the mode is displayed in
the 4-digit display.
SELECTING MODES – The 8 selectable modes are located to the left of the
MODE/V L knob. Each mode has an LED that, when lit solid, indicates the mode
is selected and its value is ready to be adjusted by turning the MODE/V L knob.
If a mode LED is blinking, turning MODE/V L allows you to scroll through all
modes.
When you arrive at the mode you would like to adjust, press and release the
MODE/V L knob to select the mode. The mode’s LED will stop blinking and light
up solid. If more than one parameter can be adjusted on the 4-digit display, such
as in LOOP Mode, the currently selected parameter will continue to blink while
you adjust it.
REVERSE Button – Loop and Loop B each have a REVERSE button allowing
you to enable/disable the Reverse function for each loop independently. Press
the REVERSE button and the respective loop reverses its Playback/Overdub
direction. When enabled, the REVERSE buttons glow red. Reverse can be used at
any time except when recording an initial loop.
NOTE: pressing REVERSE while a loop is synchronized to the 22500’s Rhythm
loop could put the loop out of sync with the Rhythm. In this case we recommend
you stop loop playback (Rhythm can continue to play), press REVERSE, and then
start loop playback. The reversed loop will be in sync with the Rhythm loop.
OCTAVE Button – Similar to the REVERSE buttons, Loop and Loop B each
have an independent OCT VE button. Each press of an OCT VE button cycles
the respective loop’s speed through the following choices: half speed or down,
double speed or up, original speed. The OCT VE buttons glow red when either
half speed or double speed are activated, the OCT VE button does not illuminate
when set to original speed. Enabling half speed or double speed for a loop does

11
not change the playback speed of the other loop or the Rhythm loop. You can
playback and overdub in any of the Octave modes.
Half Speed: Upon pressing the OCT VE button to activate half speed, the 4-digit
display shows the word “down” for about 1 second. When set to half speed, the
pitch of the loop goes down 1 octave and the tempo is halved. Exactly like
playing a tape at half speed.
Double Speed: Press the OCT VE button again to activate double speed. The 4-
digit display shows the word “UP” for about 1 second. When set to double
speed, the pitch of the loop goes up 1 octave and the tempo is doubled. Exactly
like playing a tape at double speed.
TRIGGER LEDs – Loop and B each have a white LED situated between the
REVERSE and OCT VE buttons. When illuminated these LEDs indicate that
TRIGGER mode is activated for their respective loop. These LEDs blink when
they are waiting for an input signal to exceed their trigger threshold to start loop
recording. See more on TRIGGER mode, page 21.
LOOP A & LOOP B FSWs – These two footswitches (FSWs) control much of the
activity for their respective loops. If you start with an empty loop, the following
actions can be performed by pressing either of the Loop FSWs:
Press Loop FSW once > Start Recording Initial Loop >
Press Loop FSW once > End Recording and Set Loop Length, Immediately Start Playback >
Press Loop FSW once > Start Overdubbing >
Press Loop FSW once > End Overdubbing, Continue to Playback Loop >
Press and Hold Loop FSW for 1.5 Seconds > Undo Last Overdub > Release FSW >
Press and Hold Loop FSW for 1.5 Seconds > Redo Last Overdub > Release FSW >
Double Tap Loop FSW > Stop just the Loop associated with the FSW >
Press Loop FSW once > Start Loop Playback
STOP/TAP FSW – The STOP/T P FSW performs the following 3 functions: Stop
Everything, Start/Stop Rhythm loops, Tap Tempo. The STOP/T P FSW function
can be changed by enabling or disabling the RHYTHM and T P ON buttons
above the FSW. See the table on the following page for more information.
R YT M Button – When this button glows orange RHYTHM is enabled and the
STOP/T P FSW starts and stops the Rhythm loop. See the table on the following
page for more information.
TAP ON Button – Press this button to enable/disable T P ON and allow the
STOP/T P FSW to perform tap tempo for the loops and Rhythm. See the table
on the following page for more information.

12
The following table breaks down the function of the STOP/T P FSW depending
on the buttons that are enabled.
RHYTHM
BUTTON
T P ON
BUTTON
STOP/T P FSW FUNCTION
Disabled Disabled 1. single press of the STOP/T P
FSW immediately stops playback
of all loops including Rhythm.
2. Press and hold the FSW for 1.5
seconds to return to Loop ’s
originally recorded tempo.
Enabled Disabled 1. single press of the STOP/T P
FSW starts and stops Rhythm
playback.
2. double tap of the FSW stops
everything.
3. Press and hold the FSW for 1.5
seconds to return to Loop ’s
originally recorded tempo.
Disabled Enabled
1. Three or more taps of the
STOP/T P FSW sets the tempo for
Loops and B and the Rhythm
loop.
2. Press and hold the FSW for 1.5
seconds to return to Loop ’s
originally recorded tempo.
Enabled Enabled 1. If the Rhythm loop is not playing,
a single press of the STOP/T P
FSW starts the 22500’s Rhythm
loop.
2. Three or more taps of the
STOP/T P FSW sets the tempo for
Loops and B and the Rhythm
loop.
3. Press and hold the FSW for 1.5
seconds to stop all loops.

13
- MORE ON TEMPO & TAP TEMPO -
TEMPO – The 22500 displays the current tempo setting, in BPM, when you
select R TEMPO mode. The settable tempo range is 40.0 to 320.0 BPM. The
tempo setting is saved with each bank, so as you change banks the last used
tempo for a given bank is recalled the next time you return to the bank.
TEMPO ADJUSTMENTS – You may adjust tempo in two ways: 1) by rotating
the MODE knob when R TEMPO is selected or 2) by tapping a tempo using the
STOP/FSW when T P ON is enabled.
USING TAP TEMPO – It is usually best practice to give the STOP/T P FSW 3
taps each time you set the tempo. The 22500 employs tap averaging where 3 or
more taps are averaged together to set the tempo. If you have already set the
tempo with previous taps and you want to update the tempo slightly faster or
slower, then 2 taps can be used but we still recommend going with at least 3
taps. The tap tempo range is 40 to 320 BPM. NOTE: If you tap 3 times but one
pair of taps is way off from the other, the 22500 throws away the 3rd tap which
means a 4th tap is needed to set the tempo.
TIME STRETC & COMPRESSION – When you adjust tempo, Loop and B
do not change pitch. Their audio is time stretched or compressed, making the
loops faster or slower to remain in sync with the adjusted tempo setting. The
time stretching/compressing algorithm creates audio artifacts that often sound
like tremolo, this is normal. NOTE: The Rhythm loop audio does not time stretch
or compress when you adjust the tempo. Instead the Rhythm loop changes
speed so both pitch and time are altered.
LOOP A SETS BANK DEFAULT TEMPO – When you record Loop ’s initial
loop, the tempo setting at the time of its recording establishes the default tempo
for the loop bank in which you are working.
RETURN TO ORIGINAL TEMPO – fter making adjustments to the tempo you
may want to return to the original tempo that was set at the time you first
recorded Loop . Pressing and holding either the STOP/T P FSW or MODE knob
returns the 22500 to Loop ’s original tempo setting. The 22500 only returns to
Loop ’s original tempo, it does not return to Loop B’s original tempo, even if
Loop B was recorded first.
To return to the original tempo using the STOP/T P FSW: ensure the RHYTHM
and T P ON buttons are not both enabled, then press and hold the FSW for 1.5
seconds. When both buttons are enabled, pressing and holding the FSW stops all
loops. Using MODE knob: make sure the R TEMPO LED is lit solid or blinking and
then press and hold the MODE knob for 1.5 seconds.
NON-QUANTIZE TEMPO C ANGES – Tempo is always active, even when you
create loops where Quantize is disabled. Most likely the non-Quantized loops you
create will have nothing to do with the original Tempo setting. If you plan on
changing the tempo of non-Quantized loops you can set the tempo wherever you

14
like before creating Loop . Then use the initial tempo setting as a starting place
for adjusting tempo later. NOTE: Tap tempo may not work as expected for non-
Quantized loops.
- MORE ON UNDO/REDO -
The 22500 allows for one level of undo and redo. When each loop’s MEM LEDs
are blinking, an undo or redo is capable of being performed for the respective
loop. If the MEM LED is lit solid than no undo or redo is available for that loop.
PERFORMING UNDO/REDO – Press and hold the footswitch associated with
the loop for which you wish to perform undo. For example, hold down the LOOP
FSW for 1.5 seconds, after which the display shows “undo” or “rEdo”. t this
point undo or redo has been carried out on Loop , and the footswitch may be
released.
INITIAL LOOP UNDO – fter recording Loop or B’s initial loop, if you
perform an undo it will completely erase the loop. Using undo to erase a new
loop is handy because it is a quick way to start over on a loop while using only
your feet. You do need to be careful though because you cannot perform a redo
to bring the loop back. fter you have entered overdub for a loop you can no
longer erase the initial loop using undo, instead use ER SE mode, see page 23.
OVERDUB LOOP UNDO/REDO – Once you begin overdubbing onto a loop,
undo and redo are both available. Undo removes the last overdub layer while
redo restores the last overdub, after an undo is performed. NOTE: if you undo
an overdub and then begin overdubbing again, the previous overdub is erased.
UNDO NO LONGER AVAILABLE – Undo and redo are only available at the
time you are creating the loop. You lose the ability to undo an overdub if you
change loop banks or power cycle the unit. In either case, when you return to
the loop bank the loop remains as you left it. If you performed undo on your last
overdub and then power cycle or change banks, the overdub cannot be restored
with redo.
- I/O & POWER -
L/MONO Input – ¼” Left Instrument/Line Input Jack. Plug the output of your
instrument or another effects pedal into this jack. If you use just one input we
recommend you use the L/MONO input. In order to use this jack the LEFT INPUT
switch on the rear panel must be set downward to INST. The input impedance
presented at this jack is 1MΩ. The maximum allowable signal level into this jack
is +11 dBu, it is an unbalanced input.

15
MIC Input – XLR Input Jack for microphones. To use the MIC input, set the
LEFT INPUT switch to MIC. Flip the PH NTOM POWER switch to ON to apply a
phantom power voltage of approximately +45VDC to the MIC input. Please
ensure the microphone you are using can withstand phantom power before
enabling the switch. In particular, phantom power is known to possibly damage
ribbon microphones. The input impedance presented at the XLR input is 10kΩ.
R Input – ¼” Right Instrument/Line Input Jack. Plug the output of your
instrument or another effects pedal into this jack. Use this jack for stereo
recording or for recording a second instrument. The input impedance presented
at this jack is 1MΩ. The maximum allowable signal level into this jack is +11
dBu, it is an unbalanced input.
L/MONO Output – ¼” Left Output Jack. The Left output signal is sent through
this jack. The dry signal present at the Left input – whether the ¼” input or the
MIC input – will be output on the L/MONO Output jack. The left signal on Loop
, Loop B, and the Rhythm loop come out of the L/MONO Output jack. The
source impedance of the L/MONO Output is approximately 400Ω.
R Output – ¼” Right Output Jack. The Right output signal is sent through this
jack. The dry signal present at the Right input jack is output on the R Output
jack. The right signal of Loop , Loop B, and the Rhythm loop come out of the R
Output jack. The source impedance of the R Output is 400Ω.
FC Jack – ¼” Foot Controller Jack. Insert a standard, mono ¼” instrument
cable into the FC jack. Connect the other end of the cable to the optional 22500
Foot Controller. The 22500 Foot Controller can be used to scroll up or down
through the 22500’s loop banks. Press and hold the footswitches on the Foot
Controller to jump by 10 through the banks. The 22500 does not accept general
purpose footswitch boxes at its FC jack. Use the 22500 Foot Controller only.
9V Power Jack – Connect the output plug of the supplied C daptor into the
9VDC power jack on the rear panel of the 22500. The 22500’s current
requirement is 240m at 9VDC. The polarity of the power jack is center negative.
The maximum allowable power supply voltage is 10.5 VDC.

16
- SIGNAL PAT -
Left/Right Audio Paths – The Left and Right channels remain separate
throughout the 22500.
Signals input through either the L/MONO ¼” jack or the XLR MIC connector are
recorded onto the left channel of each loop. The loop’s left channel is output
through the L/MONO output jack only. You cannot record L/MONO ¼” jack or
XLR MIC inputs simultaneously. Use the LEFT INPUT toggle switch to choose one
or the other. When LEFT INPUT is set to INST, the L/MONO ¼” jack connects to
the input of the loop recorder. The MIC setting connects the XLR input to the
loop recorder.
Signals input through the R ¼” input jack are recorded onto the right channel of
each loop. The loop’s right channel is output through the R output jack only.
Use the EHX Pan Pedal, mixer, or audio workstation with the outputs of the
22500 to create a stereo mix-down for a variety of applications.
Stereo Looping – The 22500 always records each loop in stereo, no matter
your settings or the connections to the input/output jacks.
- EXPLANATION OF MODES -
•Press and release the MODE knob to enter in and out of modes.
•When a particular mode LED is lit solid, then the mode is selected.
•If a mode LED is blinking, no mode is selected. Turn the MODE knob to
scroll through all the modes.
•When you land on the MODE you want to adjust, press and release the
MODE knob to enter into the mode. The selected LED goes solid.
•t this point you can turn the MODE knob to adjust its value. fter you
have adjusted the value, press and release the MODE knob to exit out
of the mode. The selected MODE LED blinks.
NAVIGATING T ROUG T E MODES – The MODE-encoder knob is used to
navigate around the 8 Modes. While any of the 8 Mode LEDs is blinking, turning
the MODE knob in either direction will cycle in a circular fashion through all the
modes.

17
Rotate the MODE knob clockwise to cycle around the modes in a clockwise
direction. For example, rotate clockwise to move from B NK to R TEMPO to R
TYPE. Rotate MODE counter-clockwise to cycle through the modes in a counter-
clockwise direction, for example from B NK to LOOP to OVERDUB.
s you move from mode to mode, the 4-digit display shows the value of the
current mode. When you arrive at the mode you want to adjust, press and
release the MODE knob. Once a mode is selected, its LED goes solid. t this
point, turn the MODE knob to adjust the current value of the selected mode.
Press and release the MODE knob again to exit the current mode. The mode LED
will start blinking and you may now cycle around to other modes.
BANK Mode – B NK mode allows the user to choose the current loop bank. The
loop banks are not stored internally to the 22500 but instead are located on the
SD Card. The range of available banks on any given SD Card is 00 to 99. blank
card gives you 100 empty banks ready for use.
Whenever you select an empty bank, most mode values automatically default
back to the last settings you used when recording a new initial loop even if it was
in a different bank number. The 22500 defaults back to your last used mode
values so that you can set up the 22500 to work a certain way and always come
back to that way of working when creating new loops. If you would like to
change your default settings, first go to an empty bank and then change the
settings before starting to record on either loop. The following modes are saved
as part of your default loop mode: LOOP, OVERDUB, TRIGGER, R TEMPO, R
TYPE, R LEVEL, RHYTHM, and T P ON.
The 22500 does not allow Loop Banks to change while a loop is recording or
overdubbing. If you change banks while playing loops, everything stops.
LOOP Mode – LOOP mode is used to set key parameters for creating loops and
controlling how the loops interact with each other. In LOOP mode you can
choose Parallel or Sequential loop play, set up Quantize, Freeform or Loop-Lock,
the Loop-Lock Multiple, and 1-Shot modes.
LOOP mode has 3 pages. Pages 2 and 3 disable/enable 1-Shot mode while the
first page sets all the other parameters listed above. Here’s a more in-depth
breakdown of LOOP mode’s 3 pages:
LOOP Mode: Page 1 – Each of the 4 digits sets an individual parameter:

18
Some typical examples of LOOP mode’s Page 1 display include:
L 2 4 P
Digit 1 Digit 2 Digit 3 Digit 4
F n S
Digit 1 Digit 2 Digit 3 Digit 4
Digit 1 – F or L: Digit 1 determines the relationship between Loop and Loop
B’s length. When set to F, for Freeform, Loop and B are completely indepen-
dent and may have different lengths that are unrelated to each other. When set
to L, for Loop Lock, Loop B’s length is always a multiple of a Loop and the
22500 automatically sets Loop B’s length when recording Loop B’s initial loop.
Digit 2 – blank, .5, 1, 2, …, 9, U: When Digit 1 is set to L, Digit 2 sets the
Loop Lock Multiple for Loop B. If Digit 1 is set to F, then Digit 2 is blank since a
Loop B’s length is not locked to Loop .
Digit 2 has 10 numbers available, each signifying the loop multiple for Loop B,
for example .5x, 1x, 2x up to 9x. The numbers start with .5, where Loop B will
be half the length of Loop . When Digit 2 is set to 1, Loop B’s length equals
Loop ’s length, when set to 2, Loop B is twice the length of Loop and so on
up to 9x the length of Loop .
Digit 2 has one other choice available which is the letter U. When set to U, you,
the user, can set the loop multiple as you create Loop B where the only
restriction is that the multiple must be a whole number. To end Loop B, when set
to U mode, press Loop B’s FSW, then the 22500 will continue recording Loop B
until it comes to the end of the current Loop multiple.
Digit 3 – Quantize Modes – n, 2, 3, 4, 6, b: Digit 3 sets the Quantize mode
for both Loop and Loop B. Quantize mode allows you to create loops that are
exact bar or beat lengths. For example, a loop that is exactly 4 bars in length,
with each bar 4 beats in length or a loop that is 6 beats long. Quantize is
disabled when Digit 3 is set to n (Non-Quantize), otherwise Quantize is enabled.
NOTE: Quantized loop lengths are synchronized to the 22500’s Rhythm drum
loop which must be playing in order to record a Quantized loop. The easiest way
to properly play in time with a Quantized loop is to play along with one of the
Rhythm loops. The 22500 does not start recording the first loop on a Quantized
loop bank unless the Rhythm loop is also playing. For example, if you press Loop
’s FSW to begin recording a loop and the Rhythm loop is not playing, Loop
remains in Record-Ready mode (REC LED blinking) until 1 bar or 1 beat after you
start Rhythm loop playback.

19
Using Quantize Modes 2, 3, 4, 6: These four quantize modes all record loops
in the following manner:
1. Press either loop footswitch, the 22500 begins recording the loop on
beat 1 of the Rhythm loop’s following bar. For example, if you press the
Loop FSW on beat 2 of the Rhythm loop, the 22500 enters Record-
Ready mode and waits for the Rhythm loop’s next beat 1. t the
moment beat 1 hits, the 22500 starts recording.
2. When ending a recording, the 22500 records out the current bar in
which you press the loop FSW. If you press the loop FSW on beat 2
during the second bar of recording, the 22500 continues to record up to
the following beat 1 of the next bar, at which point the 22500 goes into
PL Y mode. The loop will be exactly 2 bars in length.
2: 2/4 time, quantizes loops to full bar lengths where each bar has 2 beats.
NOTE: Quantize mode 2 works best with Rhythm loops that are 2/4, 4/4, and
6/8. The 22500 does not contain a 2/4 Rhythm loop, though the majority of
factory Rhythms are 4/4. When you have a Rhythm playing, the RHYTHM
button’s LED blinks on the first beat of each bar while the T P ON button’s LED
blinks on both beats.
3: 3/4 time, quantizes loops to full bar lengths where each bar has 3 beats.
NOTE: Quantize mode 3 works best when the Rhythm Type is set to a 3/4 drum
loop. The 22500 does not contain a 3/4 Rhythm loop from the factory but R
TYPE 01 is a generic metronome click which may be used. When you have a
Rhythm playing, the RHYTHM button’s LED blinks on the first beat of each bar
while the T P ON button’s LED blinks on all three beats.
4: 4/4 time, quantizes loops to full bar lengths where each bar is made up of 4
beats. Since most popular western music uses the 4/4 time signature, this will
probably be the most used Quantize mode. The majority of built-in rhythms that
are supplied with the 22500 are in 4/4 time. NOTE: When you have a rhythm
playing, the RHYTHM button’s LED blinks on the first beat of each bar while the
T P ON button’s LED blinks on all four beats.
6: 6/8 time, quantizes loops to full bar lengths where each bar has six 1/8th note
beats. Normally 6/8 time is used to create a triplet feel and the 1 and 4 beats
are usually accented. NOTE: Quantize mode 6 works best with a 6/8 Rhythm
loop. One 6/8 Rhythm loop is included from the factory: R TYPE 16. When you
select 6/8 quantize, the RHYTHM button’s LED blinks on the first beat and the
T P ON button’s LED blinks on all six beats.

20
b: beat, quantizes loop lengths to the nearest beat. You can make your loop any
number of beats in length. The 22500 begins recording the loop on the following
beat after you press either the Loop or Loop B FSW and ends the loop on the
first beat after you press either FSW. We consider b Quantize to be an expert
setting and is best attempted after you have mastered one of the other Quantize
settings. NOTE: Both the RHYTHM and T P ON LEDs blink on every beat.
Digit 4 – Parallel or Sequential Modes – P
or
S: Digit 4’s setting determines
how Loop and Loop B interact with each other when recording, overdubbing
and playing back.
P: Parallel Mode: Loop and Loop B playback simultaneously. dditionally one
loop can either be recording or overdubbing while the other plays, both loops
cannot record or overdub at the same time. When Digit 1 is set to F, Loop and
B are independent of each other so the 22500 can be used like two loopers in
one unit. Set Digit 1 to L for Loop-Lock mode and the 22500 acts like a 2-track
recorder where Loop B’s length is set by Loop and the two loops play back in
sync with each other.
S: Sequential Mode: Only one loop plays, records or overdubs at a time. Sequen-
tial mode works best when you want to change from one loop to another without
any gaps, for use in verse/chorus situations or /B parts. When Digit 1 is set to F
and Digit 3 to n, Non-Quantize, the loops change instantly when you press the
FSW of the loop currently not playing. If you set Digit 3 to any of the Quantize
modes, the loops change over on the next beat 1, or the next beat if Digit 3 is b.
If you set Digit 1 to L, no matter the setting of Digit 3, loops change over when
the loop currently playing reaches its end.
1-S OT Mode – When enabled, 1-Shot plays a loop in its entirety just once.
When the end of the loop’s audio is reached – whether recording, playing or
over-dubbing – the loop goes into Stop mode automatically. NOTE: While 1-Shot
is enabled: after recording an initial loop, the loop stops immediately and does
not playback once. You must press the loop’s FSW to hear the loop.
LOOP Mode: Page 2, LOOP A 1-S OT Setting – Page 2 of LOOP mode
enables/disables 1-Shot mode for Loop . The display shows A1oF when 1-Shot
mode is turned off or A1on when 1-Shot is enabled.
LOOP Mode: Page 3, LOOP B 1-S OT Setting – Page 3 of LOOP mode
enables/disables 1-Shot mode for Loop B. The display shows B1oF when 1-Shot
mode is disabled or B1on when 1-Shot is enabled.
Other manuals for 22500
2
Table of contents
Other Electro-Harmonix Music Equipment manuals

Electro-Harmonix
Electro-Harmonix 22500 User manual

Electro-Harmonix
Electro-Harmonix NEO HOLY GRAIL User manual

Electro-Harmonix
Electro-Harmonix VOICE BOX User manual

Electro-Harmonix
Electro-Harmonix Stereo Talking Machine User manual

Electro-Harmonix
Electro-Harmonix Ravish Sitar User manual

Electro-Harmonix
Electro-Harmonix Holier Grail User manual

Electro-Harmonix
Electro-Harmonix Deluxe Memory Boy User manual

Electro-Harmonix
Electro-Harmonix Deluxe Memory Man User manual

Electro-Harmonix
Electro-Harmonix B9 Operation manual

Electro-Harmonix
Electro-Harmonix 95000 Assembly instructions