ElectroFlip NiteEye Mini User manual

This document is a property of ElectroFlip LLC (www.ElectroFlip.com).
No unauthorized reproduction is allowed.
1
NiteEye mini
USER GUIDE
The NiteEye Mini is a simple yet effective security device designed to be used in any lighting condition,
especially the dark with a need for long range motion detection all while wire free. This is a new
technology that can be used to record video or take pictures without you being there.
All information and instructions included in this manual are current as of May, 2014. However, due to the
fluid nature of advancing technology, some characteristics may change or need modifications in the future.
Should you encounter any problems or have any further questions about your purchase, please visit our
website www.ElectroFlip.com and contact us through our Contact Us page.

This document is a property of ElectroFlip LLC (www.ElectroFlip.com).
No unauthorized reproduction is allowed.
2
Table of Contents
PRODUCT INFORMATION............................................................................................................. 3
Hardware Parts................................................................................................................................3
Product Specification........................................................................................................................3
GETTING STARTED....................................................................................................................... 4
Charging the Device.........................................................................................................................4
Recording a Video............................................................................................................................4
Taking a Photo.................................................................................................................................5
Time and Date Watermark.............................................................................................................4-5
Video and Photo Playback.................................................................................................................6
TROUBLESHOOTING..................................................................................................................6-7
This document is a property of ElectroFlip LLC (www.ElectroFlip.com).
No unauthorized reproduction is allowed.
3
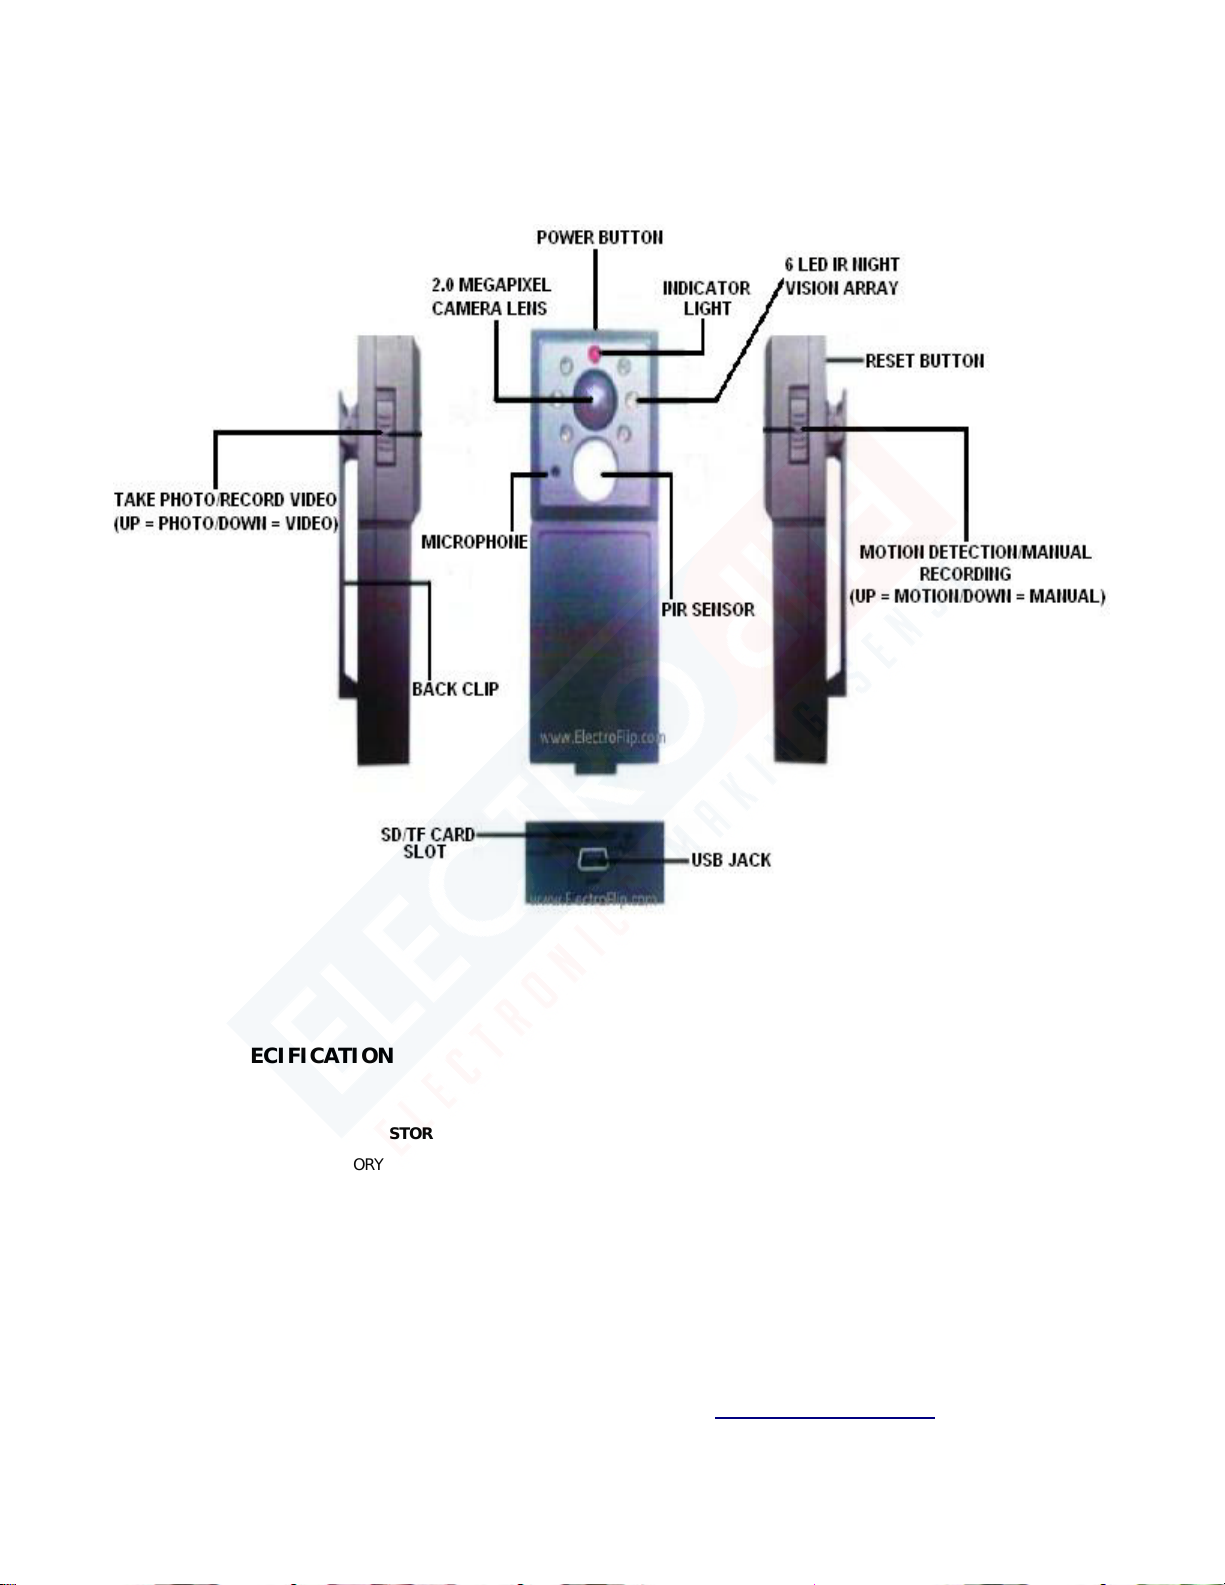
PRODUCT INFORMATION
HARDWARE PARTS
PRODUCT SPECIFICATION
PHYSICAL STORAGE FILE FORMAT RANGE POWER
INTERFACE USB
MEMORY
Up to 16GB SD/SDHC/TF card
(not included)
DISTANCE 30 feet max BATTERY
TYPE
Rechargeable Lithium-
ion
VIDEO
Format: AVI
Quality: 640 x 480 pixels VGA
Up to 6 hours of video
footage
Speed: 24 frames per second
(FPS)
PHOTO Format: JPEG
This document is a property of ElectroFlip LLC (www.ElectroFlip.com).
No unauthorized reproduction is allowed.
4
GETTING STARTED
CHARGING THE DEVICE
You can charge the device by connecting it to your computer using the USB Transfer/Charging Cable that
came with the unit. Or, you may charge it using the AC Adapter. For the initial charging of the device, it
must be charge for 6 hours for the first three uses. The subsequent charging would only take 3 hours. It’s
not mandatory, but it will help extend the life of your device.
RECORDING A VIDEO
For the NiteEye Mini, there are two ways to record a video – Continuous Recording and Motion Detect
Recording. To learn how to activate each mode, please follow the steps below.
Burst Manual Recording
1. Insert SD/TF card.
2. Move the Take Photo/Record Video and Motion Detection/Manual Recording
buttons to a DOWN position.
3. Insert SD/TF card to the device.
4. Press and hold the Power button for 3 seconds to switch on the device. A green indicator
light will lit up.
5. Press the Power button once and the green indicator light will flash to indicate that the
device is starting to record a video. The device will record a 10 second clip then stop by
design. This function is more for quick burst point and shoot recordings.
6. To stop recording, allow it to finish its clip then press the Power button for 5 seconds and
it will power off.
Motion Detect Video Recording
1. Insert SD/TF card.
2. Move button Take Photo/Record Video to a DOWN position and Motion
Detection/Manual Recording to an Up position.
3. Press and hold Power button for 3 seconds to turn on the device. A green indicator light
will lit up. The device is now in motion activated mode.
4. Device will record a 10 second video clip every time motion is detected. Green indicator
light will flash when recording.
5. The device will continue to record videos in Motion Activated Mode until the batteries run
out. The device will automatically overwrite old video files when the memory card is full.
6. To stop recording and power it off, just press and press the Power button for 5 seconds
and it will stop is current recording session and power off.
This document is a property of ElectroFlip LLC (www.ElectroFlip.com).
No unauthorized reproduction is allowed.
5
TAKING A PHOTO
There are two ways to take a photo – Manual Photo Mode and Motion Detect Photo Mode. The steps
on how to activate each mode are discussed below.
Manual Photo Mode
1. Insert SD/TF card.
2. Move the Take Photo/Record Video button to an Up position. (Photo Mode)
3. Move the Motion Detection/Manual Recording button to a Down position. (Manual
Photo Mode)
4. Press and hold the Power button for 3 second to turn on the device. A green indicator light
will power on.
5. Press the Power button again for 1 second and in 3 seconds it will take a picture.
6. To power it off, just press and press the Power button for 5 seconds and it will power off.
Motion Detect Photo Mode
1. Insert SD/TF card.
2. Move Take Photo/Record Video and Motion Detection/Manual Recording button
into the Up position.
3. Insert SD/TF card.
4. Press and hold the Power button for 3 seconds to turn on the device. A green indicator
light will flash. The device is now in Motion Activated Mode.
5. The device will take 3 pictures anytime motion is detected. And, will continue taking photos
as motion is detected and should the memory card become full it will start overwriting the
oldest photos first.
6. To power it off, just press and press the Power button for 5 seconds and it will power off.
TIME AND DATE WATERMARK
The NiteEye Mini automatically watermarks all videos and photos with the current date and time. Please
set time as follows:
1. Open up Microsoft Notepad (or equivalent) and type:
2012/10/12 13:01:45
2. Adjust the date and military time accordingly.
3. Save the file on the root directory of the memory card with the file name “time.txt”
NOTE: Do not save the file within any folders, just on the root of the removable storage devices
(also called memory card/TF inside your device).
4. Turn ON the device and record a short clip then turn it off. Repeat the same steps once more. The
second video clip recorded and all videos going forward will have a time and date watermarked on
them.


This document is a property of ElectroFlip LLC (www.ElectroFlip.com).
No unauthorized reproduction is allowed.
7
VIDEO AND PHOTO PLAYBACK
There are two ways to view videos (.AVI format) and photos (.JPEG format) from your computer –
Playback via SD Card Reader (use a memory card reader to access digital files).
Playback via SD Card Reader
1. Simply insert the SD card into your computer's card reader to view your videos and photos.
2. Open My Computer and locate the removable disk drive that pertains to your memory
card. It may be labeled as D:, E: or F:. Open the removable disk and there you will find
your recorded video and photos. Click on a video or photos that you want to view.
3. Once you click on a video you want to view, the default playback software of your
computer will play the video.
TROUBLESHOOTING
Below are the possible issues that you may encounter when using the device. If the issue you are having is
not on the list you may visit our FAQ section (http://help.electroflip.com/index.php) or you can
contact us through our website, www.ElectroFlip.com, and go to our Contact Us page. You may also
give us a call at our Customer Support number 1-877-686-7495.
My camera seems frozen and or I cannot power it up?
Locate the reset button on the back of your unit at the top near the shirt clip. Press the button with
a small paper clip or ballpoint pen for 30 seconds. Give the camera minute to reconcile, then power
it up and use as normal.
In motion detection video or pictures are taken when nothing is there?
The NiteEye Mini is hyper sensitive by design. It can detect motion detection directly in front of it at
30 feet with a 120 degree fan spread view. That being said, tree branches, bugs, dirt, smog,
smoke, light changes, can all trigger its recording. This is by design so you can toss the footage
that’s useful versus not. It’s better to capture than not.
To test this concept and understand you cameras motion range limitations, setup your camera in
motion detection mode and power it on. Take the camera into a bathroom face the camera away
from you towards a mirror at an angle. The position should be so that you can see the LED light
from the front of the camera in the mirror, but you are standing away and behind the camera. The
idea here is that you do not want the camera’s PIR sensor to see you or anything else moving. Now
slowly wave your hand to the right side or left side of the camera and stop once you see the LED
begin blinking (its recording). Do the same to the opposite side. Now keep doing this to help get a
barometer of how you’ll need to implement it into your environment.

This document is a property of ElectroFlip LLC (www.ElectroFlip.com).
No unauthorized reproduction is allowed.
8
Can I turn off the IR (Infrared) lights of this device?
You can't turn off the IR (Infrared) lights of the NiteEye Mini as per popular demand. If you would
like the light not to be visible you may cover the power light with a black electrical tape. But please
note you would eliminate the cameras night vision capabilities.
http://help.electroflip.com/article-329.html
I try playing my videos but my video player crashes and gives me an error.
Cause: The video clips are very large in size and you are trying to play the video clips directly off
your device or your memory card. A USB port cannot handle the bandwidth load of a large video
clip during playback.
Solution: Copy the video clip from your device or memory card to your computer's local hard drive
then play the video clips from your computer's local hard drive disk. The USB port is designed to
transfer video clips not for real-time playback.
http://help.electroflip.com/article-98.html
Can I use this device to take pictures at night?
Yes, you can. The device is using an advance infrared technology and has 6 IR LEDs which helps
penetrate the pitch darkness. However like any light source there are limitations on distance and
you may require an additional Infrared LED Lamp, we can offer suggestions for additional lighting
sources.
http://help.electroflip.com/article-315.html
All information and instructions included in this manual are current as of May, 2014. However, due to the
fluid nature of advancing technology, some characteristics may change or need modifications in the future.
Should you encounter any problems or have any further questions about your purchase, please visit our
website www.ElectroFlip.com and contact us through our Contact Us page.
Table of contents
Other ElectroFlip Camcorder manuals


