ElectroFlip iSpyHD User manual

This document is a property of ElectroFlip LLC (www.ElectroFlip.com).
No unauthorized reproduction is allowed.
1
iSpyHD
User Guide
This is a multifunction high definition digital camcorder with an exquisite discrete shirt clip design. The
iSpyHD has a TrueHD glass lens which no other pocket camera currently offers.
All information and instructions included in this manual are current as of April 10, 2016. However, due to
the fluid nature of advancing technology, some characteristics may change or need modifications in the
future. Should you encounter any problems or have any further questions about your purchase, please visit
our website www.ElectroFlip.com and contact us through our Contact Us page.

This document is a property of ElectroFlip LLC (www.ElectroFlip.com).
No unauthorized reproduction is allowed.
2
Table of Contents
PRODUCT INFORMATION............................................................................................................. 3
Hardware Parts................................................................................................................................3
Function Keys ..................................................................................................................................4
Mode and Menu Settings...................................................................................................................4
Product Specification........................................................................................................................5
Inside the Package...........................................................................................................................5
GETTING STARTED....................................................................................................................... 5
Charging the ISpyHD........................................................................................................................5
Inserting a Memory Card ..................................................................................................................6
Turning On the ISpyHD.....................................................................................................................6
Turning Off the ISpyHD ....................................................................................................................6
Recording a Video............................................................................................................................6
Taking a Photo.................................................................................................................................6
Preview Mode ..................................................................................................................................7
Deleting While In Video/Photo Preview..............................................................................................7
Preview Video/Photo Through PC ......................................................................................................7
Preview Video/Photo Using the Memory Card .....................................................................................7
Mode Setting ...................................................................................................................................8
TROUBLESHOOTING..................................................................................................................... 8

This document is a property of ElectroFlip LLC (www.ElectroFlip.com).
No unauthorized reproduction is allowed.
4
FUNCTION KEYS
BUTTON VIDEO MODE PHOTO MODE HDMI MODE
POWER BUTTON Turn on or off the product. Take Video or Pause to take Video Turn on or off the product.
RECORD BUTTON Take Video or Pause to take Video Enter into Review Mode
Take Video or Pause to take video or play
video
Enter into Photo Mode/Enter into Review
Mode
MODE BUTTON Enter into Photo Mode – Next video or picture
FORWARD – – Last video or picture
BACKWARD
–
–
–
MODE AND MENU SETTING
MENU (VIDEO)
SETTING (VIDEO)
MENU (PHOTO)
SETTING (PHOTO)
Size
1280x720 / 848x480 / 640x480 /320x240
Size
8M/5M
EV 0/-0.3/-0.7/-1/-1.3/-1.7/-2/2/1.7/1.3/1/0.7/0.3 EV 0/-0.3/-0.7/-1/-1.3/-1.7/-2/2/1.7/1.3/0.7/0.3
Whire B Auto/Sunny/Cloudy/Tungsten/Fluorescent Quality Fine/good/normal
Contrast Standard/Hard/Soft Whire B Auto/Sunny/Cloudy/Tungsten/Fluorescent
Sharpness
Standard/Hard/Soft
Contrast
Standard/Hard/Soft
Effect
Vivid/Monochrome/Negative/Sepia/Art/Off
Sharpness
Standard/Hard/Soft
Duration
NO/15min/30min/45min
Effect
Off/Art/Sepia/Negative/Monochrome/Vivid
Recycle NO/5min/10min/15min/30min Self-timer No/Yes
Burst No/3pics/5pics
ALL OTHER SETTINGS
Delete
No/Yes

This document is a property of ElectroFlip LLC (www.ElectroFlip.com).
No unauthorized reproduction is allowed.
5
Slide Show
No/1 Second/ 3 Second/ 5 Second
Volume 0/ 1/ 2/ …/ 8
Language English/Japanese/Simplified Chinese/Traditional Chinese
Date 000 00 00
Clock
12:00:00 AM
Format
Cancel/Yes
System Reset
No/Yes
Auto Off OFF/1 minute/ 3 minute/ 5 minute
Light Frequency 50HZ/60HZ
PRODUCT SPECIFCATION
SENSOR Custom Solution CMOS sensor BATTERY 500mAh lithium-ion rechargeable
VIDEO Video format: 1280x720 30fps, MOV
WORKING
TEMPERATURE 15°C - 50°C
PHOTO Photo format: 200x2400 (.JPEG) WORKING HUMIDITY 15% - 85%
VIDEO OUTPUT
HDMI, support 720P output mode
PRODUCT WEIGHT
36g
STORAGE
Internal: External: supports up to 32GB
(Max) (Class 4)
PRODUCT SIZE
108m (L) x 28mm (W) x 18mm H (Approx)
INTERFACE HDMI/USB 2.0
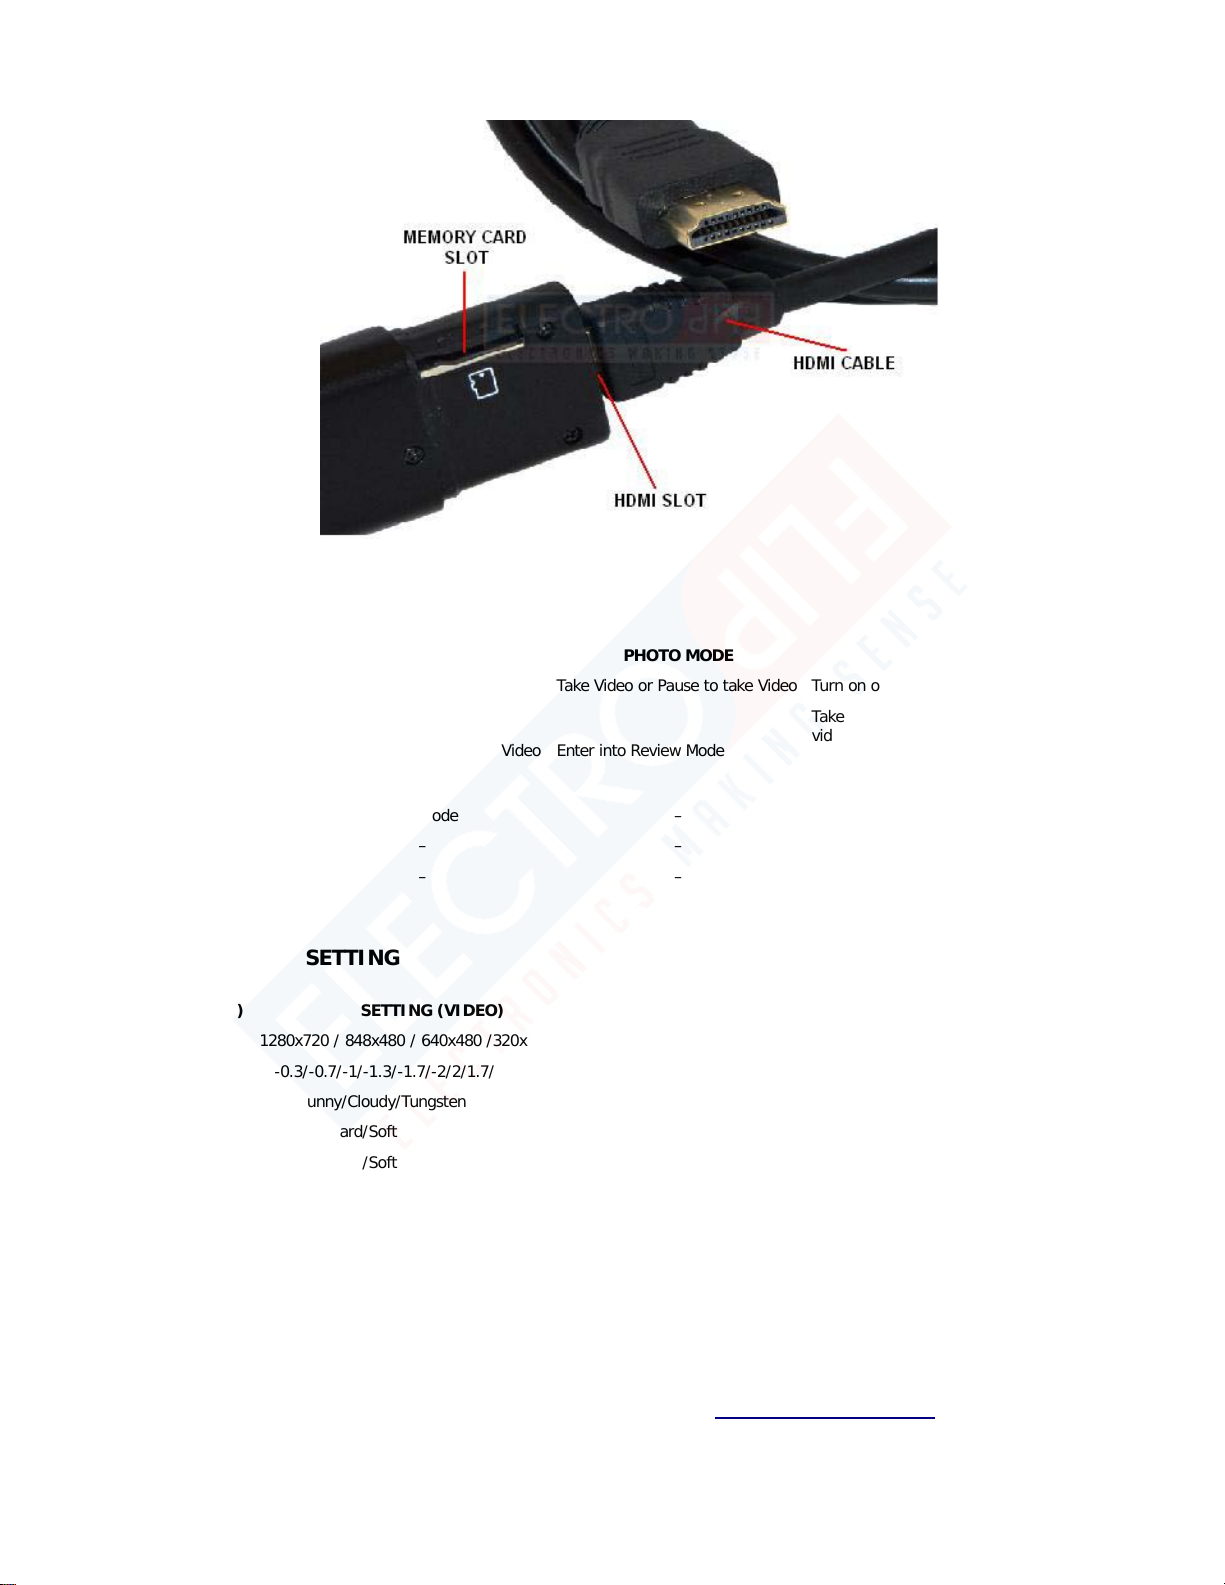
INSIDE THE PACKAGE
•Retail iSpyHD unit (memory card not included)
•USB Charging Cable
•USB Wall Adapter
•HDMI Cable
GETTING STARTED
CHARGING THE ISPYHD
Charge ISpyHD Using a Wall Charger:
1. Connect the USB cable to the USB wall charger and and then to your iSpyHD’s USB port.
2. A red LED on the iSpyHD will flash to indicate that it is charging. Once the iSpyHD is fully charged
the red LED will remain solid.
This document is a property of ElectroFlip LLC (www.ElectroFlip.com).
No unauthorized reproduction is allowed.
6
INSERTING A MICROSD MEMORY CARD
1. Please make sure that the MicroSD card is facing the correct direction before you insert it into the
ejection loading slot. Inserting the MicroSD card in the wrong direction might cause damage to the
product and to the MicroSD card. You’ll easily identify which direction by gently inserting it to see
which way it fits best.
2. It's a spring loaded slot which requires the memory card to be pushed down until it locks into
place. Do not exert too much force when you push in the memory card it will lock it self into place
on its own.
3. To remove the memory card, gently push in the memory card for it to eject and release.
NOTE: If the MicroSD card is not compatible with the iSpyHD, your iSpyHD will power up for a few second
then automatically power down. Check the specifications for memory type compatibility or seek further
support from your vendor.
TURNING ON THE ISPYHD
1. Press and hold the POWER button for 3 second to power up the iSpyHD.
2. A blue indicator LED will light up once the iSpyHD has completely powered up.
TURNING OFF THE ISPYHD
1. Press and hold the POWER button for 3 seconds to power down the iSpyHD.
2. The blue indicator LED will go out once iSpyHD has powered off.
RECORDING A VIDEO
1. Power up the iSpyHD.
2. The iSpyHD automatically enters standby video mode once powered on.
3. Simply press RECORD button once to begin a video recording. Both blue and red LED indicators
remain solid to indicate that the iSpyHD is recording.
4. To stop the recording and close the file session, just press the RECORD button again. The red LED
will go out and blue LED remain steady. (standby video mode)
TAKING A PHOTO
1. Power up the iSpyHD. The iSpyHD will automatically go to video mode.
2. Press the MODE button once to enter Camera Mode. The blue LED will begin blinking, indicating
its in standby camera mode.
3. Press the RECORD button once to take a photo. The red LED will light up for a few second, then
go out. Indicating it has taken a photo.
This document is a property of ElectroFlip LLC (www.ElectroFlip.com).
No unauthorized reproduction is allowed.
7
PREVIEW MODE
While the iSpyHD is connected to a TV through the built-in HDMI port of the iSpyHD, you will be able to
preview the pictures or videos taken by following the steps below.
1. Turn on the iSpyHD to go to Video Mode.
2. Press the MODE button to enter Photo Mode then press the MODE button again to access
Review/Preview Mode.
3. Press the DIRECTION button forward or backward to view pictures or video taken.
4. Press RECORD button to play the video on TV.
5. Press RECORD button again to pause the video.
6. While the video is playing, you can use the DIRECTION button to play forward or backward the
video.
7. To go to the next video, press RECORD button to stop the current video that is playing then press
the DIRECTION button to go to the next file.
8. Press MODE button to exit.
NOTE: If the picture is tagged with that means that it is a video.
DELETING WHILE IN VIDEO/PHOTO PREVIEW
1. While viewing a video, press MODE button for 3 seconds to enter Setting Mode.
2. Press MODE button to go to deleting display.
3. Press DIRECTION button to choose the deleting option.
4. Press MODE button to exit.
PREVIEW VIDEO/PHOTO ON PC
1. Power up your iSpyHD (ensure you have battery power available) connect iSpyHD to the computer
through the USB Cable.
2. Open “My Computer” located on the desktop of your computer.
3. You will see two removable disks, one is the internal storage and the other is the external storage
(memory card).
4. Find the stored videos and photos on either of the two removable disks.
5. You can copy and paste the videos to the hard drive of your computer and play it from there to
ensure that you will have a smooth playback.
PREVIEW VIDEO/PHOTO USING A USB MEMORY CARD READER
Alternatively and might be easiest. You may preview the video and photos stored in your memory card by
directly inserting the memory USB memory card reader then into your computers USB port. Please follow
the steps below.
1. Insert the memory card to a USB card reader then connect the USB card reader to your computer’s
USB port.

This document is a property of ElectroFlip LLC (www.ElectroFlip.com).
No unauthorized reproduction is allowed.
8
2. Open My Computer and locate the removable disk pertaining to your memory card. It may be
labeled as D:, E:, or F:.
3. Open the removable disk drive and drag and drop the video clips from the memory card to your
desktop (or whichever location you prefer to save the files). You can also do copy and paste.
4. Play the video files using QuickTime, RealPlayer or any video player that supports the video format
of the iSpyHD. It is recommended to playback video files directly from the hard drive of your
computer to ensure a smooth playback.
5. After you are finished uploading the files, make sure that you use the hardware removal tool
located on the browsers tool bar. Failure to do so can corrupt or damage the iSpyHDs data storage.
MODE SETTING
1. Whether in Video/Camera/Review or Preview Mode, press the MODE button for three (3) seconds
to enter the Mode Setting.
2. Press the MODE button to enter each menu setting (refer to Mode and Menu Setting table for the
list of menu).
3. At any menu mode, press the DIRECTION button to go to the menu setting options. You can then
choose your desired settings.
4. Press MODE button to confirm the changes.
5. Press the RECORD button to exit the current menu setting and to go back to original mode.
TROUBLESHOOTING
Below are possible issues that you may encounter when using the iSpyHD. If the issue you are having is
not on the list you may visit our FAQ section (http://help.electroflip.com) or you can contact us through
our website, www.ElectroFlip.com, and go to our Contact Us page.
1. The iSpyHD is not powering up, I don’t see any lights?
Ensure your unit has been fully charged with the USB cable and USB wall adapter provided. Make sure
that the memory card is correctly oriented and properly inserted. Lastly, you can format the memory
card on your computer or try a different memory card. Ultimately contact your vendor for support.
All information and instructions included in this manual are current as of April 10, 2016. However, due to
the fluid nature of advancing technology, some characteristics may change or need modifications in the
future. Should you encounter any problems or have any further questions about your purchase, please visit
our website www.ElectroFlip.com and contact us through our Contact Us page.
Table of contents
Other ElectroFlip Camcorder manuals


