Electrolux Professional Combi TOUCH 6 GN 1/1 User manual

Electrical and Gas Oven
Combi TOUCH
EN User manual *
*Original instructions 0595402L00- 2022.02

2
Foreword
Read the following instructions, including the warranty terms before installing and using the appliance.
Visit our website www.electroluxprofessional.com and open the Support section to:
Register your product
Get hints & tips of your product, service and repair information
The installation, use and maintenance manual (hereinafter Manual) provides the user with information necessary for correct and
safe use of the appliance.
The following must not be considered a long and exacting list of warnings, but rather a set of instructions suitable for improving ap-
pliance performance in every respect and, above all, preventing injury to persons and animals and damage to property due to im-
proper operating procedures.
All persons involved in appliance transport, installation, commissioning, use and maintenance, repair and disassembly must con-
sult and carefully read this manual before carrying out the various operations, in order to avoid wrong and improper actions that
could compromise the appliance's integrity or endanger people. Make sure to periodically inform the user regarding the safety reg-
ulations. It is also important to instruct and update personnel authorised to operate on the appliance, regarding its use and
maintenance.
The manual must be available to operators and carefully kept in the place where the appliance is used, so that it is always at hand
for consultation in case of doubts or whenever required.
If, after reading this manual, there are still doubts regarding appliance use, do not hesitate to contact the Manufacturer or the au-
thorised Service Centre to receive prompt and precise assistance for better operation and maximum efficiency of the appliance.
During all stages of appliance use, always respect the current regulations on safety, work hygiene and environmental protection. It
is the user's responsibility to make sure the appliance is started and operated only in optimum conditions of safety for people, ani-
mals and property.
IMPORTANT
• The manufacturer declines any liability for operations carried out on the appliance without respecting the instructions
given in this manual.
• The manufacturer reserves the right to modify the appliances presented in this publication without notice.
• No part of this manual may be reproduced.
• This manual is available in digital format by:
– contacting the dealer or reference customer care;
– downloading the latest and up to date manual on the web site www.electroluxprofessional.com;
• The manual must always be kept in an easily accessed place near the appliance. Appliance operators and mainte-
nance personnel must be able to easily find and consult it at any time.

3
Contents
A WARNING AND SAFETY INFORMATION...................................................................................................5
A.1 General information ......................................................................................................................5
A.2 Personal protection equipment ........................................................................................................6
A.3 General safety .............................................................................................................................6
A.4 Protection devices installed on the appliance ...................................................................................... 7
A.5 Safety signs to be placed on the appliance or near its area ....................................................................8
A.6 Reasonably foreseeable improper use ..............................................................................................8
A.7 Residual risks ..............................................................................................................................8
A.8 Appliance cleaning........................................................................................................................9
A.9 Preventive Maintenance............................................................................................................... 10
A.10 Parts and accessories ................................................................................................................. 10
A.11 Precautions for use and maintenance ............................................................................................. 10
A.12 Appliance maintenance................................................................................................................ 10
B WARRANTY ....................................................................................................................................... 10
B.1 Warranty terms and exclusions...................................................................................................... 10
C GENERAL INFORMATION .................................................................................................................... 11
C.1 Introduction ............................................................................................................................... 11
C.2 Intended use and restrictions ........................................................................................................ 11
C.3 Testing and inspection ................................................................................................................. 11
C.4 Copyright.................................................................................................................................. 11
C.5 Keeping the manual .................................................................................................................... 11
C.6 Recipients of the manual .............................................................................................................. 11
C.7 Definitions................................................................................................................................. 11
C.8 Responsibility ............................................................................................................................ 12
D NORMAL MACHINE USE...................................................................................................................... 12
D.1 Characteristics of personnel enabled to operate on the appliance ......................................................... 12
D.2 Basic requirements for appliance use.............................................................................................. 12
E PRODUCT DESCRIPTION .................................................................................................................... 12
E.1 Use – Introduction ...................................................................................................................... 12
E.2 Appliance overview..................................................................................................................... 13
E.3 Opening and closing the oven door................................................................................................. 13
E.4 Control panel............................................................................................................................. 14
F OPERATING....................................................................................................................................... 14
F.1 Switch the oven ON .................................................................................................................... 14
F.2 Main menu................................................................................................................................ 15
F.3 Touch screen commands / info and display messages ........................................................................ 16
F.4 Drawers area............................................................................................................................. 16
F.5 Manual mode............................................................................................................................. 18
F.6 Automatic mode ......................................................................................................................... 26
F.6.1 Cycles+ / Special cycles ..................................................................................................... 28
F.7 Programs mode ......................................................................................................................... 32
F.8 SkyHub favorites mode (Homepage) .............................................................................................. 36
F.9 Help mode ................................................................................................................................ 37
F.10 Agenda mode (Calendar – My Planner) ........................................................................................... 37
F.11 USB mode ................................................................................................................................ 39
F.12 Plan&Save/Cooking Optimizer mode .............................................................................................. 41
F.13 SkyDuo/Match mode (depending on your model - optional).................................................................. 42
F.14 Hood management ..................................................................................................................... 44
F.15 Cleaning mode........................................................................................................................... 44
F.15.1 Boiler maintenance............................................................................................................ 48
F.16 Settings.................................................................................................................................... 48
G OVEN CARE....................................................................................................................................... 53
G.1 Care information......................................................................................................................... 53
G.2 Appliance cleaning...................................................................................................................... 53
G.3 Cooking chamber ....................................................................................................................... 54
G.4 Boiler or steam generator (models equipped only) ............................................................................. 54
G.5 Cooking chamber filter................................................................................................................. 54
G.6 Air filter..................................................................................................................................... 54
G.7 Door gasket............................................................................................................................... 54
G.8 Inner, outer and cooking chamber glass........................................................................................... 55
G.9 Door area ................................................................................................................................. 55
G.10 Efficiency control of the discharge system ........................................................................................ 56
G.11 Condensate drip collector............................................................................................................. 56
G.12 Food probe ............................................................................................................................... 56
G.13 Other surfaces ........................................................................................................................... 56
G.14 Periods of non-use...................................................................................................................... 57
G.15 Replacing wear and tear components ............................................................................................. 57
G.16 Repair and extraordinary maintenance ............................................................................................ 57
G.17 Maintenance intervals.................................................................................................................. 57
G.18 Maintenance contacts (only for Australia)......................................................................................... 58
H TROUBLESHOOTING.......................................................................................................................... 58
H.1 Introduction ............................................................................................................................... 58

4
H.2 Anomaly table............................................................................................................................ 58
I FURTHER INFORMATION .................................................................................................................... 67
I.1 Ergonomic features..................................................................................................................... 67
I.1.1 Certification ..................................................................................................................... 67
I.1.2 General recommendations .................................................................................................. 67
J MACHINE DISPOSAL........................................................................................................................... 69
J.1 Procedure regarding appliance disposal .......................................................................................... 69
5
A WARNING AND SAFETY INFORMATION
A.1 General information
To ensure safe use of the appliance and a proper understanding of the manual it is
necessary to be familiar with the terms and typographical conventions used in the
documentation. The following symbols are used in the manual to indicate and identify the
various types of hazards:
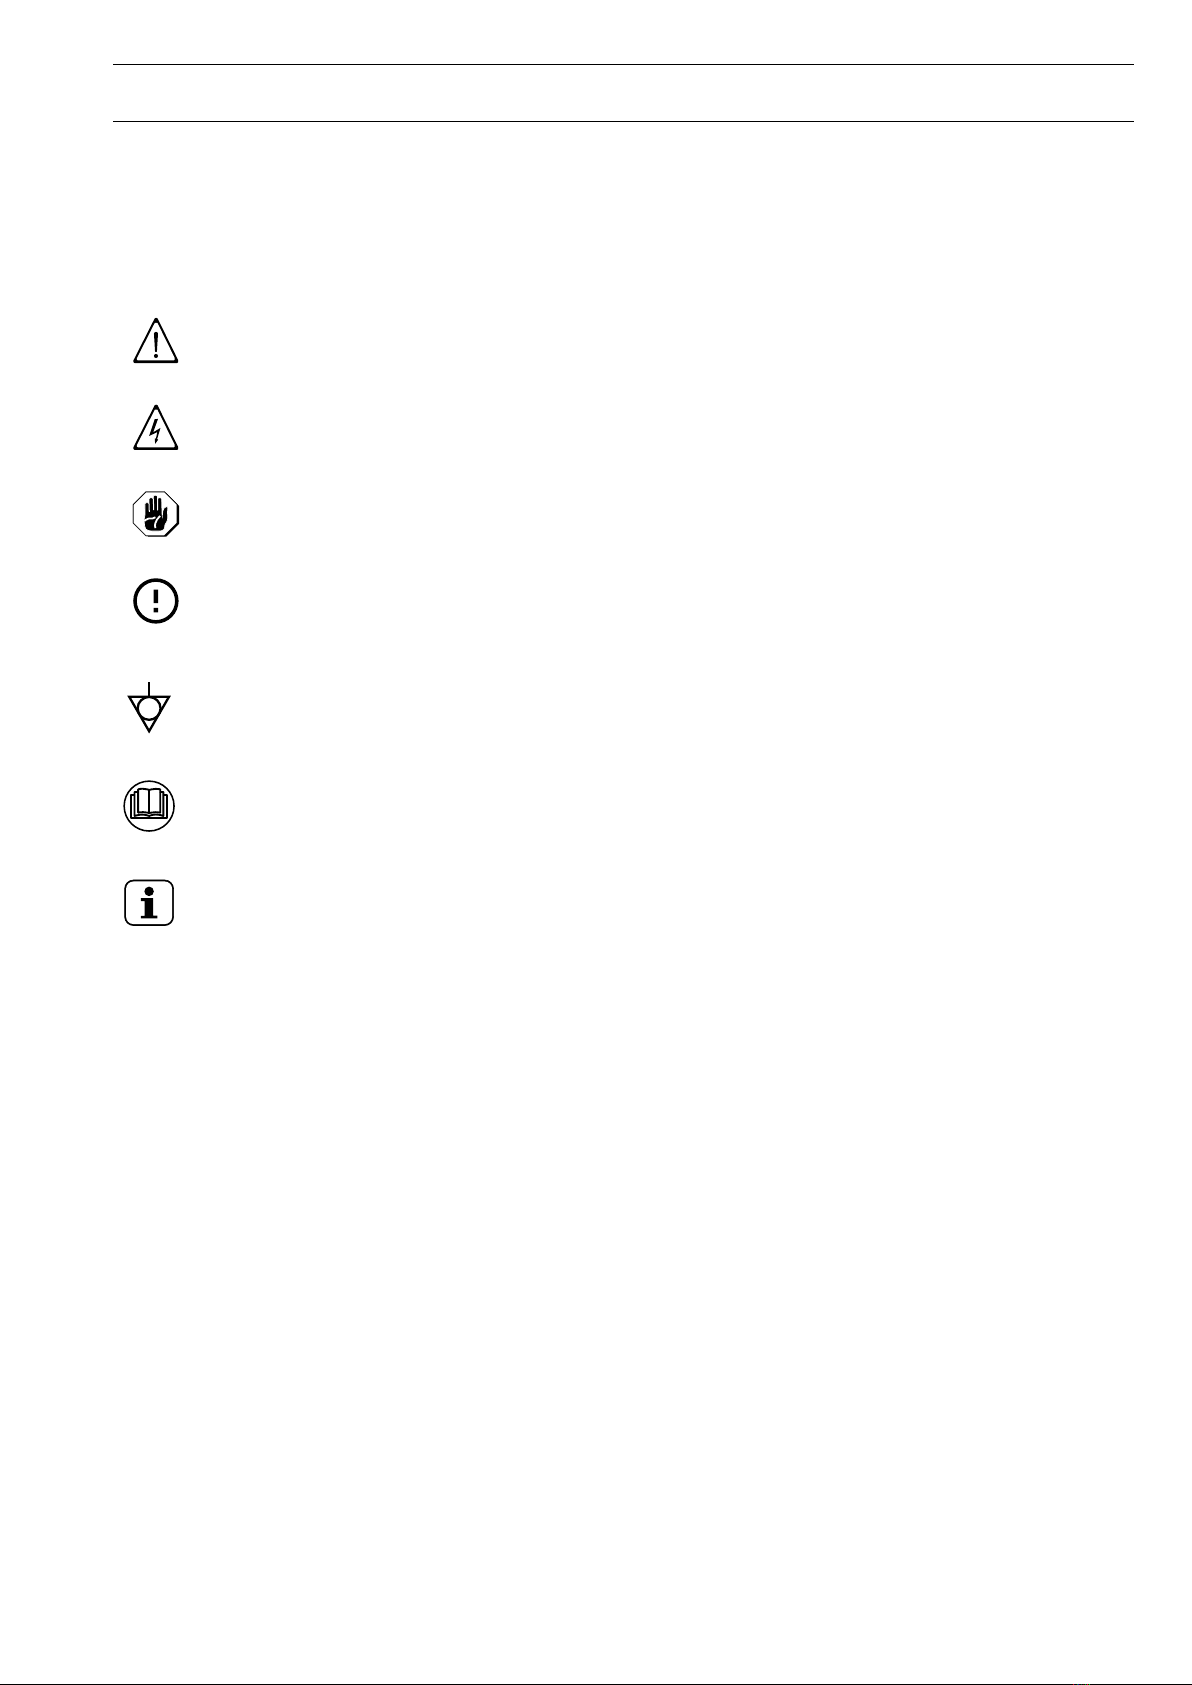
WARNING
Danger for the health and safety of operators.
WARNING
Danger of electrocution - dangerous voltage.
CAUTION
Risk of damage to the appliance or the product.
IMPORTANT
Important instructions or information on the product
Equipotentiality
Read the instructions before using the appliance
Clarifications and explanations
• Incorrect installation, servicing, maintenance, cleaning or modifications to the unit may
result in damage, injury or death.
• Only specialised personnel are authorised to operate on the appliance.
• This appliance is to be intended for commercial and collective use, for example in
kitchens of restaurants, canteens, hospitals and in commercial enterprises such as
bakeries, butcheries, etc., not for continuous mass production of food. Any other use is
deemed improper.
• This appliance must not be used by minors and adults with limited physical, sensory or
mental abilities or without adequate experience and knowledge regarding its use.
• For your safety do not store or use gasoline or other flammable materials, vapours and
liquids in the vicinity of this or any other appliance.
• Do not store explosive substances, such as pressurized containers with flammable
propellant, in this appliance.
• Refer to the data given on the appliance’s data plate for relations with the Manufacturer
(e.g. when ordering spare parts, etc.).
• When scrapping the appliance, the marking CE must be destroyed.
• Save these instructions carefully for further consultation by the various operators.
6
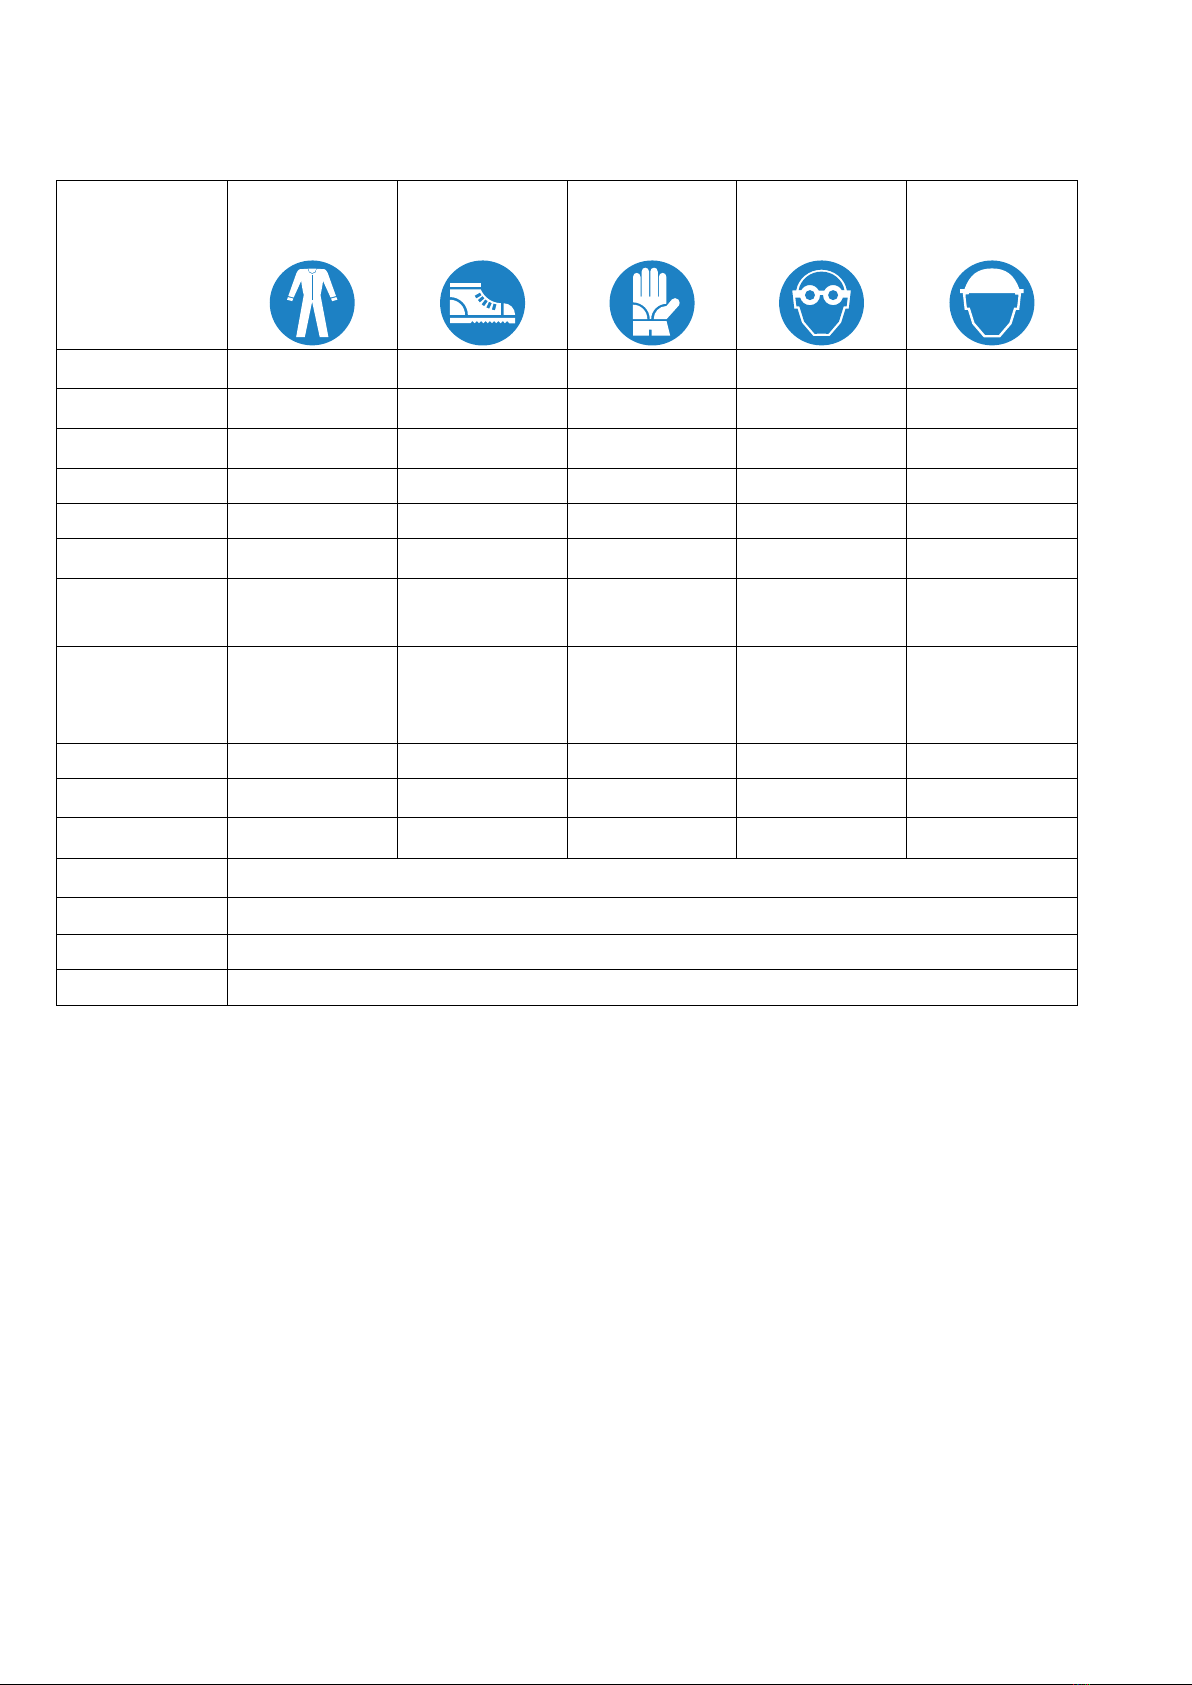
A.2 Personal protection equipment
Summary table of the Personal Protection Equipment (PPE) to be used during the various
stages of the appliance's service life.
Stage Protective
garments
Safety
footwear
Gloves Glasses Safety
helmet
Transport ● ○ —○
Handling —● ○ — —
Unpacking —● ○ — —
Installation —● ●1— —
Normal use ● ● ●2— —
Adjustments ○ ● — — —
Routine
cleaning
○ ● ●1ˉ3○—
Extraordi-
nary
cleaning
○ ● ●1ˉ3○—
Maintenance ○ ● ○ — —
Dismantling ○ ● ○ ○ —
Scrapping ○ ● ○ ○ —
Key:
●PPE REQUIRED
○PPE AVAILABLE OR TO BE USED IF NECESSARY
—PPE NOT REQUIRED
1. During these operations, gloves must be cut-resistant. Failure to use the personal protection equipment by
operators, specialized personnel or users can involve exposure to damage to health (depending on the model).
2. During these operations, gloves must be heatproof to protect hands from contact with hot food or hot parts of
the appliance and/or when removing hot items from it. Failure to use the personal protection equipment by
operators, specialised personnel or users can involve exposure to chemical risk and cause possible damage to
health (depending on the model).
3. During these operations, gloves must be suitable for contact with chemical substances used (refer to the
safety data sheet of the substances used for information regarding the required PPE). Failure to use the
personal protection equipment by operators, specialized personnel or users can involve exposure to chemical
risk and cause possible damage to health (depending on the model).
A.3 General safety
• The appliances are provided with electric and/or mechanical safety devices for
protecting workers and the appliance itself.
• Never operate the appliance, removing, modifying or tampering with the guards,
protection or safety devices.
• Do not make any modifications to the parts supplied with the appliance.
• Several illustrations in the manual show the appliance, or parts of it, without guards or
with guards removed. This is purely for explanatory purposes. Do not use the appliance
without the guards or with the protection devices deactivated.

7
Disconnect the appliance from the power
supply before carrying out any installation,
assembly, cleaning or maintenance
procedure.
• Do not remove, tamper with or make illegible the CE marking, the safety, danger and
instruction signs and labels on the appliance.
• The A-weighted emission sound pressure level does not exceed 70 dB(A).
• Do not use products (even if diluted) containing chlorine (sodium hypochlorite,
hydrochloric or muriatic acid, etc.) to clean the appliance or the floor under it.
• Carefully avoid exposure of the equipment to ozone - do not use ozonizers in the rooms
where the equipment is installed.
• Do not spray aerosols in the vicinity of this appliance while it is in operation.
• Do not place flammable liquids (e.g. spirits) inside the oven during operation.
• Never check for leaks with an open flame.
• Install the appliance under conditions of adequate ventilation in order to provide a
suitable air change per hour. Make sure that the ventilation system, whatever it is,
always remains operational and efficient for the entire period of time during which the
equipment is operating.
The appliance must be installed under ventilation hood only.
• Improper ventilation of the oven can be hazardous to the health of the operator; and will
result in operational problems, unsatisfactory cooking results, and possible damage to
the equipment. Damage sustained as a direct result of improper ventilation OF THE
OVEN will not be covered by the Manufacturer's warranty.
• Do not obstruct the flow of combustion and ventilation air.
• The following operations have to be carried out by specialised authorised personnel or
Customer Care Service provided with all the appropriate personal protection equipment
(A.2 Personal protection equipment), tools, utensils and ancillary means, who can ask
the manufacturer to supply a servicing manual:
– Installation and assembly
– Positioning
– Electrical connection
– Appliance cleaning, repair and extraordinary maintenance
– Appliance disposal
– Work on electrical equipment
A.4 Protection devices installed on the appliance
Guards
The appliance has:
• fixed guards (e.g. casings, covers, side panels, etc.), fixed to the appliance and/or frame
with screws or quick-release connectors that can only be removed or opened with tools;
therefore the user must not remove or tamper with such devices. The Manufacturer
declines any liability for damage due to tampering or their non-use;
• interlocked movable guards (door) for access inside the appliance;
• appliance electrical equipment access doors, made from hinged panels openable with
tools. The door must not be opened when the appliance is connected to the power
supply.
ON
OFF

8
A.5 Safety signs to be placed on the appliance or near its area
Prohibition Meaning
do not remove the safety devices
do not use water to extinguish fires (placed on electrical
parts)
Keep the area around the appliance clear and free from
combustible materials. Do not keep flammable materials in
the vicinity of the appliance
Danger Meaning
caution hot surface
danger of electrocution (shown on electrical parts with
indication of voltage)
A.6 Reasonably foreseeable improper use
Improper use is any use different from that specified in this manual. During appliance
operation, other types of work or activities deemed improper and that in general can involve
risks for the safety of operators and damage to the appliance are not allowed. Reasonably
foreseeable improper use includes:
• lack of appliance maintenance, cleaning and periodical checks;
• structural changes or modifications to the operating logic;
• tampering with the guards or safety devices;
• failure to use personal protection equipment by operators, specialised personnel and
maintenance personnel;
• failure to use suitable accessories (e.g. use of unsuitable equipment or ladders);
• keeping combustible or flammable materials, or in any case materials not compatible
with or pertinent to the work, near the appliance;
• wrong appliance installation;
• placing in the appliance any objects or things not compatible with its use, or that can
damage the appliance, cause injury or pollute the environment;
• climbing on the appliance;
• non-compliance with the requirements for correct appliance use;
• other actions that give rise to risks not eliminable by the Manufacturer.
WARNING
The previously described actions are prohibited!
A.7 Residual risks
The appliance has several risks that were not completely eliminated from a design
standpoint or with the installation of adequate protection devices. Nevertheless, through
this manual the Manufacturer has taken steps to inform operators of such risks, carefully
9
indicating the personal protection equipment to be used by them. In order to reduce the
risks, provide for sufficient spaces while installing the unit.
To preserve these conditions, the areas around the appliance must always be:
• kept free of obstacles (e.g. ladders, tools, containers, boxes, etc.);
• clean and dry;
• well lit.
For the Customer's complete information, the residual risks remaining on the appliance are
indicated below: such actions are deemed improper and therefore strictly forbidden.
Residual risk Description of hazardous situation
Slipping or falling The operator can slip due to water, any liquid or dirt
on the floor
Burns/abrasions (e.g. heating
elements, cold pan, cooling
circuit plates and pipes)
The operator deliberately or unintentionally touches
some components inside the appliance without
using protective gloves.
Electrocution Contact with live parts during maintenance
operations carried out with the electrical panel
powered
Falling from above The operator intervenes on the appliance using
unsuitable systems to access the upper part (e.g.
rung ladders, or climbs on it)
Crushing or injury The specialised personnel may not correctly fix the
control panel when accessing the technical
compartment. The panel could close suddenly.
Tipping of loads When handling the appliance or the packing
containing it, using unsuitable lifting systems or
accessories or with the unbalanced load
Chemical Contact with chemical substances (e.g. detergent,
rinse aid, scale remover, etc.) without taking
adequate safety precautions. Therefore always refer
to the safety cards and labels on the products used.
Sudden closing of the lid/door/
oven door (if present, depending
on the appliance type)
The operator for normal appliance use could
suddenly and deliberately close (if present,
depending on the appliance type):
• door/s
A.8 Appliance cleaning
IMPORTANT
In order to maintain the appliance performance and safeness, the appliance
shall be maintained and cleaned.
• Do not touch the appliance with wet hands or feet or when barefoot.
• Use a ladder with suitable protection for work on appliances with high accessibility.
• Put the appliance in safe conditions before starting any cleaning operation.
• Respect the requirements for the various routine and extraordinary maintenance
operations. Non-compliance with the instructions can create risks for personnel.
• Do not spray water or use water jets, steam cleaner or high pressure cleaner.

10
A.9 Preventive Maintenance
In order to ensure the safety and performance of your equipment, it is recommended that
service is undertaken by Electrolux Professional authorised engineers every 12 months, in
accordance with Electrolux Professional Service Manuals. Please contact your local
Electrolux Professional Service Centre for further details.
A.10 Parts and accessories
Use only original accessories and/or spare parts. Failure to use original accessories and/or
spare parts will invalidate the original manufacturer warranty and may render the appliance
not compliant with the safety standard.
A.11 Precautions for use and maintenance
• Risks mainly of a mechanical, thermal and electrical nature exist in the appliance.
Where possible the risks have been neutralised:
– directly, by means of adequate design solutions.
– indirectly by using guards, protection and safety devices.
• Any anomalous situations are signalled on the control panel display.
• During maintenance several risks remain, as these could not be eliminated, and must be
neutralised by adopting specific measures and precautions.
• Do not carry out any checking, cleaning, repair or maintenance operations on moving
parts. Workers must be informed of this prohibition by means of clearly visible signs.
• Make sure to periodically check correct operation of all the safety devices and the
insulation of electrical cables, which must be replaced if damaged.
In case of a significant anomaly (e.g. short circuits, wires coming out of the terminal block,
motor breakdowns, worn electrical cable sheathing, etc.) the operator for normal appliance
use must:
• immediately deactivate the appliance and disconnect all the supplies (electricity, gas,
water).
Before carrying out any operation on the appliance, always consult the manual which gives
the correct procedures and contains important information on safety.
A.12 Appliance maintenance
• The inspection and maintenance intervals depend on the actual appliance operating
conditions and ambient conditions (presence of dust, damp, etc.), therefore precise time
intervals cannot be given. In any case, careful and periodical appliance maintenance is
advisable in order to minimise service interruptions.
• It is advisable to stipulate a preventive and scheduled maintenance contract with the
Customer Care Service.
• Put the appliance in safe conditions before starting any maintenance operation.
• To guarantee appliance efficiency and correct operation, periodical maintenance must
be carried out according to the instructions given in the manual.
B WARRANTY
B.1 Warranty terms and exclusions
If the purchase of this product includes warranty coverage,
warranty is provided in line with local regulations and subject to
the product being installed and used for the purposes as
designed, and as described within the appropriate equipment
documentation.
Warranty will be applicable where the customer has used only
genuine spare parts and has performed maintenance in
accordance with Electrolux Professional user and
maintenance documentation made available in paper or
electronic format.
Electrolux Professional strongly recommends using Electrolux
Professional approved cleaning, rinse and descaling agents to
obtain optimal results and maintain product efficiency over
time.
The Electrolux Professional warranty does not cover:
• service trips cost to deliver and pick up the product;
• installation;

11
• training on how to use/operate;
• replacement (and/or supply) of wear and tear parts unless
resulting from defects in materials or workmanship reported
within one (1) week from the failure;
• correction of external wiring;
• correction of unauthorized repairs as well as any damages,
failures and inefficiencies caused by and/or resulting from;
– insufficient and/or abnormal capacity of the electrical
systems (current/voltage/frequency, including spikes and/or
outages);
– inadequate or interrupted water supply, steam, air, gas
(including impurities and/or other that does not comply with
the technical requirements for each appliance);
– plumbing parts, components or consumable cleaning
products that are not approved by the manufacturer;
– customer’s negligence, misuse, abuse and/or non-com-
pliance with the use and care instructions detailed within the
appropriate equipment documentation;
– improper or poor: installation, repair, maintenance
(including tampering, modifications and repairs carried out
by third parties not authorized) and modification of safety
systems;
– Use of non-original components (e. g.: consumables,
wear and tear, or spare parts);
– environment conditions provoking thermal (e. g. over-
heating/freezing) or chemical (e. g. corrosion/oxidation)
stress;
– foreign objects placed in- or connected to- the product;
– accidents or force majeure;
– transportation and handling, including scratches, dents,
chips, and/or other damage to the finish of the product,
unless such damage results from defects in materials or
workmanship and is reported within one (1) week of delivery
unless otherwise agreed;
• product with original serial numbers that have been
removed, altered or cannot be readily determined;
• replacement of light bulbs, filters or any consumable parts;
• any accessories and software not approved or specified by
Electrolux Professional.
Warranty does not include scheduled maintenance activities
(including the parts required for it) or the supply of cleaning
agents unless specifically covered within any local agreement,
subject to local terms and conditions.
Check on Electrolux Professional website the list of authorized
customer care.
C GENERAL INFORMATION
WARNING
Refer to “WARNING and Safety
Information“.
C.1 Introduction
The drawings and diagrams given in the manual are not in
scale. They supplement the written information with an outline,
but are not intended to be a detailed representation of the
appliance supplied.
The numerical values given on the appliance installation
diagrams refer to measurements in millimeters and/or inches.
C.2 Intended use and restrictions
This appliance is designed for cooking food. It is intended for
collective use.
Any other use is deemed improper.
NOTE!
The manufacturer declines any liability for
improper use of the product.
C.3 Testing and inspection
Our appliances have been designed and optimized, with
laboratory testing, in order to obtain high performance and
efficiency.
IMPORTANT
For 20 grids models only: the oven shall be used
with the supplied trolley or with the appropriate ones
listed in the accessory catalogue.
The appliance is shipped ready for use.
Passing of the tests (visual inspection - gas/electrical test -
functional test) is guaranteed and certified by the specific
enclosures.
C.4 Copyright
This manual is intended solely for consultation by the operator
and can only be given to third parties with the permission of
Electrolux Professional company.
C.5 Keeping the manual
The manual must be carefully kept for the entire life of the
appliance, until scrapping. The manual must stay with the
appliance in case of transfer, sale, hire, granting of use or
leasing.
C.6 Recipients of the manual
This manual is intended for:
• the carrier and handling personnel;
• installation and commissioning personnel;
• the employer of appliance users and the workplace
manager;
• operators for normal appliance use;
• specialised personnel - Customer Care service (see service
manual).
C.7 Definitions
Listed below are the definitions of the main terms used in the
manual. It is advisable to read them carefully before use.
Operator appliance installation, adjustment, use,
maintenance, cleaning, repair and trans-
port personnel.
Manufacturer Electrolux Professional SpA or any other
service centre authorised by Electrolux
Professional SpA.
Operator for
normal appli-
ance use
an operator who has been informed and
trained regarding the tasks and hazards
involved in normal appliance use.
Customer
Care service
or specialised
personnel
an operator instructed/trained by the
Manufacturer and who, based on his
professional and specific training, experi-
ence and knowledge of the accident-
prevention regulations, is able to appraise
the operations to be carried out on the
appliance and recognise and prevent any
risks. His professionalism covers the
mechanical, electrotechnical and elec-
tronics fields etc.
Danger source of possible injury or harm to health.
Hazardous
situation
any situation where an operator is
exposed to one or more hazards.
Risk a combination of probabilities and risks of
injury or harm to health in a hazardous
situation.

12
Protection
devices
safety measures consisting of the use of
specific technical means (guards and
safety devices) for protecting operators
against risks.
Guard an element of a appliance used in a
specific way to provide protection by
means of a physical barrier.
Safety device a device (other than a guard) that elimi-
nates or reduces the risk; it can be used
alone or in combination with a guard.
Customer the person who purchased the appliance
and/or who manages and uses it (e. g.
company, entrepreneur, firm).
Electrocution an accidental discharge of electric current
on a human body.
C.8 Responsibility
The Manufacturer declines any liability for damage and
malfunctioning caused by:
• non-compliance with the instructions contained in this
manual;
• repairs not carried out in a workmanlike fashion, and
replacements with parts different from those specified in
the spare parts catalogue (the fitting and use of non-original
spare parts and accessories can negatively affect appliance
operation and invalidates the original manufacturer
warranty);
• operations carried out by non-specialised personnel;
• unauthorized modifications or operations;
• missing, lack or inadequate maintenance;
• improper appliance use;
• unforeseeable extraordinary events;
• use of the appliance by uninformed and / or untrained
personnel;
• non-application of the current provisions in the country of
use, concerning safety, hygiene and health in the workplace.
The Manufacturer declines any liability for damage caused by
arbitrary modifications and conversions carried out by the user
or the Customer.
The employer, workplace manager or service technician are
responsible for identifying and choosing adequate and suitable
personal protection equipment to be worn by operators, in
compliance with regulations in force in the country of use.
The Manufacturer declines any liability for inaccuracies con-
tained in the manual, if due to printing or translation errors.
Any supplements to the installation, use and maintenance
manual the Customer receives from the Manufacturer will form
an integral part of the manual and therefore must be kept
together with it.
D NORMAL MACHINE USE
D.1 Characteristics of personnel enabled to
operate on the appliance
The Customer must make sure the personnel for normal
appliance use are adequately trained and skilled in their duties.
The operator must:
• read and understand the manual;
• receive adequate training and instruction for their duties in
order to operate safely;
• receive specific training for correct appliance use.
IMPORTANT
The Customer must make sure his personnel have
understood the instructions received and in partic-
ular those regarding work hygiene and safety in use
of the appliance.
D.2 Basic requirements for appliance use
• Knowledge of the technology and specific experience in
operating the appliance.
• Adequate general basic education and technical knowledge
for reading and understanding the contents of the manual,
including correct interpretation of the drawings, signs and
pictograms.
• Sufficient technical knowledge for safely performing his
duties as specified in the manual.
• Knowledge of the regulations on work hygiene and safety.
E PRODUCT DESCRIPTION
E.1 Use – Introduction
The instructions and information given in this manual are
important for correct and optimum oven use. If required, further
details regarding its characteristics and cooking performance
can be obtained from the dealer.
• To avoid obstructing the fume and steam discharge pipes,
do not place pans or utensils of any kind on the oven.
• Do not place objects (e. g. pans) under the bottom of the
oven, so as not to obstruct any cooling air inlet or outlet
holes.
IMPORTANT
In 20 Grids models run the cleaning cycles only
with trolley inside the oven. It helps the sealing in
closing the bottom openings between the cavity and
the door.
• Do not salt food inside the oven, in particular with humid
cycles.
• Do not place flammable liquids (e.g. spirits) inside the oven
during operation.
IMPORTANT
After the installation of 6, 10 and 20 grids ovens
(stacking installation included) is carried out, check
at which height the upper trays are placed in the
oven. If required, place the following sticker (sup-
plied) on the front of the oven and at a height of
1,60 m or higher above the floor.
CAUTION
To avoid burns, do not use recipients
containing liquids (or products that
become liquid with cooking) in shelves
positioned at levels higher than 1,6 m
above the floor. This is to prevent spilling
during handling.

13
Food loading on oven
No. of grids MODELS
6 GN 1/1 6 GN 2/1 10 GN 1/1 10 GN 2/1 20 GN 1/1 20 GN 2/1
Maximum
oven load
Kg 30 60 50 100 100 200
Maximum pan/
tray load
Kg 15 30 15 30 15 30
E.2 Appliance overview
1. Door handle (shape depending on the model)
2. Glass door
3. Led bar for lighting cavity
4. Grids support
5. Exhaust gas cavity heat exchanger (all gas models)
6. Steam discharge (electric and gas models)
7. Exhausting gas from steam generator (gas models with
boiler)
8. Air inlets (electric and gas models)
9. Control panel
10. Cavity filter – housing for detergent tabs (cavity washing)
11. ON/OFF button
12. USB pendrive position
13. Dataplate
14. Descaling/rinse agent drawer
15. Feet
16. Hand spray cleaning unit, if present in your model
NOTE!
The hand spray only works if the oven is
switched on.
E.3 Opening and closing the oven door
Below the instructions for closing and opening the oven door,
model by model.
6 GN and 10 GN Model
14
1. Turn the door handle clockwise or counterclockwise all the
way to fully open the oven door. The cooking cycle is
stopped, if in progress.
2. To close the door press it against the oven enough to lock
it.
20 GN Model
1. Rotate the handle by 90℃counterclockwise to open the
door completely. The cooking programme is stopped, if in
progress.
2. For closing rotate the handle by 90℃counterclockwise
until it stops and bring the door against the oven.
3. Keeping the door pressed against the oven, rotate the
handle back in its vertical position to complete its locking.
E.4 Control panel
A. Display – Touch screen
B. ON/OFF button
C. USB pendrive in/out
D. Connection for accessory
E. Openable flap
F OPERATING
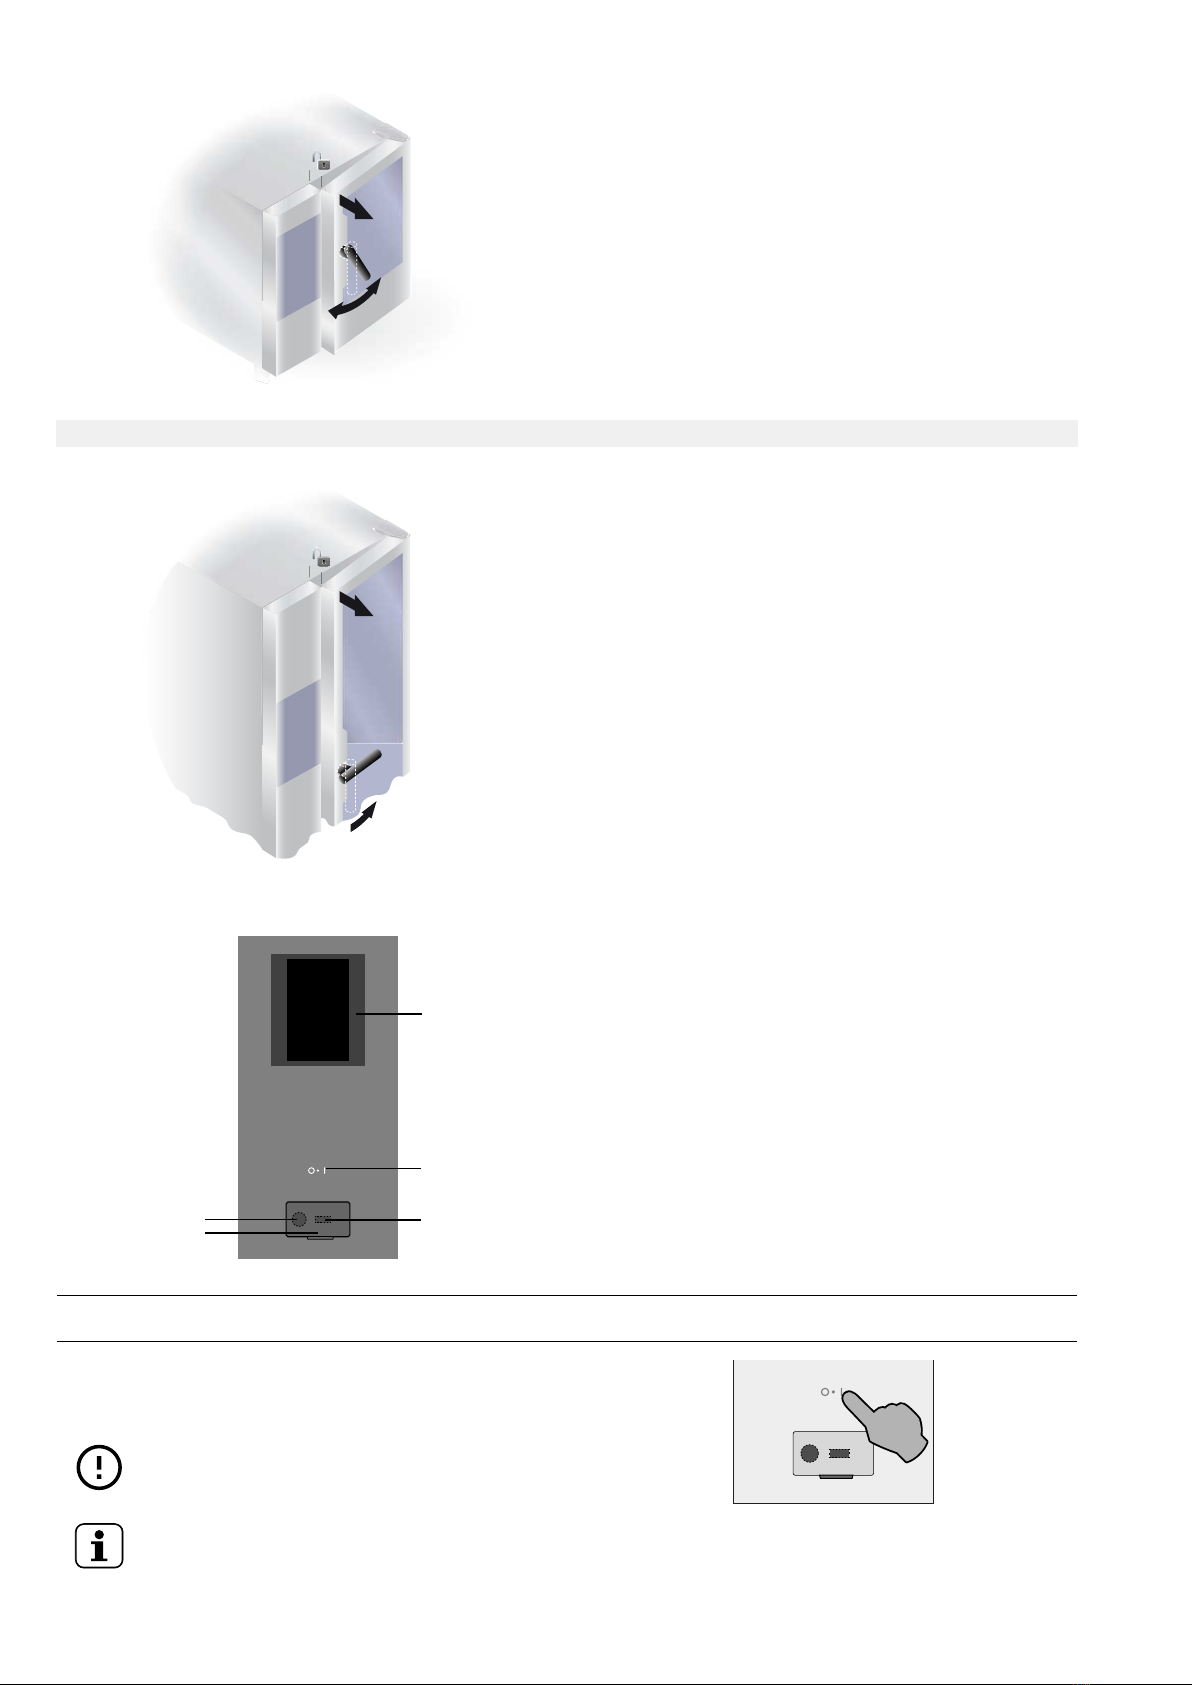
F.1 Switch the oven ON
Press the “I“ side of the button “O – I“ to switch the oven on.
Press the “O“ side of the same button to switch the oven off.
IMPORTANT
For gas models only: wait 5 minutes before
relighting.
NOTE!
After switching off the oven, the cooling fan can still
remain active for safety reasons.
The display illuminates, loads the software and after a while
shows, by default the following screen, in MANUAL mode.
A
B
CD
E
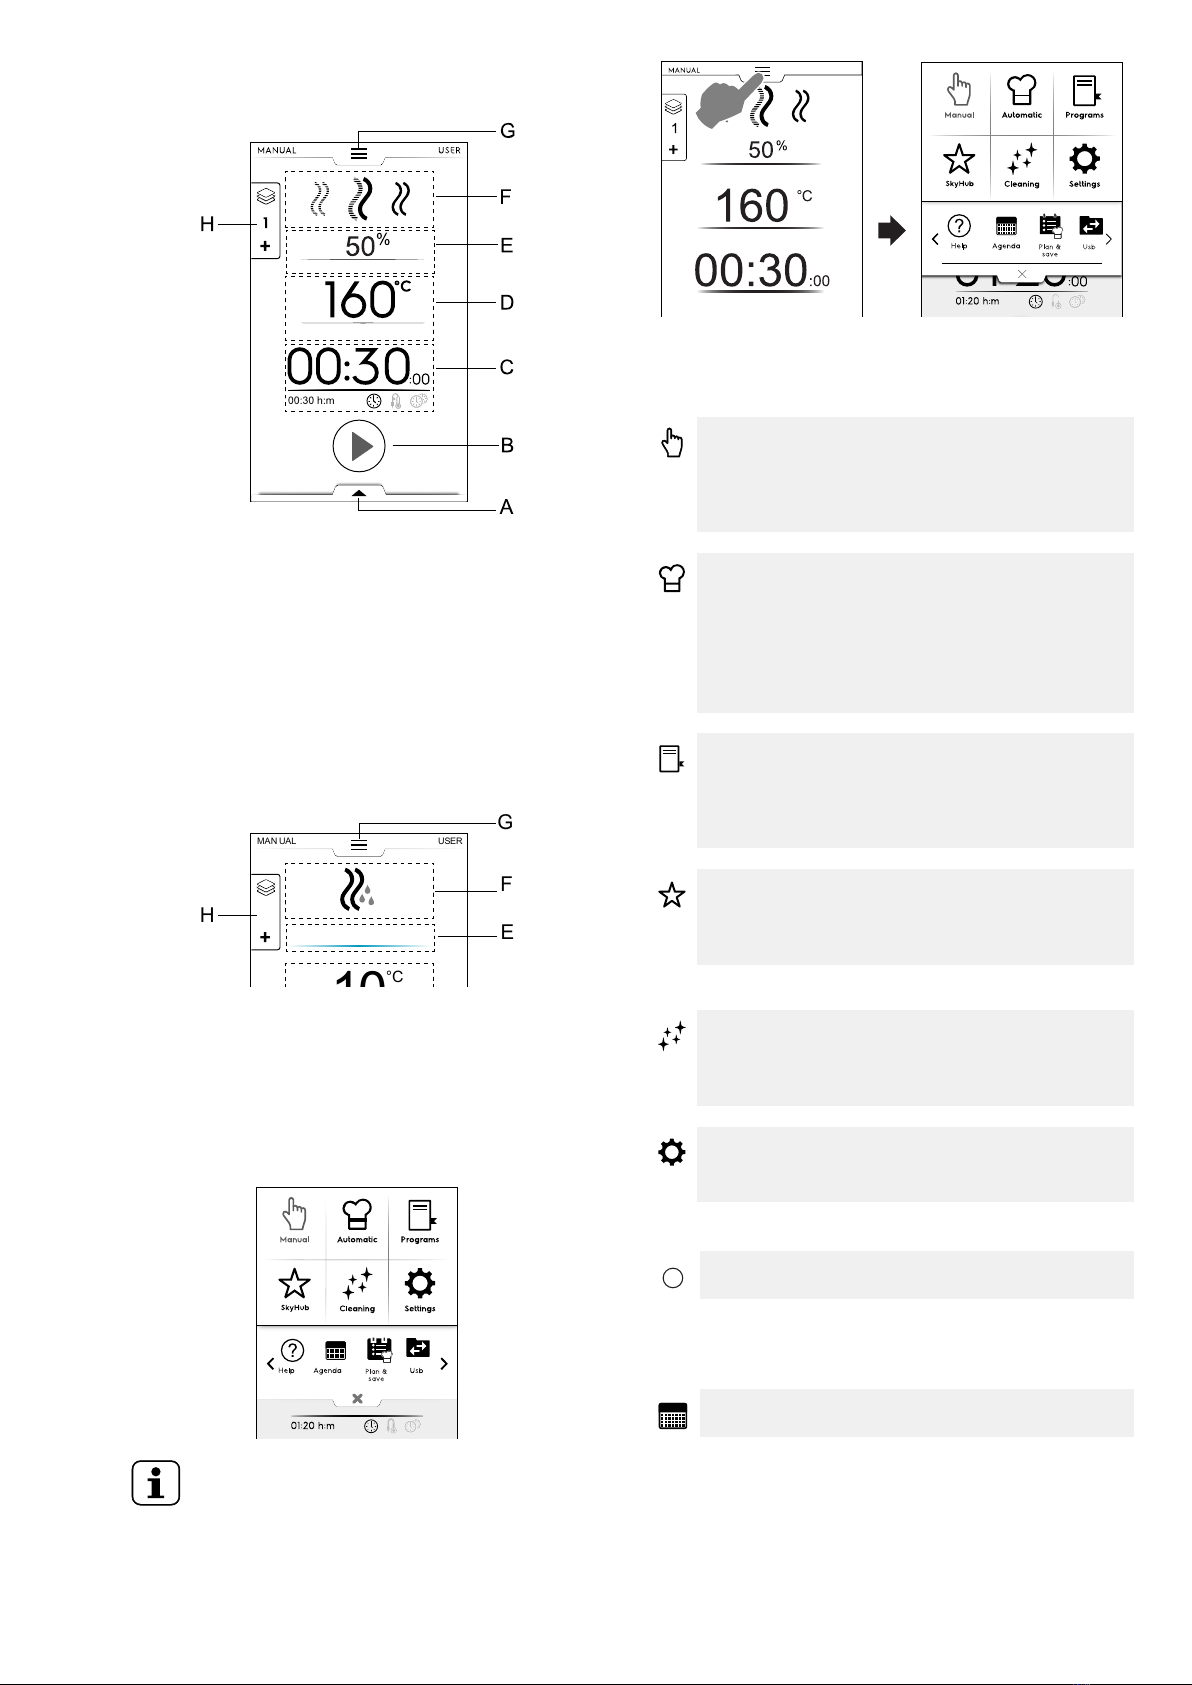
15
Models with boiler
A. Lower drawer – Additional functions (utilities)
B. Start button area
C. Time / Food Probe / MultiTimer area
D. Cavity temperature area
E. Cavity humidification area
F. Cooking cycle(s) area
G. Upper drawer – Main menu
H. Multiphase Drawer
Models boilerless
F.2 Main menu
The oven allows cooking in different cooking modes according
to your food type and requirements, to create and store recipes,
programs, to recall them, to plan cooking activities or to carry
out an automatic cleaning.
The main menu of the start page is composed of various
modes corresponding to the different functions of the oven.
NOTE!
To navigate inside the main menu, always touch
the upper drawer.
Touch the required icon in the main menu to access inside the
different modes.
Cooking modes
Manual Mode
“Manual“ mode customizes the cooking cycles
choosing among Convention, Combi and Steam
cycles and setting the humidity level, time and
temperature (see F.5 Manual mode chapter).
Automatic Mode
“Automatic“ mode allows to cook food in a quick and
easy way, just choosing the required food and the
way to cook it.
The set parameters enable you to get excellent and
repeatable cooking results whenever you want (see
F.6 Automatic mode chapter).
Programs mode
“Programs“ mode recalls the recipes previously
saved and restores quickly parameters and settings
of each cooking cycle avoiding the need to assign
them again (see F.7 Programs mode chapter).
Homepage Mode (SkyHub/SoloMio)
“Homepage Mode“ helps to store your recipes
managing them inside a customized area (see F.7
Programs mode chapter).
Other modes
Cleaning mode
With “Cleaning mode“ it is possible to carry out the
cleaning of the cavity and the descaling cycle of the
boiler, if available in your model.
Settings mode
“Settings mode “ allows to customize the oven
functions and options for a better use.
< SCROLLING AREA Options>
Help
This function provides QR codes in order to display the
user manual on your device (smartphone, tablet or laptop).
See F.9 Help mode chapter).
AGENDA (MyPlanner/Calendar)
This function allows to plan oven activities, cooking or
cleaning programs or to set reminders, according to your
schedule (see F.10 Agenda mode (Calendar – My Planner)
chapter).
160
°C
0 0 30 :
: 0 0
MANUAL USER
B
C
A
H
G
F
E
D
1
50
%
00:30 h:m
10
°C
0 0 20 :
: 0 0
00:30 h:m
160 °C
MANUAL USER
B
C
A
H
G
F
E
D
1
5
01:20 h:m
50%
20
%
°C
?
Manual Automatic Programs
Cleaning Settings
Help Agenda
AgendaPlan &
save
SkyHub
Usb
50
%1
00:30:00
160
° C
MANUAL
01:20 h:m
0 1 2 0:
: 0 0
160°C
50%
20
%
°C
?
Manual Automatic Programs
Cleaning Settings
Help Agenda
Plan &
save
Usb
SkyHub
?

16
PLAN-N-SAVE/COOKING OPTIMIZER
This function allows you to optimise consecutive cooking
processes in order to reduce energy and water consump-
tion of the transition phases (see F.12 Plan&Save/Cooking
Optimizer mode chapter).
SKYDUO/MATCH (optional)
NOTE!
Available as option only on specific models com-
bined with the appropriate accessory.
This function can be activated on demand and works
combined with connectivity devices installed by specialised
personnel. It allows to connect the oven to a blast chiller (see
F.13 SkyDuo/Match mode (depending on your model -
optional) chapter.
USB
The USB mode allows to upload/download, from or into the
appliance, programs or other data by means of the USB
pendrive. See F.11 USB mode chapter.
F.3 Touch screen commands / info and
display messages
The icons of this area allow the interaction with the oven or just
give information about the oven status or the accessories
connected.
Touch screen commands
Touch this icon to confirm and/or save the
selection
Touch this icon to discard the selection or close
a pop-up window
Touch this icon to come back to the previous
menu
Touch this icon to start a cycle
Hold down this button for a few seconds to stop
a running cycle
Touch this icons to move between the pages
(horizontal scrolling) or increase/decrease a
value
Touch this icons to move between the pages
(vertical scrolling)
Signalling information
Door open warning signalling icon
The icon appears when the door is open or not properly
closed
Fan speed level
Boiler in filling or heating phase
Not available in boilerless models
Boiler temperature too high
Not available in boilerless models
In gas models only:
Gas burner1blocked.
To reset the boiler ignition touch the green flame
icon .
Water injection
Reduced power
Blocking alarm
Display messages
Warnings
A pop up window appears on the display to show the
warning in progress.
Alarms signalling icon
A pop up window appears on the display to show the alarm
in progress. The icon remain visible until the problem is
resolved.
Information
An information message communicates if something is
wrong, if a procedure is completed or should be repeated
and so on.
F.4 Drawers area
The drawers are an expansion located inside several environ-
ments of the menu and contains options and functions.
UPPER DRAWER
• This drawer allows to navigate into the main menu.
!
5
!
i
MANUAL USER
1. It can be the upper cavity burner or the bottom cavity burner or the boiler burner
17
– Upper drawer opening:
– Moving between pages:
Touch the arrows in the scrolling area;
– Upper drawer closing:
Touch button to close the drawer.
LOWER DRAWER
• This drawer allows to access to further options, accessories
and advanced features.
– Lower drawer opening:
– Lower drawer closing
LOWER DRAWER functions – Utilities
This drawer contains further settings, accessory management
and advanced features. Its composition depends on the setting
parameters and on the phase cycle.
Fan speed
• Touch this icon to set the speed of the fan from 1 to 7 levels.
• Touch icon to close and enable the setting.
• To disable this function operate on / icons.
Water injection into cavity (available only for the
convection cooking cycle)
Touch this icon to increase the humidity level in the cavity at
the beginning of the cooking phase.
• Set the duration of the water injection (from 10 seconds to
30 minutes).
• Touch icon to close and enable the setting.
• To disable this function operate on / icons.
Reduced power
Touch this icon to limit the power peak of the installed power.
Available for every cooking cycle. When selected the icon
becomes green.
Food Service Control (FSC)
To enable this function see FSC Safety Control (FSC) para-
graph in F.16 Settings chapter.
FSC enables the control of the microbiological safe condition
of the food while cooking (see the paragraph FSC Safety
Control (FSC))
• Touch this icon. A pop up message asks to select the level
of risk between standard or high
• Set the required food icon to change the risk.
The corresponding icon on the lower drawer changes
accordingly .
50
%1
00:30:00
160
° C
USERMANUAL
01:20 h:m
0 1 2 0:
: 0 0
160°C
50%
20
%
25
°C
?
Manual Automatic Programs
Cleaning Settings
Help AgendaUsb
Plan
save
SkyHub
01:20 h:m
0 1 2 0:
: 0 0
160°C
50%
20
%
25
°C
?
Manual Automatic Programs
Cleaning Settings
Help Agenda
Plan &
save
SkyHub
01:20 h:m
2 0
: 0 0
50%
20
%
°C
Manual Automatic Programs
Cleaning Settings
SkyHub
Usb
SkyDo
01:20 h:m
0 1 2 0:
: 0 0
160°C
50
20
%
25
°C
?
Manual Automatic Programs
Cleaning Settings
Help Usb Agenda
Plan &
save
SkyHub
100
%
0 0 3 0:
: 0 0
00:30 h:m
160°C
PM5:30 100%
120°C300°C
Delayed
start
Save
program
Fan
speed
7
Water
injection
Half
power
Food
Safe
Control
MANUAL USER
FSC
100
°C
0 0 3 0:
: 0 0
00:30 h:m
160°C
PM5:30 100%
120°C300°C
Save
program
Fan
speed
7
Water
inection
Half
power
Food
Safe
Control
M S
Delayed
start
FSC
5
100
: 0 0
00:30 h:m
160°C
PM5:30 100%
120°C300°C
Delayed
start
Save
program
Fan
speed
5
ater
injection
Half
power
Food
Safe
Control
M S
FSC
5
100
0 0 3 0:
: 0 0
00:30 h:m
160°C
PM5:30 100%
120°C300°C
Delayed
start
Save
program
Fan
speed
Water
injection
Half
power
Food
Safe
Control
M S
FSC
20s
00:20 m:s
<table>
<tgroup cols="2">
<?PubTbl tgroup dispwid="1786.00px"?>
<colspec colname="col1" colwidth="0.16*"/>
<colspec colname="col2" colwidth="1.85*"/>
<tbody>
<row>
<entry colsep="0" rowsep="0" valign="middle">
<?PubTbl cell border-left-style="none" border-top-style="none"?>
<graphic
fileref="x-svn:///svn/els^/efs/inline%20graphics/oven/check%20mate/ChkM_ic_half_power.svg"/>
</entry>
<entry rowsep="0" valign="middle"><?Pub _cellfont Shading="gray1"?>
<?PubTbl cell border-right-style="none" border-top-style="none"?>
<p>Half power</p>
</entry>
</row>
<row>
<entry nameend="col2" namest="col1" valign="middle">
<?PubTbl cell border-bottom-style="none" border-left-style="none"
border-right-style="none"?>
<p>This feature limits the power peak to half of the installed power.</p>
</entry>
</row>
</tbody>
</tgroup>
</table>
+
18
Delayed start
With this option it will be possible to delay the start of a
cycle at a more convenient time.
After having set the delayed start and touched the
button, the display shows the corresponding icon and the
selected delay time. The appliance starts the countdown.
Save program
Touch this icon to save and store customized cooking cycles.
See How to create and save a program paragraph in F.7
Programs mode chapter.
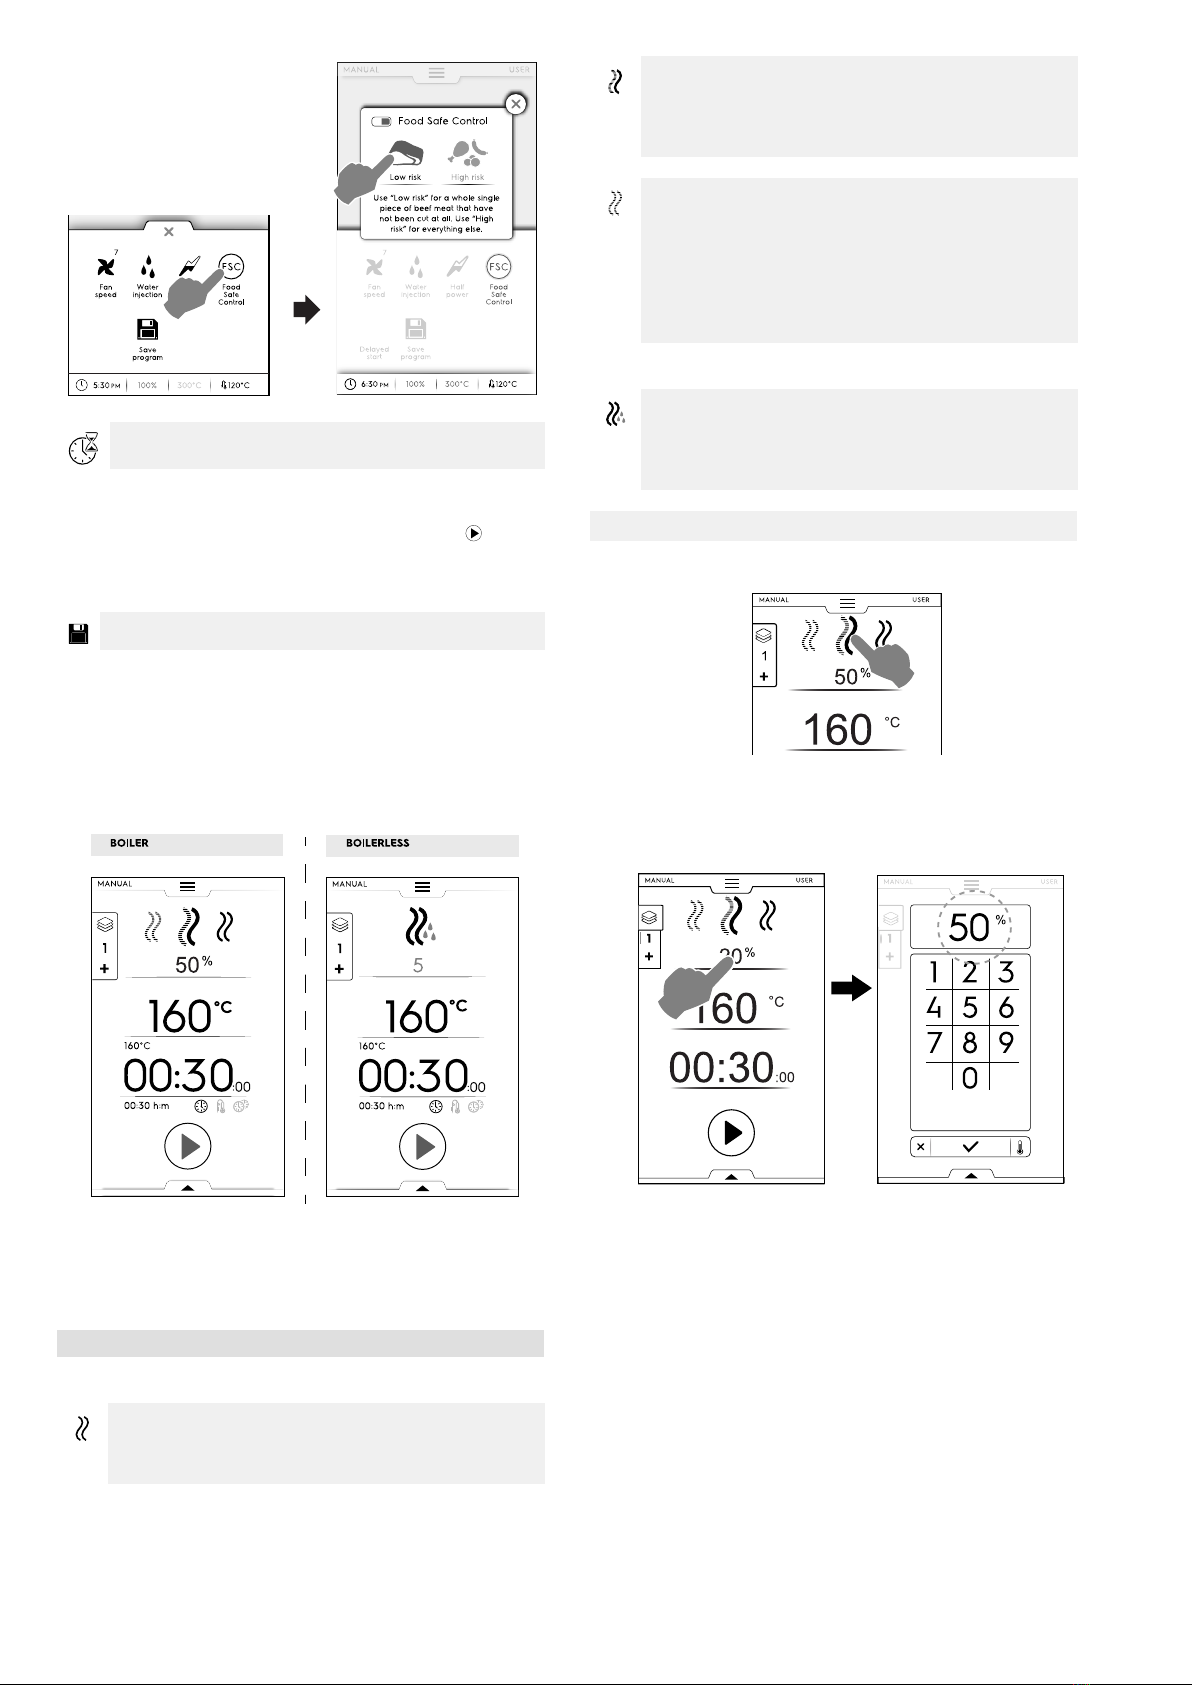
F.5 Manual mode
The manual mode displays the following first page:
To display the home page with more detailed information, see
F.16 Settings chapter (Manual ⇨General, ⇨Show real and set
values).
/
COOKING CYCLES
Models with boiler
CONVECTION Cycle
For roasting and gratinating:
Maximum temperature up to 300 ℃.
COMBI Cycle
The steam generator and compartment heaters are
used at the same time to keep foods tender;
Maximum temperature up to 300 ℃.
STEAM Cycle
Ideal for boiling (operating temperature automatically
fixed at 100℃;
Low temperature steam for gentle cooking, vacuum
packed foods and for defrosting (temperature from
25℃to 99℃);
Superheated steam (temperature 101℃– 130℃).
Models boilerless
CONVECTION Cycle
Maximum temperature up to 300 ℃.
For roasting and gratinating; Maximum temperature
up to 300 ℃.
How to set a cooking cycle
1. Select a cycle, for example COMBI;
2. If it is necessary, set the required HUMIDITY;
• Touch the row of the humidity value;
• Enter the new value on the numeric keypad appearing
on the display.
ent Closed
50°C
50°C
20
25
FSC
+
PM5:30 100%
120°C300°C
Fan
speed
Water
injection
Smoker roma
Half
power
Food
Safe
Control
Delayed
start
Save
program
7
MNUL USER
Food Safe Control
Low risk High risk
Lorem ipsum
Use “Low risk” for a whole single
piece of beef meat that have
not been cut at all. Use “High
risk” for everything else.
FSC
+Fan
speed
Water
injection
Half
power
Food
Safe
Control
Delayed
start
Save
program
7
PM6:30 100% 300°C 120°C
MNUL USER
Food Safe Control
Low risk High risk
Lorem ipsum
Use “Low risk” for a whole single
piece of beef meat that have
not been cut at all. Use “High
risk” for everything else.
100
%
0 0 3 0:
: 0 0
00:30 h:m
160°C
PM5:30 100%
120°C300°C
Delayed
start
Save
program
Fan
speed
7
Water
injection
Half
power
Food
Safe
Control
MNUL USER
FSC
160
°C
0 0 30 :
: 0 0
00:30 h:m
160°C
MANUAL
1
160
°C
0 0 30 :
: 0 0
00:30 h:m
160°C
MANUAL
1
5
BOILER BOILERLESS
50
%
50
%
00 0 00
160
° C
USERMANUAL
1
20
%
00:30:00
160
°
C
USERMANUAL
20 -
°
c
Ha r d Chill
1:30
4
7
5
8
61 2 3
0
9
USERMAN U AL
50
11
%
19
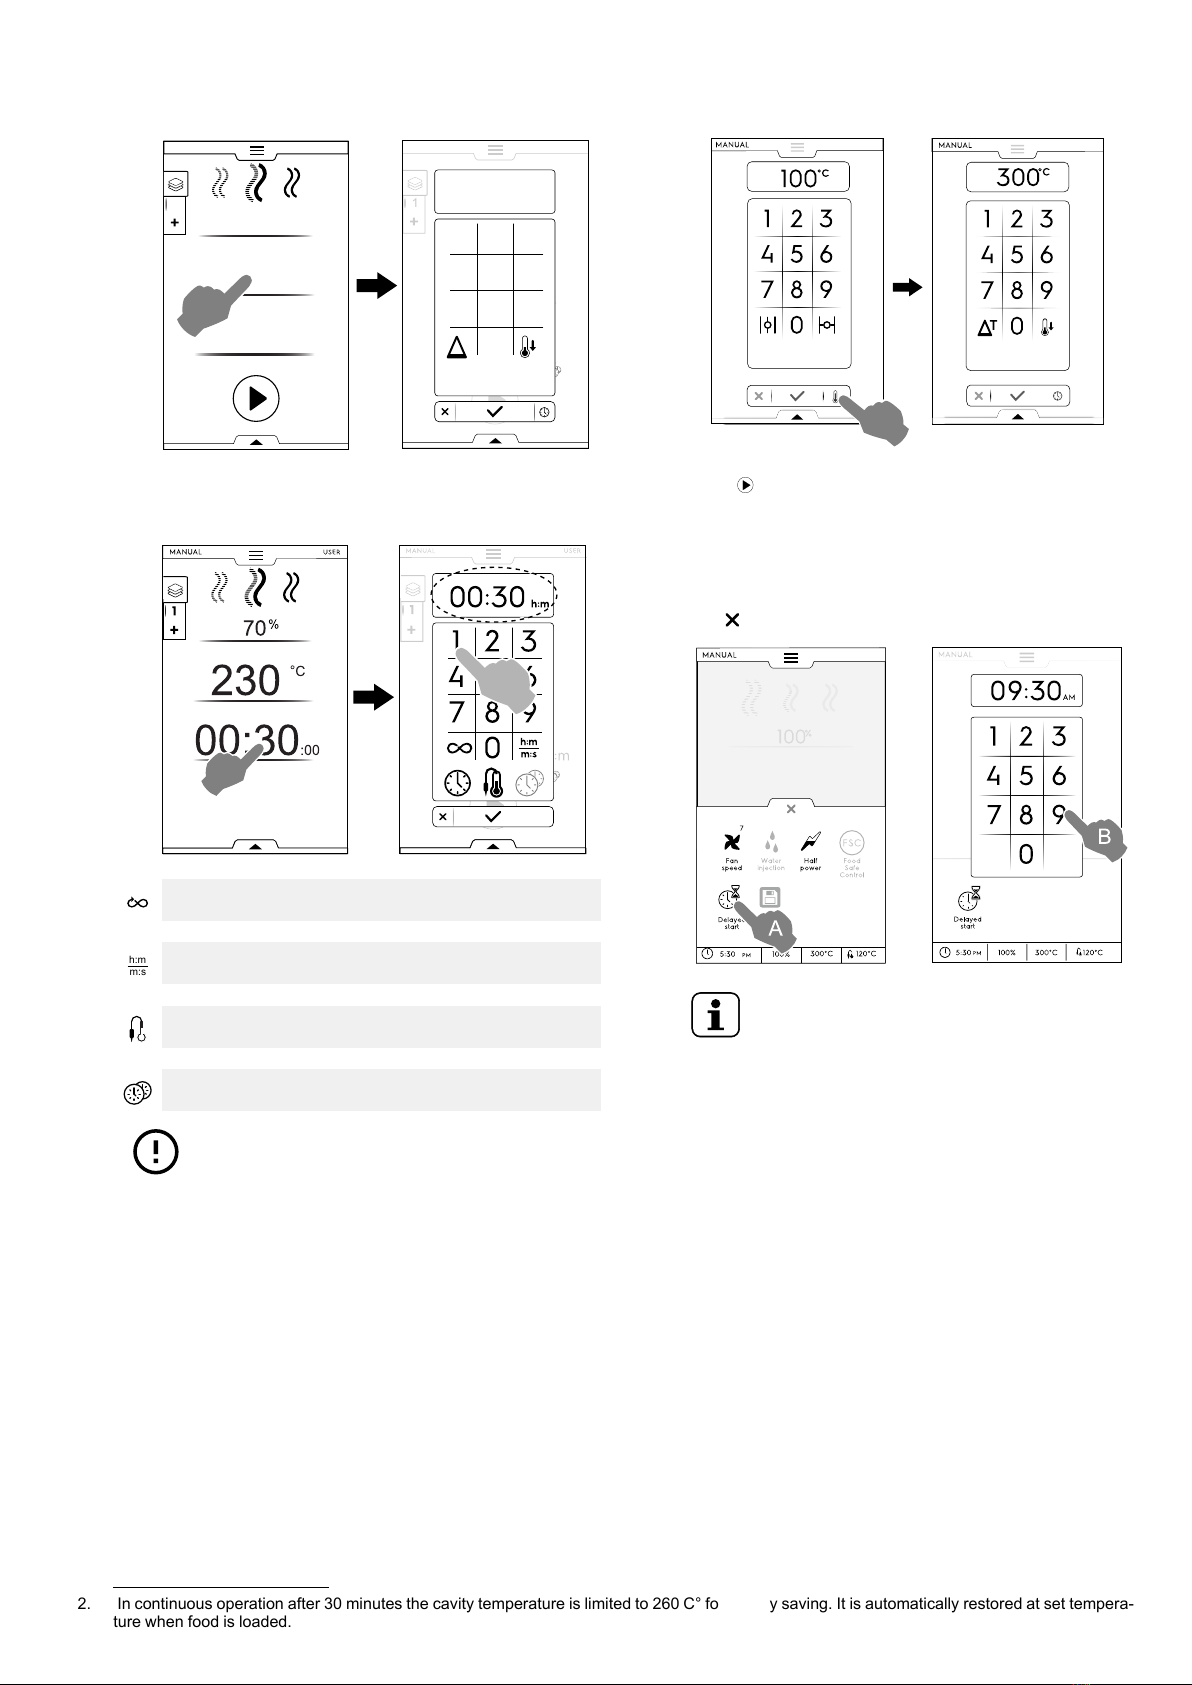
3. Set the required TEMPERATURE2
• Touch the row of the temperature value; enter the new
value on the numeric keypad appearing on the display.
4. Set the duration TIME
• Touch the row of the time value; enter the new value
on the numeric keypad.
Continuous cooking time
Displayed time
Food Probe
MultiTimer
IMPORTANT
The numeric keypad allows to set further options of
the cycle without returning back to the first page of
Manual mode.
• Touch the button illustrated in the figure to access the
setting of temperature and time options;
5. Touch button to start the set cooking cycle.
Delay Start setting before touching START button
A. Open the lower drawer and touch the corresponding icon
(“A“);
B. Set the starting time on the appearing keypad (“B“) and
touch to close it;
NOTE!
To cancel the delayed start, open the lower
drawer again and touch the green delay start
icon. It should change colour from green into
white.
70
%
00:30:00
160
°
C
CHEF 1MANUAL
20 -
°
c
Ha r d Chill
1:30
h:m
4
7
5
8
6
1 2 3
0
9
USERMAN U AL
°C
160
11
T
70
%
00:30:00
230
°
C
MANUAL
20 -
°
c
Ha r d Chill
h:m
4
7
5
8
61 2 3
0
9
00:30
USEMAN U AL
1
m:s
h:m
h:m
1
USE
m:s
h:m
1 2 3
4 5 6
7 8
0
9
T
1 2 3
4 5 6
7 8
0
9
°C°C
300100
MANUAL
MANUAL
100
%
MANUAL
Fan
speed
7
Water
injection
Half
power
Food
Safe
Control
FSC
Delayed
start
Sae
program
PM5:30 100% 120°C300°C
Delayed
start
MANUAL
AM
1 2 3
4 5 6
7 8
0
9
0 9 3 : 0
B
120°C300°C100%5:30
PM
A
2. In continuous operation after 30 minutes the cavity temperature is limited to 260 C° for energy saving. It is automatically restored at set tempera-
ture when food is loaded.

20
C. The display shows the set cooking cycle with the delayed
start. Touch the button to confirm it (“C“).
• If you want the oven to perform the preheating for the
delayed cycle, see F.16 Settings chapter (Manual ⇨
General, ⇨) and enable the feature “Delayed start
preheating“ ( / ).
In this case the oven asks to perform the preparation
phase (preheating) for the cycle at the set time.
The appliance starts the countdown. The display shows
the delay start icon, the remaining time and the set starting
time.
It is still possible to skip the delay and start immediately
the cycle. In this case the oven starts the preheating
phase.
Start Options
AUTO START
The cooking cycle starts by closing the door. The START
button is not visible on the display.
To enable the Autostart in all modes see F.16 Settings
chapter (Autostart).
6. The preheating (or precooling) phase starts. The pre-
heating or precooling prepares the cavity temperature
before the beginning of the selected cycle.
NOTE!
If the cavity temperature is too high a message
asks for opening the door to facilitate its cooling
down.
Skip Preheating / Precooling
Touch the icon to skip this phase and go immediately to the
main cycle.
NOTE!
This phase can be enabled or disabled in F.16
Settings chapter (Manual ⇨General, ⇨Cooking
preheating).
7. At the end of Preheating acoustic signals sound and the
door light flashes.
A pop-up window opens, showing the message that the
cycle can start.
1. If a TIME CYCLE is chosen: insert the food in the
appliance and close the door to start the cycle;
2. If the PROBE CYCLE is chosen: insert the food in the
appliance, the food probe in the product and close the
door to start the cycle;
Stop cycle
• Hold down the button to stop the cycle.
3. At the end of the cycle acoustic signals sounds A pop-up
window opens showing the summary of consumption,
time cycle and utility used.
Touch button to close the pop-up window;
0 9 0 0:09:30
MANUAL
Delayed
start
C
0 1 3 0:
5 0:
09:30
Delayed start
1
Preparation phase request
Do you want to perform the
preparation phase for this cycle?
70
%
1
250
° C
USERMANUAL
00:45:00
Preheating
250°C
1
MANUAL USER
Preheating done!
Insert the food into the cavity
and close the door to start the
cycle.
27
°C
0 0 2 9:
: 5 5
00:30 h:m
160°C
Other manuals for Combi TOUCH 6 GN 1/1
1
This manual suits for next models
5
Table of contents
Other Electrolux Professional Oven manuals

Electrolux Professional
Electrolux Professional Combi DIGITAL User manual

Electrolux Professional
Electrolux Professional Combi TOUCH 6 GN 1/1 User manual

Electrolux Professional
Electrolux Professional thermaline MBVG CPO Series User manual

Electrolux Professional
Electrolux Professional Touch and Digital User manual
Popular Oven manuals by other brands

Brandt
Brandt FC 222 user manual

aumate
aumate TOA20M04N-1E instruction manual

Maytag
Maytag CWE4100AC - 24" Single Electric Wall Oven Dimension Guide

Kernau
Kernau KBO 1076 S PT B instruction manual

Bosch
Bosch HB 37 N Series User manual and installation instructions

Electrolux
Electrolux EOD5420AA user manual


