Electrolux XLCE User manual

User
Manual
Laundry
Center
137624000A (1304)Manufactured by Electrolux Home Products, NA
XLCE
MODEL TYPE:
Manufactured for 50 Hz operation.
See page 21 for conversion to 60 Hz.

2
Thank you for selecting our appliance
Content
We wish you lots of enjoyment with your new appliance and we hope that you will consider our brand again when
purchasing household appliances.
Please read this user manual carefully and keep it throughout the product life cycle as a reference document. The
user manual should be passed on to any future owner of the appliance.
The following symbols are used in this manual:
Important information concerning your personal safety and information on how to avoid damaging the
appliance.
General information and tips
Environmental information
Safety information - - - - - - - - - - - - - - - - - - - - - 3-4
Description of the appliance - - - - - - - - - - - - - - - - 5
Control panel and functions - - - - - - - - - - - - - - - - 6
Washer Programme table - - - - - - - - - - - - - - - - - - 7
Washing Hints - - - - - - - - - - - - - - - - - - - - - - - - 8-9
Before the washer first use - - - - - - - - - - - - - - - - 9
Washer Operating Sequence - - - - - - - - - - - - - - - 10
Dryer Programme table - - - - - - - - - - - - - - - - - - 11
Drying Hints - - - - - - - - - - - - - - - - - - - - - - - - - 12
Before the dryer first use - - - - - - - - - - - - - - - - - 12
Dryer Operating Sequence - - - - - - - - - - - - - - - - 13
Care and cleaning - - - - - - - - - - - - - - - - - - - - - 14
What to do if... - - - - - - - - - - - - - - - - - - - - - - 15-16
Technical Data - - - - - - - - - - - - - - - - - - - - - - - - 17
Dimensions - - - - - - - - - - - - - - - - - - - - - - - - - - 17
Installation instruction - - - - - - - - - - - - - - - - 18-22
Environmental concerns - - - - - - - - - - - - - - - - - 23
Notes - - - - - - - - - - - - - - - - - - - - - - - - - - - - - - 24

3
Important Safety Information
In the interest of your safety and to ensure the correct use, before installing and first using the appliance, read this
user manual carefully, including its hints and warnings. To avoid unnecessary mistakes and accidents, it is impor-
tant to ensure that all people using the appliance are thoroughly familiar with its operation and safety features.
Save these instructions and make sure that they remain with the appliance if it is moved or sold, so that everyone
using it through its life will be properly informed on appliance use and safety.
General safety
• It is dangerous to alter the specifications or attempt to
modify this product in any way.
• Make sure that small pets do not climb into the wash tub
or dryer drum. To avoid this, please check into the tub and
drum before using.
• Any objects such as coins, safety pins, nails, screws,
stones or any other hard, sharp material can cause exten-
sive damage and must not be placed into the machine.
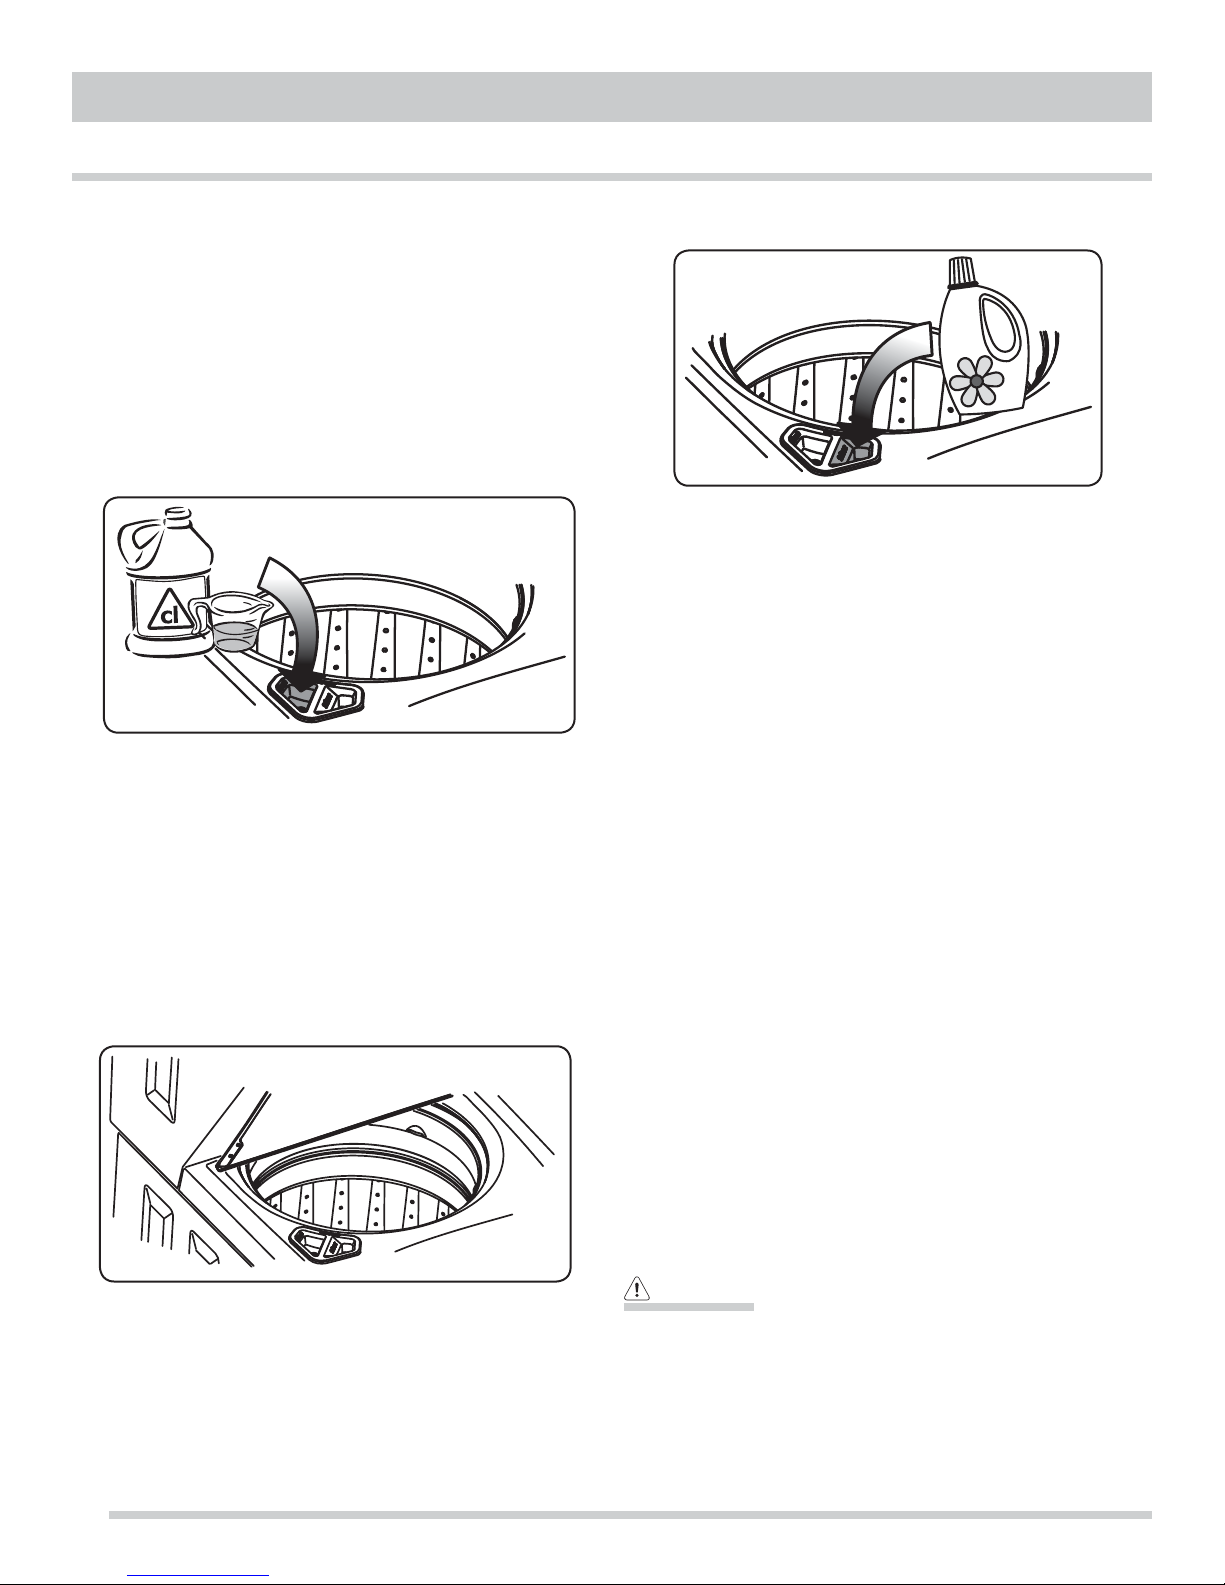
• Only use the advised quantities of fabric softener and
detergent. Damage to the fabric can ensue if you over-fill.
Refer to the manufacturer’s recommendations of quantities.
• Wash small items such as socks, laces, washable belts
etc. in a washing bag or pillow case as it is possible for
such items to slip down between the tub and the inner
drum.
• Do not use your appliance to wash articles with whale-
bones, material without hems or torn material.
• To avoid damaging the appliance and personal injury, DO
NOT hang on or lean against the dryer door.
• Do not place detergent, bleach or fabric softener contain-
ers on top of the appliance. They can damage the finish or
controls.
• Always unplug the appliance and turn off the water supply
after use, clean and maintenance.
• Under no circumstances you should attempt to repair the
appliance yourself. Repairs carried out by inexperienced
people may cause injury or serious malfunctioning. Contact
your local Service Centre. Always insist on genuine spare
parts.
• Items that have been soiled with substances such as cook-
ing oil acetone, petrol, kerosene, spot removers, turpen-
tine, waxes and wax removers should be washed in hot
water with an extra amount of detergent before being dried
in the tumble dryer.
• Danger of explosion: Never tumble dry items that have been
in contact with inflammable solvents (petrol, methylated
spirits, dry cleaning fluid and the like). As these substance
are volatile, they could cause an explosion. Only tumble dry
items washed with water.
• Risk of fire: items that have been spotted or soaked with
vegetable or cooking oil constitute a fire hazard and should
not be placed in the tumble dryer.
• Ensure you have adequate ventilation in the installation
room to avoid the back flow of gases into the room from
appliances burning other fuels, including open fires.
• If you have washed your laundry with stain remover you
must execute an extra rinse cycle before loading your
tumble dryer.
• Please make sure that no gas lighters or matches have
accidentally been left in pockets of garments to be loaded
into appliance.
WARNING! - RISK OF FIRE!
Never stop a tumble dry before the end of the drying
cycle unless all items are quickly removed and spread
out so that the heat is dissipated.
Installation
• This appliance is heavy. Care should be taken when mov-
ing it.
• When unpacking the appliance, check that it is not dam-
aged. If in doubt, do not use it and contact the Service
Centre.
• All packing and transit bolts must be removed before use.
Serious damage can occur to the product and to property
if this is not adhered to. See relevant section in the user
manual.
• After having installed the appliance, check that it is not
standing on the inlet and drain hose and the appliance is
not pressing the electrical supply cable against the wall.
• Do not install appliance on a carpeted floor.
• Always be sure, that there is no water leakage from hoses
and their connections after the installation.
• If the machine is installed in a location subject to frost,
please read the «dangers of freezing» chapter.
• Any plumbing work required to install this appliance should
be carried out by a qualified plumber or competent person.
• Any electrical work required to install this appliance should
be carried out by a qualified electrician or competent per-
son.

4
Use
• This appliance is designed for domestic use. It must not be
used for different purposes.
• Only wash and dry fabrics which are designed to be ma-
chine laundered. Follow the instructions on each garment
label.
• Do not dry unwashed items in the tumble dryer.
• Do not overload the appliance.
• Clothes which are dripping wet should not be placed in the
dryer.
• Before washing, ensure that all pockets are empty and but-
tons and zips are fastened. Avoid washing frayed or torn
articles and treat stains such as paint, ink, rust, and grass
before washing. Bras must NOT be machine washed.
• Garments which have been in contact with volatile petro-
leum products should not be machine washed. If volatile
cleaning fluids are used, care should be taken to ensure
that the fluid is removed from the garment before placing in
the appliance.
• The final part of a tumble dryer cycle occurs without heat
(cool down cycle) to ensure that the items are left at a tem-
perature that ensures that items will not be damaged.
Important Safety Information, continued
• Never pull the power supply cord to remove the plug from
the socket; always take hold of the plug itself.
• Never use the appliance if the power supply cord, the con-
trol panel, the working surface or the base are damaged so
that the inside of the appliance is accessible.
• Fabric softeners, or similar products should be used as
specified by the fabric softener instructions.
Child safety
• This appliance is not intended for use by people (including
children) with reduced physical sensory or mental capabili-
ties or lack of experience and knowledge unless they have
been given supervision or instruction concerning use of the
appliance by a person responsible for their safety.
• Young children should be supervised to ensure that they do
not play with the appliance.
• The packaging components (e.g. plastic film, polystyrene)
can be dangerous to children - danger of suffocation! Keep
them out of children’s reach.
• Keep all detergents in a safe place out of children’s reach.
• Make sure that children or pets do not climb into the tub or
drum.

5
1Dryer controls
2Washer controls
3“BLEACH”: compartment for liquid bleaching agent
4“SOFTENER”: compartment for liquid fabric softener
5Lint («fluff») filter
6Washer lid safety lock
Description of the appliance
2
1
34
6
6
7
8
89
9
10
11
5
7Serial number / Rating plate
8Adjustable front feet
9Self-leveling rear feet
10 Plastic access cover shield
11 Rear vent outlet

6
1 2 3 4 5 6
Control Panel
Information
Henceforth, the programme selector dial and the different buttons will be indicated in all the book with the relevant numbers
given in this picture.
1Dryer Programme
Selector Dial
The programme selector dial allows to select a drying programme. It can be turned either
clockwise or anticlockwise. (See «Dryer Programme Table» for more details about the drying
programmes).
2Dryer Temperature Selec-
tor Knob
This button allows you to change the drying temperature according to the fiber content of
fabrics to be dried. (See «Drying hints» for more details).
• HIGH: Recommended for durable fabrics and towels.
• NORMAL: Recommended for wrinkle free, easy care, lightweight fabrics and bulky loads.
• LOW: Recommended for delicate fabrics.
• AIR DRY: This setting (no heat) should only be used with a Timed Dry cycle to dry items
containing feathers, down, foam rubber, plastics or rubber-like materials; to refresh cloth-
ing, stuffed animal, pillows or blankets; and to dust draperies.
Note: Not all temperatures are available in every programme. For best results, follow the care
label instructions.
3Dryer Chime A signal will sound at the end of the drying cycle if this option is selected.
4Washer Fabric Softener
Selector Switch
You must turn the fabric softener switch to the «On» position for correct operation of the
fabric softener dispenser. See «Care and Cleaning» for dispenser cleaning procedures.
5Washer Temperature
Selector Knob
This button allows to change the wash water temperature according to the kind of fabrics,
colorfasteness and soil level. (See «Washing hints» for more details).
Note:
For best results, follow the care label instructions and use the hottest water safe for the
fabric.
6Washer Programme
Selector Dial
The programme selector dial allows to select a washing programme. It can be turned either
clockwise or anticlockwise. (See «Washer Programme Table» for more details about the
washing programmes).

Washer Programme Table
7
NORMAL / COTTON
Hot - Warm - Cool - Cold - Cold Water Clean
Spin speed: 600
Main wash - Rinses - Long spin
White and Colour Fast: e.g. light to normally soiled cottons, towels,
shirts, denims and mixed loads.
Available options: Fabric Softener, Energy Saver
LIGHT / BLENDS
Hot - Warm - Cool - Cold - Cold Water Clean
Spin speed: 600
Gentle wash - Rinses - Short spin
Non-Colour Fast items: for example poly blends with a perma-
nent press or no-iron finish.
Available options: Fabric Softener, Energy Saver
BLANKETS
Hot - Warm - Cool - Cold - Cold Water Clean
Spin speed: 600
Gentle wash - Rinses - Long spin
For one large comforter or two light-duty sleeping bags. Press
the item(s) to the bottom of the tub as much as possible to
prevent them from floating as the tub fills with water
Available options: Fabric Softener, Energy Saver
HEAVY / DUTY
Hot - Warm - Cool - Cold - Cold Water Clean
Spin speed: 600
Main wash - Rinses - Long spin
Durable items: towels, sports gear, or fabric tote bags. For
best soil and stain removal, use the hottest water safe for the
fabrics being washed.
Available options: Fabric Softener
DELICATES / SILKS
Warm - Cool - Cold - Cold Water Clean
Spin speed: 600
Gentle wash - Rinses - Short spin
For lightly soiled knits and delicates which require gentle washing.
Available options: Fabric Softener
Washing Programmes / Suitable Temperature / Spin Speed / Cycle Description / Load Capacity / Type of Laundry / Available Options
BED SHEETS
Hot - Warm - Cool - Cold - Cold Water Clean
Spin speed: 600
Gentle wash - Rinses - Long spin
For large items such as blankets, sheets, mattress pads, linens,
duvet covers and similar items
.
Available options: Fabric Softener, Energy Saver
QUICK WASH
Warm - Cool - Cold - Cold Water Clean
Spin speed: 600
Gentle wash - Long spin
Quickly wash a small, lightly soiled load in 25 minutes.
Available options: Fabric Softener
RINSE & SPIN
Cold Water Clean
Spin speed: 600
Fill - Long spin
For loads that need a cold water rinse or to add fabric softener
that may have been omitted in a regular cycle.
Available options: Fabric Softener
PRE-SOAK
Warm - Cool - Cold - Cold Water Clean
Spin speed: drain only, no spin
Fill - Soak - Drain
Use this cycle to soak heavily soiled and stained items before
washing. Cold water is recommended with this cycle as
warmer water may set some stains. Use the amount of deter-
gent recommended for a normal wash cycle. If desired, use a
bleach or a soaking agent safe for the fabric.
Note: Follow Pre-Soak with a complete wash cycle suitable for
the load using a half dose of detergent.

8
Washing Hints
Before loading the laundry
Never wash whites and coloureds together. Whites may lose
their «whiteness» in the wash.
New coloured items may run in the first wash; they should
therefore be washed separately the first time.
Make sure that no metal objects are left in the laundry (e.g. hair
clips, safety pins, pins). Button up pillowcases, close zip fasteners,
hooks and poppers. Tie any belts or long tapes.
Remove persistent stains before washing. Rub particularly
soiled areas with a special detergent or detergent paste.
Treat curtains with special care. Remove hooks or tie them
up in a bag or net.
Maximum Loads
General rules:
Cotton, linen: tub full but not too tightly packed;
Synthetics: tub no more than half full;
Delicate fabrics and woollens: tub no more than one third full.
Sorting The Laundry
Follow the wash code symbols on each garment label and
the manufacturer’s washing instructions. Sort the laundry as
follows: whites, coloureds, synthetics, delicates, woollens.
Temperatures
Hot for normally soiled white cottons and linen
(e.g. tea cloths, towels, tablecloths, sheets...)
Warm
for normally soiled, colour fast garments (e.g.
shirts, night dresses, pyjamas....) in linen,
cotton or synthetic fibres and for lightly soiled
white cotton (e.g. underwear).
Cold
for delicate items (e.g. net curtains), mixed
laundry including synthetic fibres and wool-
lens bearing the label «pure new wool, ma-
chine washable, non-shrink».
Removing Stains
Stubborn stains may not be removed by just water and deter-
gent. It is therefore advisable to treat them prior to washing.
Blood: treat fresh stains with cold water. For dried stains, soak
overnight in water with a special detergent then rub in the
soap and water.
Oil based paint: moisten with benzine stain remover, lay the
garment on a soft cloth and dab the stain; treat several times.
Dried grease stains: moisten with turpentine, lay the garment
on a soft surface and dab the stain with the fingertips and a
cotton cloth.
Rust: oxalic acid dissolved in hot water or a rust removing
product used cold. Be careful with rust stains which are not
recent since the cellulose structure will already have been
damaged and the fabric tends to hole.
Mould stains: treat with bleach, rinse well (whites and fast
coloureds only).
Grass: soap lightly and treat with bleach (whites and fast
coloureds only).
Ball point pen and glue: moisten with acetone (*), lay the gar-
ment on a soft cloth and dab the stain.
Lipstick: moisten with acetone as above, then treat stains
with methylated spirits. Remove any residual marks from
white fabrics with bleach.
Red wine:
soak in water and detergent, rinse and treat with ace-
tic or citric acid, then rinse. Treat any residual marks with bleach.
Ink: depending on the type of ink, moisten the fabric first with
acetone (*), then with acetic acid; treat any residual marks on
white fabrics with bleach and then rinse thoroughly.
Tar stains: first treat with stain remover, methylated spirits or
benzine, then rub with detergent paste.
(*) do not use acetone on artificial silk.

9
1 soft 0-7 0-15
2 medium 8-14 16-25
3 hard 15-21 26-37
4 very hard >21 >37
Level Characteristic
Degrees
German
°dH
French
°T.H.
Detergents and Additives
Good washing results also depend on the choice of deter-
gent and use of the correct quantities to avoid waste and
protect the environment. Although biodegradable, detergents
contain substances which, in large quantities, can upset the
delicate balance of nature.
The choice of detergent will depend on the type of fabric
(delicates, woollens, cottons, etc.), the colour, washing tem-
perature and degree of soiling.
All commonly available washing machine detergents may be
used in this appliance:
• powder detergents for all types of fabric,
• powder detergents for delicate fabrics and woollens,
• liquid detergents, preferably for low temperature wash
programmes for all types of fabric, or special for woollens
only.
Pour liquid detergent directly into the wash tub before adding
wash load.
The additives must be placed in the appropriate compart-
ments of the dispenser before starting the wash programme.
Any fabric softener must be poured into the compartment
marked «Softener» before starting the wash programme. Do
not exceed the «MAX» mark in the fabric softener compartment.
Overfilling can cause early dispensing of the fabric softener
which could result in stained clothes.
Do not pour fabric softener directly on the wash load.
The bleaching agent (chlorine) can be used only for white
cotton and linen items. Pour it into the compartment marked
«Bleach». Bleach is dispensed immediately to the bottom of tub
as you pour it in the «Bleach» compartment. Follow up with 250
ml of water to flush the dispenser.
Do not pour undiluted liquid chlorine bleach directly onto the
load or into the tub. Fabric damage can occur.
Quantity of Detergent to be Used
The type and quantity of detergent will depend on the type of
fabric, load size, degree of soiling and hardness of the water
used. Follow the product manufacturers’ instructions on
quantities to use.
Use less detergent if:
• you are washing a small load,
• the laundry is lightly soiled,
• large amounts of foam form during washing.
Degrees of Water Hardness
Water hardness is classified in so-called «degrees» of hard-
ness. Information on hardness of the water in your area can
be obtained from the relevant water supply company, or from
your local authority.
Before the First Use
Ensure that the electrical and water connections comply with
the installation instructions.
WARNING!
Remove any material from the tub.
We recommend you to run a Normal/Cotton cycle, with Hot
water and no laundry in the appliance, to remove any manu-
facturing residue from the tub. Pour 1/2 a measure of deter-
gent into the tub and start the cycle.
IMPORTANT!
IMPORTANT!

10
Washer Operating Sequence
1. Sort laundry into loads that can be washed together
See «Washing Hints» for more details.
2. Pretreat stains and heavy soil
See «Washing Hints» for more details.
3. Add a measured amount of detergent to the wash tub before
adding the laundry load.
• Follow detergent manufacturer’s directions. The amount
required depends on type of detergent, load size and
soil level, and water hardness.
4. If desired, add liquid bleach to bleach dispenser.
• Before adding the wash load, add liquid bleach to bleach
dispenser located in left front corner under the lid:
6. If desired, add liquid fabric softener to fabric softener dis-
penser.
• Refer to bleach manufacturer’s directions for quantity to
add.
• Then add 250 ml water to flush the dispenser.
• Do not use powdered bleach in the bleach dispenser.
Add powdered bleach to the empty tub.
5. Add laundry load to washer.
• For best washing performance, dry load level should not
be higher than the upper row of holes in the wash tub.
Do not overload the washer.
• As the washer dampens and moves the load, the level
of the clothes will settle in the tub. This does not indicate
that more clothes should be added to the tub.
• Combine large and small items in a load. Load large
items first. Large items should not be more than half the
total wash load.
• When washing a single heavy item, add 1 or 2 towels to
balance the load.
• Add liquid softener to the dispenser, following fabric
softener label directions. DO NOT use granular detergent
in this dispenser.
• DO NOT fill above the maximum fill line.
• Turn fabric softener option on.
• Do not use bleach in this dispenser.
7. Select the appropriate cycle and settings for the load.
• See «Washing Hints» and «Washer Programme Table»
for more details.
8. Wake up and start the washer.
• Close the washer lid. The washer will not operate with
the lid open.
• Push in or turn the cycle selector knob
6
or turn any op-
tion knob
4
or
5
to “wake” the washer. You will hear three
beeps to indicate washer is ready to operate.
• After making your selections, push in the selector knob
6
to start the cycle. You will hear one beep and the washer
lid will lock.
• To add a forgotten item to the wash tub, push in the
cycle selector knob
6
to pause the cycle. You will hear
two beeps. After the lock releases, lift the lid and add the
item. Close the lid and push in the selector knob
6
again,
continuing the current cycle.
• To stop a running cycle, push in the cycle selector knob 6.
9. At the end of the programme
• For your safety, the lid is locked during the operation of
the washer. It will unlock at the cycle end after the tub
has come to a complete stop.
• To open the lid during cycle operation, push in the cycle
selector knob to pause the cycle. You will hear two
beeps. Wait for the lid lock to release.
Do not force open
the locked lid.
• Place washed items in automatic dryer, line dry, or dry flat
as directed by fabric care label. Excess wrinkling, color
transfer or odors may develop in items left in the washer
after the cycle has ended.
To avoid serious personal injury, do not operate washer if
safety lid lock is missing, damaged or operating improperly.
WARNING!

11
Dryer Programme Table
NORMAL / COTTON
High - Normal
Cycled Heat - Cool down
Select this cycle to dry everyday fabrics including cottons, linens
and sheets.
Available options: Chime
HEAVY DUTY
High - Normal
Cycled Heat - Cool down
Select this Auto Dry programme to dry durable fabrics such as
work wear and overalls.
Available options: Chime
DELICATES / SILKS
Normal - Low
Cycled Heat - Cool down
Select this programme to dry knits and delicates.
Available options: Chime
LIGHT / BLENDS
High - Normal - Low
Cycled Heat - Cool down
Select this programme to dry cottons, blends and permanent
press items with a no-iron finish.
Available options: Chime
Drying Programmes / Suitable Temperature / Cycle Description / Type of Laundry / Available Options
TOWELS
High - Normal
Cycled Heat - Cool down
Select this programme to dry heavy loads such as towels and
non-rubber-backed bath mats.
Available options: Chime
REFRESH
High - Normal - Low - Air Dry
Cycled Heat - Timed Duration - Cool down
For removing wrinkles from clean and dry items that were not
taken from the dryer at the end of the programme, have been
stored in crowded closets or drawers, or unpacked from lug-
gage following a trip. It provides approximately 10 minutes of
tumbling followed by a 5-minute cool down period.
Available options: Chime
TIME DRY (30/60/90)
High - Normal - Low - Air Dry
Cycled Heat - Timed Duration - Cool down
To manually select the drying time for any load, turn the knob to a
numbered setting: 30, 60, or 90 minutes.
Available options: Chime

12
Drying Hints
Before loading the laundry
Never tumble dry the following:
Particularly delicate items such as net curtains, woollen,
silk, fabrics with metal trim, nylon tights, bulky materials
such as anoraks, blankets, eiderdowns, sleeping bags,
feather quilts and any items containing rubber foam or
materials similar to rubber foam.
• Always follow the instructions on garment labels:
may be tumble dried
normal drying (high temperature)
delicate drying (low temperature)
do not tumble dry
• Close pillowcases and covers with fasteners to prevent
small laundry items getting tangled inside them. Close
press studs, zips and hooks and tie belts and apron
strings.
• Sort laundry according to type and degree of drying re-
quired.
• Do not over-dry laundry, this avoids creasing and saves
energy.
• Avoid drying dark clothes with light coloured fluffy items
such as towels as they could attract the fluff.
• The laundry must be thoroughly spun before tumble drying.
• Easy-care items, too, e.g. shirts, should be briefly pre-spun
before drying (depending on crease resistance approx. 30
seconds or using the special brief spin programme of your
washing machine).
• Knitted textiles (knitted underwear) may shrink a little during
drying. Please do not overdry items of this type. It is advis-
able to allow for shrinkage when choosing the size of new
purchases.
• To avoid a static charge when drying is completed, use
either a fabric softener when you are washing the laundry
or a fabric conditioner specifically for tumble dryers.
• Remove the laundry when the dryer has finished drying.
• If individual items are still damp after drying, set a brief
post-drying time, for at least 30 minutes. This will be
necessary particularly for multilayered items (e.g. collars,
pockets, etc.).
Before the First Use
Ensure that the electrical connections comply with the instal-
lation instructions.
WARNING!
IMPORTANT!
IMPORTANT!
Remove any material from the drum.
Before using your tumble dryer for the first time, we recom-
mend that you place a few damp cloths inside the appliance
and dry for 30 minutes. There may be dust inside a brand
new tumble dryer.

Dryer Operating Sequence
1. Check that the lint filter is
clean and in place.
2. Load the dryer and close the door.
• Load items loosely. The average wet load will fill the
drum 1/3 to 1/2 full. Items need room to tumble freely
for even drying and less wrinkling.
• If desired, place a dryer fabric softener sheet on top of
the load at the beginning of the cycle.
• To save energy and time and avoid uneven drying and
wrinkling, do not overload the dryer.
• When drying large items, dry only two or three items at
a time. Fill out the load with small and medium sized
items.
• For delicate or very small loads, add two or three similar
items to improve tumbling action.
3. Select the appropriate programme and settings for each load.
See «Drying Hints» and «Dryer Programme Table» for more
details.
4. Wake up and start the dryer.
• Close the dryer door. The dryer will not operate with the
door open.
• Push in or turn the cycle selector knob 1or turn any op-
tion knob 2or 3to “wake” the dryer. You will hear three
beeps to indicate dryer is ready to operate.
• After making your selections, push in the selector knob
1to start the cycle. You will hear one beep before the
drum begins to rotate.
• To add or remove items when the dryer is running, push
in the cycle selector knob 1to pause the cycle and
open the door. Opening the door with a cycle running
will also pause the cycle. You will hear two beeps. Allow
the drum to come to a complete stop before reach-
ing inside. Add or remove the item, close the door and
push in the selector knob 1again, continuing the current
cycle.
• To stop a running cycle, push in the cycle selector knob 1.
13
Do not operate dryer without lint filter in place.
IMPORTANT!
If drying a single large or bulky item, such as a comforter,
remove the item part way through the cycle and turn it “inside
out” to maximize drying effectiveness. Place item back in
dryer and re-start cycle.
NOTE
5. When the programme ends...
• Remove the items promptly and hang or fold.
• You are advised to unplug the appliance.
• Clean the filter after every drying programme. A clean
filter ensures correct functioning of the appliance.

14
Care and Cleaning
Inside Dryer
• Your dryer will only function well if the filter is clean. Clean the lint («fluff»)
filter after every load. Lint build-up on the filter restricts air flow, which
causes longer drying times. The filter is located at the bottom of the
door opening. Remove filter by pulling straight up. Remove the lint and
replace the filter.
Inside Washer
• Remove items from the washer as soon as the cycle ends. Excess wrin-
kling, color transfer, and odors may develop in items left in the washer.
• Descaling: The water we use normally contains lime. It is a good idea to
periodically use a water softening powder in the appliance. Do this sepa-
rately from any laundry washing, and according to the softening powder
manufacturer’s instructions. This will help to prevent the formation of lime
deposits.
• When extremely soiled items have been washed, a dirty residue may
remain on the tub. Remove this by wiping the tub with a nonabrasive
household cleanser. Rinse thoroughly with water.
Fabric Softener Dispenser
• Remove the dual chamber insert (a) from the bleach and fabric softener
dispenser by pinching at the chamber divider and lifting upward. Also
remove the siphon cap (b).
• Rinse the insert and cap with a combination of 200 ml liquid chlorine
bleach and 4 litres hot tap water to remove any buildup. Large amounts
of fabric softener residue may indicate improper dilution or more fre-
quent cleaning is required. Rinse well with tap water.
• For the dispenser well, use a small brush to clean the recesses. Remove
all residue.
• Replace the siphon cap and insert by pressing it in place until you hear a
slight click.
External Cleaning
• Clean the exterior cabinet of the appliance with soap and water only,
and then dry thoroughly.
• If your water is very hard or contains traces of lime deposit, the water in-
let filter may become clogged. It is therefore a good idea to clean it from
time to time. Turn off the water tap. Unscrew the water inlet hose. Clean
the filter using a hard bristle brush. Tighten up the inlet hose.
The dangers of freezing
If the appliance is exposed to temperatures below 0°C, certain precautions
should be taken.
• Pull out the plug from the power socket;
• Turn off the water tap.
• Unscrew the inlet hose.
• Place the end of the inlet hose in a bowl placed on the floor and let
water drain out.
• Screw the water inlet hose back on again.
• When you intend to start the appliance up again, make sure that the
room temperature is above 0°C.
• You must DISCONNECT the appliance from
the electricity supply, before you can carry
out any cleaning or maintenance work.
• Do not use methylated spirit, diluents or
similar products.
• Do not use any type spray cleanser when
cleaning the dryer interior. Hazardous fumes or
electrical shock could occur.
IMPORTANT:
Fabric softener may build up in the dispenser
well. Residue should be removed once or twice
a month.
a
b
NOTE

15
What to do if...
Certain problems are due to lack of simple maintenance or oversights, which can be solved easily without calling out an engi-
neer. Before contacting your local Service Centre, please carry out the checks listed below.
During appliance operation it is possible that few acoustic signals sound to indicate that the appliance is not working.
Once the problem has been eliminated, press the button 1or 7to restart the programme. If after all checks, the problem per-
sists, contact your local Service Centre.
IMPORTANT!
The washer does not start: The lid or door has not been closed.
• Close firmly the lid or door.
The plug is not properly inserted in the power socket.
• Insert the plug into the power socket.
There is no power at the socket.
• Please check your domestic electrical installation.
The main fuse has blown.
• Replace the fuse.
The button 6has not been pressed.
• Press the button 6.
The washer does not fill: The water tap is closed.
• Open the water taps.
The inlet hose is squashed or kinked.
• Check the inlet hose connection.
The lid is not properly closed.
• Close firmly the lid.
The appliance fills then empties immediately: The end of the drain hose is too low.
• Refer to relevant paragraph in «water drainage» section.
The appliance does not empty and/or does not
spin: The drain hose is squashed or kinked.
• Check the drain hose connection.
The laundry is not evenly distributed in the drum.
• Redistribute the laundry.
There is water on the floor: Check whether there are any leaks from one of the inlet hose fittings. It is not always
easy to see this as the water runs down the hose; check to see if it is damp.
• Check the water inlet hose connection.
The inlet hose is damaged.
• Change it with new one.
Unsatisfactory washing results: Too little detergent or unsuitable detergent has been used.
• Increase the detergent quantity or use another one.
Stubborn stains have not been treated prior to washing.
• Use commercial products to treat the stubborn stains.
The correct temperature was not selected.
• Check if you have selected the correct temperature.
Excessive laundry load.
• Introduce into the tub less laundry.
The lid will not open: The programme is still running.
• Wait the end of the wash cycle.
The lid lock has not been released.
• Wait until the lid lock has released.
Washer Malfunction Possible Cause / Solution

16
What to do if..., continued
If you are unable to identify or solve the problem, contact our service centre.
Before telephoning, make a note of the model, serial number and purchase date of your appliance: the Service Centre will
require this information.
Washer Malfunction Possible Cause / Solution
The appliance vibrates or is noisy: The transit bolt has not been removed.
• Check the correct installation of the appliance.
The support feet have not been adjusted.
• Check the correct levelling of the appliance.
The laundry is not evenly distributed in the tub.
• Redistribute the laundry manually.
Maybe there is very little laundry in the tub.
• Load more laundry.
Spinning starts late or the appliance does not spin: The electronic unbalance detection device has cut in because the laundry is not evenly
distributed in the tub. The cycle will finish, spinning at a reduced speed and the laundry
will be wetter than usual. In this case, redistribute the load manually and select the spin
programme.
• Redistribute the laundry.
Dryer Malfunction Possible Cause / Solution
Dryer does not start. Electrical power cord is not securely plugged in or plug may be loose.
• Make sure the plug fits tightly in wall outlet.
House fuse blown or circuit breaker tripped.
• Reset circuit breaker or replace fuse.
• Make sure electrical line is not overloaded and the dryer is on a separate circuit.
The button 1has not been pressed.
• Press the button 1.
Thermal limiter tripped.
• Call authorized service person for replacement.
Dryer runs but won’t heat. There are 2 house fuses in the dryer circuit. If 1 of the 2 fuses is blown, the drum may
turn but the heater will not operate. (electric models).
• Replace fuse.
Drying cycle takes too long, outside of the dryer
feels too hot or smells hot. Lint filter is clogged with lint.
• Make sure all lint has been removed from the dryer lint filter before starting each
cycle.
Exhaust duct requirements have not been met.
• Exhaust duct must be at least 100 mm in diameter and made of rigid or semi-
rigid metal.
• When in place, the duct must have no more than four 90° bends and must not
exceed 2 m.
Drying procedures have not been followed.
• See “Operating Instructions.”
Outside exhaust hood or exhaust duct may be clogged or restricted.
• Clean out any obstruction.
High humidity.
• Use a dehumidifier near the dryer.
Excessive wrinkling. Dryer is overloaded.
• Do not overload. See “Operating Instructions.”
Items left in dryer too long.
• Remove items as soon as cycle ends.
Insufficient sorting of items.
• See “Operating Instructions.”
Drying temperature too high.
• Follow fabric care label instructions.

17
Technical data
Electrical connection information Information on the electrical connection is given on the rating plate on
the edge of the dryer door.
Voltage [V] 230-240, single phase [50 Hz]
220-230, single phase [60 Hz]
Frequency (Hz) 50 - 60
Rated input (washer only) 300 watts
Maximum dry load (washer) Cotton
Synthetics
10.1 kg
7 kg
Maximum dry load (dryer) Cotton
Synthetics
10.1 kg
7 kg
Washer Spin speeds Maximum 600 rpm
Washer tub size 92.5 l
Water supply pressure Minimum
Maximum
0,05 MPa
0,8 MPa
Dryer drum volume 156 l
Dryer heating element 4300 watts
Usage range in domestic setting + 5°C + 35°C
Dimensions
1unit height 193 cm
2unit width 68.5 cm
3unit depth with dryer loading
door open 120.5 cm
4height to bottom of open dryer
loading door 139 cm
5height to top of closed washer
lid 94 cm
6unit depth with dryer loading
door closed 80 cm
1
2 3
4
5
6

18
Installation
Unpacking
All transit bolts and packing must be removed before using
the appliance. You are advised to keep all transit devices
so that they can be refitted if the appliance ever has to be
transported again.
1.After removing all the packaging, carefully lay the appliance
on its left side. Use a rug, blanket or piece of cardboard to
protect the floor.
2.With a suitable spanner unscrew and remove the following
from the bottom and rear of the appliance:
• shipping bolt
• plastic spacer
• wire clip securing drain hose end
3.Carefully return the appliance to an upright position.
Positioning
Install the appliance on a flat hard floor. Make sure that air
circulation around the appliance is not impeded by carpets,
rugs etc. Check that the appliance does not touch the wall or
other kitchen units. Make sure there are no obstructing items
or material near the air-intake louvres provided at the back
(e.g. paper, rags etc.).
Level the appliance by raising or lowering the feet. The feet
may be tight to adjust, but the appliance MUST be level and
stable. Any necessary adjustment can be made with a span-
ner. The feet must never be removed.
Accurate levelling prevents vibra-
tion, noise and displacement of
the appliance during operation.
Never place cardboard, wood
or similar materials under the
appliance to compensate for any
unevenness in the floor.
If necessary, check the setting
with a spirit level. Improper instal-
lation could cause an increase of
vibration and noise, especially during spinning phases.
WIRE CLIP
PLASTIC
SPACER
SHIPPING
BOLT
PLASTIC
CLIP
IMPORTANT!
Do NOT remove plastic clip securing the drain hose.

19
1
2
3
4
6
7
5
1Terminal block
2Internal ground (GREEN screw)
3Live (“
L
” terminal)
4Earth/Ground (“ ” terminal)
5Neutral (“
N
” terminal)
6Access cover screw
7Strain relief
Electrical connection
This machine is designed to operate on a 220-240 V, single phase, 50 or
60 Hz (depending on country of final destination). Check that your domes-
tic electrical installation can take the maximum load required (4,5 Kw) also
taking into account any other appliances in use.
Connect the machine to an earthed socket, in accordance with current
wiring regulations.
The power supply cable must be accessible after installing the ma-
chine. If the flexible cord is provided without plug, the appliance must
be provided an accessible all pole disconnection according to 61058-1
for overvoltage category 3. The nominal cross-sectional area of con-
ductors must be minimum 4,0 mm2.
IMPORTANT!
WARNING!
The manufacturer declines any responsibility for damage or injury
through failure to comply with the above safety precautions.
Supplied strain relief fits supply cords ranging from 11.4 mm to 18.0 mm.
If your installation requires a cord outside these dimension parameters,
purchase and install the appropriate strain relief from a local supply store.
IMPORTANT!
After installation ensure that earth wire is longer than power wires.
IMPORTANT!
Installing power supply cord
1. Turn off power supply to outlet.
2. Remove large, plastic access cover shield (item 11, page 5) on
dryer back sheet.
3. Remove the screw (6) securing the terminal block access cover on
the back of the dryer.
4. Remove the strain relief cap nut (7) and thread the dryer power cord
through it.
5. Continue threading the power supply cord through the strain relief
below the terminal access, temporarily leaving the cap nut loose at
this time.
6. Attach the power cord neutral conductor to the “N” terminal (5) on
the terminal block. Tighten the screw securely.
7. Attach the power cord ground (earth) conductor to the “ ” terminal
(4) on the terminal block. Tighten the screw securely.
8. Attach the power cord “live” conductor to the “L” terminal (3) on the
terminal block. Tighten the screw securely.
9. Slide the strain relief cap nut up the cord and tighten securely on
the strain relief threads.
10.Reinstall terminal block cover and screw and then plastic access
cover shield removed earlier.
342 5

20
Venting
Whilst drying, the tumble dryer will expel a certain amount
of warm, very moist air, and this should be removed from
the room as quickly as possible to prevent condensation.
Carry the dryer’s exhaust outside via a 100 mm diameter
venting system ending at a fixed ventilation grille fitted to an
exterior wall. The dryer must be exhausted outdoors. Do
not exhaust dryer into a chimney, a wall, a ceiling, an attic, a
crawl space or any concealed space of a building. A clothes
dryer produces combustible lint. If the dryer is not exhausted
outdoors, some fine lint will be expelled into the laundry area.
An accumulation of lint in any area of the home can create a
health and fire hazard.
Exhaust air must not be discharged into a flue which is used
for exhausting fumes from appliances burning gas or other
fuels, for example, a
cooker hood, or a chim-
ney or flue pipe designed
to carry the exhaust from
a fuel burning appliance.
Use only 100 mm diameter rigid or flexible metal duct and
approved vent hood which has a swing-out damper(s) that
open when the dryer is in operation. When the dryer stops,
the dampers automatically close to prevent drafts and the
entrance of insects and rodents. To avoid restricting the
outlet, maintain a minimum of 30 cm clearance between the
vent hood and the ground or any other obstruction.
WARNING!
WARNING!
The appliance must not be installed behind the lockable door,
a sliding door or a door with a hinge on the opposite side to
that of the appliance, in such a way that a full opening of the
tumble dryer door is restricted.
Number of 90° turns
MAXIMUM LENGTH
of 100 mm Rigid Metal Duct
VENT HOOD TYPE
(Preferred)
100 mm louvered 65 mm
0 17.0 m 13 m
1 14.5 m 10.5 m
2 12.0 m 8.0 m
3 9.5 m 5.5 m
Exceeding the length of duct pipe or number of elbows
allowed in the “MAXIMUM LENGTH” chart can cause an ac-
cumulation of lint in the exhaust system. Plugging the system
could create a fire hazard, as well as increase drying times.
Install male fittings in correct direction:
correct incorrect
If installing flexible metal (semi-rigid) venting, do not exceed 2 m
total duct length.
Do not screen the exhaust ends of the vent system, or use
any screws, rivets or other fasteners that extend into the duct
to assemble the exhaust system. Lint can become caught in
the screen, on the screws or rivets, clogging the duct work
and creating a fire hazard as well as increasing drying times.
Use an approved vent hood to terminate the duct outdoors,
and seal all joints with metal foil duct tape.
All male duct pipe fittings MUST be installed downstream
with the flow of air.
Installation
Table of contents
Languages:
Other Electrolux Laundry Appliance manuals