Electronic.Star 10007194 User manual

IR Wildkamera 4MP
10007194

Sehr geehrter Kunde,
zunächst möchten wir Ihnen zum Erwerb Ihres Gerätes gratulieren.
Bitte lesen Sie die folgenden Anschluss- und Anwendungshinweise sorgfältig durch und befolgen Sie diese
um möglichen technischen Schäden vorzubeugen.
Features
Unterstützt Bilder bis zu 4 MP und QVGA-Videos
Datum- und Zeitstempel auf jdem Bild
Integrierte 1.5“ Farbanzeige
Zwei Modi zum Stromsparen und einen Schnell-Foto-Modus
16 MB interner Flash-Speicher
Kartenslot unterstützt Compact Flash bis 4 GB abhängig vom Hersteller, unterstützt 1 GB CF Karten
aller Hersteller
Bewegungssensor Betriebswahl: Tag - Nacht - 24 Std.
Videodauereinstellung: 3 ~ 90 Sekunden
Ausgang unterstützt NTSC und PAL TV
USB-Anschluss zum Herunterladen der Bilder und Aktualisierung der Firmware
Leistungsstarkes Infrarot-Blitzlicht für klare, monochrome Bilder und Videos bei Nacht bis zu 12m
LCD-Anzeige und Tasten zur leichteren Bedienung von Kamera und Bewegungssensor getrennt
Pausierungseinstellung: 0,1,3,5,10,20,30,60,90 Min.
Schnell-Foto-Modus ermöglicht bis zu 3 Bilder pro Erkennung
Einzelne Symbole für Batterie des Bewegungssensors, der Kamera und des Infrarot-Blitzlichts
Bewegungssensor Radar-Symbol im eingeschalteten Zustand
Speicher voll-Symbol
Videomodus-Symbol
Testlicht für Modus und Einstellung
Empfindlichkeit des Bewegungssensors einstellbar
LCD-Anzeige mit Hintergrundbeleuchtung
Mitgeliefertes Zubehör
USB-Kabel x1
TV-Kabel x1
CD-ROM mit Treibern, Bildbearbeitungsprogramm und Kameratreibern x1
Stahlhalteklammern und U-Bügel zur sicheren Befestigung x1 Satz (optional)
Hauptgerät x1

Bedienung
Vorbereitung
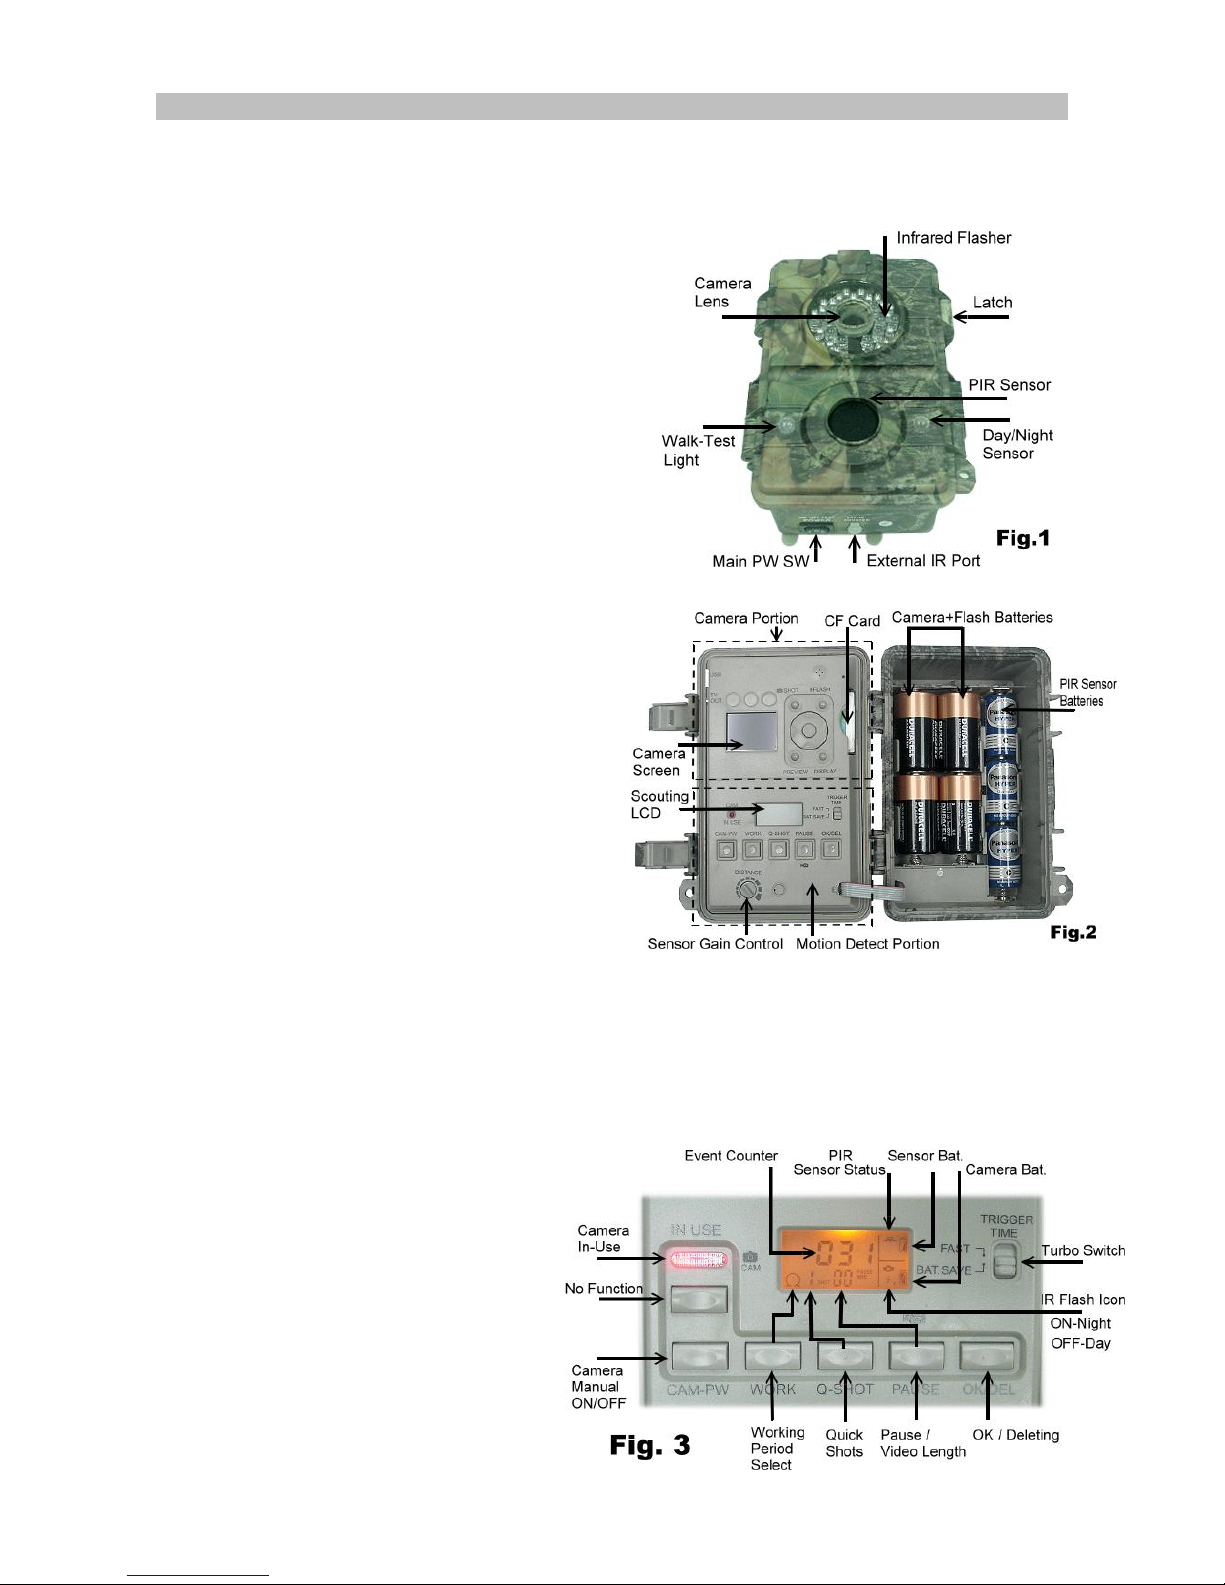
1. Entfernen Sie die Stahlsicherungsteile (optional)
und öffnen Sie die vordere Klappe, indem Sie
beide Verriegelungen an der Seite des Gehäuses
lösen. Stellen Sie die Ein-/Ausschalter auf OFF
(Mitte).
2. Legen Sie 3 Typ C-Batterien in das rechte
Batteriefach für den Bewegungssensor ein.
3. Legen Sie 4 Typ D-Batterien in das linke
Batteriefach für die Kamera ein.
4. Legen Sie ein CF Karte, auf der die Aufnahme
gespeichert werden sollen ein. Beachten Sie
hierbei die richtige Ausrichtung. Der interne 16
MB Speicher kann ca. 50 1.3MP-Bilder
speichern. Vergewissern Sie sich vor dem
Einlegen, dass der Ein-/Ausschalter auf OFF
steht, da sonst die Daten gelöscht werden.
Schnellstart
Der einfachste Weg ist diese Schritt-für-Schritt-
Anleitung. Folgen Sie dieser ohne
Einstellungen vorzunehmen, wird das Gerät mit
Werkseinstellungen betrieben:
1. Entscheide Sie, ob Sie den internen
Speicher oder eine CF Karte
verwenden wollen. Ist eine CF Karte
eingelegt, werden alle Bilder
automatisch auf dieser gespeichert.
Siehe „Verwendeung einer CF
Karte“.
2. Stellen Sie den Ein-/Ausschalter an der
unteren Seite des Außengehäuses auf
ON.
3. Das System benötigt zur Initialisierung 20 Sek., danach ist es bereit Einstellungen vorzunehmen.
Stellen Sie den Ein-/Ausschalter der Kamera auf ON.
4. Stellen Sie Datum und Uhrzeit der Kamera ein und wählen Sie danach Bild- oder Videomodus ein.
Siehe „Einstellung von Datum und Uhrzeit“; „Standbild-/Videomodus“.
5. Stellen Sie die anderen Parameter ein und verlassen Sie das Einstellungsmenü. Siehe „Einstellung
des Bewegungssensors“.
6. Befestigen Sie das Gerät an einem stabilen Baum in ca 1m Höhe und richten Sie es in die zu
überwachende Richtung aus.
7. Stellen Sie den Ein-/Ausschalter auf TEST und stellen Sie die Sensorempfindlichkeit auf Maximum
(im Uhrzeigersinn). Das Selbsttestlicht erlischt nach 1 Min., nun testen Sie das Gerät. Gehen Sie in
den Sensorbereich und prüfen ab welcher Entfernung das Selbsttestlicht blinkt.
8. Stellen Sie den Ein-/Ausschalter auf ON und verlassen den Sensorbereich. Nach einer 1-minütigen
Startphase ist das Gerät betriebsbereit.
Werkseinstellungen
Für die Kamera: Aufnahme von
Einzelbild/ Auto-Belichtung/ 2MP
Auflösung/ Qualität=Normal
/Zeitstempel=Ein /Sprache=Englisch
/TV=NTSC /Download=MSDC
Für den bewegungssensor: Pause=1
Min./ Schnell-Foto=1/ Turbo=Stromspar/
Betriebsmodus=24Std. Es wird für
erfahrene Benutzer empfohlen diese
Einstellungen zu ändern.

Einschalten mit Benutzereinstellungen
Schalten Sie den Ein-/Ausschalter auf ON und dir untere Anzeige zeigt die Werkseinstellungen an. Nach
20~30 Sek. erlischt die Hintergrundbeleuchtung und Sie können Einstellungen für Kamera und
Bewegungssensor vornehmen. Falls Sie keine Einstellungen vornehmen, wechselt das Gerät nach 1 Minute in
den normalen Betriebsmodus.
Einstellung des Bewegungssensors (PIR Sensor)
Die hier beschriebenen Einstellungen nehmen Sie über die unteren Tasten in Inneren vor Siehe Fig.3.
Betriebmodus Tag, Nacht oder 24 Std. wählen
Drücken Sie WORK einmalig um zwischen 24 Std. > Nacht > Tag zu wählen. Bei 24 Std. blinkt das Symbol
“Uhr”, bei Tag “Sonne” und bei Nacht “Mond”. Ist der Bewegungssensor aktiv leuchtet das Radar-Symbol.
Das Gerät reagiert nun auf Bewegung in dem gewählten Zeitraum.
Schnell-Foto-Wahl
Im Schnell-Foto-Modus bleibt das Gerät nach dem ersten Bild in Bereitschaft, um ein 2. oder 3. Bild aufzu-
nehmen. Nach dem ersten Bild wechselt das Gerät in den Pause-Modus und löst wenn es bereit ist ein
weiteres Mal aus. (Beispiel: So können Sie von einer Gruppe von Tieren, die die Kamera passieren, mehrere
Bilder aufnehmen.) Zwischen den Bildern liegen ca. 20 sekunden. Nach der Aufnahme wechselt das Gerät
zurück in den Pause-Modus.
Pause-Zeit
Dies ist die Zeit die zwischen dem Auslösungen des Bewegungssensors liegen muss. Während dieser Zeit ist
der Bewegungssensor inaktiv.Sie können zwischen 01, 03, 05, 10, 20, 30, 45, 60, 90 Minuten Pause wählen.
Drücken Sie PAUSE, um diese Einstellung vorzunehmen. Als Standard blinkt 01 und bei jedem weiteren
Drücken erhöht sich diese Zeit. Drücken Sie abschließend zur Bestätigung OK/DEL.
Filmlänge wählen
Hier können Sie die Aufnahmedauer einstellen, zur Wahl stehen 3, 5, 10, 20, 30, 45, 60, 90 Sekunden
Aufnahmedauer. Die PAUSE-Taste hat zwei Funktionen. Drücken und halten Sie PAUSE für 3 Sek. und ein
blinkendes Videokamera-Symbol erscheint und zeigt Ihnen das Sie die Filmlänge einstellen können. Drücken
Sie nun wiederholt PAUSE um die Filmlänge zu bestimmen. Drücken Sie abschließend zur Bestätigung
OK/DEL.
NOTIZ: Sie müssen zusätzlich VIDEO in den Kameraeinstellungen aktivieren, da sonst weiterhin Fotos
aufgenommen werden.
OK/DEL
Diese Taste verfügt über 2 Funktionen. Nachdem Sie Eintellungen bei WORK, Q-SHOT und PAUSE/Video
Length vorgenommen haben, müssen Sie diese mit OK/DEL bestätigen. Für die andere Funktion drücken
und halten Sie diese Taste 3 Sekunden gedrückt. Es wird die Löschfunktion für den Ereigniszähler auf dem
unteren Bildschirm durchgeführt. Dieses verändert nicht den Inhalt des Kameraspeichers.
Ereigniszähler
Die drei Ziffern auf dem unteren Bildschirm zeigen Ihnen bis zu 400 erkannte Bewegungen an. Um diesen
Zähler zurückzusetzen, drücken und halten Sie OK/DEL bis die LCD-Anzeige blinkt und anschließend [000]
anzeigt.
Batterie-Symbol
Drei Symbole zeigen Ihnen die verschiedenen Batteriegruppen. Das Symbol oben rechts ist für die
Bewegungssensor-Batterie, das zweite rechts ist für die Kamera und das letzte unten rechts ist für das IR-
Blitzlicht. Alle drei Symbole zeigen folgende Stati an:
GOOD: Batterie ist in gutem Zustand.
LOW: Batterie ist halb leer.
BAD: Batterie ist komplett entleert.
GOOD: Battery Icon show with solid.
Notiz: Ersetzen Sie falls Kamera- oder Blitzlichtbatterie
leer sind, immer die Batterien beider Bauteile und nicht
nur von einem der Beiden. Nur die Batterien des
Bewegungssensors sind unabhängig und können separat
getauscht werden.
Selbsttest / Sensorempfindlichkeit
Mittels Distanzregler können Sie die Empfindlichkeit des Bewegungssensor einstellen. Ist der Regler ganz
nach rechts gedreht, ist die Empfindlichkeit maximal und es werden Tiere auf bis zu 12m erkannt. Wollen Sie
das Tier von Nahem fotografieren sollten Sie die Empfindlichkeit reduzieren. Führen Sie nach dem Einstellen
einen Selbsttest durch. Stellen Sie den Ein-/Ausschalter auf TEST und lassen Sie das Gerät 1 Minute starten.
Das Selbststestlicht blinkt dreimal wenn Sie durch den Sensor erkannt werden. Nähern Sie sich von Weiten
dem Gerät und testen Sie wann Sie erkannt werden. Im Test-Modus werden keine Fotos gemacht.
Notiz: Das gerät wechselt automatisch 3 Minuten nach dem letzten erkannten Test in den Normalbetrieb.
Dies verhindert das Vergessen, dass Gerät auf ON zu stellen bevor Sie gehen.
Einschalten
Der Ein-/Ausschalter sitzt unten am Gehäuse. Stellen Sie diesen auf ON und warten Sie 1 Minute bis das
Gerät betriebsbereit ist und Bewegungen erkennt, Foto und Videos aufnimmt. Auch wenn der Kamera-
speicher voll ist, werden bis zu 400 Bewegungsereignisse durch das Gerät gezählt.
Ausschalten
Schieben Sie zum Ausschalten den Ein-/Ausschalter auf Mittelposition. Alle Bilder und Einstellungen werden
gespeichert und die Uhrzeit bleibt weiterhin aktuell. Notiz: Sollte das Gerät für längere Zeit nicht benutzt
werden, entnehmen Sie die Batterien.
Selbststest (LED+DC-Gebrauchsanzeige)
Beide Leuchten sind für 1 Minute an und blinken dreimal wenn Sie während des Sebsttests erkannt werden.
Während Sie Einstellungen vornehmen, blinken diese bei jedem Tastendruck.
Turbo-Auslöser
Es befindet sich ein Schalter rechts neben der LCD-Anzeige. Drücken Sie diesen zum Aktivieren des Turbo-
Auslösers. In diesem Modus ist der Auslöser doppelt so schnell wie im Stromsparmodus. Es wird jedoch auch
mehr Energie verbraucht. Um die Lebensdauer der Batterie zu erhöhen, wählen Sie den Modus BAT_SAVE.
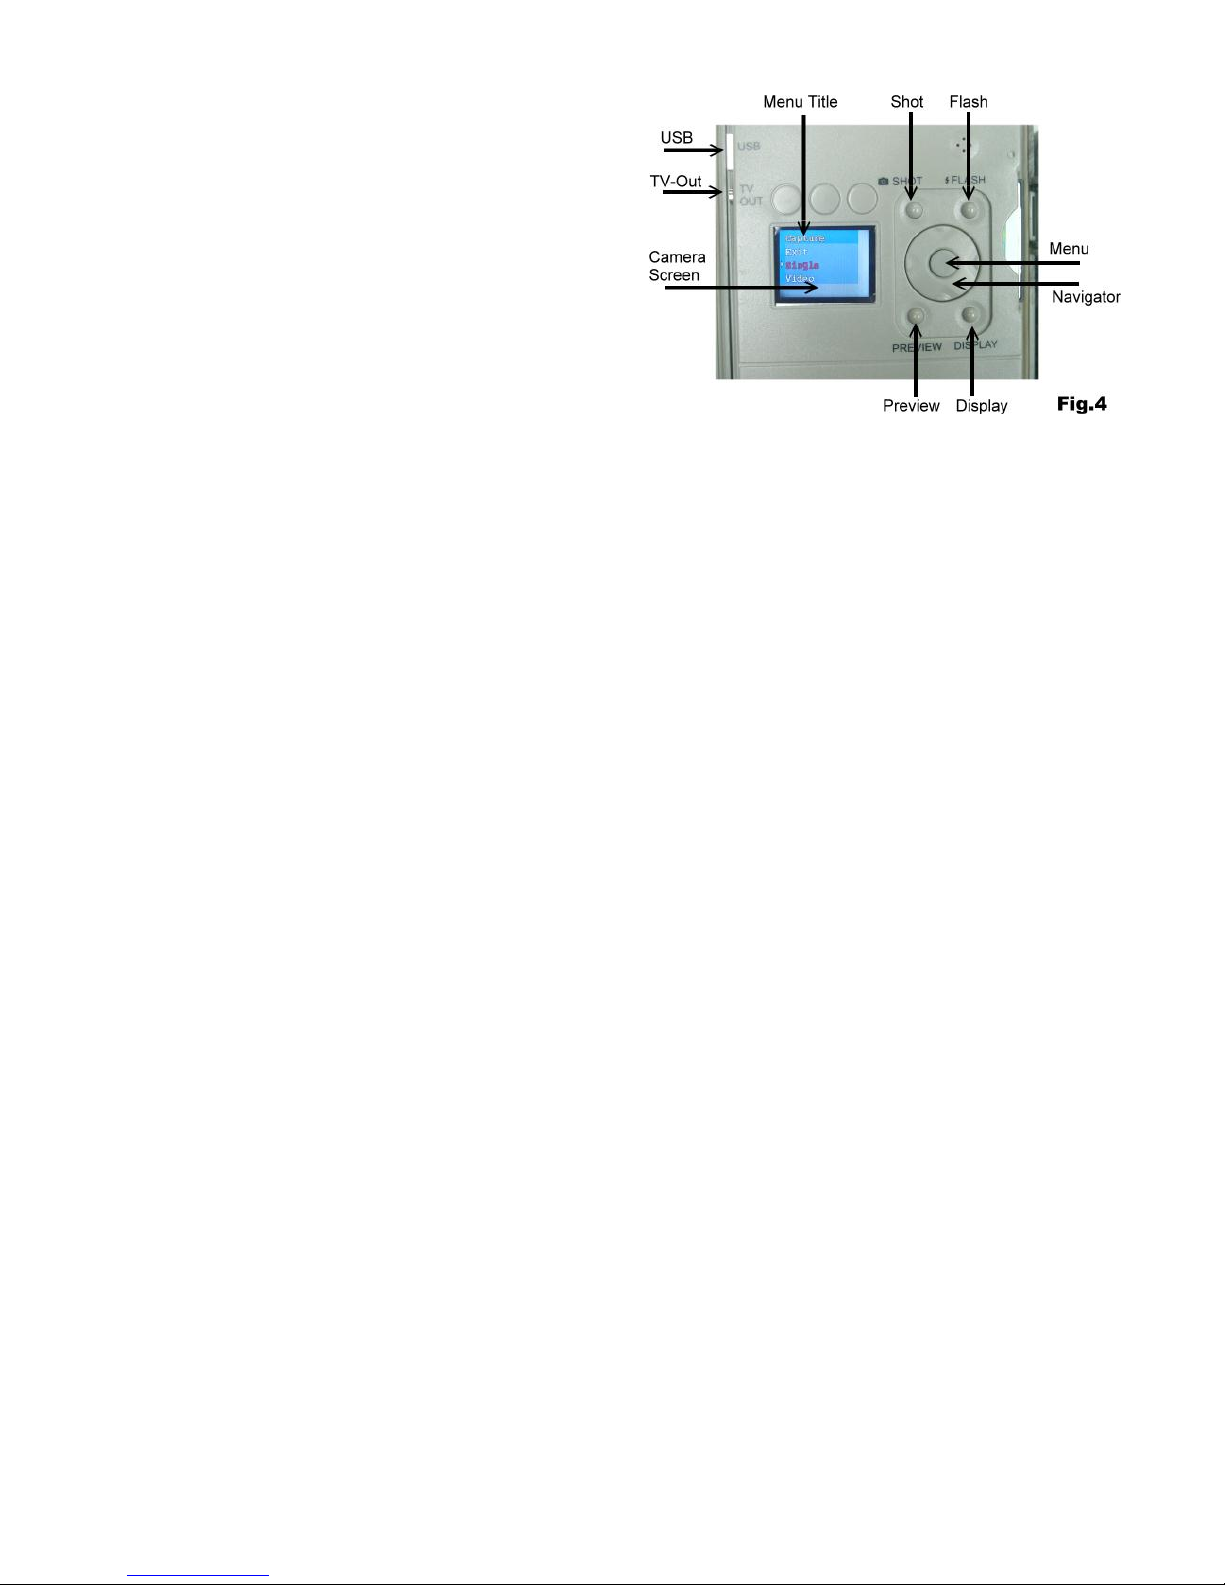
Einstellungen für Kamera / Bedienung
Beschreibung der Kamera-Bedientasten
Auslöser
Vorschau
Blitz
Anzeige
Menü (Mittlere Taste)
Navigationsscheibe
Kamera-Ein/Aus (Kamera-
Ein/Ausschalter)
Vor dem Einstellen vergewissern Sie sich, dass
die Kamera eingeschaltet ist. Der Hauptschalter
muss auf ON stehen. Es gibt zwei Modi LIVE VIEW und PLAY-BACK zur Bedienung der Kamera.
Standardmäßig ist nach dem Einschlaten LIVE VIEW aktiviert. Die Einschalt- und die Selbststest-LED
leuchten. Die kleine DC-Ein/Aus-LED leuchtet für 2 Sekunden und zeigt dass das Gerät eingeschaltet ist. Die
Anzeige bleibt dunkel bis Sie DISPLAY oder PREVIEW gedrückt haben. Sie können nun
Einstellungenvornehmen, Bilder manuell aufnehmen, Bilder zum PC downloaden oder jede andere Funktion
nutzen, bei der die Kamera eingeschaltet sein muss. Schalten Sie nach der Benutzung die Kamera auf OFF
(aus).
Solange die Kamera eingeschaltet ist, ist der Bewegungssensor deaktiviert.
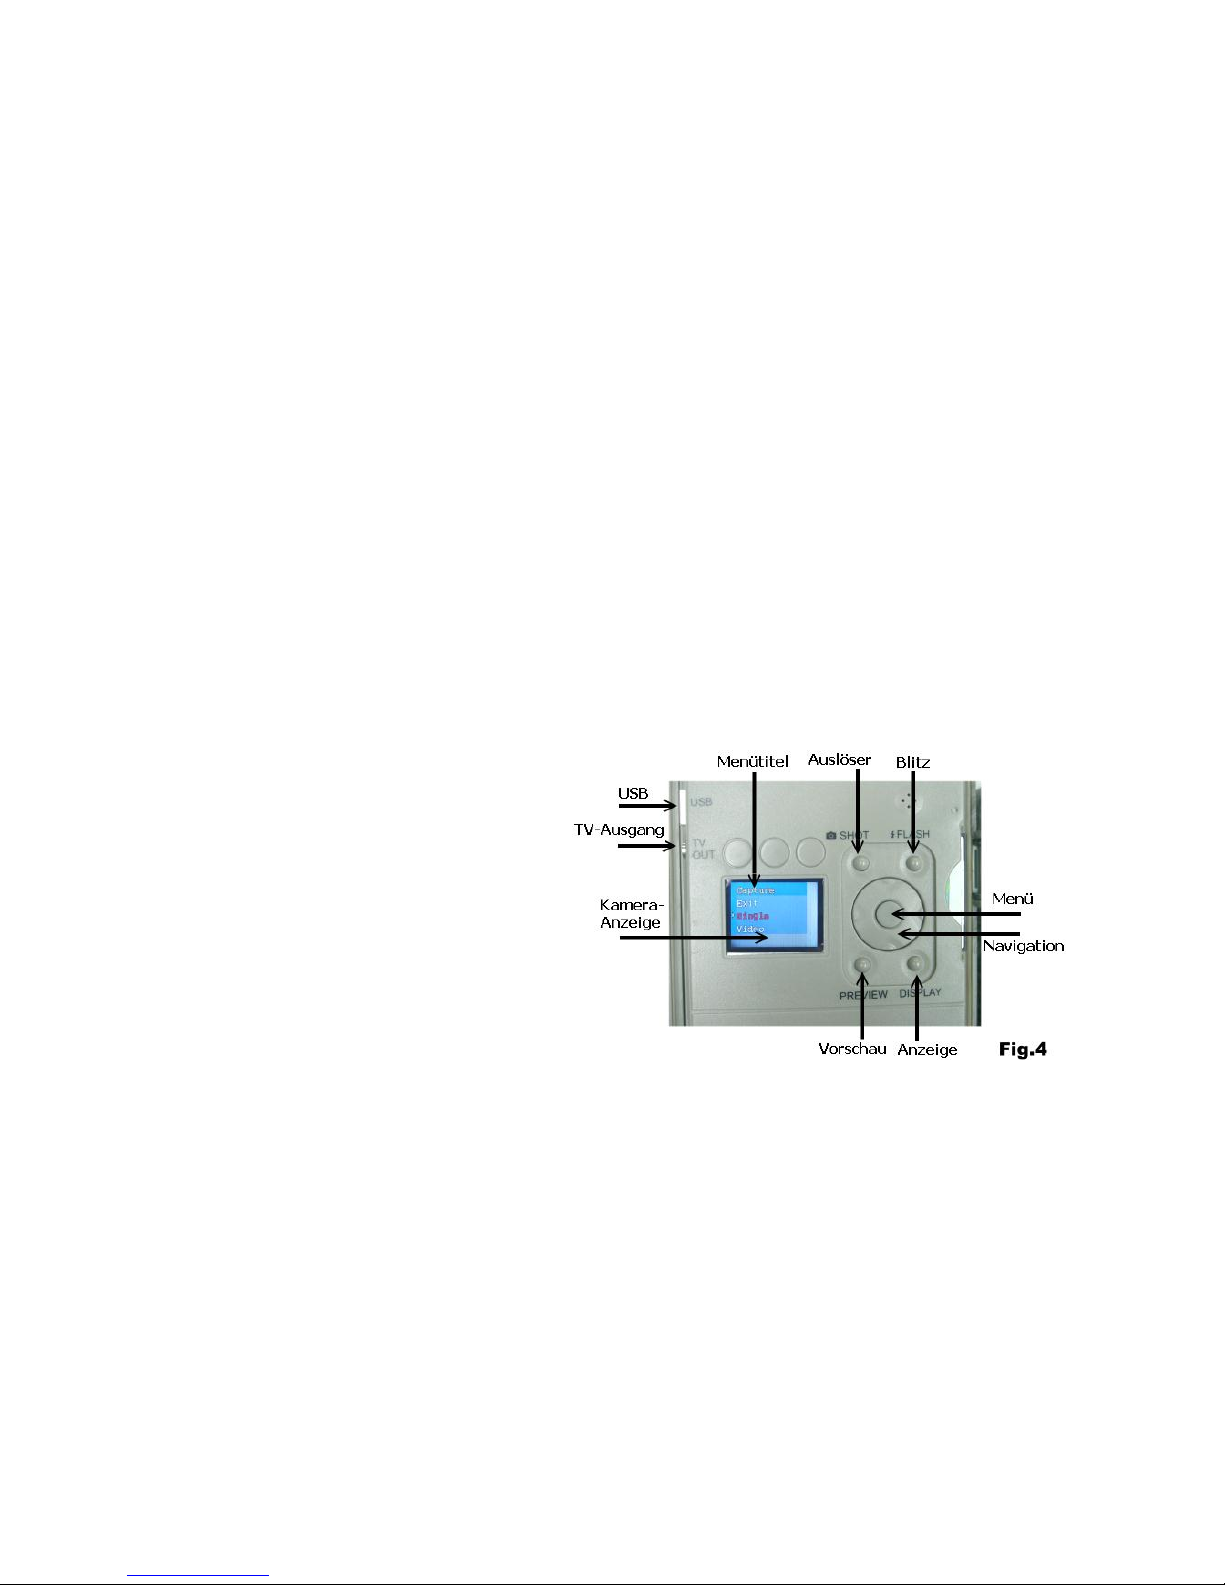
Navigationsscheibe / Menütasten:
Beschreibung der Bedientasten im oberen Bereich des Innenbereichs
Siehe Fig.4
Die vier Seiten der Scheibe stehen für Links / Rechts / Hoch / Runter. Die Mitte des Reglers ist die
MENÜ Taste. Sämtliche Einstellungen warden über diese Tasten durchgeführt. Drücken Sie MENÜ um die
Optionen der Modi anzuzeigen. Wählen Sie eine Option mit Links oder Rechts und anschließend einen Titel
mit Hoch oder Runter. Drücken Sie Menü um die Einstellung zu bestätigen und das Menü zu verlassen.

Menütitel der Kameraeinstellung
Es gibt zwei Hauptmenüs für die beiden Modi:
A. Live View Modus (Echtzeitanzeige)
B. Play-Back Modus (Wiedergabe)
Datum und Uhrzeit einstellen
Stellen Sie bevor Sie andere Einstellungen durchführen zuerst die Uhrzeit ein. Schalten Sie die Kamera ein,
drücken Sie Menü, wählen Sie nun mit Rechts Date/Time und anschließend mit Hoch/Runter “SET”. Drücken
Sie nun zum Anzeigen des Kalenders “MENU”, stellen Sie mit den Navigationstasten das Datum ein und
Bestätigen Sie YES mit der Menü-Taste. NOTIZ: Der Kalender zeigt die Uhrzeit im 24h-Format an.
Schalten Sie den Zeitstempel ein/aus, um diesen auf dem Bilder anzuzeigen. Diese Funktion besitzt der
Videomodus nicht.
Live View- und Play-Back-Menü verfügen über unterschiedliche Menütitel:
A. Live View-Modus
Nach dem Einschalten ist dieser Modus antiv. Schalten Sie die Anzeige durch Drücken von DISPLAY ein. Sie
können nun manuell Bilder machen oder Einstellungen vornehmen.
Foto/Video manuell aufnehmen
Auslöser:
Drücken Sie zum Auslösen SHOT. Dieses funtkioniert bei eingeschalteter Kamera auch wenn die Anzeige aus
ist. Für Videoaufnahmen drücken Sie einmal SHOT zum Beginnen und noch einmal SHOT zum Beenden.
Blitz:
Diese Funktion unterstützt die Aufnahme von Foto oder Video bei Dunkelheit. Drücken Sie diese Taste um
das Fotolicht für 10 Sekunden einzuschalten. Sie können So die Umgebung vor dem Fotografieren
betrachten. Zur Aufnahme muss Sie innerhalb dieser Zeit SHOT drücken. Anderenfalls ist das Bild bzw. Video
dunkel.
Anzeige:
Drücken Sie Taste für folgenden Optionen mehrmals: Anzeige ein>Informationen ausblenden>Anzeige aus.
Kamera Aufnahmeeinstellungen
Drücken Sie nach dem Einschalten Menü, um zwischen folgenden 7 Titeln zu wählen:
1. Aufnahmemodus
a. Ausgang
b. Einzel (Aufnahme Bild)
c. Video (Aufnahme Film)
2. Auflösung
a. Ausgang
b. Hoch (4 Mp )
c. Normal (2.1 Mp)
d. Niedrig (1.3 Mp)
3. Qualität
a. Ausgang
b. Hoch
c. Normal
4. Datum / Uhrzeit
a. Ausgang
b. Einstellung
c. Zeitstempel ein/aus
5. TV-Ausgang
a. Ausgang
b. NTSC (Standard für Nordamerika)
c. PAL
6. Sprache
a. Englisch
b. Französisch
7. Bright-ISO
a. Ausgang
b. ISO-100 (Verwenden um bei kurzer Distanz den Weißanteil im Bild zu verringern)
c. Auto (Standard, empfohlen)

Einzel (Bild) Modus
Das Gerät ist standardmäßig auf diesen Modus gestellt. Es werden Farbbilder bei Tag und Schwarz/Weiß-
Bilder bei Nacht aufgenommen. Sobald der Bewegungssensor eine Bewegung erkennt, wird eine Aufnahme
ausgelöst und der Ereigniszähler registriert dieses Ereignis.
Video Modus
Wählen Sie im Einstellungsmenü Video aus und es werden bei Tag und Nacht Videos aufgenommen. Das
Videokamera-Symbol zeigt an, dass dieser Modus aktiv ist. Um das Gerät auf Foto-Aufnahme zurück-
zustellen, müssen Sie dieses im Menü auswählen und anschließend das Gerät neu starten. Ist dieses
erfolgreich gewesen, verschwindet das Videokamera-Symbol.
Wichtig: Falls die Batterien schwächer werden, werden keine Bilder bei Nacht sondern nur noch Bilder am
Tag aufgenommen.
B. Play-Back Modus
In diesem Modus können Sie Bilder und Videos auf der Anzeige oder einem via Kabel angeschlossenen TV
wiedergeben.
Vorschau:
Drücken Sie bei eingeschalteter Kamera PREVIEW und drücken Sie für folgende Optionen wiederholt
DISPLAY: Vollbildanzeige eine Bildes>Leerer Bildschirm>Bilderübersicht
Sie können Bilder/Videos auf zwei Arten anschauen.
1.Bild/Video über Anzeige wiedergeben
Nachdem Sie PREVIEW gedrückt haben, wird das zuletzt aufgenommene Bild in Vollbild angezeigt.
Wechseln Sie mit links/rechts zwischen den Aufnahmen. Drücken Sie DISPLAY um die Bilderübersicht
aufzurufen, wählen Sie mit links/rechts eine Aufnahme und drpcken Sie erneut DISPLAY um diese
aufzurufen.
2. Bild/Video über TV wiedergeben
Das Gerät verfügt über einen TV-Ausgang an den Sie mittels Cinch-Kabel ein TV anschließen können.
Wechseln Sie zuerst in den Wiedergabemodus und verbinden dann das Gerät mit dem TV.
NOTIZ: Das zuletzt aufgenommene Bild zuerst angezeigt. Außerdem wird die Anzahl aller Bilder
eingeblendet.
Digitaler Zoom
Sowohl bei der Echtzeit-Anzeige als auch bei der Vollbildwiedergabe können Sie mittels hoch/runter herein-
und herauszoomen.
Fotos löschen
Drücken Sie MENU im Vorschaumodus, wählen Sie aus ob ein oder alle Bilder löschen wollen und drücken
Sie zur Bestätigung MENU.
Schreibgeschütztes Foto oder Video
Um eine Datei schreibzuschützen, drücken Sie MENU, wählen dann PROTECT und es wird als Bestätigung
ein kleines Schloß in der oberen linken Ecke des Bildes angezigt. Wiederholen Sie diesen Vorgang um den
Schreibschutz aufzuheben. Geschützte Dateien werden bei der Formatierung nicht gelöscht.
Formatierung
Hierbei wird der gesamte Speicher gelöscht. Seien Sie sorgsam mit dieser Funktion.
Wiedergabeenstellungen ändern
Drücken Sie im Wiedergabemodus MENU u zwischen folgenden 4 Punkten zu wählen:
a. Lösch-Modus
a. Ausgang
b. Ein (Eine Aufnahme löschen)
c. Alle (Alle Aufnahme löschen)
d. Formatierung (Löscht den gesamten Speicher)
e. Schreibschutz (Bild/Video schützen)
b. Datum / Uhrzeit
a. Ausgang
b. EinstellungZeitstempel ein/aus

c. TV-Ausgang
a. Ausgang
b. NTSC
c. PAL
d. USB
a. Ausgang
b. MSDC (Standard zum Dowload mittels Windows)
c. SIDC (Nur zum Download mittels Windows XP)
Benutzung der CF-Karte
Das Gerät verfügt über 16MB internen Speicher und kann einige Bilder ohne eingelegte CF-Karte
aufnehmen. Es wird empfohlen eine 1GB Speicherkarte einzulegen, damit Sie einige tausend Bilder
aufnehmen können.
Notiz: Schalten Sie das Gerät aus bevor Sie die CF-Karte einlegen oder entnehmen. So
verringern Sie die Gefahr die Speicherkarte zu beschädigen oder Daten zu verlieren.
Wichtig: Falls die Speicherkarte schwer einzulegen ist, entnehmen Sie diese und prüfen Sie die
Ausrichtung. Versuchen Sie niemals eine Speicherkarte mit Gewalt einzulegen.
Warnung: Eine neue leere CF-Karte oder eine de in einer anderen Kamera benutzt wurde, muss vor dem
ersten Gebrauch mit dem Gerät formatiert werden.
Speichermanagement
Ist der interne Speicher oder die Speicherkarte voll, wird dieses durch ein Symbol angezeigt. Es werden
keine Aufnahme erstellt bis Sie die Speicherkarte ersetzen oder einige Aufnahmen löschen. Und anschlie-
ßend das Gerät neu starten. Die Kamera wird ohne Neustart nicht funktionieren.
Treiber installieren
Schließen Sie die Kamera zum ersten Mal an Ihren PC an, wird neues USB-Gerät erkannt und nach Treibern
gesucht. Es ist also notwendig zuerst die mitgelieferte CD-ROM einzulegen und zu installieren. Folgen Sie
den Anweisungen. Sollte das Setup nicht automatisch starten, führen Sie die Datei „SETUP“ aus und folgen
den Anweisungen.
Bildbearbeitungssoftware installieren
Es gibt eine Bild- und eine Videobearbeitunssoftware. Sie können diese Punkte der Installations auch
überspringen, falls Sie schon über eine bessere Software verfügen.
- Legen Sie die CD ein und klicken Sie auf “Photo Express“ auf dem Start-Bildschirm.
- Wählen Sie die gewünschte Sprache.
- Installieren Sie die Software.
- Starten Sie den PC neu.
Download von Fotos / Filmen zum PC
- Der Treiber muss installiert und die Kamera eingeschaltet sein. Drücken Sie nun PREVIEW um den
Wiedergabemodus zu starten.
- Verbinden Sie die Kamera mittels USB-Kabel mit dem PC.
- Der Speicher wird erkannt und Sie können diesen aufrufen. Z.B.: “H” oder “I”:\DCIM\100MEDIA.
- Klicken Sie auf das Verzeichnis um sich die Dateien anzuzeigen.
Gerät befestigen
Vor der Benutzung muss die Kamera sicher befestigt werden. Der
Haltepunkt z.B. ein Baum muss mindestens einen Durchmesser von 15cm
haben und die Montagehöhe darf 1m nicht überschreiten. Verwenden Sie
eine der beiden unten aufgeführten Befestigungsmethoden.
A Gurtbefestigung: Der Gurt ist im Lieferumfang enthalten. Siehe
Fig.5

B Einstellbares Python-Kabelschloss (Nicht im
Lieferumfag enthalten): Siehe Fig. 6
Sie können auch zur Sicherung ein Python-Kabelschloss der
Marke “Master Lock” verwenden. Zur zusätzlichen Sicherung
kann auch ein U-Bügel aus dem Zubehörhandel benutzt werden.
Anschluss einer zusätzlichen IR-Leuchteinheit
Erfahrene Benutzer, die eine sehr hohe Bildqualität erhalten
möchten, können bis zu 4 zusätzliche Leuchteinheoten an das
Gerät in Reihe anschließen. Der Anschluss ist am Boden des
Gehäuses. Sie können ein Blitzlicht der Serie IRX-800 oder IR-
Lampen wie die RX-20B oder IRX-22B
Fehlerbehebung
Auf einigen Bildern ist kein Tier zu sehen:
1. Prüfen Sie, ob die Kamera in Richtung Sonnenauf- bzw. untergang zeigt und so Fehlauslösungen
verursacht werden.
2. Der PIR Sensor könnte Tiere hinter Vegetation außerhalb des Sichtbereichs erfasst haben.
3. Falls sich die Tiere zu schnell bewegen, können diese unter Umständen nicht aufgenommen
werden.
4. Prüfen Sie die Kamera auf festen Sitz. Der Baum darf nich wackeln.
Die Beriebs-LED ist an, aber die Kamera reagiert nicht:
1. Es ist zu viel Zeit vergangen und die Kamera hat sich abgeschaltet. Wiederholen Sie die Schritte
zum Einschalten.
2. Die Batterie ist zu schwach um die Kamera einzuschalten. Ersetzen Sie die 4 Typ D-Batterien.
Der Kamera-Ein-/Ausschalter reagiert nicht:
Sie haben versucht die Kamera zu schnell nach dem Haupt-Ein-/Ausschalter einzuschalten. Warten Sie 10
Sekunden bis das Hintergrundlicht der Anzeige erlischt und versuchen es erneut.
Das Licht an der Vorderseite des Gehäuses bleibt eingeschaltet:
1. Das Gerät befindet sich im Selbsttestmodus und das Licht bleibt beim Starten für 60 Sekunden an.
2. Der Kamera-Ein-/Ausschalter ist nicht auf OFF gestellt. Denken Sie daran diesen Schalter auf OFF zu
stellen.
Die Kamera scheint keine Aufnahmen auf eine leere CF-Karte zu speichern und zeigt vollen
Speicher an:
1. Sie müssen die CF-Karte vor dem Gebrauch formatieren.
2. Prüfen Sie die aktuell eingelegte Speicherkarte und testen Sie eine 1GB CF-Karte, falls Sie eine 2GB oder
größer verwenden. Nur CF-Karten von bestimmten Herstellern werden bei 2GB oder größer unterstützt.
Zurücksetzen des Geräts bei Systemabsturz:
Falls der Ereigniszähler nicht mehr reagiert oder die Anzeige wenn eingeschaltet nichts anzeigt, ist das Gerät
eventuell abgestürzt. Entfernen Sie sämtliche Batterien und warten Sie mehr als 10 Minuten. Die Aufnahmen
verbleiben auf dem Gerät, jedoch werden alle Einstellugen auf Werkeinstellung zurückgesetzt. Sie müssen
diese erneut programmieren.

SICHERHEITSHINWEISE UND GEWÄHRLEISTUNG
Diese Bedienungsanleitung dient dazu, Sie mit der Funktionsweise dieses Produktes vertraut zu
machen. Bewahren Sie diese Anleitung daher stets gut auf, damit Sie jederzeit darauf zugreifen
können.
Sie erhalten bei Kauf dieses Produktes zwei Jahre Gewährleistung auf Defekt bei sachgemäßem
Gebrauch.
Bitte verwenden Sie das Produkt nur in seiner bestimmungsgemäßen Art und Weise. Eine
anderweitige Verwendung führt eventuell zu Beschädigungen am Produkt oder in der Umgebung des
Produktes.
Ein Umbauen oder Verändern des Produktes beeinträchtigt die Produktsicherheit. Achtung
Verletzungsgefahr!
Öffnen Sie das Produkt niemals eigenmächtig und führen Sie Reparaturen nie selber aus!
Behandeln Sie das Produkt sorgfältig. Es kann durch Stöße, Schläge oder den Fall aus bereits
geringer Höhe beschädigt werden.
Halten Sie das Produkt fern von Feuchtigkeit und extremer Hitze.
ACHTUNG:
Es wird keine Haftung für Folgeschäden übernommen. Technische Änderungen und Irrtümer
vorbehalten!
Wichtige Hinweise zur Entsorgung
Dieses Elektrogerät gehört NICHT in den Hausmüll. Für die fachgerechte Entsorgung wenden Sie sich bitte
an die öffentlichen Sammelstellen in Ihrer Gemeinde.
Einzelheiten zum Standort einer solchen Sammelstelle und über ggf. vorhandene Mengenbeschränkungen
pro Tag/ Monat/ Jahr sowie über etwa anfallende Kosten bei Abholung entnehmen Sie bitte den
Informationen der jeweiligen Gemeinde.
Hinweise zur Batterieentsorgung
Batterien dürfen nicht in den Hausmüll gegeben werden. Als Endverbraucher sind
Sie zur Rückgabe gebrauchter Batterien gesetzlich verpflichtet. Sie können
Batterien nach Gebrauch in der Verkaufsstelle oder deren unmittelbarer Nähe
(z.B. in kommunalen Sammelstellen oder im Handel) unentgeltlich zurückgeben.
Sie können Batterien auch per Post an uns zurücksenden.
Batterien oder Akkus, die Schadstoffe enthalten, sind mit dem Symbol einer
durchgekreuzten Mülltonne gekennzeichnet, wie das oben stehende Symbol.
In der Nähe zum Mülltonnensymbol befindet sich die chemische Bezeichnung des Schadstoffes. »Cd« steht
für Cadmium, »Pb« für Blei und »Hg« für Quecksilber.
Viel Spaß mit unserem Produkt.
Warnhinweise
Reparaturen am Gerät sollten nur von einer autorisierten Fachwerkstatt durchgeführt werden.
Öffnen Sie in keinem Fall das Gerät.
Falscher Zusammenbau führt möglicherweise zu Fehlfunktionen oder dem Totalausfall.
Das Gerät sollte vor jeglichen Feuchtigkeit und direkter Sonneneinstrahlung geschützt werden.
Das Gerät bitte nicht mit Reinigungsmitteln reinigen.
Verwenden Sie zur Reinigung nur ein trockenes (Mikrofaser) Tuch.
Schließen Sie das Gerät nur an die dafür vorgesehene Netzspannung.
Schließen Sie das Gerät in keinem Fall an andere Spannungen als vorgesehen an.
Die Gewährleistung verfällt bei Fremdeingriffen in das Gerät.
CHAL-TEC Vertriebs- + Handels GmbH; Wallstraße 16; 10179 Berlin

Carefully read this instruction manual before operating device.
You should also save the packing material and box in case you need to ship this unit. The box is also printed
with useful information.
Features
Taking Up to 4 Mp high quality pictures and QVGA video when a motion is detected.
Date and Time Stamp on each picture
Built-In 1.5” Color Screen for field viewing
Two modes for extending long battery life and Turbo snap mode (Fast shot )
16 Mb internal flash memory
Card Slot support Compact Flash up to 4G depend the brand, it does fully support all brands of 1G
CF card
Motion detect on duty selection: DAY –NIGHT –24 HOUR
Video length option: 3 ~ 90 seconds.
TV out port support NTSC and PAL TV
USB port for downloading images to computer and firmware upgrade
Powerful Infra-Red flash to take monochrome clear picture and video at night within 40 feet.
Separated LCD screens and keys to simplify setting for camera and motion sensor controls
Pause setting option: 0,1,3,5,10,20,30,60 ,90 minutes
Quick Shot mode allow for more detections up to 3 pictures.
Separate Icons for Battery of Motion sensor and Camera and Infra-Red light
Motion Sensor Radar Icon for Sensor ON- Duty status
Memory Full Icon
Video mode Icon
Walk-Test light for Distance and setup
Dial for adjusting sensitivity of motion sensor
Back light for LCD viewing.
Accessory Included
USB Cable x1
TV Cable x1
CD Rom with Driver and Picture editing and the Camera driver software x1
Steel mounting bracket plus U bar provides stronger security option x1set (Optional, it may not
including in this packing)
Main unit x1
OPERATING INSTRUCTIONS
Preparation
1. Remove the Steel security bar (Optional parts) and open the front door by pulling up the two
latches on the side of the cabinet. Push the power switch to OFF (Center).
2. Install 3 pcs C type Alkaline batteries into the
battery compartment on the right for Motion
sensor working.
3. Install 4 pcs D type Alkaline batteries to the
compartment on the left for Digital Camera
operation.
4. Install a CF card if you wish to take more pictures
or video clips. Be careful to insert the CF card
according to direction shown on the CF card. 16M
internal Flash memory will able to store around
50 frame 1.3Mp images only. Before replacing a
CF card, be sure the PW switch is already at OFF
position in order to avoid the data in the CF might
be flushed.
Quick Start
An easy way below to tell you step by step for getting
a quick start with the unit, it will run under the
factory default if you do not change any parameter:
1. Determine if using internal flash memory
or insert a CF card for the device storage
media. Since a CF card is used, all
pictures will be saved in it automatically
without a further setting. Regarding a CF
card usage, skip to view a description in
the paragraph below for “Using a CF
Card”
2. Push the main power switch which is
allocated in the bottom of out-side
cabinet to ON
3. After 20s since PW is ON, system will finish initialization and ready for setup. Press CAM-PW to
switch On the camera section.
4. Set date and time for the Camera and choose either Picture or Video mode.(See the paragraph
below for “
Date and time Setting”; Still Picture / Video Mode
)
5. Set other parameters of scouting and exit the setting mode after finished. (See more paragraphs
about the
Setting for Motion Sensor
below)
6. Hang unit on a steady tree around 1 meter height that almost point to the area which you wish
to monitor.
7. Push the main PW switch to TEST
and turn the Sensor Gain to Max.
(Clock-wise). After the SELF-
TEST light goes OFF after 1
minute, try to walk in front of
motion sensor in order to verify
how much distance and a zone
you will be detected according to
the flashing walk-test light .
8. Push PW back to ON and leave.
Now the scouting camera will
ready to work after 1 minute of
warm-up time.

Factory default settings
For Camera: Capture for Single Picture /Auto Exposure / 2M pixels resolution / Quality =Normal / Stamp
=ON / Language = English / TV =NTSC / Download =MSDC For Motion detection: Pause= 1 minute / Quick-
Shot =1 / Turbo = PW-Save / Work Duty = 24 HRs
It is suggested to customize your settings if you are an experience user.
Start up with User’s Setting
Switch the PW ON, the lower LCD show the default settings immediately. After 20~30s, it’s back light
goes to OFF and now you can able to program with your desired parameters instead of the system default
for both camera and motion detector operation. When the unit exit from setting mode or no change since
PW ON, it will goes to the motion detection ON Duty mode automatically after 1 minute.
Setting for Motion Sensor Operation (PIR Sensor)
The settings explained below is referred to keys on the lower portion of the inner panel. See the Fig.3
Select ON DUTY for Day, Night or 24 hours
The WORK button is pressed once to enter the 24 HOUR > NIGHT > DAY options, the 24 (Clock) On Duty
icons will remain blinking. Press again to move the blinking icon to the SUN icon, one more pressing will
move it to the Moon. Press the OK/DEL key on your right to accept for the desired icon and then it become
stable. The Clock icon is represented for motion detection will be valid day and night. The SUN is
represented for day working. The MOON is represented for Night working only. If ON Duty is effective, a
Radar icon will run with radiation to show the device can sense any motion in this period.
Select for Quick Shot
Quick Shot allows for more images to be taken if additional motions may be detected after the 1st
image and the camera does not shut down to be ready for more instant shots. You can choose 1~3 images
in order to take a group animals passing-by. “1” is the default that only one picture to be taken and then
goes to PAUSE time. “2” or “3” will re-arm the sensor for taking the second and third picture if more
animals are following. (Example of use: On a trail when you want a picture of what is following
the first young deer. Like a smart buck, it always walk at the last). A time-out of each shot is
around 20 seconds. The system will goes to Pause mode after a total number of events are done or time-
out.
Pause Time
This is a time of silent between the motion sensor does able to detect event for a capture. The sensor will
not work within the gap. You can select 01, 03, 05, 10, 20, 30, 45, 60, 90 minutes for a PAUSE option.
Press the PAUSE button once to enter for setting, The default 01 will be blinking. Press again to change it
until the desired choice appears. Press OK/DEL on right to accept it.
Change for Movie Length
This option will let you determine how long for each video to take. There are 3, 5, 10, 20, 30, 45, 60, 90
seconds of video length to be selected. The PAUSE key is shared for two functions. Press and hold the
PAUSE key for 3 seconds, a blinking video camera icon will appear to let you know you already do enter for
video length setting. Then press PAUSE repeatedly until your desired length appears. Confirm updated
change by the OK/DEL key.
NOTE: You must also select VIDEO option in the camera setting when you wish to take video clips.
Otherwise, the device still does take pictures.
OK/DEL
It is a key for shared with two functions. Any time you have done to program the WORK, Q-SHOT and
PAUSE / Video Length, just press the OK/DEL key to accept the new change. On the other hand, press and
hold it with 3 seconds, it perform the DELETE function that all event counts on the lower LCD will be
cleared. But it is not effect to any contents in the camera memory

Event Counter
Three digits in the center of the lower LCD are the event counter which let you know how many motion
records that up to 400 events for a trail history. If you want to renew the counter anytime, simply to press
and hold the OK/DEL button until LCD become blinking, then it will resume to [000].
Battery Icon
Three icons are for difference battery groups. The Bat-icon on the upper corner of right is represented for
motion sensor power. The second on the right is for camera power. The rest on the lower of right corner is
for IR flash power. All Bat-icons will indicate three status as below:
GOOD: Battery Icon show with solid.
LOW: Battery Icon is half blank.
BAD: Battery icon is totally blank.
Note: You have to replace all batteries for new one completely when either camera or IR
Flasher are BAD. Do not try to replace some of them only. But the motion sensor power is
independent to the camera power system.
Walk-Test / Sensitivity Adjustment
The DISTANCE dial on inner panel is used for adjusting sensitivity of the motion sensor. By turning the dial
to the right, sensor sensitivity is set to the Max to detect animal over 40 feet away. You may reduce the
detection distance for taking picture with a larger animal target. Walk-Test feature is used to verify the
detection range and pointing zone before placing it in the field. After hanged the unit on a tree, push the PW
switch to Walk-TEST. The Walk-Test LED will light up last 1 minute to warm up. A radar icon with TEST alert
is remaining blinking during Walk-Test mode. Then, Walk-Test Light will goes off and will alert with 3 times
flash once you will be detected in front of the device. Now you try to go far away to check how long the PIR
motion sensor will still see you. The camera does not take any picture during this test process.
Note: The system will resume to normal ON DUTY mode automatically after 3 minutes (Time-Out) since the
last triggered detection of walk-test to avoid user may forget to push the PW switch back to ON before left.
PW-ON Mode
This is main PW switch in the bottom of cabinet. Since the PW-SW is pushed to ON mode, the unit will begin
to warms up for 1 minute, then start to detect motion for taking pictures/ Video. When an animal or human
is detected, an event will be recorded and the camera will shot immediately. All the detected events will be
counted up to 400 events even the memory of Digital Camera may full.
OFF Mode
Slide the PW to the center position turn the system power OFF. All pictures and current settings will be
remained at this mode and internal real time clock will still run. Note: Remember to remove all batteries if
you will not use it for a long time
Walk-Test (LED+DC in-use Indicator)
Both lights will be ON during the first minute of starting Walk-Test mode and Camera setting mode. They
will blink for 3 times once a walk-test motion to be detected.
In the scouting setting mode, an instant flash is response to each valid key input.
Turbo Shot
There is switch knob on the right of the scouting LCD. Push the knob to Turbo mode, the DC will be set for
fast shooting. In this mode, capture speed will be 2x faster than setting in the BAT-Save while a motion is
detected. Setting of BAT_SAVE will ideal for extending battery life.
Setting for CAMERA / Operation
Description for Camera Operation Keys
SHOT
PREVIEW
FLASH
DISPLAY
MENU (Center Key)
Navigation Disk
CAM-PW (Camera Power Button)
Before programming for the camera, be sure Main Power switch at ON position.
There are two modes that called LIVE VIEW and PLAY-BACK for operating the camera, once you press
CAM-PW to switch ON the Camera, it works at the default of the LIVE VIEW. Both the IN-USE and Walk-Test
LED are lighted. DC-PW small light on the right top will alerts with red light for 2 seconds to show camera is
PW ON already. But camera screen is remaining dark until DISPLAY or PREVIEW key is pressed. In this case,
you can either change the setting of camera ,view pictures, take a picture manually, download pictures to
PC, or any operations which need camera to ON depend on which mode you will select. When you do finish
using the camera, remember to turn the camera OFF by pressing the CAM-PW switch again.
During camera ON mode, motion sensor will stop working until camera PW is turned to OFF.
Navigator Disk / Menu Button:
Description for Camera Operation Keys which are in the upper portion of the inner panel
See Fig.4
Four sides of disk represent for the Left / Right / Up / Down keys. The center knob is the MENU
button. All camera settings will be programmed with them. Press the MENU to display the option title of
either modes. Select a title that you wish to change by pressing the left or right navigator key. Highlight
your choice from a list of the displaying title by the Up or Down Key. Press the MENU to accept the change
and exit.
Camera Operating Menu Titles
There are two main menus for two modes:
A. Live View Mode
B. Play-Back Mode
Date and time Setting
Before you would place this unit in the field, you are recommended to update with your local time first. In
either of modes since CAM-PW power ON, press the MENU key to view the camera setting menu. Then Press
Right key to find Date /Time after a several titles. Highlight “SET” by using the Up or DOWN key. Push the
center “MENU” button to display the Calendar and move the cursor staying at the desired item by RIGHT or
LEFT button and change them with the UP or Down until to finish. Press Menu to accept with YES. NOTE:
The calendar is shown in military fashion with 24 hour format. Example: 2:00 pm will be shown as
14:00.00. (Hour: Minute: Second)
Toggle the Stamp option ON/OFF to show whatever the calendar on all images or not. But this feature will
not functioned in video mode.
Both Live View and Play-Back menu are including difference titles which described as below:
A. Live View Mode
Since camera is ON, it always work at the Live View Mode even the screen being OFF as a default setting.
Press DISPLAY to turn ON the screen.
With the Live display mode, it is used for a manual shot for nature scene or change setting of camera
parameters like taking picture /video mode; resolution; image quality; calendar stamp; firmware upgrade…..

Taking a Photo/ Video Manually
Shot key :
Push it to take a picture any time while camera is ON even screen remaining OFF. For taking a video clip, 1st
press SHOT to start taking, a stop watch counter will work and press again to stop.
Flash key:
It is an assistant feature at night before taking a manual night picture or video. Press this key to switch ON
the infrared light for 10 seconds in order to illuminate the scene in front of camera. You may view from
camera screen what will be captured in the range of dark environment before take a shot. A capture
pressing by pressing SHOT key must be made during a period of IR flash light-up. Otherwise, you may get a
black picture or video.
Display key:
Press this key time by time to turn ON screen > Remove information from screen > turn screen OFF
repeatedly.
Change Camera Capture Setting
Since camera is ON, press MENU key to enter the camera capture setting menu that consist of 7 titles:
1. Capture Mode
a. Exit
b. Single (Take Picture)
c. Video (Take Movie)
2. Resolution
a. Exit
b. High (4 Mp )
c. Normal (2.1 Mp)
d. Basic (1.3 Mp)
3. Quality
a. Exit
b. High
c. Normal
4. Date / Time
a. Exit
b. Set
c. Stamp ON/OFF (Optional for a calendar showing on each image)
5. TV out
a. Exit
b. NTSC (Default setting, Used in North America)
c. PAL
6. Language
a. English
b. French
7. Bright-ISO
a. Exit
b. ISO-100 (Used for very short distance capturing setting at night to avoid images to be too much
white)
c. Auto (Default, Recommended)
Single (Picture) Mode
The system default setting is Single Still Picture Mode for capturing colorful images at day and monochrome
images at night. Once the motion sensor does detect a motion, camera will snap it into the memory.
Scouting counter will renew the reading after each event.
Video Mode
Move the highlight to Video and press MENU key, now the VIDEO mode is selected. The unit will take video
clips day or night. Since a 1st event is recorded, a video-cam icon will appear in the lower scouting LCD
showing you are in video mode.
In case you would switch back for Single Picture mode, just need to turn ON camera by pressing CAM-PW,
then highlight the SINGLE from Capture Mode Title. Accept it and re-boot the unit by turn off the main PW
and back ON. You will see the Video-cam icon to be disappear.
Important: If the unit detects batteries becoming too weak and an blank battery icon appear, the unit will
stop taking night pictures and take day time pictures or video only.

B. Play-Back Mode
It is the mode either for Previewing photos and videos in the camera from the viewing screen or connecting
to a TV with an attached cable.
Preview key:
While camera is ON and press PREVIEW key, Camera will be switched to Play-Back mode at once and show
the last image. It is also a toggle button let you skip between Live View and Play-Back mode. During in Play-
Back mode, the DISPLAY key become for skipping Full View an image > Clean screen > >Thumbnail
pictures.
You have two ways to enjoy the images /videos.
1.View Image/ Video by Screen
Since press Preview, screen will always show a full screen of the last shot. Use the left or right key to view
other previous or next image. If you expect to view more pictures a time, press Display for a thumbnail
screen. See more images by pressing Left / Right key. Then enlarge it by pressing Display again.
2.View Image /Video with TV
The unit is equipped with a TV-out port that allow you to connect to TV at home with an attached cable.
Be sure the RCA end is plugged in the TV Video-In of your TV. To view pictures on TV set after camera
is in Play-Back mode, just done a connection between camera and TV, all displays will be moved to TV
screen. If you pull out the TV cable, the digital camera will switch to the internal viewing screen display
automatically.
NOTE: The last picture taken will be the first to appear and will include a display of the total number of
pictures stored and the number of this picture. Example: 0024/0036 is the 24th picture of a total of 36
pictures.
Digital Zoom
Whenever in the live display mode or viewing a full size picture at Play-Back mode, press the UP key to
Zoom In and the DOWN key to Zoom Out for a closer shoot or see more details when enjoying an image.
Deleting Photos
Press MENU key under the preview mode, then highlight deletion of Single or All photos from the Erase Title.
Press MENU key to confirm deletion.
Protect an Image or Video
During viewing an image or video which you would like to retain in the memory without wash-out by delete
processing, press MENU and highlight the PROTECT option once. Then an icon with small lock on the left top
corner of this image to show it is protected. Repeat the same processing to unlock it.
All of protected items will not be deleted except you try to format
Format
After proceed this function, every things in the card or internal flash memory will removed completely. Be
careful when do it.
Change Camera Play-Back Setting
When you are in Play-Back mode, press the MENU key to display the menu with 4 titles.
1. Erase Mode
a. Exit
b. One (Delete One photo)
c. All (Delete All items except protected items)
d. Format(Delete Every things in disk)
e. Protect (Protect an image /video)
2.Date / Time
a. Exit
b. Set
c. Stamp ON/OFF (Same as Live View)
3.TV Out
a. Exit
b. NTSC (Same as Live View)
c. PAL
4.USB
a. Exit
b. MSDC (Default for frequency use to down pictures at any Window platform)
c. SIDC (Only for Win-XP to download depend on personal hobby)

Using a CF card
This unit has built-in with 16Mb internal memory and therefore the camera can capture for some images or
videos immediately even no CF card in the slot. In fact, 1G CF card is recommended to increase more
storage capacity that allow more than a few thousands of pictures to be saved when you will leave it in the
field. If you have two CF cards and a card reader, it is very good for you that one could be left in the camera
and the other one at home for backing-up after viewing and downloading.
Note: Be sure the Main PW Switch is OFF before replacing for a CF card in order to minimize a
risk to damage your CF card or loss data partially.
Important: If a CF card can not be inserted smoothly, you must retract it and check if the
direction of card is correct or not. Never force to push hardly with the CF. Most of case with a
problem with card usage is found that caused by an improper insertion.
Warning: Before using a blank new CF card, or used in other cameras, it is suggested to format it before
usage.
Memory Management
In case either built-in or CF card memory is full, a memory FULL icon will be remaining blinking on the
scouting LCD. The camera will stop to shoot. Replace an empty CF card or delete some or all contents then
reboot the unit by the main Power switch to refresh the memory status. Make sure the memory FULL icon
disappear after PW up again. The camera will not resume to work without rebooting the system.
Installing Driver
The first time that you connect the camera to your computer, the computer will detect a new USB device
has been connected and try to looking for a driver. So that, it is required to run the attached CD-Rom before
connecting the camera to PC. Follow the instructions to complete the driver and software installation. Since
the CD-Rom is inserted, an auto-run will show a pop up installation menu. If your computer does not run the
setup program automatically, please run "SETUP" file under root directory of the CD-Rom. Then, click the
DRIVER button on the pop up window. Follow the instruction until to complete itself.
Installing Photo Editing Software
There are two simple photo / video editing software for entry level user. You may skip this option and exit
directly if you already have other existing or better software for viewing the pictures or videos.
- Insert the installation CD. Click “ Photo Express “ Button on the Welcome Screen.
-Choose the operation language which you need.
-Install the software according to hints.
-Restart your PC.
Downloading photos/ Movies to your computer
- Be sure the driver has been installed successfully. Press CAM-PW to turn the camera ON, then press
PREVIEW for Play-Back mode.
- Connect your computer and the camera with USB cable.
-A pop up to show the mobile hard disk which is assigned for the trail monitor device For example:
“H” or “I”:\DCIM\100MEDIA
-Click into the proper directory to see all files inside.
Mounting Device
Before starting to put this camera in the field for scouting game, the
camera must be mounted in a certain place properly or on a tree
whose diameter will not be less than 6 inch (15cm) and located not
higher than 1M with your desired mounting method that following the
installation method as shown as below. The design is reserved to fit for
two ways of mounting.
A Belt Mount: This belt is attached in the packing. See the Fig.5

B Python Adjustable Locking Cable (Not including in
this packing): See the Fig. 6
You can able to use a Python adjustable locking cable to
provide more security to your WildSpy Cam. The
“Master Lock” brand is a good choice.
With an optional choice, a steel mounting bracket and U type
security bar can be used to provide stronger
security ability. You can buy this accessory from your local
dealer.
CONNECT An Ext- Infra-Red Booster
For an experienced user, you always would expect to get extreme quality pictures and videos at night.
WildSpy Cam provide an option that up to 4 pcs external IR booster will be supported in a chain connection.
The “Ext-IR BOOSTER” port is found on the bottom of cabinet. You just plug one end from the booster
which is our WildSpot Flash series like IRX-800 to the port on the camera without any further setting
required. Thus, you will get about 2~4X higher illumination at night. For advanced user, it should be
available to work with a totally invisible black IR booster like IRX-20B or IRX-22B series to be upgraded
as an invisible black night vision camera
Troubleshooting Guide
No animal showing in some pictures:
1. Check if the unit is pointed the direction where the sun is rising or sunset that the sensor might
be triggered.
2. The PIR sensor may detect an animals through vegetation out of view from the camera.
3. If the animal was moving quickly, camera may not capture it in time while an animal still
staying in the zone.
4. Make sure that the unit is mounted on a steady tree or other place that does not wobble.
The Camera In-Use light is remaining ON, but the camera does not respond:
1. The camera may be time-out and shut down automatically. Repeat to press the CAM-PW to
resume the camera ON.
2. Battery may be too low that could not support the camera staying ON. Replace with 4pcs D
type brand new batteries.
The CAM-PW switch does not respond:
Attempt to turn the camera too quickly after the main power ON. Wait for about 10 seconds until the back
light of scouting LCD goes to OFF. Then try again.
The Light in the front of the housing does remain ON:
1. The unit just is set for Walk-Test mode. The light remains On steady within 60s warming up period.
2. The CAM-PW is not OFF. Remember to turn camera OFF after finishing usage.
Camera seems NOT write any picture into my empty CF card and displayed with Memory Full:
1. You must format the CF card which was ever used in the other device before applying it in this
camera.
2. Check the current CF card and try to use 1G CF card instead of your current CF which may larger
than 2G or above. To use a large CF card over 1G, a specified brand may be required.
Reset the Unit out of System Halt:
In case the event counter stop to respond for any sensing, or you notice the LCD is always blank even the
Power switch is ON, the system may halt already to cause the problem. Remove all batteries out of
compartment for more than 10 minutes in order to reset the unit. All pictures will be retained and the unit
will resume to the factory default settings. You will need to reprogram with your desired parameters before
use.
Table of contents
Languages:
Popular IP Camera manuals by other brands

Grandstream Networks
Grandstream Networks GXV 3615 Series quick start guide

Edimax
Edimax ND-323 Brochure & specs

NST
NST CVD3IP Hardware installation guide

Ikegami
Ikegami ICD-E11 user manual

Eneo
Eneo Minitrax HDD-1012PTZ1080 Full manual

Planet Networking & Communication
Planet Networking & Communication ICA-E5550V user manual


