ElectroPhonic Innovations One User manual

Page 1 of 13 v3.0
Model One User Manual

Page 2 of 13 v3.0
1 Welcome!
Model One is unlike any other guitar. This guide will help you get started making music.
As you learn your way around your guitar’s controls, creating inspiring tones will
become second nature.
Model One Features
Specifically, your Model One includes the following:
•Hardwood body
•All analog electronics
•Pre-amplifier
•On-board effects
•18-watt dual channel power amplifier
•Dual full-range speakers
•Smart phone connectivity
•Rechargeable Li-ion smart power system
•22 Frets – 24.75” scale
Additionally, you have:
•Controls on the front of the guitar (PICKUP VOL, AMP DRIVE, MASTER VOL)
•Controls on the top of the guitar – In the CONTROL PANEL
•Various inputs and outputs on the bottom of the guitar – In the JACK BAY
BYPASS MODE
Your Model One powers up in BYPASS MODE. As the name implies, this mode
bypasses the preamp gain stages.
In BYPASS MODE you have a warm, clean tone without overdrive.

Page 3 of 13 v3.0
This is a great acoustic-type sound for strumming, fingerstyle, etc. and you can add
DELAY and CHORUS effects - sweet!
This is also the setting you can use to plug into an amp (like a regular electric guitar).
AMP MODE
Push the BYPASS button to enter AMP MODE. (LED turns from GREEN to RED).
Now you have engaged the three slide-toggle switches to dial in various amp sounds.
You also activated the GAIN CONTROL (middle knob on the front of the guitar).
The EQ controls are also active in AMP MODE.

Page 4 of 13 v3.0
2 Getting Started
Read Up on Your Model One
We know that you probably don’t think that you need to read the manual, but we
recommend that you at least skim it. The Model One is a versatile music creation tool
whose subtle attributes can be overlooked if you max out the knobs and start banging
away.
Unpack Your New Guitar
Carefully unpack your guitar and accessories. This should be very straightforward.
DO NOT DISCARD THE SHIPPING CARTON.
In the specially designed shipping box you will find the following:
•Your Model One
•4 NCR 18650 batteries
•A recharger that can be used globally – may need a plug adapter.
•This Guide - Since this guide is only available online, you should check back on
our website periodically for updates.
Charge Your Li-ion Batteries
Your batteries arrive partially charged and although they may have a small charge, they
should be fully charged before use.You’ve waited this long to get your guitar, what’s
another few hours.
As with any other battery charger, note the polarity of the batteries as you insert them in
the charger.
The first charge will be the longest if you are using new batteries. Our experience is that
this will take about 8 hours…. let’s say “overnight.”
Page 5 of 13 v3.0
Play, Play, Play
As soon as your batteries are charged, insert them in the guitar’s battery compartment
(note the polarity again), and settle in for some fun.
Note
With certain settings your MODEL ONE will produce acoustic feedback, i.e. squeals,
howls, etc. This is NORMAL!
If you have played through a high-gain amp or at high volume while near an amp you
are familiar with this feedback.
Players like Jimi Hendrix created amazing music by artfully controlling feedback and
“riding the wave.” Manipulating your Model One’s controls allows you to shape this
feedback and bring it in and out during performances.
Experiment with the three knobs on the front of the guitar (PICKUP VOL, DRIVE,
MASTER VOL) and the tone controls.
With practice, shaping and “playing” acoustic feedback becomes intuitive and reflexive.
Hint
Start with the DRIVE and MASTER VOL rolled down until you get a feel for the
interaction of Model One’s controls. Copy these CONTROL PANEL settings.
RED
ON
ON
Pushbut ton
Pushbut ton
LED

Page 6 of 13 v3.0
3 Features and Functions – All the Cool Stuff That Makes the Model
One Unique
Let’s make this as simple as we can. There are 3 areas that require a few words. They
are:
•The guitar’s front knobs and toggle switch
•The CONTROL PANEL’s switches and knobs
•The JACK BAY
The guitar’s front knobs and toggle switch
The three pots on the front are:
•Master Volume – Closest to strap pin. It is the final output control.
•Overdrive – Middle pot of the 3
•Pickup volume – Closest to the neck. This controls the output of the pickups
before they hit the preamp.
The Top CONTROL PANEL and It’s Knobs
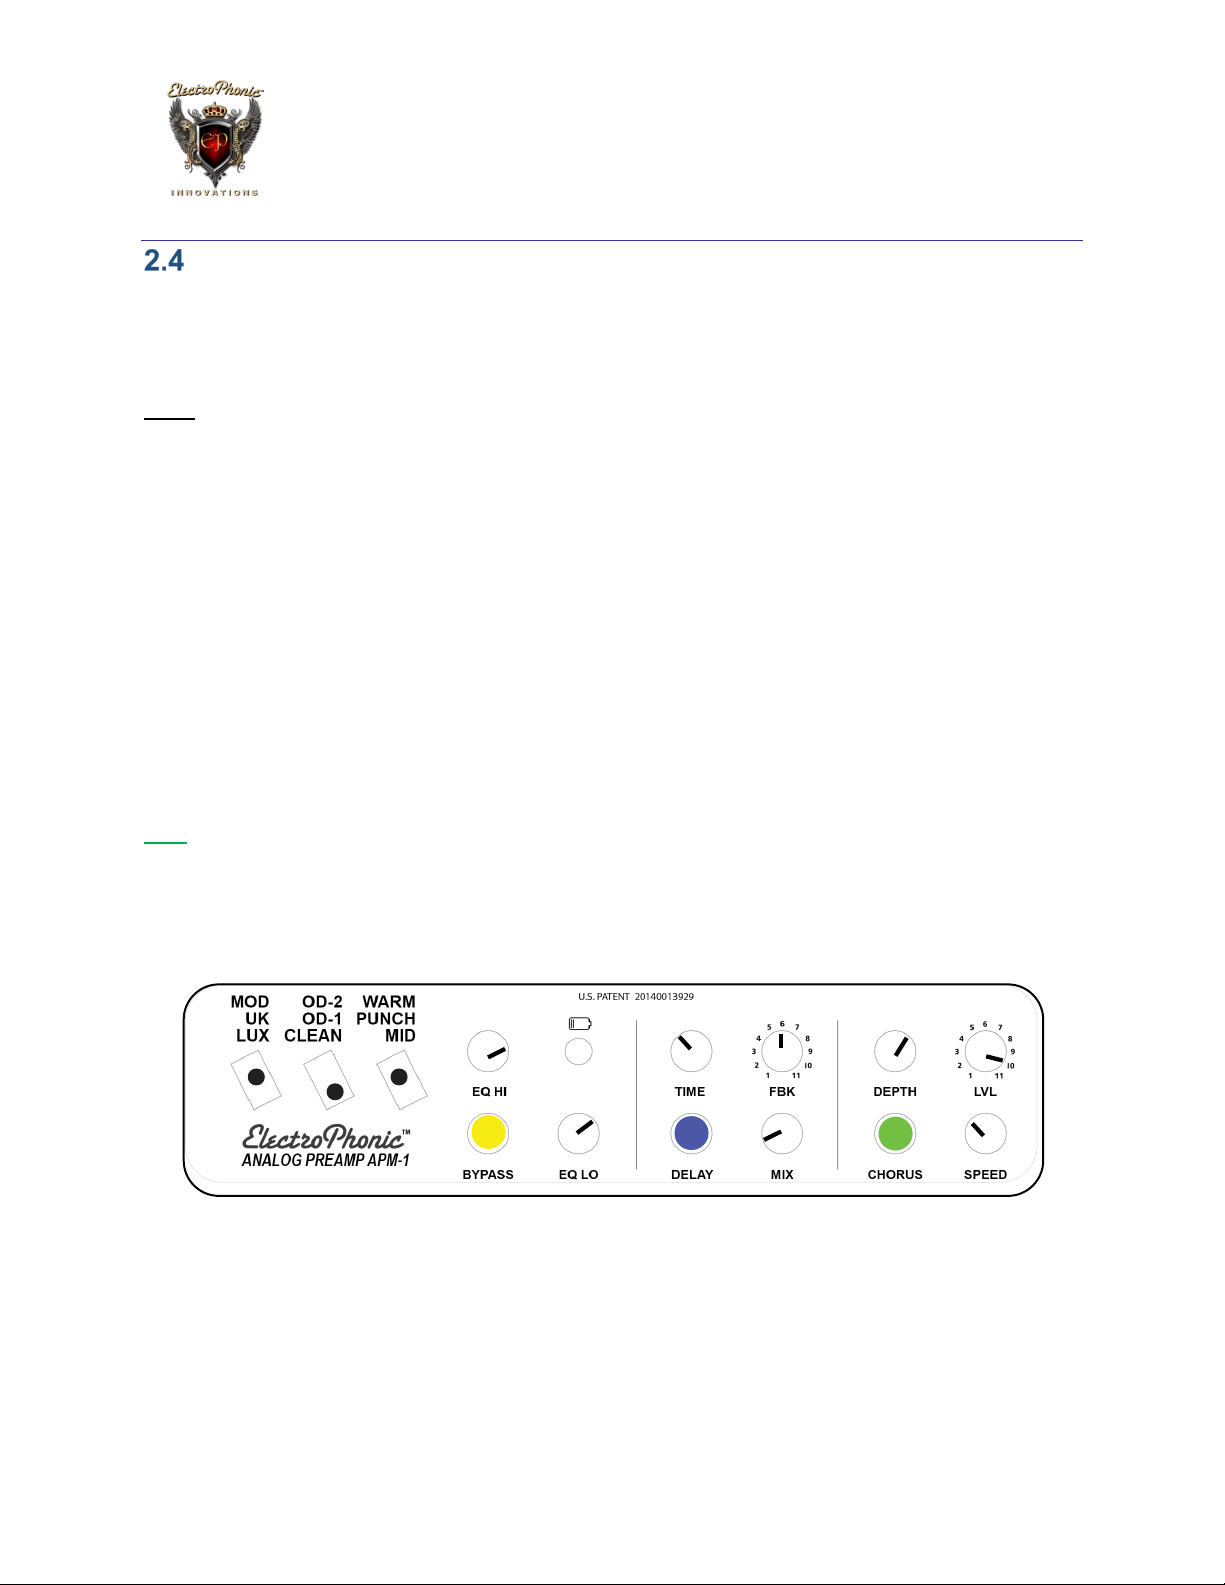
The top CONTROL PANEL comprises the preamp controls, EQ, and effects.
3.2.1 CONTROL PANEL
The CONTROL PANEL is made up of four sections:

Page 7 of 13 v3.0
•Amp Controls
•EQ
•Delay
•Chorus
3.2.2 CONTROL PANEL – PREAMP
Each toggle switch has 3 positions that are labeled on the panel.
•Toggle switch 1 has MOD, UK, and LUX settings
•Toggle switch 2 has Overdrive – 1, Overdrive – 2, and Clean
•Toggle switch 3 has Warm, Punch, and Mid.
The Hi and Lo EQ (or equalizer) give you control over the sound contour. They are your
tone controls.

Page 8 of 13 v3.0
3.2.3 CONTROL PANEL – D EL AY
Push the illuminated switch to activate the DELAY module. Adjust the delay TIME, FBK
(feedback/ repeats) and MIX (amount of delay).
3.2.4 CONTROL PANEL – CHORUS
Pushbut ton Pushbut ton
Pushbut ton
Pushbut ton
LED

Page 9 of 13 v3.0
Push the illuminated switch to activate the CHORUS module. Adjust the chorus DEPTH
(pitch), LVL (amount/ mix) and SPEED (modulation rate).
JACK BAY
The JACK BAY is where the various inputs and outputs are located. The ON/OFF
rocker switch is also here.
Here you can interface with a smart phone, plug in headphones, and power your guitar
with a DC power supply (wall wart).
Specifically, what you will see here are:
•DC-In jack used with a wall wart (power supply that plugs into the wall outlets). If
and when you use this type of power supply, please be sure that you pay
attention to the polarity: “center pin +.”
*** If you want to buy a wall wart, we recommend the XP Power VEC50US15. A
lot of voltage and amperage. You can find this power supply in a number of
different places. Search on it and you will find.
Note: Using the wall wart will not charge your batteries. To do that you must

Page 10 of 13 v3.0
remove them from your guitar and put them into the external charger that we
provided to you.
•The ⅛” headphone jack. When plugged into this jack the speakers are muted.
•The ⅛” TRRS jack. The smart phone interface.
•On/Off rocker switch. Turns the guitar on and off.
•The ¼” “Guitar Out” jack is used to connect you to external effects and guitar
amp. This jack is mono. When a cable is plugged in, the speakers are muted.
Note: The Model One has an active (powered) preamp so, even when playing
through an amp or other similar device, the power on your guitar must be
switched on.
Things That Could Go Wrong
3.4.1 Your Model One is vibrating and feeding back
This can happen easily if you are pushing a lot of overdrive or speaker
volume. You will likely feel the resonation in the body as well. Don’t
panic, turn down the Master Volume on the front of the guitar, turn
down the Overdrive Level, and turn down the Pickup Level pots on the
guitar’s front face. Now start setting up your Model One again.
3.4.2 My Model One does not power up
Check your indicator LED on the front of the guitar. Chances are that
it is not lit either. This usually means that the batteries are not

Page 11 of 13 v3.0
charged, been installed incorrectly, or not installed at all. Always
check the polarity as well.
4 Cool Feature Alerts
Feature Alert #1
When you plug your Model One into a guitar amp via the ¼” jack, you have access to
the onboard DELAY and CHORUS effects. You can tweak the effects from the
CONTROL PANEL.
Feature Alert #2
If you plug straight into a PA or workstation/ recording console, etc. you can use AMP
MODE to get cool amp tones without needing a guitar amp.
Feature Alert #3
Plug your smart phone (or player, device, etc) into the TRRS jack to play along with
backing tracks, or use various readily available software apps for recording, etc.
We’ve also used this jack for a Bluetooth receiver (link) to wirelessly connect to our
smart phones.
5 A Word About Your Warranty
Your warranty is voided if you open the Model One and tinker with it. This is not the end
of the world, but you need to be aware of that if you want to change out any
components.
6 Contact Us
•support@electrophonicinnovations.com
Our support hours are 9 am – 5 pm Pacific Time. During this period, we will
endeavour to answer your questions within 2 hours.

Page 12 of 13 v3.0

Page 13 of 13 v3.0
7 Glossary of Terms
Term Meaning
BYPASS MODE
This is the “CLEAN” tone setting of the Model One. The
illuminated BYPASS switch toggles between Green
(BYPASS) and Red (AMP MODE). Similarly, the DELAY and
CHORUS effects can be activated/bypassed by pushing their
illuminated switches.
CONTROL PANEL
This board is the primary user interface. It is on the top of the
guitar’s body and has potentiometers, switches, and LEDs on
it.
JACK BAY This PANEL
is the small one on the bottom of the Model One.
It houses the on/off switch and several jacks.
LED “Light Emitting Diode.” An illuminated status indicator. We
use them throughout our systems.
POWER AMP These are the amplifiers that drive our speakers. They are
the final stage in the Model One’s analog circuit.
PREAMP A series of amplifiers and tone controls. It is the first stage of
the Model One’s analog circuit.
TRRS Stands for “Tip, Ring, Ring, Sleeve.” We rely on it as an
Industry standard for smart phone connectivity.
Thank you for being part of this musical adventure!
Model One is not like any guitar/amp you have experienced before… take your time and
enjoy getting to know your Model One’s unique attributes.
We are continuing to develop this concept. Your thoughts/input are welcome and
encouraged… the possibilities are endless.
Happy Playing!
The EP Team
Table of contents


