Eleglide E-bike M1 User manual

User Manual

CATALOGUE
1~14
15~28
29~42
43~56
57~70
71~84
ENGLISH
ITALIANO
FRANÇAIS
DEUTSCHE
ESPAÑOL
POLSKI

*Before your first operation,
please read the user manual carefully!
1. Note
2. Warning
3. Diagram
4. Specification
5. Package List
6. Assembly Guide
7. LED Display Guide
8. LCD Display Guide
9. Maintenance
10. Troubleshooting
11. Warranty
Contents
Before your first ride, it is important for you to know your new e-bike well, so that you can get the best
performance, comfort, enjoyment and safety from it during your ride. To understand the new bicycle
and the correct operation, you should first read the manual carefully.
Second, it is significant to take your first ride under a safe and controlled circumstance, like staying
away from cars, obstacles and other cyclists.
Third, bicycles are vehicles with certain risks. Please follow the traffic rules during cycling. It’s better to
learn the local traffic rules about riding an e-bike on public roads before your first ride in case you
violate the regulations. For your own safety, never forget to put on a qualified helmet before you get on
the e-bike.
Fourth, the electric bike is supplied without basic mandatory equipment, which may vary from place to
place. Therefore, if you intend to use the e-bike on public roads, it's necessary to equip the bike with the
basic mandatory equipment, in accordance with the relevant laws and regulations.
In addition, this product is designed for your personal use. Do not use it for commercial or other
purposes.
Last, keep this manual safe for reference.
1. Note
Before each charge, check the charger, cable and plug. If there is any damage, do not use the charger.
Before riding, check the tire pressure and check whether the wheels and handlebar are installed
correctly and tightly.
Before riding, check whether the headlights are securely fastened in the correct position, clean and not
covered by anything. Damaged reflectors must be replaced.
2. Warning
01
EN
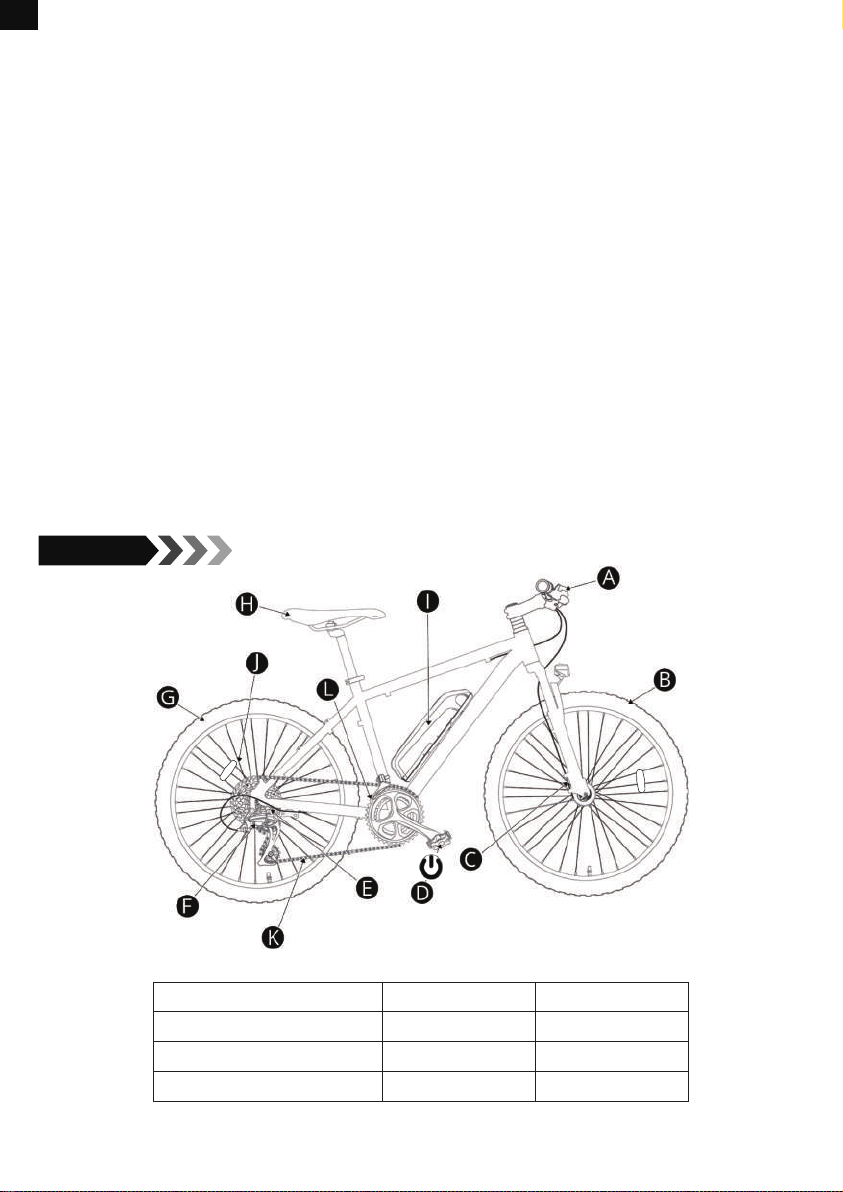
3. Diagram
Besides, if the seat post in the seat tube is not inserted deep enough to reach the minimum insertion
mark, the seat post may break. Check whether it is inserted deeper than the minimum insertion depth.
When braking on a wet road, the braking distance is usually longer than on a dry road. Therefore, brake
earlier for a safer stop.
When you have to brake urgently, please hit the right hand brake first to stop the rear wheel, and then
hit the left hand brake, especially when you brake at a high speed. If the front wheel stops suddenly
while the rear wheel is still cycling at a high speed, you may fall over and get hurt. So please ride it
carefully.
Furthermore, avoid puddles, wet mud, swamps, water, snow or ice. Try not to use the e-bike on a rainy,
stormy or snowy day. If the bicycle’s electric parts (control unit, engine and battery) get damp, wet or
soaked, it will cause irreversible damage, or even a battery explosion.
This product can only be used by one adult at a time. Do not carry any extra passengers.
This vehicle is not a toy. Same as other vehicles, it is possible to fall, crash or encounter other danger-
ous situations. Please don’t offer your e-bike to anyone that doesn’t know how to use it correctly. If you
let anyone else ride your bike, it will be your responsibility to ensure that all riders understand all
warnings, cautions, instructions and safety precautions, and to ensure that they are able to use this
product safely and responsibly and protect themselves and others from injury.
02
EN
A. Handlebar with Display
D. Pedals
G. Rear Wheel
J. Spoke Reflector
B. Front Wheel
E. Electric Motor
H. Saddle
K. Chain
C. Brake
F. Rear Derailleur
I. Battery
L. Front Derailleur

4. Specification
03
EN
1. Brake Lever
4. Rear Derailleur Lever
2. Handle
5. Bell
3. Front Derailleur Lever
6. LED/LCD Display
M1
1790mm x 680mm x 1041mm
680mm
21.3kg
IPX4
Aluminium Alloy
65km
No Limit
25km/h
3 (Front), 7 (Rear)
Shimano
250W / 36V
500W
210
45N.M
7.5Ah / 36V
270Wh
Yes
Disc Brake & Auto Power-off Design
160mm
M6 x 16mm
27.5"x2.1" CST Pneumatic Rubber Tires
45~65PSI
50PSI (Front Tire)
55PSI (Rear Tire)
Mechanical Damping
160-185cm
M1 Plus
21.7kg
100km
12.5Ah / 36V
450Wh
Hydraulic Damping
165-195cm
Unfolded Size
Width of Handlebar
N.W.
Waterproof Level
Material
Max. Range
Max. Speed
Shifter Quantity
Brand
Rated Power/Voltage
Instant Max. Power
Max. RPM
Max. Output Torque
Capacity/Voltage
Standard Power Consumption
Protection System
Type
Outside Diameter
Thread Root Diameter
Size, Brand, Type, Material
Tire Pressure
Best Tire Pressure
Assist Mode
Manual Mode
Model
Basic Spec.
Derailleur
Motor
Battery
Brake
Brake Disc
Tire
Shock Absorption
Recommended Rider Heights
11
2 2
54
3
6

Step 1 Install The Front Wheel
A) Take out the bike and make it stand up.
B) Loose the nut to remove the temporary protected bar.
C) Insert the wheel between the fork blades so that the axle can seat firmly at the fork dropouts (the
slots at the tip of the fork blades).
D) Put the gaskets on it and tighten the nuts.
Note: if the lever cannot be pushed all the way to a position parallel to the fork blade, return the lever to the
OPEN position. Then turn the tension adjusting nut counterclockwise and make a one-quarter turn, and try
tightening the lever again.
Step 2 Adjust The Stem
A) Undo the stem bolts slightly till you can turn the stem.
B) Align the stem with the front wheel.
C) Tighten up the stem bolts.
6. Assembly Guide
5. Package List
04
EN
Eleglide E-bike x 1
Pedal x 2
Spoke Reflector x 2
User Manual x 1
Tool Kit x 1
Rear Reflector x 1
Charger x 1
Key x 2

05
EN
Step 3 Install The Steering Bar
A) Undo the handlebar clamp bolts to open the clamp.
B) Place the handlebar and make sure the clamp is in the middle of the handlebar. (The brake levers
should be in front of the grips.)
C) Tighten up the clamp bolts to lock the clamp.
Pedal Left Right
Step 5 Install The Pedals
Step 4 Install The Front Light
A) Place the front light with the fork brace.
B) Secure the light by tightening up the bolt.
×
√

06
EN
Step 6 Install The Seat
A) Put the seat post into the support frame.
B) Adjust the seat to a suitable height and fix it by locking the quick-release clip.
Step 7 Install The Battery
A) Put the battery in the right position and unlock the battery before you use it.
Step 8 Install The Reflectors
Step 9 Turn The Power on
A) Put the battery in the right position and unlock the battery before you use it.
B) Press the On/off button on the control panel to turn the power on. Then it’s ready to go!

07
EN
7. LED Display Guide
Power on/off
Press the ON/OFF button to turn the LED
display on/off.
Headlight on/off
When the display is turned on, press the
LIGHT button to turn the headlight on. Press it
again to turn it off.
Battery Power Indicator
When battery level is 100%, all the LED lights
will be on. When there is only one LED light on
and blinking, it means it’s running out of
battery power and it needs to charge
immediately.
5 Speed Mode Indicator
The five LED lights below the word “ASSIST”
represent the five speed modes, including 12
km/h, 16 km/h, 20 km/h, 23 km/h and 25
km/h. Press the MODE button to change the
speed mode.
6km/h Push Mode
First, turn the LED display on and keep the
bike standstill. Then, press the MODE button
till the first light blinks to turn on the 6km/h
push mode. The push mode can be turned off
by hitting the brake.

08
EN
Contents on The Display
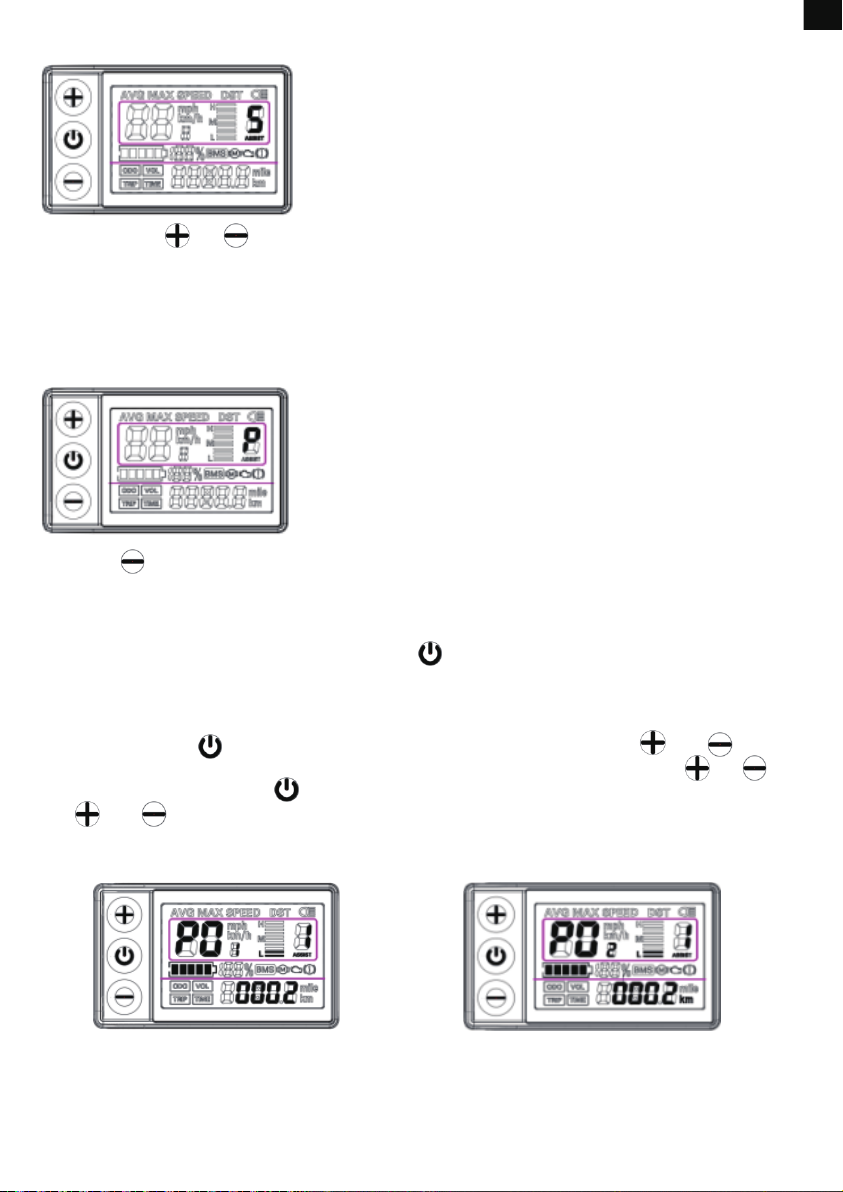
8. LCD Display Guide
1
7
8
9
4 5
10 11
6
2
3
Functions & Operations
Power on/off
Long press the button to turn the machine on/off. When the bicycle isn’t moving and the display
hasn’t been used for 10mins, it will turn off all the power automatically.
Light on/off
Long press the button to turn on/off the LCD backlight and the bike light.
1
2
3
4
5
6
7
8
9
10
11
UP
ON/OFF
DOWN
Real-time Speed Unit
Real-time Speed Unit
Single Average Speed
Single Max. Speed
Speed Mode Shifting
Light-on Mark
Motor Malfunction Mark
Brake Mark
Malfunction Mark
Battery Power Indicator
Mileage Unit
Mileage Unit
Odometer
Trip Distance
Real-time Battery Voltage
Trip Time
09
EN
Shifting Speed Mode
Short press the or button to shift among the five speed modes from 1 to 5. Mode 1 is for 12
km/h, 2 for 16 km/h, 3 for 20 km/h, 4 for 23 km/h, and 5 for 25 km/h. It will shift back to the lowest
speed mode every time when the display reboots. Mode 0 is non-assist mode, which means no power.
If the zero start mode has been turned on, it will go back to the mode 0 when the display reboots. If it is
set on non-zero start mode, it will turn to the mode 1 when the display reboots.
Setting 6km/h Push Mode
Press the button till the speed mode zone shows “P”. Then the bike will move at a speed no more
than 6km/h. The push mode can be turned off by hitting the brake.
Checking More Information
After the LCD display is turned on, short press the button to shift among ODO, TRIP, VOL and TIME
to check their corresponding information.
Activating More Function
First, long press the button to turn the LCD display on. Then long press the and buttons
to enter P01 menu. The data shown on the menu can be altered by short pressing the or
buttons. Then, short press the button to shift to the next menu. After the adjustment, long press
the and buttons again to leave the menu page and back to the original page.
P01: Adjusting the LCD backlight illuminance;
Level 1 is the darkest and level 3 the brightest.
P02: Changing the mileage unit; 0 is for km,
and 1 for mile.

10
EN
9. Maintenance
Cleaning
Use a soft and wet cloth to wipe the mainframe clean. Dirt that is hard to remove can be scrubbed with
a toothbrush and toothpaste, then cleaned with a soft and damp cloth. Do not wash your e-bike with
alcohol, gasoline, acetone, or other corrosive/volatile solvents. These substances may damage the
appearance and internal structure of the e-bike. Do not soak the bike or wash it with a pressure washer
or hose.
Storage
A) Bicycle
1. Do not expose the e-bike to direct sunlight or rain for an extended period of time, and avoid storing it
at a high temperature. It’s better to store the bike in a dry and safe place at a temperature of
0°C-25°C.
2. Avoid corrosive gas, so as to avoid chemical corrosion and damage to the electrical parts and
painted surfaces, which may lead to operational failure and accident.
3. Don’t store it in an explosive or flammable environment or near flammable liquids.
B) Lithium-ion Battery
1. Charge the battery after each ride and avoid draining the battery completely. Because completely
draining the battery may cause permanent damage to it. Never keep the lithium-ion battery
discharged for a long time. If the voltage of the cell drops under allowed limit due to self-discharge, it
will cause damage. For maximum durability, store the battery charged up to 50% of the maximum
capacity.
2. Never charge the battery in an explosive or flammable environment or near flammable liquids. Do
not charge the battery on a flammable substrate, such as paper, textiles, etc., when the battery is
detached from the vehicle. Charge it at a safe place away from flammable items.
3. Never charge a battery which is already damaged or is leaking.
4. Don’t charge the battery too long. Stop charging when it gets full.
5. Charge or discharge the battery at a temperature within 0~45°C.
6. It is better to store the battery indoors within 20°C~25°C temperature while it is not being used for a
long time. (When used at 25°C, the battery range and performance is at its best. But using it at a
temperature below 0°C can decrease its mileage and performance.)
7. Do not store the battery at a too high or too low temperature.
8. The humidity of the storage place should be 60±25%RH. As for the working place, the humidity
should be 5~85%RH.
9. Do not puncture, hit or crash the battery.
10. Don’t try to disassemble the old or damaged battery or throw it away. Please take it to the local
professional battery recycling facility.
P09: Setting the zero/non-zero start; 0 is for
zero start and 1 for non-zero start.
P16: Resetting the odometer by pressing the
button for 5 seconds;

11
EN
Head Sets
Joints
Brakes
Front Suspension Fork
Tires
Wheel Hubs
Pedals
Cranks
Chain
Rims
Sprockets
Saddle and Seat Post
Kickstand
Remove, clean and lubricate the rims annually. Replace them if
necessary.
Continuously check all nuts, bolts and quick-release devices for
tightness.
Lubricate the brake cables slightly with oil monthly. Check the
adjustment and replace the brake parts (blocks, shoes, pads) in time
if they are worn. The cables must be replaced if they are
damaged/down.
Entrust it to experts.
Regularly check for damage, wear, cut and air leakage.
Lubricate the hub bearings monthly. Check and adjust the cones, if
necessary, to prevent the hubs from rubbing against the forks.
Lubricate the bearings and check for tightness.
Lubricate the bearings monthly (unless a maintenance-free center
bracket is installed on the bike). Check whether all center bracket
parts are correctly tightened.
Take it off and clean it every 6 months. The chain must be clean but
not dry.
Frequently check whether the wheels are tight and secure. The rims
should be protected from oil, wax, grease, adhesive, etc. Check
whether the spokes are loosing or missing.
Clean regularly as necessary and grease lightly. Keep the front and
rear derailleur running smoothly by adjusting.
Check whether the screws, nuts and quick-release devices are tight.
Clean and lightly grease it annually.
C) Other Parts
Attention: when lubricating, make sure the lubricant doesn’t get on the brake discs and pads.
Otherwise, the brake system may fail to function.

12
EN
Please check the following issues and solutions before sending the product to designated repair
offices.
10. Troubleshooting
Attention: if any other failures occur and you can not find any solution from the chart above, please contact
the re-seller to solve it. Any other maintenance and repair that need to be done by using professional tools
and techniques, should be performed by a qualified bicycle mechanic designated by manufacturer or the
maintenance center.
Problem
The display fails to work
or the vehicle can’t be
turned on.
The front light fails to
work.
The battery fails to
charge.
Insufficient Riding
Distance
The motor fails to
work.
Possible Causes
a. No power supply;
b. The electric wire is not plugged in
properly or tightly;
c. The display is damaged;
d. Controller burnout or water damage;
a. The wire isn’t plugged in properly;
b. It is damaged;
a. The charger isn’t plugged in properly;
b. It is out of the recommended
temperature range;
c. The battery is charged below rated
voltage;
d. It is damaged;
a. Battery isn’t fully charged;
b. Low tire pressure;
c. Frequent braking;
d. Battery aging or battery capacity
attenuation;
e. Low ambient temperature;
a. The brake lever doesn’t back properly;
b. The electric wire isn’t plugged in
properly;
c. The sensor or controller is inefficient;
Solutions
a. Charge the battery;
b. Reconnect the electric wire
properly and tightly;
c.& d. Contact the re-seller for
help;
a. Plug the wire in properly;
b. Contact the re-seller;
a. Plug it in properly and charge it
again;
b. Charge it at a proper tempera
ture;
c. Charge it under rated voltage;
d. Contact the re-seller;
a. Fully charge the battery;
b. Check the tire pressure before
each use;
c. Develop good riding habits;
d.& e. It’s normal;
a. Adjust the brake lever;
b. Plug the electric wire in properly;
c. Contact the re-seller for help;

13
EN
Eleglide provides an easy, reliable and efficient service for all products under our warranty. Please refer
to the chart below for the warranty periods of various products and accessories starting from the date
of purchase.
Our distributors, partners, sellers and re-sellers should provide after-sale services directly to their
customers. If your Eleglide product has a warranty-related issue, please contact the seller from whom
you purchased the product. You should provide all relevant order information, such as order numbers,
invoices, receipts, etc.
11. Warranty
Warranty Process
Buyers have to provide sufficient proof of purchase.
A description of the defect needs to be provided in order to issue a warranty claim.
Visible proof of defect must be provided along with the item's serial number (if any).
Eleglide must document what happens when buyers troubleshoot the products.
You may need to return an item for quality inspection.
When you return the defective product, you should put it in the original packaging or the packaging
approved by the dealer.
Model
M1
M1 Plus
Components
Frame
Front Fork
Controller
Motor
Accelerator
Charger
Battery
Control Panel
Chainwheel
Freewheel
Brake Assembly
Thumb Shifter
Front Derailleur
Rear Derailleur
Kickstand
Front Light
Pedal
Others
Warranty
3 years
1 year
1 year
1 year
1 year
1 year
6 months
6 months
6 months
6 months
6 months
6 months
6 months
6 months
3 months
6 months
3 months
14 days

14
EN
Valid Proof of Purchase
The order number of your online purchase from the Eleglide's authorized reseller;
Sales invoice;
Dated sales receipt from the authorized Eleglide's reseller;
Note: more than one type of proof of purchase may be required to process a warranty claim (such as receipt
of money transfer and confirmation of address that the item was originally shipped to).
Warranty will be void in the following situations:
The product is out of the warranty period.
The product is lost or stolen.
The product is free or complimentary.
The product is used in inappropriate ways or conditions, including but not limited to: falls, extreme
temperatures, water, improper operations.
The product is not in its original state, such as modifications.
The product has been used in combinations with accessories that is not compatible with the
product.
Buyers have no sufficient proof of purchase of products.
Unsupported software or firmware has been installed to the product.
When damage is caused by the customer, the customer is responsible for the costs for the repairs
and shipment.
Customers' personal items are sent to Eleglide, instead of the Eleglide products.

15
IT
*Leggere attentamente il manuale prima di
utilizzare il prodotto per la prima volta!
1. Note
2. Avvertenza
3. Schema
4. Specifiche
5. Elenco Contenuti
6. Guida al Montaggio
7. Guida al Display a LED
8. Guida al Display LCD
9. Manutenzione
10. Risoluzione dei Problemi
11. Garanzia
Contenuti
Prima del vostro primo utilizzo, è importante che conosciate bene la vostra nuova e-bike, in modo da
poterne ottenere le migliori prestazioni, comfort, divertimento e sicurezza durante l'utilizzo. Per capire la
nuova bicicletta e il suo corretto funzionamento, dovreste innanzitutto leggere attentamente il manuale.
In secondo luogo, è importante fare il primo giro in una circostanza sicura e controllata, stando lontano
da auto, ostacoli e altri ciclisti.
In terzo luogo, le biciclette sono veicoli con certi rischi. Si prega di seguire le regole del traffico durante
la pedalata. È meglio imparare le regole del traffico locale sull'uso di una e-bike sulle strade pubbliche
prima del primo giro, nel caso in cui si violino i regolamenti. Per la vostra sicurezza, non dimenticate
mai di indossare un casco certificato prima di salire sulla e-bike.
In quarto luogo, la bicicletta elettrica è fornita senza equipaggiamento di base obbligatorio, che può
variare da un luogo all'altro. Pertanto, se si intende utilizzare la e-bike su strade pubbliche, è necessario
dotare la bicicletta dell'equipaggiamento obbligatorio di base, in conformità con le leggi e i regolamenti
pertinenti.
Inoltre, questo prodotto è progettato per l'uso personale. Non utilizzarlo per scopi commerciali o di
altro tipo.
Infine, conservate questo manuale come riferimento.
1. Note
Prima di ogni carica, controllare il caricabatterie, il cavo e la spina. Se c'è qualche danno, non usare il
caricabatterie.
Prima di guidare, controllare la pressione degli pneumatici e verificare se le ruote e il manubrio sono
installati correttamente e saldamente.
2. Warning

16
IT
Prima di partire, controllate che i fari siano ben fissati nella posizione corretta, puliti e non coperti da
nulla. I riflettori danneggiati devono essere sostituiti.
Inoltre, se il reggisella nel tubo sella non è inserito abbastanza in profondità da raggiungere il segno di
inserimento minimo, il reggisella potrebbe rompersi. Controlla se è inserito più a fondo della profondità
minima di inserimento.
Quando si frena su una strada bagnata, lo spazio di frenata è solitamente più lungo che su una strada
asciutta. Perciò, frena prima per un arresto più sicuro.
Quando dovete frenare con urgenza, premete prima il freno a mano destro per fermare la ruota
posteriore, e poi premete il freno a mano sinistro, specialmente quando frenate ad alta velocità. Se la
ruota anteriore si ferma improvvisamente mentre la ruota posteriore sta ancora pedalando ad alta
velocità, potresti cadere e farti male. Quindi, per favore, guida con attenzione.
Inoltre, evita pozzanghere, fango bagnato, paludi, acqua, neve o ghiaccio. Cerca di non usare la e-bike
in un giorno di pioggia, tempesta o neve. Se le parti elettriche della bicicletta (unità di controllo, motore
e batteria) si inumidiscono, si bagnano o si inzuppano, ciò causerà danni irreversibili o addirittura
l'esplosione della batteria.
Questo prodotto può essere usato solo da un adulto alla volta. Non trasportare altri passeggeri.
Questo veicolo non è un giocattolo. Come altri veicoli, è possibile cadere, schiantarsi o incontrare altre
situazioni pericolose. Per favore, non offra la sua e-bike a qualcuno che non sa come usarla corretta-
mente. Se lasciate che qualcun altro guidi la vostra bicicletta, sarà vostra responsabilità assicurarvi
che tutti i ciclisti comprendano tutte le avvertenze, precauzioni, istruzioni e precauzioni di sicurezza, e
che siano in grado di utilizzare questo prodotto in modo sicuro e responsabile e di proteggere se stessi
e gli altri da lesioni.
3. Schema
A. Manubrio con Display
D. Pedali
G. Ruota Posteriore
J. Riflettore a Raggiera
B. Ruota Anteriore
E. Motore Elettrico
H. Sella
K. Catena
C. Freno
F. Deragliatore Posteriore
I. Batteria
L. Deragliatore Anteriore

17
IT
4. Specifiche
1. Leva Freno
4. Leva Deragliatore Posteriore
2. Maniglia
5. Campanello
3. Leva Deragliatore Anteriore
6. Display LED/LCD
M1
1790mm x 680mm x 1041mm
680mm
21.3kg
IPX4
Lega di Alluminio
65km
Nessun Limite
25km/h
3 (Fronte), 7 (Retro)
Shimano
250W / 36V
500W
210
45N.M
7.5Ah / 36V
270Wh
Si
Freno a Disco e Spegnimento Automatico
160mm
M6 x 16mm
27.5"x2.1" CST Pneumatici di Gomma
45~65PSI
50PSI (Ruota Anteriore)
55PSI (Ruota Posteriore)
Ammortizzazione meccanica
160-185cm
M1 Plus
21.7kg
100km
12.5Ah / 36V
450Wh
Ammortizzazione idraulica
165-195cm
Dimensioni non ripiegate
Larghezza Manubrio
Peso Netto.
Livello Impermeabilità
Materiale
Distanza Max.
Velocità Massima
Quantità Cambio
Marca
Potenza/Voltaggio nominale
Max. Potenza Istantanea
Max. RPM
Torsione Max.
Capacità/Voltaggio
Consumo di Energia Standard
Sistema di Protezione
Tipo
Diametro Esterno
Diametro della Radice della Filettatura
Dimensione, Marca, Tipo, Materiale
Pressione pneumatici
Pressione ottimale
Modalità Assistita
Modalità Manuale
Modello
Spec. di Base
Deragliatore
Motore
Batteria
Freno
Disco Freni
Pneumatici
Ammortizzatori
Altezza consigliata per l’utente
11
2 2
54
3
6

18
IT
Passaggio 1 Installare la Ruota Anteriore
A) Tirare fuori la bici e metterla verticalmente.
B) Allenta i bulloni per rimuovere la barra temporaneamente protetta.
C) Inserire la ruota tra le lame della forcella in modo che l'asse possa sedersi saldamente nei forcellini
della forcella (le fessure sulla punta delle lame della forcella).
D) Mettere le guarnizioni e stringere i dadi.
Nota: se la leva non può essere spinta fino ad una posizione parallela alla lama della forcella, riportare la leva
in posizione OPEN. Quindi ruotare la tensione regolando il dado in senso antiorario per un quarto di giro,
provando a stringere di nuovo la leva.
Passaggio 2 Regolare lo stelo
A) Allentare leggermente i bulloni dell'attacco manubrio fino a poterlo girare.
B) Allineare lo stelo con la ruota anteriore.
C) Serrare i bulloni dello stelo.
6. Guida al Montaggio
5. Elenco Contenuti
Eleglide E-bike x 1
Pedali x 2
Riflettore a Raggi x 2
Manuale x 1
Attrezzi x 1
Riflettore Posteriore x 1
Caricatore x 1
Chiavi x 2
Other manuals for E-bike M1
1
This manual suits for next models
1
Table of contents
Languages:
Other Eleglide Bicycle manuals


